window NISSAN ALTIMA HYBRID 2007 L32A / 4.G Quick Reference Guide
[x] Cancel search | Manufacturer: NISSAN, Model Year: 2007, Model line: ALTIMA HYBRID, Model: NISSAN ALTIMA HYBRID 2007 L32A / 4.GPages: 28, PDF Size: 5.15 MB
Page 8 of 28

6
0402
010910070803
05
06
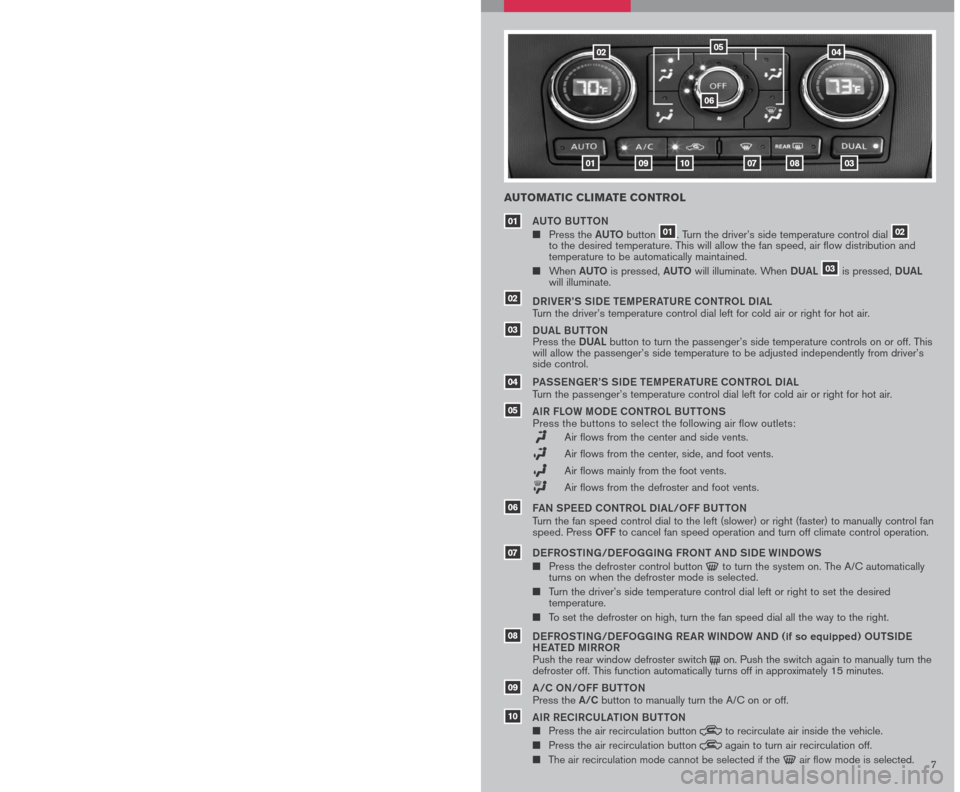
AUTOMATIC CLIMATE CONTROL
AUto BU ttoN
Press the AUto button 01. Turn the driver’s side temperature control dial 02 to the desired temperature. This will allow the fan speed, air flow distribution and temperature to be automatically maintained.
When AUto is pressed, AUto will illuminate. When DUAL 03 is pressed, DUAL will illuminate.
DRIV eR’S SID e te MP eRA tUR e C oNtR o L DIAL
Turn the driver’s temperature control dial left for cold air or right for hot air.
DUAL BU ttoN
Press the DUAL button to turn the passenger’s side temperature controls on or off. This will allow the passenger’s side temperature to be adjusted independently from driver’s side control.
PASS eNG eR’S SID e te MP eRA tUR e C oNtR o L DIAL
Turn the passenger’s temperature control dial left for cold air or right for hot air.
AIR FLo W MoDe C oNtR o L BU ttoNS
Press the buttons to select the following air flow outlets:
Air flows from the center and side vents.
Air flows from the center, side, and foot vents.
Air flows mainly from the foot vents.
Air flows from the defroster and foot vents.
FAN SP eeD C oNtR o L DIAL/ oFF BU ttoN
Turn the fan speed control dial to the left (slower) or right (faster) to manually control fan speed. Press oFF to cancel fan speed operation and turn off climate control operation.
D eFR oStING/D eFo GGING FR oNt AND SID e WINDoWS
Press the defroster control button to turn the system on. The A/C automatically turns on when the defroster mode is selected.
Turn the driver’s side temperature control dial left or right to set the desired temperature.
To set the defroster on high, turn the fan speed dial all the way to the right.
D eFR oStING/D eFo GGING R eAR WIND oW AND (if so equipped) oUtSID e
H eAte D MIRR oR
Push the rear window defroster switch on. Push the switch again to manually turn the defroster off. This function automatically turns off in approximately 15 minutes.
A /C oN/ oFF BU ttoN
Press the A/C button to manually turn the A/C on or off.
AIR R eCIRCULA tIo N BU ttoN
Press the air recirculation button to recirculate air inside the vehicle.
Press the air recirculation button again to turn air recirculation off.
The air recirculation mode cannot be selected if the air flow mode is selected.
04
03
01
05
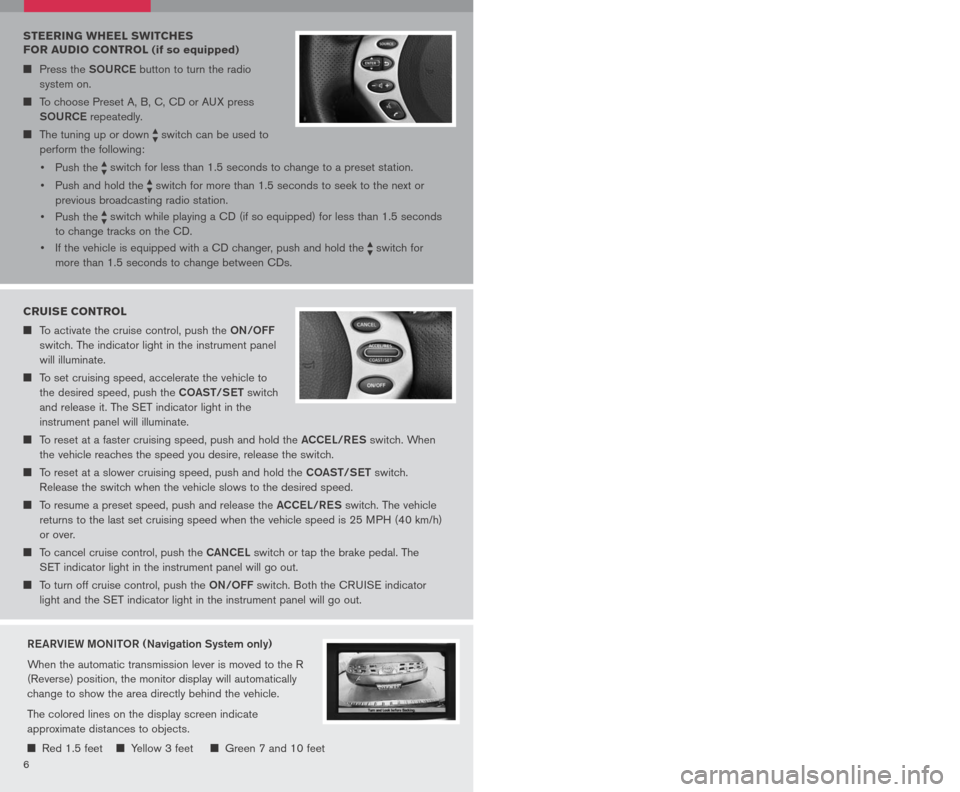
STEERING WHEEL SWITCHES
FOR AUDIO CONTROL (if so equipped)
Press the SoURCe button to turn the radio
system on.
To choose Preset A, B, C, CD or AUX press
SoURCe
repeatedly.
The tuning up or down switch can be used to
perform the following:
• Push the
switch for less than 1.5 seconds to change to a preset station.
• Push and hold the
switch for more than 1.5 seconds to seek to the next or
previous broadcasting radio station.
• Push the
switch while playing a CD (if so equipped) for less than 1.5 seconds
to change tracks on the CD.
• If the vehicle is equipped with a CD changer, push and hold the
switch for
more than 1.5 seconds to change between CDs.
7
08
07
09
02
06
10
CRUISE CONTROL
To activate the cruise control, push the oN/oFF
switch. The indicator light in the instrument panel
will illuminate.
To set cruising speed, accelerate the vehicle to
the desired speed, push the Co ASt/S et switch
and release it. The SET indicator light in the
instrument panel will illuminate.
To reset at a faster cruising speed, push and hold the ACCeL/ReS switch. When
the vehicle reaches the speed you desire, release the switch.
To reset at a slower cruising speed, push and hold the Co ASt/S et switch.
Release the switch when the vehicle slows to the desired speed.
To resume a preset speed, push and release the ACCeL/ReS switch. The vehicle
returns to the last set cruising speed when the vehicle speed is 25 MPH (40 km/h)
or over.
To cancel cruise control, push the CANCeL switch or tap the brake pedal. The
SET indicator light in the instrument panel will go out.
To turn off cruise control, push the oN/oFF switch. Both the CRUISE indicator
light and the SET indicator light in the instrument panel will go out.
Re ARVI eW M oNIto R (Navigation System only)
When the automatic transmission lever is moved to the R
(Reverse) position, the monitor display will automatically
change to show the area directly behind the vehicle.
The colored lines on the display screen indicate
approximate distances to objects.
Red 1.5 feet Yellow 3 feet Green 7 and 10 feet
Page 9 of 28

6
0402
010910070803
05
06
AUTOMATIC CLIMATE CONTROL
AUto BU ttoN
Press the AUto button 01. Turn the driver’s side temperature control dial 02 to the desired temperature. This will allow the fan speed, air flow distribution and temperature to be automatically maintained.
When AUto is pressed, AUto will illuminate. When DUAL 03 is pressed, DUAL will illuminate.
DRIV eR’S SID e te MP eRA tUR e C oNtR o L DIAL
Turn the driver’s temperature control dial left for cold air or right for hot air.
DUAL BU ttoN
Press the DUAL button to turn the passenger’s side temperature controls on or off. This will allow the passenger’s side temperature to be adjusted independently from driver’s side control.
PASS eNG eR’S SID e te MP eRA tUR e C oNtR o L DIAL
Turn the passenger’s temperature control dial left for cold air or right for hot air.
AIR FLo W MoDe C oNtR o L BU ttoNS
Press the buttons to select the following air flow outlets:
Air flows from the center and side vents.
Air flows from the center, side, and foot vents.
Air flows mainly from the foot vents.
Air flows from the defroster and foot vents.
FAN SP eeD C oNtR o L DIAL/ oFF BU ttoN
Turn the fan speed control dial to the left (slower) or right (faster) to manually control fan speed. Press oFF to cancel fan speed operation and turn off climate control operation.
D eFR oStING/D eFo GGING FR oNt AND SID e WINDoWS
Press the defroster control button to turn the system on. The A/C automatically turns on when the defroster mode is selected.
Turn the driver’s side temperature control dial left or right to set the desired temperature.
To set the defroster on high, turn the fan speed dial all the way to the right.
D eFR oStING/D eFo GGING R eAR WIND oW AND (if so equipped) oUtSID e
H eAte D MIRR oR
Push the rear window defroster switch on. Push the switch again to manually turn the defroster off. This function automatically turns off in approximately 15 minutes.
A /C oN/ oFF BU ttoN
Press the A/C button to manually turn the A/C on or off.
AIR R eCIRCULA tIo N BU ttoN
Press the air recirculation button to recirculate air inside the vehicle.
Press the air recirculation button again to turn air recirculation off.
The air recirculation mode cannot be selected if the air flow mode is selected.
04
03
01
05
STEERING WHEEL SWITCHES
FOR AUDIO CONTROL (if so equipped)
Press the SoURCe button to turn the radio
system on.
To choose Preset A, B, C, CD or AUX press
SoURCe
repeatedly.
The tuning up or down switch can be used to
perform the following:
• Push the
switch for less than 1.5 seconds to change to a preset station.
• Push and hold the
switch for more than 1.5 seconds to seek to the next or
previous broadcasting radio station.
• Push the
switch while playing a CD (if so equipped) for less than 1.5 seconds
to change tracks on the CD.
• If the vehicle is equipped with a CD changer, push and hold the
switch for
more than 1.5 seconds to change between CDs.
7
08
07
09
02
06
10
CRUISE CONTROL
To activate the cruise control, push the oN/oFF
switch. The indicator light in the instrument panel
will illuminate.
To set cruising speed, accelerate the vehicle to
the desired speed, push the Co ASt/S et switch
and release it. The SET indicator light in the
instrument panel will illuminate.
To reset at a faster cruising speed, push and hold the ACCeL/ReS switch. When
the vehicle reaches the speed you desire, release the switch.
To reset at a slower cruising speed, push and hold the Co ASt/S et switch.
Release the switch when the vehicle slows to the desired speed.
To resume a preset speed, push and release the ACCeL/ReS switch. The vehicle
returns to the last set cruising speed when the vehicle speed is 25 MPH (40 km/h)
or over.
To cancel cruise control, push the CANCeL switch or tap the brake pedal. The
SET indicator light in the instrument panel will go out.
To turn off cruise control, push the oN/oFF switch. Both the CRUISE indicator
light and the SET indicator light in the instrument panel will go out.
Re ARVI eW M oNIto R (Navigation System only)
When the automatic transmission lever is moved to the R
(Reverse) position, the monitor display will automatically
change to show the area directly behind the vehicle.
The colored lines on the display screen indicate
approximate distances to objects.
Red 1.5 feet Yellow 3 feet Green 7 and 10 feet
Page 16 of 28

1415
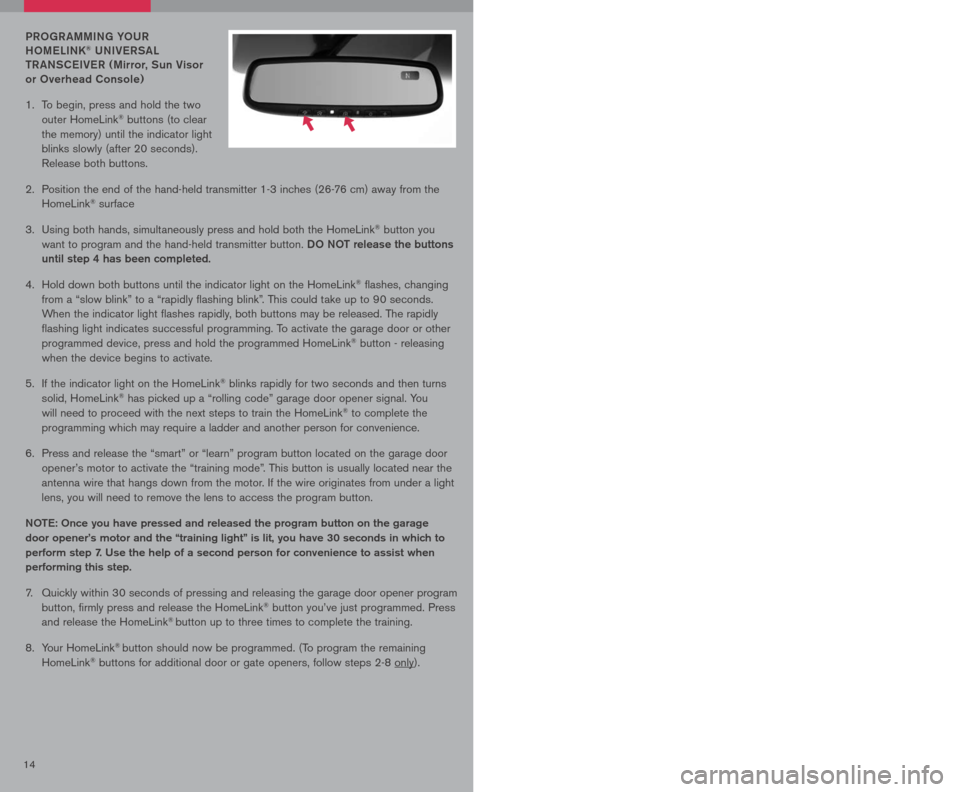
PRoGR AMMING Y oUR
H o M eLINK® UNIV eRSAL
t R ANSC eIV eR ( Mirror, Sun Visor
or overhead Console)
1. To be
gin, press and hold the two
outer HomeLink® buttons (to clear
the memory) until the indicator light
blinks slowly (after 20 seconds).
Release both buttons.
2. Position the end of the hand-held transmitter 1-3 inches (26-76 cm) away from the
HomeLink® surface
3. Using both hands, simultaneously press and hold both the HomeLink
® button you
want to program and the hand-held transmitter button. Do Not release the buttons
until step 4 has been completed.
4. Hold down both buttons until the indicator light on the HomeLink
® flashes, changing
from a “slow blink” to a “rapidly flashing blink”. This could take up to 90 seconds.
When the indicator light flashes rapidly, both buttons may be released. The rapidly
flashing light indicates successful programming. To activate the garage door or other
programmed device, press and hold the programmed HomeLink® button - releasing
when the device begins to activate.
5. If the indicator light on the HomeLink
® blinks rapidly for two seconds and then turns
solid, HomeLink® has picked up a “rolling code” garage door opener signal. You
will need to proceed with the next steps to train the HomeLink® to complete the
programming which may require a ladder and another person for convenience.
6. Press and release the “smart” or “learn” program button located on the garage door
opener’s motor to activate the “training mode”. This button is usually located near the
antenna wire that hangs down from the motor. If the wire originates from under a light
lens, you will need to remove the lens to access the program button.
Note : o nce you have pressed and released the program button on the garage
door opener’s motor and the “training light” is lit, you have 30 seconds in which to
perform step 7. Use the help of a second person for convenience to assist when
performing this step.
7. Quickly within 30 seconds of pressing and releasing the garage door opener program
button, firmly press and release the HomeLink® button you’ve just programmed. Press
and release the HomeLink® button up to three times to complete the training.
8. Your HomeLink
® button should now be programmed. (To program the remaining
HomeLink® buttons for additional door or gate openers, follow steps 2-8 only).
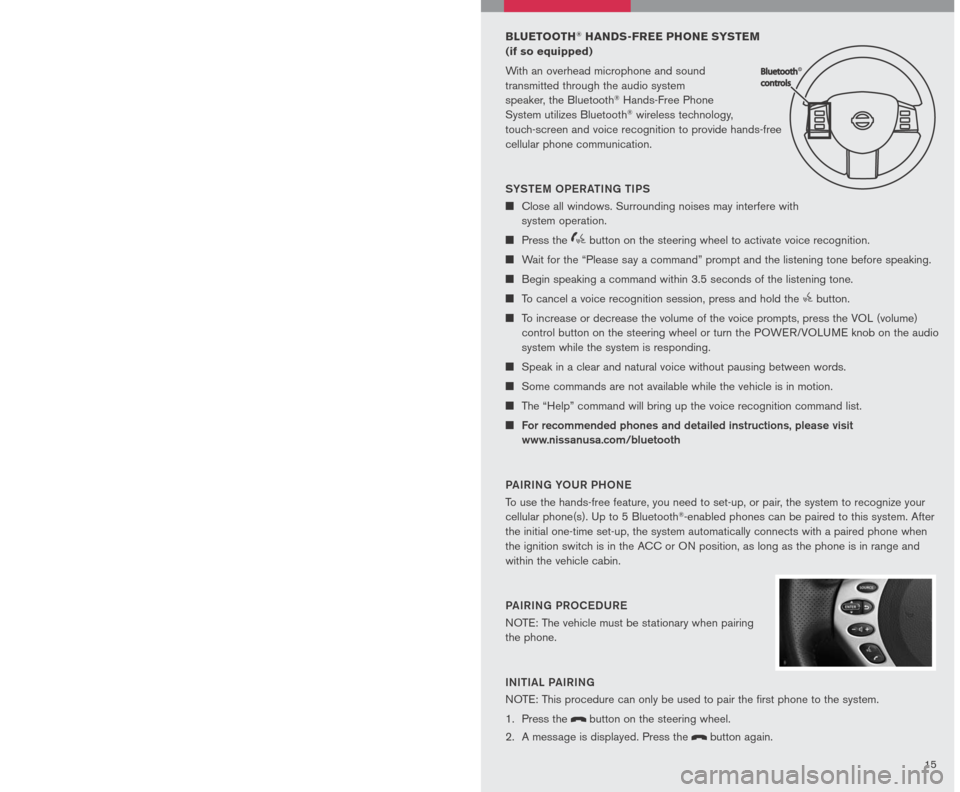
BLUETOOTH® HANDS-FREE PHONE SYSTEM
(if so equipped)
With an overhead microphone and sound
transmitted through the audio system
speaker, the Bluetooth® Hands-Free Phone
System utilizes Bluetooth® wireless technology,
touch-screen and voice recognition to provide hands-free
cellular phone communication.
SYS teM oPe R A tING tIPS
Close all windows. Surrounding noises may interfere with
system operation.
Press the icon C button on the steering wheel to activate voice recognition.
Wait for the “Please say a command” prompt and the listening tone before speaking.
Begin speaking a command within 3.5 seconds of the listening tone.
To cancel a voice recognition session, press and hold the button.
To increase or decrease the volume of the voice prompts, press the VOL (volume)
control button on the steering wheel or turn the POWER/VOLUME knob on the audio
system while the system is responding.
Speak in a clear and natural voice without pausing between words.
Some commands are not available while the vehicle is in motion.
The “Help” command will bring up the voice recognition command list.
For recommended phones and detailed instructions, please visit
www.nissanusa.com/bluetooth
PAIRING Y oUR PH oNe
To use the hands-free feature, you need to set-up, or pair, the system to recognize your
cellular phone(s). Up to 5 Bluetooth®-enabled phones can be paired to this system. After
the initial one-time set-up, the system automatically connects with a paired phone when
the ignition switch is in the ACC or ON position, as long as the phone is in range and
within the vehicle cabin.
PAIRING PR oCeDUR e
NOTE: The vehicle must be stationary when pairing
the phone.
INItIAL PAIRING
NOTE: This procedure can only be used to pair the first phone to the system.
1. Press the
button on the steering wheel.
2. A message is displayed. Press the
button again.
Page 17 of 28

1415
PRoGR AMMING Y oUR
H o M eLINK® UNIV eRSAL
t R ANSC eIV eR ( Mirror, Sun Visor
or overhead Console)
1. To be
gin, press and hold the two
outer HomeLink® buttons (to clear
the memory) until the indicator light
blinks slowly (after 20 seconds).
Release both buttons.
2. Position the end of the hand-held transmitter 1-3 inches (26-76 cm) away from the
HomeLink® surface
3. Using both hands, simultaneously press and hold both the HomeLink
® button you
want to program and the hand-held transmitter button. Do Not release the buttons
until step 4 has been completed.
4. Hold down both buttons until the indicator light on the HomeLink
® flashes, changing
from a “slow blink” to a “rapidly flashing blink”. This could take up to 90 seconds.
When the indicator light flashes rapidly, both buttons may be released. The rapidly
flashing light indicates successful programming. To activate the garage door or other
programmed device, press and hold the programmed HomeLink® button - releasing
when the device begins to activate.
5. If the indicator light on the HomeLink
® blinks rapidly for two seconds and then turns
solid, HomeLink® has picked up a “rolling code” garage door opener signal. You
will need to proceed with the next steps to train the HomeLink® to complete the
programming which may require a ladder and another person for convenience.
6. Press and release the “smart” or “learn” program button located on the garage door
opener’s motor to activate the “training mode”. This button is usually located near the
antenna wire that hangs down from the motor. If the wire originates from under a light
lens, you will need to remove the lens to access the program button.
Note : o nce you have pressed and released the program button on the garage
door opener’s motor and the “training light” is lit, you have 30 seconds in which to
perform step 7. Use the help of a second person for convenience to assist when
performing this step.
7. Quickly within 30 seconds of pressing and releasing the garage door opener program
button, firmly press and release the HomeLink® button you’ve just programmed. Press
and release the HomeLink® button up to three times to complete the training.
8. Your HomeLink
® button should now be programmed. (To program the remaining
HomeLink® buttons for additional door or gate openers, follow steps 2-8 only).
BLUETOOTH® HANDS-FREE PHONE SYSTEM
(if so equipped)
With an overhead microphone and sound
transmitted through the audio system
speaker, the Bluetooth® Hands-Free Phone
System utilizes Bluetooth® wireless technology,
touch-screen and voice recognition to provide hands-free
cellular phone communication.
SYS teM oPe R A tING tIPS
Close all windows. Surrounding noises may interfere with
system operation.
Press the icon C button on the steering wheel to activate voice recognition.
Wait for the “Please say a command” prompt and the listening tone before speaking.
Begin speaking a command within 3.5 seconds of the listening tone.
To cancel a voice recognition session, press and hold the button.
To increase or decrease the volume of the voice prompts, press the VOL (volume)
control button on the steering wheel or turn the POWER/VOLUME knob on the audio
system while the system is responding.
Speak in a clear and natural voice without pausing between words.
Some commands are not available while the vehicle is in motion.
The “Help” command will bring up the voice recognition command list.
For recommended phones and detailed instructions, please visit
www.nissanusa.com/bluetooth
PAIRING Y oUR PH oNe
To use the hands-free feature, you need to set-up, or pair, the system to recognize your
cellular phone(s). Up to 5 Bluetooth®-enabled phones can be paired to this system. After
the initial one-time set-up, the system automatically connects with a paired phone when
the ignition switch is in the ACC or ON position, as long as the phone is in range and
within the vehicle cabin.
PAIRING PR oCeDUR e
NOTE: The vehicle must be stationary when pairing
the phone.
INItIAL PAIRING
NOTE: This procedure can only be used to pair the first phone to the system.
1. Press the
button on the steering wheel.
2. A message is displayed. Press the
button again.