ESP NISSAN ALTIMA HYBRID 2010 L32A / 4.G Quick Reference Guide
[x] Cancel search | Manufacturer: NISSAN, Model Year: 2010, Model line: ALTIMA HYBRID, Model: NISSAN ALTIMA HYBRID 2010 L32A / 4.GPages: 36, PDF Size: 2.61 MB
Page 5 of 36
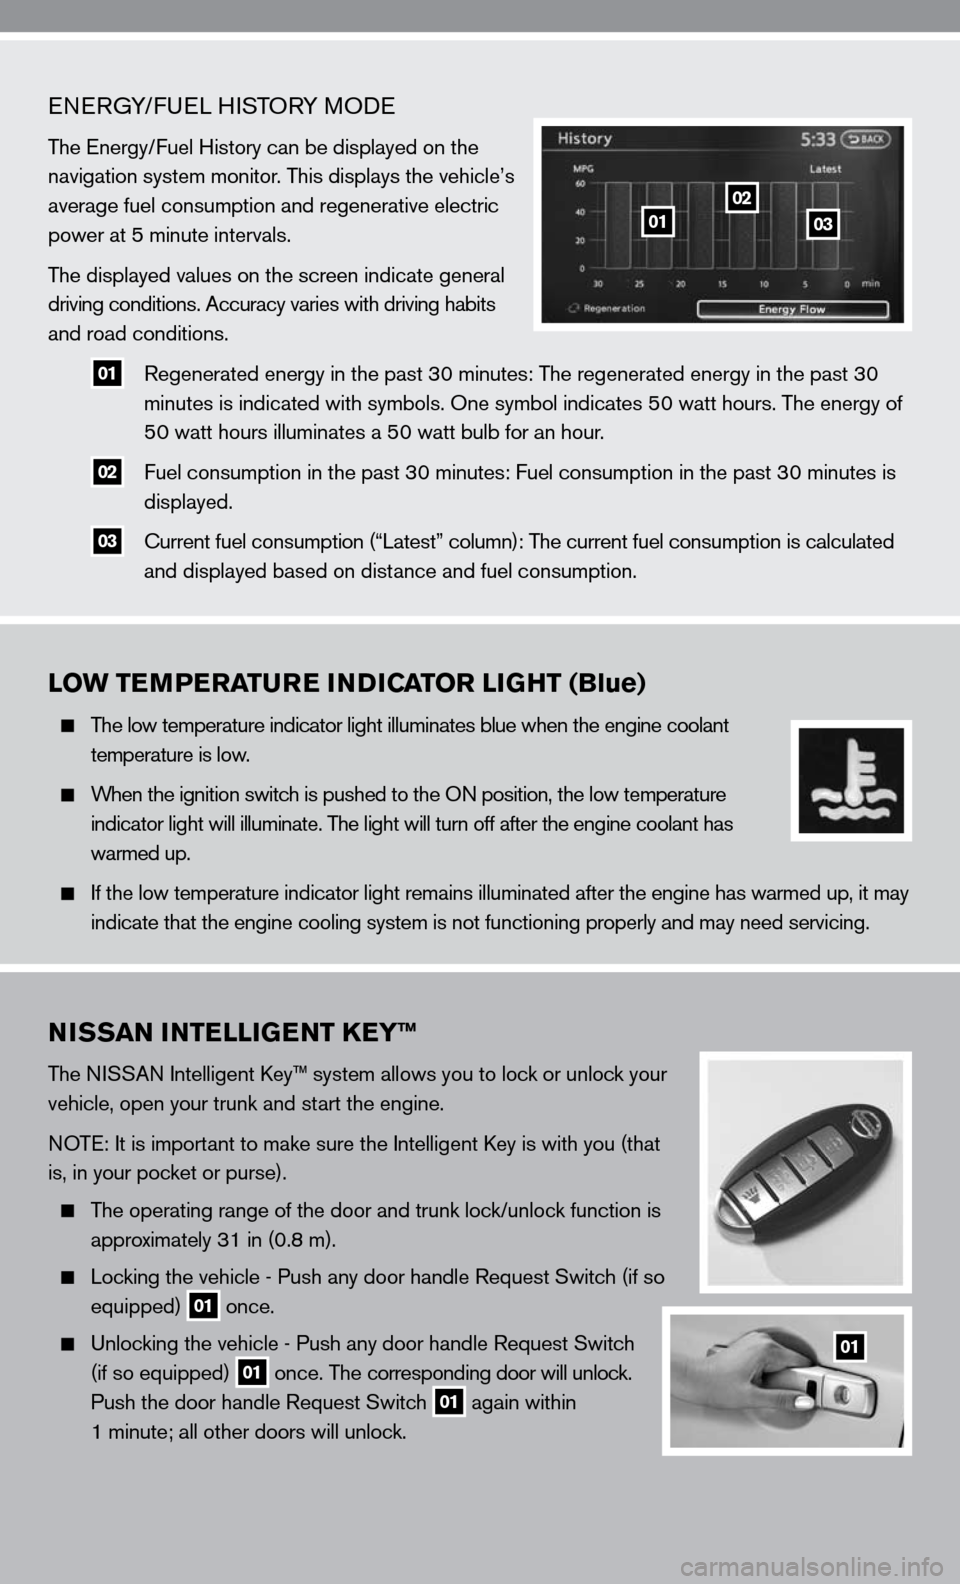
eneRGy/fue L HiSTOR y MOde
The energy/ fuel History can be displayed on the
navigation system monitor. This displays the vehicle’s
average fuel consumption and regenerative electric
power at 5 minute intervals.
The displayed values on the screen indicate general
driving conditions. Accuracy varies with driving habits
and road conditions.
01 Regenerated energy in the past 30 minutes: The regenerated energy in the past 30
minutes is indicated with symbols. One symbol indicates 50 watt hours. The energy of
50 watt hours illuminates a 50 watt bulb for an hour.
02 fuel consumption in the past 30 minutes: fuel consumption in the past 30 minutes is
displayed.
03 c
urrent fuel consumption (“Latest” column): The current fuel consumption is calculated
and displayed based on distance and fuel consumption.
LOW TEMPERATURE INDICATOR LIGHT (Blue)
The low temperature indicator light illuminates blue when the engine coolant
temperature is low.
When the ignition switch is pushed to the O n position, the low temperature
indicator light will illuminate. The light will turn off after the engine coolant has
warmed up.
i f the low temperature indicator light remains illuminated after the engine has warmed up, it may
indicate that the engine cooling system is not functioning properly and \
may need servicing.
0102
03
NISSAN INTELLIGENT KEY™
The ni SSAn intelligent k ey™ system allows you to lock or unlock your
vehicle, open your trunk and start the engine.
n OTe: it is important to make sure the intelligent k ey is with you (that
is, in your pocket or purse).
The operating range of the door and trunk lock/unlock function is
approximately 31 in (0.8 m).
Locking the vehicle - Push any door handle Request Switch (if so
equipped)
01 once.
u nlocking the vehicle - Push any door handle Request Switch
(if so equipped)
01 once. The corresponding door will unlock.
Push the door handle Request Switch
01 again within
1 minute; all other doors will unlock.
01
Page 12 of 36
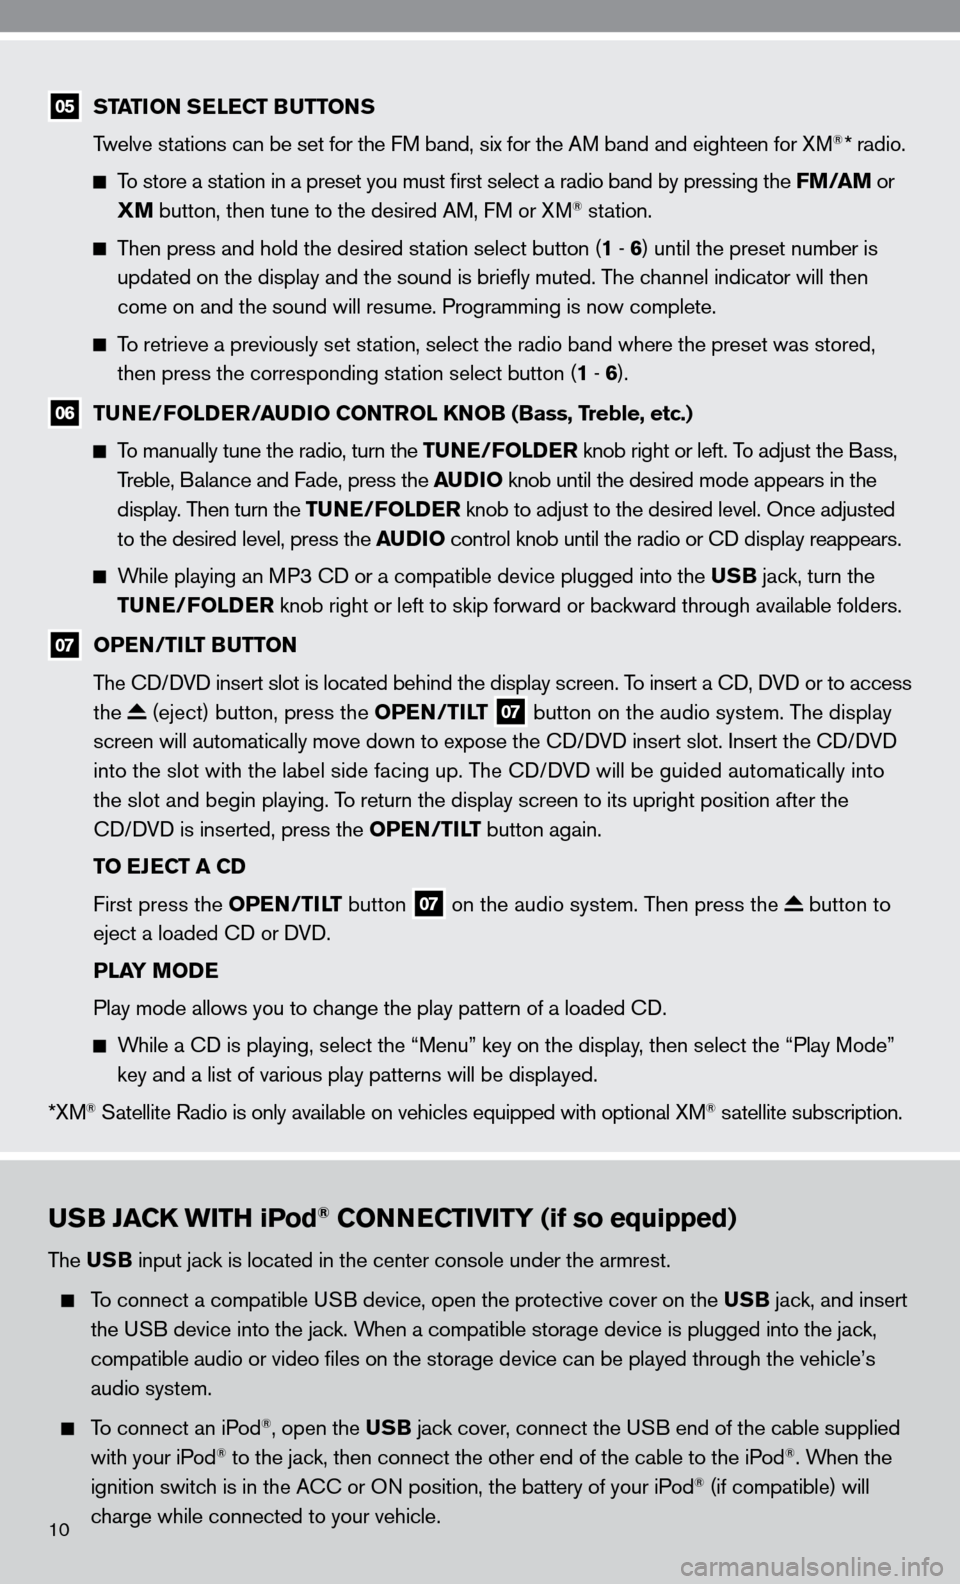
USB JACK WITH iPod® CONNECTIVITY (if so equipped)
The USB input jack is located in the center console under the armrest.
To connect a compatible u SB device, open the protective cover on the USB jack, and insert
the u SB device into the jack. When a compatible storage device is plugged into the jack,
compatible audio or video files on the storage device can be played th\
rough the vehicle’s
audio system.
To connect an iPod®, open the USB jack cover, connect the u SB end of the cable supplied
with your iPod® to the jack, then connect the other end of the cable to the iPod®. When the
ignition switch is in the A cc or On position, the battery of your iPod® (if compatible) will
charge while connected to your vehicle.
05 STATION SELECT BUTTONS
Twelve stations can be set for the f M band, six for the AM band and eighteen for XM®* radio.
To store a station in a preset you must first select a radio band by pressing the FM/AM or
XM button, then tune to the desired AM, f M or XM® station.
Then press and hold the desired station select button (1 - 6 ) until the preset number is
updated on the display and the sound is briefly muted. The channel indicator will then
come on and the sound will resume. Programming is now complete.
To retrieve a previously set station, select the radio band where the preset was stored,
then press the corresponding station select button (1 - 6 ).
06 TUNE/FOLDER/AUDIO CONTROL KNOB (Bass, Treble, etc.)
To manually tune the radio, turn the TUNE/FOLDER knob right or left. To adjust the Bass,
Treble, Balance and fade, press the AUDIO knob until the desired mode appears in the
display. Then turn the TUNE/FOLDER knob to adjust to the desired level. Once adjusted
to the desired level, press the AUDIO control knob until the radio or cd display reappears.
While playing an MP3 cd or a compatible device plugged into the USB jack, turn the
TUNE/FOLDER knob right or left to skip forward or backward through available folders.
07 OPEN/TILT BUTTON
The cd/ dVd insert slot is located behind the display screen. To insert a cd, dVd or to access
the
(eject) button, press the OPEN/TILT 07 button on the audio system. The display
screen will automatically move down to expose the cd/d Vd insert slot. insert the cd/d Vd
into the slot with the label side facing up. The cd/ dVd will be guided automatically into
the slot and begin playing. To return the display screen to its upright position after the
cd/ dVd is inserted, press the OPEN/TILT button again.
TO EJECT A CD
first press the OPEN/TILT button
07 on the audio system. Then press the button to
eject a loaded cd or d Vd.
PLAY MODE
Play mode allows you to change the play pattern of a loaded cd.
While a cd is playing, select the “Menu” key on the display, then select the “Play Mode”
key and a list of various play patterns will be displayed.
*XM
® Satellite Radio is only available on vehicles equipped with optional XM® satellite subscription.
10
Page 16 of 36
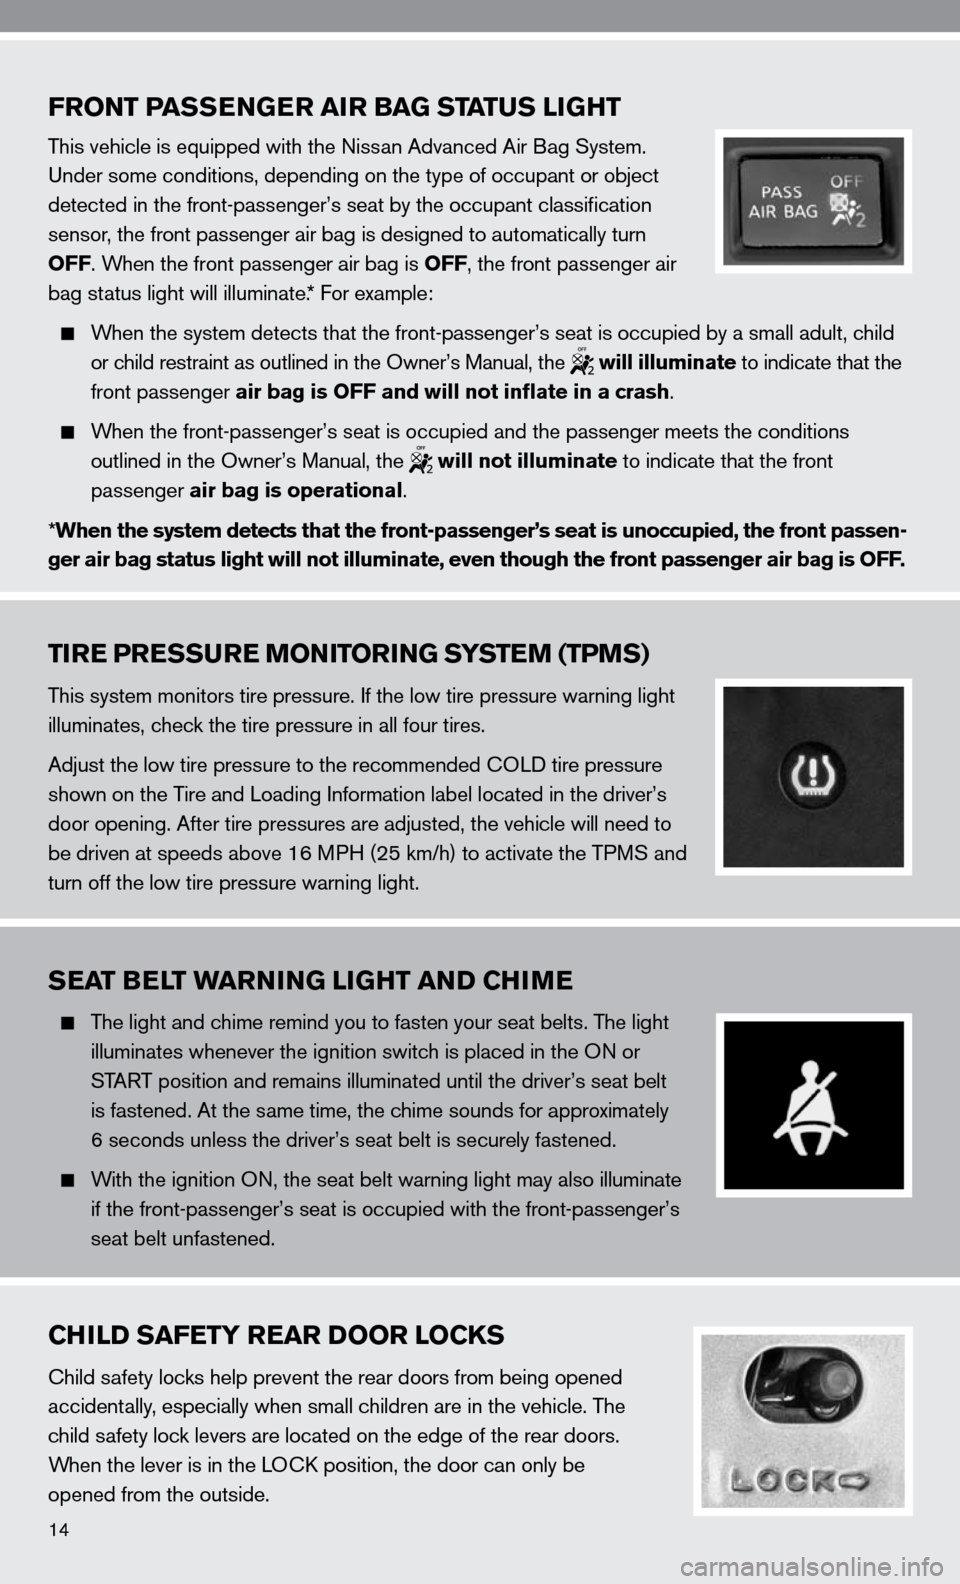
FRONT PASSENGER AIR BAG STATUS LIGHT
This vehicle is equipped with the nissan Advanced Air Bag System.
u nder some conditions, depending on the type of occupant or object
detected in the front-passenger’s seat by the occupant classification
sensor, the front passenger air bag is designed to automatically turn
OFF. When the front passenger air bag is OFF, the front passenger air
bag status light will illuminate.* f or example:
When the system detects that the front-passenger’s seat is occupied by a small adult, child
or child restraint as outlined in the Owner’s Manual, the
will illuminate to indicate that the
front passenger air bag is OFF and will not inflate in a crash.
When the front-passenger’s seat is occupied and the passenger meets the conditions
outlined in the Owner’s Manual, the
will not illuminate to indicate that the front
passenger air bag is operational.
* When the system detects that the front-passenger’s seat is unoccupied\
, the front passen-
ger air bag status light will not illuminate, even though the front pass\
enger air bag is OFF.
TIRE PRESSURE MONITORING SYSTEM (TPMS)
This system monitors tire pressure. if the low tire pressure warning light
illuminates, check the tire pressure in all four tires.
Adjust the low tire pressure to the recommended cOL d tire pressure
shown on the Tire and Loading information label located in the driver’s
door opening. After tire pressures are adjusted, the vehicle will need to
be driven at speeds above 16 MPH (25 km/h) to activate the TPMS and
turn off the low tire pressure warning light.
SEAT BELT WARNING LIGHT AND CHIME
The light and chime remind you to fasten your seat belts. The light
illuminates whenever the ignition switch is placed in the O n or
START position and remains illuminated until the driver’s seat belt
is fastened. At the same time, the chime sounds for approximately
6 seconds unless the driver’s seat belt is securely fastened.
With the ignition O n, the seat belt warning light may also illuminate
if the front-passenger’s seat is occupied with the front-passenger’s
seat belt unfastened.
CHILD SAFETY REAR DOOR LOCKS
child safety locks help prevent the rear doors from being opened
accidentally, especially when small children are in the vehicle. The
child safety lock levers are located on the edge of the rear doors.
When the lever is in the LO ck position, the door can only be
opened from the outside.
14
Page 20 of 36
SySTe M OP eRATin G TiPS
close all windows. Surrounding noises may interfere with system operation\
and performance.
Press the
button on the steering wheel to activate voice recognition.
Wait for the “Would you like to access Phone, navigation, information, Audio or Help?”
prompt and the listening tone before speaking.
Begin speaking a command within 1.5 seconds of the listening tone.
To cancel a voice recognition session, press and hold the
button for 2 seconds.
To increase or decrease the volume of the voice prompts, push the + or – (volume) control
switch on the steering wheel or turn the VOL (volume) knob on the audio system while the
system is responding.
Speak in a clear and natural voice without pausing between words.
The “Help” command will bring up the voice recognition command list\
.
Please refer to the cellular phone manufacturer’s Owner’s Manual for detailed information
regarding your Bluetooth® phone.
for recommended phones and detailed instructions, please visit
www.nissanusa.com/bluetooth.
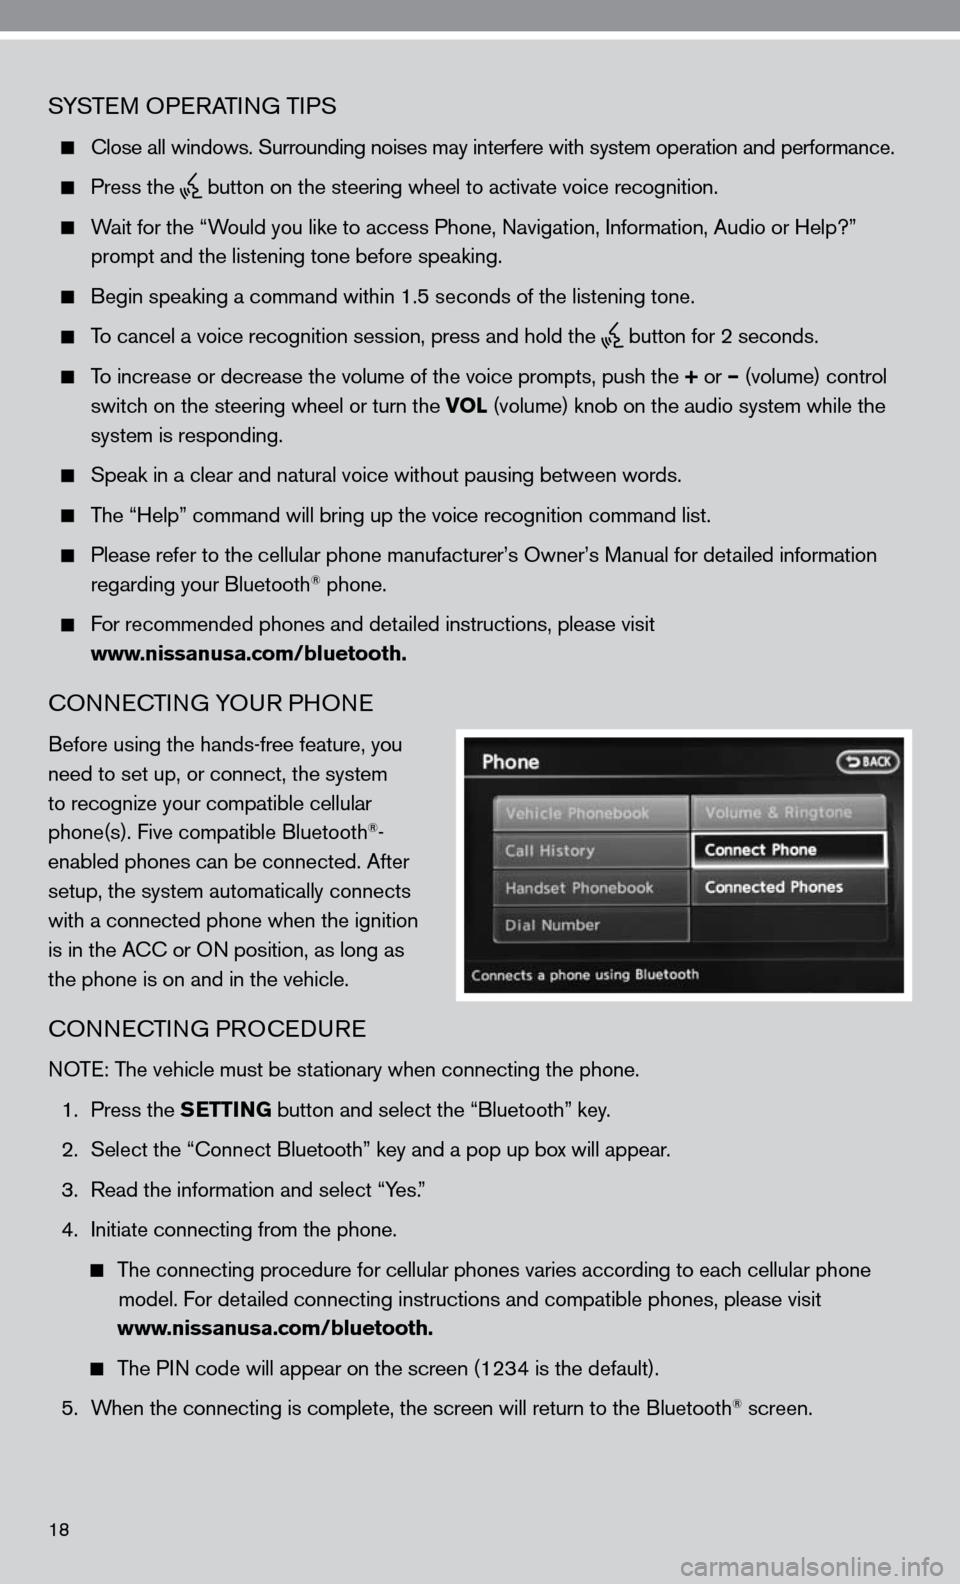
cOnnec TinG yOu R PHOne
Before using the hands-free feature, you
need to set up, or connect, the system
to recognize your compatible cellular
phone(s). five compatible Bluetooth
®-
enabled phones can be connected. After
setup, the system automatically connects
with a connected phone when the ignition
is in the A cc or O n position, as long as
the phone is on and in the vehicle.
cOnnec TinG PROcedu Re
n OTe: The vehicle must be stationary when connecting the phone.
1. Press the SETTING button and select the “Bluetooth” key.
2. Select the “connect Bluetooth” key and a pop up box will appear.
3. Read the information and select “y es.”
4. initiate connecting from the phone.
The connecting procedure for cellular phones varies according to each cellular phone
model. f or detailed connecting instructions and compatible phones, please visit
www.nissanusa.com/bluetooth.
The P in code will appear on the screen (1234 is the default).
5. When the connecting is complete, the screen will return to the Bluetooth
® screen.
18
Page 22 of 36
20
HOW TO SAy nuMBeRS
The system provides two commands for entering and dialing a phone number: “ diAL” and
“inTe RnATi OnAL c ALL.” The “diAL” command is used for domestic phone numbers up to
10-digits in length, starting with the area code. The “inTe RnATi OnAL c ALL” command is used
when more than 10-digits need to be dialed or when special characters are required, such as: *,
# or +. When using these two commands, please follow the phone digit speaking rul\
es below:
Only single digits 0 (zero) to 9 (nine) can be spoken.
When saying the phone number 800-662-6200, the system will accept “eight hundred” in
addition to “eight zero zero” or “eight oh oh.” 500, 700 and 900 are also supported.
The long-distance calling prefix “1” is not required when making a call.
“diAL” c OMMAnd O nLy
y ou can say all the digits of a 7- or 10-digit phone number at one time.
f or a 10-digit number, saying the phone number in groups of 3, 3 and 4 digits may improve
recognition for some speakers. To use this group dialing method, say only the first 3 digits of
the phone number. After the system recognizes the number, it will request the next 3 digits
and finally the last 4 digits.
i f a phone number is incorrectly recognized, you can try entering the phone number again
using the 3-3-4 group dialing procedure by saying, “c HAnGe nu MBeR.”
“inTe RnATi OnAL c ALL” c OMMAnd O nLy
y ou can say the entire phone number at once or in groups of any digit length.
f or *, # and +, say “STAR, ” “POund” or “PLuS,” respectively.
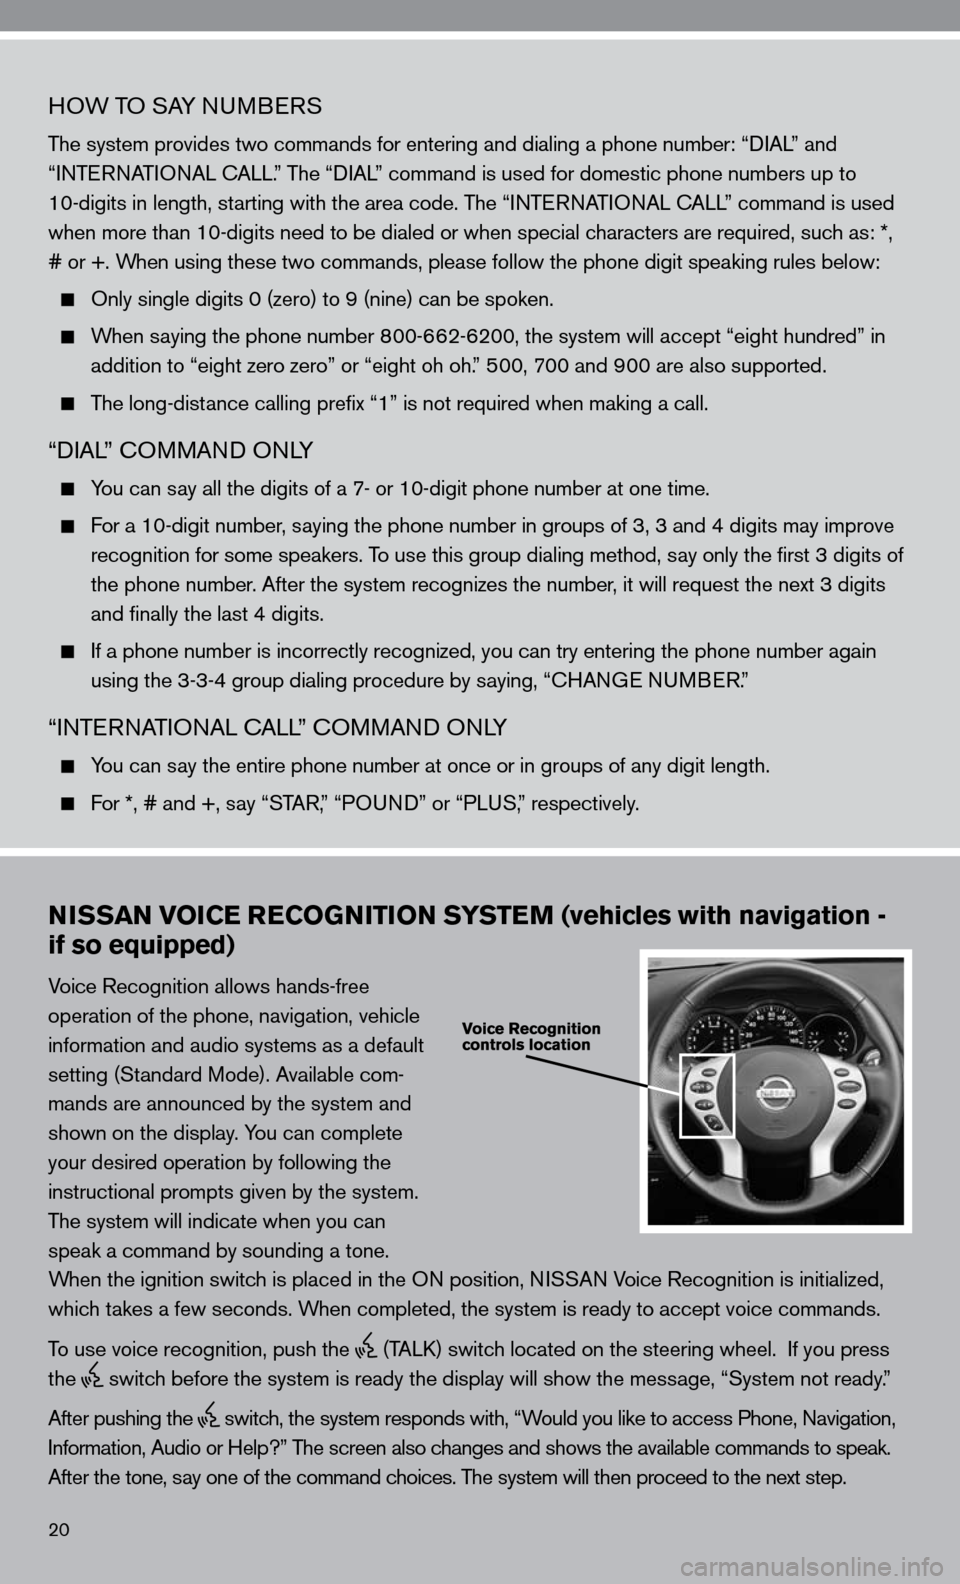
NISSAN VOICE RECOGNITION SYSTEM (vehicles with navigation -
if so equipped)
Voice Recognition allows hands-free
operation of the phone, navigation, vehicle
information and audio systems as a default
setting (Standard Mode). Available com-
mands are announced by the system and
shown on the display. y ou can complete
your desired operation by following the
instructional prompts given by the system.
The system will indicate when you can
speak a command by sounding a tone.
When the ignition switch is placed in the O n position, niSSAn Voice Recognition is initialized,
which takes a few seconds. When completed, the system is ready to accept voice commands.
To use voice recognition, push the
(TALk) switch located on the steering wheel. if you press
the
switch before the system is ready the display will show the message, “System not ready.”
After pushing the
switch, the system responds with, “Would you like to access Phone, navigation,
i nformation, Audio or Help?” The screen also changes and shows the available commands to speak.
After the tone, say one of the command choices. The system will then proceed to the next step.
Page 23 of 36
21
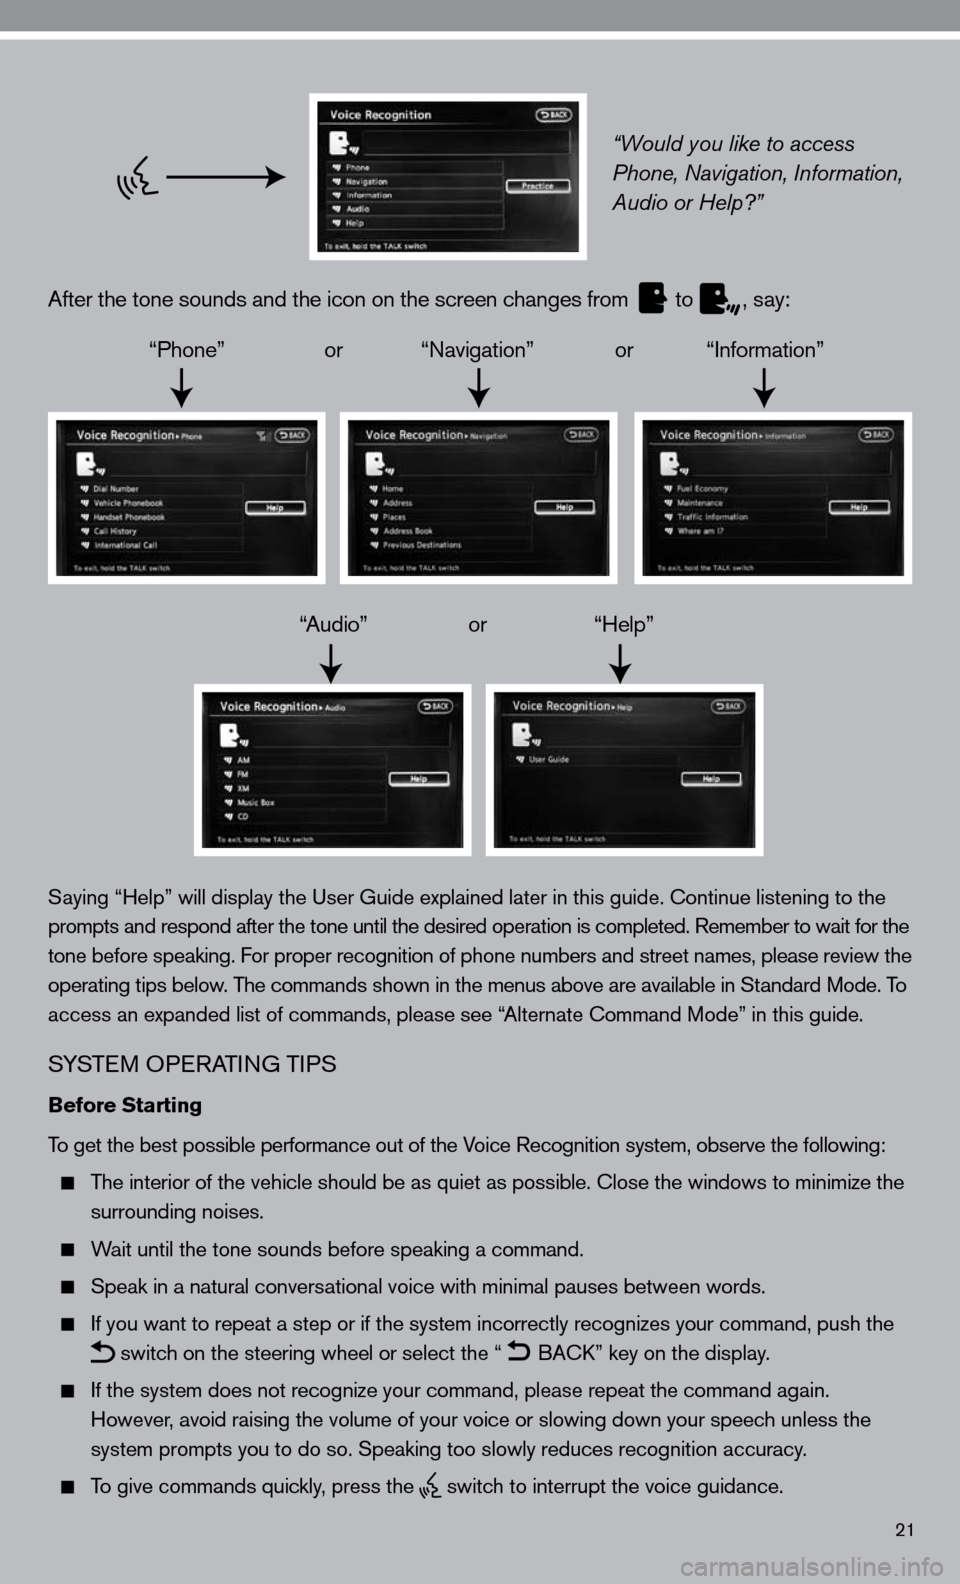
“Would you like to access
Phone, Navigation, Information,
Audio or Help?”
After the tone sounds and the icon on the screen changes from
to
, say:
“Phone” or “navigation” or “information”
“Audio” or “Help”
Saying “Help” will display the user Guide explained later in this guide. continue listening to the
prompts and respond after the tone until the desired operation is completed. Remember to wait for the
tone before speaking. for proper recognition of phone numbers and street names, please review the
operating tips below. The commands shown in the menus above are available in Standard Mode. To
access an expanded list of commands, please see “Alternate command Mode” in this guide.
S ySTe M OP eRATin G TiPS
Before Starting
To get the best possible performance out of the Voice Recognition system, observe the following:
The interior of the vehicle should be as quiet as possible. close the windows to minimize the
surrounding noises.
Wait until the tone sounds before speaking a command.
Speak in a natural conversational voice with minimal pauses between words.
if you want to repeat a step or if the system incorrectly recognizes your command, push the
switch on the steering wheel or select the “
BA
ck” key on the display.
if the system does not recognize your command, please repeat the command \
again.
However, avoid raising the volume of your voice or slowing down your speech unless the
system prompts you to do so. Speaking too slowly reduces recognition acc\
uracy.
To give commands quickly, press the
switch to interrupt the voice guidance.
Page 24 of 36
22
How to speak phone numbers
The system provides two commands for entering and dialing a phone number: “diAL” and
“inTe RnATi OnAL c ALL.” The “diAL” command is used for domestic phone numbers up to
10 digits in length starting with the area code. The “ inTe R nAT iO nAL cALL” command is used
when more than 10 digits need to be dialed or when special characters are required such as *, #,
or +. When using these two commands, please follow the phone digit speaking rul\
es below:
Only single digits 0 (zero) to 9 (nine) can be spoken.
Speak digits at a normal pace. Speaking too slowly reduces recognition a\
ccuracy.
When saying the phone number 800-662-6200, the system will accept “eight zero zero” or
“eight oh oh.” 500, 700 and 900 are also supported.
The long-distance dialing prefix “1” is not required when making a call.
“diAL” c OMMAnd O nLy
you can say all the digits of a 7- or 10-digit phone number at one time.
for a 10-digit number, saying the phone number in groups of 3, 3 and 4 digits may improve
recognition for some speakers. To use this group dialing method, say only the first 3 digits of
the phone number. After the system recognizes the 3 three digits, it will request the next 3
digits and finally the last 4 digits.
if a phone number is incorrectly recognized, you can try entering the pho\
ne number again
using the 3-3-4 group dialing procedure by saying, “c HAnGe nu MBeR.”
“inTe RnATi OnAL c ALL” c OMMAnd O nLy
you can say the entire phone number at once or in groups of any digit length.
for *, # and +, say “STAR,” “PO und” or “PLuS,” respectively.
VOice c OMMAnd u SAGe
Making a Phone Call
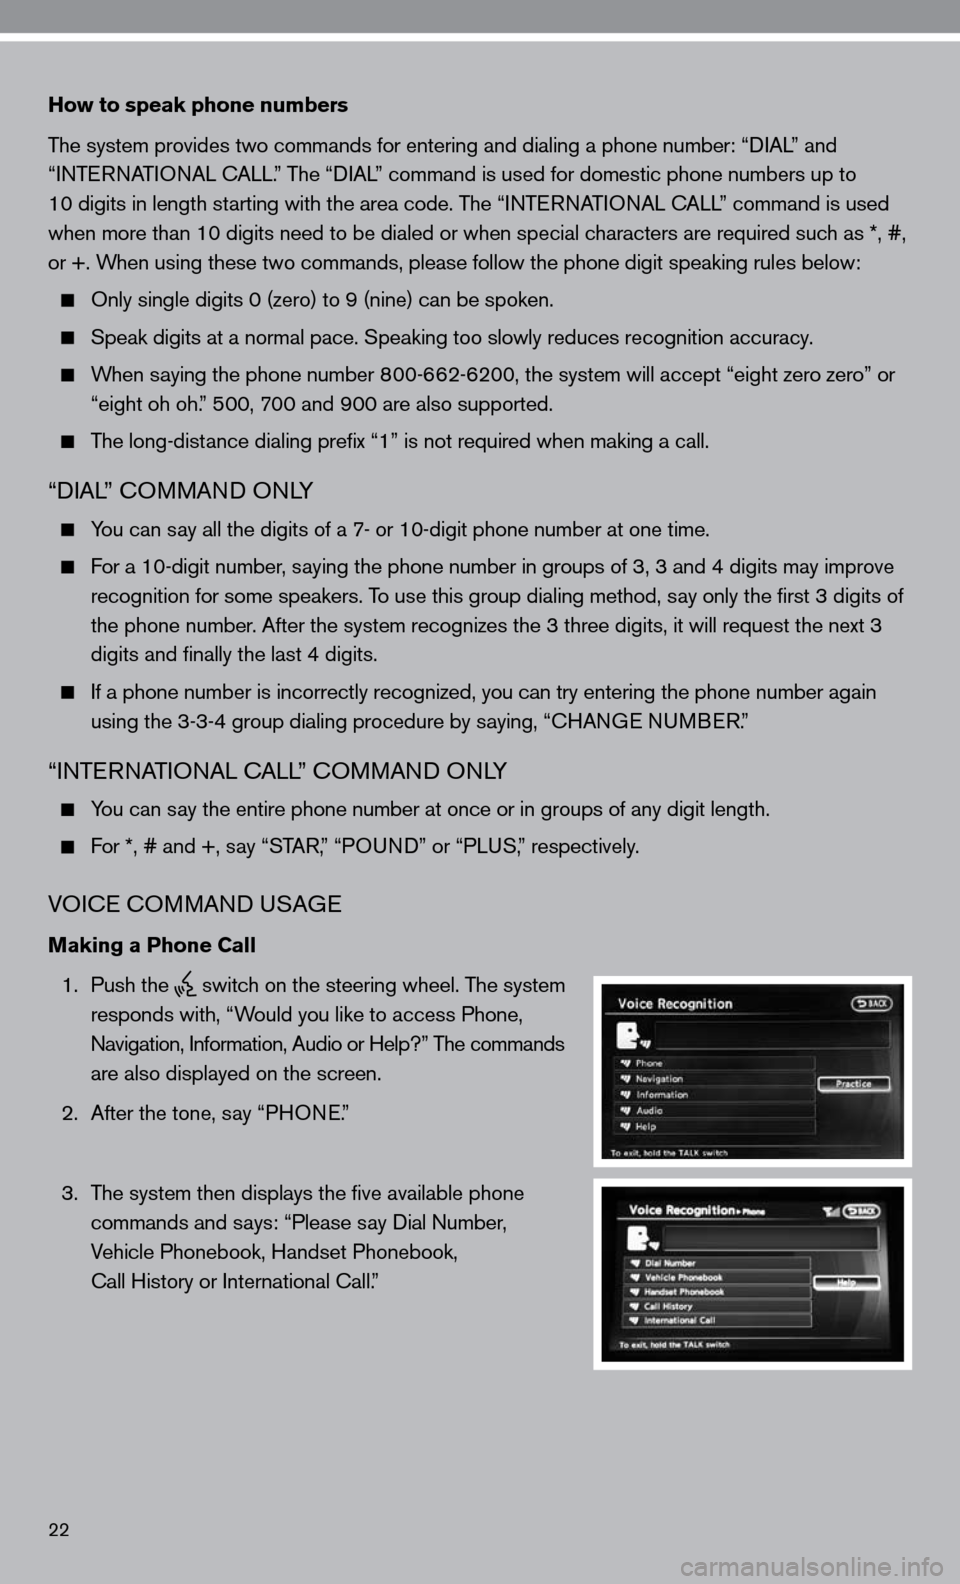
1. Push the
switch on the steering wheel. The system
responds with, “Would you like to access Phone,
n avigation, information, Audio or Help?” The commands
are also displayed on the screen.
2. After the tone, say “PHO ne.”
3. The system then displays the five available phone
commands and says: “Please say dial number,
Vehicle Phonebook, Handset Phonebook,
call History or international call.”
Page 25 of 36
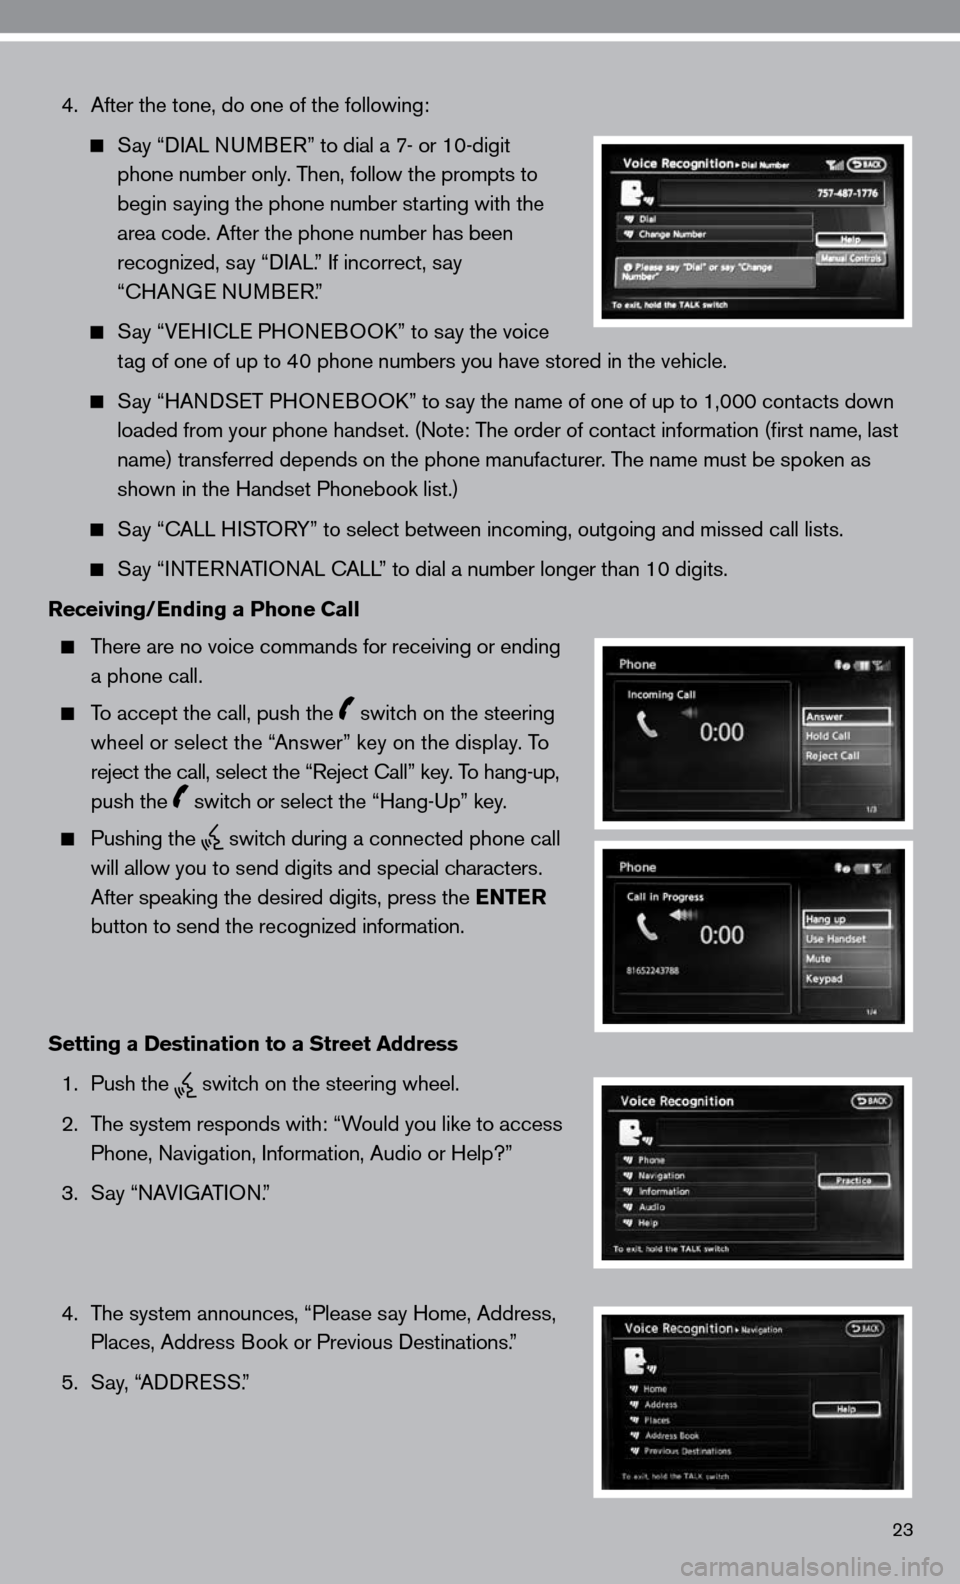
4. After the tone, do one of the following:
Say “ diAL nu MB eR” to dial a 7- or 10-digit
phone number only. Then, follow the prompts to
begin saying the phone number starting with the
area code. After the phone number has been
recognized, say “ diAL.” if incorrect, say
“cHAn Ge nu MBeR.”
Say “V eH ic Le PHO neBOO k” to say the voice
tag of one of up to 40 phone numbers you have stored in the vehicle.
Say “HAnd SeT PHO neBOO k” to say the name of one of up to 1,000 contacts down
loaded from your phone handset. ( note: The order of contact information (first name, last
name) transferred depends on the phone manufacturer. The name must be spoken as
shown in the Handset Phonebook list.)
Say “c ALL HiSTOR y” to select between incoming, outgoing and missed call lists.
Say “inTe RnATi OnAL c ALL” to dial a number longer than 10 digits.
Receiving/Ending a Phone Call
There are no voice commands for receiving or ending
a phone call.
To accept the call, push the switch on the steering
wheel or select the “Answer” key on the display. To
reject the call, select the “Reject call” key. To hang-up,
push the
switch or select the “Hang-up” key.
Pushing the
switch during a connected phone call
will allow you to send digits and special characters.
After speaking the desired digits, press the ENTER
button to send the recognized information.
Setting a Destination to a Street Address
1. Push the
switch on the steering wheel.
2. The system responds with: “Would you like to access
Phone, navigation, information, Audio or Help?”
3. Say “nAVi GATiOn.”
4. The system announces, “Please say Home, Address,
Places, Address Book or Previous destinations.”
5. Say, “ AddR eSS.”
23
Page 31 of 36
29
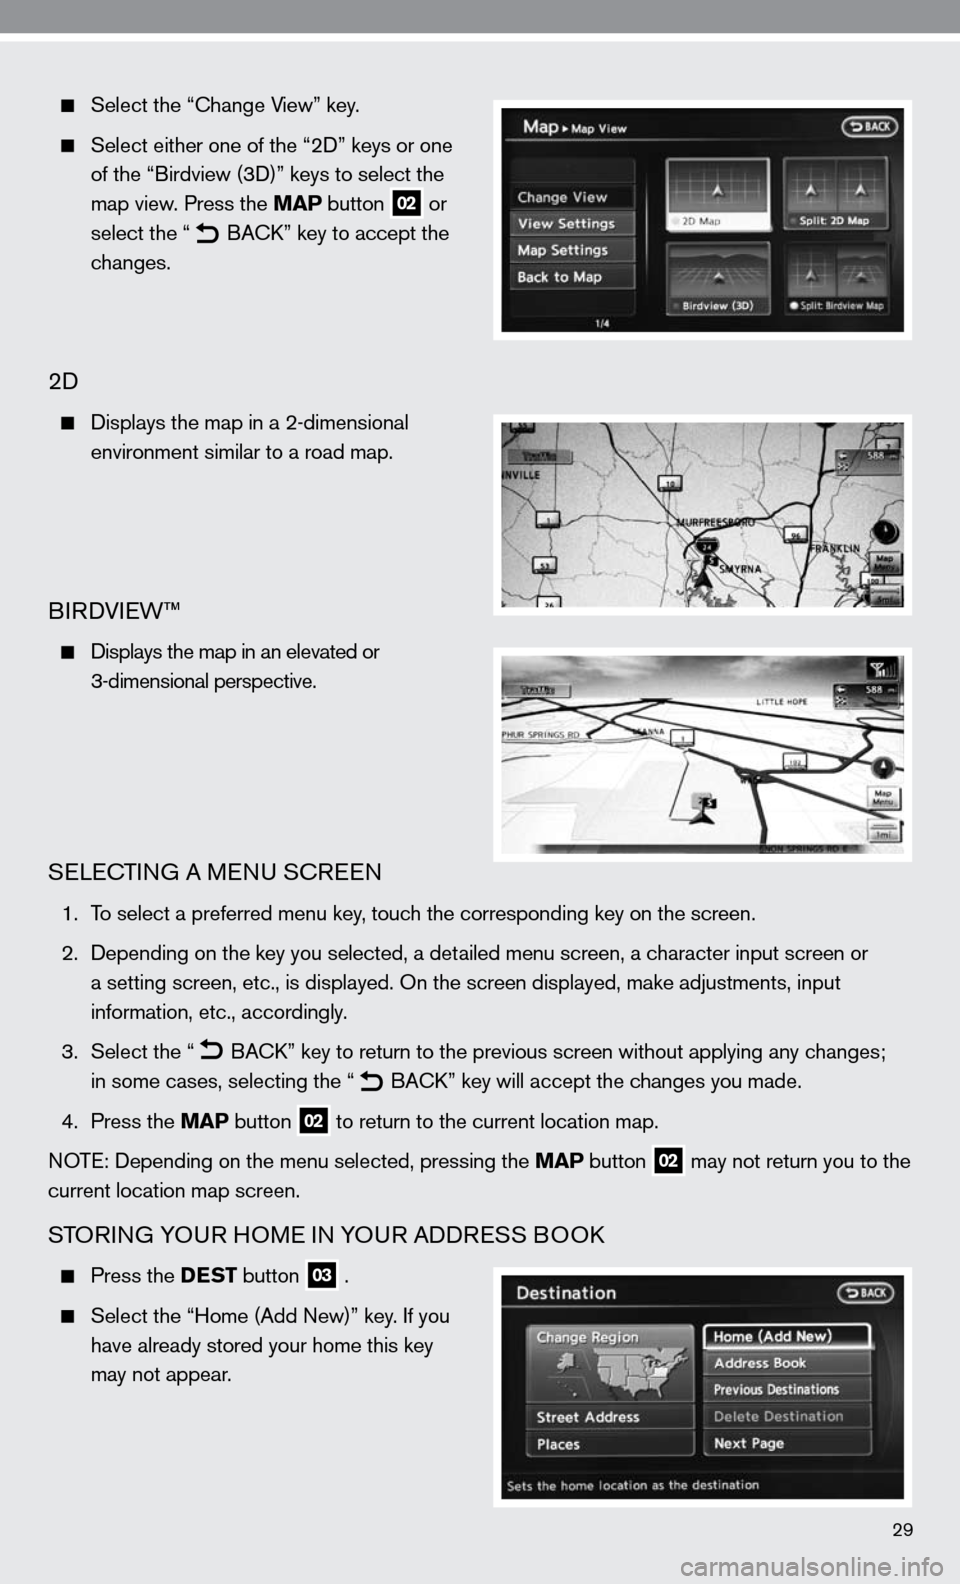
Select the “ change View” key.
Select either one of the “2 d” keys or one
of the “Birdview (3 d)” keys to select the
map view. Press the MAP button
02 or
select the “
B
Ack ” key to accept the
changes.
2d
displays the map in a 2-dimensional
environment similar to a road map.
BiRd Vie W™
d isplays the map in an elevated or
3-dimensional perspective.
SeLec TinG A M enu S cReen
1. To select a preferred menu key, touch the corresponding key on the screen.
2. depending on the key you selected, a detailed menu screen, a character input screen or
a setting screen, etc., is displayed. On the screen displayed, make adju\
stments, input
information, etc., accordingly.
3. Select the “
B
Ack ” key to return to the previous screen without applying any changes;
in some cases, selecting the “
B
Ack ” key will accept the changes you made.
4. Press the MAP button
02 to return to the current location map.
n OTe: depending on the menu selected, pressing the MAP button
02 may not return you to the
current location map screen.
STOR inG y OuR HOM e in yOuR Add ReSS BOO k
Press the DEST button 03 .
Select the “Home (Add new)” key. if you
have already stored your home this key
may not appear.