NISSAN ARMADA 2004 1.G Owner's Manual
Manufacturer: NISSAN, Model Year: 2004, Model line: ARMADA, Model: NISSAN ARMADA 2004 1.GPages: 344, PDF Size: 5.67 MB
Page 21 of 344

Seat lifter (driver’s seat)
Push the front or rear end of the switch up or
down to adjust the angle and height of the seat
cushion.
Lumbar support (driver’s seat)
The lumbar support feature provides lower back
support to the driver. Move the lever up or down
to adjust the seat lumbar area.
2ND ROW CAPTAIN’S CHAIR
ADJUSTMENT (if so equipped)
Reclining
To recline the seatback, pull up on the lever and
lean back.
The recline feature allows adjustment of the seat
back for occupants of different sizes to help
obtain proper seat belt fit (see “Precautions on
seat belt usage” later in this section) . Also, the
seatback can be reclined to allow occupants to
rest when the vehicle is stopped.
WRS0277LRS0278WRS0369
Safety—Seats, seat belts and supplemental air bags1-5
ZREVIEW COPY:Ð2004 Pathfinder Armada
(wzw)
Owners Manual(owners)ÐUSA English(nna)
01/14/04Ðtbrooks
X
Page 22 of 344
WARNING
cAfter adjustment, gently rock in the seat
to make sure it is securely locked.
cDo not ride in a moving vehicle when
the seatback is reclined. This can be
dangerous. The shoulder belt will not
be against your body. In an accident,
you could be thrown into it and receive
neck or other serious injuries. You
could also slide under the lap belt and
receive serious internal injuries.
cFor the most effective protection when
the vehicle is in motion, the seat should
be upright. Always sit well back in the
seat and adjust the seat belt properly.
See “Precautions on seat belt usage”
later in this section.
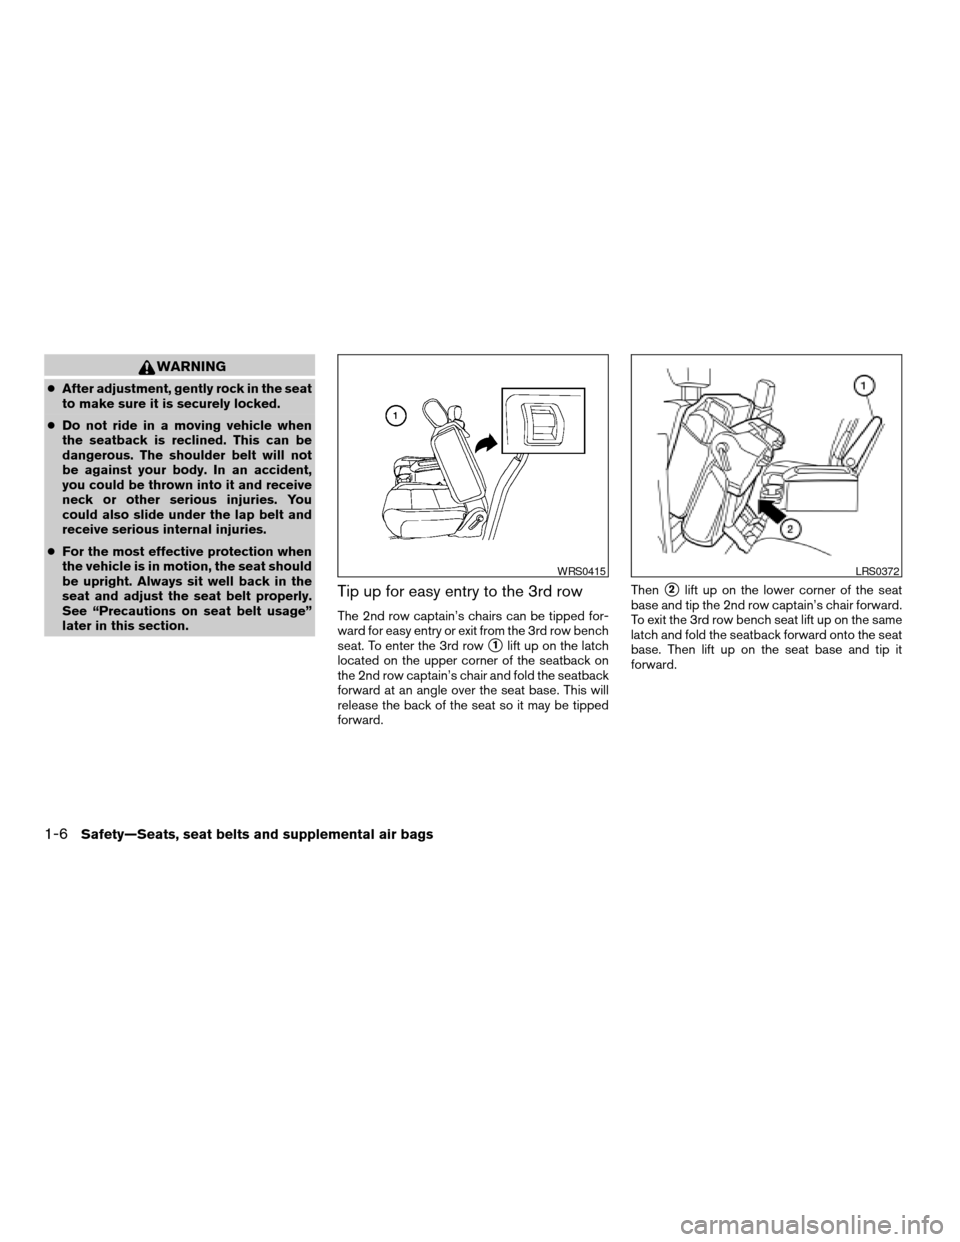
Tip up for easy entry to the 3rd row
The 2nd row captain’s chairs can be tipped for-
ward for easy entry or exit from the 3rd row bench
seat. To enter the 3rd row
s1lift up on the latch
located on the upper corner of the seatback on
the 2nd row captain’s chair and fold the seatback
forward at an angle over the seat base. This will
release the back of the seat so it may be tipped
forward.Then
s2lift up on the lower corner of the seat
base and tip the 2nd row captain’s chair forward.
To exit the 3rd row bench seat lift up on the same
latch and fold the seatback forward onto the seat
base. Then lift up on the seat base and tip it
forward.
WRS0415LRS0372
1-6Safety—Seats, seat belts and supplemental air bags
ZREVIEW COPY:Ð2004 Pathfinder Armada
(wzw)
Owners Manual(owners)ÐUSA English(nna)
01/14/04Ðtbrooks
X
Page 23 of 344
2ND ROW BENCH SEAT
ADJUSTMENT (if so equipped)
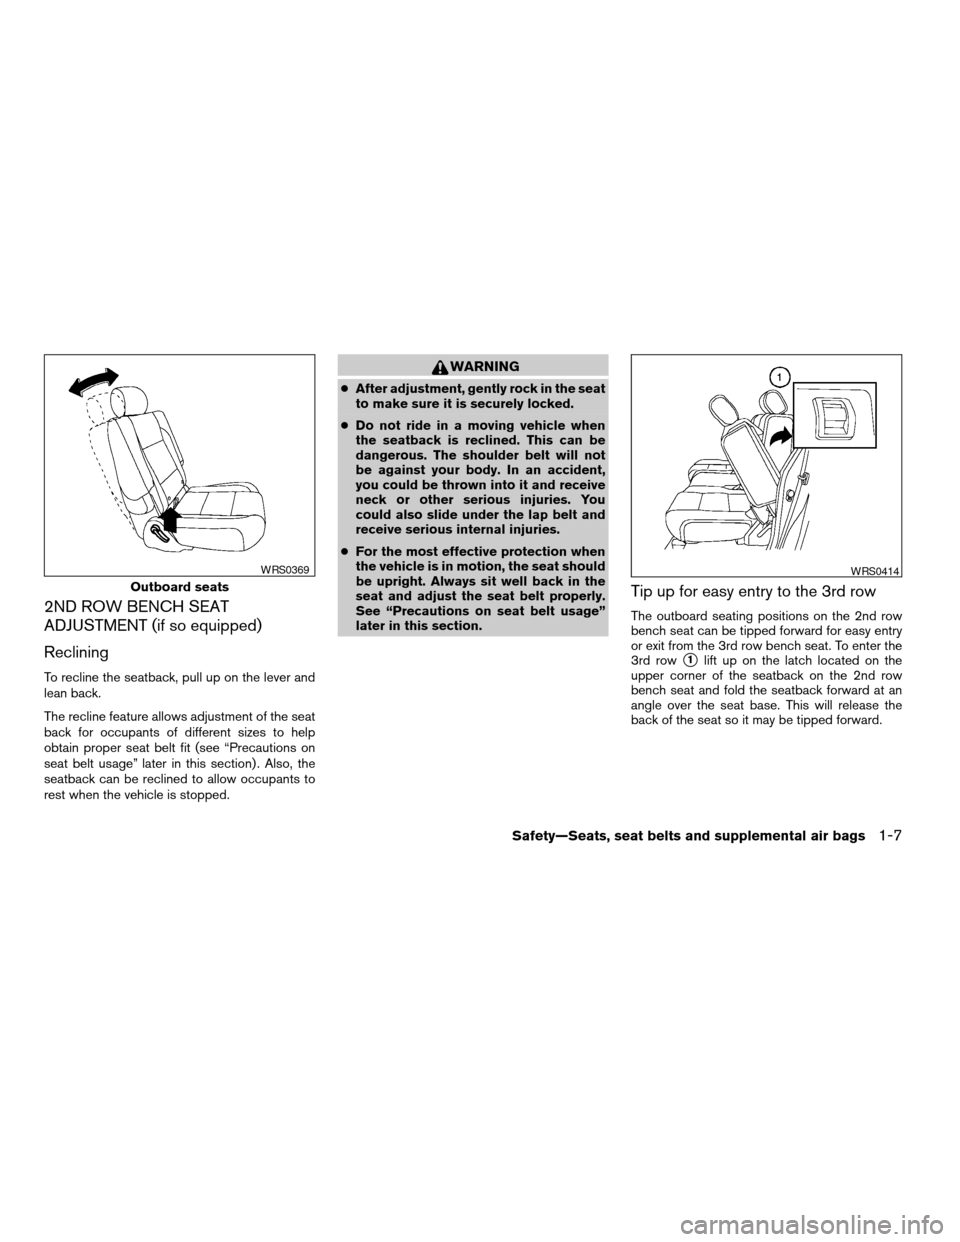
Reclining
To recline the seatback, pull up on the lever and
lean back.
The recline feature allows adjustment of the seat
back for occupants of different sizes to help
obtain proper seat belt fit (see “Precautions on
seat belt usage” later in this section) . Also, the
seatback can be reclined to allow occupants to
rest when the vehicle is stopped.
WARNING
cAfter adjustment, gently rock in the seat
to make sure it is securely locked.
cDo not ride in a moving vehicle when
the seatback is reclined. This can be
dangerous. The shoulder belt will not
be against your body. In an accident,
you could be thrown into it and receive
neck or other serious injuries. You
could also slide under the lap belt and
receive serious internal injuries.
cFor the most effective protection when
the vehicle is in motion, the seat should
be upright. Always sit well back in the
seat and adjust the seat belt properly.
See “Precautions on seat belt usage”
later in this section.
Tip up for easy entry to the 3rd row
The outboard seating positions on the 2nd row
bench seat can be tipped forward for easy entry
or exit from the 3rd row bench seat. To enter the
3rd row
s1lift up on the latch located on the
upper corner of the seatback on the 2nd row
bench seat and fold the seatback forward at an
angle over the seat base. This will release the
back of the seat so it may be tipped forward.
Outboard seats
WRS0369WRS0414
Safety—Seats, seat belts and supplemental air bags1-7
ZREVIEW COPY:Ð2004 Pathfinder Armada
(wzw)
Owners Manual(owners)ÐUSA English(nna)
01/14/04Ðtbrooks
X
Page 24 of 344
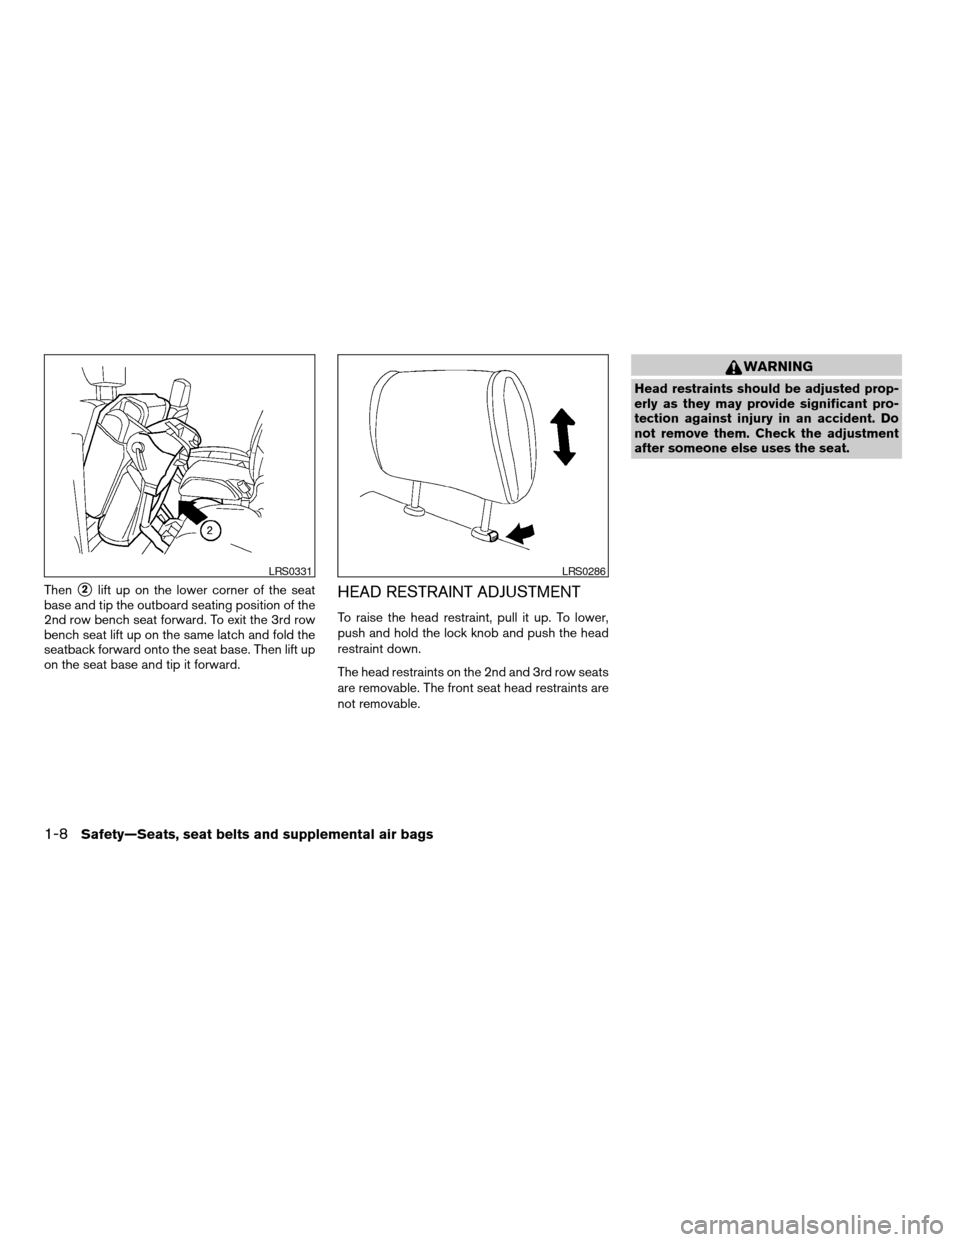
Thens2lift up on the lower corner of the seat
base and tip the outboard seating position of the
2nd row bench seat forward. To exit the 3rd row
bench seat lift up on the same latch and fold the
seatback forward onto the seat base. Then lift up
on the seat base and tip it forward.HEAD RESTRAINT ADJUSTMENT
To raise the head restraint, pull it up. To lower,
push and hold the lock knob and push the head
restraint down.
The head restraints on the 2nd and 3rd row seats
are removable. The front seat head restraints are
not removable.
WARNING
Head restraints should be adjusted prop-
erly as they may provide significant pro-
tection against injury in an accident. Do
not remove them. Check the adjustment
after someone else uses the seat.
LRS0331LRS0286
1-8Safety—Seats, seat belts and supplemental air bags
ZREVIEW COPY:Ð2004 Pathfinder Armada
(wzw)
Owners Manual(owners)ÐUSA English(nna)
01/14/04Ðtbrooks
X
Page 25 of 344
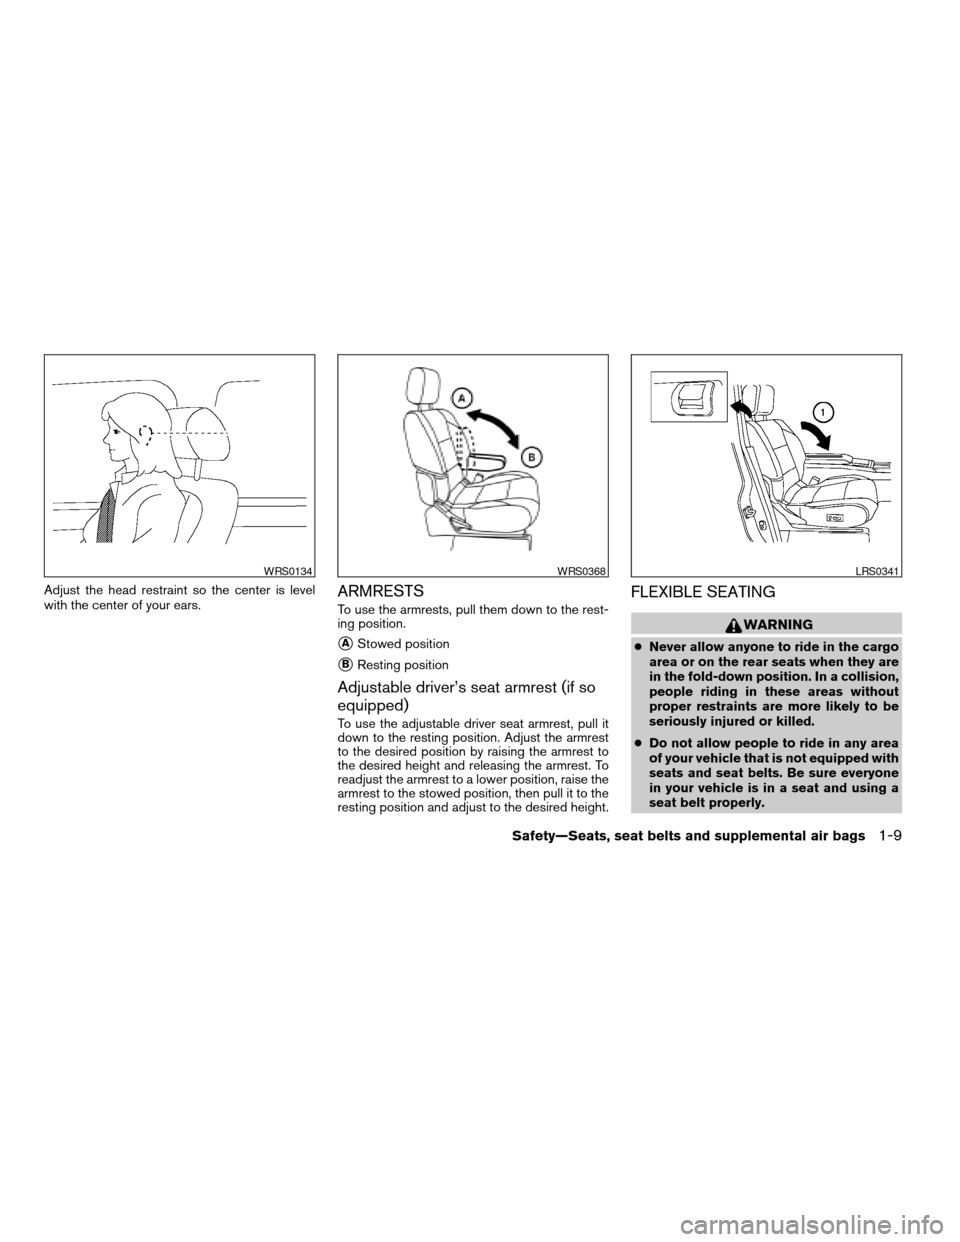
Adjust the head restraint so the center is level
with the center of your ears.ARMRESTS
To use the armrests, pull them down to the rest-
ing position.
sAStowed position
sBResting position
Adjustable driver’s seat armrest (if so
equipped)
To use the adjustable driver seat armrest, pull it
down to the resting position. Adjust the armrest
to the desired position by raising the armrest to
the desired height and releasing the armrest. To
readjust the armrest to a lower position, raise the
armrest to the stowed position, then pull it to the
resting position and adjust to the desired height.
FLEXIBLE SEATING
WARNING
cNever allow anyone to ride in the cargo
area or on the rear seats when they are
in the fold-down position. In a collision,
people riding in these areas without
proper restraints are more likely to be
seriously injured or killed.
cDo not allow people to ride in any area
of your vehicle that is not equipped with
seats and seat belts. Be sure everyone
in your vehicle is in a seat and using a
seat belt properly.
WRS0134WRS0368LRS0341
Safety—Seats, seat belts and supplemental air bags1-9
ZREVIEW COPY:Ð2004 Pathfinder Armada
(wzw)
Owners Manual(owners)ÐUSA English(nna)
02/02/04Ðmarlene
X
Page 26 of 344
cDo not fold down the rear seats when
occupants are in the rear seat area or
any luggage is on the rear seats.
cHead restraints should be adjusted
properly as they may provide significant
protection against injury in an accident.
Always replace and adjust them prop-
erly if they have been removed for any
reason.
cIf the head restraints are removed for
any reason, they should be securely
stored to prevent them from causing
injury to passengers or damage to the
vehicle in case of sudden braking or an
accident.
cWhen returning the seatbacks to the
upright position, be certain they are
completely secured in the latched posi-
tion. If they are not completely secured,
passengers may be injured in an acci-
dent or sudden stop.
cProperly secure all cargo to help pre-
vent it from sliding or shifting. Do not
place cargo higher than the seatbacks.
In a sudden stop or collision, unsecured
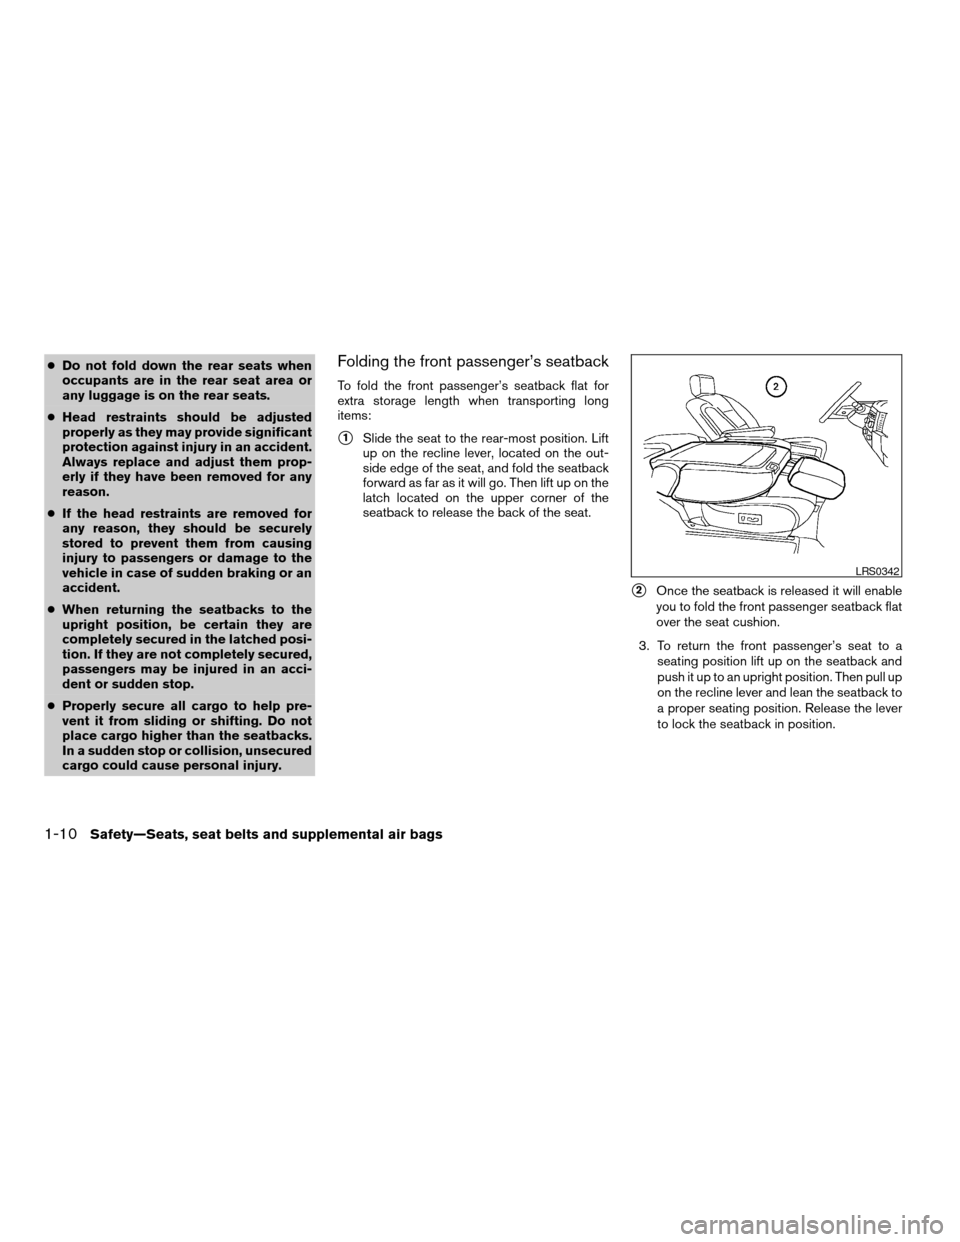
cargo could cause personal injury.Folding the front passenger’s seatback
To fold the front passenger’s seatback flat for
extra storage length when transporting long
items:
s1Slide the seat to the rear-most position. Lift
up on the recline lever, located on the out-
side edge of the seat, and fold the seatback
forward as far as it will go. Then lift up on the
latch located on the upper corner of the
seatback to release the back of the seat.
s2Once the seatback is released it will enable
you to fold the front passenger seatback flat
over the seat cushion.
3. To return the front passenger’s seat to a
seating position lift up on the seatback and
push it up to an upright position. Then pull up
on the recline lever and lean the seatback to
a proper seating position. Release the lever
to lock the seatback in position.
LRS0342
1-10Safety—Seats, seat belts and supplemental air bags
ZREVIEW COPY:Ð2004 Pathfinder Armada
(wzw)
Owners Manual(owners)ÐUSA English(nna)
02/02/04Ðmarlene
X
Page 27 of 344
WARNING
cIf you fold the front passenger’s seat-
back flat forward to carry longer ob-
jects, be sure this cargo is properly se-
cured and not near an air bag. In a
crash, an inflating air bag might force
that object toward a person. This could
cause severe injury or even death. Se-
cure objects away from the area in
which an air bag would inflate. See
“Precautions on supplemental restraint
system” later in this section.
cNever allow anyone to ride in the cargo
area or on the front passenger’s seat
when it is in the fold-down position. Use
of these areas by passengers could re-
sult in serious injury in an accident or
sudden stop.
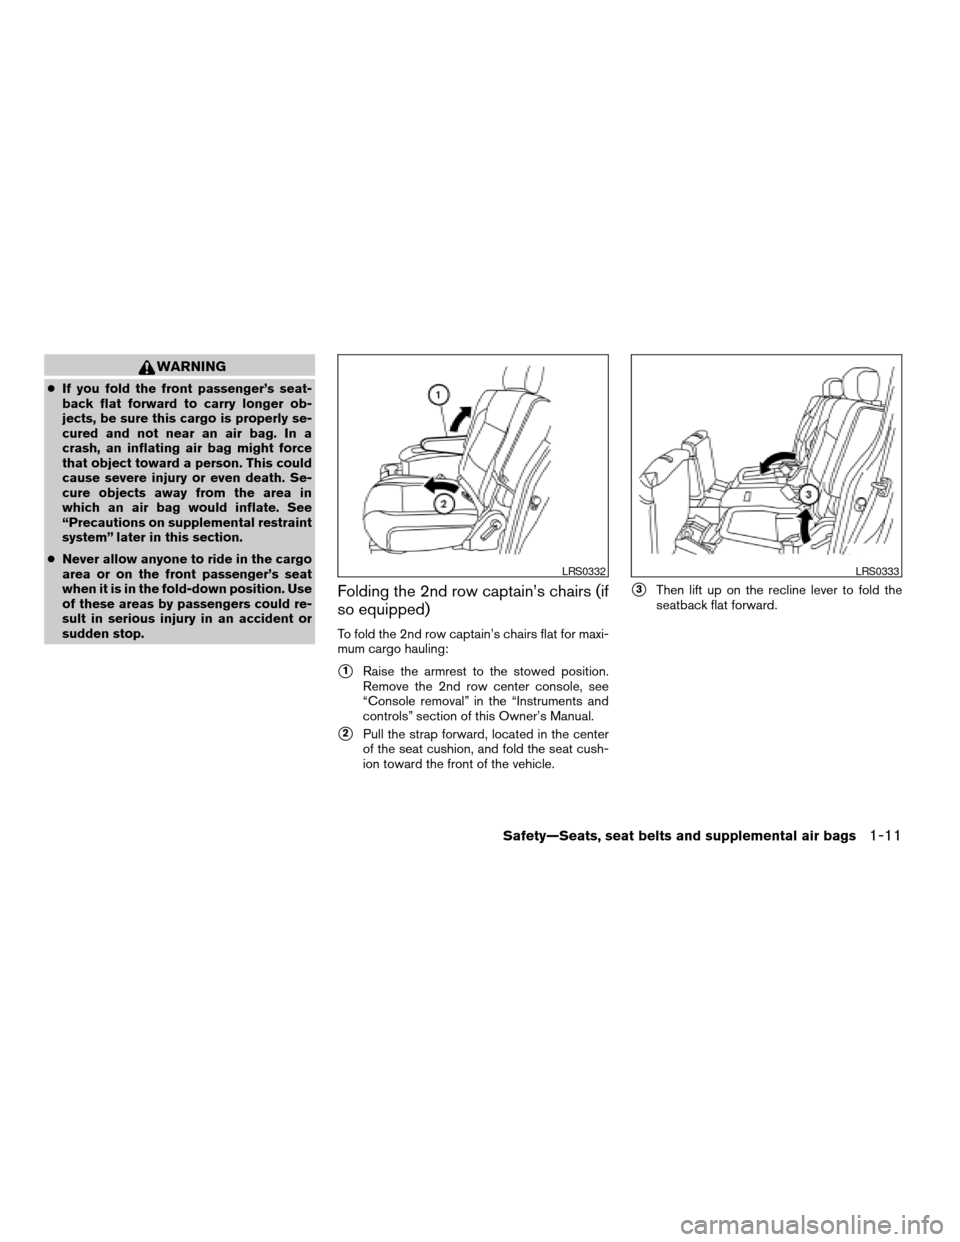
Folding the 2nd row captain’s chairs (if
so equipped)
To fold the 2nd row captain’s chairs flat for maxi-
mum cargo hauling:
s1Raise the armrest to the stowed position.
Remove the 2nd row center console, see
“Console removal” in the “Instruments and
controls” section of this Owner’s Manual.
s2Pull the strap forward, located in the center
of the seat cushion, and fold the seat cush-
ion toward the front of the vehicle.
s3Then lift up on the recline lever to fold the
seatback flat forward.
LRS0332LRS0333
Safety—Seats, seat belts and supplemental air bags1-11
ZREVIEW COPY:Ð2004 Pathfinder Armada
(wzw)
Owners Manual(owners)ÐUSA English(nna)
02/02/04Ðmarlene
X
Page 28 of 344
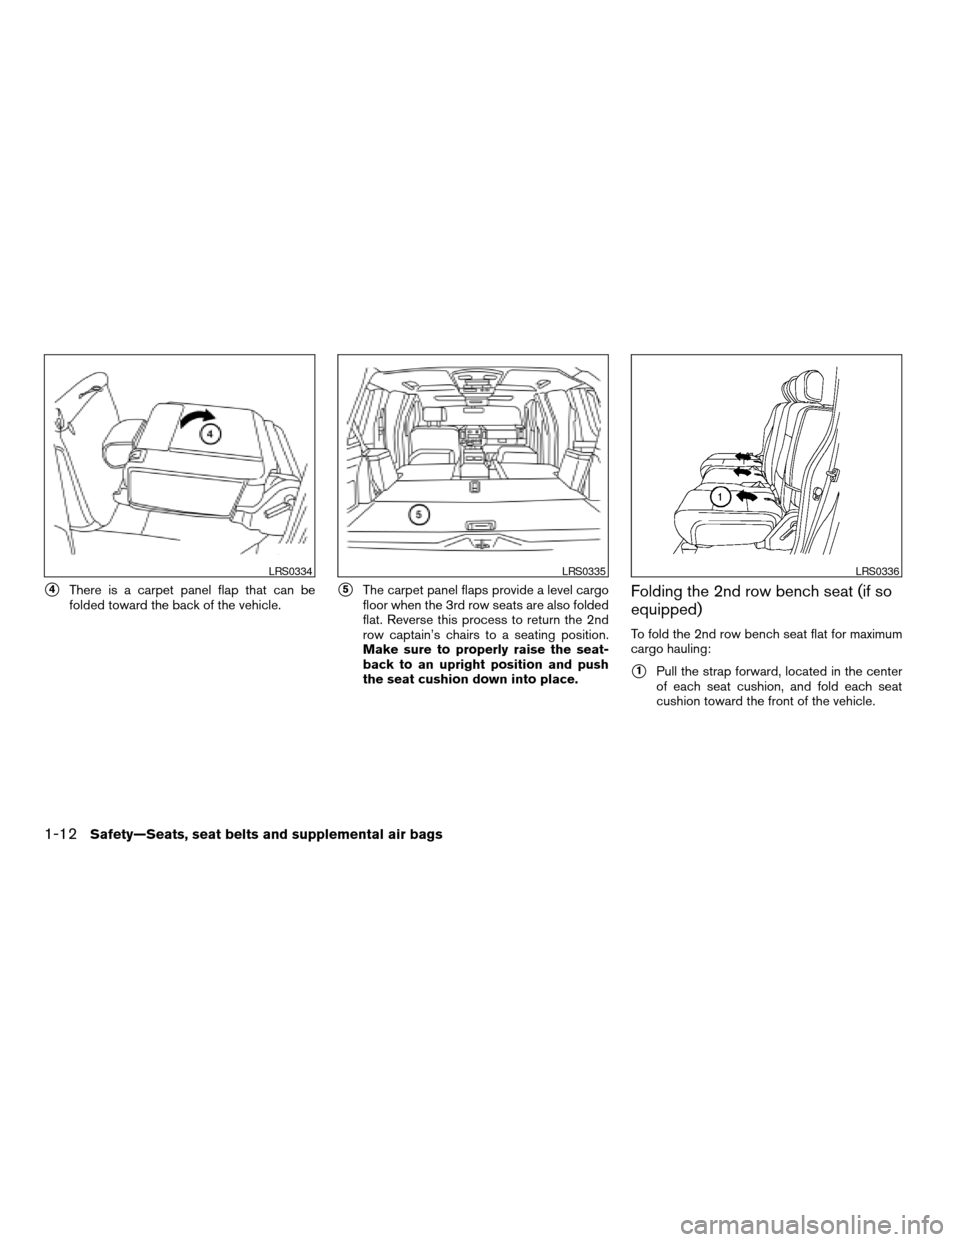
s4There is a carpet panel flap that can be
folded toward the back of the vehicle.s5The carpet panel flaps provide a level cargo
floor when the 3rd row seats are also folded
flat. Reverse this process to return the 2nd
row captain’s chairs to a seating position.
Make sure to properly raise the seat-
back to an upright position and push
the seat cushion down into place.Folding the 2nd row bench seat (if so
equipped)
To fold the 2nd row bench seat flat for maximum
cargo hauling:
s1Pull the strap forward, located in the center
of each seat cushion, and fold each seat
cushion toward the front of the vehicle.
LRS0334LRS0335LRS0336
1-12Safety—Seats, seat belts and supplemental air bags
ZREVIEW COPY:Ð2004 Pathfinder Armada
(wzw)
Owners Manual(owners)ÐUSA English(nna)
02/02/04Ðmarlene
X
Page 29 of 344

s2Then lift up on the recline lever on the side of
the outboard seats to fold the outboard seat-
backs flat. To fold the center seatback flat,
pull up on the strap on the edge of the center
seat cushion and fold the seatback toward
the front of the vehicle.s3There is a carpet panel flap on the back of
each seat that can be folded toward the
back of the vehicles4The carpet panel flap provides a level cargo
floor when the 3rd row seats are also folded
flat.
5. To return the outboard 2nd row bench seats
to a seating position reverse the process for
the outboard seats.
6. To return the center seat to a seating posi-
tion, lift up on the pull strap on the back of
the seat base while lifting on the seatback.
Then push the seat cushion back into place.
Make sure to properly raise the seat-
back to an upright position and push
the seat cushion down into place.
LRS0337LRS0338LRS0339
Safety—Seats, seat belts and supplemental air bags1-13
ZREVIEW COPY:Ð2004 Pathfinder Armada
(wzw)
Owners Manual(owners)ÐUSA English(nna)
01/14/04Ðtbrooks
X
Page 30 of 344
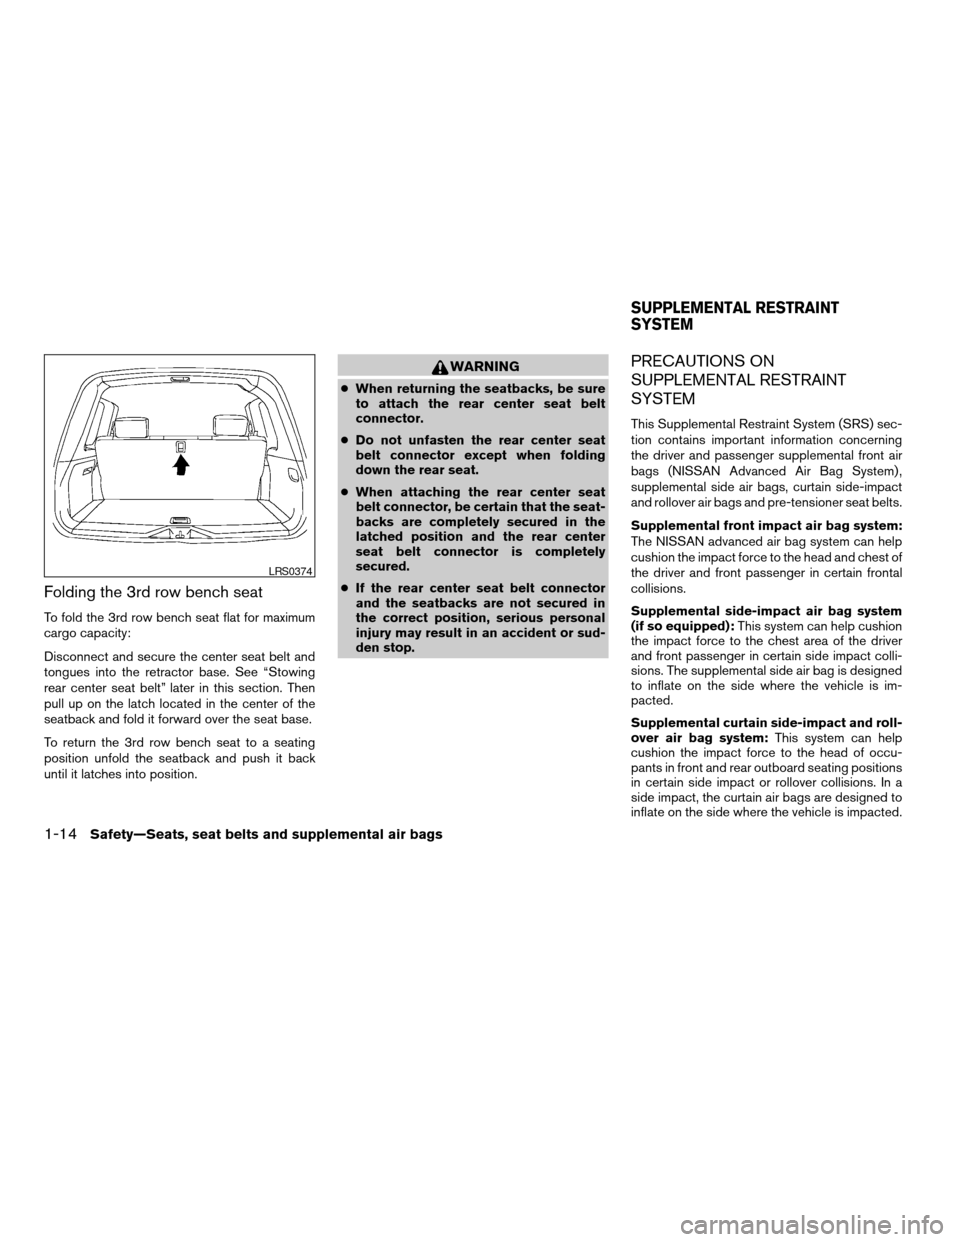
Folding the 3rd row bench seat
To fold the 3rd row bench seat flat for maximum
cargo capacity:
Disconnect and secure the center seat belt and
tongues into the retractor base. See “Stowing
rear center seat belt” later in this section. Then
pull up on the latch located in the center of the
seatback and fold it forward over the seat base.
To return the 3rd row bench seat to a seating
position unfold the seatback and push it back
until it latches into position.
WARNING
cWhen returning the seatbacks, be sure
to attach the rear center seat belt
connector.
cDo not unfasten the rear center seat
belt connector except when folding
down the rear seat.
cWhen attaching the rear center seat
belt connector, be certain that the seat-
backs are completely secured in the
latched position and the rear center
seat belt connector is completely
secured.
cIf the rear center seat belt connector
and the seatbacks are not secured in
the correct position, serious personal
injury may result in an accident or sud-
den stop.
PRECAUTIONS ON
SUPPLEMENTAL RESTRAINT
SYSTEM
This Supplemental Restraint System (SRS) sec-
tion contains important information concerning
the driver and passenger supplemental front air
bags (NISSAN Advanced Air Bag System) ,
supplemental side air bags, curtain side-impact
and rollover air bags and pre-tensioner seat belts.
Supplemental front impact air bag system:
The NISSAN advanced air bag system can help
cushion the impact force to the head and chest of
the driver and front passenger in certain frontal
collisions.
Supplemental side-impact air bag system
(if so equipped):This system can help cushion
the impact force to the chest area of the driver
and front passenger in certain side impact colli-
sions. The supplemental side air bag is designed
to inflate on the side where the vehicle is im-
pacted.
Supplemental curtain side-impact and roll-
over air bag system:This system can help
cushion the impact force to the head of occu-
pants in front and rear outboard seating positions
in certain side impact or rollover collisions. In a
side impact, the curtain air bags are designed to
inflate on the side where the vehicle is impacted.
LRS0374
SUPPLEMENTAL RESTRAINT
SYSTEM
1-14Safety—Seats, seat belts and supplemental air bags
ZREVIEW COPY:Ð2004 Pathfinder Armada
(wzw)
Owners Manual(owners)ÐUSA English(nna)
01/14/04Ðtbrooks
X