seat adjustment NISSAN ARMADA 2006 1.G User Guide
[x] Cancel search | Manufacturer: NISSAN, Model Year: 2006, Model line: ARMADA, Model: NISSAN ARMADA 2006 1.GPages: 352, PDF Size: 6.1 MB
Page 42 of 352
WARNING
cDo not unfasten the rear center seat
belt connector except when folding
down the rear seat.
cWhen attaching the rear center seat
belt connector, be certain that the seat-
backs are completely secured in the
latched position and the rear center
seat belt connector is completely
secured.
cIf the rear center seat belt connector
and the seatbacks are not secured in
the correct position, serious personal
injury may result in an accident or sud-
den stop.
Shoulder belt height adjustment (front
and 2nd row outboard seats)
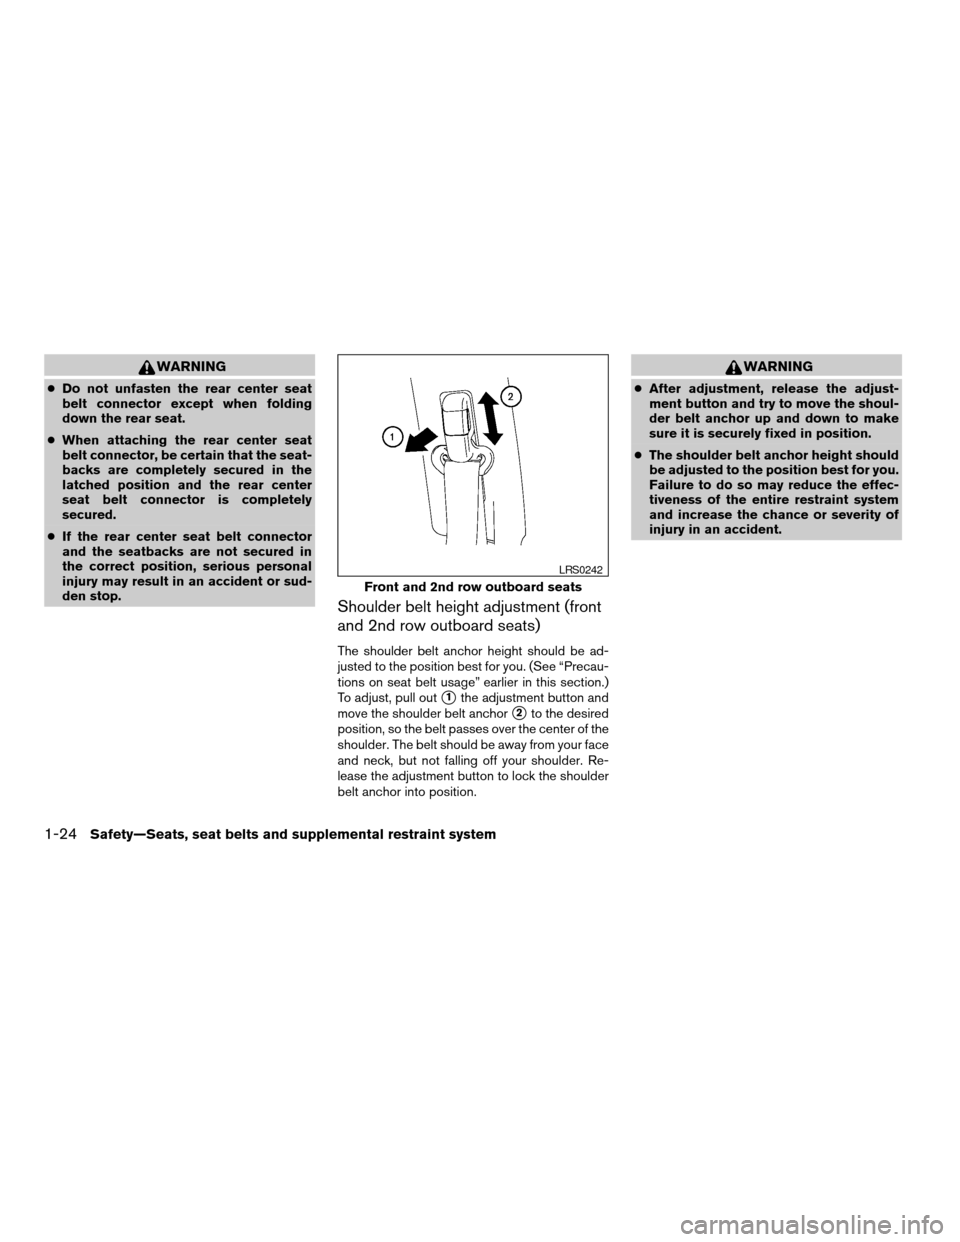
The shoulder belt anchor height should be ad-
justed to the position best for you. (See “Precau-
tions on seat belt usage” earlier in this section.)
To adjust, pull out
s1the adjustment button and
move the shoulder belt anchor
s2to the desired
position, so the belt passes over the center of the
shoulder. The belt should be away from your face
and neck, but not falling off your shoulder. Re-
lease the adjustment button to lock the shoulder
belt anchor into position.
WARNING
cAfter adjustment, release the adjust-
ment button and try to move the shoul-
der belt anchor up and down to make
sure it is securely fixed in position.
cThe shoulder belt anchor height should
be adjusted to the position best for you.
Failure to do so may reduce the effec-
tiveness of the entire restraint system
and increase the chance or severity of
injury in an accident.
Front and 2nd row outboard seats
LRS0242
1-24Safety—Seats, seat belts and supplemental restraint system
ZREVIEW COPYÐ2006 Armada(wzw)
Owners ManualÐUSA_English(nna)
06/15/05Ðdebbie
X
Page 44 of 352
WARNING
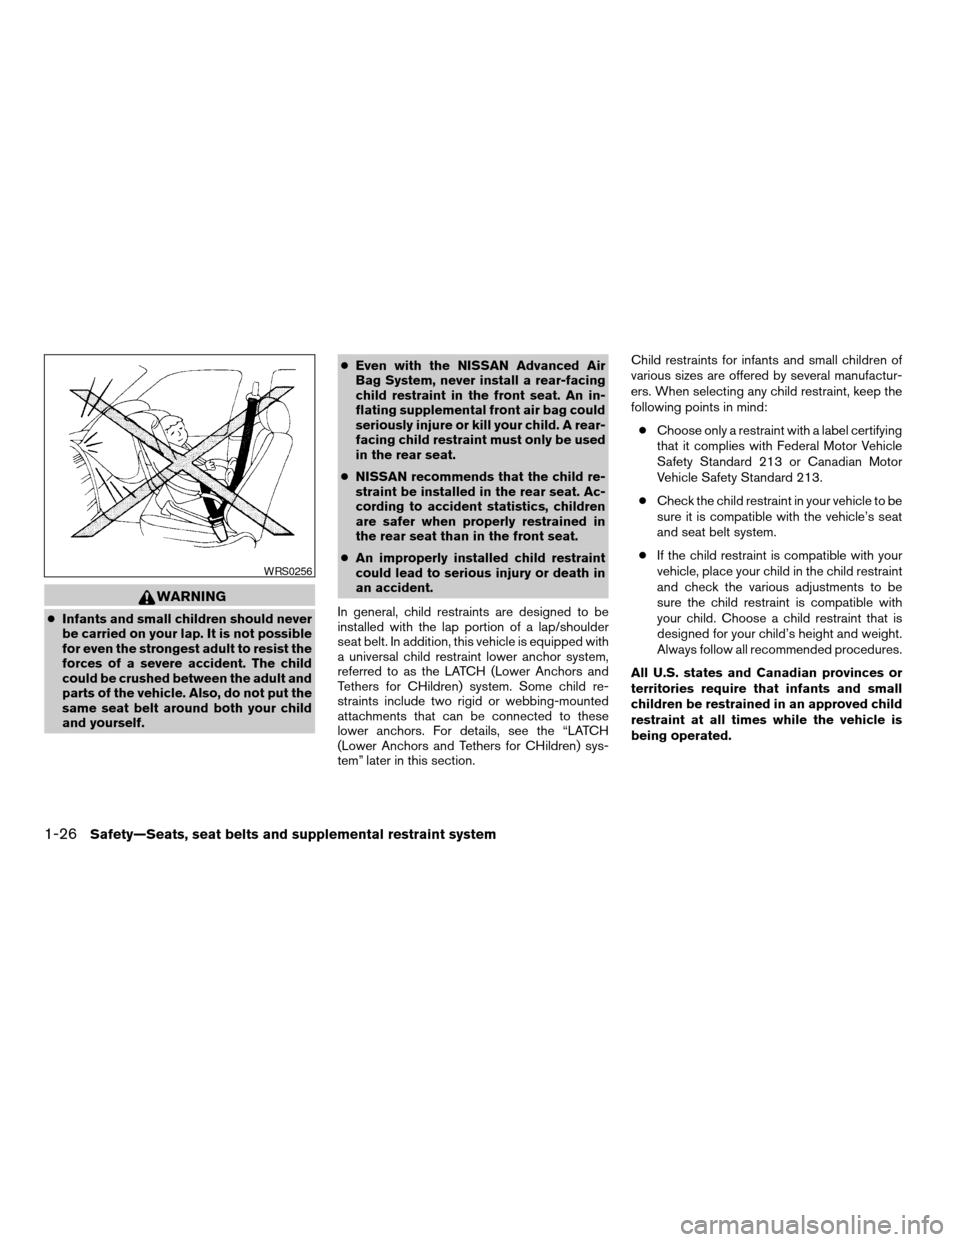
cInfants and small children should never
be carried on your lap. It is not possible
for even the strongest adult to resist the
forces of a severe accident. The child
could be crushed between the adult and
parts of the vehicle. Also, do not put the
same seat belt around both your child
and yourself.cEven with the NISSAN Advanced Air
Bag System, never install a rear-facing
child restraint in the front seat. An in-
flating supplemental front air bag could
seriously injure or kill your child. A rear-
facing child restraint must only be used
in the rear seat.
cNISSAN recommends that the child re-
straint be installed in the rear seat. Ac-
cording to accident statistics, children
are safer when properly restrained in
the rear seat than in the front seat.
cAn improperly installed child restraint
could lead to serious injury or death in
an accident.
In general, child restraints are designed to be
installed with the lap portion of a lap/shoulder
seat belt. In addition, this vehicle is equipped with
a universal child restraint lower anchor system,
referred to as the LATCH (Lower Anchors and
Tethers for CHildren) system. Some child re-
straints include two rigid or webbing-mounted
attachments that can be connected to these
lower anchors. For details, see the “LATCH
(Lower Anchors and Tethers for CHildren) sys-
tem” later in this section.Child restraints for infants and small children of
various sizes are offered by several manufactur-
ers. When selecting any child restraint, keep the
following points in mind:
cChoose only a restraint with a label certifying
that it complies with Federal Motor Vehicle
Safety Standard 213 or Canadian Motor
Vehicle Safety Standard 213.
cCheck the child restraint in your vehicle to be
sure it is compatible with the vehicle’s seat
and seat belt system.
cIf the child restraint is compatible with your
vehicle, place your child in the child restraint
and check the various adjustments to be
sure the child restraint is compatible with
your child. Choose a child restraint that is
designed for your child’s height and weight.
Always follow all recommended procedures.
All U.S. states and Canadian provinces or
territories require that infants and small
children be restrained in an approved child
restraint at all times while the vehicle is
being operated.
WRS0256
1-26Safety—Seats, seat belts and supplemental restraint system
ZREVIEW COPYÐ2006 Armada(wzw)
Owners ManualÐUSA_English(nna)
06/15/05Ðdebbie
X
Page 46 of 352
Front facing
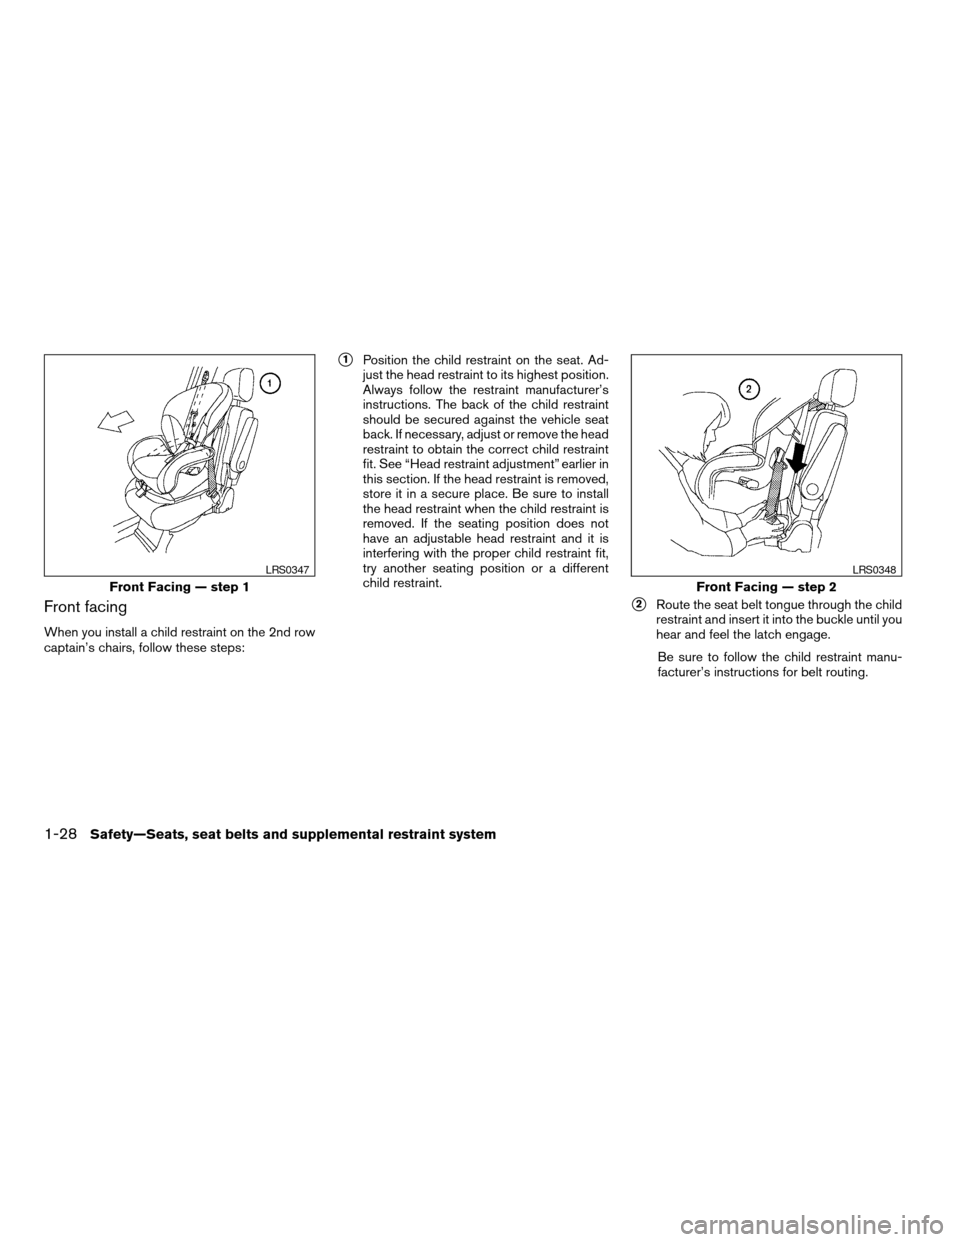
When you install a child restraint on the 2nd row
captain’s chairs, follow these steps:
s1Position the child restraint on the seat. Ad-
just the head restraint to its highest position.
Always follow the restraint manufacturer’s
instructions. The back of the child restraint
should be secured against the vehicle seat
back. If necessary, adjust or remove the head
restraint to obtain the correct child restraint
fit. See “Head restraint adjustment” earlier in
this section. If the head restraint is removed,
store it in a secure place. Be sure to install
the head restraint when the child restraint is
removed. If the seating position does not
have an adjustable head restraint and it is
interfering with the proper child restraint fit,
try another seating position or a different
child restraint.
s2Route the seat belt tongue through the child
restraint and insert it into the buckle until you
hear and feel the latch engage.
Be sure to follow the child restraint manu-
facturer’s instructions for belt routing.
Front Facing — step 1
LRS0347
Front Facing — step 2
LRS0348
1-28Safety—Seats, seat belts and supplemental restraint system
ZREVIEW COPYÐ2006 Armada(wzw)
Owners ManualÐUSA_English(nna)
06/15/05Ðdebbie
X
Page 51 of 352
Front facing
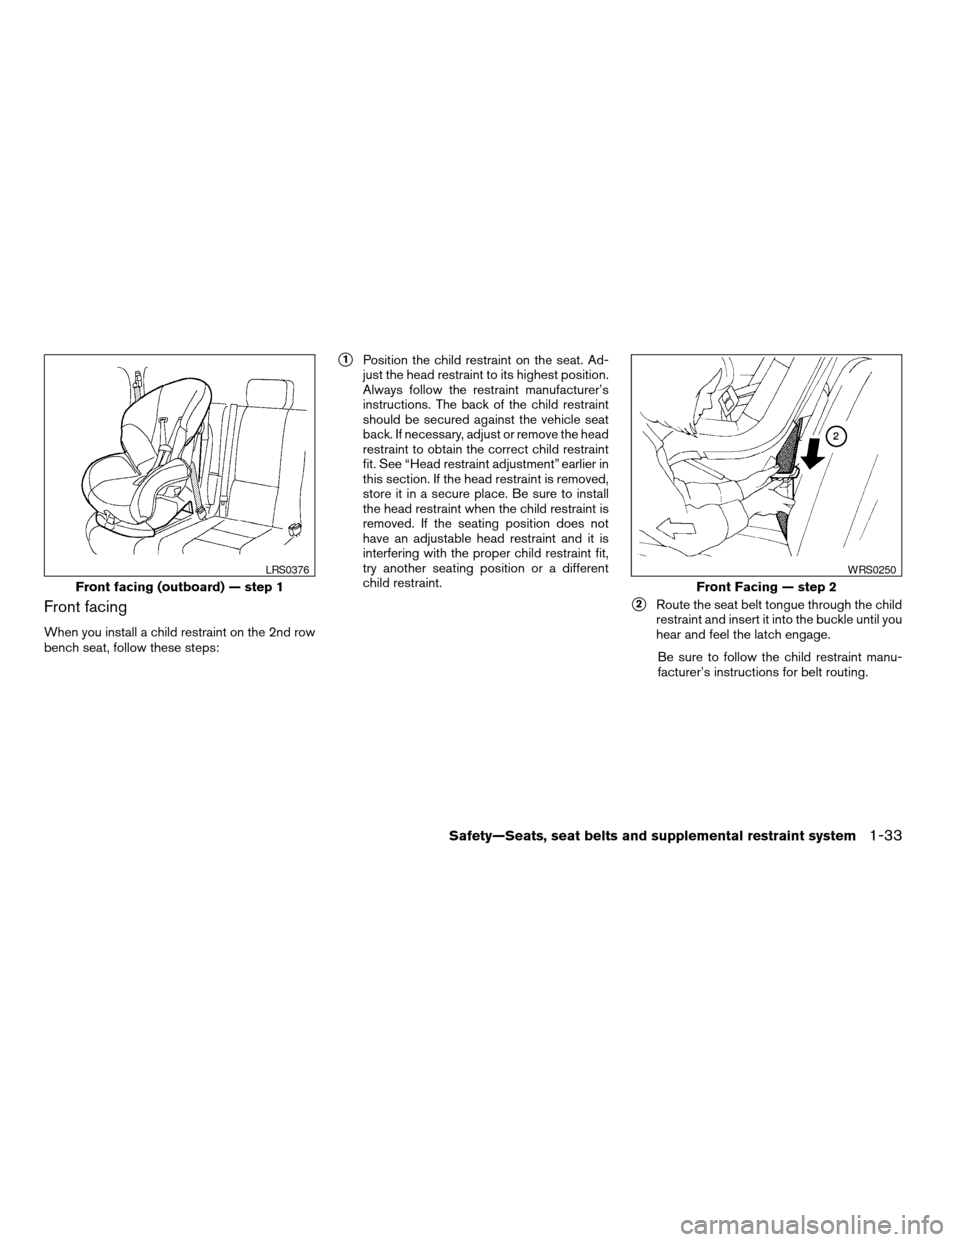
When you install a child restraint on the 2nd row
bench seat, follow these steps:
s1Position the child restraint on the seat. Ad-
just the head restraint to its highest position.
Always follow the restraint manufacturer’s
instructions. The back of the child restraint
should be secured against the vehicle seat
back. If necessary, adjust or remove the head
restraint to obtain the correct child restraint
fit. See “Head restraint adjustment” earlier in
this section. If the head restraint is removed,
store it in a secure place. Be sure to install
the head restraint when the child restraint is
removed. If the seating position does not
have an adjustable head restraint and it is
interfering with the proper child restraint fit,
try another seating position or a different
child restraint.
s2Route the seat belt tongue through the child
restraint and insert it into the buckle until you
hear and feel the latch engage.
Be sure to follow the child restraint manu-
facturer’s instructions for belt routing.
Front facing (outboard) — step 1
LRS0376
Front Facing — step 2
WRS0250
Safety—Seats, seat belts and supplemental restraint system1-33
ZREVIEW COPYÐ2006 Armada(wzw)
Owners ManualÐUSA_English(nna)
06/15/05Ðdebbie
X
Page 56 of 352
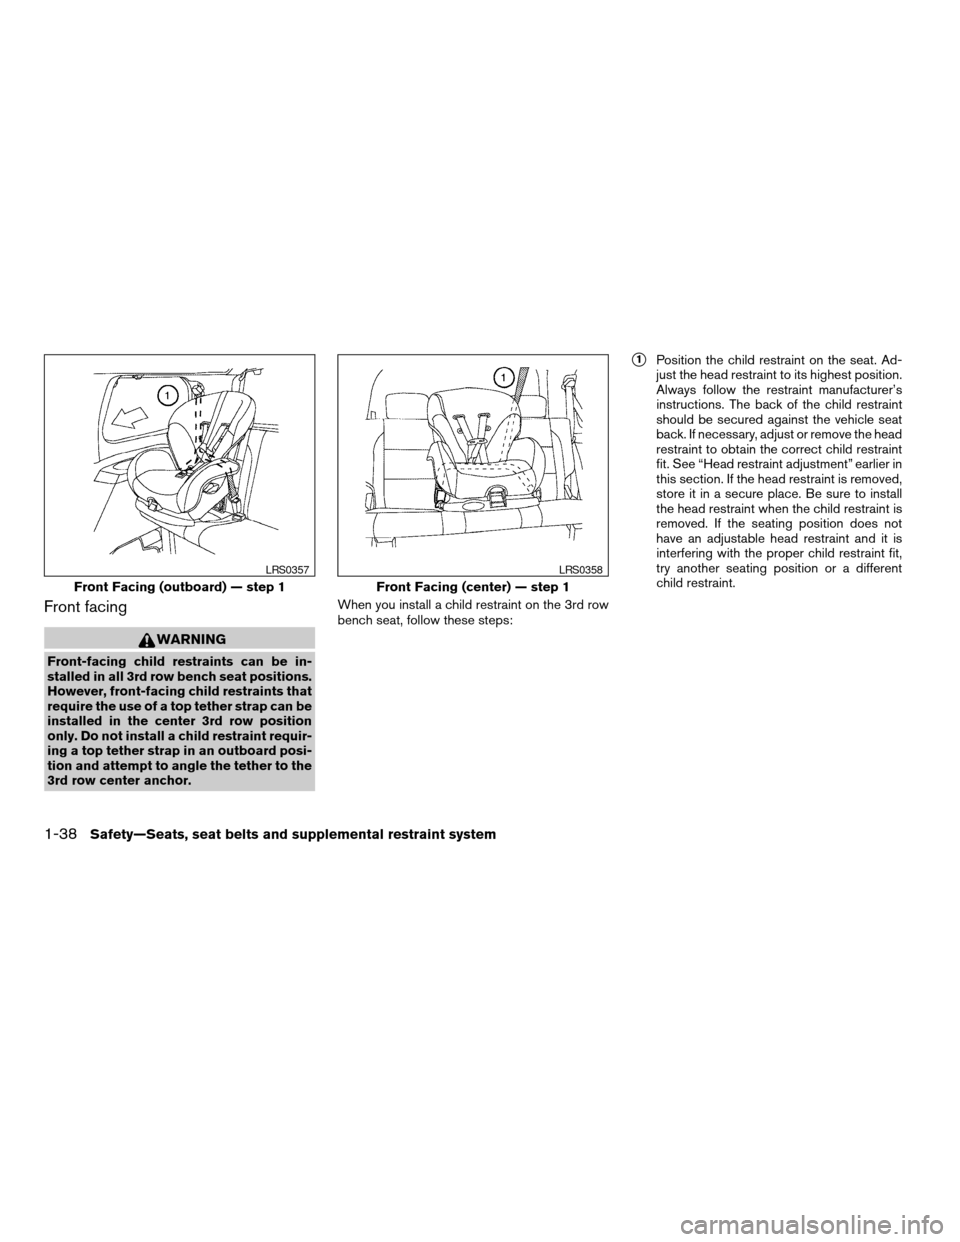
Front facing
WARNING
Front-facing child restraints can be in-
stalled in all 3rd row bench seat positions.
However, front-facing child restraints that
require the use of a top tether strap can be
installed in the center 3rd row position
only. Do not install a child restraint requir-
ing a top tether strap in an outboard posi-
tion and attempt to angle the tether to the
3rd row center anchor.When you install a child restraint on the 3rd row
bench seat, follow these steps:
s1Position the child restraint on the seat. Ad-
just the head restraint to its highest position.
Always follow the restraint manufacturer’s
instructions. The back of the child restraint
should be secured against the vehicle seat
back. If necessary, adjust or remove the head
restraint to obtain the correct child restraint
fit. See “Head restraint adjustment” earlier in
this section. If the head restraint is removed,
store it in a secure place. Be sure to install
the head restraint when the child restraint is
removed. If the seating position does not
have an adjustable head restraint and it is
interfering with the proper child restraint fit,
try another seating position or a different
child restraint.
Front Facing (outboard) — step 1
LRS0357
Front Facing (center) — step 1
LRS0358
1-38Safety—Seats, seat belts and supplemental restraint system
ZREVIEW COPYÐ2006 Armada(wzw)
Owners ManualÐUSA_English(nna)
06/15/05Ðdebbie
X
Page 67 of 352

If you must install a child restraint in the front seat,
follow these steps:
s1Position the child restraint on the front pas-
senger seat.It should be placed in a
front-facing direction only. Move the
seat to the rearmost position.Adjust the
head restraint to its highest position. Always
follow the child restraint manufacturer’s in-
structions.Child restraints for infants
must be used in the rear-facing direc-
tion and therefore must not be used in
the front seat.The back of the child restraint should be
secured against the vehicle seat back. If
necessary, adjust or remove the head re-
straint to obtain the correct child restraint fit.
See “Head restraint adjustment” earlier in
this section. If the head restraint is removed,
store it in a secure place. Be sure to install
the head restraint when the child restraint is
removed. If the seating position does not
have an adjustable head restraint and it is
interfering with the proper child restraint fit,
try another seating position or a different
child restraint.
s2Route the seat belt tongue through the child
restraint and insert it into the buckle until you
hear and feel the latch engage.
Be sure to follow the child restraint manu-
facturer’s instructions for belt routing.
Front Facing — step 1WRS0379
Front Facing — step 2
WRS0159
Safety—Seats, seat belts and supplemental restraint system1-49
ZREVIEW COPYÐ2006 Armada(wzw)
Owners ManualÐUSA_English(nna)
06/15/05Ðdebbie
X
Page 70 of 352
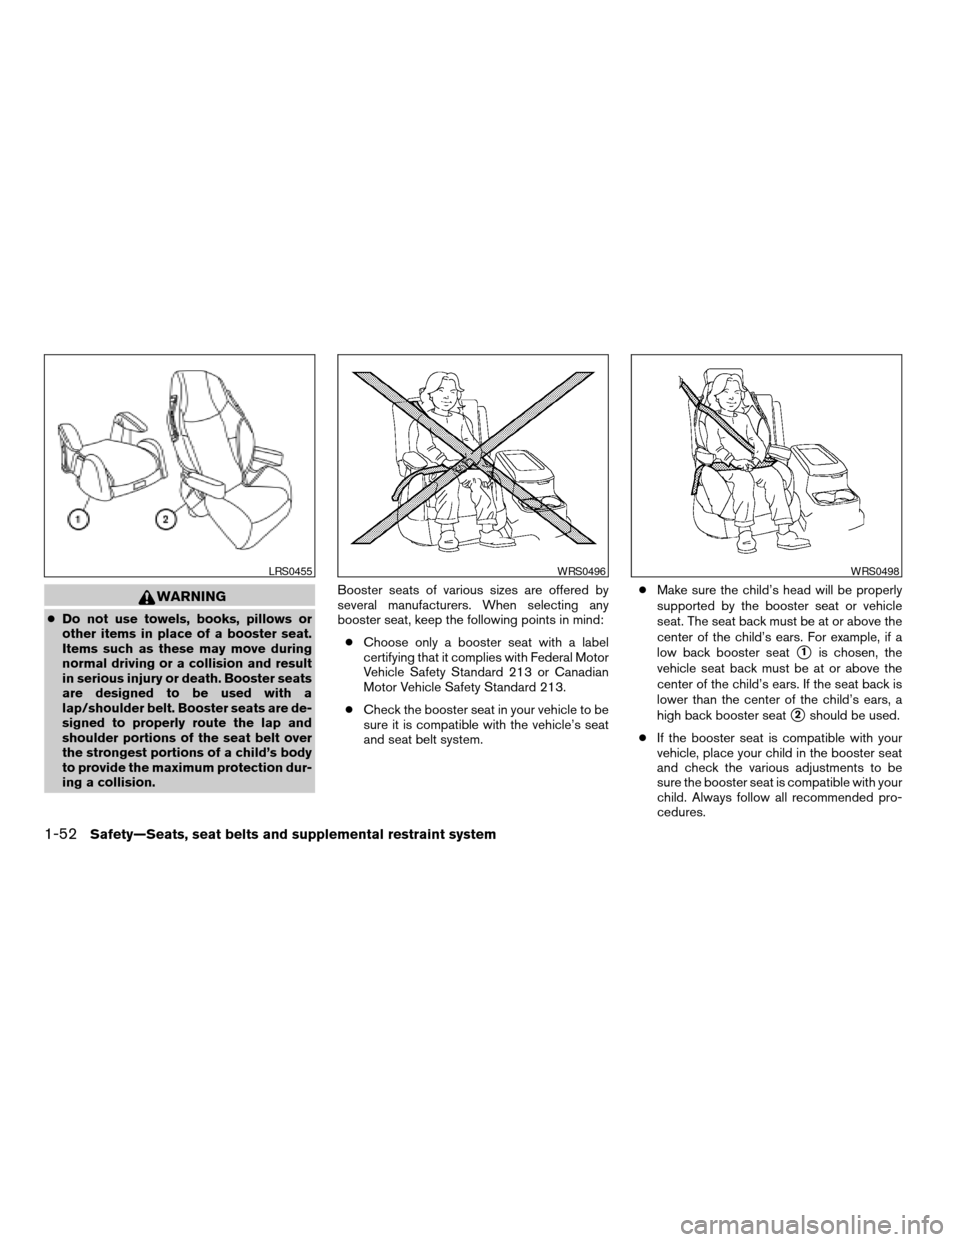
WARNING
cDo not use towels, books, pillows or
other items in place of a booster seat.
Items such as these may move during
normal driving or a collision and result
in serious injury or death. Booster seats
are designed to be used with a
lap/shoulder belt. Booster seats are de-
signed to properly route the lap and
shoulder portions of the seat belt over
the strongest portions of a child’s body
to provide the maximum protection dur-
ing a collision.Booster seats of various sizes are offered by
several manufacturers. When selecting any
booster seat, keep the following points in mind:
cChoose only a booster seat with a label
certifying that it complies with Federal Motor
Vehicle Safety Standard 213 or Canadian
Motor Vehicle Safety Standard 213.
cCheck the booster seat in your vehicle to be
sure it is compatible with the vehicle’s seat
and seat belt system.cMake sure the child’s head will be properly
supported by the booster seat or vehicle
seat. The seat back must be at or above the
center of the child’s ears. For example, if a
low back booster seat
s1is chosen, the
vehicle seat back must be at or above the
center of the child’s ears. If the seat back is
lower than the center of the child’s ears, a
high back booster seat
s2should be used.
cIf the booster seat is compatible with your
vehicle, place your child in the booster seat
and check the various adjustments to be
sure the booster seat is compatible with your
child. Always follow all recommended pro-
cedures.
LRS0455WRS0496WRS0498
1-52Safety—Seats, seat belts and supplemental restraint system
ZREVIEW COPYÐ2006 Armada(wzw)
Owners ManualÐUSA_English(nna)
06/15/05Ðdebbie
X
Page 72 of 352
2. The booster seat should be positioned on
the vehicle seat so that it is stable. If neces-
sary, adjust or remove the head restraint to
obtain the correct booster seat fit. See
“Head restraint adjustment” earlier in this
section. If the head restraint is removed,
store it in a secure place. Be sure to install
the head restraint when the booster seat is
removed. If the seating position does not
have an adjustable head restraint and it is
interfering with the proper booster seat fit,
try another seating position or a different
booster seat.
3. Position the lap portion of the seat belt low
and snug on the child’s hips. Be sure to
follow the booster seat manufacturer’s in-
structions for adjusting the belt routing.
4. Pull the shoulder belt portion of the seat belt
toward the retractor to take up extra slack.
Be sure the shoulder belt is positioned
across the top, middle portion of the child’s
shoulder. Be sure to follow the booster seat
manufacturer’s instructions for adjusting the
belt routing.
5. Follow the warnings, cautions and instruc-
tions for properly fastening a seat belt
shown in the “Three-point seat belt with
retractor” earlier in this section.
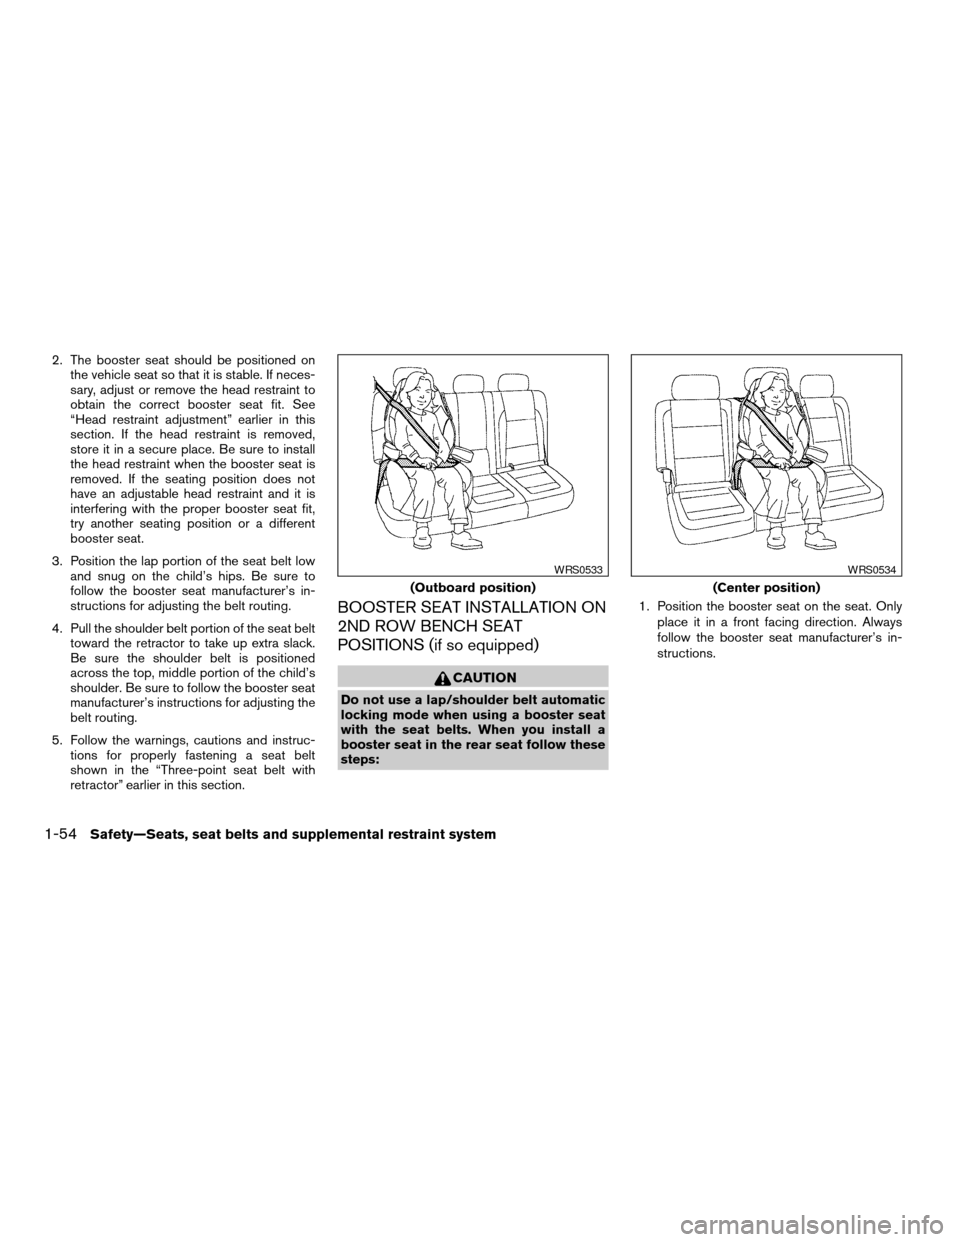
BOOSTER SEAT INSTALLATION ON
2ND ROW BENCH SEAT
POSITIONS (if so equipped)
CAUTION
Do not use a lap/shoulder belt automatic
locking mode when using a booster seat
with the seat belts. When you install a
booster seat in the rear seat follow these
steps:1. Position the booster seat on the seat. Only
place it in a front facing direction. Always
follow the booster seat manufacturer’s in-
structions.
(Outboard position)
WRS0533
(Center position)
WRS0534
1-54Safety—Seats, seat belts and supplemental restraint system
ZREVIEW COPYÐ2006 Armada(wzw)
Owners ManualÐUSA_English(nna)
06/15/05Ðdebbie
X
Page 73 of 352
2. The booster seat should be positioned on
the vehicle seat so that it is stable. If neces-
sary, adjust or remove the head restraint to
obtain the correct booster seat fit. See
“Head restraint adjustment” earlier in this
section. If the head restraint is removed,
store it in a secure place. Be sure to install
the head restraint when the booster seat is
removed. If the seating position does not
have an adjustable head restraint and it is
interfering with the proper booster seat fit,
try another seating position or a different
booster seat.
3. Position the lap portion of the seat belt low
and snug on the child’s hips. Be sure to
follow the booster seat manufacturer’s in-
structions for adjusting the belt routing.
4. Pull the shoulder belt portion of the seat belt
toward the retractor to take up extra slack.
Be sure the shoulder belt is positioned
across the top, middle portion of the child’s
shoulder. Be sure to follow the booster seat
manufacturer’s instructions for adjusting the
belt routing.
5. Follow the warnings, cautions and instruc-
tions for properly fastening a seat belt
shown in the “Three-point seat belt with
retractor” earlier in this section.
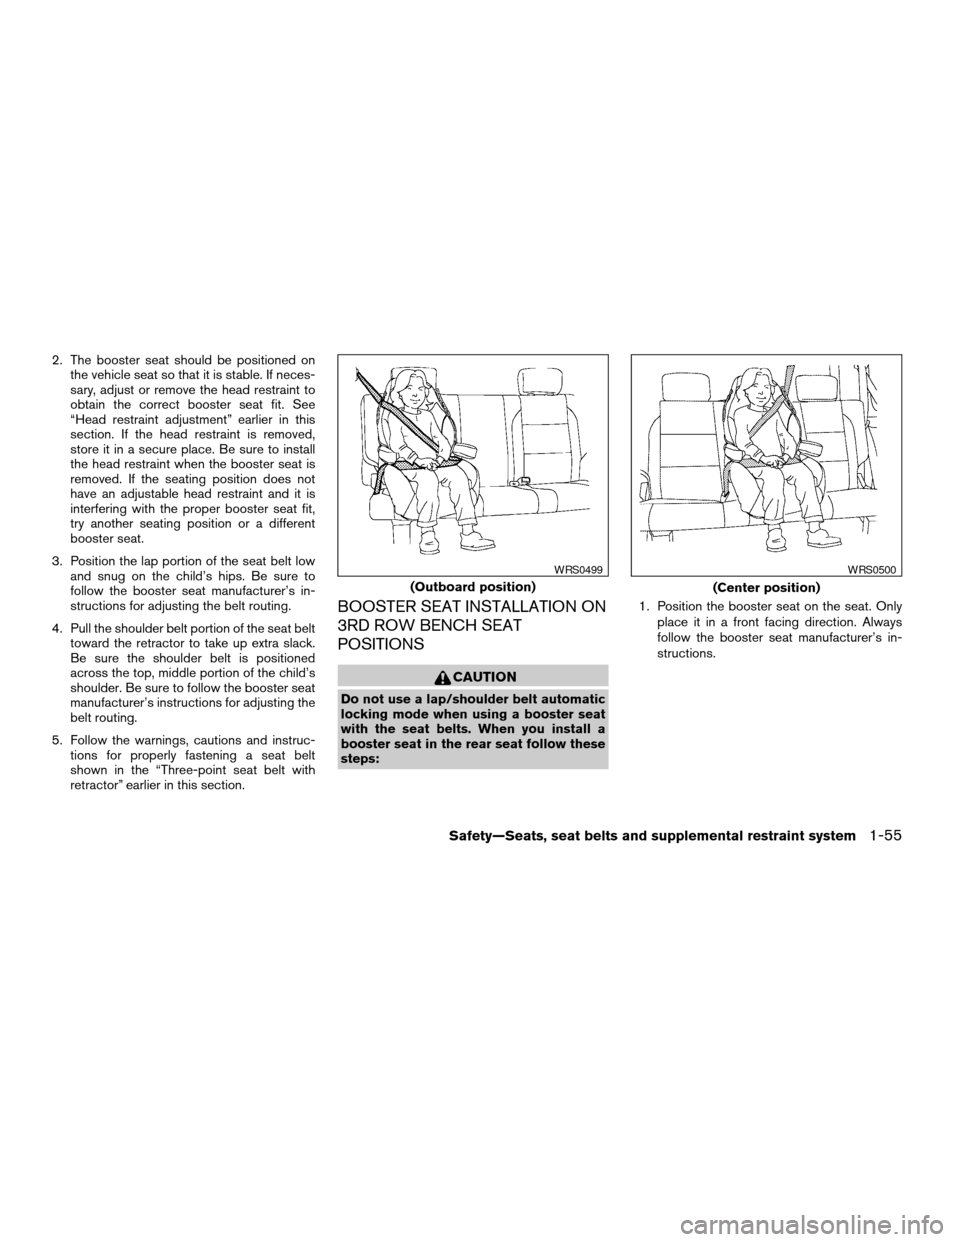
BOOSTER SEAT INSTALLATION ON
3RD ROW BENCH SEAT
POSITIONS
CAUTION
Do not use a lap/shoulder belt automatic
locking mode when using a booster seat
with the seat belts. When you install a
booster seat in the rear seat follow these
steps:1. Position the booster seat on the seat. Only
place it in a front facing direction. Always
follow the booster seat manufacturer’s in-
structions.
(Outboard position)
WRS0499
(Center position)
WRS0500
Safety—Seats, seat belts and supplemental restraint system1-55
ZREVIEW COPYÐ2006 Armada(wzw)
Owners ManualÐUSA_English(nna)
06/15/05Ðdebbie
X
Page 74 of 352
2. The booster seat should be positioned on
the vehicle seat so that it is stable. If neces-
sary, adjust or remove the head restraint to
obtain the correct booster seat fit. See
“Head restraint adjustment” earlier in this
section. If the head restraint is removed,
store it in a secure place. Be sure to install
the head restraint when the booster seat is
removed. If the seating position does not
have an adjustable head restraint and it is
interfering with the proper booster seat fit,
try another seating position or a different
booster seat.
3. Position the lap portion of the seat belt low
and snug on the child’s hips. Be sure to
follow the booster seat manufacturer’s in-
structions for adjusting the belt routing.
4. Pull the shoulder belt portion of the seat belt
toward the retractor to take up extra slack.
Be sure the shoulder belt is positioned
across the top, middle portion of the child’s
shoulder. Be sure to follow the booster seat
manufacturer’s instructions for adjusting the
belt routing.
5. Follow the warnings, cautions and instruc-
tions for properly fastening a seat belt
shown in the “Three-point seat belt with
retractor” earlier in this section.
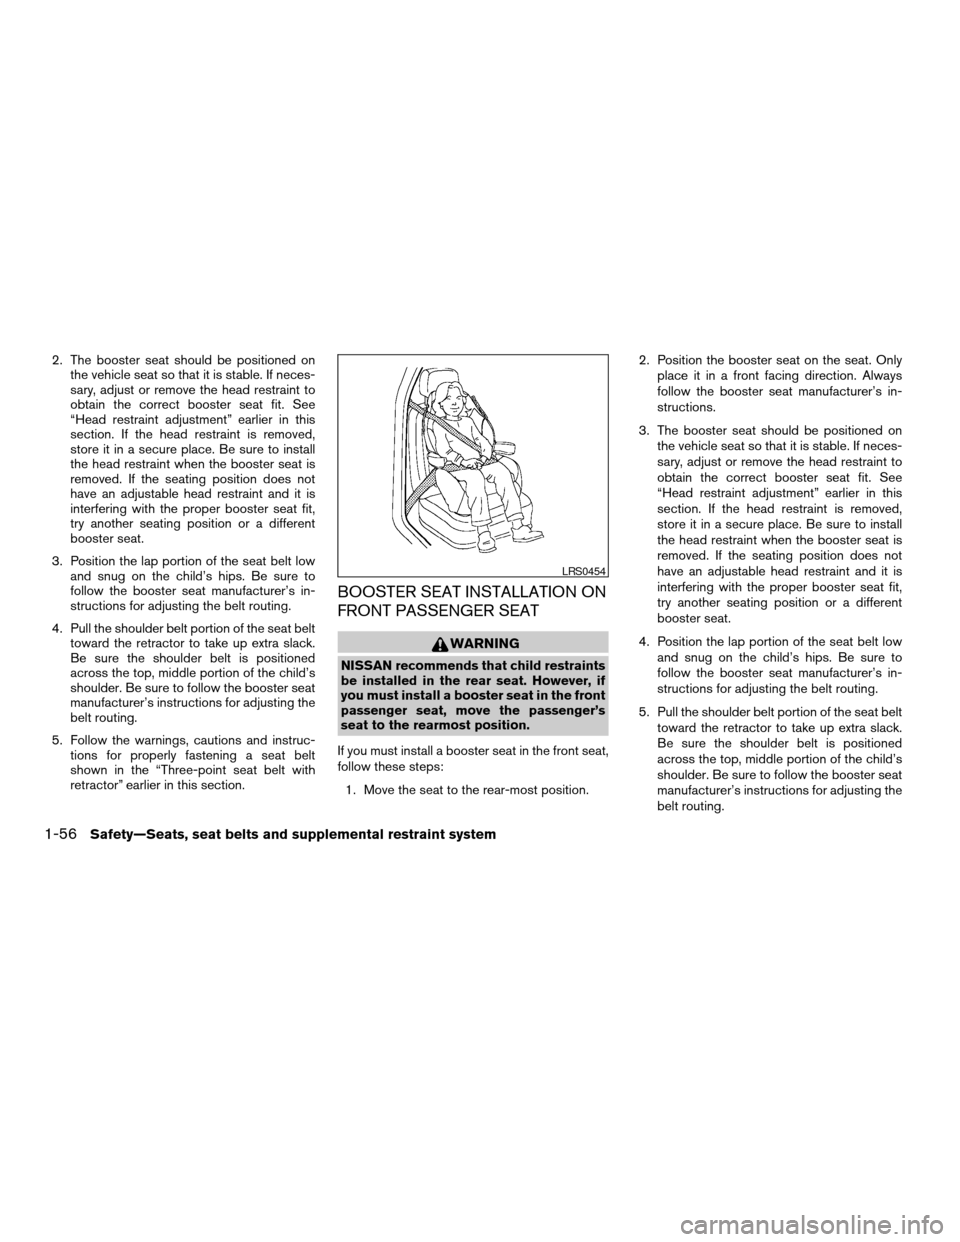
BOOSTER SEAT INSTALLATION ON
FRONT PASSENGER SEAT
WARNING
NISSAN recommends that child restraints
be installed in the rear seat. However, if
you must install a booster seat in the front
passenger seat, move the passenger’s
seat to the rearmost position.
If you must install a booster seat in the front seat,
follow these steps:
1. Move the seat to the rear-most position.2. Position the booster seat on the seat. Only
place it in a front facing direction. Always
follow the booster seat manufacturer’s in-
structions.
3. The booster seat should be positioned on
the vehicle seat so that it is stable. If neces-
sary, adjust or remove the head restraint to
obtain the correct booster seat fit. See
“Head restraint adjustment” earlier in this
section. If the head restraint is removed,
store it in a secure place. Be sure to install
the head restraint when the booster seat is
removed. If the seating position does not
have an adjustable head restraint and it is
interfering with the proper booster seat fit,
try another seating position or a different
booster seat.
4. Position the lap portion of the seat belt low
and snug on the child’s hips. Be sure to
follow the booster seat manufacturer’s in-
structions for adjusting the belt routing.
5. Pull the shoulder belt portion of the seat belt
toward the retractor to take up extra slack.
Be sure the shoulder belt is positioned
across the top, middle portion of the child’s
shoulder. Be sure to follow the booster seat
manufacturer’s instructions for adjusting the
belt routing.
LRS0454
1-56Safety—Seats, seat belts and supplemental restraint system
ZREVIEW COPYÐ2006 Armada(wzw)
Owners ManualÐUSA_English(nna)
06/15/05Ðdebbie
X