language NISSAN ARMADA 2015 1.G Owners Manual
[x] Cancel search | Manufacturer: NISSAN, Model Year: 2015, Model line: ARMADA, Model: NISSAN ARMADA 2015 1.GPages: 510, PDF Size: 4.18 MB
Page 119 of 510
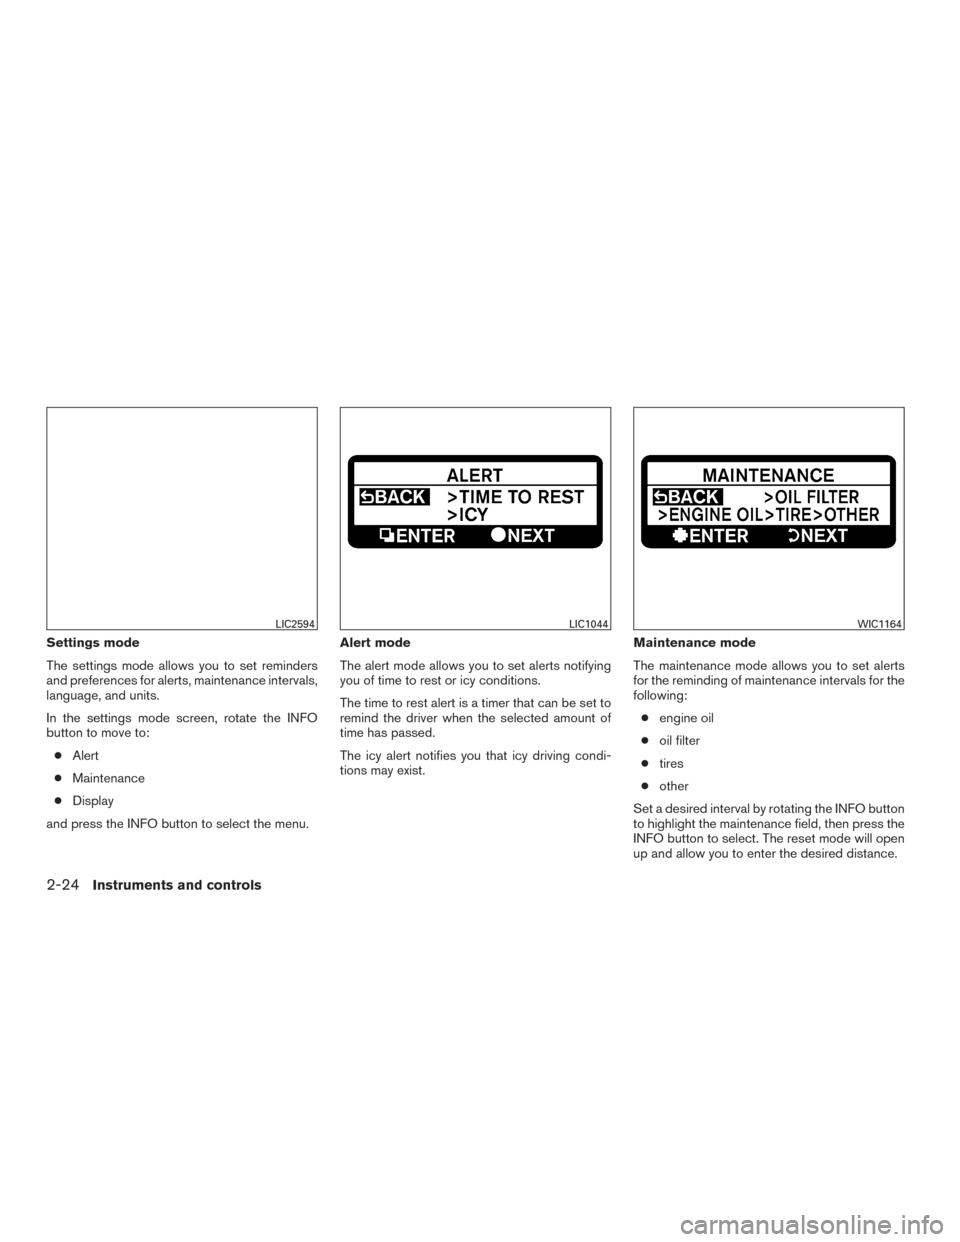
Settings mode
The settings mode allows you to set reminders
and preferences for alerts, maintenance intervals,
language, and units.
In the settings mode screen, rotate the INFO
button to move to:● Alert
● Maintenance
● Display
and press the INFO button to select the menu. Alert mode
The alert mode allows you to set alerts notifying
you of time to rest or icy conditions.
The time to rest alert is a timer that can be set to
remind the driver when the selected amount of
time has passed.
The icy alert notifies you that icy driving condi-
tions may exist.
Maintenance mode
The maintenance mode allows you to set alerts
for the reminding of maintenance intervals for the
following:
● engine oil
● oil filter
● tires
● other
Set a desired interval by rotating the INFO button
to highlight the maintenance field, then press the
INFO button to select. The reset mode will open
up and allow you to enter the desired distance.
LIC2594LIC1044WIC1164
2-24Instruments and controls
Page 120 of 510
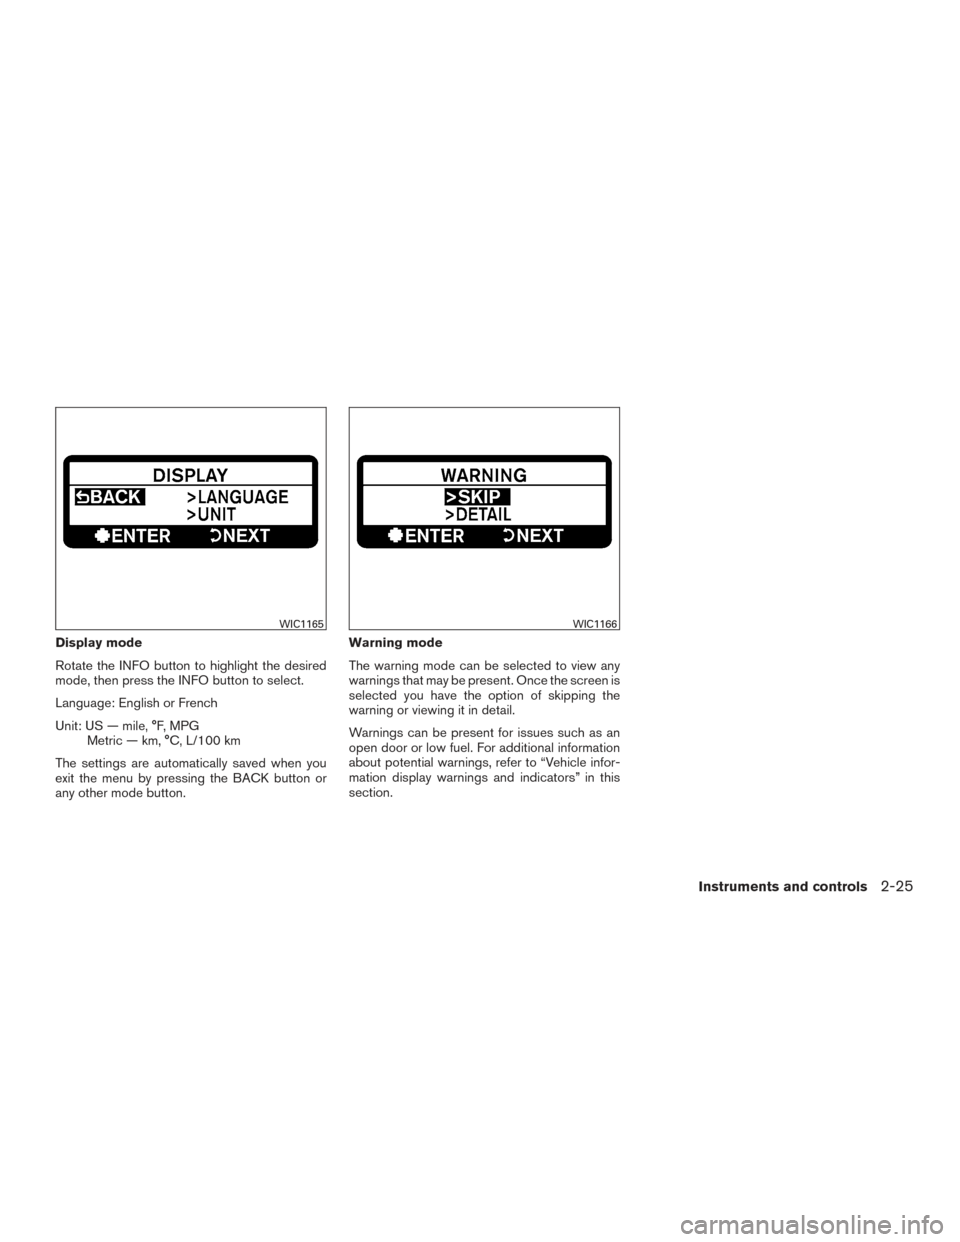
Display mode
Rotate the INFO button to highlight the desired
mode, then press the INFO button to select.
Language: English or French
Unit: US — mile, °F, MPGMetric — km, °C, L/100 km
The settings are automatically saved when you
exit the menu by pressing the BACK button or
any other mode button. Warning mode
The warning mode can be selected to view any
warnings that may be present. Once the screen is
selected you have the option of skipping the
warning or viewing it in detail.
Warnings can be present for issues such as an
open door or low fuel. For additional information
about potential warnings, refer to “Vehicle infor-
mation display warnings and indicators” in this
section.
WIC1165WIC1166
Instruments and controls2-25
Page 210 of 510
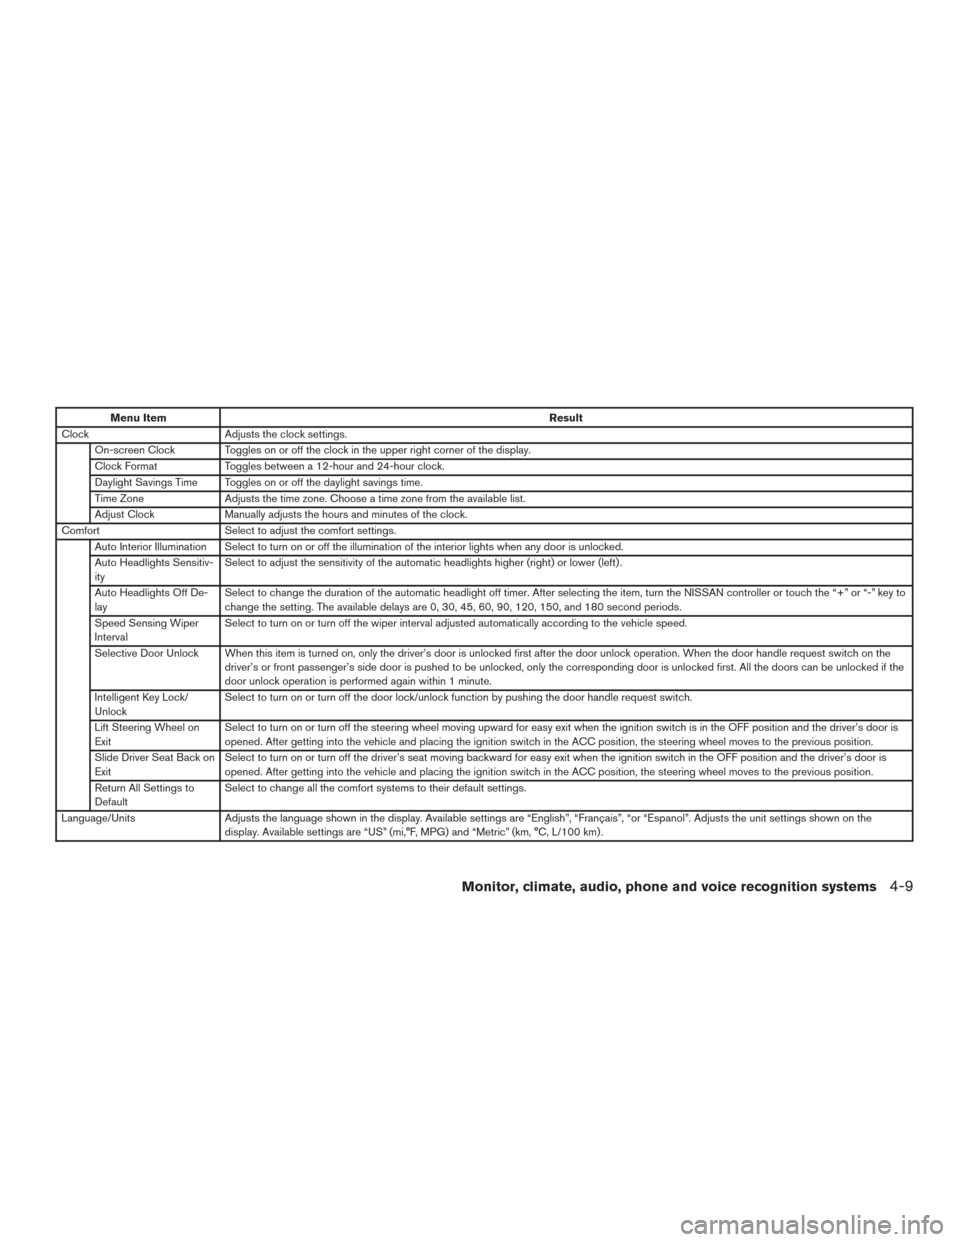
Menu ItemResult
Clock Adjusts the clock settings.
On-screen Clock Toggles on or off the clock in the upper right corner of the display.
Clock Format Toggles between a 12-hour and 24-hour clock.
Daylight Savings Time Toggles on or off the daylight savings time.
Time Zone Adjusts the time zone. Choose a time zone from the available list.
Adjust Clock Manually adjusts the hours and minutes of the clock.
Comfort Select to adjust the comfort settings.
Auto Interior Illumination Select to turn on or off the illumination of the interior lights when any door is unlocked.
Auto Headlights Sensitiv-
ity Select to adjust the sensitivity of the automatic headlights higher (right) or lower (left) .
Auto Headlights Off De-
lay Select to change the duration of the automatic headlight off timer. After selecting the item, turn the NISSAN controller or touch the “+” or “-” key to
change the setting. The available delays are 0, 30, 45, 60, 90, 120, 150, and 180 second periods.
Speed Sensing Wiper
Interval Select to turn on or turn off the wiper interval adjusted automatically according to the vehicle speed.
Selective Door Unlock When this item is turned on, only the driver’s door is unlocked first after the door unlock operation. When the door handle reques tswitchonthe
driver’s or front passenger’s side door is pushed to be unlocked, only the corresponding door is unlocked first. All the doors can be unlocked if the
door unlock operation is performed again within 1 minute.
Intelligent Key Lock/
Unlock Select to turn on or turn off the door lock/unlock function by pushing the door handle request switch.
Lift Steering Wheel on
Exit Select to turn on or turn off the steering wheel moving upward for easy exit when the ignition switch is in the OFF position and the driver’s door is
opened. After getting into the vehicle and placing the ignition switch in the ACC position, the steering wheel moves to the previous position.
Slide Driver Seat Back on
Exit Select to turn on or turn off the driver’s seat moving backward for easy exit when the ignition switch in the OFF position and the driver’s door is
opened. After getting into the vehicle and placing the ignition switch in the ACC position, the steering wheel moves to the previous position.
Return All Settings to
Default Select to change all the comfort systems to their default settings.
Language/Units Adjusts the language shown in the display. Available settings are “English”, “Français”, “or “Espanol”. Adjusts the unit settings shown on the
display. Available settings are “US” (mi,°F, MPG) and “Metric” (km, °C, L/100 km) .
Monitor, climate, audio, phone and voice recognition systems4-9
Page 219 of 510
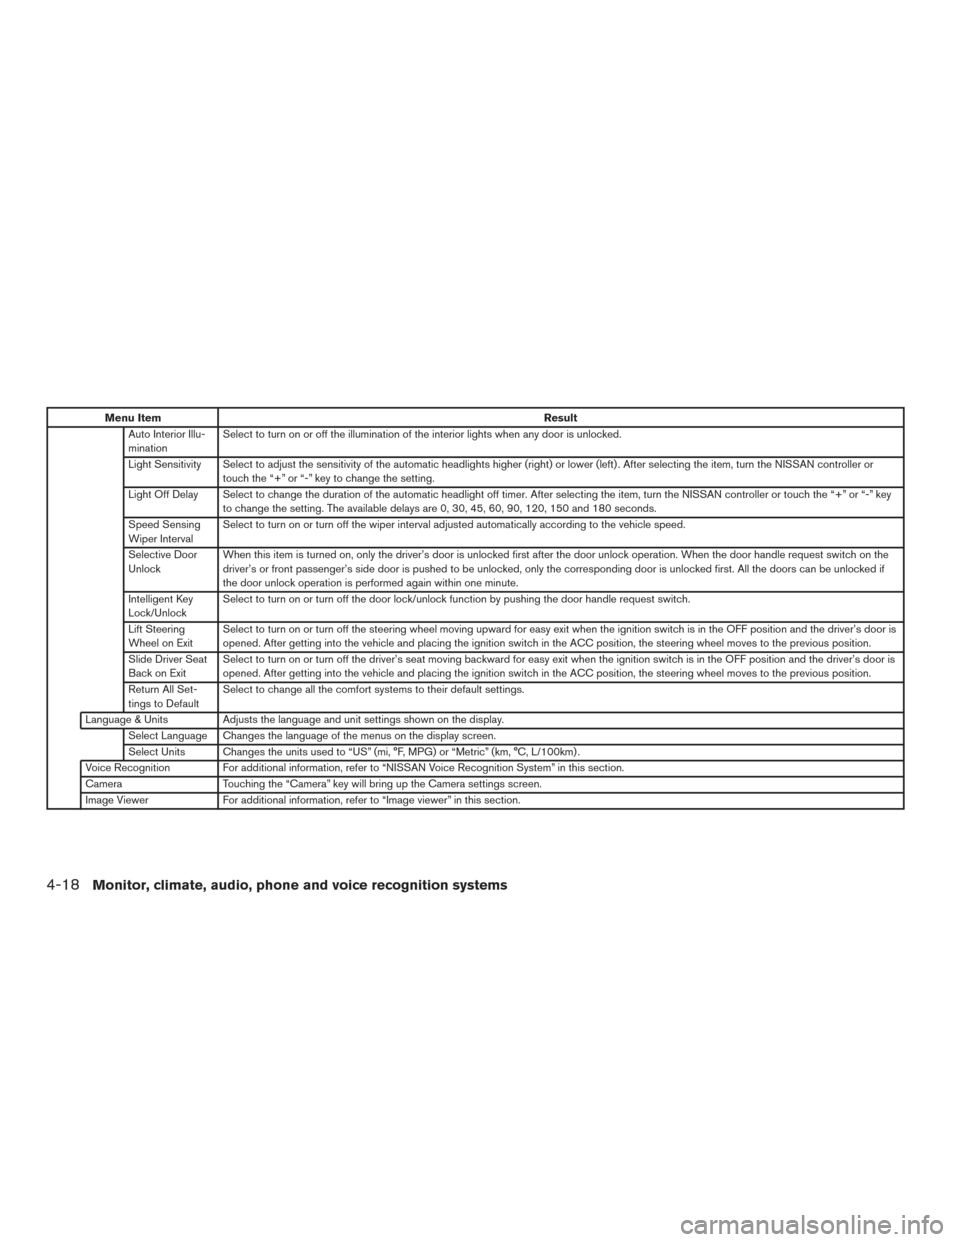
Menu ItemResult
Auto Interior Illu-
mination Select to turn on or off the illumination of the interior lights when any door is unlocked.
Light Sensitivity Select to adjust the sensitivity of the automatic headlights higher (right) or lower (left) . After selecting the item, turn the NISSAN controller or touch the “+” or “-” key to change the setting.
Light Off Delay Select to change the duration of the automatic headlight off timer. After selecting the item, turn the NISSAN controller or touch the “+” or “-” key to change the setting. The available delays are 0, 30, 45, 60, 90, 120, 150 and 180 seconds.
Speed Sensing
Wiper Interval Select to turn on or turn off the wiper interval adjusted automatically according to the vehicle speed.
Selective Door
Unlock When this item is turned on, only the driver’s door is unlocked first after the door unlock operation. When the door handle request switch on the
driver’s or front passenger’s side door is pushed to be unlocked, only the corresponding door is unlocked first. All the doors can be unlocked if
the door unlock operation is performed again within one minute.
Intelligent Key
Lock/Unlock Select to turn on or turn off the door lock/unlock function by pushing the door handle request switch.
Lift Steering
Wheel on Exit Select to turn on or turn off the steering wheel moving upward for easy exit when the ignition switch is in the OFF position and the driver’s door is
opened. After getting into the vehicle and placing the ignition switch in the ACC position, the steering wheel moves to the previous position.
Slide Driver Seat
Back on Exit Select to turn on or turn off the driver’s seat moving backward for easy exit when the ignition switch is in the OFF position and the driver’s door is
opened. After getting into the vehicle and placing the ignition switch in the ACC position, the steering wheel moves to the previous position.
Return All Set-
tings to Default Select to change all the comfort systems to their default settings.
Language & Units Adjusts the language and unit settings shown on the display. Select Language Changes the language of the menus on the display screen.
Select Units Changes the units used to “US” (mi, °F, MPG) or “Metric” (km, °C, L/100km) .
Voice Recognition For additional information, refer to “NISSAN Voice Recognition System” in this section.
Camera Touching the “Camera” key will bring up the Camera settings screen.
Image Viewer For additional information, refer to “Image viewer” in this section.
4-18Monitor, climate, audio, phone and voice recognition systems
Page 239 of 510
USB (Universal Serial Bus)
Connection Port (if so equipped)
WARNING
Do not connect, disconnect, or operate the
USB device while driving. Doing so can be
a distraction. If distracted you could lose
control of your vehicle and cause an acci-
dent or serious injury.
CAUTION
●Do not force the USB device into the
USB port. Inserting the USB device
tilted or up-side-down into the port may
damage the port. Make sure that the
USB device is connected correctly into
the USB port.
● Do not grab the USB port cover (if so
equipped) when pulling the USB device
out of the port. This could damage the
port and the cover.
● Do not leave the USB cable in a place
where it can be pulled unintentionally.
Pulling the cable may damage the port.
The vehicle is not equipped with a USB device.
USB devices should be purchased separately as
necessary. This system cannot be used to format USB de-
vices. To format a USB device, use a personal
computer.
In some jurisdictions, the USB device for the front
seats plays only sound without images for regu-
latory reasons, even when the vehicle is parked.
This system supports various USB connection
port devices, USB hard drives and iPod® play-
ers. Some USB devices may not be supported by
this system.
● Partitioned USB devices may not play cor-
rectly.
● Some characters used in other languages
(Chinese, Japanese, etc.) may not appear
properly in the display. Using English lan-
guage characters with a USB device is rec-
ommended.
General notes for USB use ● Refer to your device manufacturer’s owner
information regarding the proper use and
care of the device. Notes for iPod® use
iPod® is a trademark of Apple Inc., registered in
the U.S. and other countries.
● Improperly plugging in the iPod® may cause
a checkmark to be displayed on and off
(flickering) . Always make sure that the
iPod® is connected properly.
● An iPod® nano (1st Generation) may remain
in fast forward or rewind mode if it is con-
nected during a seek operation. In this case,
please manually reset the iPod®.
● An iPod® nano (2nd Generation) will con-
tinue to fast-forward or rewind if it is discon-
nected during a seek operation.
● An incorrect song title may appear when the
Play Mode is changed while using an iPod®
nano (2nd Generation) .
● Audiobooks may not play in the same order
as they appear on an iPod®.
● Large video files cause slow responses in an
iPod®. The vehicle center display may mo-
mentarily black out, but will soon recover.
● If an iPod® automatically selects large video
files while in the shuffle mode, the vehicle
center display may momentarily black out,
but will soon recover.
4-38Monitor, climate, audio, phone and voice recognition systems
Page 266 of 510
– Select the “Back” key to return to theprevious menu screen.
– Select the “Hide” key to hide the opera- tion keys.
● Title Menu (DVD-VIDEO)
Some menus specific to each disc will be
shown. For additional information, refer to
the instructions attached to the disc.
● Title Search (DVD-VIDEO, DVD-VR)
The scene with the specified title will be
displayed the number of times the “+” or “-”
side is selected.
● Group Search (VIDEO CD)
The scene with the specified group will be
displayed the number of times the “+” or “-”
side is selected.
● 10 Key Search (DVD-VIDEO, VIDEO CD,
CD-DA, DVD-VR)
Select the “10 Key Search” key to open the
number entry screen. Input the number you
want to search for and select the “OK” key.
The specified Title/Chapter or Group/Track
will be played.
● Select No. (VIDEO CD)
Select the “Select No.” key to open the
number entry screen. Input the number you
want to search for and select the “OK” key.
The specified scene will be played. ●
Angle (DVD-VIDEO)
If the DVD contains different angles (such as
moving images) , the current image angle
can be switched to another one. Select the
“Angle” key and use the “+” or “-” key to
change the angle.
● Angle Mark (DVD-VIDEO)
When this item is turned on, an angle mark
will be shown on the bottom of the screen if
the scene can be seen from a different angle.
● Menu Skip (DVD-VIDEO)
DVD menus are automatically configured
and the contents will be played directly
when the “Menu Skip” key is turned on. Note
that some discs may not be played directly
even if this item is turned on.
● CM Skip (DVD-VIDEO)
Select the “CM Skip” key to choose the
setting time for CM backward and forward
operations. Use the “+” or “-” key to choose
a setting time of 15, 30 or 60 seconds.
● DRC (DVD-VIDEO, DVD-VR)
DRC (Dynamic Range Compression) auto-
matically adjusts the soundtrack volume
level to maintain a more even sound to the
speakers. ●
DVD Language (DVD-VIDEO, VIDEO CD)
Select the “DVD Language” key to open the
number entry screen. Input the number cor-
responding to the preferred language and
select the “OK” key. The DVD top menu
language will be changed to the one speci-
fied.
● Display
Adjust the image quality of the screen by
selecting the preferred adjustment items.
● Audio
Choose the preferred language for the au-
dio.
● Subtitle (DVD-VIDEO, DVD-VR)
Choose the preferred language for the sub-
titles.
● Display Mode (DVD-VIDEO, VIDEO CD,
DVD-VR)
Choose from the “Full”, “Wide”, “Normal” or
“Cinema” mode.
● Title List (DVD-VR)
Choose the preferred title from the list.
● Play Mode
Choose the preferred play mode.
● PG/PL Mode (DVD-VR)
Choose from the “PG” or “PL” mode.
Monitor, climate, audio, phone and voice recognition systems4-65
Page 272 of 510
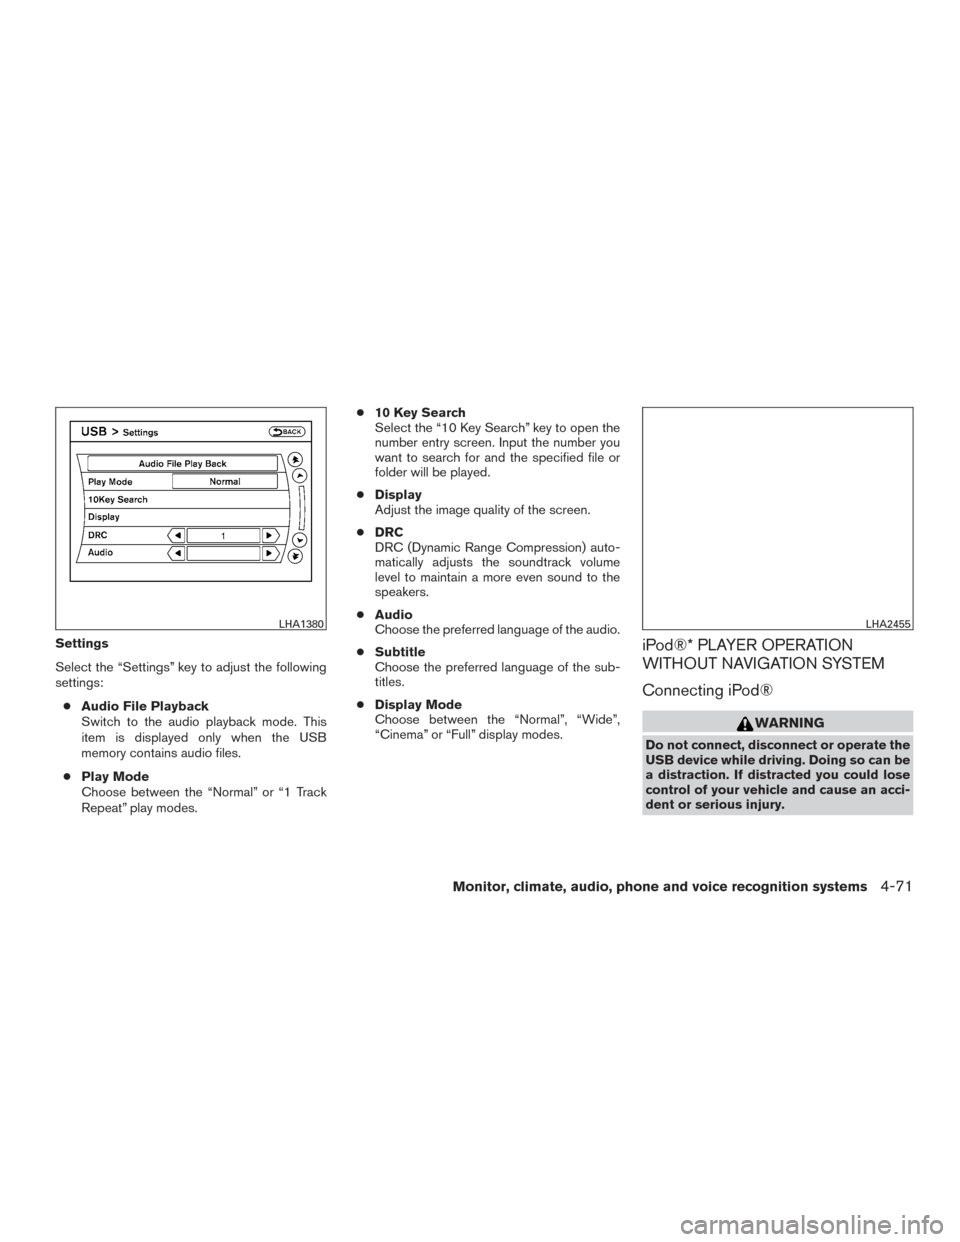
Settings
Select the “Settings” key to adjust the following
settings:● Audio File Playback
Switch to the audio playback mode. This
item is displayed only when the USB
memory contains audio files.
● Play Mode
Choose between the “Normal” or “1 Track
Repeat” play modes. ●
10 Key Search
Select the “10 Key Search” key to open the
number entry screen. Input the number you
want to search for and the specified file or
folder will be played.
● Display
Adjust the image quality of the screen.
● DRC
DRC (Dynamic Range Compression) auto-
matically adjusts the soundtrack volume
level to maintain a more even sound to the
speakers.
● Audio
Choose the preferred language of the audio.
● Subtitle
Choose the preferred language of the sub-
titles.
● Display Mode
Choose between the “Normal”, “Wide”,
“Cinema” or “Full” display modes.iPod®* PLAYER OPERATION
WITHOUT NAVIGATION SYSTEM
Connecting iPod®
WARNING
Do not connect, disconnect or operate the
USB device while driving. Doing so can be
a distraction. If distracted you could lose
control of your vehicle and cause an acci-
dent or serious injury.
LHA1380LHA2455
Monitor, climate, audio, phone and voice recognition systems4-71
Page 291 of 510
24. DOWN button
25. RETURN button
26. ENTER button
27. LEFT button
28. UP button
29. MENU button
30. MUTE button
31. DVD-A button
32. POWER button
NOTE:
The following remote control functions do
not apply to this model: A-B and Program.
Source button
Press this button to cycle between monitor A
audio/video sources and monitor B audio/video
sources.
Setup button
Press this button to navigate the DVD OSD
menu. For additional information, refer to “How to
use the DVD OSD menu” in this section.
Eject button
Press this button to eject the disc.
DVD–B button
Press this button to transmit the remote control
codes and functions to operate monitor B.
PIX button
Press this button to access the picture adjust-
ment menu and select between BRIGHTNESS,
CONTRAST, SATURATION, HUE, SHARP-
NESS, IR HEADPHONE, LANGUAGE, and RE-
SET. Press the
orbuttons to
adjust the screen.
REPEAT button
Press this button to select between different
repeat modes.
RIGHT button
Press this button to navigate right when display-
ing a menu or file list.
AUDIO button
Press this button to select and listen to different
audio streams (this function only applies to DVD
titles that support multiple audio streams) .
ANGLE button
Press this button to select different viewing
angles (this function only applies to DVD titles
that support multiple angles) .
DISPLAY button
Press this button to display various information
including title, chapter/track, elapsed time, time
remaining, or turn off the display.
RANDOM button
Press this button to play content in a random
order.
3D button
Press this button to select between several audio
effects. DVD mode: Concert, Living Room, Hall,
Bathroom, Cave, Arena, Church, and Off.
PBC (Video CD only) button
Press this button to run the playback control on or
off.
ZOOM button
Press this button to zoom in or out when display-
ing images or playing DVDs. The zoom range for
images is from 50% to 200%. The zoom range
for DVDs is from 1/4 size to 4x the original size.
NEXT button
Press this button to select the next chapter, track,
or file.
4-90Monitor, climate, audio, phone and voice recognition systems
Page 294 of 510
HOW TO USE THE DVD OSD MENU
This section describes how to set and adjust
settings using On-Screen Display (OSD) Menu.
You can use the OSD menu to adjust all the
settings. Follow the steps outlined below to se-
lect the desired function.
General Setup Page
Press the SETUP button on the remote control.
Use the
orand the
orbuttons to navigate the Setup Page.
Press ENTER to select and then
to
return to the sub–menu. To cancel the Setup
Display, press the SETUP button on the remote.
OSD Language
The OSD Lang sub-menu allows the user to
select the language for the on-screen display.
When the OSD Lang option is highlighted, press
the
button once and then use
the
orbuttons on the re-
mote control to select the desired language. The
user can select English, Simplified/Traditional
Chinese, French, German, Italian, Spanish, Por-
tuguese, or Korean for the OSD language. Press
ENTER to select and then the
button
to return the sub-menu.
LHA3851LHA3852
Monitor, climate, audio, phone and voice recognition systems4-93
Page 297 of 510
Audio
The Audio sub-menu allows the user to select the
audio stream in the desired language for play-
back. When the Audio option is highlighted,
press the
button once and then use
the
orbuttons on the re-
mote control to select the desired language. The
user can select English, French, Spanish, Chi-
nese, Japanese, German, Portuguese, Italian, Ko-
rean, Russian or Thai for the audio stream lan-
guage. Press ENTER to select and then
the
button to return to the sub-menu.
The DVD title must include the desired audio
stream in order for it to be heard during playback.
Subtitle
The Subtitle sub-menu allows the user to select
the subtitle in the desired language for playback.
When the Subtitle option is highlighted, press
the
button once and then use
the
orbuttons on the re-
mote control to select the desired language. The
user can select English, French, Spanish, Chi-
nese, Japanese, German, Portuguese, Italian, Ko-
rean, Russian, Thai or OFF for the subtitle lan-
guage. Press ENTER to select and then
the
button to return to the sub-menu.
The DVD title must include the desired audio
stream in order for it to be heard during playback.
Disc Menu
The Disc Menu sub-menu allows the user to
select the desired language of the DVD disc
menu. When the Disc Menu option is highlighted,
press the
button once and then use
the
orbuttons on the re-
mote control to select the desired language. The
user can select English, French, Spanish, Chi-
nese, Japanese, German, Portuguese, Italian, Ko-
rean, Russian or Thai for the Disc Menu language.
Press ENTER to select and then the
button to return to the sub-menu. The DVD title
must include the desired menu language in order
for it to be displayed during playback.
LHA3858LHA3859LHA3860
4-96Monitor, climate, audio, phone and voice recognition systems