display NISSAN ARMADA 2015 1.G Quick Reference Guide
[x] Cancel search | Manufacturer: NISSAN, Model Year: 2015, Model line: ARMADA, Model: NISSAN ARMADA 2015 1.GPages: 28, PDF Size: 1.9 MB
Page 22 of 28

20
SYSTEM GUIDE
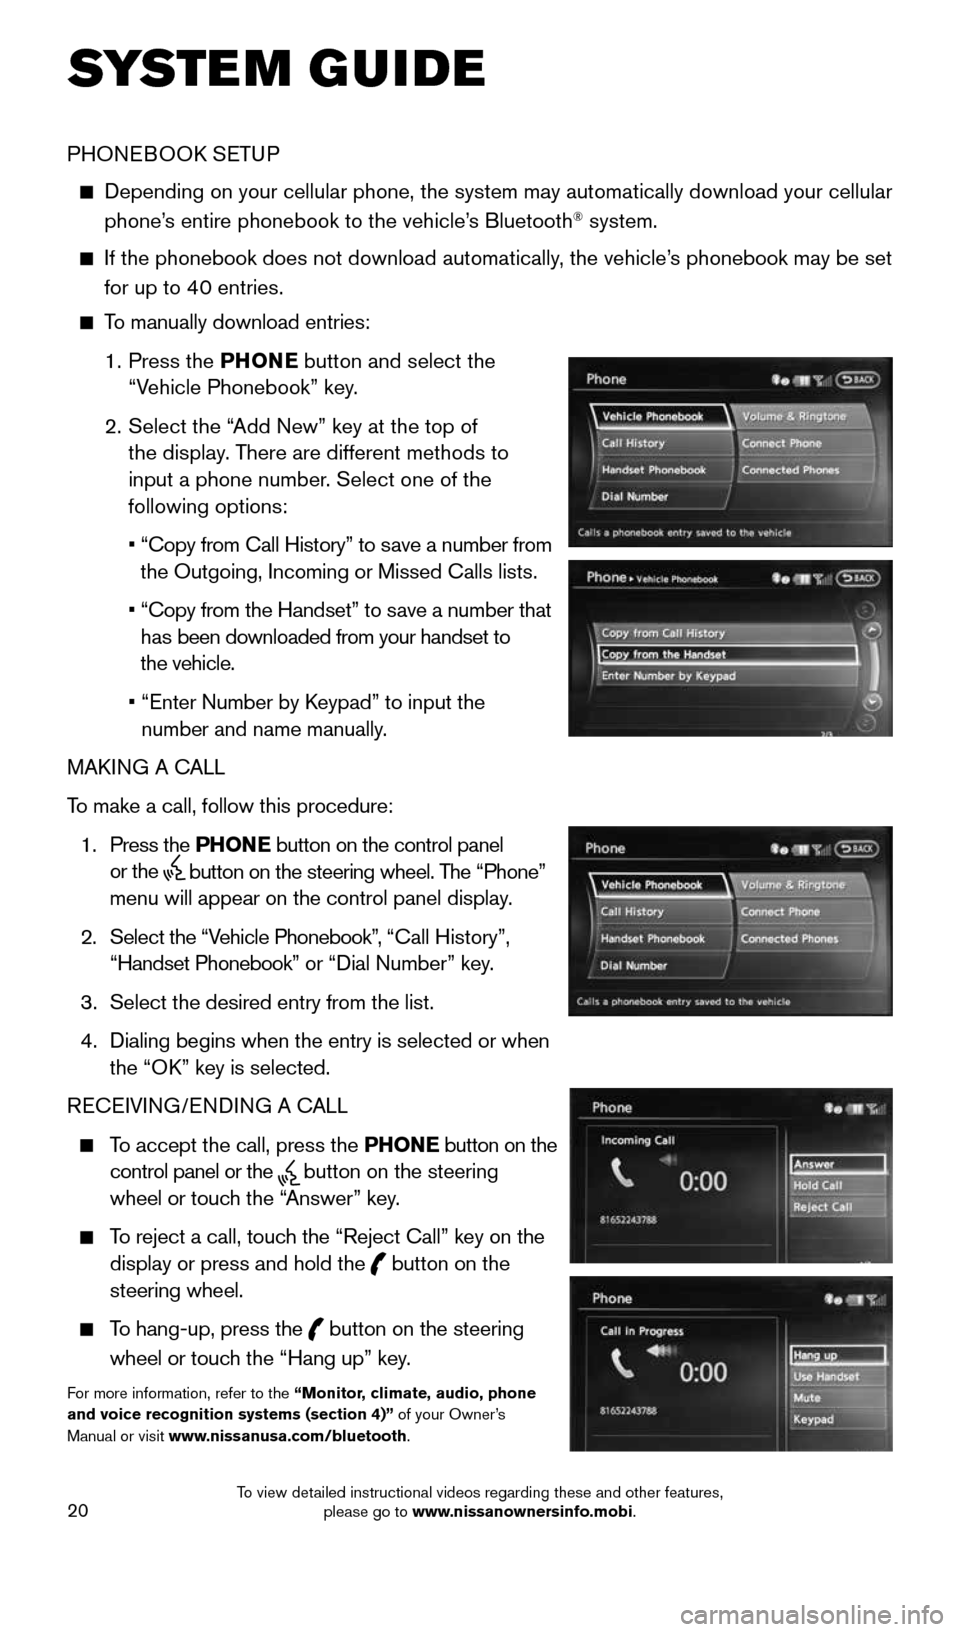
PHONEBOOK SETUP
Depending on your cellular phone, the system may automatically download \
your cellular
phone’s entire phonebook to the vehicle’s Bluetooth® system.
If the phonebook does not download automatically, the vehicle’s phonebook may be set
for up to 40 entries.
To manually download entries:
1. Press the PHONE
button and select the
“Vehicle Phonebook” key.
2. Select the “Add New” key at the top of
the display. There are different methods to
input a phone number. Select one of the
following options:
• “Copy from Call History” to save a number from
the Outgoing, Incoming or Missed Calls lists.
• “Copy from the Handset” to save a number that
has been downloaded from your handset to
the vehicle.
• “Enter Number by Keypad” to input the
number and name manually.
MAKING A CALL
To make a call, follow this procedure:
1. Press the PHONE button on the control panel
or the
button on the steering wheel. The “Phone”
menu will appear on the control panel display.
2. Select the “Vehicle Phonebook”, “Call History”,
“Handset Phonebook” or “Dial Number” key.
3. Select the desired entry from the list.
4. Dialing begins when the entry is selected or when
the “OK” key is selected.
RECEIVING/ENDING A CALL
To accept the call, press the PHONE button on the
control panel or the
button on the steering
wheel or touch the “Answer” key.
To reject a call, touch the “Reject Call” key on the
display or press and hold the
button on the
steering wheel.
To hang-up, press the
button on the steering
wheel or touch the “Hang up” key.
For more information, refer to the “Monitor, climate, audio, phone
and voice recognition systems (section 4)” of your Owner’s
Manual or visit www.nissanusa.com/bluetooth.
1904705_15c_Armada_QRG_072315.indd 207/23/15 8:59 AM
To view detailed instructional videos regarding these and other features, please go to www.nissanownersinfo.mobi.
Page 23 of 28

21
NAVIGATION SYSTEM (if so equipped)
Your Navigation System can calculate a route from your current location t\
o a preferred
destination. The real-time map display and turn-by-turn voice guidance will lead you
along the route.
The Navigation System will continually update your vehicle’s position. If you have
deviated from the original route, it will recalculate the route from you\
r current location.
To help promote safe driving, some functions cannot be operated or have limited
operation when the vehicle speed is above 5 mph (8 km/h). The on-screen text and
keys for these restricted functions will be grayed-out or muted and cann\
ot be selected
while driving. These functions will become available again when the vehicle speed
is reduced to 5 mph (8 km/h). Voice commands may be available for some of the
restricted functions. For more information, refer to the “Monitor, climate, audio, phone
and voice recognition systems (section 4)” of your Owner’s Manual.
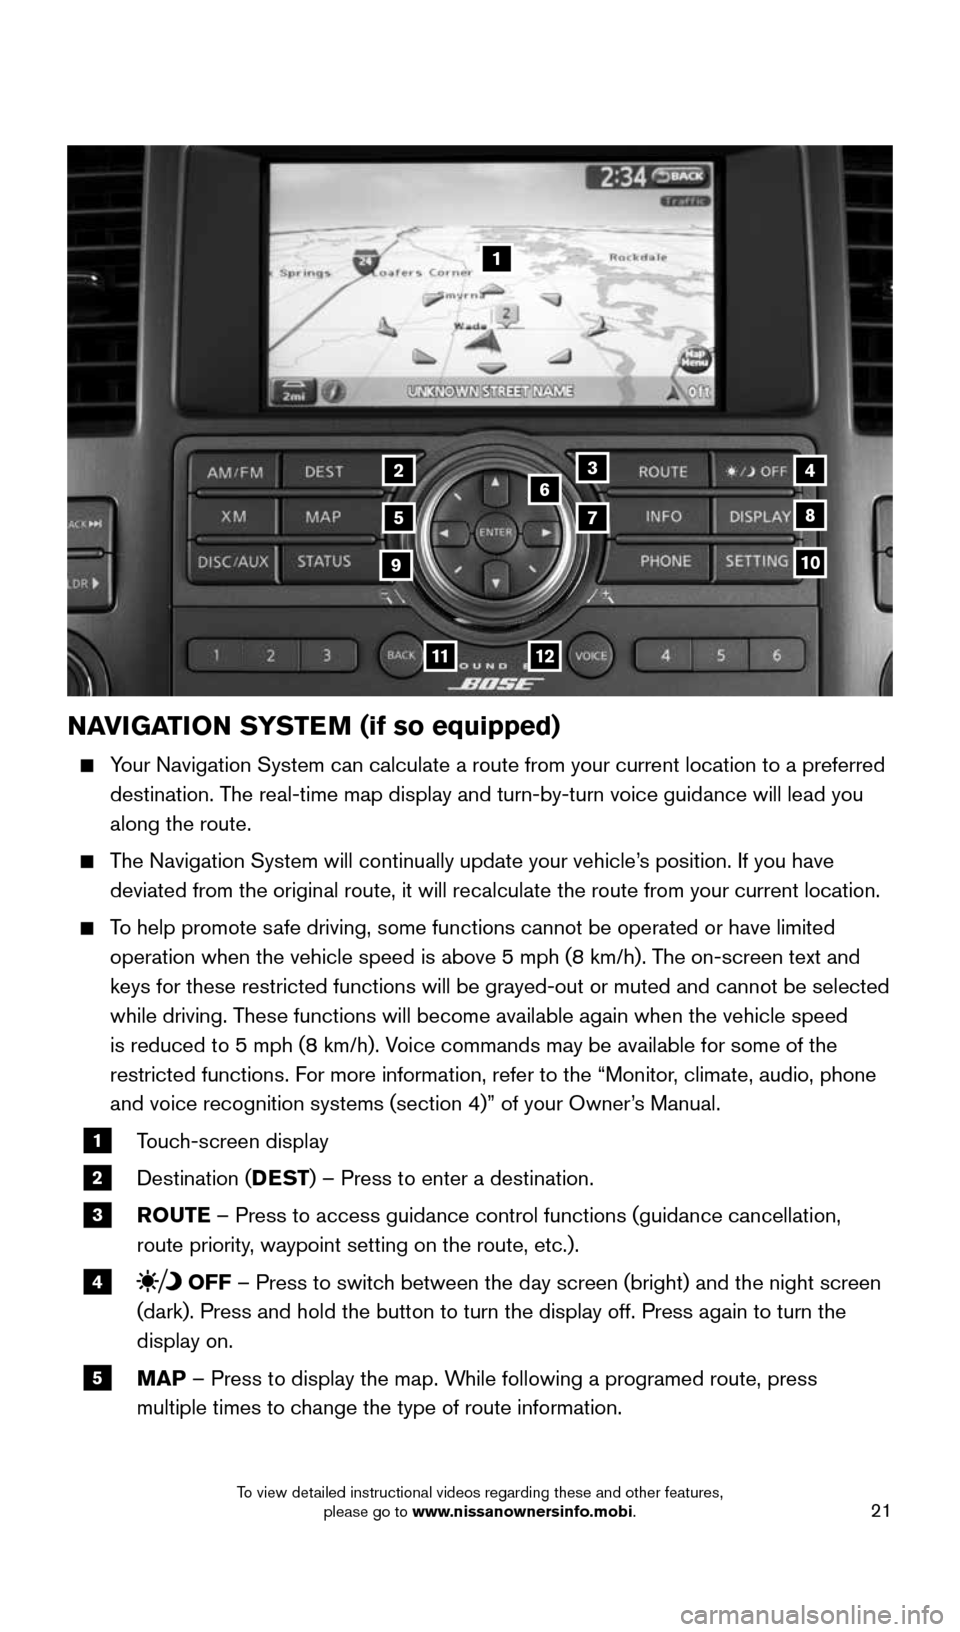
1 Touch-screen display
2 Destination (DEST
) – Press to enter a destination.
3 ROUTE – Press to access guidance control functions (guidance cancellation\
,
route priority, waypoint setting on the route, etc.).
4 OFF – Press to switch between the day screen (bright) and the night screen
(dark). Press and hold the button to turn the display off. Press again\
to turn the
display on.
5 MAP – Press to display the map. While following a programed route, press
multiple times to change the type of route information.
1
3
5
6
78
10
1112
24
9
1904705_15c_Armada_QRG_072315.indd 217/23/15 8:59 AM
To view detailed instructional videos regarding these and other features, please go to www.nissanownersinfo.mobi.
Page 24 of 28

22
SYSTEM GUIDE
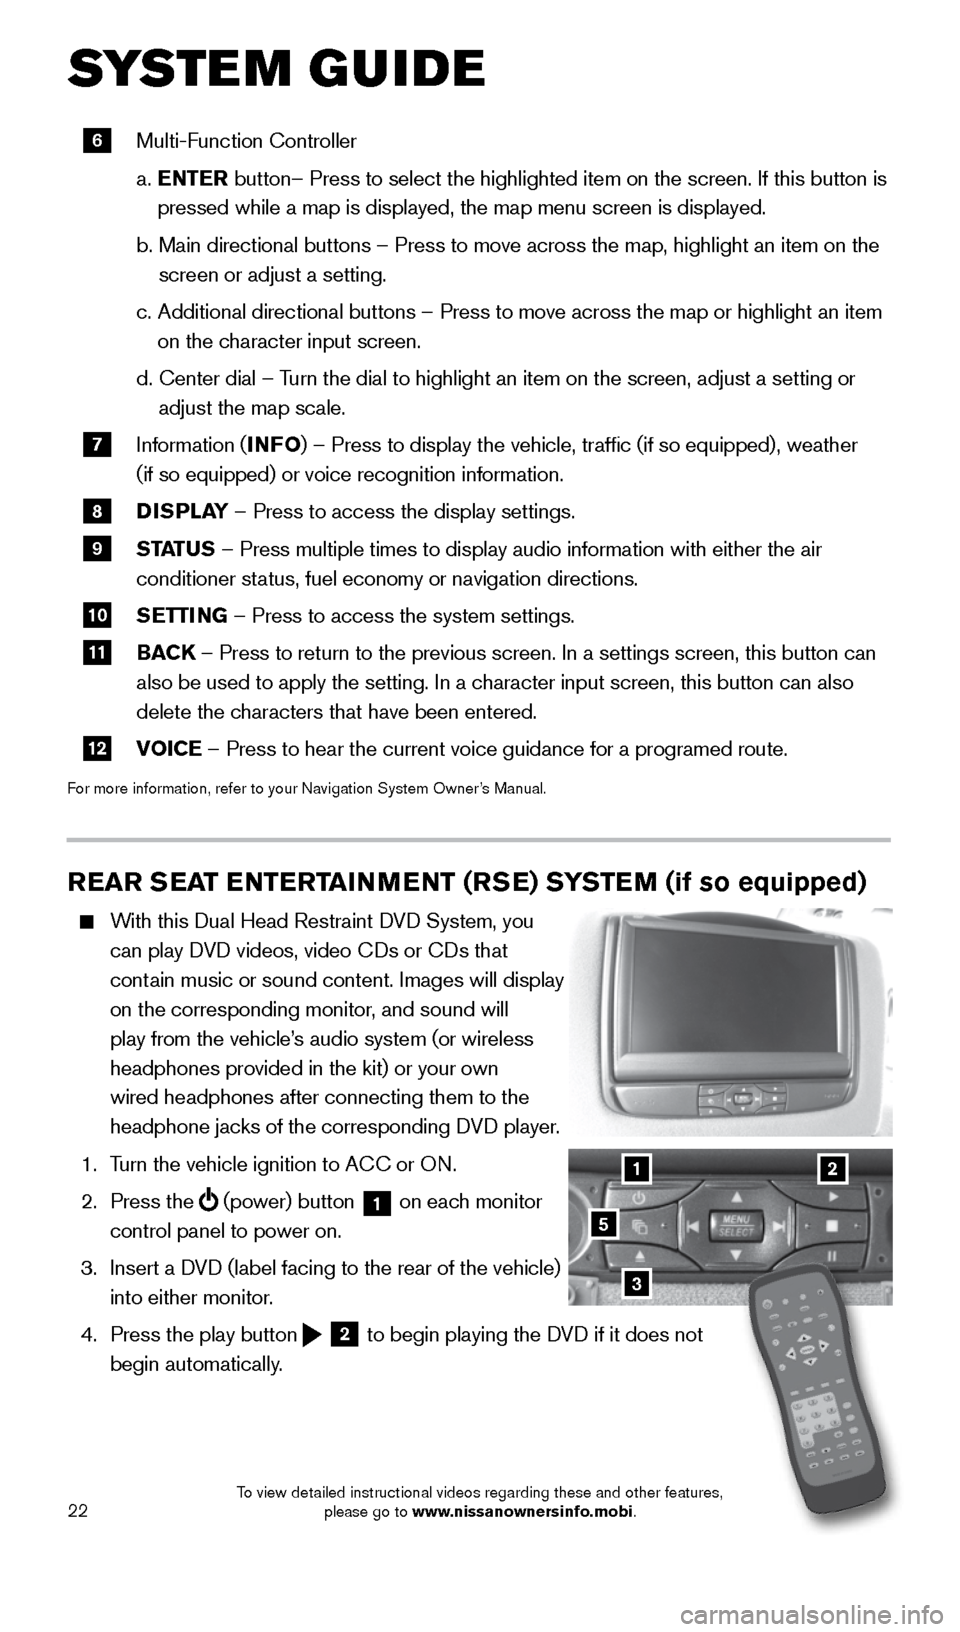
REAR SEAT ENTERTAINMENT (RSE) SYSTEM (if so equipped)
With this Dual Head Restraint DVD System, you
can play DVD videos, video CDs or CDs that
contain music or sound content. Images will display
on the corresponding monitor, and sound will
play from the vehicle’s audio system (or wireless
headphones provided in the kit) or your own
wired headphones after connecting them to the
headphone jacks of the corresponding DVD player.
1. Turn the vehicle ignition to ACC or ON.
2. Press the
(power) button 1 on each monitor
control panel to power on.
3. Insert a DVD (label facing to the rear of the vehicle)
into either monitor.
4. Press the play button
2 to begin playing the DVD if it does not
begin automatically.
3
21
5
6 Multi-Function Controller
a. ENTER button– Press to select the highlighted item on the screen. If this b\
utton is
pressed while a map is displayed, the map menu screen is displayed.
b. Main directional buttons – Press to move across the map, highlight an\
item on the
screen or adjust a setting.
c. Additional directional buttons – Press to move across the map or high\
light an item
on the character input screen.
d. Center dial
– Turn the dial to highlight an item on the screen, adjust a setting or
adjust the map scale.
7 Information (INFO
) – Press to display the vehicle, traffic (if so equipped), weat\
her
(if so equipped) or voice recognition information.
8 DISPLAY
– Press to access the display settings.
9 STATUS – Press multiple times to display audio information with either the \
air
conditioner status, fuel economy or navigation directions.
10 SETTING – Press to access the system settings.
11 BACK
– Press to return to the previous screen. In a settings screen, this\
button can
also be used to apply the setting. In a character input screen, this button can also
delete the characters that have been entered.
12 VOICE – Press to hear the current voice guidance for a programed route.
For more information, refer to your Navigation System Owner’s Manual.
1904705_15c_Armada_QRG_072315.indd 227/23/15 8:59 AM
To view detailed instructional videos regarding these and other features, please go to www.nissanownersinfo.mobi.
Page 25 of 28

23
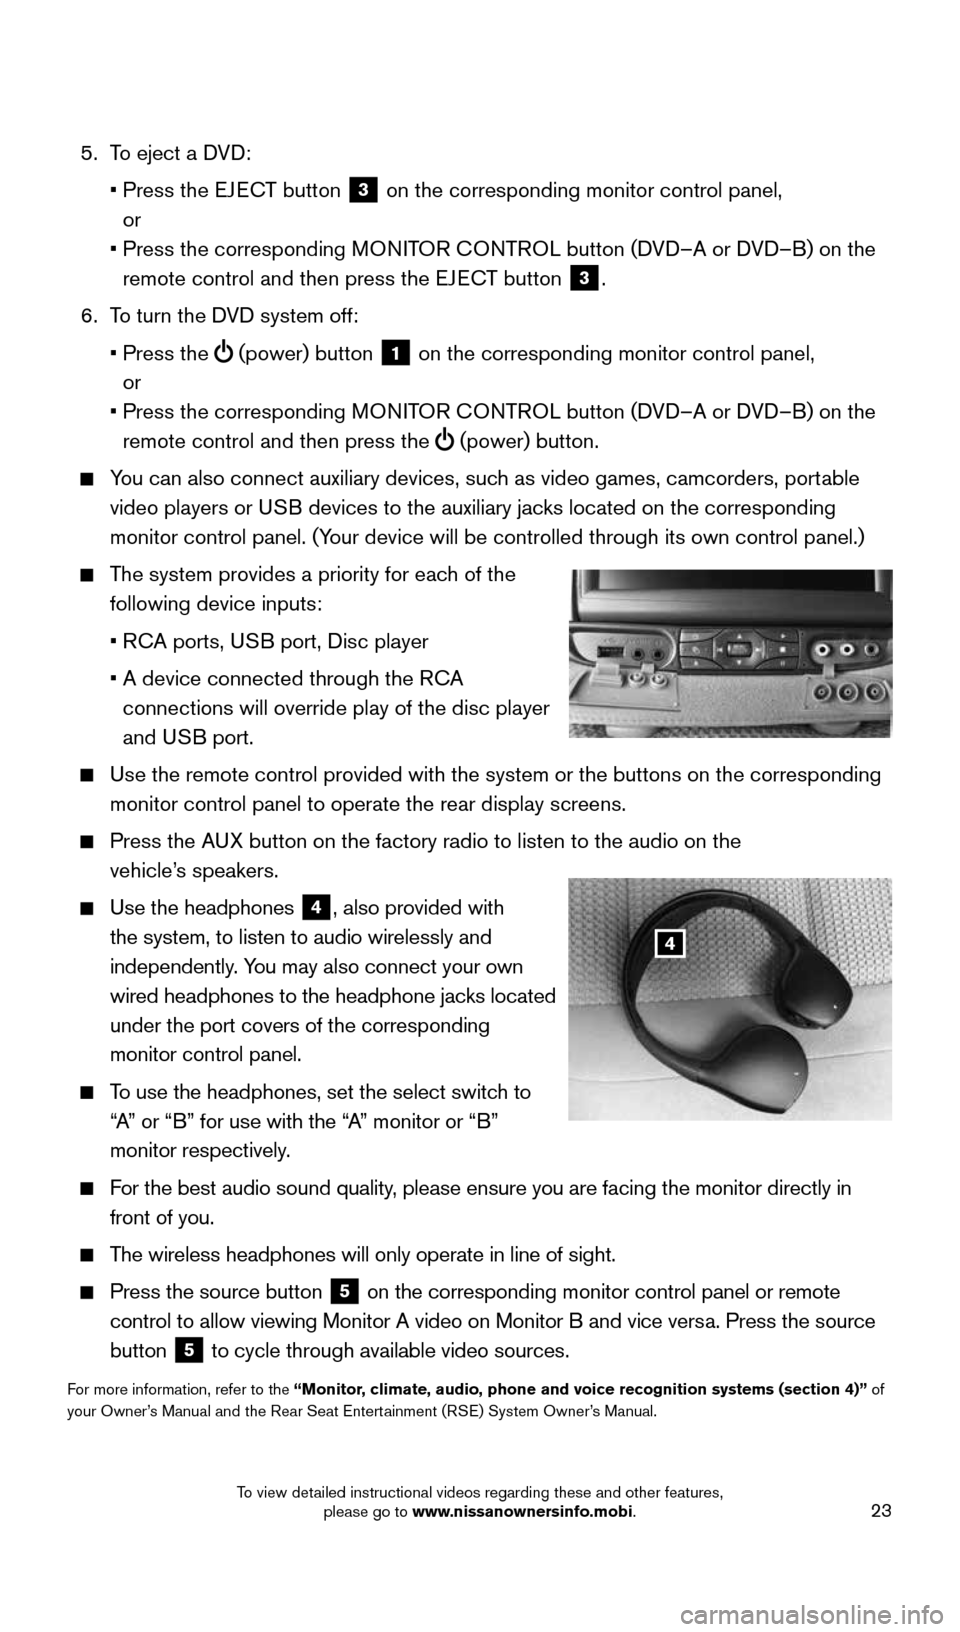
5. To eject a DVD:
• Press the EJECT button
3 on the corresponding monitor control panel,
or
• Press the corresponding MONITOR CONTROL button (DVD–A or DVD–B) on the
remote control and then press the EJECT button
3.
6. To turn the DVD system off:
• Press the
(power) button 1 on the corresponding monitor control panel,
or
• Press the corresponding MONITOR CONTROL button (DVD–A or DVD–B) on the
remote control and then press the
(power) button.
You can also connect auxiliary devices, such as video games, camcorders, portable
video players or USB devices to the auxiliary jacks
located on the corresponding
monitor control panel. (Your device will be controlled through its own control panel.)
The system provides a priority for each of the
following device inputs:
• RCA ports, USB port, Disc player
• A device connected through the RCA
connections will override play of the disc player
and USB port.
Use the remote control
provided with the system or the buttons on the corresponding
monitor control panel to operate the rear display screens.
Press the AUX button on the factory radio to listen to the audio on the
vehicle’s speakers.
Use the headphones
4, also provided with
the system, to listen to audio wirelessly and
independently. You may also connect your own
wired headphones to the headphone jacks located
under the port covers of the corresponding
monitor control panel.
To use the headphones, set the select switch to
“A” or “B” for use with the “A” monitor or “B”
monitor respectively.
For the best audio sound quality, please ensure you are facing the monitor directly in
front of you.
The wireless headphones will only operate in line of sight.
Press the source button 5 on the corresponding monitor control panel or remote
control to allow viewing Monitor A video on Monitor B and vice versa. Press the source
button
5 to cycle through available video sources.
For more information, refer to the “Monitor, climate, audio, phone and voice recognition systems (section 4)” of
your Owner’s Manual and the Rear Seat Entertainment (RSE) System Owner’s Manual.
4
1904705_15c_Armada_QRG_072315.indd 237/23/15 8:59 AM
To view detailed instructional videos regarding these and other features, please go to www.nissanownersinfo.mobi.