warning light NISSAN ARMADA 2019 Owner´s Manual
[x] Cancel search | Manufacturer: NISSAN, Model Year: 2019, Model line: ARMADA, Model: NISSAN ARMADA 2019Pages: 536, PDF Size: 2.56 MB
Page 140 of 536
2-46Instruments and controls
knob to the OFF position (center). The
indicator lighton the control knob
goes off at the OFF position.
The climate controlled seat has air
filters. If the climate controlled seat is
not functioning properly, it may indi-
cate the air filters may be clogged. To
check the air filters for the climate
controlled seat, it is recommended
you visit a NISSAN dealer.
WARNING
Do not use or allow occupants to use
the climate controlled seats if you or
the occupants cannot monitor seat
temperatures or have an inability to
feel pain in those body parts in
contact with the seat. Use of the
climate controlled seats by such
people could result in serious injury.
CAUTION
. The battery could run down if the
climate controlled seat is oper-
ated while the engine is not run-
ning. .
Do not use the climate controlled
seat for extended periods or
when no one is using the seat.
. Do not put anything on the seat
which insulates heat, such as a
blanket, cushion, seat cover, etc.
Otherwise, the seat may become
overheated.
. Do not place anything hard or
heavy on the seat or pierce it with
a pin or similar object. This may
result in damage to the climate
controlled seat.
. Any liquid spilled on the seat
should be removed immediately
with a dry cloth.
. The climate controlled seat has
an air filter. Do not operate cli-
mate controlled seat without an
air filter. This may result in da-
mage to the system.
. When cleaning the seat, never use
gasoline, thinner, or any similar
materials.
. If any malfunctions are found or
the climate controlled seat does
not operate, turn the switch off
and have the system checked. It
is recommended you visit a
NISSAN dealer for this service.
SSD0956
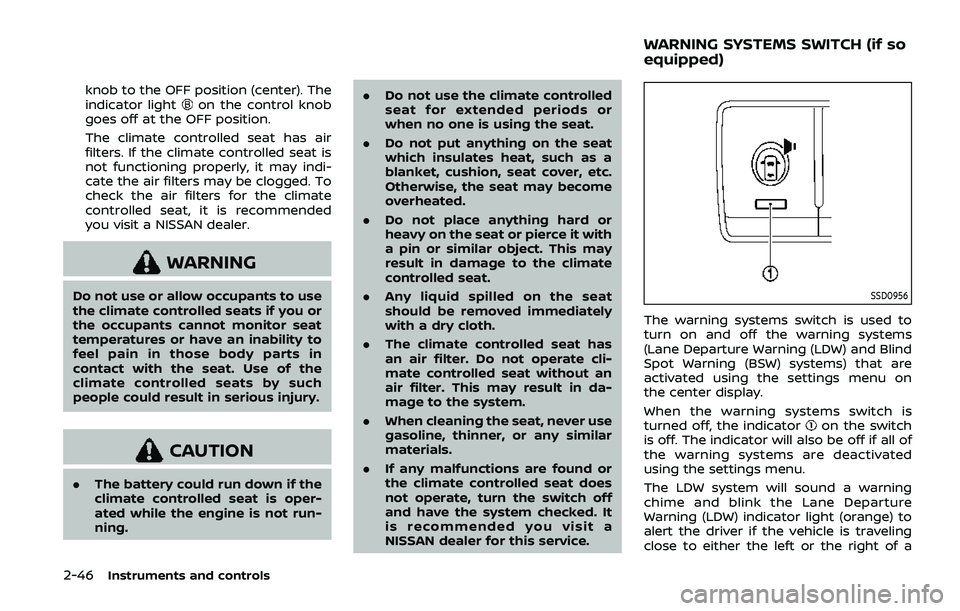
The warning systems switch is used to
turn on and off the warning systems
(Lane Departure Warning (LDW) and Blind
Spot Warning (BSW) systems) that are
activated using the settings menu on
the center display.
When the warning systems switch is
turned off, the indicator
on the switch
is off. The indicator will also be off if all of
the warning systems are deactivated
using the settings menu.
The LDW system will sound a warning
chime and blink the Lane Departure
Warning (LDW) indicator light (orange) to
alert the driver if the vehicle is traveling
close to either the left or the right of a
WARNING SYSTEMS SWITCH (if so
equipped)
Page 141 of 536
traveling lane with detectable lane mar-
kers. (See “Lane Departure Warning
(LDW)/Intelligent Lane Intervention (I-LI)”
(P.5-23).)
The BSW system will turn on the side
indicator lights, located next to the out-
side mirrors, if the radar sensors detect a
vehicle in the detection zone. If the turn
signal is activated in the direction of the
detected vehicle, a chime sounds twice
and the side indicator light will flash. (See
“Blind Spot Warning (BSW)” (P.5-33).)
SIC4454
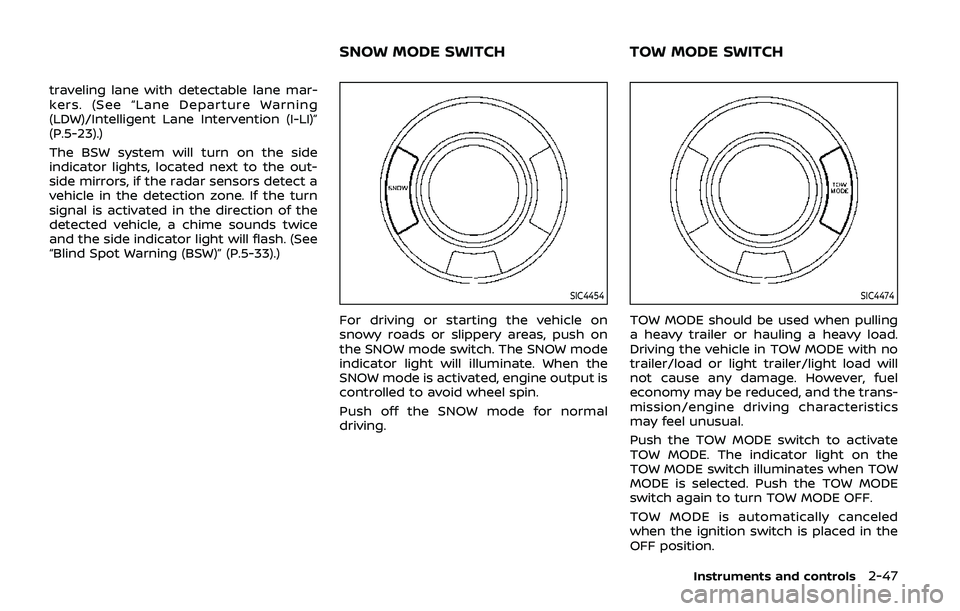
For driving or starting the vehicle on
snowy roads or slippery areas, push on
the SNOW mode switch. The SNOW mode
indicator light will illuminate. When the
SNOW mode is activated, engine output is
controlled to avoid wheel spin.
Push off the SNOW mode for normal
driving.
SIC4474
TOW MODE should be used when pulling
a heavy trailer or hauling a heavy load.
Driving the vehicle in TOW MODE with no
trailer/load or light trailer/light load will
not cause any damage. However, fuel
economy may be reduced, and the trans-
mission/engine driving characteristics
may feel unusual.
Push the TOW MODE switch to activate
TOW MODE. The indicator light on the
TOW MODE switch illuminates when TOW
MODE is selected. Push the TOW MODE
switch again to turn TOW MODE OFF.
TOW MODE is automatically canceled
when the ignition switch is placed in the
OFF position.
Instruments and controls2-47
SNOW MODE SWITCHTOW MODE SWITCH
Page 151 of 536
CAUTION
.Do not use for anything other
than glasses.
. Do not leave glasses in the sun-
glasses holder while parking in
direct sunlight. The heat may
damage the glasses.
SIC4393
GLOVE BOX
WARNING
Keep glove box lid closed while driv-
ing to help prevent injury in an
accident or a sudden stop.
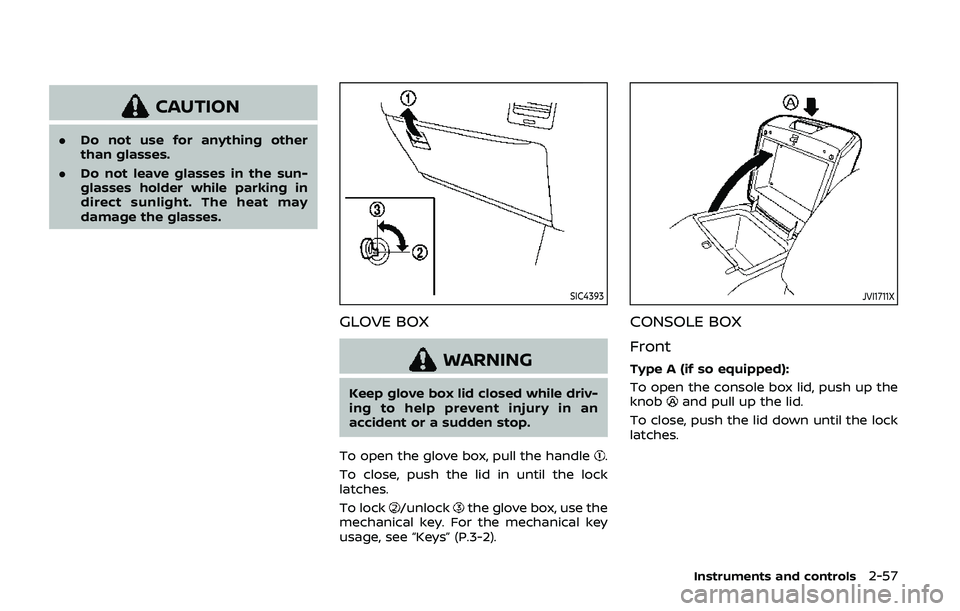
To open the glove box, pull the handle
.
To close, push the lid in until the lock
latches.
To lock
/unlockthe glove box, use the
mechanical key. For the mechanical key
usage, see “Keys” (P.3-2).
JVI1711X
CONSOLE BOX
Front
Type A (if so equipped):
To open the console box lid, push up the
knob
and pull up the lid.
To close, push the lid down until the lock
latches.
Instruments and controls2-57
Page 165 of 536
SIC4448
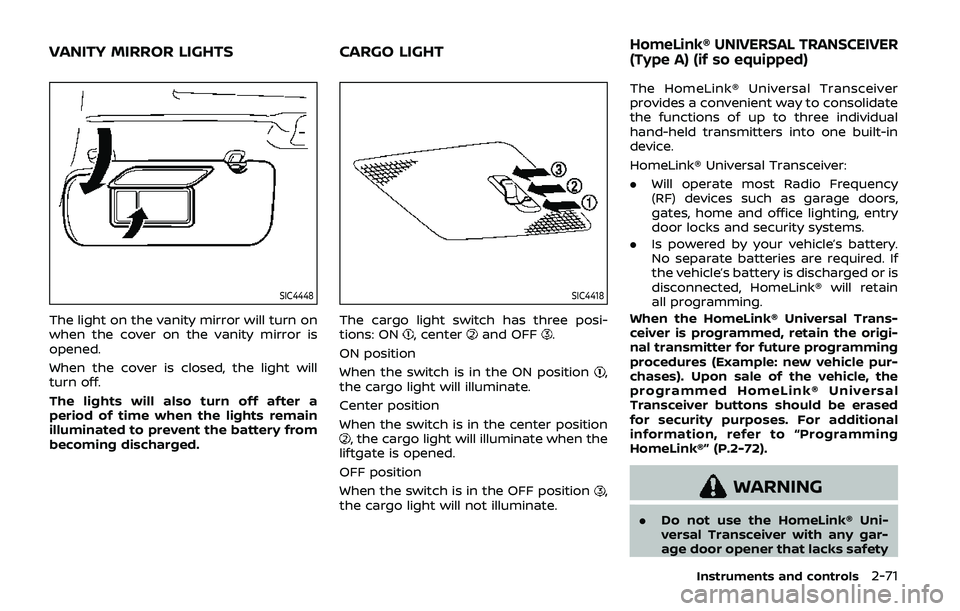
The light on the vanity mirror will turn on
when the cover on the vanity mirror is
opened.
When the cover is closed, the light will
turn off.
The lights will also turn off after a
period of time when the lights remain
illuminated to prevent the battery from
becoming discharged.
SIC4418
The cargo light switch has three posi-
tions: ON, centerand OFF.
ON position
When the switch is in the ON position
,
the cargo light will illuminate.
Center position
When the switch is in the center position
, the cargo light will illuminate when the
liftgate is opened.
OFF position
When the switch is in the OFF position
,
the cargo light will not illuminate. The HomeLink® Universal Transceiver
provides a convenient way to consolidate
the functions of up to three individual
hand-held transmitters into one built-in
device.
HomeLink® Universal Transceiver:
.
Will operate most Radio Frequency
(RF) devices such as garage doors,
gates, home and office lighting, entry
door locks and security systems.
. Is powered by your vehicle’s battery.
No separate batteries are required. If
the vehicle’s battery is discharged or is
disconnected, HomeLink® will retain
all programming.
When the HomeLink® Universal Trans-
ceiver is programmed, retain the origi-
nal transmitter for future programming
procedures (Example: new vehicle pur-
chases). Upon sale of the vehicle, the
programmed HomeLink® Universal
Transceiver buttons should be erased
for security purposes. For additional
information, refer to “Programming
HomeLink®” (P.2-72).WARNING
. Do not use the HomeLink® Uni-
versal Transceiver with any gar-
age door opener that lacks safety
Instruments and controls2-71
VANITY MIRROR LIGHTS CARGO LIGHTHomeLink® UNIVERSAL TRANSCEIVER
(Type A) (if so equipped)
Page 169 of 536
“Programming HomeLink®” - Step 1.
For questions or comments, contact
HomeLink® at: www.homelink.com/
nissan or 1-800-355-3515.
The HomeLink® Universal Transceiver
button has now been reprogrammed.
The new device can be activated by
pushing the HomeLink® button that was
just programmed. This procedure will not
affect any other programmed HomeLink®
buttons.
IF YOUR VEHICLE IS STOLEN
If your vehicle is stolen, you should
change the codes of any non-rolling code
device that has been programmed into
HomeLink®. Consult the Owner’s Manual
of each device or call the manufacturer or
dealer of those devices for additional
information.
When your vehicle is recovered, you will
need to reprogram the HomeLink® Uni-
versal Transceiver with your new trans-
mitter information.
FCC Notice:
For USA:
This device complies with Part 15 of the
FCC Rules. Operation is subject to the
following two conditions: (1) This device
may not cause harmful interference,
and (2) this device must accept any interference received, including inter-
ference that may cause undesired op-
eration.
NOTE:
Changes or modifications not expressly
approved by the party responsible for
compliance could void the user’s
authority to operate the equipment.
For Canada:
This device complies with Industry Ca-
nada licence-exempt RSS standard(s).
Operation is subject to the following
two conditions: (1) this device may not
cause interference, and (2) this device
must accept any interference, including
interference that may cause undesired
operation of the device.
The HomeLink® Universal Transceiver
provides a convenient way to consolidate
the functions of up to three individual
hand-held transmitters into one built-in
device.
HomeLink® Universal Transceiver:
.
Will operate most Radio Frequency
(RF) devices such as garage doors,
gates, home and office lighting, entry
door locks and security systems.
. Is powered by your vehicle’s battery.
No separate batteries are required. If
the vehicle’s battery is discharged or is
disconnected, HomeLink® will retain
all programming.
When the HomeLink® Universal Trans-
ceiver is programmed, retain the origi-
nal transmitter for future programming
procedures (Example: new vehicle pur-
chases). Upon sale of the vehicle, the
programmed HomeLink® Universal
Transceiver buttons should be erased
for security purposes. For additional
information, refer to “Programming
HomeLink®” (P.2-76).
WARNING
. Do not use the HomeLink® Uni-
versal Transceiver with any gar-
age door opener that lacks safety
Instruments and controls2-75
HomeLink® UNIVERSAL TRANSCEIVER
(Type B) (if so equipped)
Page 181 of 536
WARNING
.Radio waves could adversely af-
fect electric medical equipment.
Those who use a pacemaker
should contact the electric med-
ical equipment manufacturer for
the possible influences before
use.
. The Intelligent Key transmits
radio waves when the buttons
are pushed. The FAA advises that
the radio waves may affect air-
craft navigation and communica-
tion systems. Do not operate the
Intelligent Key while on an air-
plane. Make sure the buttons are
not operated unintentionally
when the unit is stored during a
flight.
The Intelligent Key system can operate all
the door locks using the remote control-
ler function or pushing the request switch
on the vehicle without taking the key out
from a pocket or purse. The operating
environment and/or conditions may af-
fect the Intelligent Key system operation.
Be sure to read the following before using
the Intelligent Key system.
CAUTION
. Be sure to carry the Intelligent
Key with you when operating the
vehicle.
. Never leave the Intelligent Key in
the vehicle when you leave the
vehicle.
The Intelligent Key is always communi-
cating with the vehicle as it receives radio
waves. The Intelligent Key system trans-
mits weak radio waves. Environmental
conditions may interfere with the opera-
tion of the Intelligent Key system under
the following operating conditions.
. When operating near a location where
strong radio waves are transmitted,
such as a TV tower, power station and
broadcasting station.
. When in possession of wireless equip-
ment, such as a cellular telephone,
transceiver, and CB radio.
. When the Intelligent Key is in contact
with or covered by metallic materials.
. When any type of radio wave remote
control is used nearby.
. When the Intelligent Key is placed near
an electric appliance such as a perso-
nal computer. .
When the vehicle is parked near a
parking meter.
In such cases, correct the operating
conditions before using the Intelligent
Key function or use the mechanical key.
Although the life of the battery varies
depending on the operating conditions,
the battery’s life is approximately 2 years.
If the battery is discharged, replace it with
a new one.
Since the Intelligent Key is continuously
receiving radio waves, if the key is left
near equipment which transmits strong
radio waves, such as signals from a TV
and personal computer, the battery life
may become shorter.
For information regarding replacement of
a battery, see “Intelligent Key battery
replacement” (P.8-21).
As many as 4 Intelligent Keys can be
registered and used with one vehicle. For
information about the purchase and use
of additional Intelligent Keys, contact a
NISSAN dealer.
CAUTION
. Do not allow the Intelligent Key,
which contains electrical compo-
nents, to come into contact with
water or salt water. This could
Pre-driving checks and adjustments3-7
INTELLIGENT KEY SYSTEM
Page 186 of 536
3-12Pre-driving checks and adjustments
CAUTION
The lockout protection may not
function under the following condi-
tions:
.When the Intelligent Key is placed
on top of the instrument panel.
. When the Intelligent Key is placed
inside the glove box or a storage
bin.
. When the Intelligent Key is placed
inside the door pockets.
. When the Intelligent Key is placed
inside or near metallic materials.
Unlocking doors and fuel-filler door
1. Push the door handle request switch
(driver’s or front passenger’s)or the
liftgate request switchonce while
carrying the Intelligent Key with you.
When you approach the vehicle with
the Intelligent Key, the puddle light
and the passenger cabin illumination
will illuminate and stay on for a short
period of time (if so equipped). (See
“Welcome light” (P.2-68).)
2. The hazard indicator flashes once and outside chime sounds once. The cor-
responding door will unlock. The fuel-filler door will also unlock
when the driver’s door handle request
switch is pushed.
3. Push the door handle request switch again within 60 seconds.
4. The hazard indicator flashes once and outside chime sounds once again. All
the doors will unlock.
The liftgate can be unlocked and opened
by pushing the liftgate opener switch. See
“Liftgate” (P.3-22).
All doors will be locked automatically
unless one of the following operations is
performed within 1 minute after pushing
the request switch while the doors are
locked. If during this 1-minute time period,
the request switch is pushed, all doors will
be locked automatically after another 1
minute.
. Opening any door
. Pushing the ignition switch
Power liftgate open (if so equipped)
1. Carry the Intelligent Key.
2. Push the power liftgate opener switch
.
3. The liftgate will unlock and automati- cally open.
4. The hazard indicator flashes 4 times and the outside chime sounds.
BATTERY SAVER SYSTEM
When all the following conditions are met
for a period of time, the battery saver
system will cut off the power supply to
prevent battery discharge.
.The ignition switch is in the ACC
position, and
. All doors are closed, and
. The shift lever is in the P (Park)
position.
WARNING SIGNALS
To help prevent the vehicle from moving
unexpectedly by erroneous operation of
the Intelligent Key listed on the following
chart or to help prevent the vehicle from
being stolen, chime or beep sounds inside
and outside the vehicle and a warning
displays in the vehicle information display.
When a chime or beep sounds or the
warning displays, be sure to check the
vehicle and Intelligent Key.
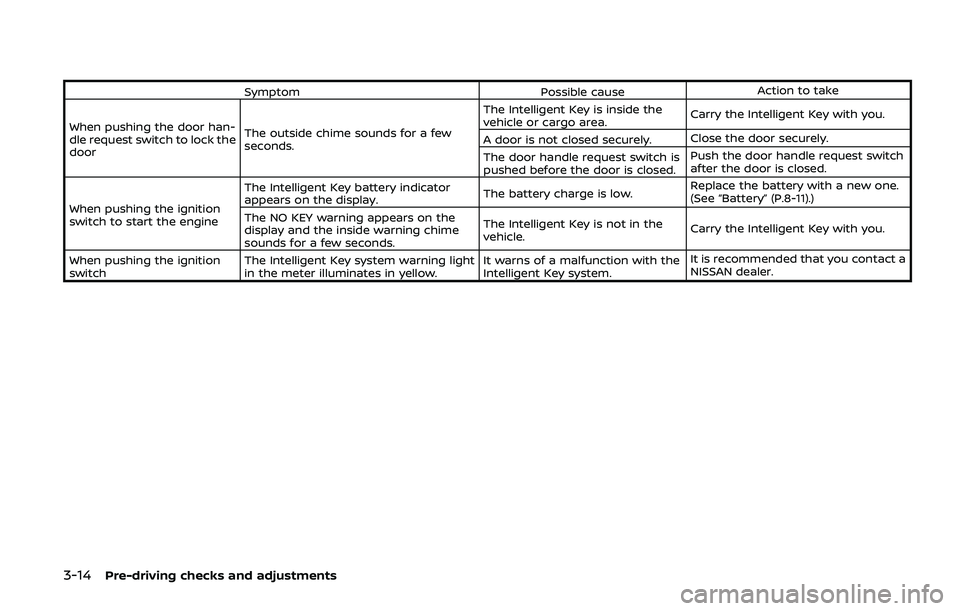
See “Troubleshooting guide” (P.3-13) and
“Vehicle information display” (P.2-20).
Page 188 of 536
3-14Pre-driving checks and adjustments
SymptomPossible causeAction to take
When pushing the door han-
dle request switch to lock the
door The outside chime sounds for a few
seconds. The Intelligent Key is inside the
vehicle or cargo area.
Carry the Intelligent Key with you.
A door is not closed securely. Close the door securely.
The door handle request switch is
pushed before the door is closed. Push the door handle request switch
after the door is closed.
When pushing the ignition
switch to start the engine The Intelligent Key battery indicator
appears on the display.
The battery charge is low.Replace the battery with a new one.
(See “Battery” (P.8-11).)
The NO KEY warning appears on the
display and the inside warning chime
sounds for a few seconds. The Intelligent Key is not in the
vehicle.
Carry the Intelligent Key with you.
When pushing the ignition
switch The Intelligent Key system warning light
in the meter illuminates in yellow. It warns of a malfunction with the
Intelligent Key system.It is recommended that you contact a
NISSAN dealer.
Page 189 of 536
WARNING
The Intelligent Key transmits radio
waves when the buttons are pushed.
The FAA advises that radio waves
may affect aircraft navigation and
communication systems. Do not op-
erate the Intelligent Key while on an
airplane. Make sure the buttons are
not operated unintentionally when
the unit is stored for a flight.
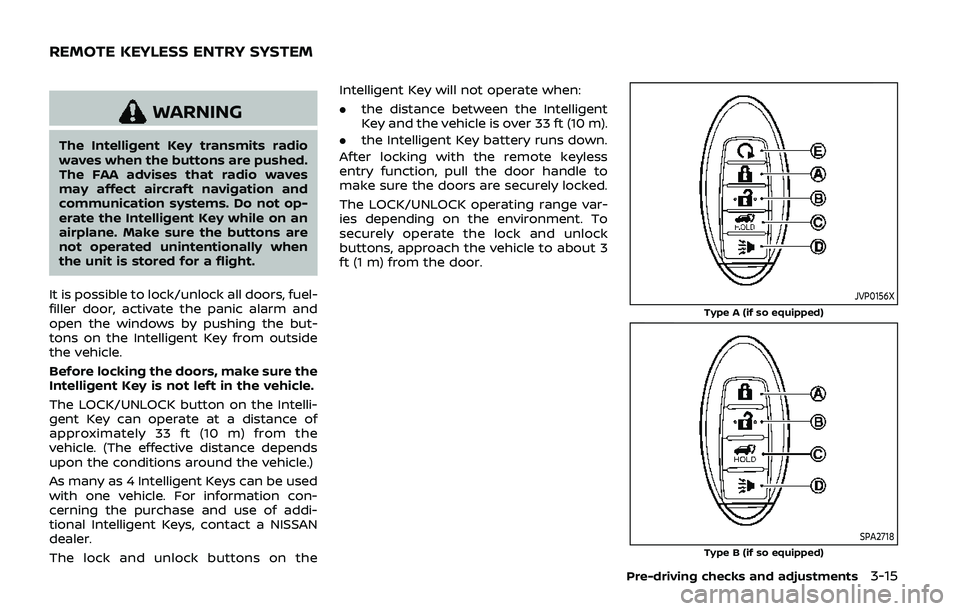
It is possible to lock/unlock all doors, fuel-
filler door, activate the panic alarm and
open the windows by pushing the but-
tons on the Intelligent Key from outside
the vehicle.
Before locking the doors, make sure the
Intelligent Key is not left in the vehicle.
The LOCK/UNLOCK button on the Intelli-
gent Key can operate at a distance of
approximately 33 ft (10 m) from the
vehicle. (The effective distance depends
upon the conditions around the vehicle.)
As many as 4 Intelligent Keys can be used
with one vehicle. For information con-
cerning the purchase and use of addi-
tional Intelligent Keys, contact a NISSAN
dealer.
The lock and unlock buttons on the Intelligent Key will not operate when:
.
the distance between the Intelligent
Key and the vehicle is over 33 ft (10 m).
. the Intelligent Key battery runs down.
After locking with the remote keyless
entry function, pull the door handle to
make sure the doors are securely locked.
The LOCK/UNLOCK operating range var-
ies depending on the environment. To
securely operate the lock and unlock
buttons, approach the vehicle to about 3
ft (1 m) from the door.
JVP0156X
Type A (if so equipped)
SPA2718Type B (if so equipped)
Pre-driving checks and adjustments3-15
REMOTE KEYLESS ENTRY SYSTEM
Page 191 of 536
Opening/closing liftgate (if so
equipped)
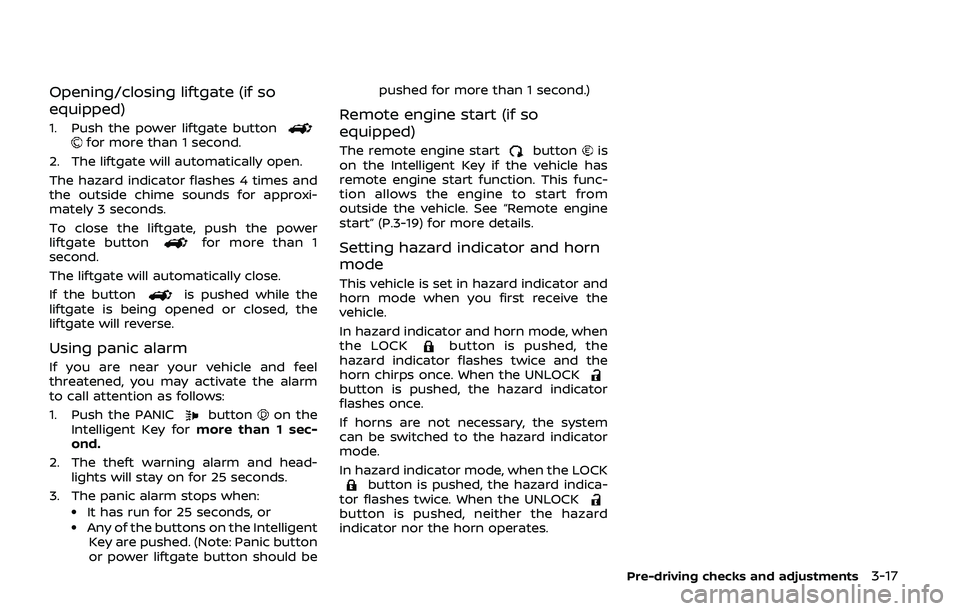
1. Push the power liftgate buttonfor more than 1 second.
2. The liftgate will automatically open.
The hazard indicator flashes 4 times and
the outside chime sounds for approxi-
mately 3 seconds.
To close the liftgate, push the power
liftgate button
for more than 1
second.
The liftgate will automatically close.
If the button
is pushed while the
liftgate is being opened or closed, the
liftgate will reverse.
Using panic alarm
If you are near your vehicle and feel
threatened, you may activate the alarm
to call attention as follows:
1. Push the PANIC
buttonon the
Intelligent Key for more than 1 sec-
ond.
2. The theft warning alarm and head- lights will stay on for 25 seconds.
3. The panic alarm stops when:
.It has run for 25 seconds, or.Any of the buttons on the Intelligent Key are pushed. (Note: Panic button
or power liftgate button should be pushed for more than 1 second.)
Remote engine start (if so
equipped)
The remote engine startbuttonis
on the Intelligent Key if the vehicle has
remote engine start function. This func-
tion allows the engine to start from
outside the vehicle. See “Remote engine
start” (P.3-19) for more details.
Setting hazard indicator and horn
mode
This vehicle is set in hazard indicator and
horn mode when you first receive the
vehicle.
In hazard indicator and horn mode, when
the LOCK
button is pushed, the
hazard indicator flashes twice and the
horn chirps once. When the UNLOCK
button is pushed, the hazard indicator
flashes once.
If horns are not necessary, the system
can be switched to the hazard indicator
mode.
In hazard indicator mode, when the LOCK
button is pushed, the hazard indica-
tor flashes twice. When the UNLOCK
button is pushed, neither the hazard
indicator nor the horn operates.
Pre-driving checks and adjustments3-17