check engine light NISSAN ARMADA 2021 Owner´s Manual
[x] Cancel search | Manufacturer: NISSAN, Model Year: 2021, Model line: ARMADA, Model: NISSAN ARMADA 2021Pages: 603, PDF Size: 3.16 MB
Page 147 of 603
3. To turn off the heater, return theswitch to the level position. Make sure
the indicator light turns off.
The heater is controlled by a thermo-
stat, automatically turning the heater
on and off. The indicator light will
remain on as long as the switch is on.
When the vehicle’s interior is warmed,
or before you leave the vehicle, be
sure to turn off the switch.
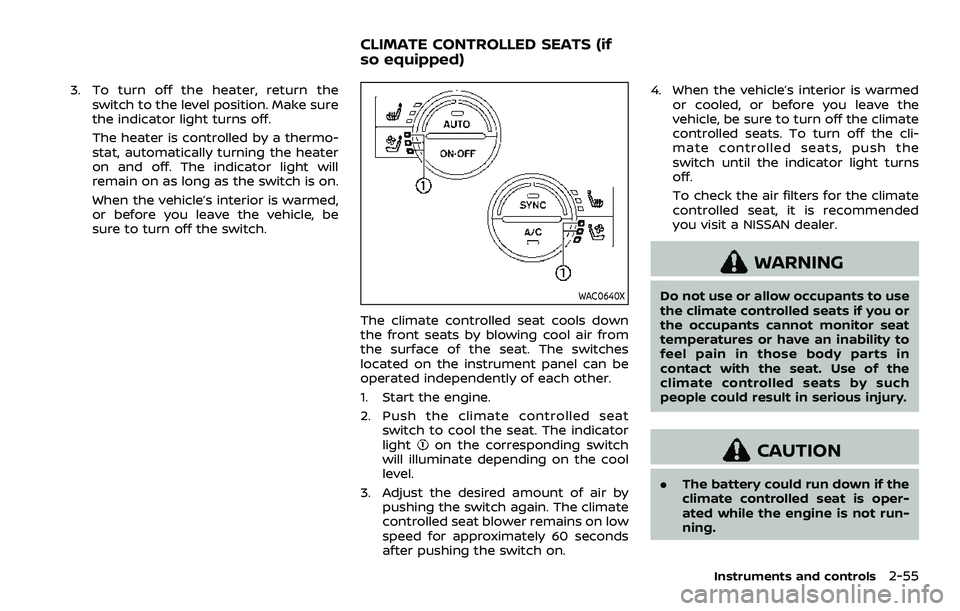
WAC0640X
The climate controlled seat cools down
the front seats by blowing cool air from
the surface of the seat. The switches
located on the instrument panel can be
operated independently of each other.
1. Start the engine.
2. Push the climate controlled seatswitch to cool the seat. The indicator
light
on the corresponding switch
will illuminate depending on the cool
level.
3. Adjust the desired amount of air by pushing the switch again. The climate
controlled seat blower remains on low
speed for approximately 60 seconds
after pushing the switch on. 4. When the vehicle’s interior is warmed
or cooled, or before you leave the
vehicle, be sure to turn off the climate
controlled seats. To turn off the cli-
mate controlled seats, push the
switch until the indicator light turns
off.
To check the air filters for the climate
controlled seat, it is recommended
you visit a NISSAN dealer.
WARNING
Do not use or allow occupants to use
the climate controlled seats if you or
the occupants cannot monitor seat
temperatures or have an inability to
feel pain in those body parts in
contact with the seat. Use of the
climate controlled seats by such
people could result in serious injury.
CAUTION
.The battery could run down if the
climate controlled seat is oper-
ated while the engine is not run-
ning.
Instruments and controls2-55
CLIMATE CONTROLLED SEATS (if
so equipped)
Page 151 of 603

.When the driver puts the vehicle in the
P (Park) position, a notification mes-
sage appears in the vehicle informa-
tion display with the options to
“Dismiss Message” or “Disable Alert” if
desired.
— Select “Disable Alert” to temporarily
disable for that stop.
— No selection or ‘Dismiss Message” will keep the alert enabled for that
stop.
. If the alert is enabled when a driver
exits the vehicle, a message will ap-
pear in the vehicle information display
that states “Check Rear Seat for All
Articles.”
If “Horn & Alert” setting is selected:
— An audible horn sound will occur
after a short time unless a rear
door is opened and closed within a
short time to deactivate the alert.
— If the doors are locked before the alert is deactivated by opening a
rear door, the horn will sound.
— If the liftgate is opened before a rear door is opened, the horn will be
delayed until after the liftgate is
closed.
NOTE:
If “Alert Only” setting is selected, the
message alert will still be shown in the vehicle information display but the horn
will not sound.
WARNING
.
If the driver selects “Disable
Alert”, no audible alert will be
provided regardless of rear door
open/close status.
. There may be times when there is
an object or passenger in the rear
seat(s) but the audible alert does
not sound. For example, this may
occur if rear seat passengers
enter or exit the vehicle during a
trip.
. The system does not directly
detect objects or passengers in
the rear seat(s). Instead, it can
detect when a rear door is
opened and closed, indicating
that there may be something in
the rear seat(s).
NOTE:
There may be times when the horn
sounds but there are no objects or
passengers in the rear seat(s).
(See “42. Rear Door Alert is activated” (P.2-
33).)
CAUTION
. Use power outlet with the engine
running to avoid discharging the
vehicle battery.
. Avoid using power outlet when
the air conditioner, headlights or
rear window defroster is on.
. Before inserting or disconnecting
a plug, be sure the electrical
accessory being used is turned
OFF.
. When not in use, be sure to close
the cap. Do not allow water or any
liquid to contact the outlet.
Instruments and controls2-59
POWER OUTLET
Page 167 of 603
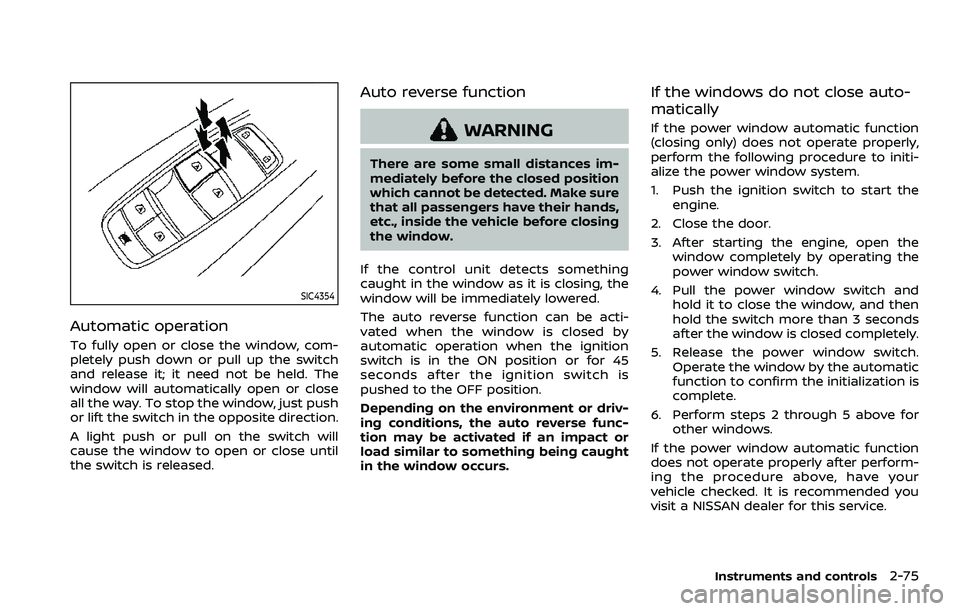
SIC4354
Automatic operation
To fully open or close the window, com-
pletely push down or pull up the switch
and release it; it need not be held. The
window will automatically open or close
all the way. To stop the window, just push
or lift the switch in the opposite direction.
A light push or pull on the switch will
cause the window to open or close until
the switch is released.
Auto reverse function
WARNING
There are some small distances im-
mediately before the closed position
which cannot be detected. Make sure
that all passengers have their hands,
etc., inside the vehicle before closing
the window.
If the control unit detects something
caught in the window as it is closing, the
window will be immediately lowered.
The auto reverse function can be acti-
vated when the window is closed by
automatic operation when the ignition
switch is in the ON position or for 45
seconds after the ignition switch is
pushed to the OFF position.
Depending on the environment or driv-
ing conditions, the auto reverse func-
tion may be activated if an impact or
load similar to something being caught
in the window occurs.
If the windows do not close auto-
matically
If the power window automatic function
(closing only) does not operate properly,
perform the following procedure to initi-
alize the power window system.
1. Push the ignition switch to start the engine.
2. Close the door.
3. After starting the engine, open the window completely by operating the
power window switch.
4. Pull the power window switch and hold it to close the window, and then
hold the switch more than 3 seconds
after the window is closed completely.
5. Release the power window switch. Operate the window by the automatic
function to confirm the initialization is
complete.
6. Perform steps 2 through 5 above for other windows.
If the power window automatic function
does not operate properly after perform-
ing the procedure above, have your
vehicle checked. It is recommended you
visit a NISSAN dealer for this service.
Instruments and controls2-75
Page 196 of 603
3-14Pre-driving checks and adjustments
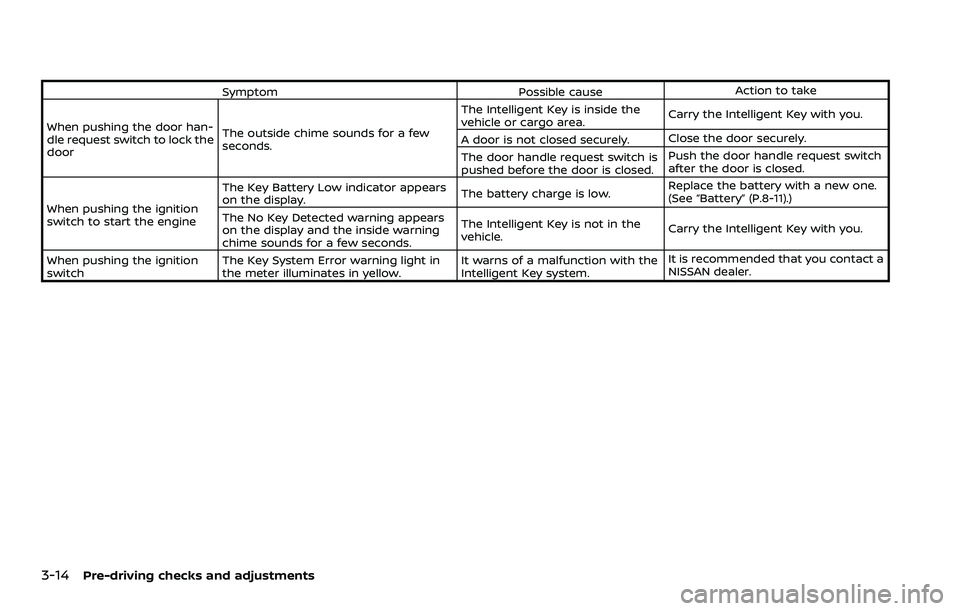
SymptomPossible causeAction to take
When pushing the door han-
dle request switch to lock the
door The outside chime sounds for a few
seconds. The Intelligent Key is inside the
vehicle or cargo area.
Carry the Intelligent Key with you.
A door is not closed securely. Close the door securely.
The door handle request switch is
pushed before the door is closed. Push the door handle request switch
after the door is closed.
When pushing the ignition
switch to start the engine The Key Battery Low indicator appears
on the display.
The battery charge is low.Replace the battery with a new one.
(See “Battery” (P.8-11).)
The No Key Detected warning appears
on the display and the inside warning
chime sounds for a few seconds. The Intelligent Key is not in the
vehicle.
Carry the Intelligent Key with you.
When pushing the ignition
switch The Key System Error warning light in
the meter illuminates in yellow. It warns of a malfunction with the
Intelligent Key system.It is recommended that you contact a
NISSAN dealer.
Page 198 of 603
3-16Pre-driving checks and adjustments
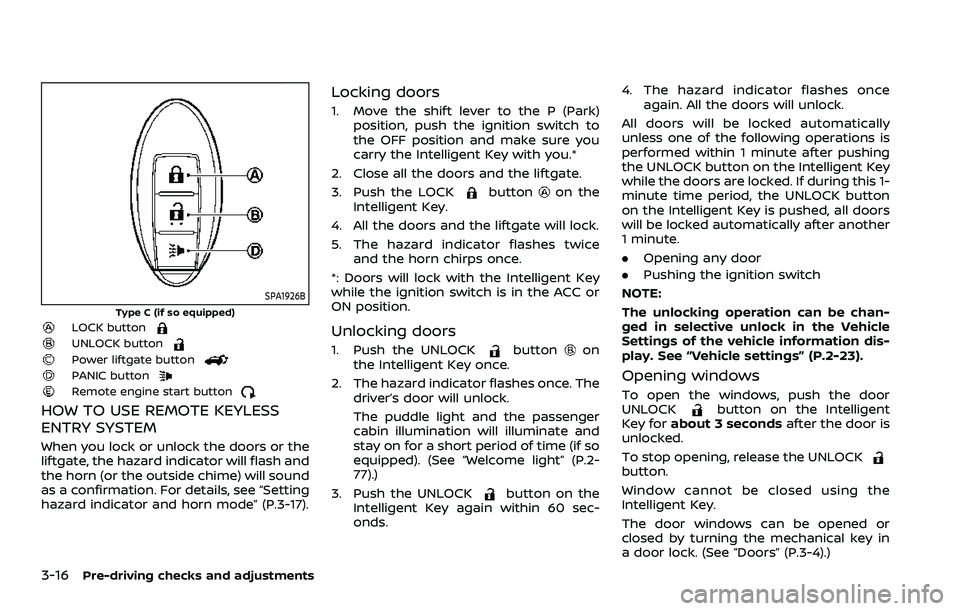
SPA1926B
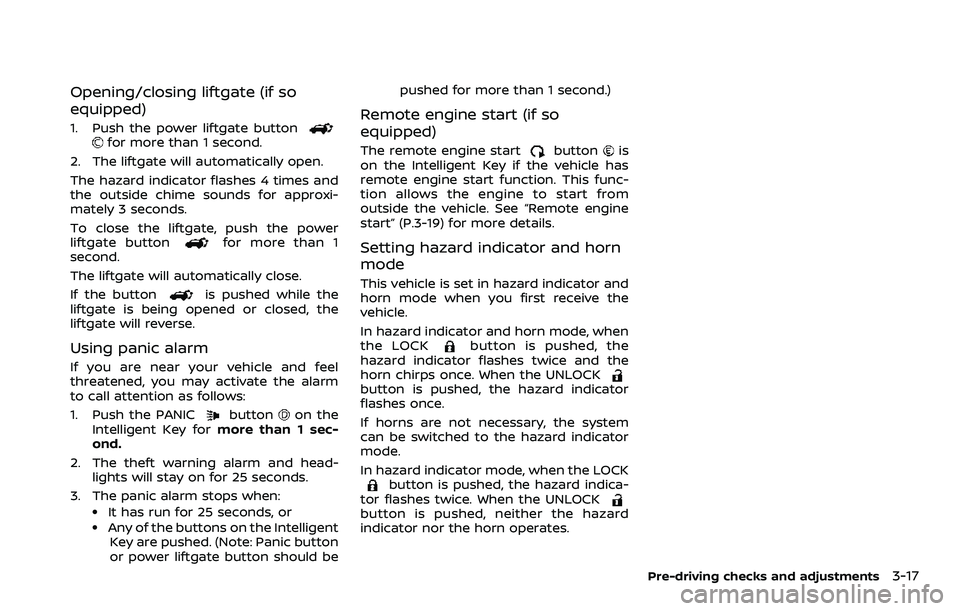
Type C (if so equipped)LOCK buttonUNLOCK buttonPower liftgate buttonPANIC buttonRemote engine start button
HOW TO USE REMOTE KEYLESS
ENTRY SYSTEM
When you lock or unlock the doors or the
liftgate, the hazard indicator will flash and
the horn (or the outside chime) will sound
as a confirmation. For details, see “Setting
hazard indicator and horn mode” (P.3-17).
Locking doors
1. Move the shift lever to the P (Park)position, push the ignition switch to
the OFF position and make sure you
carry the Intelligent Key with you.*
2. Close all the doors and the liftgate.
3. Push the LOCK
buttonon the
Intelligent Key.
4. All the doors and the liftgate will lock.
5. The hazard indicator flashes twice and the horn chirps once.
*: Doors will lock with the Intelligent Key
while the ignition switch is in the ACC or
ON position.
Unlocking doors
1. Push the UNLOCKbuttonon
the Intelligent Key once.
2. The hazard indicator flashes once. The driver’s door will unlock.
The puddle light and the passenger
cabin illumination will illuminate and
stay on for a short period of time (if so
equipped). (See “Welcome light” (P.2-
77).)
3. Push the UNLOCK
button on the
Intelligent Key again within 60 sec-
onds. 4. The hazard indicator flashes once
again. All the doors will unlock.
All doors will be locked automatically
unless one of the following operations is
performed within 1 minute after pushing
the UNLOCK button on the Intelligent Key
while the doors are locked. If during this 1-
minute time period, the UNLOCK button
on the Intelligent Key is pushed, all doors
will be locked automatically after another
1 minute.
. Opening any door
. Pushing the ignition switch
NOTE:
The unlocking operation can be chan-
ged in selective unlock in the Vehicle
Settings of the vehicle information dis-
play. See “Vehicle settings” (P.2-23).
Opening windows
To open the windows, push the door
UNLOCKbutton on the Intelligent
Key for about 3 seconds after the door is
unlocked.
To stop opening, release the UNLOCK
button.
Window cannot be closed using the
Intelligent Key.
The door windows can be opened or
closed by turning the mechanical key in
a door lock. (See “Doors” (P.3-4).)
Page 199 of 603
Opening/closing liftgate (if so
equipped)
1. Push the power liftgate buttonfor more than 1 second.
2. The liftgate will automatically open.
The hazard indicator flashes 4 times and
the outside chime sounds for approxi-
mately 3 seconds.
To close the liftgate, push the power
liftgate button
for more than 1
second.
The liftgate will automatically close.
If the button
is pushed while the
liftgate is being opened or closed, the
liftgate will reverse.
Using panic alarm
If you are near your vehicle and feel
threatened, you may activate the alarm
to call attention as follows:
1. Push the PANIC
buttonon the
Intelligent Key for more than 1 sec-
ond.
2. The theft warning alarm and head- lights will stay on for 25 seconds.
3. The panic alarm stops when:
.It has run for 25 seconds, or.Any of the buttons on the Intelligent Key are pushed. (Note: Panic button
or power liftgate button should be pushed for more than 1 second.)
Remote engine start (if so
equipped)
The remote engine startbuttonis
on the Intelligent Key if the vehicle has
remote engine start function. This func-
tion allows the engine to start from
outside the vehicle. See “Remote engine
start” (P.3-19) for more details.
Setting hazard indicator and horn
mode
This vehicle is set in hazard indicator and
horn mode when you first receive the
vehicle.
In hazard indicator and horn mode, when
the LOCK
button is pushed, the
hazard indicator flashes twice and the
horn chirps once. When the UNLOCK
button is pushed, the hazard indicator
flashes once.
If horns are not necessary, the system
can be switched to the hazard indicator
mode.
In hazard indicator mode, when the LOCK
button is pushed, the hazard indica-
tor flashes twice. When the UNLOCK
button is pushed, neither the hazard
indicator nor the horn operates.
Pre-driving checks and adjustments3-17
Page 202 of 603
3-20Pre-driving checks and adjustments
3. Within 5 seconds push and hold theremote engine startbutton until
the turn signal lights flash and the tail
lights illuminate. If the vehicle is not
within view, push and hold the remote
engine start
button for at least 2
seconds.
The following events will occur when the
engine starts:
. The front parking lights will turn on
and remain on as long as the engine is
running.
. The doors will be locked and the air
conditioner system may turn on.
. The engine will continue to run for
about 10 minutes. Repeat the steps to
extend the time for an additional 10
minutes. See “Extending engine run
time” (P.3-20).
Depress and hold the brake pedal, then
place the ignition switch in the ON posi-
tion before driving. For further instruc-
tions, see “Driving the vehicle” (P.5-17).
EXTENDING ENGINE RUN TIME
The remote engine start function can be
extended one time by performing the
steps listed in “Remote starting the en-
gine” (P.3-19). Run time will be calculated
as follows:
. The first 10 minute run time will start
when the remote engine start func- tion is performed.
. The second 10 minutes will start im-
mediately when the remote engine
start function is performed. For exam-
ple, if the engine has been running for
5 minutes, and 10 minutes are added,
the engine will run for a total of 15
minutes.
. Extending engine run time will count
towards the two remote engine start
limit.
A maximum of two remote engine starts,
or a single start with an extension, are
allowed between ignition cycles.
The ignition switch must be cycled to the
ON position and then back to the OFF
position before the remote engine start
procedure can be used again.
CANCELING A REMOTE ENGINE
START
To cancel a remote engine start, perform
one of the following:
. Aim the Intelligent Key at the vehicle
and push and hold the remote engine
start
button until the front park-
ing lights turn off.
. Turn on the hazard indicator flashers.
. Cycle the ignition switch ON and then
OFF. .
The extended engine run time has
expired.
. The first 10 minute timer has expired.
. The engine hood has been opened.
. The shift lever is moved out of the P
(Park) position.
. The theft alarm sounds due to illegal
entry into the vehicle.
. The ignition switch is pushed without
an Intelligent Key in the vehicle.
. The ignition switch is pushed with an
Intelligent Key in the vehicle but the
brake pedal is not depressed.
CONDITIONS THE REMOTE ENGINE
START WILL NOT WORK
The remote engine start will not operate
if any of the following conditions are
present:
.The ignition switch is placed in the ON
position.
. The hood is not securely closed.
. The hazard indicator flashers are on.
. The engine is still running. The engine
must be completely stopped. Wait at
least 6 seconds if the engine goes
from running to off. This is not applic-
able when extending engine run time.
. The remote engine start
button is
not pushed and held for at least 2
seconds.
Page 203 of 603
.The remote engine startbutton is
not pushed and held within 5 seconds
of pushing the “LOCK”
button.
. The brake pedal is depressed.
. The doors are not closed and locked.
. The liftgate is open.
. The Key System Error warning light
remains on in the vehicle information
display.
. An Intelligent Key is left inside the
vehicle.
. The theft alarm sounds due to illegal
entry into the vehicle.
. Two remote engine starts, or a single
remote engine start with an exten-
sion, have already been used.
. The shift lever is not in the P (Park)
position.
The remote engine start may display a
warning or indicator in the vehicle infor-
mation display. For an explanation of the
warning or indicator, see “Operational
indicators” (P.2-29).
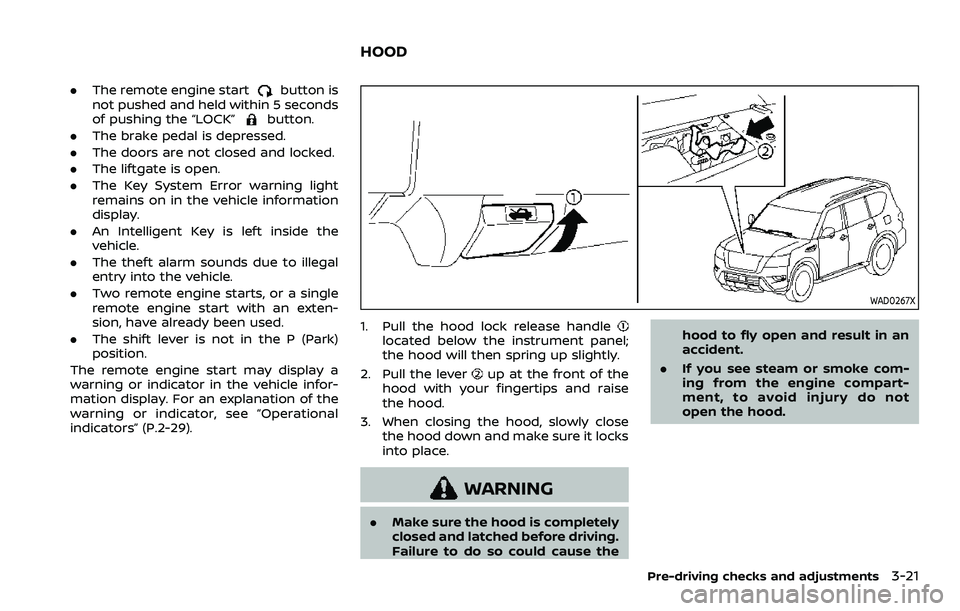
WAD0267X
1. Pull the hood lock release handlelocated below the instrument panel;
the hood will then spring up slightly.
2. Pull the lever
up at the front of the
hood with your fingertips and raise
the hood.
3. When closing the hood, slowly close the hood down and make sure it locks
into place.
WARNING
.Make sure the hood is completely
closed and latched before driving.
Failure to do so could cause the hood to fly open and result in an
accident.
. If you see steam or smoke com-
ing from the engine compart-
ment, to avoid injury do not
open the hood.
Pre-driving checks and adjustments3-21
HOOD
Page 218 of 603
3-36Pre-driving checks and adjustments
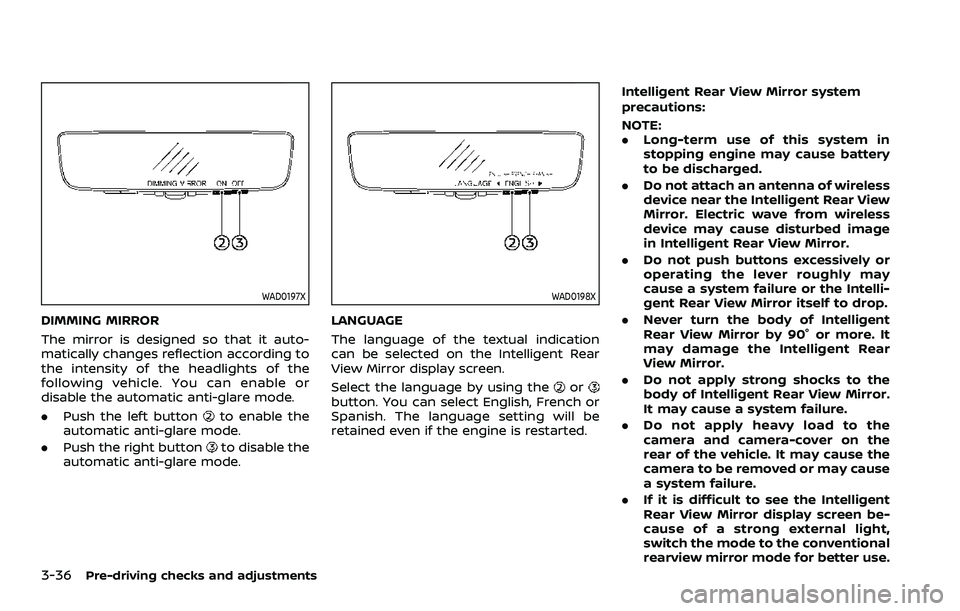
WAD0197X
DIMMING MIRROR
The mirror is designed so that it auto-
matically changes reflection according to
the intensity of the headlights of the
following vehicle. You can enable or
disable the automatic anti-glare mode.
.Push the left button
to enable the
automatic anti-glare mode.
. Push the right button
to disable the
automatic anti-glare mode.
WAD0198X
LANGUAGE
The language of the textual indication
can be selected on the Intelligent Rear
View Mirror display screen.
Select the language by using the
orbutton. You can select English, French or
Spanish. The language setting will be
retained even if the engine is restarted. Intelligent Rear View Mirror system
precautions:
NOTE:
.
Long-term use of this system in
stopping engine may cause battery
to be discharged.
. Do not attach an antenna of wireless
device near the Intelligent Rear View
Mirror. Electric wave from wireless
device may cause disturbed image
in Intelligent Rear View Mirror.
. Do not push buttons excessively or
operating the lever roughly may
cause a system failure or the Intelli-
gent Rear View Mirror itself to drop.
. Never turn the body of Intelligent
Rear View Mirror by 90° or more. It
may damage the Intelligent Rear
View Mirror.
. Do not apply strong shocks to the
body of Intelligent Rear View Mirror.
It may cause a system failure.
. Do not apply heavy load to the
camera and camera-cover on the
rear of the vehicle. It may cause the
camera to be removed or may cause
a system failure.
. If it is difficult to see the Intelligent
Rear View Mirror display screen be-
cause of a strong external light,
switch the mode to the conventional
rearview mirror mode for better use.
Page 282 of 603
5-16Starting and driving
.Make sure the area around the vehicle
is clear.
. Check fluid levels such as engine oil,
coolant, brake fluid and window
washer fluid as frequently as possible,
or at least whenever you refuel.
. Check that all windows and lights are
clean.
. Visually inspect tires for their appear-
ance and condition. Also check tires
for proper inflation.
. Lock all doors.
. Position seat and adjust head re-
straints/headrests.
. Adjust inside and outside mirrors.
. Fasten seat belts and ask all passen-
gers to do likewise.
. Check the operation of warning lights
when the ignition switch is pushed to
the ON position. (See “Warning lights,
indicator lights and audible remin-
ders” (P.2-10).) 1. Apply the parking brake.
2. Move the shift lever to the P (Park) or N
(Neutral) position. (P is recommended.)
The starter is designed not to operate
unless the shift lever is in either of the
above positions.
3. Push the ignition switch to the ON position. Firmly depress the brake
pedal and push the ignition switch to
start the engine.
To start the engine immediately, push
and release the ignition switch while
depressing the brake pedal with the
ignition switch in any position.
.If the engine is very hard to start inextremely cold weather or when
restarting, depress the accelerator
pedal a little (approximately 1/3 to
the floor) and while holding, crank
the engine. Release the accelerator
pedal when the engine starts.
.If the engine is very hard to startbecause it is flooded, depress the
accelerator pedal all the way to the
floor and hold it. Push the ignition
switch to the ON position to start
cranking the engine. After 5 or 6
seconds, stop cranking by pushing
the ignition switch to OFF. After
cranking the engine, release the
accelerator pedal. Crank the engine
with your foot off the accelerator pedal
by depressing the brake
pedal and pushing the push-button
ignition switch to start the engine.
If the engine starts, but fails to run,
repeat the above procedure.
CAUTION
Do not operate the starter for more
than 15 seconds at a time. If the
engine does not start, push the
ignition switch to OFF and wait 10
seconds before cranking again,
otherwise the starter could be da-
maged.
4. Warm-up
Allow the engine to idle for at least 30
seconds after starting. Do not race the
engine while warming it up. Drive at
moderate speed for a short distance
first, especially in cold weather. In cold
weather, keep the engine running for
a minimum of 2 - 3 minutes before
shutting it off. Starting and stopping
the engine over a short period of time
may make the vehicle more difficult to
start.
When racing the engine up to 4,000
rpm or more under the no load
condition, the engine will enter the
BEFORE STARTING THE ENGINE STARTING THE ENGINE