tow NISSAN ARMADA 2023 User Guide
[x] Cancel search | Manufacturer: NISSAN, Model Year: 2023, Model line: ARMADA, Model: NISSAN ARMADA 2023Pages: 604, PDF Size: 2.97 MB
Page 98 of 604
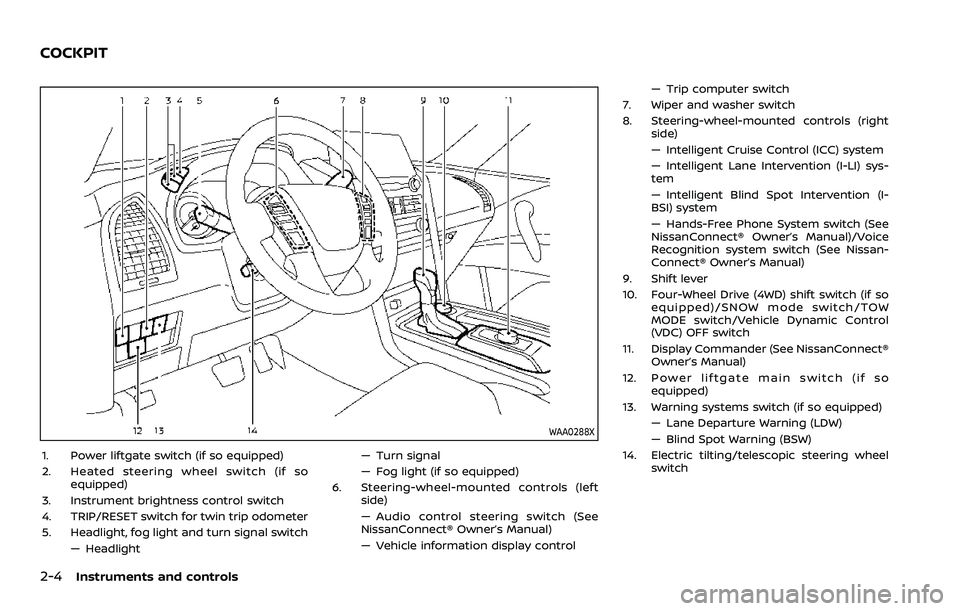
2-4Instruments and controls
WAA0288X
1. Power liftgate switch (if so equipped)
2. Heated steering wheel switch (if soequipped)
3. Instrument brightness control switch
4. TRIP/RESET switch for twin trip odometer
5. Headlight, fog light and turn signal switch — Headlight — Turn signal
— Fog light (if so equipped)
6. Steering-wheel-mounted controls (left side)
— Audio control steering switch (See
NissanConnect® Owner’s Manual)
— Vehicle information display control — Trip computer switch
7. Wiper and washer switch
8. Steering-wheel-mounted controls (right side)
— Intelligent Cruise Control (ICC) system
— Intelligent Lane Intervention (I-LI) sys-
tem
— Intelligent Blind Spot Intervention (I-
BSI) system
— Hands-Free Phone System switch (See
NissanConnect® Owner’s Manual)/Voice
Recognition system switch (See Nissan-
Connect® Owner’s Manual)
9. Shift lever
10. Four-Wheel Drive (4WD) shift switch (if so equipped)/SNOW mode switch/TOW
MODE switch/Vehicle Dynamic Control
(VDC) OFF switch
11. Display Commander (See NissanConnect® Owner’s Manual)
12. Power liftgate main switch (if so equipped)
13. Warning systems switch (if so equipped) — Lane Departure Warning (LDW)
— Blind Spot Warning (BSW)
14. Electric tilting/telescopic steering wheel switch
COCKPIT
Page 100 of 604
2-6Instruments and controls
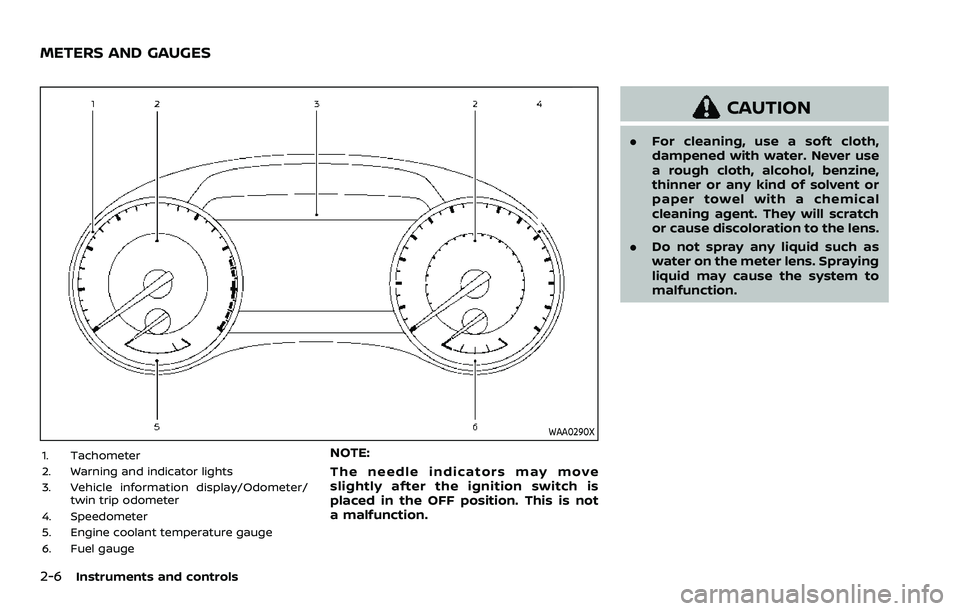
WAA0290X
1. Tachometer
2. Warning and indicator lights
3. Vehicle information display/Odometer/twin trip odometer
4. Speedometer
5. Engine coolant temperature gauge
6. Fuel gaugeNOTE:
The needle indicators may move
slightly after the ignition switch is
placed in the OFF position. This is not
a malfunction.
CAUTION
. For cleaning, use a soft cloth,
dampened with water. Never use
a rough cloth, alcohol, benzine,
thinner or any kind of solvent or
paper towel with a chemical
cleaning agent. They will scratch
or cause discoloration to the lens.
. Do not spray any liquid such as
water on the meter lens. Spraying
liquid may cause the system to
malfunction.
METERS AND GAUGES
Page 105 of 604
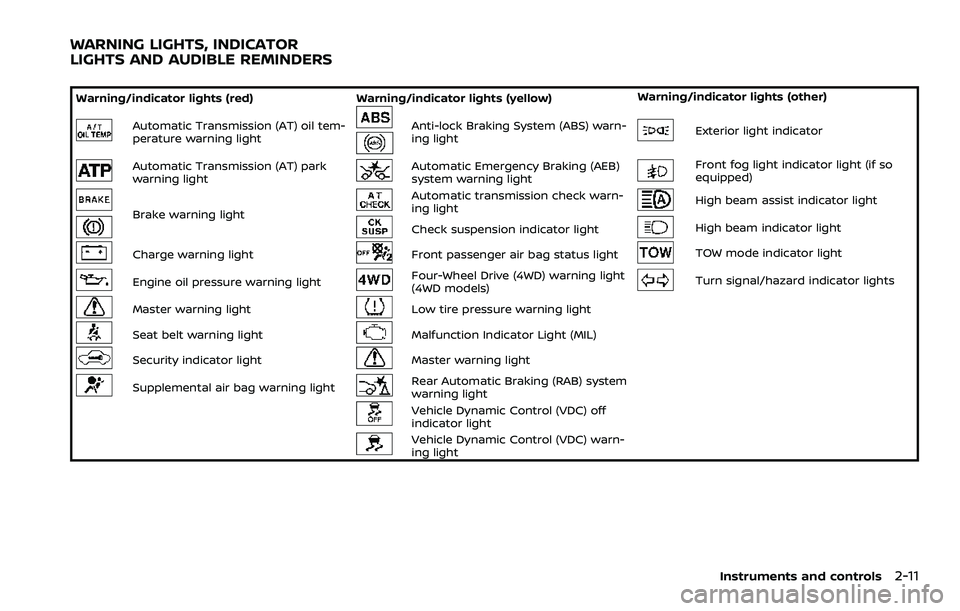
Warning/indicator lights (red)Warning/indicator lights (yellow) Warning/indicator lights (other)
Automatic Transmission (AT) oil tem-
perature warning lightAnti-lock Braking System (ABS) warn-
ing lightExterior light indicator
Automatic Transmission (AT) park
warning lightAutomatic Emergency Braking (AEB)
system warning lightFront fog light indicator light (if so
equipped)
Brake warning light
Automatic transmission check warn-
ing lightHigh beam assist indicator light
Check suspension indicator lightHigh beam indicator light
Charge warning lightFront passenger air bag status lightTOW mode indicator light
Engine oil pressure warning lightFour-Wheel Drive (4WD) warning light
(4WD models)Turn signal/hazard indicator lights
Master warning lightLow tire pressure warning light
Seat belt warning lightMalfunction Indicator Light (MIL)
Security indicator lightMaster warning light
Supplemental air bag warning lightRear Automatic Braking (RAB) system
warning light
Vehicle Dynamic Control (VDC) off
indicator light
Vehicle Dynamic Control (VDC) warn-
ing light
Instruments and controls2-11
WARNING LIGHTS, INDICATOR
LIGHTS AND AUDIBLE REMINDERS
Page 107 of 604
Low hydraulic pressure warning indica-
tor:
If the brake warning light illuminates
when the engine is running, or while
driving with the parking brake is released,
check the brake fluid level. If the brake
fluid level is sufficient, it may indicate low
hydraulic pressure in the brake booster. It
is recommended that you have the brake
system checked by a NISSAN dealer
promptly.
Anti-lock Braking System (ABS) warning
indicator:
When the parking brake is released and
the brake fluid level is sufficient, if both
the brake warning light and the Anti-lock
Braking System (ABS) warning light illu-
minate, it may indicate the ABS is not
functioning properly. Have the brake
system checked, and if necessary re-
paired. It is recommended you visit a
NISSAN dealer for this service. (See “Anti-
lock Braking System (ABS) warning light”
(P.2-15).)
WARNING
.Your brake system may not be
working properly if the warning
light is on. Driving could be dan-
gerous. If you judge it to be safe, drive carefully to the nearest
service station for repairs. Other-
wise, have your vehicle towed
because driving it could be dan-
gerous.
. Pressing the brake pedal with the
engine stopped and/or low brake
fluid level may increase your
stopping distance and braking
will require greater pedal effort
as well as pedal travel.
. If the brake fluid level is below the
minimum or MIN mark on the
brake fluid reservoir, do not drive
until the brake system has been
checked. It is recommended you
visit a NISSAN dealer for this
service.
Charge warning light
When the ignition switch is in the ON
position, the charge warning light illumi-
nates and then turns off.
If the light comes on while the engine is
running, it may indicate the charging
system is not functioning properly. Turn
the engine off and check the alternator
belt. If the belt is loose, broken, missing or
if the light remains on, have your vehicle
serviced immediately. It is recommended you visit a NISSAN dealer for this service.
CAUTION
Do not continue driving if the alter-
nator belt is loose, broken or miss-
ing.
Engine oil pressure warning
light
This light warns of low engine oil pres-
sure. If the light flickers or comes on
during normal driving, pull off the road in
a safe area, stop the engine immediately
and call a NISSAN dealer or other author-
ized repair shop.
The engine oil pressure warning light is
not designed to indicate a low oil level.
Use the dipstick to check the oil level.
(See “Engine oil” (P.8-6).)
CAUTION
Running the engine with the engine
oil pressure warning light on could
cause serious damage to the engine
almost immediately. Such damage is
not covered by warranty. Turn off the
engine as soon as it is safe to do so.
Instruments and controls2-13
Page 112 of 604
2-18Instruments and controls
Malfunction Indicator Light
(MIL)
If the malfunction indicator light comes
on steady or blinks while the engine is
running, it may indicate a potential emis-
sion control malfunction.
The malfunction indicator light may also
come on steady if the fuel-filler cap is
loose or missing, or if the vehicle runs out
of fuel. Check to make sure the fuel-filler
cap is installed and closed tightly, and
that the vehicle has at least 3 US gallons
(14 liters) of fuel in the fuel tank.
After a few driving trips, the
light
should turn off if no other potential
emission control system malfunction ex-
ists.
If this indicator light remains on for 20
seconds and then blinks for 10 seconds
when the engine is not running, it indi-
cates that the vehicle is not ready for an
emission control system inspection/
maintenance test. (See “Readiness for
Inspection/Maintenance (I/M) test” (P.10-
38).)
Operation:
The malfunction indicator light will come
on in one of two ways: .
Malfunction indicator light on steady
— An emission control system mal-
function has been detected. Check
the fuel-filler cap if the Loose Fuel
Cap warning appears in the vehicle
information display. If the fuel-filler
cap is loose or missing, tighten or
install the cap and continue to drive
the vehicle. The
light should turn
off after a few driving trips. If the
light does not turn off after a few
driving trips, have the vehicle in-
spected. It is recommended you visit
a NISSAN dealer for this service. You
do not need to have your vehicle
towed to the dealer.
. Malfunction indicator light blinking —
An engine misfire has been detected
which may damage the emission
control system.
To reduce or avoid emission control
system damage:
1) Do not drive at speeds above 45
MPH (72 km/h).
2) Avoid hard acceleration or decel- eration.
3) Avoid steep uphill grades.
4) If possible, reduce the amount of cargo being hauled or towed.
The malfunction indicator light may
stop blinking and remain on.
Have the vehicle inspected. It is re- commended you visit a NISSAN dealer
for this service. You do not need to
have your vehicle towed to the dealer.
CAUTION
Continued vehicle operation without
having the emission control system
checked and repaired as necessary
could lead to poor driveability, re-
duced fuel economy, and possible
damage to the emission control sys-
tem.
Master warning light
When the ignition switch is in the ON
position, the master warning light illumi-
nates when a warning message appears
in the vehicle information display.
See “Vehicle information display” (P.2-20).
Rear Automatic Braking (RAB)
system warning light
This light comes on when the ignition
switch is placed in the ON position. It
turns off after the engine is started.
This light illuminates when the RAB sys-
tem is turned off in the vehicle informa-
tion display.
Page 113 of 604
If the light illuminates when the RAB
system is on, it may indicate that the
system is unavailable. (See “Rear Auto-
matic Braking (RAB)” (P.5-116).)
Vehicle Dynamic Control (VDC)
off indicator light
When the ignition switch is in the ON
position, the Vehicle Dynamic Control
(VDC) off indicator light illuminates and
then turns off.
The light comes on when the VDC off
switch is pushed to OFF. This indicates
that the VDC system is not operating.
When the 4L position is selected with the
Four-Wheel Drive (4WD) shift switch, the
VDC system is disabled and the VDC off
indicator light illuminates. (4WD models)
For additional information, see “Vehicle
Dynamic Control (VDC) system” (P.5-144).
Vehicle Dynamic Control (VDC)
warning light
When the ignition switch is in the ON
position, the Vehicle Dynamic Control
(VDC) warning light illuminates and then
turns off.
The light will blink when the VDC system
or the traction control system is operat-
ing, thus alerting the driver that the vehicle is nearing its traction limits. The
road surface may be slippery.
When the VDC warning light illuminates
when the VDC system is turned on, this
light alerts the driver to the fact that the
VDC system’s fail-safe mode is operating,
for example the VDC or hill start assist
system may not be functioning properly.
Have the system checked. It is recom-
mended you visit a NISSAN dealer for this
service. If a malfunction occurs in the
system, the VDC system function will be
canceled but the vehicle is still driveable.
For additional information, see “Vehicle
Dynamic Control (VDC) system” (P.5-144).
WARNING/INDICATOR LIGHTS
(other)
Exterior light indicator
This indicator illuminates when the head-
light switch is turned to the AUTO,orposition and the front parking lights,
instrument panel lights, rear combination
lights, license plate lights or headlights
are on. The indicator turns off when these
lights are turned off.
Front fog light indicator light
(if so equipped)
The front fog light indicator light illumi-
nates when the front fog lights are on.
(See “Fog light switch” (P.2-54).)
High beam assist indicator
light
The high beam assist indicator light
illuminates when the high beam assist
system is turned on and it is operational.
(See “High beam assist” (P.2-50).)
High beam indicator light
This light comes on when the headlight
high beam is on and goes out when the
low beam is selected.
TOW mode indicator light
This light will illuminate when the TOW
MODE is selected while the engine is
running. (See “TOW mode” (P.5-134).)
Turn signal/hazard indicator
lights
The light flashes when the turn signal
switch lever or hazard switch is turned on.
Instruments and controls2-19
Page 137 of 604
JVI1010X
Type A (if so equipped)
JVI1011XType B (if so equipped)
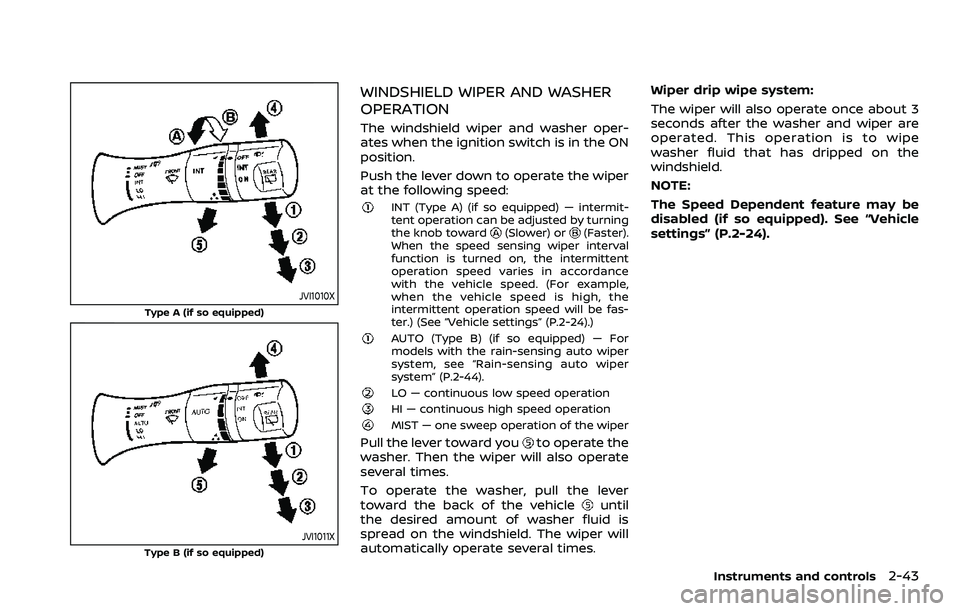
WINDSHIELD WIPER AND WASHER
OPERATION
The windshield wiper and washer oper-
ates when the ignition switch is in the ON
position.
Push the lever down to operate the wiper
at the following speed:
INT (Type A) (if so equipped) — intermit-
tent operation can be adjusted by turning
the knob toward
(Slower) or(Faster).
When the speed sensing wiper interval
function is turned on, the intermittent
operation speed varies in accordance
with the vehicle speed. (For example,
when the vehicle speed is high, the
intermittent operation speed will be fas-
ter.) (See “Vehicle settings” (P.2-24).)
AUTO (Type B) (if so equipped) — For
models with the rain-sensing auto wiper
system, see “Rain-sensing auto wiper
system” (P.2-44).
LO — continuous low speed operationHI — continuous high speed operationMIST — one sweep operation of the wiper
Pull the lever toward youto operate the
washer. Then the wiper will also operate
several times.
To operate the washer, pull the lever
toward the back of the vehicle
until
the desired amount of washer fluid is
spread on the windshield. The wiper will
automatically operate several times. Wiper drip wipe system:
The wiper will also operate once about 3
seconds after the washer and wiper are
operated. This operation is to wipe
washer fluid that has dripped on the
windshield.
NOTE:
The Speed Dependent feature may be
disabled (if so equipped). See “Vehicle
settings” (P.2-24).
Instruments and controls2-43
Page 138 of 604
2-44Instruments and controls
JVI1013X
RAIN-SENSING AUTO WIPER SYS-
TEM (if so equipped)
The rain-sensing auto wiper system can
automatically turn on the wipers and
adjust the wiper speed depending on
the rainfall and the vehicle speed by using
the rain sensor located on the upper part
of the windshield.
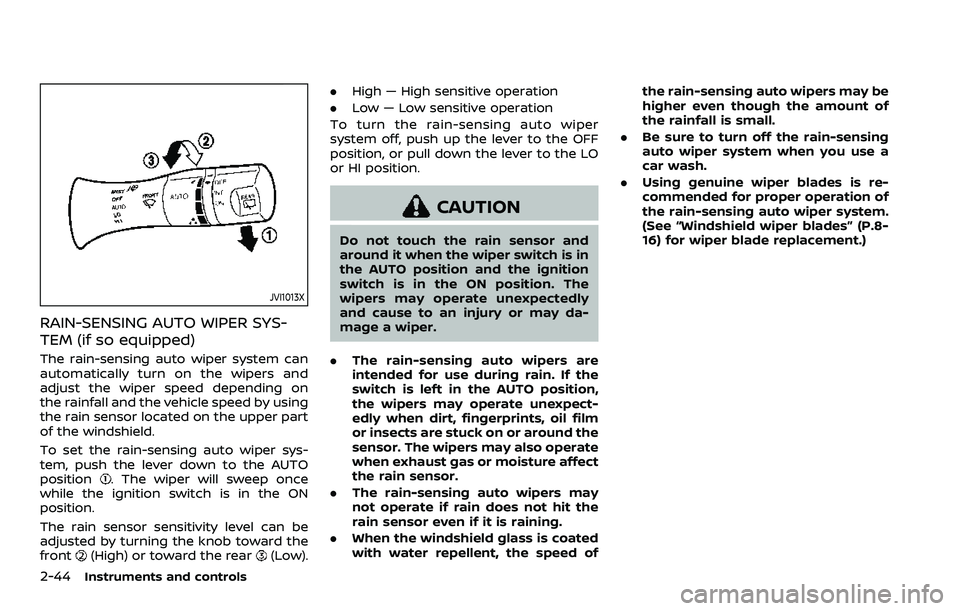
To set the rain-sensing auto wiper sys-
tem, push the lever down to the AUTO
position
. The wiper will sweep once
while the ignition switch is in the ON
position.
The rain sensor sensitivity level can be
adjusted by turning the knob toward the
front
(High) or toward the rear(Low). .
High — High sensitive operation
. Low — Low sensitive operation
To turn the rain-sensing auto wiper
system off, push up the lever to the OFF
position, or pull down the lever to the LO
or HI position.
CAUTION
Do not touch the rain sensor and
around it when the wiper switch is in
the AUTO position and the ignition
switch is in the ON position. The
wipers may operate unexpectedly
and cause to an injury or may da-
mage a wiper.
. The rain-sensing auto wipers are
intended for use during rain. If the
switch is left in the AUTO position,
the wipers may operate unexpect-
edly when dirt, fingerprints, oil film
or insects are stuck on or around the
sensor. The wipers may also operate
when exhaust gas or moisture affect
the rain sensor.
. The rain-sensing auto wipers may
not operate if rain does not hit the
rain sensor even if it is raining.
. When the windshield glass is coated
with water repellent, the speed of the rain-sensing auto wipers may be
higher even though the amount of
the rainfall is small.
. Be sure to turn off the rain-sensing
auto wiper system when you use a
car wash.
. Using genuine wiper blades is re-
commended for proper operation of
the rain-sensing auto wiper system.
(See “Windshield wiper blades” (P.8-
16) for wiper blade replacement.)
Page 143 of 604
Automatic headlights off delay:
You can keep the headlights on for up to
180 seconds after you place the ignition
switch in the OFF position and open any
door then close all the doors.
You can adjust the period of the auto-
matic headlights off delay from 0 seconds
(OFF) to 180 seconds. The factory default
setting is 45 seconds.
See “Vehicle settings” (P.2-24).
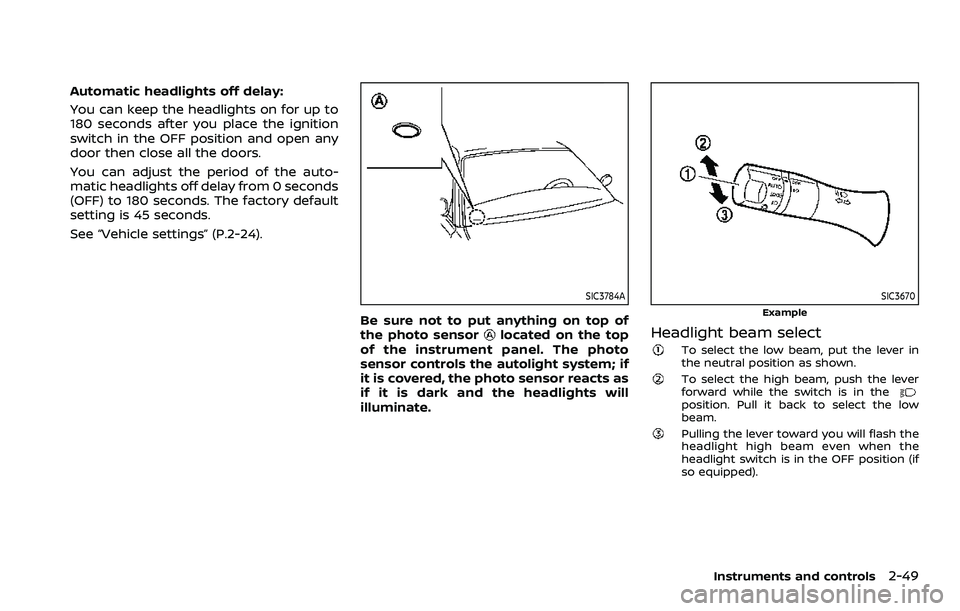
SIC3784A
Be sure not to put anything on top of
the photo sensorlocated on the top
of the instrument panel. The photo
sensor controls the autolight system; if
it is covered, the photo sensor reacts as
if it is dark and the headlights will
illuminate.
SIC3670
Example
Headlight beam select
To select the low beam, put the lever in
the neutral position as shown.
To select the high beam, push the lever
forward while the switch is in the
position. Pull it back to select the low
beam.
Pulling the lever toward you will flash the
headlight high beam even when the
headlight switch is in the OFF position (if
so equipped).
Instruments and controls2-49
Page 144 of 604
2-50Instruments and controls
High beam assist
The high beam assist system will operate
when the vehicle is driven at approxi-
mately 25 MPH (40 km/h) and above.
If an oncoming vehicle or leading vehicle
appears in front of your vehicle when the
headlight high beam is on, the headlight
will be switched to the low beam auto-
matically.
Precautions on high beam assist:
WARNING
.The high beam assist system is a
convenience but it is not a sub-
stitute for safe driving operation.
The driver should remain alert at
all times, ensure safe driving
practices and switch the high
beam and low beam manually
when necessary.
. The high beam or low beam may
not switch automatically under
the following conditions. Switch
the high beam and low beam
manually.
— During bad weather (rain, fog,
snow, wind, etc.). — When a light source similar to
a headlight or tail light is in
the vicinity of the vehicle.
— When the headlights of the oncoming vehicle or the lead-
ing vehicle are turned off,
when the color of the light is
affected due to foreign mate-
rials on the lights, or when the
light beam is out of position.
— When there is a sudden, con- tinuous change in brightness.
— When driving on a road that passes over rolling hills, or a
road that has level differ-
ences.
— When driving on a road with many curves.
— When a sign or mirror-like surface is reflecting intense
light towards the front of the
vehicle.
— When the container, etc. being towed by a leading vehicle is
reflecting intense light.
— When a headlight on your vehicle is damaged or dirty.
— When the vehicle is leaning at an angle due to a punctured tire, being towed, etc.
. The timing of switching the low
beam and high beam may
change under the following situa-
tions.
— The brightness of the head-
lights of the oncoming vehicle
or leading vehicle.
— The movement and direction of the oncoming vehicle and
the leading vehicle.
— When only one light on the oncoming vehicle or the lead-
ing vehicle is illuminated.
— When the oncoming vehicle or the leading vehicle is a two-
wheeled vehicle.
— Road conditions (incline, curve, the road surface, etc.).
— The number of passengers and the amount of luggage.