tow NISSAN ARMADA 2023 Owners Manual
[x] Cancel search | Manufacturer: NISSAN, Model Year: 2023, Model line: ARMADA, Model: NISSAN ARMADA 2023Pages: 604, PDF Size: 2.97 MB
Page 11 of 604
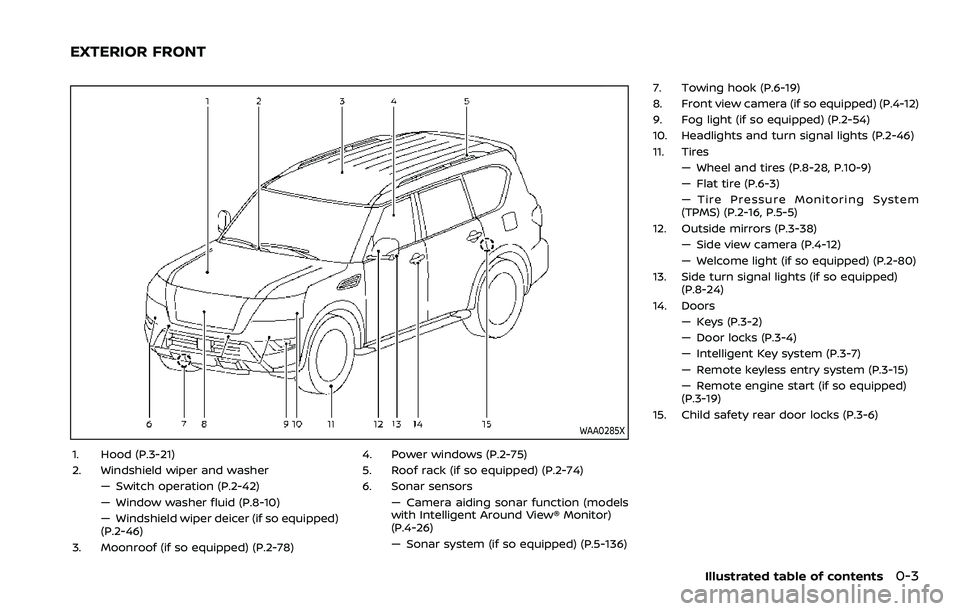
WAA0285X
1. Hood (P.3-21)
2. Windshield wiper and washer— Switch operation (P.2-42)
— Window washer fluid (P.8-10)
— Windshield wiper deicer (if so equipped)
(P.2-46)
3. Moonroof (if so equipped) (P.2-78) 4. Power windows (P.2-75)
5. Roof rack (if so equipped) (P.2-74)
6. Sonar sensors
— Camera aiding sonar function (models
with Intelligent Around View® Monitor)
(P.4-26)
— Sonar system (if so equipped) (P.5-136) 7. Towing hook (P.6-19)
8. Front view camera (if so equipped) (P.4-12)
9. Fog light (if so equipped) (P.2-54)
10. Headlights and turn signal lights (P.2-46)
11. Tires
— Wheel and tires (P.8-28, P.10-9)
— Flat tire (P.6-3)
— Tire Pressure Monitoring System
(TPMS) (P.2-16, P.5-5)
12. Outside mirrors (P.3-38) — Side view camera (P.4-12)
— Welcome light (if so equipped) (P.2-80)
13. Side turn signal lights (if so equipped) (P.8-24)
14. Doors — Keys (P.3-2)
— Door locks (P.3-4)
— Intelligent Key system (P.3-7)
— Remote keyless entry system (P.3-15)
— Remote engine start (if so equipped)
(P.3-19)
15. Child safety rear door locks (P.3-6)
Illustrated table of contents0-3
EXTERIOR FRONT
Page 12 of 604
0-4Illustrated table of contents
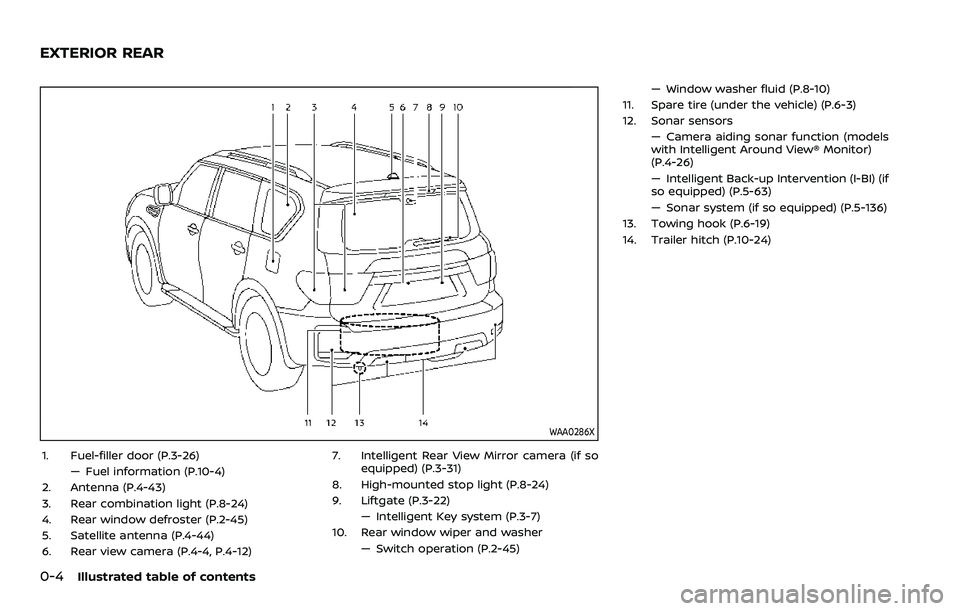
WAA0286X
1. Fuel-filler door (P.3-26)— Fuel information (P.10-4)
2. Antenna (P.4-43)
3. Rear combination light (P.8-24)
4. Rear window defroster (P.2-45)
5. Satellite antenna (P.4-44)
6. Rear view camera (P.4-4, P.4-12) 7. Intelligent Rear View Mirror camera (if so
equipped) (P.3-31)
8. High-mounted stop light (P.8-24)
9. Liftgate (P.3-22) — Intelligent Key system (P.3-7)
10. Rear window wiper and washer
— Switch operation (P.2-45) — Window washer fluid (P.8-10)
11. Spare tire (under the vehicle) (P.6-3)
12. Sonar sensors — Camera aiding sonar function (models
with Intelligent Around View® Monitor)
(P.4-26)
— Intelligent Back-up Intervention (I-BI) (if
so equipped) (P.5-63)
— Sonar system (if so equipped) (P.5-136)
13. Towing hook (P.6-19)
14. Trailer hitch (P.10-24)
EXTERIOR REAR
Page 14 of 604
0-6Illustrated table of contents
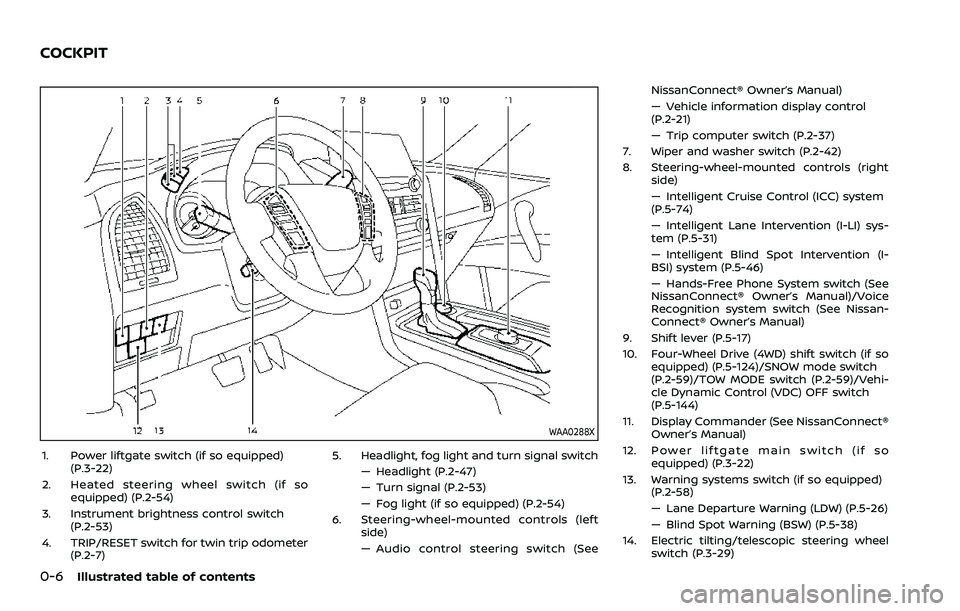
WAA0288X
1. Power liftgate switch (if so equipped)(P.3-22)
2. Heated steering wheel switch (if so equipped) (P.2-54)
3. Instrument brightness control switch (P.2-53)
4. TRIP/RESET switch for twin trip odometer (P.2-7) 5. Headlight, fog light and turn signal switch
— Headlight (P.2-47)
— Turn signal (P.2-53)
— Fog light (if so equipped) (P.2-54)
6. Steering-wheel-mounted controls (left side)
— Audio control steering switch (See NissanConnect® Owner’s Manual)
— Vehicle information display control
(P.2-21)
— Trip computer switch (P.2-37)
7. Wiper and washer switch (P.2-42)
8. Steering-wheel-mounted controls (right side)
— Intelligent Cruise Control (ICC) system
(P.5-74)
— Intelligent Lane Intervention (I-LI) sys-
tem (P.5-31)
— Intelligent Blind Spot Intervention (I-
BSI) system (P.5-46)
— Hands-Free Phone System switch (See
NissanConnect® Owner’s Manual)/Voice
Recognition system switch (See Nissan-
Connect® Owner’s Manual)
9. Shift lever (P.5-17)
10. Four-Wheel Drive (4WD) shift switch (if so equipped) (P.5-124)/SNOW mode switch
(P.2-59)/TOW MODE switch (P.2-59)/Vehi-
cle Dynamic Control (VDC) OFF switch
(P.5-144)
11. Display Commander (See NissanConnect® Owner’s Manual)
12. Power liftgate main switch (if so equipped) (P.3-22)
13. Warning systems switch (if so equipped) (P.2-58)
— Lane Departure Warning (LDW) (P.5-26)
— Blind Spot Warning (BSW) (P.5-38)
14. Electric tilting/telescopic steering wheel switch (P.3-29)
COCKPIT
Page 18 of 604
0-10Illustrated table of contents
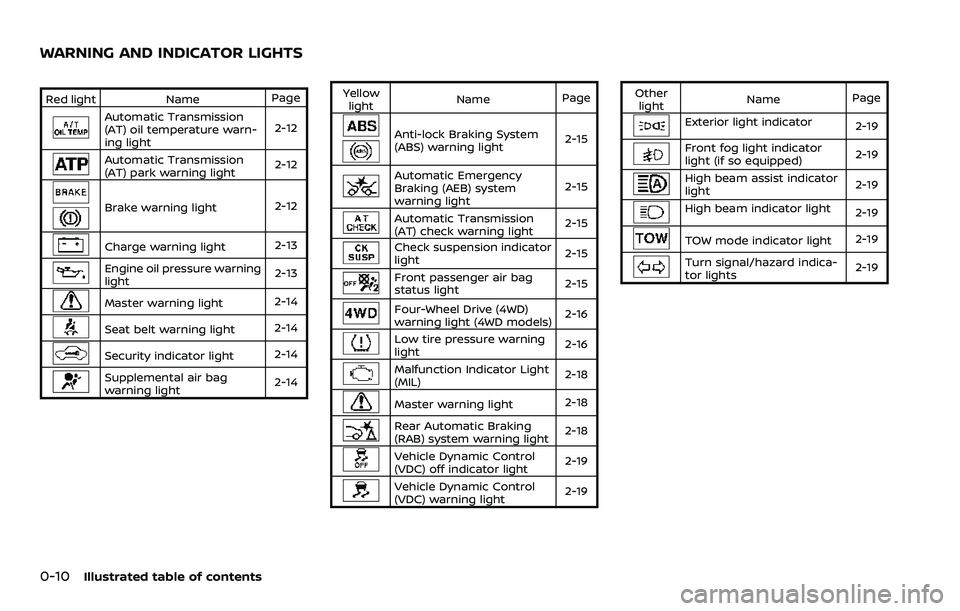
Red lightNamePage
Automatic Transmission
(AT) oil temperature warn-
ing light 2-12
Automatic Transmission
(AT) park warning light
2-12
Brake warning light
2-12
Charge warning light2-13
Engine oil pressure warning
light2-13
Master warning light
2-14
Seat belt warning light
2-14
Security indicator light2-14
Supplemental air bag
warning light2-14Yellow
light Name
Page
Anti-lock Braking System
(ABS) warning light 2-15
Automatic Emergency
Braking (AEB) system
warning light2-15
Automatic Transmission
(AT) check warning light
2-15
Check suspension indicator
light
2-15
Front passenger air bag
status light
2-15
Four-Wheel Drive (4WD)
warning light (4WD models)2-16
Low tire pressure warning
light
2-16
Malfunction Indicator Light
(MIL)2-18
Master warning light
2-18
Rear Automatic Braking
(RAB) system warning light2-18
Vehicle Dynamic Control
(VDC) off indicator light
2-19
Vehicle Dynamic Control
(VDC) warning light2-19Other
light Name
Page
Exterior light indicator
2-19
Front fog light indicator
light (if so equipped)2-19
High beam assist indicator
light2-19
High beam indicator light
2-19
TOW mode indicator light2-19
Turn signal/hazard indica-
tor lights2-19
WARNING AND INDICATOR LIGHTS
Page 31 of 604
CAUTION
.When folding the 2nd row seat for
maximum cargo hauling, be sure
that cargo does not contact the
center console of the captain’s
seat (if so equipped) to avoid
possible damage to the console.
. When folding or returning the
seat(s) to the upright position, to
avoid injury to yourself and
others:
— Make sure that the seat path
is clear before moving the
seat.
— Be careful not to allow hands or feet to get caught or
pinched in the seat.
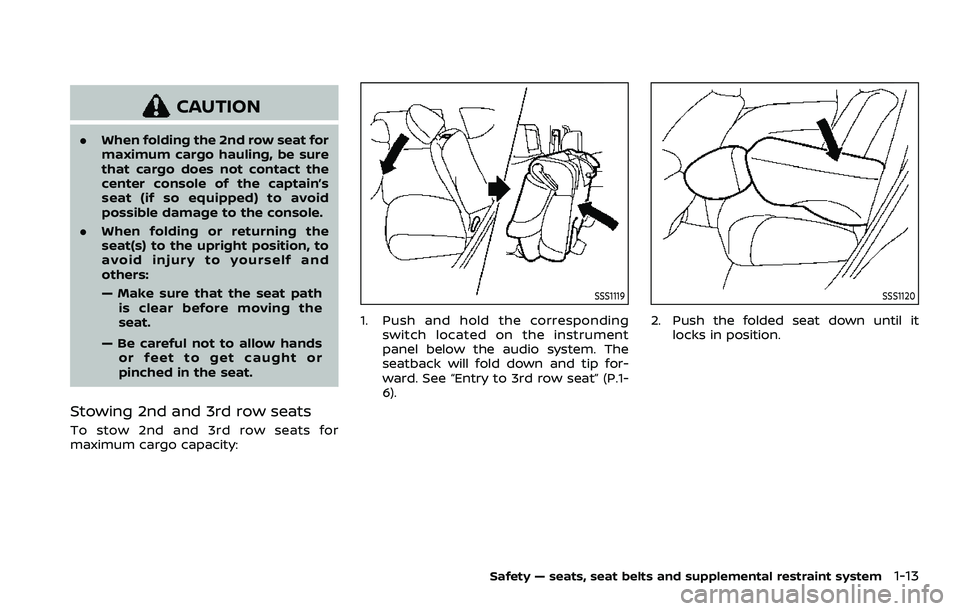
Stowing 2nd and 3rd row seats
To stow 2nd and 3rd row seats for
maximum cargo capacity:
SSS1119
1. Push and hold the corresponding switch located on the instrument
panel below the audio system. The
seatback will fold down and tip for-
ward. See “Entry to 3rd row seat” (P.1-
6).
SSS1120
2. Push the folded seat down until it locks in position.
Safety — seats, seat belts and supplemental restraint system1-13
Page 42 of 604
1-24Safety — seats, seat belts and supplemental restraint system
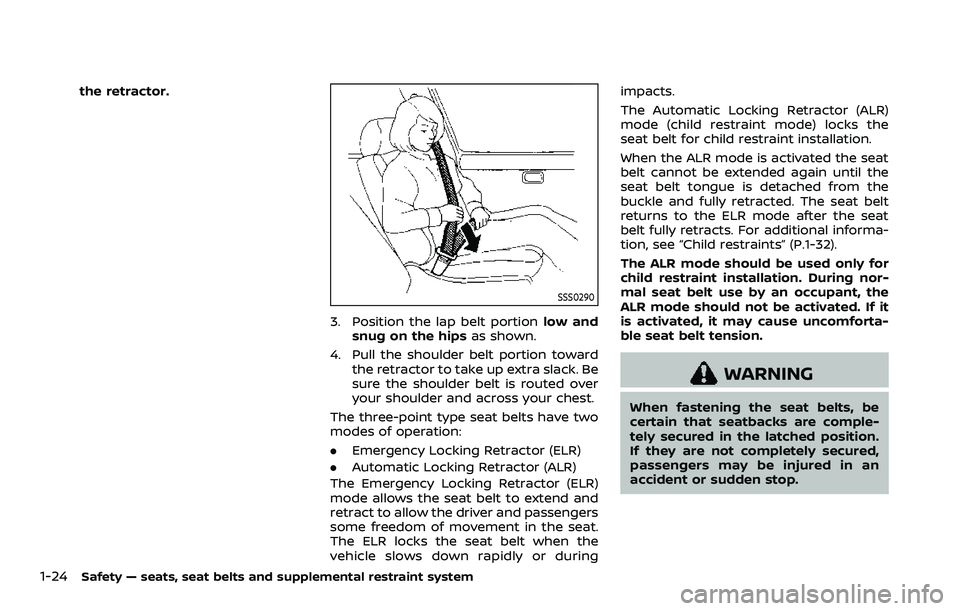
the retractor.
SSS0290
3. Position the lap belt portionlow and
snug on the hips as shown.
4. Pull the shoulder belt portion toward the retractor to take up extra slack. Be
sure the shoulder belt is routed over
your shoulder and across your chest.
The three-point type seat belts have two
modes of operation:
. Emergency Locking Retractor (ELR)
. Automatic Locking Retractor (ALR)
The Emergency Locking Retractor (ELR)
mode allows the seat belt to extend and
retract to allow the driver and passengers
some freedom of movement in the seat.
The ELR locks the seat belt when the
vehicle slows down rapidly or during impacts.
The Automatic Locking Retractor (ALR)
mode (child restraint mode) locks the
seat belt for child restraint installation.
When the ALR mode is activated the seat
belt cannot be extended again until the
seat belt tongue is detached from the
buckle and fully retracted. The seat belt
returns to the ELR mode after the seat
belt fully retracts. For additional informa-
tion, see “Child restraints” (P.1-32).
The ALR mode should be used only for
child restraint installation. During nor-
mal seat belt use by an occupant, the
ALR mode should not be activated. If it
is activated, it may cause uncomforta-
ble seat belt tension.
WARNING
When fastening the seat belts, be
certain that seatbacks are comple-
tely secured in the latched position.
If they are not completely secured,
passengers may be injured in an
accident or sudden stop.
Page 45 of 604
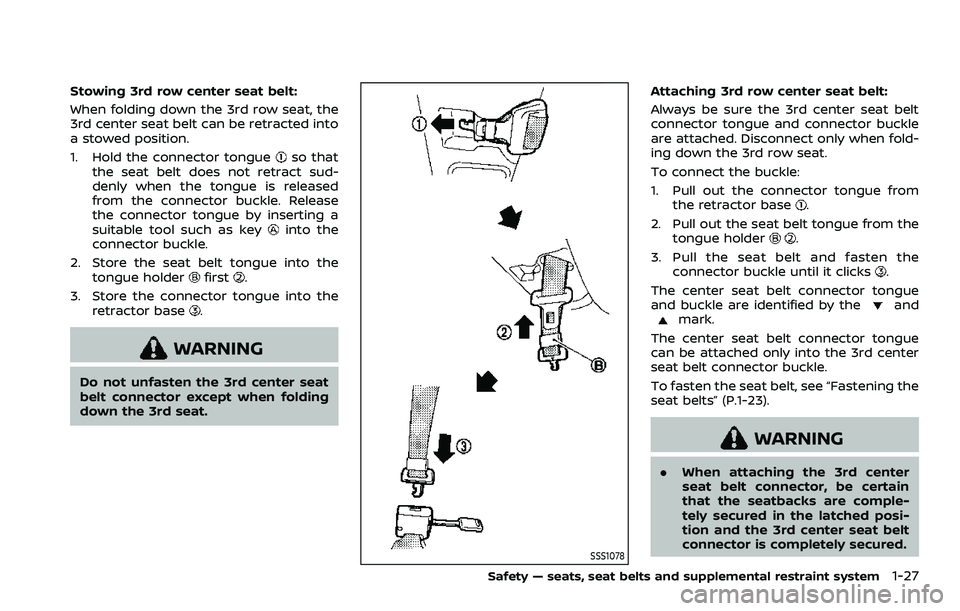
Stowing 3rd row center seat belt:
When folding down the 3rd row seat, the
3rd center seat belt can be retracted into
a stowed position.
1. Hold the connector tongue
so that
the seat belt does not retract sud-
denly when the tongue is released
from the connector buckle. Release
the connector tongue by inserting a
suitable tool such as key
into the
connector buckle.
2. Store the seat belt tongue into the tongue holder
first.
3. Store the connector tongue into the retractor base
.
WARNING
Do not unfasten the 3rd center seat
belt connector except when folding
down the 3rd seat.
SSS1078
Attaching 3rd row center seat belt:
Always be sure the 3rd center seat belt
connector tongue and connector buckle
are attached. Disconnect only when fold-
ing down the 3rd row seat.
To connect the buckle:
1. Pull out the connector tongue fromthe retractor base
.
2. Pull out the seat belt tongue from the tongue holder
.
3. Pull the seat belt and fasten the connector buckle until it clicks
.
The center seat belt connector tongue
and buckle are identified by the
andmark.
The center seat belt connector tongue
can be attached only into the 3rd center
seat belt connector buckle.
To fasten the seat belt, see “Fastening the
seat belts” (P.1-23).
WARNING
. When attaching the 3rd center
seat belt connector, be certain
that the seatbacks are comple-
tely secured in the latched posi-
tion and the 3rd center seat belt
connector is completely secured.
Safety — seats, seat belts and supplemental restraint system1-27
Page 72 of 604
1-54Safety — seats, seat belts and supplemental restraint system
proper booster seat fit, try another
seating position or a different booster
seat.
4. Position the lap portion of the seat belt low and snug on the child’s hips.
Be sure to follow the booster seat
manufacturer’s instructions for ad-
justing the seat belt routing.
5. Pull the shoulder belt portion of the seat belt toward the retractor to take
up extra slack. Be sure the shoulder
belt is positioned across the top,
middle portion of the child’s shoulder.
Be sure to follow the booster seat
manufacturer’s instructions for ad-
justing the seat belt routing.
6. Follow the warnings, cautions and instructions for properly fastening a
seat belt shown in “Seat belts” (P.1-20).
SSS0803
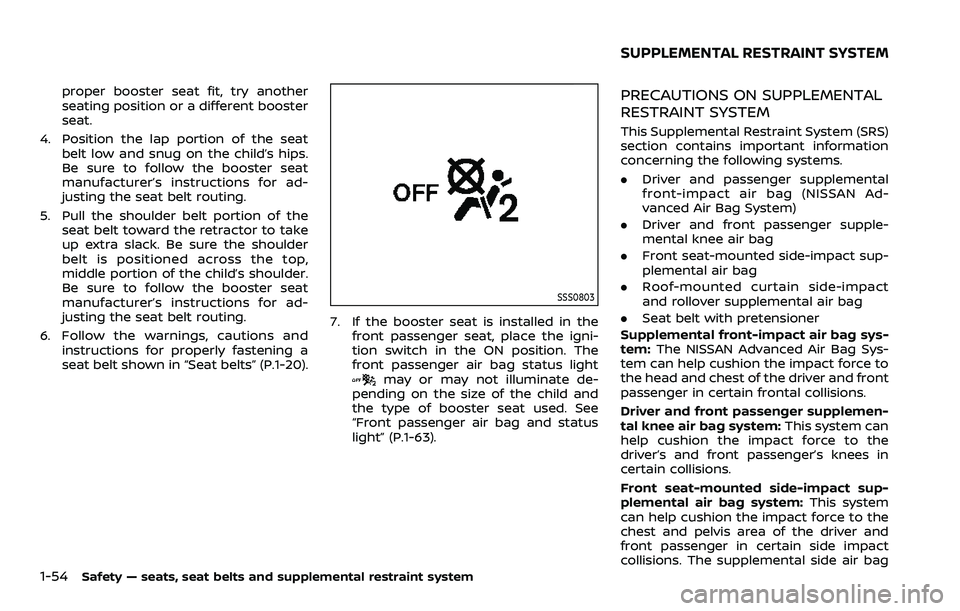
7. If the booster seat is installed in thefront passenger seat, place the igni-
tion switch in the ON position. The
front passenger air bag status light
may or may not illuminate de-
pending on the size of the child and
the type of booster seat used. See
“Front passenger air bag and status
light” (P.1-63).
PRECAUTIONS ON SUPPLEMENTAL
RESTRAINT SYSTEM
This Supplemental Restraint System (SRS)
section contains important information
concerning the following systems.
. Driver and passenger supplemental
front-impact air bag (NISSAN Ad-
vanced Air Bag System)
. Driver and front passenger supple-
mental knee air bag
. Front seat-mounted side-impact sup-
plemental air bag
. Roof-mounted curtain side-impact
and rollover supplemental air bag
. Seat belt with pretensioner
Supplemental front-impact air bag sys-
tem: The NISSAN Advanced Air Bag Sys-
tem can help cushion the impact force to
the head and chest of the driver and front
passenger in certain frontal collisions.
Driver and front passenger supplemen-
tal knee air bag system: This system can
help cushion the impact force to the
driver’s and front passenger’s knees in
certain collisions.
Front seat-mounted side-impact sup-
plemental air bag system: This system
can help cushion the impact force to the
chest and pelvis area of the driver and
front passenger in certain side impact
collisions. The supplemental side air bag
SUPPLEMENTAL RESTRAINT SYSTEM
Page 86 of 604
1-68Safety — seats, seat belts and supplemental restraint system
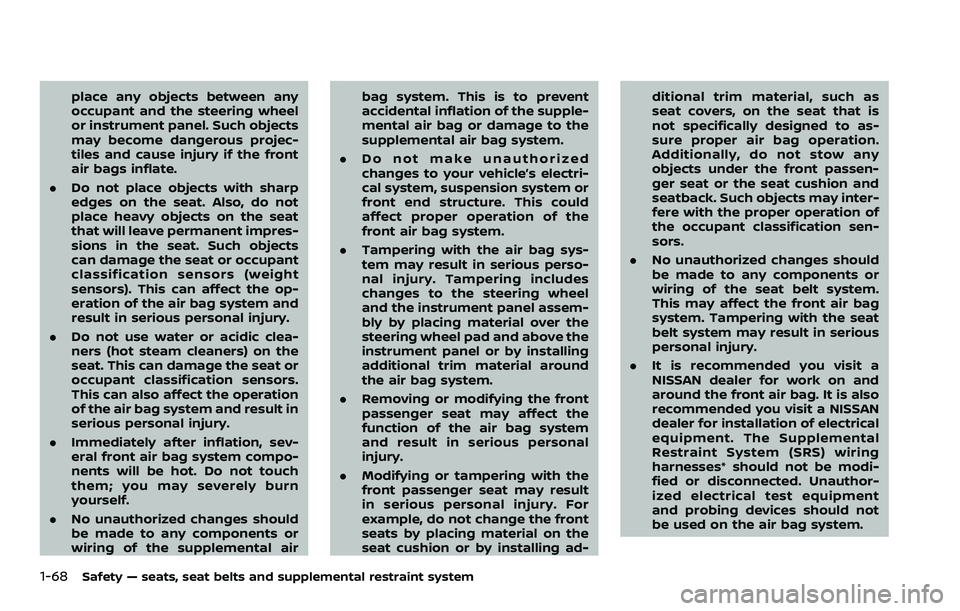
place any objects between any
occupant and the steering wheel
or instrument panel. Such objects
may become dangerous projec-
tiles and cause injury if the front
air bags inflate.
. Do not place objects with sharp
edges on the seat. Also, do not
place heavy objects on the seat
that will leave permanent impres-
sions in the seat. Such objects
can damage the seat or occupant
classification sensors (weight
sensors). This can affect the op-
eration of the air bag system and
result in serious personal injury.
. Do not use water or acidic clea-
ners (hot steam cleaners) on the
seat. This can damage the seat or
occupant classification sensors.
This can also affect the operation
of the air bag system and result in
serious personal injury.
. Immediately after inflation, sev-
eral front air bag system compo-
nents will be hot. Do not touch
them; you may severely burn
yourself.
. No unauthorized changes should
be made to any components or
wiring of the supplemental air bag system. This is to prevent
accidental inflation of the supple-
mental air bag or damage to the
supplemental air bag system.
. Do not make unauthorized
changes to your vehicle’s electri-
cal system, suspension system or
front end structure. This could
affect proper operation of the
front air bag system.
. Tampering with the air bag sys-
tem may result in serious perso-
nal injury. Tampering includes
changes to the steering wheel
and the instrument panel assem-
bly by placing material over the
steering wheel pad and above the
instrument panel or by installing
additional trim material around
the air bag system.
. Removing or modifying the front
passenger seat may affect the
function of the air bag system
and result in serious personal
injury.
. Modifying or tampering with the
front passenger seat may result
in serious personal injury. For
example, do not change the front
seats by placing material on the
seat cushion or by installing ad- ditional trim material, such as
seat covers, on the seat that is
not specifically designed to as-
sure proper air bag operation.
Additionally, do not stow any
objects under the front passen-
ger seat or the seat cushion and
seatback. Such objects may inter-
fere with the proper operation of
the occupant classification sen-
sors.
. No unauthorized changes should
be made to any components or
wiring of the seat belt system.
This may affect the front air bag
system. Tampering with the seat
belt system may result in serious
personal injury.
. It is recommended you visit a
NISSAN dealer for work on and
around the front air bag. It is also
recommended you visit a NISSAN
dealer for installation of electrical
equipment. The Supplemental
Restraint System (SRS) wiring
harnesses* should not be modi-
fied or disconnected. Unauthor-
ized electrical test equipment
and probing devices should not
be used on the air bag system.
Page 96 of 604
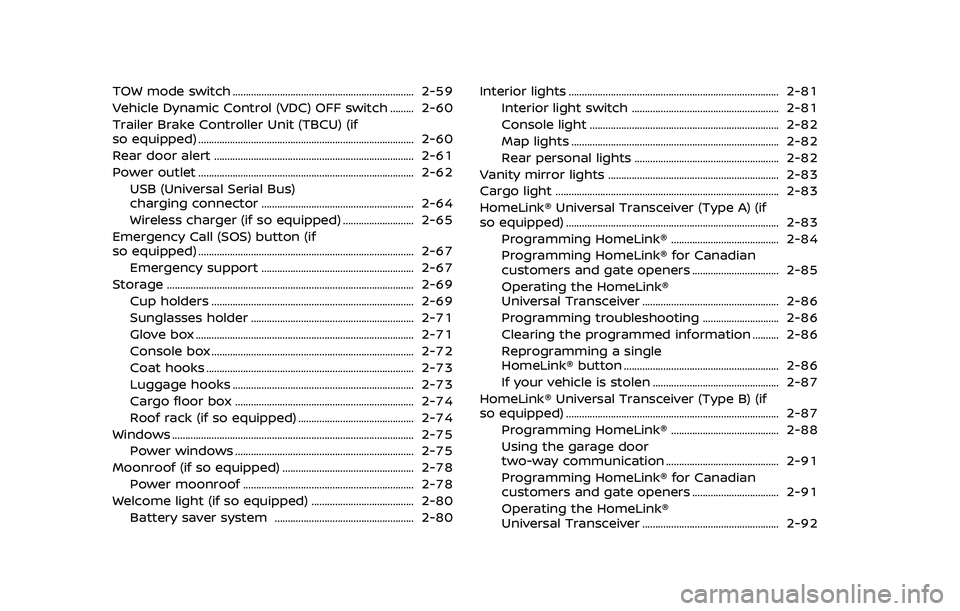
TOW mode switch ..................................................................... 2-59
Vehicle Dynamic Control (VDC) OFF switch ......... 2-60
Trailer Brake Controller Unit (TBCU) (if
so equipped) ........................................................................\
.......... 2-60
Rear door alert ........................................................................\
.... 2-61
Power outlet ........................................................................\
.......... 2-62USB (Universal Serial Bus)
charging connector .......................................................... 2-64
Wireless charger (if so equipped) ........................... 2-65
Emergency Call (SOS) button (if
so equipped) ........................................................................\
.......... 2-67
Emergency support .......................................................... 2-67
Storage ........................................................................\
...................... 2-69 Cup holders ........................................................................\
..... 2-69
Sunglasses holder .............................................................. 2-71
Glove box ........................................................................\
........... 2-71
Console box ........................................................................\
..... 2-72
Coat hooks ........................................................................\
....... 2-73
Luggage hooks ..................................................................... 2-73
Cargo floor box .................................................................... 2-74
Roof rack (if so equipped) ............................................ 2-74
Windows ........................................................................\
.................... 2-75 Power windows .................................................................... 2-75
Moonroof (if so equipped) .................................................. 2-78
Power moonroof ................................................................. 2-78
Welcome light (if so equipped) ....................................... 2-80 Battery saver system ..................................................... 2-80 Interior lights ........................................................................\
........ 2-81
Interior light switch ........................................................ 2-81
Console light ........................................................................\
2-82
Map lights ........................................................................\
....... 2-82
Rear personal lights ....................................................... 2-82
Vanity mirror lights ................................................................. 2-83
Cargo light ........................................................................\
............. 2-83
HomeLink® Universal Transceiver (Type A) (if
so equipped) ........................................................................\
......... 2-83 Programming HomeLink® ......................................... 2-84
Programming HomeLink® for Canadian
customers and gate openers ................................. 2-85
Operating the HomeLink®
Universal Transceiver .................................................... 2-86
Programming troubleshooting ............................. 2-86
Clearing the programmed information .......... 2-86
Reprogramming a single
HomeLink® button ........................................................... 2-86
If your vehicle is stolen ................................................ 2-87
HomeLink® Universal Transceiver (Type B) (if
so equipped) ........................................................................\
......... 2-87
Programming HomeLink® ......................................... 2-88
Using the garage door
two-way communication ........................................... 2-91
Programming HomeLink® for Canadian
customers and gate openers ................................. 2-91
Operating the HomeLink®
Universal Transceiver .................................................... 2-92