steering wheel NISSAN CUBE 2009 Owner's Manual
[x] Cancel search | Manufacturer: NISSAN, Model Year: 2009, Model line: CUBE, Model: NISSAN CUBE 2009Pages: 321, PDF Size: 4.99 MB
Page 182 of 321
Black plate (180,1)
Model "Z12-D" EDITED: 2009/ 1/ 28
entering a phone number” earlier in this section
for more details.)
“Redial”
*C
Use the Redial command to call the last number
that was dialed within the vehicle.
NOTE:
The system will not redial the last number
dialed by the handset keypad.
If a redial number does not exist, the system
announces, “There is no number to redial” and
ends the VR session.
“Call Back”
*D
Use the Call Back command to dial the number
of the last incoming call within the vehicle.
The system acknowledges the command, re-
peats the number and begins dialing.
If a call back number does not exist, the system
announces, “There is no number to call back”
and ends the VR session.
International
When you would like to enter a phone number
other than in 3-3-4 digit format, say “interna-
tional”. When the system acknowledges this
command, the system will prompt you to speak
the number you wish to enter.
During a callDuring a call there are several command options
available. Push the
button on the steering
wheel to mute the receiving voice and enter
commands.
.“Help” — The system announces the avail-
able commands.
.“Go back/Correction” — The system an-
nounces “Go back,” ends the VR session
and returns to the call.
.“Cancel/Quit” — The system announces
“Cancel,” ends the VR session and returns
to the call.
.“Send/Enter/Call/Dial” — Use the Send
command to enter numbers during a call.
For example, if you were directed to dial an
extension by an automated system:
Say: “Send one two three four.”
The system acknowledges the command
and sends the tones associated with the
numbers. The system then ends the VR
session and returns to the call.
.“Transfer Call” — Use the Transfer Call
command to transfer the call from the
Bluetooth
®Hands-Free Phone System to
the cellular phone when privacy is desired.
The system announces, “Transfer call. Calltransferred to privacy mode.” The system
then ends the VR session.
You can also issue the Transfer Call
command again to return to a hands-free
call through the vehicle.
.“Mute” — Use the Mute command to mute
your voice so the other party cannot hear it.
Use the mute command again to unmute
your voice.
NOTE:
If the other party ends the call or the
cellular phone network connection is lost
while the Mute feature is on, the Mute
feature may need to be reset to “off.”
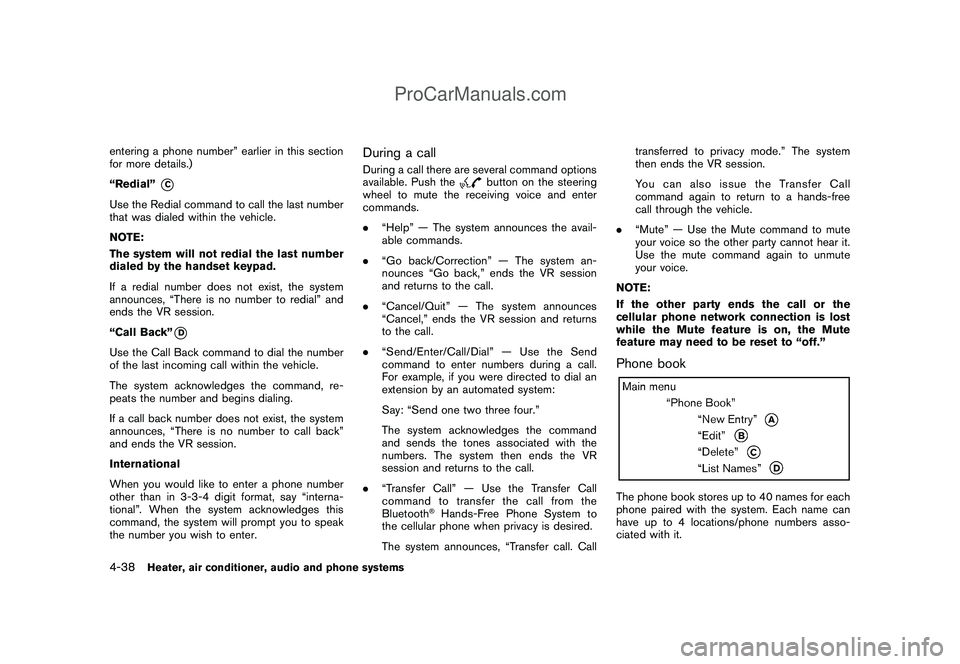
Phone bookThe phone book stores up to 40 names for each
phone paired with the system. Each name can
have up to 4 locations/phone numbers asso-
ciated with it.
4-38
Heater, air conditioner, audio and phone systems
ProCarManuals.com
Page 184 of 321
Black plate (182,1)
Model "Z12-D" EDITED: 2009/ 1/ 28
commended cellular phones.
The system repeats the number and prompts
you for the next command. When you have
finished entering numbers, choose “Store.”
The system confirms the name, location and
number, then announces that the entry has been
stored. The system then ends the VR session.
“Delete”
*C
Use the Delete command to erase one entry
from the phone book, all entries from the phone
book, the current redial number or the current
call back number.
To delete entries from the phone book, say a
name or “All entries” when prompted by the
system.
The system acknowledges the command and
asks you to confirm the deletion.
To delete the current redial number or call back
number, say “redial number” or “call back
number” when prompted by the system.
If a redial number or a call back number exists,
the system deletes them without asking for
confirmation.
If there is no number for the entry you are trying
to delete, the system says so and ends the VR
session.“List Names”
*D
Use the List Names command to hear all the
names and locations in the phone book.
The system recites the phone book entries but
does not include the actual phone numbers.
When the playback of the list is complete the
system returns to the main menu.
You can stop the playback of the list at any time
by pushing the
button on the steering
wheel. The system ends the VR session.
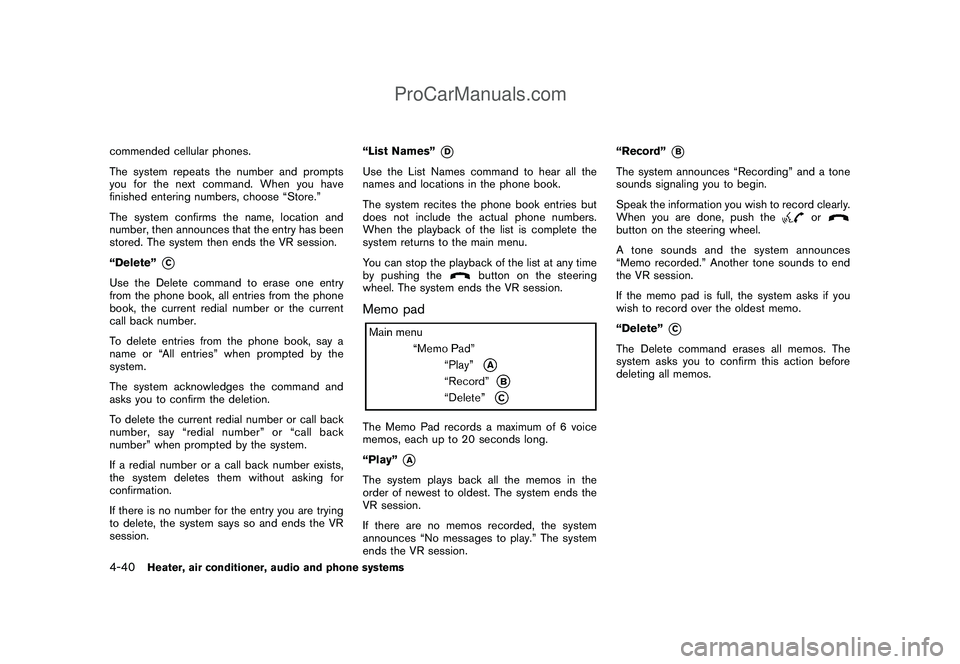
Memo padThe Memo Pad records a maximum of 6 voice
memos, each up to 20 seconds long.
“Play”
*A
The system plays back all the memos in the
order of newest to oldest. The system ends the
VR session.
If there are no memos recorded, the system
announces “No messages to play.” The system
ends the VR session.“Record”
*B
The system announces “Recording” and a tone
sounds signaling you to begin.
Speak the information you wish to record clearly.
When you are done, push the
or
button on the steering wheel.
A tone sounds and the system announces
“Memo recorded.” Another tone sounds to end
the VR session.
If the memo pad is full, the system asks if you
wish to record over the oldest memo.
“Delete”
*C
The Delete command erases all memos. The
system asks you to confirm this action before
deleting all memos.
4-40
Heater, air conditioner, audio and phone systems
ProCarManuals.com
Page 194 of 321

Black plate (192,1)
Model "Z12-D" EDITED: 2009/ 1/ 28
alternate tires and wheels allow the TPMS to
continue to function properly.Additional information.The TPMS does not monitor the tire
pressure of the spare tire.
.The TPMS will activate only when the
vehicle is driven at speeds above 16 MPH
(25 km/h) . Also, this system may not detect
a sudden drop in tire pressure (for example a
flat tire while driving) .
.The low tire pressure warning light does not
automatically turn off when the tire pressure
is adjusted. After the tire is inflated to the
recommended pressure, the vehicle must be
driven at speeds above 16 MPH (25 km/h)
to activate the TPMS and turn off the low tire
pressure warning light. Use a tire pressure
gauge to check the tire pressure.
.Tire pressure rises and falls depending on
the heat caused by the vehicle’s operation
and the outside temperature. Low outside
temperature can lower the temperature of
the air inside the tire which can cause a
lower tire inflation pressure. This may cause
the low tire pressure warning light to
illuminate. If the warning light illuminates in
low ambient temperature, check the tire
pressure for all four tires.
For additional information, see “Low tire pres-sure warning light” in the “2. Instruments and
controls” section and “TIRE PRESSURE MON-
ITORING SYSTEM (TPMS)” in the “6. In case of
emergency” section.
WARNING
.If the low tire pressure warning light
illuminates while driving, avoid sud-
den steering maneuvers or abrupt
braking, reduce vehicle speed, pull
off the road to a safe location and
stop the vehicle as soon as possi-
ble. Driving with under-inflated tires
may permanently damage the tires
and increase the likelihood of tire
failure. Serious vehicle damage
could occur and may lead to an
accident and could result in serious
personal injury. Check the tire pres-
sure for all four tires. Adjust the tire
pressure to the recommended COLD
tire pressure shown on the Tire and
Loading Information label to turn
the low tire pressure warning light
OFF. If you have a flat tire, replace it
with a spare tire as soon as possi-
ble. (See “FLAT TIRE” in the “6. In
case of emergency” section for
changing a flat tire.).When a spare tire is mounted or a
wheel is replaced, the TPMS will not
function and the low tire pressure
warning light will flash for approxi-
mately 1 minute. The light will
remain on after 1 minute. Contact
your NISSAN dealer as soon as
possible for tire replacement and/
or system resetting.
.Replacing tires with those not ori-
ginally specified by NISSAN could
affect the proper operation of the
TPMS.
.Do not inject any tire liquid or
aerosol tire sealant into the tires,
as this may cause a malfunction of
the tire pressure sensors.
CAUTION
.The TPMS may not function properly
when the wheels are equipped with
tire chains or the wheels are buried
in snow.
.Do not place metalized film or any
metal parts (antenna, etc.) on the
windows. This may cause poor re-
ception of the signals from the tire
5-4
Starting and driving
ProCarManuals.com
Page 195 of 321

Black plate (193,1)
Model "Z12-D" EDITED: 2009/ 1/ 28
pressure sensors, and the TPMS will
not function properly.
Some devices and transmitters may temporarily
interfere with the operation of the TPMS and
cause the low tire pressure warning light to
illuminate. Some examples are:
.Facilities or electric devices using similar
radio frequencies are near the vehicle.
.If a transmitter set to similar frequencies is
being used in or near the vehicle.
.If a computer (or similar equipment) or a DC/
AC converter is being used in or near the
vehicle.
FCC Notice:
Changes or modifications not expressly
approved by the party responsible for
compliance could void the user’s authority
to operate the equipment.
This device complies with Part 15 of the
FCC Rules and RSS-210 of Industry Cana-
da.
Operation is subject to the following two
conditions: (1) This device may not cause
harmful interference, and (2) this device
must accept any interference received,
including interference that may cause un-
desired operation of the device.
AVOIDING COLLISION AND ROLL-
OVER
WARNING
Failure to operate this vehicle in a safe
and prudent manner may result in loss
of control or an accident.
Be alert and drive defensively at all times. Obey
all traffic regulations. Avoid excessive speed,
high speed cornering, or sudden steering
maneuvers, because these driving practices
could cause you to lose control of your vehicle.
As with any vehicle, a loss of control could
result in a collision with other vehicles or
objects, or cause the vehicle to rollover,
particularly if the loss of control causes the
vehicle to slide sideways.Be attentive at all
times, and avoid driving when tired. Never drive
when under the influence of alcohol or drugs
(including prescription or over-the-counter
drugs which may cause drowsiness) . Always
wear your seat belt as outlined in the “SEAT
BELTS” in the “1. Safety — Seats, seat belts and
supplemental restraint system” section of this
manual, and also instruct your passengers to do
so.
Seat belts help reduce the risk of injury in
collisions and rollovers.In a rollover crash, an
unbelted or improperly belted person issignificantly more likely to be injured or
killed than a person properly wearing a
seat belt.
OFF-ROAD RECOVERYWhile driving, the right side or left side wheels
may unintentionally leave the road surface. If this
occurs, maintain control of the vehicle by
following the procedure below. Please note that
this procedure is only a general guide. The
vehicle must be driven as appropriate based on
the conditions of the vehicle, road and traffic.
1. Remain calm and do not overreact.
2. Do not apply the brakes.
3. Maintain a firm grip on the steering wheel
with both hands and try to hold a straight
course.
4. When appropriate, slowly release the accel-
erator pedal to gradually slow the vehicle.
5. If there is nothing in the way, steer the
vehicle to follow the road while the vehicle
speed is reduced. Do not attempt to drive
the vehicle back onto the road surface until
vehicle speed is reduced.
6. When it is safe to do so, gradually turn the
steering wheel until both tires return to the
road surface. When all tires are on the road
surface, steer the vehicle to stay in the
Starting and driving
5-5
ProCarManuals.com
Page 196 of 321

Black plate (194,1)
Model "Z12-D" EDITED: 2009/ 1/ 28
appropriate driving lane.
.If you decide that it is not safe to return
the vehicle to the road surface based on
vehicle, road or traffic conditions, gra-
dually slow the vehicle to a stop in a safe
place off the road.
RAPID AIR PRESSURE LOSSRapid air pressure loss or a “blow-out” can
occur if the tire is punctured or is damaged due
to hitting a curb or pothole. Rapid air pressure
loss can also be caused by driving on under-
inflated tires.
Rapid air pressure loss can affect the handling
and stability of the vehicle, especially at highway
speeds.
Help prevent rapid air pressure loss by main-
taining the correct air pressure and visually
inspect the tires for wear and damage. See
“WHEELS AND TIRES” in the “8. Maintenance
and do-it-yourself” section of this manual.
If a tire rapidly loses air pressure or “blows-out”
while driving maintain control of the vehicle by
following the procedure below. Please note that
this procedure is only a general guide. The
vehicle must be driven as appropriate based on
the conditions of the vehicle, road and traffic.
WARNING
The following actions can increase the
chance of losing control of the vehicle if
there is a sudden loss of tire air
pressure. Losing control of the vehicle
may cause a collision and result in
personal injury.
.The vehicle generally moves or pulls
in the direction of the flat tire.
.Do not rapidly apply the brakes.
.Do not rapidly release the accelera-
tor pedal.
.Do not rapidly turn the steering
wheel.
1. Remain calm and do not overreact.
2. Maintain a firm grip on the steering wheel
with both hands and try to hold a straight
course.
3. When appropriate, slowly release the accel-
erator pedal to gradually slow the vehicle.
4. Gradually steer the vehicle to a safe location
off the road and away from traffic if possible.
5. Lightly apply the brake pedal to gradually
stop the vehicle.6. Turn on the hazard warning flashers and
either contact a roadside emergency service
to change the tire or see “CHANGING A
FLAT TIRE” in the “6. In case of emergency”
section of this Owner’s Manual.
DRINKING ALCOHOL/DRUGS AND
DRIVING
WARNING
Never drive under the influence of
alcohol or drugs. Alcohol in the blood-
stream reduces coordination, delays
reaction time and impairs judgement.
Driving after drinking alcohol increases
the likelihood of being involved in an
accident injuring yourself and others.
Additionally, if you are injured in an
accident, alcohol can increase the se-
verity of the injury.
NISSAN is committed to safe driving. However,
you must choose not to drive under the influence
of alcohol. Every year thousands of people are
injured or killed in alcohol-related accidents.
Although the local laws vary on what is
considered to be legally intoxicated, the fact is
that alcohol affects all people differently and
most people underestimate the effects of
alcohol.
5-6
Starting and driving
ProCarManuals.com
Page 198 of 321
Black plate (196,1)
Model "Z12-D" EDITED: 2009/ 1/ 28
1. Move the selector lever to the P (Park)
position.
2. Turn the ignition switch slightly in the ON
direction.
3. TurntheignitionswitchtotheLOCK
position.
4. Remove the key.
If the ignition switch is turned to the LOCK
position, the selector lever cannot be moved
from the P (Park) position. The selector lever can
be moved if the ignition switch is in the ON
position with the foot brake pedal depressed.
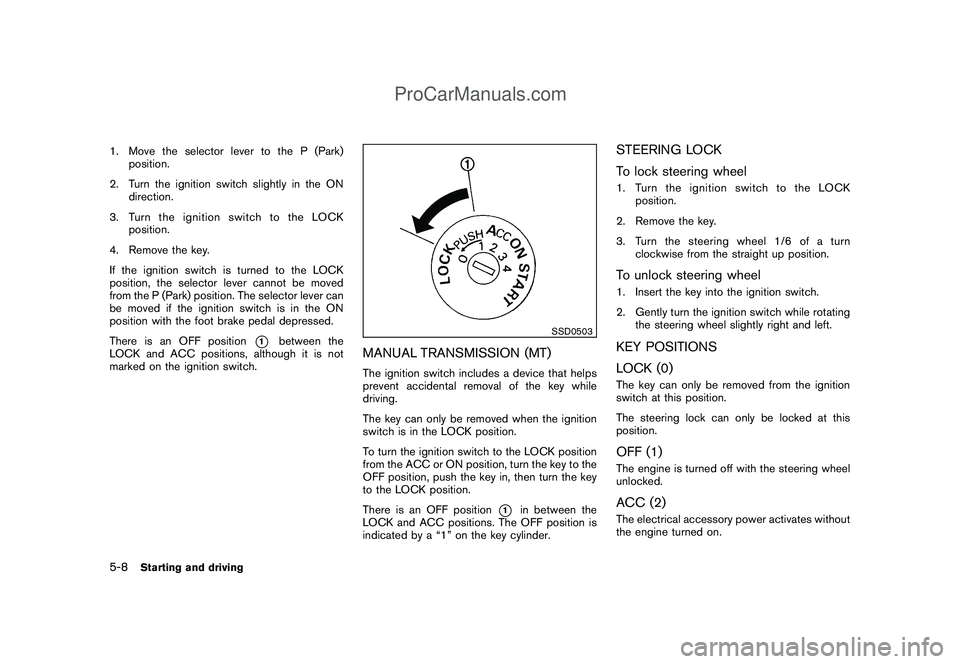
There is an OFF position
*1
between the
LOCK and ACC positions, although it is not
marked on the ignition switch.
SSD0503
MANUAL TRANSMISSION (MT)The ignition switch includes a device that helps
prevent accidental removal of the key while
driving.
The key can only be removed when the ignition
switch is in the LOCK position.
To turn the ignition switch to the LOCK position
from the ACC or ON position, turn the key to the
OFF position, push the key in, then turn the key
to the LOCK position.
There is an OFF position
*1
in between the
LOCK and ACC positions. The OFF position is
indicated by a “1” on the key cylinder.
STEERING LOCK
To lock steering wheel1. Turn the ignition switch to the LOCK
position.
2. Remove the key.
3. Turn the steering wheel 1/6 of a turn
clockwise from the straight up position.To unlock steering wheel1. Insert the key into the ignition switch.
2. Gently turn the ignition switch while rotating
the steering wheel slightly right and left.KEY POSITIONS
LOCK (0)The key can only be removed from the ignition
switch at this position.
The steering lock can only be locked at this
position.OFF (1)The engine is turned off with the steering wheel
unlocked.ACC (2)The electrical accessory power activates without
the engine turned on.
5-8
Starting and driving
ProCarManuals.com
Page 200 of 321
Black plate (198,1)
Model "Z12-D" EDITED: 2009/ 1/ 28
.The cargo room area is not included in the
operating range but the Intelligent Key may
function.
.If the Intelligent Key is placed on the
instrument panel, inside the glove box or
door pocket, the Intelligent Key may not
function.
.If the Intelligent Key is placed near the door
or window outside the vehicle, the Intelligent
Key may function.
SSD0859
PUSH-BUTTON IGNITION SWITCH
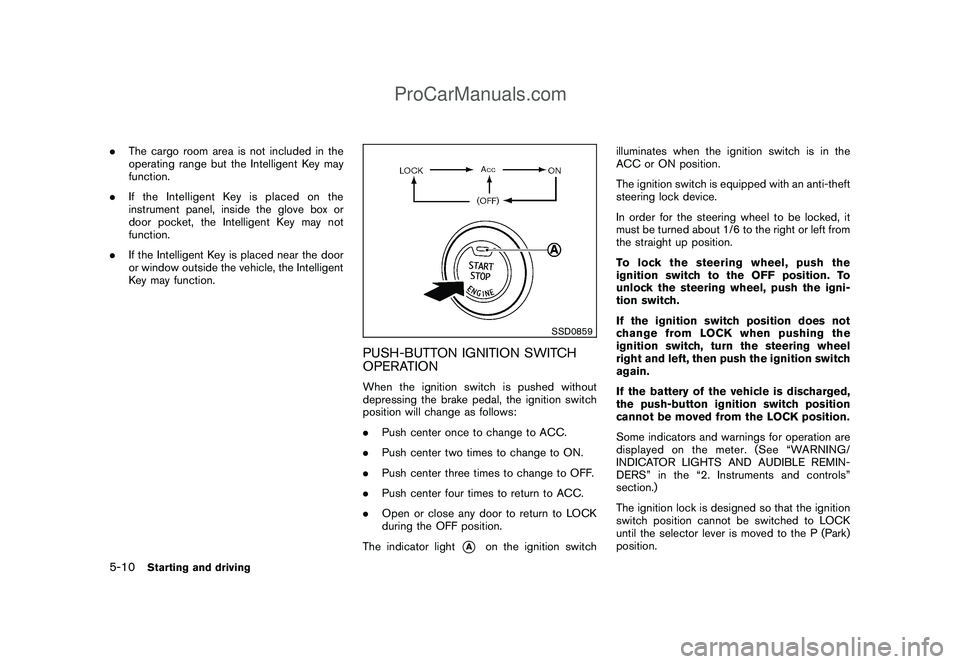
OPERATIONWhen the ignition switch is pushed without
depressing the brake pedal, the ignition switch
position will change as follows:
.Push center once to change to ACC.
.Push center two times to change to ON.
.Push center three times to change to OFF.
.Push center four times to return to ACC.
.Open or close any door to return to LOCK
during the OFF position.
The indicator light
*A
on the ignition switchilluminates when the ignition switch is in the
ACC or ON position.
The ignition switch is equipped with an anti-theft
steering lock device.
In order for the steering wheel to be locked, it
must be turned about 1/6 to the right or left from
the straight up position.
To lock the steering wheel, push the
ignition switch to the OFF position. To
unlock the steering wheel, push the igni-
tion switch.
If the ignition switch position does not
change from LOCK when pushing the
ignition switch, turn the steering wheel
right and left, then push the ignition switch
again.
If the battery of the vehicle is discharged,
the push-button ignition switch position
cannot be moved from the LOCK position.
Some indicators and warnings for operation are
displayed on the meter. (See “WARNING/
INDICATOR LIGHTS AND AUDIBLE REMIN-
DERS” in the “2. Instruments and controls”
section.)
The ignition lock is designed so that the ignition
switch position cannot be switched to LOCK
until the selector lever is moved to the P (Park)
position.
5-10
Starting and driving
ProCarManuals.com
Page 201 of 321
Black plate (199,1)
Model "Z12-D" EDITED: 2009/ 1/ 28
When the ignition switch cannot be pushed
toward the LOCK position, proceed as follows:
1. Move the selector lever into the P (Park)
position.
2. Push the ignition switch to the OFF position.
3. Open the door. The ignition switch will
change to the LOCK position.
The selector lever can be moved from the P
(Park) position if the ignition switch is in
the ON position and the brake pedal is
depressed.PUSH-BUTTON IGNITION SWITCH
POSITIONS
LOCK (Normal parking position)The ignition switch can only be locked in this
position.
The ignition switch will be unlocked when it is
pushed to the ACC position while carrying the
Intelligent Key.ACC (Accessories)This position activates electrical accessories
such as the radio, when the engine is not
running.
ON (Normal operating position)This position turns on the ignition system and
electrical accessories.OFFThe engine can be turned off without locking the
steering wheel.
The ignition lock is designed so that the ignition
switch cannot be switched to the LOCK position
until the selector lever is moved to the P (Park)
position.
CAUTION
Do not leave the vehicle with the push-
button ignition switch in ACC or ON
position when the engine is not running
for an extended period. This can dis-
charge the battery.
SSD0860
INTELLIGENT KEY BATTERY DIS-
CHARGEIf the battery of the Intelligent Key is discharged,
or environmental conditions interfere with the
Intelligent Key operation, start the engine
according to the following procedure:
1. Move the selector lever to the P (Park)
position.
2. Firmly apply the foot brake.
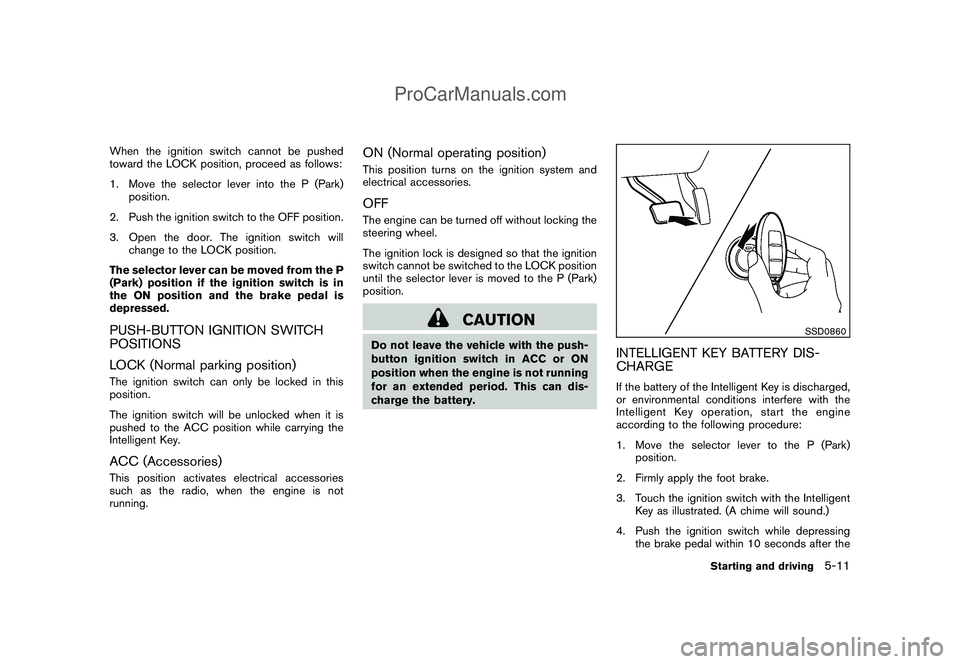
3. Touch the ignition switch with the Intelligent
Key as illustrated. (A chime will sound.)
4. Push the ignition switch while depressing
the brake pedal within 10 seconds after the
Starting and driving
5-11
ProCarManuals.com
Page 208 of 321

Black plate (206,1)
Model "Z12-D" EDITED: 2009/ 1/ 28
2. Apply the parking brake.
3. Remove the shift lock release cover
*A
using a suitable tool.
4. Push down the shift lock release using a
suitable tool.
5. Push the selector lever button and move the
selector lever to the N (Neutral) position
while holding down the shift lock release.
Place the ignition switch in the ON position to
unlock the steering wheel. The vehicle may be
moved to the desired location.
Replace the removed shift lock release cover
after the operation.
For models with Intelligent Key system: If the
battery is discharged completely, the steering
wheel cannot be unlocked. Do not move the
vehicle with the steering wheel locked.
If the selector lever cannot be moved out of the
P (Park) position, have a NISSAN dealer check
the CVT system as soon as possible.
WARNING
If the selector lever cannot be moved
from the P (Park) position while the
engine is running and the brake pedal
is depressed, the stop lights may notwork. Malfunctioning stop lights could
cause an accident injuring yourself and
others.
MANUAL TRANSMISSION (MT)
WARNING
.Do not downshift abruptly on slip-
pery roads. This may cause a loss of
control.
.Do not over-rev the engine when
shifting to a lower gear. This may
cause a loss of control or engine
damage.
CAUTION
.Do not rest your foot on the clutch
pedal while driving. This may da-
mage the clutch.
.Fully depress the clutch pedal be-
fore shifting to help prevent trans-
mission damage.
.Stop your vehicle completely before
shifting into R (Reverse) .
.When the vehicle is stopped for a
period of time, for example at a stoplight, shift to N (Neutral) and release
the clutch pedal with the foot brake
applied.
5-18
Starting and driving
ProCarManuals.com
Page 216 of 321
Black plate (214,1)
Model "Z12-D" EDITED: 2009/ 1/ 28
can go and cannot be moved with-
out depressing the foot brake pedal.
1. Firmly apply the parking brake.
2.Continuously Variable Transmission
(CVT) models:
Move the selector lever to the P (Park)
position.
Manual Transmission (MT) models:
Move the shift lever to the R (Reverse) gear.
When parking on an uphill grade, place the
shift lever in the 1st gear.
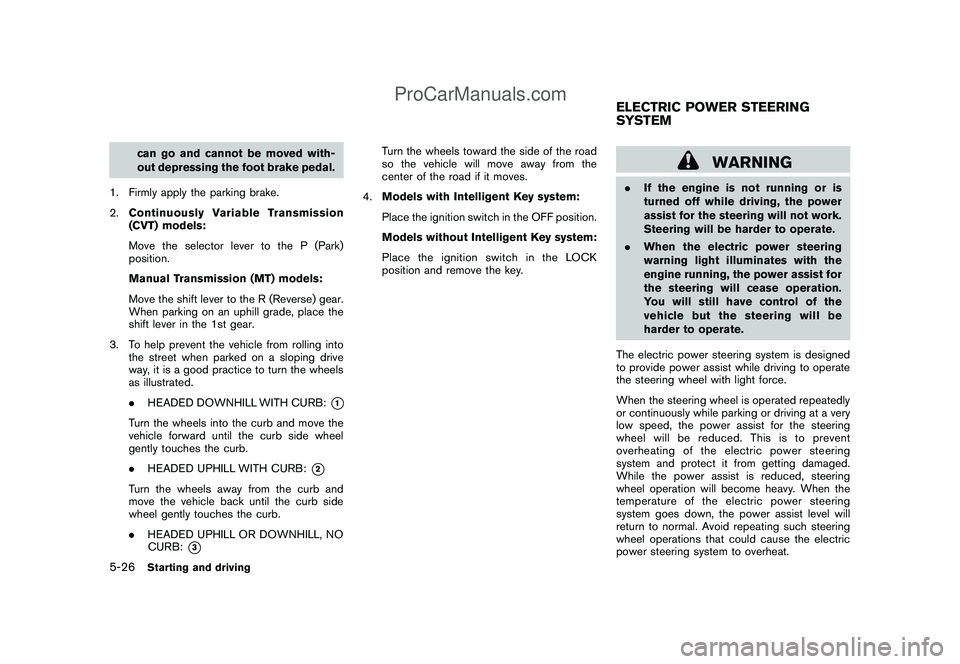
3. To help prevent the vehicle from rolling into
the street when parked on a sloping drive
way, it is a good practice to turn the wheels
as illustrated.
.HEADED DOWNHILL WITH CURB:
*1
Turn the wheels into the curb and move the
vehicle forward until the curb side wheel
gently touches the curb.
.HEADED UPHILL WITH CURB:
*2
Turn the wheels away from the curb and
move the vehicle back until the curb side
wheel gently touches the curb.
.HEADED UPHILL OR DOWNHILL, NO
CURB:
*3
Turn the wheels toward the side of the road
so the vehicle will move away from the
center of the road if it moves.
4.Models with Intelligent Key system:
Place the ignition switch in the OFF position.
Models without Intelligent Key system:
Place the ignition switch in the LOCK
position and remove the key.
WARNING
.If the engine is not running or is
turned off while driving, the power
assist for the steering will not work.
Steering will be harder to operate.
.When the electric power steering
warning light illuminates with the
engine running, the power assist for
the steering will cease operation.
You will still have control of the
vehicle but the steering will be
harder to operate.
The electric power steering system is designed
to provide power assist while driving to operate
the steering wheel with light force.
When the steering wheel is operated repeatedly
or continuously while parking or driving at a very
low speed, the power assist for the steering
wheel will be reduced. This is to prevent
overheating of the electric power steering
system and protect it from getting damaged.
While the power assist is reduced, steering
wheel operation will become heavy. When the
temperature of the electric power steering
system goes down, the power assist level will
return to normal. Avoid repeating such steering
wheel operations that could cause the electric
power steering system to overheat.ELECTRIC POWER STEERING
SYSTEM
5-26
Starting and driving
ProCarManuals.com