remote control NISSAN FRONTIER 2000 D22 / 1.G Owners Manual
[x] Cancel search | Manufacturer: NISSAN, Model Year: 2000, Model line: FRONTIER, Model: NISSAN FRONTIER 2000 D22 / 1.GPages: 269, PDF Size: 2.19 MB
Page 68 of 269

The theft warning system provides visual
and audio alarm signals if parts of the
vehicle are disturbed.
How to activate the theft warning
system
1. Close all windows.
2. Remove the key from the ignition switch.
3. Close the hood and all doors.
4. Push the
button on the multi-
remote controller. All doors lock. The
hazard lights flash twice and the hornbeeps once to indicate all doors are
locked.
I
When thebutton is pushed with all
doors locked, the hazard lights flash twice
and the horn beeps once as a reminder that
the doors are already locked. The horn may
or may not beep once. Refer to ``silencing
the horn beep feature'' later in this section.
The system can be activated even if the
windows are open.
5.
Confirm that the SECURITY indicator
light comes on. The SECURITY light
glows for about 30 seconds and then
begins to flash once every three seconds.
The system is now activated. If, during
this 30 second time period, a door is
unlocked by the key or the multi-remote
controller, or the ignition key is turned to
ACC or ON, the system will not activate.
IIf the key is turned slowly when lock-
ing the door, the system may not acti-
vate. Furthermore, if the key is turned
excessively to the unlock position, the
system may be deactivated when the
key is removed. If the indicator light
fails to glow for 30 seconds, unlock
the door once and lock it again.
IEven when the driver and/or passen-
gers are in the vehicle, the system will
activate with doors, and hood locked
and with the ignition key in the OFF
position. Turn the ignition key to ACC
or ON to turn the system off.
The theft warning system is NOT activated if
one of the following occurs:
IA door is unlocked or the ignition key is
turned to the ACC or ON position during
the 30 seconds in which the SECURITY
light stays on.
IThe SECURITY light blinks at a steady
1/2 second on - 1/2 second off rate (a
door, or the hood is open and the key is
not in the ACC or ON position). When the
ignition key is turned to the ACC or ON
position, the SECURITY light turns off.
Theft warning system operation
The theft warning system emits the follow-
ing alarm:
IThe headlights blink and the horn sounds
intermittently. In addition, the starter mo-
tor does not operate.
I
The alarm automatically turns off after 2 to
3 minutes. However, the alarm reactivates
IC0005
THEFT WARNING
(if so equipped)
2-14Instruments and controls
ZX
Page 69 of 269

if the vehicle is tampered with again. The
alarm can be shut off by unlocking a door
with the key or by pressing the
but-
tonon the multi-remote controller.
The alarm is activated by:
Iopening a door without using the key
(even if the door is unlocked by releasing
the inside lock knob).
Iopening the hood.
How to stop the alarm
The alarm stops only by unlocking a door
with the key or by pressing thebutton
on the multi-remote controller.The alarm
does not stop if the ignition switch is turned
to ACC or ON position.
Silencing the horn beep feature
If desired, the horn beep feature can be
deactivated using the multi-remote controller.
To deactivate:Press and hold theandbuttonsfor at least two
seconds.
The hazard lights will quickly flash three
times to confirm that the horn beep feature
has been deactivated.
To activate:Press and hold the
andbuttonsfor at least two seconds
once more.The hazard lights will quickly flash three
times to confirm that the horn beep feature
has been reactivated.
Deactivating the horn beep feature does not
silence the horn if the alarm is triggered.
If the system does not operate as de-
scribed above, have it checked by an
authorized NISSAN dealer.
AIC1037
Instruments and controls2-15
ZX
Page 83 of 269

3 Pre-driving checks and adjustments
Key .........................................................................3-2
Door locks ..............................................................3-2
Power door locks (if so equipped) .........................3-3
Child safety rear door lock ................................... 3-4
Multi-remote control system (if so equipped).........3-4
Battery replacement ...............................................3-7
Hood release ..........................................................3-8
Glove box ...............................................................3-9
Roof rack (if so equipped)......................................3-9
Step rail (if so equipped) ...................................... 3-11Fuel filler cap ........................................................ 3-11
Tailgate latch ........................................................3-13
Tie down hooks ....................................................3-14
Tilting steering wheel (if so equipped) .................3-15
Outside mirror remote control (if so equipped) ....3-15
Outside mirrors .....................................................3-16
Inside mirror .........................................................3-16
Vanity mirror (if so equipped)...............................3-17
ZX
Page 86 of 269

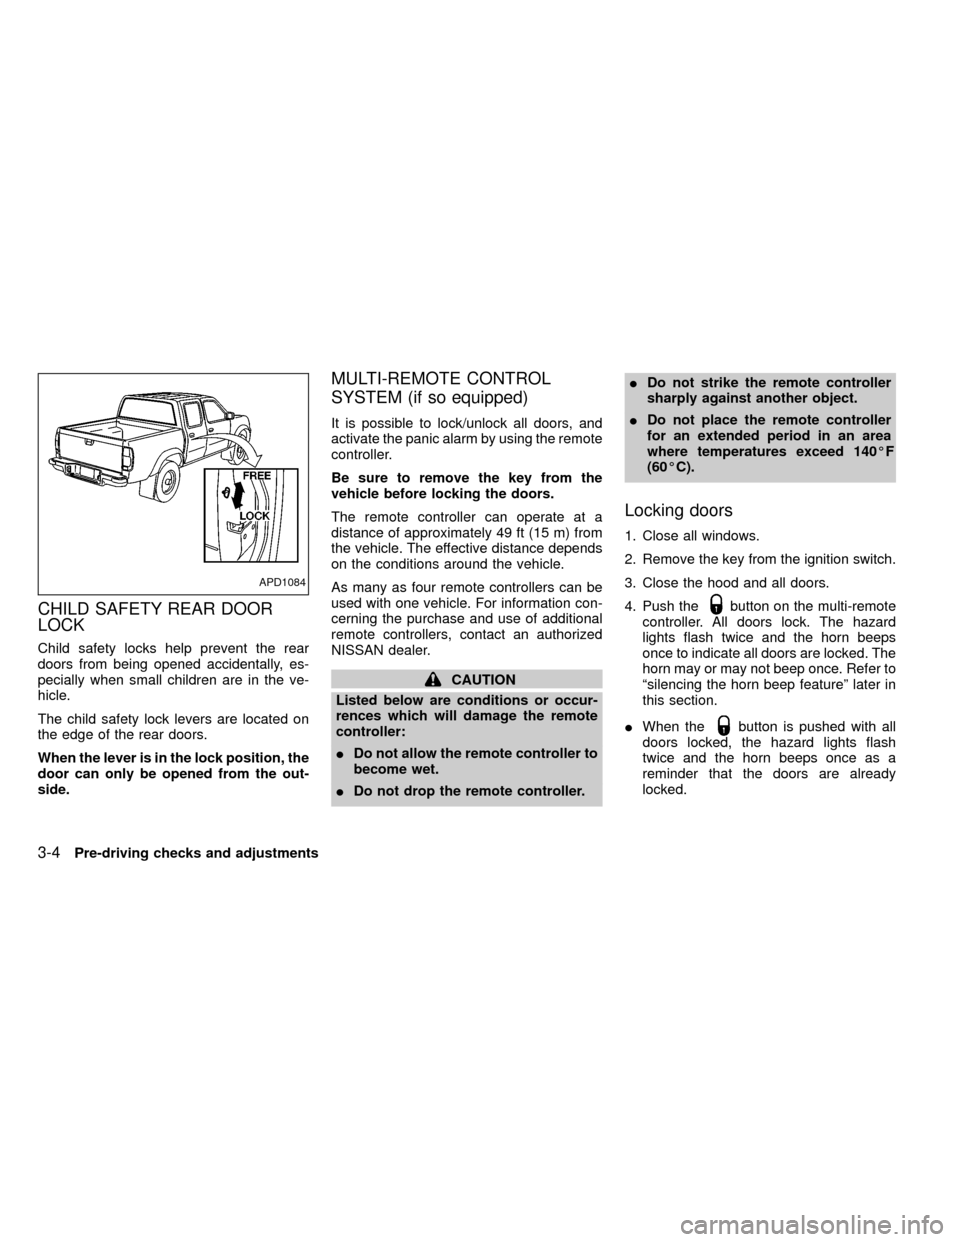
CHILD SAFETY REAR DOOR
LOCK
Child safety locks help prevent the rear
doors from being opened accidentally, es-
pecially when small children are in the ve-
hicle.
The child safety lock levers are located on
the edge of the rear doors.
When the lever is in the lock position, the
door can only be opened from the out-
side.
MULTI-REMOTE CONTROL
SYSTEM (if so equipped)
It is possible to lock/unlock all doors, and
activate the panic alarm by using the remote
controller.
Be sure to remove the key from the
vehicle before locking the doors.
The remote controller can operate at a
distance of approximately 49 ft (15 m) from
the vehicle. The effective distance depends
on the conditions around the vehicle.
As many as four remote controllers can be
used with one vehicle. For information con-
cerning the purchase and use of additional
remote controllers, contact an authorized
NISSAN dealer.
CAUTION
Listed below are conditions or occur-
rences which will damage the remote
controller:
IDo not allow the remote controller to
become wet.
IDo not drop the remote controller.IDo not strike the remote controller
sharply against another object.
IDo not place the remote controller
for an extended period in an area
where temperatures exceed 140ÉF
(60ÉC).
Locking doors
1. Close all windows.
2. Remove the key from the ignition switch.
3. Close the hood and all doors.
4. Push the
button on the multi-remote
controller. All doors lock. The hazard
lights flash twice and the horn beeps
once to indicate all doors are locked. The
horn may or may not beep once. Refer to
ªsilencing the horn beep featureº later in
this section.
IWhen the
button is pushed with all
doors locked, the hazard lights flash
twice and the horn beeps once as a
reminder that the doors are already
locked.
APD1084
3-4Pre-driving checks and adjustments
ZX
Page 87 of 269

Unlocking doors
1. Push thebutton on the multi-
remote controller. Only the driver's side
door unlocks.
2. Push the
button on the multi-remote controller again within five sec-
onds. All doors unlock.
3. The interior light illuminates for 30 sec-
onds when the light switch is in the O or
DOOR position.The interior light can be turned off without
waiting 30 seconds by inserting the key into
the ignition or locking the doors with the
multi-remote controller or pushing the
interior light switch to the OFF position.
Using the panic alarm
If you are near your vehicle and feel threat-
ened, you may activate the panic alarm to
call attention as follows:
1. Push the
button on the remote con-
troller forlonger than 1.5 seconds.
2. The theft warning alarm and headlights
will stay on for 30 seconds.
3. The panic alarm stops when:
Iit has run for 30 seconds, or
Ithe
,or thebutton is
pressed, on the multi-remote controller.
APD1093
Pre-driving checks and adjustments3-5
ZX
Page 88 of 269

Silencing the horn beep feature
If desired, the horn beep feature can be
deactivated using the multi-remote control-
ler.
To deactivate:Press and hold theand
together for at least two seconds.
The hazard lights will quickly flash three
times to confirm that the horn beep feature
has been deactivated.
To activate:Press and hold theand
together for at least two seconds
once more.
The hazard lights will quickly flash three
times to confirm that the horn beep feature
has been reactivated.
Deactivating the horn feature does not si-
lence the horn if the alarm is triggered.
AIC1037
3-6Pre-driving checks and adjustments
ZX
Page 89 of 269

Replace the battery in the multi-remote con-
troller as follows:
1. Open the lid using a coin.
2. Replace the battery with a new one.
Recommended battery: Sanyo CR2025or equivalent.
3. Close the lid securely.
4. Press the
button, then thebutton
two or three times to check the multi-
remote controller operation.
If the battery is removed for any reason
other than replacement, perform step 4
above.
IAn improperly disposed battery can
hurt the environment. Always confirm
local regulations for battery disposal.
IThe multi-remote controller is water-
resistant; however, if it does get wet,
immediately wipe completely dry.
IThe operational range of the multi-
remote controller extends to approxi-
mately 49 ft (15 m) from the vehicle.
This range may vary with conditions.
FCC Notice:
Changes or modifications not expressly
approved by the manufacturer for com-
pliance could void the user's authority to
operate the equipment.
This device complies with part 15 of the
FCC Rules and RSS-210 of Industry
Canada.
Operation is subject to the following two
conditions: (1) This device may not
cause harmful interference, and (2) this
APD1087
BATTERY REPLACEMENT
Pre-driving checks and adjustments3-7
ZX
Page 97 of 269

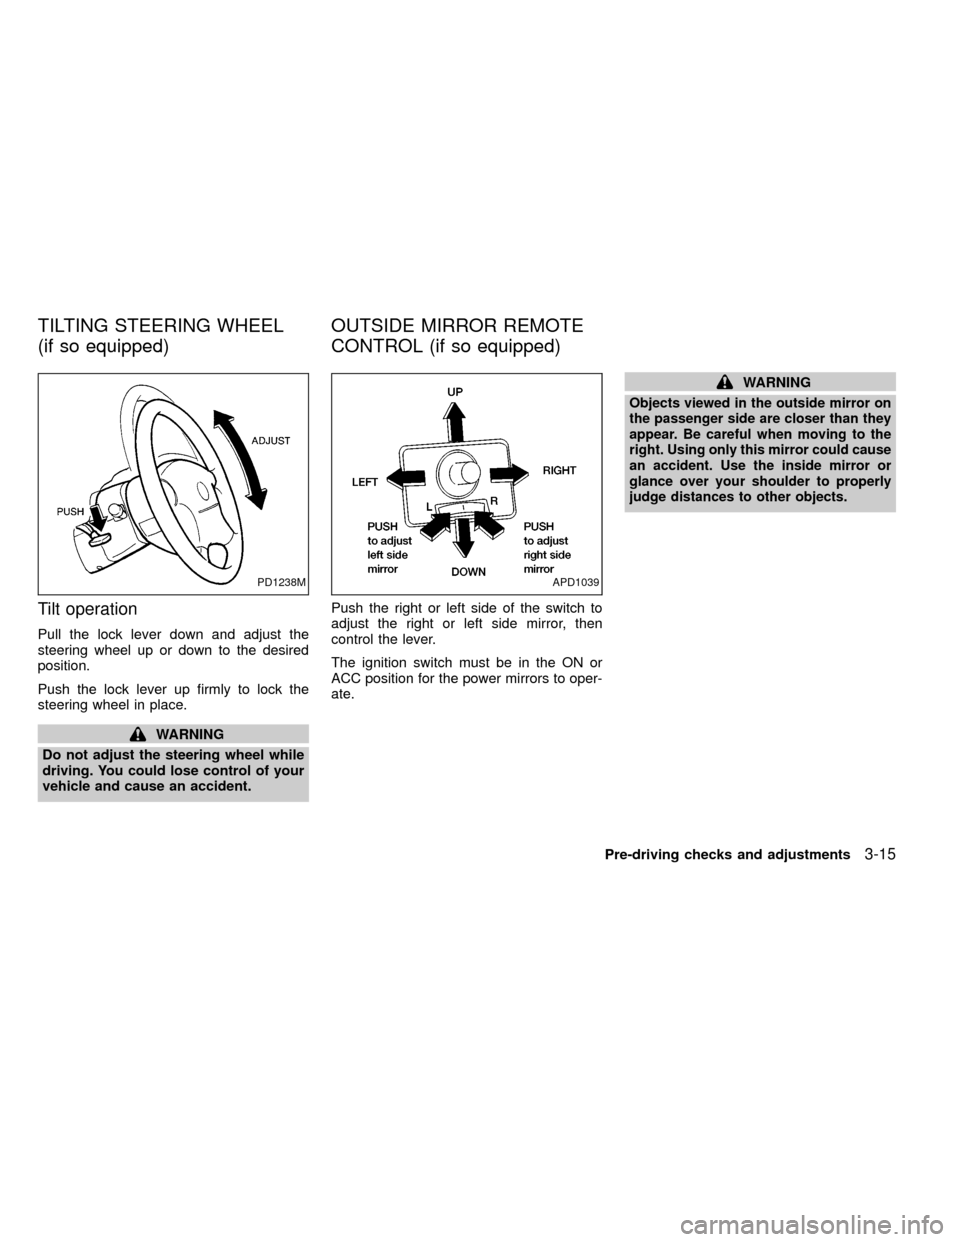
Tilt operation
Pull the lock lever down and adjust the
steering wheel up or down to the desired
position.
Push the lock lever up firmly to lock the
steering wheel in place.
WARNING
Do not adjust the steering wheel while
driving. You could lose control of your
vehicle and cause an accident.Push the right or left side of the switch to
adjust the right or left side mirror, then
control the lever.
The ignition switch must be in the ON or
ACC position for the power mirrors to oper-
ate.
WARNING
Objects viewed in the outside mirror on
the passenger side are closer than they
appear. Be careful when moving to the
right. Using only this mirror could cause
an accident. Use the inside mirror or
glance over your shoulder to properly
judge distances to other objects.
PD1238MAPD1039
TILTING STEERING WHEEL
(if so equipped)OUTSIDE MIRROR REMOTE
CONTROL (if so equipped)
Pre-driving checks and adjustments3-15
ZX
Page 183 of 269

8 Do-it-yourself
Maintenance precautions .......................................8-2
Engine compartment check locations ....................8-3
Engine cooling system ...........................................8-5
Checking engine coolant level ...............................8-5
Changing engine coolant .......................................8-6
Engine oil ...............................................................8-9
Checking engine oil level .......................................8-9
Changing engine oil .............................................8-10
Changing engine oil filter .....................................8-12
Automatic transmission fluid (ATF) ......................8-13
Temperature conditions for checking ATF ...........8-13
Power steering fluid..............................................8-14
Brake and clutch fluid ...........................................8-15
Window washer fluid ............................................8-15
Battery ..................................................................8-16
Jump starting ........................................................8-17
Drive belts ............................................................8-18Spark plug replacement .......................................8-19
Air cleaner housing filter ......................................8-21
Wiper blades ........................................................8-22
Parking brake check.............................................8-23
Brake pedal ..........................................................8-23
Brake booster .......................................................8-24
Clutch pedal .........................................................8-25
Fuses ....................................................................8-26
Multi-remote controller battery replacement ........8-27
Light bulbs ............................................................8-29
Headlights ............................................................8-29
Bulb replacement .................................................8-30
Front fog light bulb replacement (if so
equipped) .............................................................8-32
Wheels and tires...................................................8-33
Four-wheel drive models ......................................8-36
ZX
Page 209 of 269

MULTI-REMOTE CONTROLLER
BATTERY REPLACEMENTReplace the battery in the multi-remote con-
troller as follows:
1. Open the lid using a coin.
2. Replace the battery with a new one.
Recommended battery: Sanyo CR2025
or equivalent.
3. Close the lid securely.
4. Press the
button, then thebutton two or three times to check
the multi-remote controller operation.
If the battery is removed for any reason
other than replacement, perform step 4
above.
IAn improperly disposed battery can
hurt the environment. Always confirm
local regulations for battery disposal.
IThe multi-remote controller is water-
resistant; however, if it does get wet,
immediately wipe completely dry.
IThe operational range of the multi-
remote controller extends to approxi-
mately 33 ft (10 m) from the vehicle.
This range may vary with conditions.
APD1087
Do-it-yourself8-27
ZX