stop start NISSAN FRONTIER 2021 User Guide
[x] Cancel search | Manufacturer: NISSAN, Model Year: 2021, Model line: FRONTIER, Model: NISSAN FRONTIER 2021Pages: 492, PDF Size: 2.86 MB
Page 313 of 492
WARNING
• Radio waves could adversely affect
electric medical equipment. Those
who use a pacemaker should contact
the electric medical equipment
manufacturer for the possible influ-
ences before use.
• If the low tire pressure warning light
illuminates while driving, avoid sud-
den steering maneuvers or abrupt
braking, reduce vehicle speed, pull
off the road to a safe location and
stop the vehicle as soon as possible.
Driving with under-inflated tires may
permanently damage the tires and
increase the likelihood of tire failure.
Serious vehicle damage could occur
and may lead to an accident and
could result in serious personal in-
jury. Check the tire pressure for all
four tires. Adjust the tire pressure to
the recommended COLD tire pres-
sure shown on the Tire and Loading
Information label to turn the low tire
pressure warning light off. If you have
a flat tire, replace it with a spare tire
as soon as possible. For additional
information, refer to “Flat tire” in the
“In case of emergency ” section of this
manual for changing a flat tire. •
When replacing a wheel without the
TPMS such as the spare tire, when a
spare tire is mounted or a wheel is
replaced, the TPMS will not function
and the low tire pressure warning
light will flash for approximately 1
minute. The light will remain on af ter
1 minute. Have your tires replaced
and/or TPMS system reset as soon as
possible. It is recommended that you
visit a NISSAN dealer for this service.
• Replacing tires with those not origi-
nally specified by NISSAN could af-
fect the proper operation of the
TPMS.
• Do not inject any tire liquid or aerosol
tire sealant into the tires, as this may
cause a malfunction of the tire pres-
sure sensors.
CAUTION
Do not place metalized film or any
metal parts (antenna, etc.) on the win-
dows. This may cause poor reception of
the signals from the tire pressure sen-
sors, and the TPMS will not function
properly. Some devices and transmitters may tem-
porarily interfere with the operation of the
TPMS and cause the low tire pressure
warning light to illuminate.
Some examples are:
• Facilities or electric devices using similar
radio frequencies are near the vehicle.
• If a transmitter set to similar frequencies is being used in or near the vehicle.
• If a computer (or similar equipment) or a DC/AC converter is being used in or near
the vehicle.
The low tire pressure warning light may
illuminate in the following cases:
• If the vehicle is equipped with a wheel and tire without TPMS.
• If the TPMS has been replaced and the ID has not been registered.
• If the wheel is not originally specified by NISSAN.
Starting and driving5-5
Page 321 of 492
NISSAN VEHICLE IMMOBILIZER
SYSTEM
The NISSAN Vehicle Immobilizer System
will not allow the engine to start without
the use of the registered key.
If the engine fails to start using a registered
key (for example, when interference is
caused by another registered key, an auto-
mated toll road device or automatic pay-
ment device on the key ring), restart the
engine using the following procedures:
1. Leave the ignition switch in the ON posi-tion for approximately 5 seconds.
2. Place the ignition switch in the OFF or LOCK position, and wait approximately
10 seconds.
3. Repeat steps 1 and 2.
4. Restart the engine while holding the de- vice (which may have caused the inter-
ference) separate from the registered
key.
If the no start condition re-occurs, NISSAN
recommends placing the registered key on
a separate key ring to avoid interference
from other devices. • Make sure the area around the vehicle is
clear.
• Check fluid levels such as engine oil, cool- ant, brake, and windshield-washer fluid
as frequently as possible, or at least
whenever you refuel.
• Check that all windows and lights are clean.
• Visually inspect tires for their appearance and condition. Also check tires for proper
inflation.
• Check that all doors are closed.
• Position seat and adjust head restraints/ headrests.
• Adjust inside and outside mirrors.
• Fasten the seat belt and ask all passen- gers to do likewise.
• Check the operation of warning lights when the ignition switch is placed in the
ON position. For additional information,
refer to “Warning lights, indicator lights
and audible reminders” in the “Instru-
ments and controls” section of this
manual. 1. Apply the parking brake.
2. Move the shif t lever to P (Park) or N (Neu-
tral). P (Park) is recommended.
The starter is designed not to operate
unless the shif t lever is in either P
(Park) or N (Neutral).
3. Push the ignition switch to the ON posi- tion. Depress the brake pedal and push
the ignition switch to start the engine.
To start the engine immediately, push
and release the ignition switch while de-
pressing the brake pedal with the igni-
tion switch in any position.
• If the engine is very hard to start in extremely cold weather or when re-
starting, depress the accelerator
pedal a little (approximately 1/3 to the
floor) and while holding, crank the en-
gine. Release the accelerator pedal
when the engine starts.
• If the engine is very hard to start be- cause it is flooded, depress the accel-
erator pedal all the way to the floor
and hold it. Push the ignition switch to
the ON position to start cranking the
engine. Af ter 5 or 6 seconds, stop
cranking by pushing the ignition
switch to the LOCK position. Af ter
BEFORE STARTING THE ENGINE STARTING THE ENGINE
Starting and driving5-13
Page 323 of 492
CAUTION
• To avoid possible damage to your ve-
hicle, when stopping the vehicle on
an uphill grade, do not hold the ve-
hicle by depressing the accelerator
pedal. The foot brake should be used
for this purpose.
The A/T in your vehicle is electronically con-
trolled to produce maximum power and
smooth operation.
The recommended operating procedures
for this transmission are shown on the fol-
lowing pages. Follow these procedures for
maximum vehicle performance and driv-
ing enjoyment.
Starting the vehicle
1. Af ter starting the engine, fully depress the foot brake pedal before moving the
shif t lever out of the P (Park) position.
2. Keep the foot brake pedal depressed and move the shif t lever into a driving
gear.
3. Release the foot brake, then gradually start the vehicle in motion. The automatic transmission is designed
so the foot brake pedal MUST be de-
pressed before shif ting from P (Park) to
any drive position while the ignition
switch is in the ON position.
The shif t lever cannot be moved out of
the P (Park) position and into any of the
other gear positions if the ignition
switch is placed in the LOCK or OFF posi-
tion.
The shif t lever may not be moved out of
the P (Park) position and into any of the
other gear positions if the ignition
switch is placed in the ON position, but
the engine is not running and the out-
side temperature is extremely low.
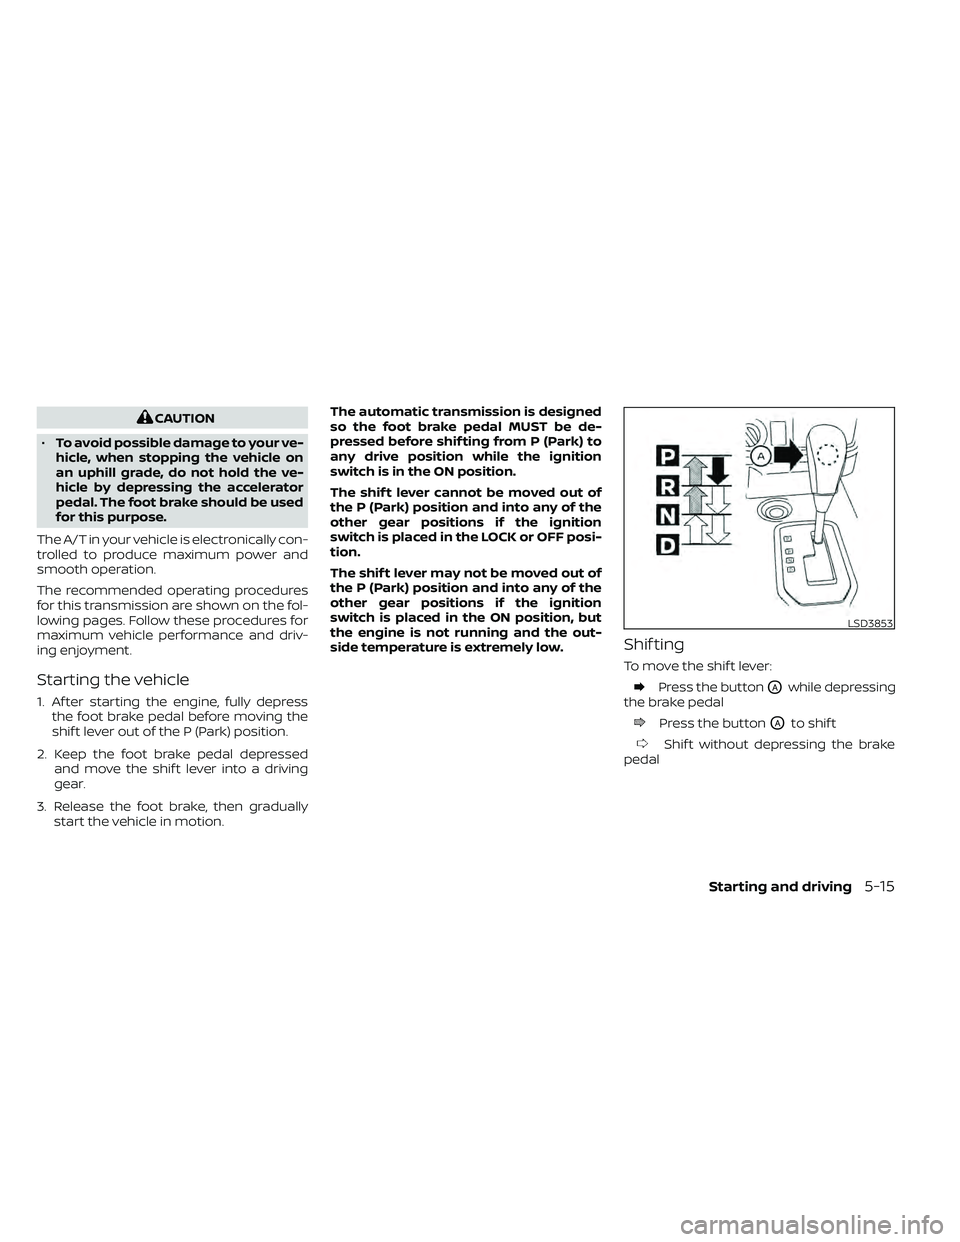
Shif ting
To move the shif t lever:
Press the buttonOAwhile depressing
the brake pedal
Press the buttonOAto shif t
Shif t without depressing the brake
pedal
LSD3853
Page 324 of 492
Shif ting
Af ter starting the engine, fully depress the
brake pedal and move the shif t lever out of
the P (Park) position.
CAUTION
To prevent transmission damage, use
the P (Park) position only when the ve-
hicle is completely stopped.
Use the P (Park) shif t lever position when
the vehicle is parked or when starting the
engine. Make sure the vehicle is completely
stopped.
The brake pedal should be depressed to
move the shif t lever from N (Neutral) or
any drive position to P (Park).
The P (Park) position is automatically en-
gaged if you switch off the ignition.
Apply the parking brake. When parking on a
hill, apply the parking brake first, then move
the shif t lever into the P (Park) position.
R (Reverse)
CAUTION
To prevent transmission damage, use
the R (Reverse) position only when the
vehicle is completely stopped.
Use the R (Reverse) position to back up. Make
sure the vehicle is completely stopped be-
fore selecting the R (Reverse) position. The
brake pedal must be depressed to move
the shif t lever from P (Park), N (Neutral) or
any drive position to R (Reverse).
N (Neutral)
Neither forward nor reverse gear is engaged.
The engine can be started in this position.
You may shif t to N (Neutral) and restart a
stalled engine while the vehicle is moving.
D (Drive)
Use this position for all normal forward
driving.
5-16Starting and driving
Page 326 of 492
M3 (Third)
Use for hill climbing or engine braking on
downhill grades.
Shif t ranges up or down one by one as
follows:
M1↔M2 ↔M3
M3 will be displayed on the position indica-
tor in the meter.
M2 (Second)
Use for hill climbing or engine braking on
downhill grades.
Shif t ranges up or down one by one as
follows:
M1 ↔M2
M2 will be displayed on the position indica-
tor in the meter.
M1 (First)
Use this position when climbing steep hills
slowly or driving slowly through deep snow,
sand or mud, or for maximum engine brak-
ing on steep downhill grades.
M1 will be displayed on the position indica-
tor on the meter. • Remember not to drive at high speeds for
extended periods of time in lower than
M4 range. This reduces fuel economy.
When shif ting up
Move the shif t lever to the + (up) side. (Shif ts
to higher range.)
When shif ting down
Move the shif t lever to the − (down) side.
(Shif ts to lower range.)
• The transmission will automatically downshif t the gears. (For example, if you
select the 3rd range, the transmission will
shif t down between the 3rd and 1st
gears.)
• Moving the shif t lever rapidly to the same side twice will shif t the ranges in succes-
sion.
When canceling the manual shif t mode
Return the shif t lever to the D (Drive) posi-
tion to return the transmission to the nor-
mal driving mode. •
In the manual shif t mode, the trans-
mission may not shif t to the selected
gear immediately because of vehicle
speed. The transmission will upshif t or
downshif t when vehicle speed
matches the programmed transmis-
sion shif t points. This helps maintain
driving performance and reduces the
chance of vehicle damage or loss of
control.
• In the manual shif t mode, the trans-
mission will not upshif t to a higher
gear than is manually selected. When
the vehicle speed decreases, the trans-
mission automatically shif ts down and
shif ts to 1st gear before the vehicle
comes to a stop.
Accelerator downshif t
— in D (Drive) position —
For passing or hill climbing, depress the
accelerator pedal to the floor. This shif ts
the transmission down into a lower gear,
depending on the vehicle speed.
5-18Starting and driving
Page 330 of 492
3.Use Air Conditioning (A/C) at Higher
Vehicle Speeds
• Below 40 mph (64 km/h), it is more efficient to open windows to cool the
vehicle due to reduced engine load.
• Above 40 mph (64 km/h), it is more efficient to use A/C to cool the vehicle
due to increased aerodynamic drag.
• Recirculating the cool air in the cabin when the A/C is on reduces cooling
load.
4. Drive at Economical Speeds and
Distances
• Observing the speed limit and not ex- ceeding 60 mph (97 km/h) (where le-
gally allowed) can improve fuel effi-
ciency due to reduced aerodynamic
drag.
• Maintaining a safe following distance behind other vehicles reduces unnec-
essary braking.
• Safely monitoring traffic to anticipate changes in speed permits reduced
braking and smooth acceleration
changes.
• Select a gear range suitable to road conditions. 5.
Use Cruise Control
• Using cruise control during highway driving helps maintain a steady speed.
• Cruise control is particularly effective in providing fuel savings when driving
on flat terrains.
6. Plan for the Shortest Route
• Utilize a map or navigation system to determine the best route to save time.
7. Avoid Idling
• Shutting off your engine when safe for stops exceeding 30–60 seconds saves
fuel and reduces emissions.
8. Buy an Automated Pass for Toll Roads
• Automated passes permit drivers to use special lanes to maintain cruising
speed through the toll and avoid stop-
ping and starting. 9.
Winter Warm Up
• Limit idling time to minimize impact to fuel economy.
• Vehicles typically need no more than 30 seconds of idling at start-up to ef-
fectively circulate the engine oil before
driving.
• Your vehicle will reach its ideal operat- ing temperature more quickly while
driving versus idling.
10. Keeping your Vehicle Cool
• Park your vehicle in a covered parking area or in the shade whenever pos-
sible.
• When entering a hot vehicle, opening the windows will help to reduce the
inside temperature faster, resulting in
reduced demand on your A/C system.
5-22Starting and driving
Page 331 of 492
• Keep your engine tuned up.
• Follow the recommended scheduledmaintenance.
• Keep the tires inflated to the correct pres- sure. Low tire pressure increases tire
wear and lowers fuel economy.
• Keep the wheels in correct alignment. Im- proper alignment increases tire wear and
lowers fuel economy.
• For vehicles equipped with
, use 4H
or 4L position only when necessary.
4-Wheel Drive operation lowers fuel
economy.
• Use the recommended viscosity engine oil. For additional information, refer to “En-
gine oil and oil filter recommendations” in
the “Technical and consumer informa-
tion” section of this manual.
CAUTION
• Do not drive the vehicle in the 4H or
4LO position on dry hard surface
roads. Driving on dry, hard surfaces in
4H or 4LO may cause unnecessary
noise, tire wear and increased fuel
consumption.
If the 4WD warning light turns on
when you are driving on dry hard sur-
face roads:
– In the 4H position, shif t the 4WD
shif t switch to 2–Wheel Drive
(2WD).
– In the 4LO position for automatic
transmission vehicles, stop the
vehicle and shif t the shif t lever to
the N (Neutral) position with the
brake pedal depressed and shif t
the 4WD shif t switch to 2WD.
• If the warning light is still on af ter the
above operation, have your vehicle
checked as soon as possible. It is rec-
ommended that you visit a NISSAN
dealer for this service.
INCREASING FUEL ECONOMYUSING 4–WHEEL DRIVE (4WD)
(if so equipped)
Starting and driving5-23
Page 332 of 492
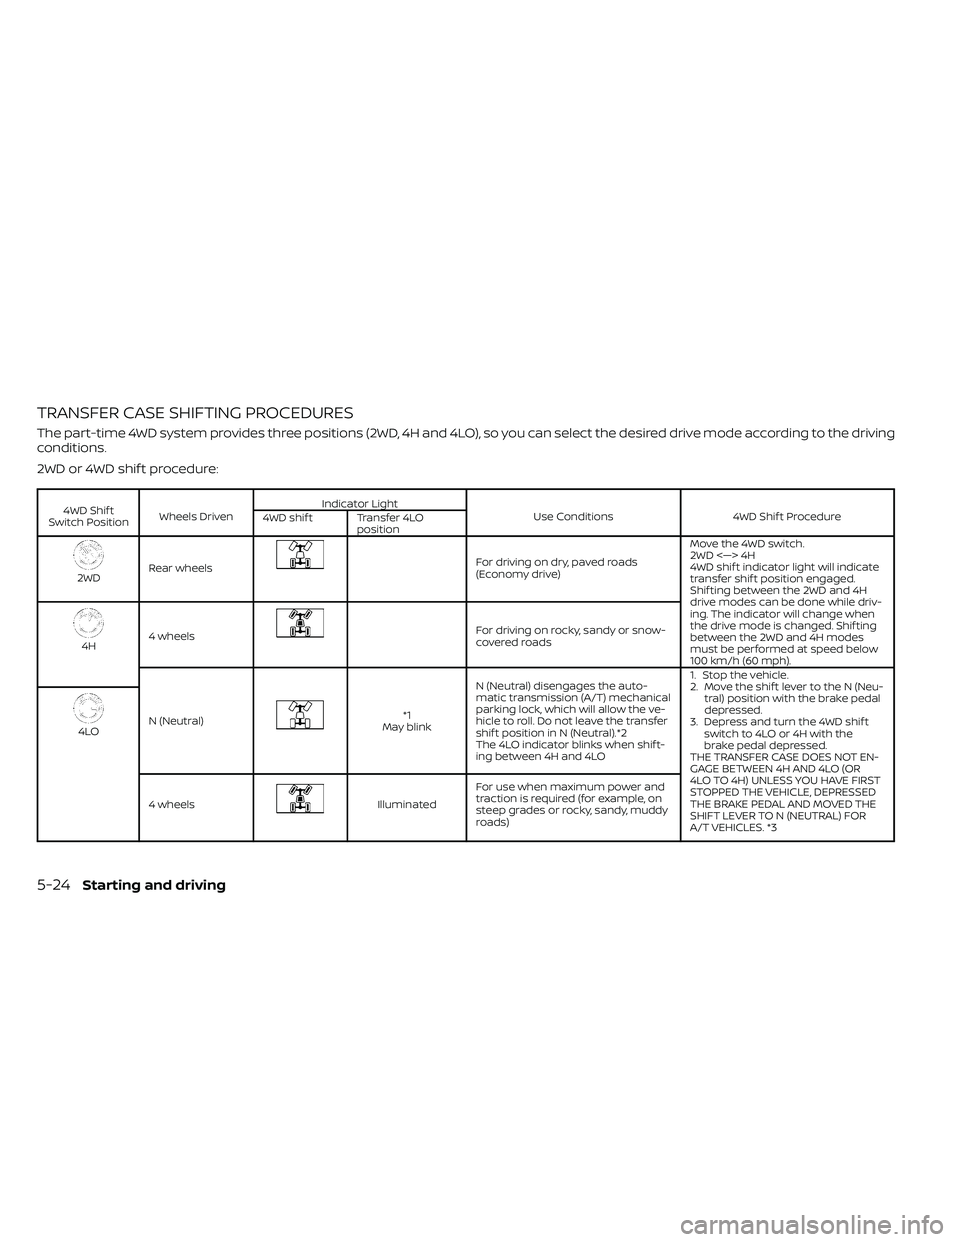
TRANSFER CASE SHIFTING PROCEDURES
The part-time 4WD system provides three positions (2WD, 4H and 4LO), so you can select the desired drive mode according to the driving
conditions.
2WD or 4WD shif t procedure:
4WD Shif t
Switch Position Wheels Driven Indicator Light
Use Conditions 4WD Shif t Procedure
4WD shif t Transfer 4LO
position
2WDRear wheels
For driving on dry, paved roads
(Economy drive) Move the 4WD switch.
2WD <—> 4H
4WD shif t indicator light will indicate
transfer shif t position engaged.
Shif ting between the 2WD and 4H
drive modes can be done while driv-
ing. The indicator will change when
the drive mode is changed. Shif ting
between the 2WD and 4H modes
must be performed at speed below
100 km/h (60 mph).
4H
4 wheels
For driving on rocky, sandy or snow-
covered roads
N (Neutral)
*1
May blink N (Neutral) disengages the auto-
matic transmission (A/T) mechanical
parking lock, which will allow the ve-
hicle to roll. Do not leave the transfer
shif t position in N (Neutral).*2
The 4LO indicator blinks when shif t-
ing between 4H and 4LO 1. Stop the vehicle.
2. Move the shif t lever to the N (Neu-
tral) position with the brake pedal
depressed.
3. Depress and turn the 4WD shif t switch to 4LO or 4H with the
brake pedal depressed.
THE TRANSFER CASE DOES NOT EN-
GAGE BETWEEN 4H AND 4LO (OR
4LO TO 4H) UNLESS YOU HAVE FIRST
STOPPED THE VEHICLE, DEPRESSED
THE BRAKE PEDAL AND MOVED THE
SHIFT LEVER TO N (NEUTRAL) FOR
A/T VEHICLES. *3
4LO
4 wheels
Illuminated For use when maximum power and
traction is required (for example, on
steep grades or rocky, sandy, muddy
roads)
5-24Starting and driving
Page 334 of 492
The transfer case 4WD shif t switch is used
to select either 2WD or 4WD depending on
the driving conditions. There are three
types of drive modes available, 2WD, 4H and
4LO.
The 4WD shif t switch electronically controls
the transfer case operation. Rotate the
switch to move between each mode, 2WD,
4H and 4LO.
To change into or out of 4LO, the vehicle
MUST be stationary, move the shif t lever
to N (Neutral), and depress the brake
pedal. The switch must be depressed
and turned when changing into or out of
4LO.
WARNING
• When parking, apply the parking
brake before stopping the engine
and make sure that the 4WD shif t in-
dicator light is on and the ATP warn-
ing light goes off. Otherwise, the ve-
hicle could unexpectedly move even
if the A/T is in the P (Park) position. •
The transfer 4LO position indicator
light must stop blinking and remain
illuminated or turn off before shif ting
the transmission into gear. If the shif t
lever is shif ted from the N (Neutral)
position to any other gear when the
transfer 4LO position indicator light
is blinking, the vehicle may move
unexpectedly.
CAUTION
• Never shif t the 4WD shif t switch be-
tween 4LO and 4H while driving.
• The 4H position provides greater
traction. Avoid excessive speed, as it
will cause increased fuel consump-
tion and higher oil temperatures, and
could damage drivetrain compo-
nents. Speeds over 62 mph (100
km/h) in 4H is not recommended.
• The 4LO position provides maximum
power and traction. Avoid raising ve-
hicle speed excessively, as the maxi-
mum speed is approximately 31 mph
(50 km/h).
•
When driving straight, shif t the 4WD
shif t switch to the 2WD or 4H position.
Do not move the 4WD shif t switch
when making a turn or reversing.
• Do not shif t the 4WD shif t switch (be-
tween 2WD and 4H) while driving on
steep downhill grades. Use the en-
gine brake and low gears 2 (Second
gear) or 1 (Low gear), for engine
braking.
• Do not operate the 4WD shif t switch
(between 2WD and 4H) with the rear
wheels spinning.
• Do not drive on dry hard surface
roads in the 4H or 4LO position. Driv-
ing on dry hard surfaces in 4H or 4LO
may cause unnecessary noise and
tire wear. NISSAN recommends driv-
ing in the 2WD position under these
conditions.
• The 4WD transfer case may not be
shif ted between 4H and 4LO at low
ambient temperatures and the
transfer 4LO position indicator light
may blink even when the 4WD shif t
switch is shif ted. Af ter driving for a
while you can change the 4WD trans-
fer case between 4H and 4LO.
5-26Starting and driving
Page 339 of 492
WARNING
• Do not stop or park the vehicle over
flammable materials such as dry
grass, waste paper or rags. They may
ignite and cause a fire.
•
Safe parking procedures require that
both the parking brake be set and the
transmission placed into P (Park). Fail-
ure to do so could cause the vehicle to
move unexpectedly or roll away and re-
sult in an accident. Make sure the shif t
lever has been pushed as far forward as
it can go and cannot be moved without
depressing the foot brake pedal.
• Never leave the engine running while
the vehicle is unattended.
• Do not leave children unattended in-
side the vehicle. They could unknow-
ingly activate switches or controls or
make the vehicle move. Unattended
children could become involved in
serious accidents.
•
To help avoid risk of injury or death
through unintended operation of the
vehicle and/or its systems, do not leave
children, people who require the assis-
tance of others or pets unattended in
your vehicle. Additionally, the tempera-
ture inside a closed vehicle on a warm day can quickly become high enough to
cause a significant risk of injury or
death to people and pets.
1. Firmly apply the parking brake.
2. Move the shif t lever to the P (Park)
position.
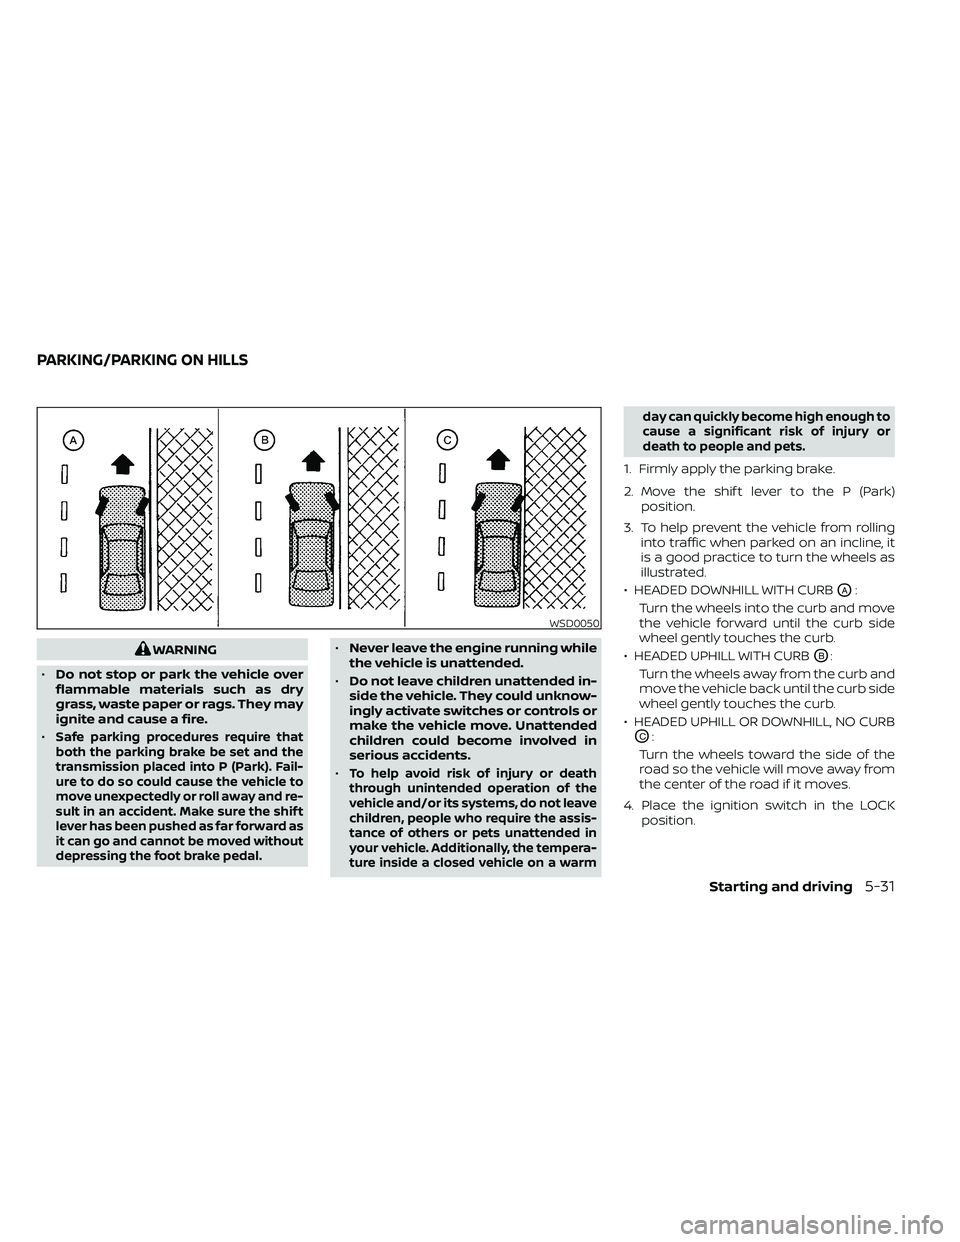
3. To help prevent the vehicle from rolling into traffic when parked on an incline, it
is a good practice to turn the wheels as
illustrated.
• HEADED DOWNHILL WITH CURB
OA:
Turn the wheels into the curb and move
the vehicle forward until the curb side
wheel gently touches the curb.
• HEADED UPHILL WITH CURB
OB:
Turn the wheels away from the curb and
move the vehicle back until the curb side
wheel gently touches the curb.
• HEADED UPHILL OR DOWNHILL, NO CURB
OC:
Turn the wheels toward the side of the
road so the vehicle will move away from
the center of the road if it moves.
4. Place the ignition switch in the LOCK position.
WSD0050
PARKING/PARKING ON HILLS
Starting and driving5-31