stop NISSAN FRONTIER 2023 Owners Manual
[x] Cancel search | Manufacturer: NISSAN, Model Year: 2023, Model line: FRONTIER, Model: NISSAN FRONTIER 2023Pages: 572, PDF Size: 6.58 MB
Page 495 of 572
Tire rotation:Rotate tires at the specified
interval shown in the maintenance sched-
ule. When rotating tires, check for damage
and uneven wear. Replace if necessary.
Transmission fluid/oil, differential oil
and transfer case oil: Visually inspect for
signs of leakage at specified intervals.
Off-road maintenance: Check the follow-
ing items frequently whenever you drive
off-road through deep sand, mud or water:
• Brake pads and rotors
• Brake linings and drums
• Brake lines and hoses
• Differential, transmission and transfer case oil
• Steering linkage
• Propeller shaf t(s) and front drive shaf ts
• Engine air filter
• Clutch housing drain (AWD only) To help ensure smooth, safe and economi-
cal driving, NISSAN provides two mainte-
nance schedules that may be used, de-
pending upon the conditions in which you
usually drive. These schedules contain
both distance and time intervals, up to
120,000 miles (192,000 km)/96 months. For
most people, the odometer reading will in-
dicate when service is needed. However, if
you drive very little, your vehicle should be
serviced at the regular time intervals
shown in the schedule.
Af ter 120,000 miles (192,000 km)/96
months, continue maintenance at the
same mileage/time intervals.
ADDITIONAL MAINTENANCE ITEMS
FOR SEVERE OPERATING
CONDITIONS
Additional maintenance items for severe
operating conditions
should be per-
formed on vehicles that are driven under
especially demanding conditions. Addi-
tional maintenance items should be per-
formed if you primarily operate your vehicle
under the following conditions:
• Repeated short trips of less than 5 miles (8 km). • Repeated short trips of less than 10 miles
(16 km) with outside temperatures re-
maining below freezing.
• Operating in hot weather in stop-and-go “rush hour” traffic.
• Extensive idling and/or low speed driving for long distances, such as police, taxi or
door-to-door delivery use.
• Driving in dusty conditions.
• Driving on rough, muddy or salt spread roads.
• Towing a trailer, using a camper or using a car-top carrier.
If your vehicle is mostly operated under the
severe conditions, follow the severe use
maintenance intervals shown in the main-
tenance schedule.
MAINTENANCE SCHEDULES
Maintenance and schedules9-7
Page 522 of 572
Change intervals
The oil and oil filter change intervals for
your engine are based on the use of the
specified quality oils and filters. Using en-
gine oil and filters that are not of the speci-
fied quality, or exceeding recommended oil
and filter change intervals could reduce
engine life or cause severe damage to the
engine. Damage to the engine caused by
improper maintenance or use of incorrect
oil and filter quality and/or viscosity is not
covered by the NISSAN New Vehicle Limited
Warranty.
Your engine was filled with a high-quality
engine oil when it was built. You do not have
to change the oil before the first recom-
mended change interval. Oil and filter
change intervals depend upon how you
use your vehicle.
NISSAN recommends the use of Genuine
NISSAN parts or equivalent. The use of
parts that do not meet or exceed NISSAN
specifications, can cause damage to your
vehicle, and have an effect on your war-
ranty coverage. It is recommended that
you visit a NISSAN dealer parts department
who can provide information on the proper
parts for your vehicle.Operation under the following conditions
may require more frequent oil and filter
changes:
• repeated short distance driving at cold
outside temperatures
• driving in dusty conditions
• extensive idling
• towing a trailer
• stop and go commuting
For additional information, see the “Mainte-
nance and schedules” section of this
manual.
AIR CONDITIONER SYSTEM
REFRIGERANT AND OIL
RECOMMENDATIONS
The air conditioner system in your
NISSAN vehicle must be charged with the
refrigerant HFO-1234yf (R-1234yf ) and
NISSAN A/C system oil Type ND-OIL12
(PAG) or the exact equivalents.
CAUTION
The use of any other refrigerant or oil
will cause severe damage to the air
conditioning system and will require
the replacement of all air conditioner
system components. The refrigerant HFO-1234yf (R-1234yf ) in
your NISSAN vehicle does not harm the
earth's ozone layer. Although this refriger-
ant does not affect the earth's atmo-
sphere, certain government regulations re-
quire the recovery and recycling of any
refrigerant during automotive air condi-
tioner system service. Air conditioner sys-
tem should only be serviced by trained and
certified technicians to ensure proper and
safe operation (SAE J2845). A NISSAN dealer
has the trained technicians and equip-
ment needed to recover and recycle your
air conditioner system refrigerant. Only
new and SAEJ2842 certified evaporator(s)
shall be used as replacement parts.
A damaged or leaking air conditioning
evaporator shall never be repaired or re-
placed with one removed from a used or
salvaged vehicle. To replace a damaged or
leaking evaporator, use only new and SAE
J2842 certified evaporator(s). It is recom-
mended that you visit a NISSAN dealer when
servicing your air conditioner system.
10-8Technical and consumer information
Page 533 of 572
5. Determine the combined weightof luggage and cargo being
loaded on the vehicle. That weight
may not safely exceed the avail-
able cargo and luggage load ca-
pacity calculated in step 4.
6. If your vehicle will be towing a trailer, load from your trailer will be
transferred to your vehicle. Con-
sult this manual to determine
how this reduces the available
cargo and luggage load capacity
of your vehicle.
Before driving a loaded vehicle, con-
firm that you do not exceed the
GVWR or the GAWR for your vehicle.
For additional information, see “Mea-
surement of weights” (P. 10-25).
Also check tires for proper inflation
pressures. For additional informa-
tion, see “Tire and Loading Informa-
tion label” (P. 8-34).
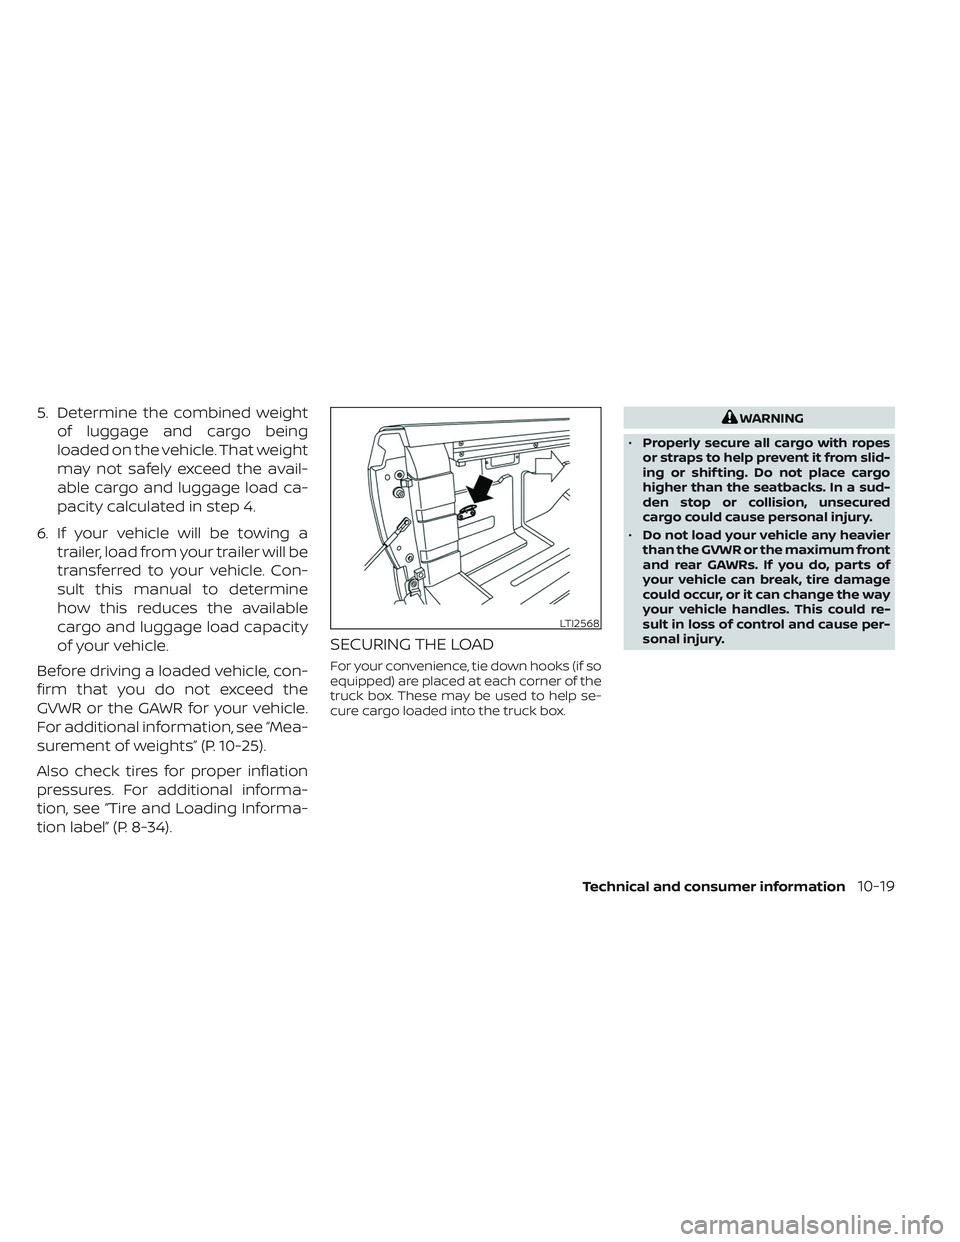
SECURING THE LOAD
For your convenience, tie down hooks (if so
equipped) are placed at each corner of the
truck box. These may be used to help se-
cure cargo loaded into the truck box.
WARNING
• Properly secure all cargo with ropes
or straps to help prevent it from slid-
ing or shif ting. Do not place cargo
higher than the seatbacks. In a sud-
den stop or collision, unsecured
cargo could cause personal injury.
• Do not load your vehicle any heavier
than the GVWR or the maximum front
and rear GAWRs. If you do, parts of
your vehicle can break, tire damage
could occur, or it can change the way
your vehicle handles. This could re-
sult in loss of control and cause per-
sonal injury.
LTI2568
Technical and consumer information10-19
Page 534 of 572

UTILI-TRACK® CHANNEL SYSTEM
(if so equipped)
1. Side channels
2. Header channel
WARNING
• Properly install and tighten the tie-
down cleats into the Utili-track®
channel system. Also, do not attach
any rope or straps directly to the
channel. Failure to properly install
the tie-down cleats or attaching
ropes or straps directly to the chan-
nel can cause the cargo to become
unsecured. In a sudden stop or colli-
sion, unsecured cargo could cause
personal injury.
• Properly secure all cargo with ropes
or straps to help prevent it from slid-
ing or shif ting. In a sudden stop or
collision, unsecured cargo could
cause personal injury.
The Utili-track® channel system allows you
to move tie-down clamps in the bed to the
best location to secure a load.
The tie-down cleats must be installed so
the clamp is properly seated in the notches
in the rail. If the tie-down cleat is not seated
in the notches, it will not be flush with the
rail and cannot be properly tightened.
The bolt in the center of the cleat must be
tightened hand tight 20 – 40 in-lbs. (2.27 -
4.6 N·m). Check the tightness of the tie-down cleat
periodically during a trip to make sure the
center bolt has not become loose.
Install the tie-down cleat as follows:
1. Remove the side channels by sliding
them out the back of the truck bed.
Properly store the side channels.
2. Loosen the center bolt completely.
LTI2592
10-20Technical and consumer information
Page 538 of 572

WARNING
Do not install accessories over the gap
between the front and rear side chan-
nels. Doing this could affect the rear
structure in certain rear impacts, which
could result in serious injury.LOADING TIPS
• The GVW must not exceed GVWR or GAWR as specified on the F.M.V.S.S./
C.M.V.S.S. certification label.
• Do not load the front and rear axle to the GAWR. Doing so will exceed
the GVWR.
WARNING
• Properly secure all cargo with
ropes or straps to help prevent
it from sliding or shif ting. Do
not place cargo higher than the
seatbacks. In a sudden stop or
collision, unsecured cargo
could cause personal injury.
• Do not load your vehicle any
heavier than the GVWR or the
maximum front and rear
GAWRs. If you do, parts of your
vehicle can break, tire damage
could occur, or it can change
the way your vehicle handles.
This could result in loss of con-
trol and cause personal injury.
LTI0123
1 correct installation, 2 incorrect installation
10-24Technical and consumer information
Page 543 of 572

Maximum Gross Vehicle Weight
(GVW)/maximum Gross Axle
Weight (GAW)
The GVW of the towing vehicle must not
exceed the Gross Vehicle Weight Rating
(GVWR) shown on the F.M.V.S.S./C.M.V.S.S.
certification label. The GVW equals the
combined weight of the unloaded vehicle,
passengers, luggage, hitch, trailer tongue
load and any other optional equipment. In
addition, front or rear GAW must not ex-
ceed the Gross Axle Weight Rating (GAWR)
shown on the F.M.V.S.S./C.M.V.S.S. certifica-
tion label.Towing capacities are calculated assum-
ing a base vehicle with driver and any op-
tions required to achieve the rating. Addi-
tional passengers, cargo and/or optional
equipment, such as the trailer hitch, will
add weight to the vehicle and reduce your
vehicle’s maximum towing capacity and
trailer tongue load.
The vehicle and trailer need to be weighed
to confirm the vehicle is within the GVWR,
Front GAWR, Rear GAWR, Gross Combined
Weight Rating (GCWR) and Towing capacity.
All vehicle and trailer weights can be mea-
sured using platform type scales com-
monly found at truck stops, highway weigh
stations, building supply centers or salvage
yards.
To determine the available payload capac-
ity for tongue load, use the following proce-
dure.
1. Locate the GVWR on the F.M.V.S.S./
C.M.V.S.S. certification label.
2. Weigh your vehicle on the scale with all of the passengers and cargo that are
normally in the vehicle when towing a
trailer. 3. Subtract the actual vehicle weight from
the GVWR. The remaining amount is the
available maximum tongue load.
To determine the available towing capacity,
use the following procedure.
1. Find the GCWR for your vehicle on the "Towing Load/Specification" chart found
in this section.
2. Subtract the actual vehicle weight from the GCWR. The remaining amount is the
available maximum towing capacity.
To determine the Gross Trailer Weight,
weigh your trailer on a scale with all equip-
ment and cargo, that are normally in the
trailer when it is towed. Make sure the
Gross Trailer Weight is not more than the
Gross Trailer Weight Rating shown on the
trailer and is not more than the calculated
available maximum towing capacity.
Also weigh the front and rear axles on the
scale to make sure the Front Gross Axle
Weight and Rear Gross Axle Weight are not
more than Front Gross Axle Weight and Rear
Gross Axle Weight on the F.M.V.S.S./C.M.V.S.S.
certification label. The cargo in the trailer and
vehicle may need to be moved or removed
to meet the specified ratings.
CA0036
Technical and consumer information10-29
Page 550 of 572
WARNING
• Do not use axle-mounted hitches.
• Do not modif y the vehicle exhaust
system, brake system, etc. to install a
trailer hitch.
• To reduce the possibility of addi-
tional damage if your vehicle is
struck from the rear, where practical,
remove the ball mount from the re-
ceiver when not in use.
•
Regularly check that all trailer hitch
mounting bolts are securely mounted.
Tire pressures
• When towing a trailer, inflate the
vehicle tires to the recommended
cold tire pressure indicated on the
Tire and Loading Information label.
• Trailer tire condition, size, load rat- ing and proper inflation pressure
should be in accordance with
the trailer and tire manufacturer's
specifications.
Safety chains
Always use suitable safety chains between
your vehicle and the trailer. The safety
chains should be crossed and should be
attached to the hitch, not to the vehicle
bumper or axle. The safety chains can be
attached to the bumper if the hitch ball is
mounted to the bumper. Be sure to leave
enough slack in the chains to permit turn-
ing corners.
Trailer lights
CAUTION
When splicing into the vehicle electrical
system, a commercially available power-
type module/converter must be used to
provide power for all trailer lighting. This
unit uses the vehicle battery as a direct
power source for all trailer lights while
using the vehicle tail light, stop light and
turn signal circuits as a signal source.
The module/converter must draw no
more than 15 milliamps from the stop
and tail lamp circuits. Using a module/
converter that exceeds these power re-
quirements may damage the vehicle's
electrical system. See a reputable trailer
dealer to obtain the proper equipment
and to have it installed.
Trailer lights should comply with federal
and/or local regulations. For assistance in
hooking up trailer lights, it is recommended
that you visit a NISSAN dealer or reputable
trailer dealer. Vehicles equipped with the
optional trailer tow package are equipped
with a 7-pin trailer harness connector. A flat
4–pin harness is available from your dealer
for vehicles without a tow package. If your
trailer is equipped with a flat 4-pin connec-
tor, an adapter will be needed to connect
the trailer lights to the vehicle. Adapters are
available at auto parts stores and hitch
retailers.
Trailer brakes
If your trailer is equipped with a braking
system, make sure it conforms to federal
and/or local regulations and that it is prop-
erly installed.
Vehicles equipped with a 7–pin trailer har-
ness connector are pre-wired for a trailer
brake controller. It is recommended that
you visit a NISSAN dealer for a trailer brake
adapter harness.
WARNING
Never connect a trailer brake system
directly to the vehicle brake system.
10-36Technical and consumer information
Page 551 of 572
When towing a trailer load of 3,500 lbs.
(1587 kg) or more, trailers with a brake
system MUST be used.However, most
states require a separate braking system
on trailers with a loaded weight above a
specific amount. Make sure the trailer
meets the local regulations and the regu-
lations where you plan to tow.
Several types of braking systems are
available.
Surge Brakes -The surge brake actuator is
mounted on the trailer tongue with a hy-
draulic line running to each trailer wheel.
Surge brakes are activated by the trailer
pushing against the hitch ball when the
tow vehicle is braking. Hydraulic surge
brakes are common on rental trailers and
some boat trailers. In this type of system,
there is no hydraulic or electric connection
for brake operation between the tow ve-
hicle and the trailer.
Electric Trailer Brakes -Electric braking
systems are activated by an electronic sig-
nal sent from a trailer brake controller (spe-
cial brake-sensing module). If electric trailer
brakes are used, see “Electric trailer brake
controller" (P. 10-37)..
Have a professional supplier of towing
equipment make sure the trailer brakes are properly installed and demonstrate proper
brake function testing.
Electric trailer brake controller
Trailers equipped with electric brakes may
require the installation of an af termarket
trailer brake controller.
A Genuine NISSAN jumper harness is avail-
able that is specifically designed to be used
when installing an af termarket brake
controller.
Install the af termarket electric trailer brake
controller according to the manufacturer's
instructions.
Pre-towing tips
• Be certain your vehicle maintains a level
position when a loaded and/or unloaded
trailer is hitched. Do not drive the vehicle if
it has an abnormal nose-up or nose-
down condition; check for improper
tongue load, overload, worn suspension
or other possible causes of either
condition.
• Always secure items in the trailer to pre- vent load shif t while driving.
• Keep the cargo load as low as possible in the trailer to keep the trailer center of
gravity low. • Load the trailer so approximately 60% of
the trailer load is in the front half and 40%
is in the back half. Also make sure the load
is balanced side to side.
• Check your hitch, trailer tire pressure, ve- hicle tire pressure, trailer light operation,
and trailer wheel lug nuts every time you
attach a trailer to the vehicle.
• Be certain your rearview mirrors conform to all federal, state or local regulations. If
not, install any mirrors required for towing
before driving the vehicle.
• Determine the overall height of the ve- hicle and trailer so the required clearance
is known.Trailer towing tips
In order to gain skill and an understanding
of the vehicle's behavior, you should prac-
tice turning, stopping and backing up in an
area which is free from traffic. Steering sta-
bility and braking performance will be
somewhat different than under normal
driving conditions.
• Always secure items in the trailer to pre-vent load shif t while driving.
• Lock the trailer hitch coupler with a pin or lock to prevent the coupler from inadver-
tently becoming unlatched.
Technical and consumer information10-37
Page 552 of 572
• Avoid abrupt starts, acceleration or stops.
• Avoid sharp turns or lane changes.
• Always drive your vehicle at a moderatespeed.
• When backing up, hold the bottom of the steering wheel with one hand. Move your
hand in the direction in which you want
the trailer to go. Make small corrections
and back up slowly. If possible, have
someone guide you when you are back-
ing up.
Always block the wheels on both vehicle
and trailer when parking. Parking on a
slope is not recommended; however, if you
must do so:
CAUTION
If you move the shif t lever to the P
(Park) position before blocking the
wheels and applying the parking brake,
transmission damage could occur.
1. Apply and hold the brake pedal.
2. Have someone place blocks on the downhill side of the vehicle and trailer
wheels.
3. Af ter the wheel blocks are in place, slowly release the brake pedal until the
blocks absorb the vehicle load. 4. Apply the parking brake.
5. Shif t the transmission into P (Park).
6. Make sure the 4WD shif t indicator light (if
so equipped) indicates the transfer case
is in 4H, 4LO, or 2WD and that the ATP
light is off. If the 4WD shif t indicator light
is flashing, or the ATP light is ON, make
sure the transmission is in P (Park) and
turn the 4WD switch to 2WD or 4H. For
additional information, see “Automatic
transmission park warning light” (P. 2-13)
and “Using 4-wheel drive (4WD)” (P. 5-109).
7. Turn off the engine.
To drive away:
1. Start the vehicle.
2. Apply and hold the brake pedal.
3. Shif t the transmission into gear.
4. Release the parking brake.
5. Drive slowly until the vehicle and trailer are clear from the blocks.
6. Apply and hold the brake pedal.
7. Have someone retrieve and store the blocks. • While going downhill, the weight of the
trailer pushing on the tow vehicle may
decrease overall stability. Therefore, to
maintain adequate control, reduce your
speed and shif t to a lower gear. Avoid
long or repeated use of the brakes when
descending a hill, as this reduces their
effectiveness and could cause overheat-
ing. Shif ting to a lower gear instead pro-
vides “engine braking” and reduces the
need to brake as frequently.
• If the engine coolant temperature rises to a high temperature, see “If your vehicle
overheats” (P. 6-13).
• Trailer towing requires more fuel than normal circumstances.
• Avoid towing a trailer for your vehicle's first 500 miles (805 km).
• For the first 500 miles (805 km) that you do tow, do not drive over 50 mph (80
km/h).
• Have your vehicle serviced more of ten than at intervals specified. For additional
information, see the “Maintenance and
schedules” section of this manual.
• When making a turn, your trailer wheels will be closer to the inside of the turn than
your vehicle wheels. To compensate for
this, make a larger than normal turning
radius during the turn.
10-38Technical and consumer information
Page 553 of 572
• Crosswinds and rough roads will ad-versely affect vehicle/trailer handling,
possibly causing vehicle sway. When be-
ing passed by larger vehicles, be pre-
pared for possible changes in crosswinds
that could affect vehicle handling.
Do the following if the trailer begins to
sway:
1. Take your foot off the accelerator pedal to allow the vehicle to coast and steer as
straight ahead as the road conditions
allow. This combination will help stabilize
the vehicle
– Do not correct trailer sway by steering or applying the brakes.
2. When the trailer sway stops, gently apply the brakes and pull to the side of the
road in a safe area.
3. Try to rearrange the trailer load so it is balanced as described in this section.
• Be careful when passing other vehicles. Passing while towing a trailer requires
considerably more distance than normal
passing. Remember, the length of the
trailer must also pass the other vehicle
before you can safely change lanes. • Downshif t the transmission to a lower
gear for engine braking when driving
down steep or long hills. This will help
slow the vehicle without applying the
brakes.
• Avoid holding the brake pedal down too long or too frequently. This could cause
the brakes to overheat, resulting in re-
duced braking efficiency.
• Increase your following distance to allow for greater stopping distances while tow-
ing a trailer. Anticipate stops and brake
gradually.
• NISSAN recommends that the cruise control not be used while towing a trailer.
• Some states or provinces have specific regulations and speed limits for vehicles
that are towing trailers. Obey the local
speed limits.
• Check your hitch, trailer wiring harness connections, and trailer wheel lug nuts
af ter 50 miles (80 km) of travel and at
every break.
• When launching a boat, don't allow the water level to go over the exhaust tail
pipe or rear bumper.
• Make sure you disconnect the trailer lights before backing the trailer into the
water or the trailer lights may burn out. When towing a trailer, final drive gear oil
should be replaced and transmission oil/
fluid should be changed more fre-
quently. For additional information, refer
to the “Do-it-yourself ” section in this
manual.
Tow mode (if so equipped)
Using tow mode is recommended when
pulling a heavy trailer or hauling a heavy
load. Press the TOW MODE switch to acti-
vate tow mode. The indicator light on the
TOW MODE switch illuminates when tow
mode is selected. Press the TOW MODE
switch again to turn tow mode off. Tow
mode is automatically canceled when the
ignition switch is turned off.
Tow mode includes the following features:
• Grade logic — Adjusts transmission shif ts
when pulling a trailer or hauling a load up
a grade.
• Downhill Speed Control (DSC) — auto- matically downshif ts when driving down
a grade with a trailer or heavy load to help
control vehicle speed.
Technical and consumer information10-39