stop NISSAN FRONTIER 2023 Owners Manual
[x] Cancel search | Manufacturer: NISSAN, Model Year: 2023, Model line: FRONTIER, Model: NISSAN FRONTIER 2023Pages: 572, PDF Size: 6.58 MB
Page 16 of 572
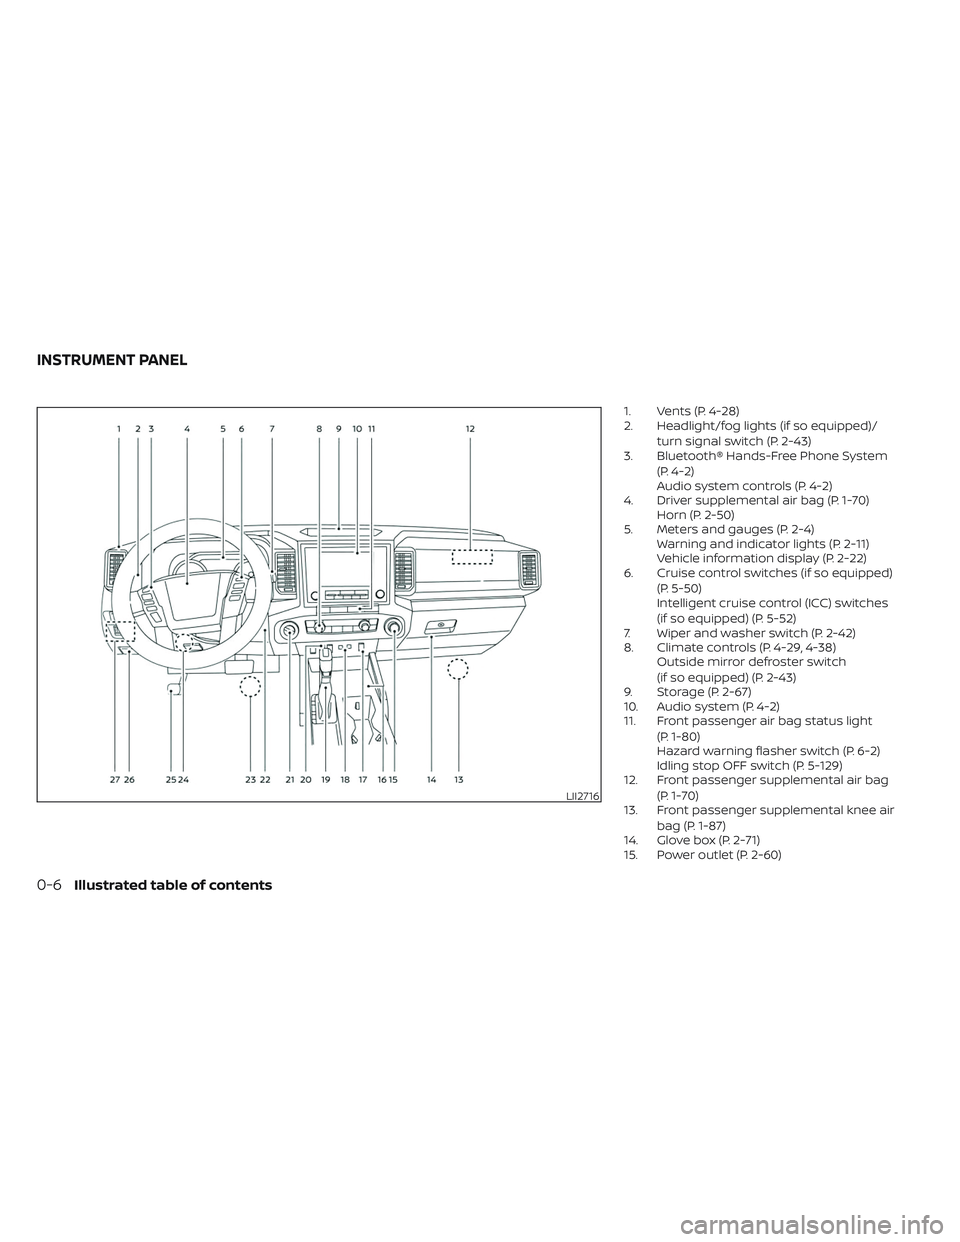
1. Vents (P. 4-28)
2. Headlight/fog lights (if so equipped)/turn signal switch (P. 2-43)
3. Bluetooth® Hands-Free Phone System
(P. 4-2)
Audio system controls (P. 4-2)
4. Driver supplemental air bag (P. 1-70) Horn (P. 2-50)
5. Meters and gauges (P. 2-4) Warning and indicator lights (P. 2-11)
Vehicle information display (P. 2-22)
6. Cruise control switches (if so equipped)
(P. 5-50)
Intelligent cruise control (ICC) switches
(if so equipped) (P. 5-52)
7. Wiper and washer switch (P. 2-42)
8. Climate controls (P. 4-29, 4-38) Outside mirror defroster switch
(if so equipped) (P. 2-43)
9. Storage (P. 2-67)
10. Audio system (P. 4-2)
11. Front passenger air bag status light
(P. 1-80)
Hazard warning flasher switch (P. 6-2)
Idling stop OFF switch (P. 5-129)
12. Front passenger supplemental air bag
(P. 1-70)
13. Front passenger supplemental knee air
bag (P. 1-87)
14. Glove box (P. 2-71)
15. Power outlet (P. 2-60)
LII2716
INSTRUMENT PANEL
0-6Illustrated table of contents
Page 18 of 572
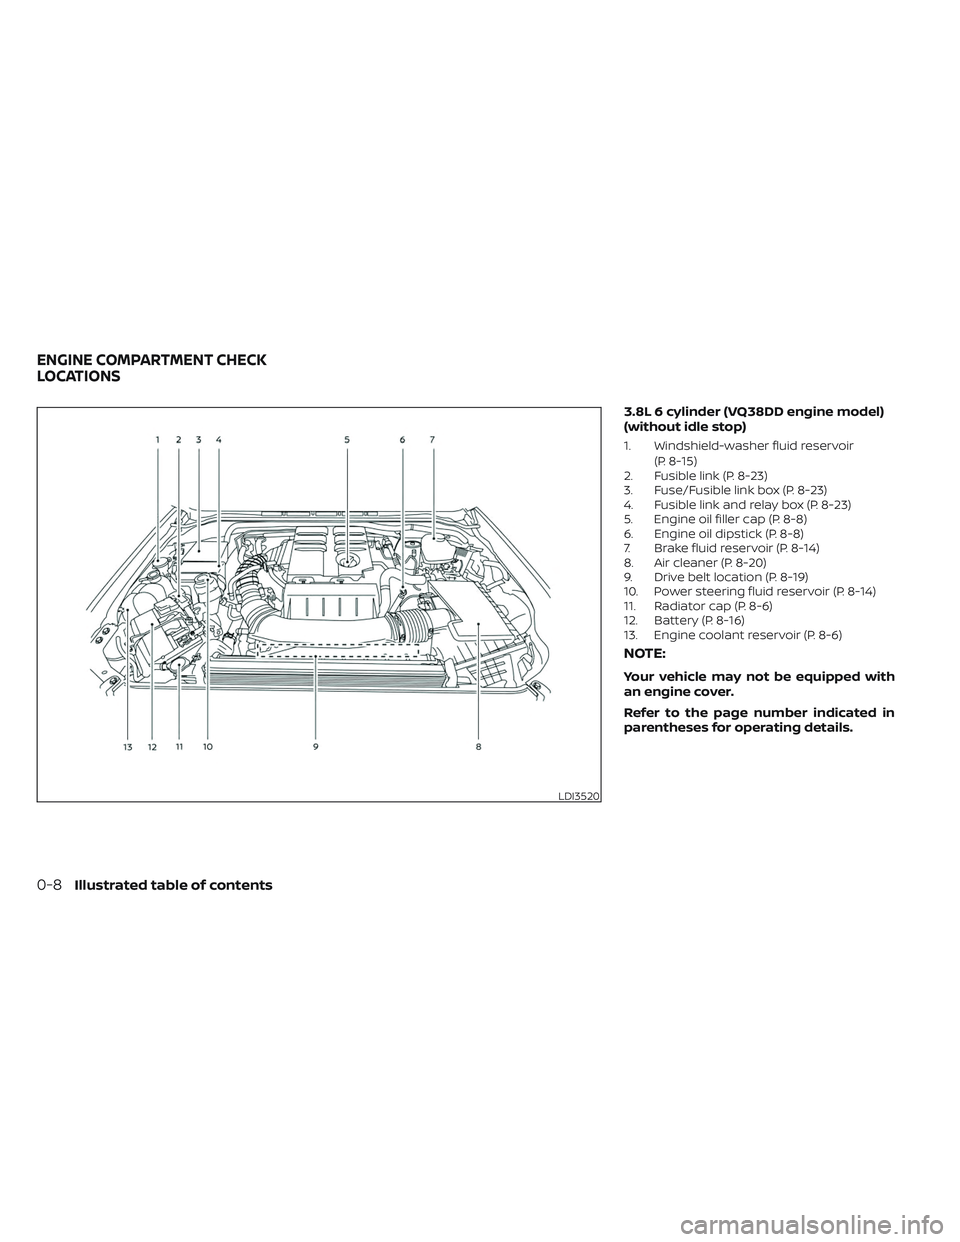
3.8L 6 cylinder (VQ38DD engine model)
(without idle stop)
1. Windshield-washer fluid reservoir(P. 8-15)
2. Fusible link (P. 8-23)
3. Fuse/Fusible link box (P. 8-23)
4. Fusible link and relay box (P. 8-23)
5. Engine oil filler cap (P. 8-8)
6. Engine oil dipstick (P. 8-8)
7. Brake fluid reservoir (P. 8-14)
8. Air cleaner (P. 8-20)
9. Drive belt location (P. 8-19)
10. Power steering fluid reservoir (P. 8-14)
11. Radiator cap (P. 8-6)
12. Battery (P. 8-16)
13. Engine coolant reservoir (P. 8-6)
NOTE:
Your vehicle may not be equipped with
an engine cover.
Refer to the page number indicated in
parentheses for operating details.
LDI3520
ENGINE COMPARTMENT CHECK
LOCATIONS
0-8Illustrated table of contents
Page 19 of 572
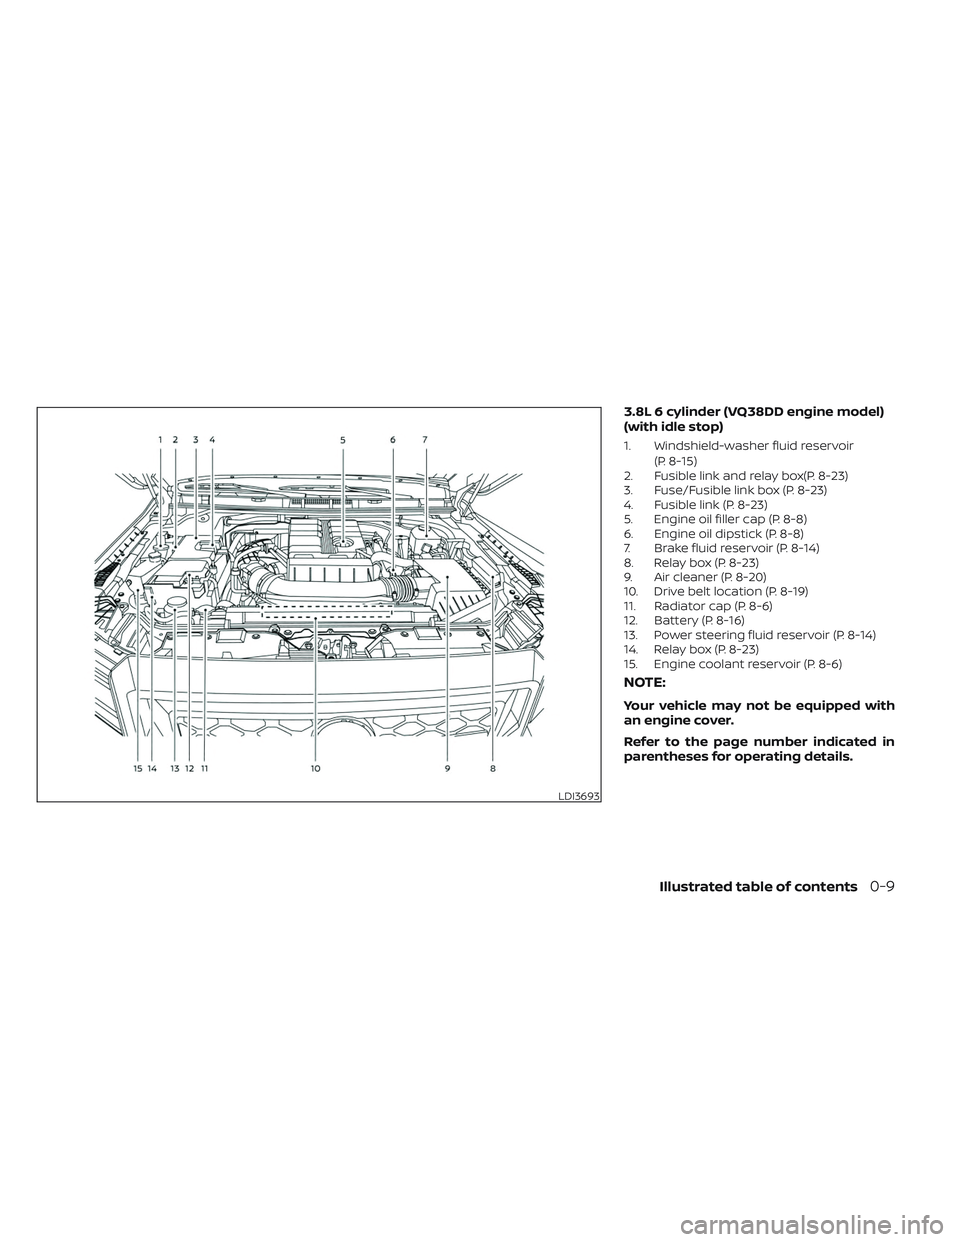
3.8L 6 cylinder (VQ38DD engine model)
(with idle stop)
1. Windshield-washer fluid reservoir(P. 8-15)
2. Fusible link and relay box(P. 8-23)
3. Fuse/Fusible link box (P. 8-23)
4. Fusible link (P. 8-23)
5. Engine oil filler cap (P. 8-8)
6. Engine oil dipstick (P. 8-8)
7. Brake fluid reservoir (P. 8-14)
8. Relay box (P. 8-23)
9. Air cleaner (P. 8-20)
10. Drive belt location (P. 8-19)
11. Radiator cap (P. 8-6)
12. Battery (P. 8-16)
13. Power steering fluid reservoir (P. 8-14)
14. Relay box (P. 8-23)
15. Engine coolant reservoir (P. 8-6)
NOTE:
Your vehicle may not be equipped with
an engine cover.
Refer to the page number indicated in
parentheses for operating details.
LDI3693
Illustrated table of contents0-9
Page 26 of 572
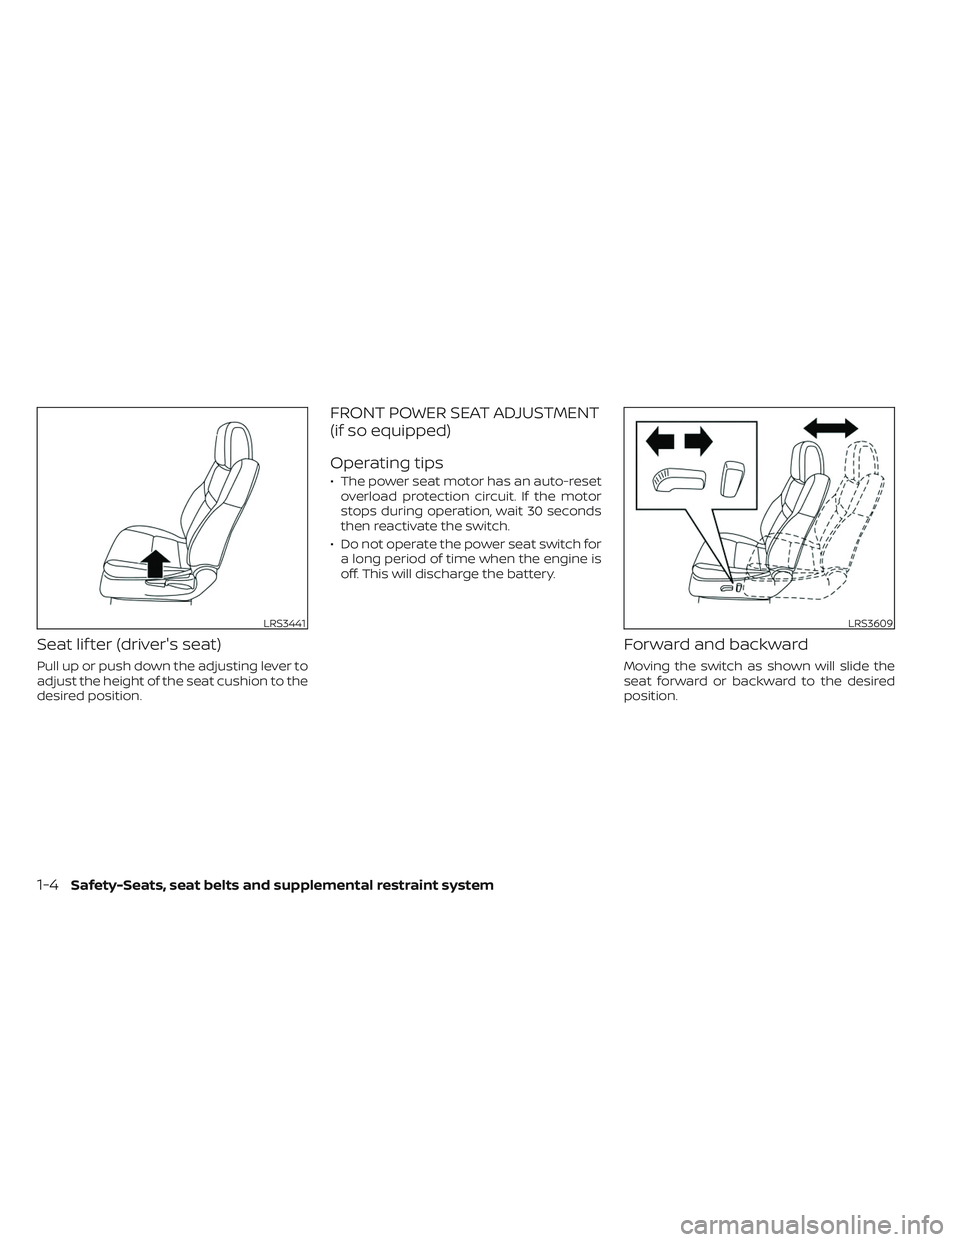
Seat lif ter (driver's seat)
Pull up or push down the adjusting lever to
adjust the height of the seat cushion to the
desired position.
FRONT POWER SEAT ADJUSTMENT
(if so equipped)
Operating tips
• The power seat motor has an auto-resetoverload protection circuit. If the motor
stops during operation, wait 30 seconds
then reactivate the switch.
• Do not operate the power seat switch for a long period of time when the engine is
off. This will discharge the battery.
Forward and backward
Moving the switch as shown will slide the
seat forward or backward to the desired
position.
LRS3441LRS3609
1-4Safety-Seats, seat belts and supplemental restraint system
Page 29 of 572
FLEXIBLE SEATING
WARNING
• Never allow anyone to ride in the
cargo area or on the rear seats when
they are in the fold-down position. In
a collision, people riding in these ar-
eas without proper restraints are
more likely to be seriously injured or
killed.
• Do not allow people to ride in any
area of your vehicle that is not
equipped with seats and seat belts.
Be sure everyone in your vehicle is in
a seat and using a seat belt properly.
• Do not allow more than one person
to use the same seat belt.
• Do not fold down the rear seats when
occupants are in the rear seat area or
any luggage is on the rear seats.
– Make sure that the seat path is
clear before moving the seat.
– Be careful not to allow hands or
feet to get caught or pinched in
the seat. •
Head restraints/headrests should be
adjusted properly as they may pro-
vide significant protection against
injury in an accident. Always replace
and adjust them properly if they have
been removed for any reason.
• If the head restraints/headrests are
removed for any reason, they should
be securely stored to prevent them
from causing injury to passengers or
damage to the vehicle in case of sud-
den braking or an accident.
• When returning the seatbacks to the
upright position, be certain they are
completely secured in the latched
position. If they are not completely
secured, passengers may be injured
in an accident or sudden stop.
• Properly secure all cargo to help pre-
vent it from sliding or shif ting. Do not
place cargo higher than the seat-
backs. In a sudden stop or collision,
unsecured cargo could cause per-
sonal injury.
Folding the rear bench seat up
(if so equipped)
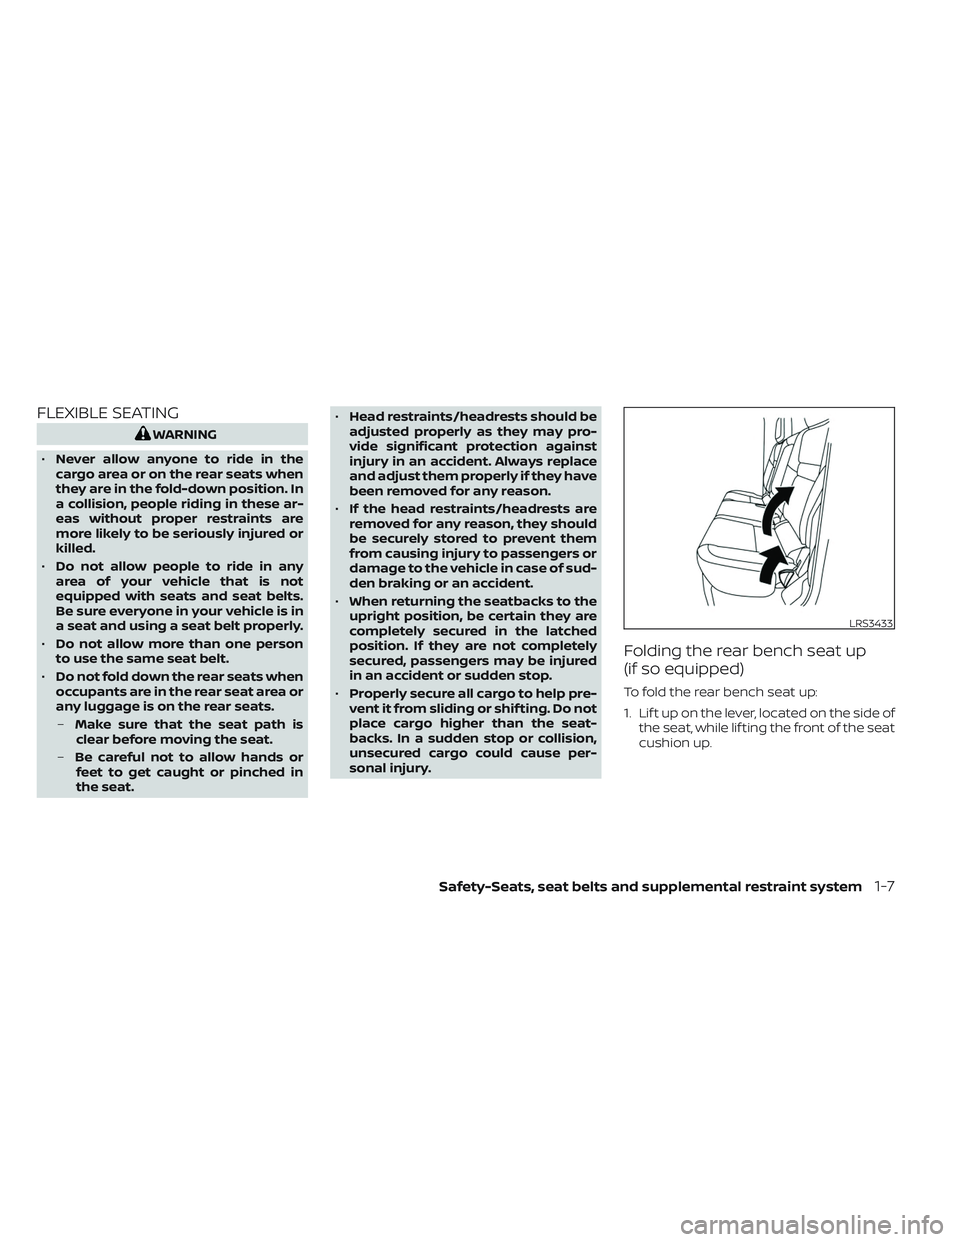
To fold the rear bench seat up:
1. Lif t up on the lever, located on the side of the seat, while lif ting the front of the seat
cushion up.
LRS3433
Safety-Seats, seat belts and supplemental restraint system1-7
Page 30 of 572
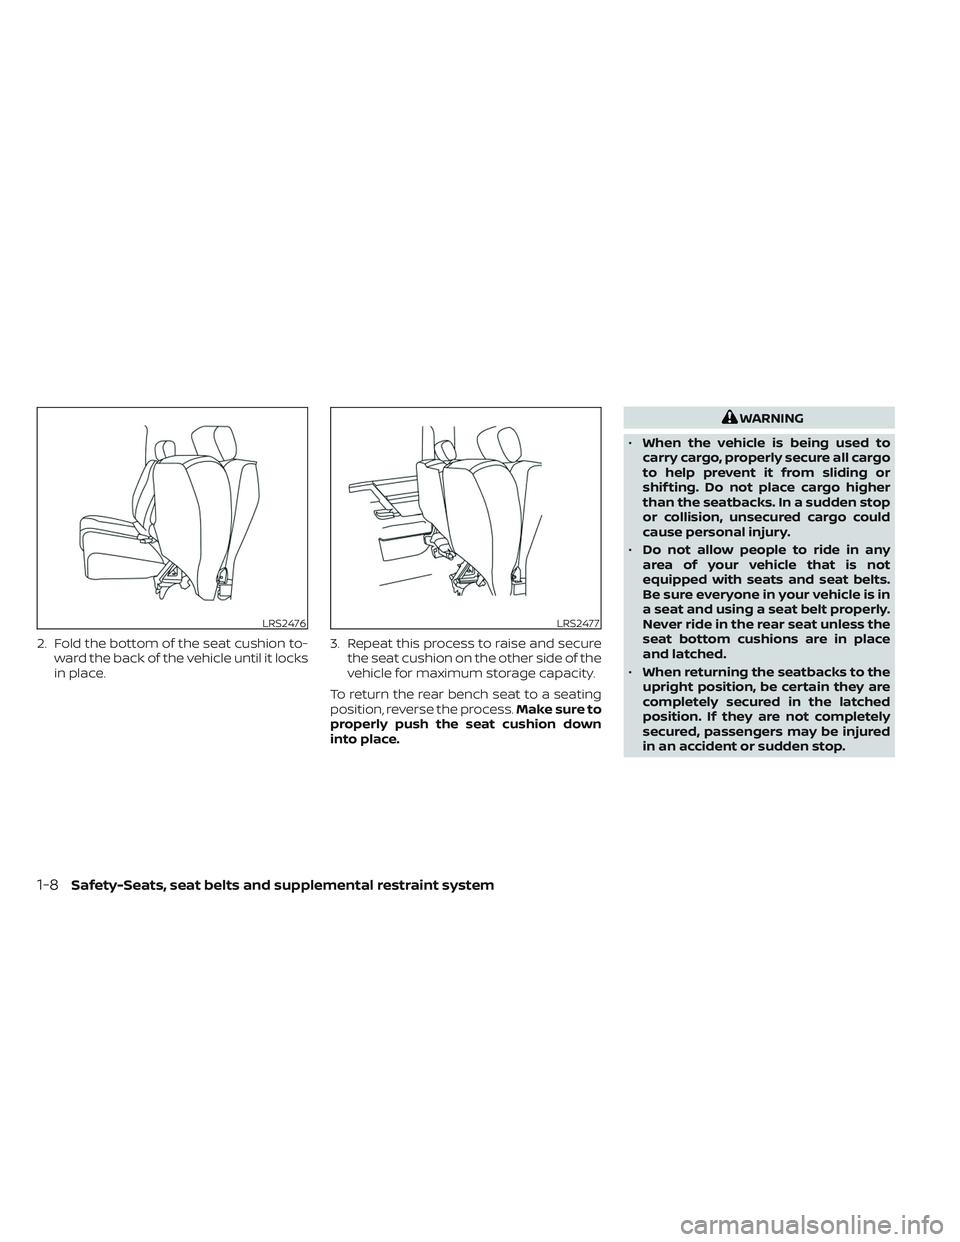
2. Fold the bottom of the seat cushion to-ward the back of the vehicle until it locks
in place. 3. Repeat this process to raise and secure
the seat cushion on the other side of the
vehicle for maximum storage capacity.
To return the rear bench seat to a seating
position, reverse the process. Make sure to
properly push the seat cushion down
into place.
WARNING
• When the vehicle is being used to
carry cargo, properly secure all cargo
to help prevent it from sliding or
shif ting. Do not place cargo higher
than the seatbacks. In a sudden stop
or collision, unsecured cargo could
cause personal injury.
• Do not allow people to ride in any
area of your vehicle that is not
equipped with seats and seat belts.
Be sure everyone in your vehicle is in
a seat and using a seat belt properly.
Never ride in the rear seat unless the
seat bottom cushions are in place
and latched.
• When returning the seatbacks to the
upright position, be certain they are
completely secured in the latched
position. If they are not completely
secured, passengers may be injured
in an accident or sudden stop.
LRS2476LRS2477
1-8Safety-Seats, seat belts and supplemental restraint system
Page 31 of 572
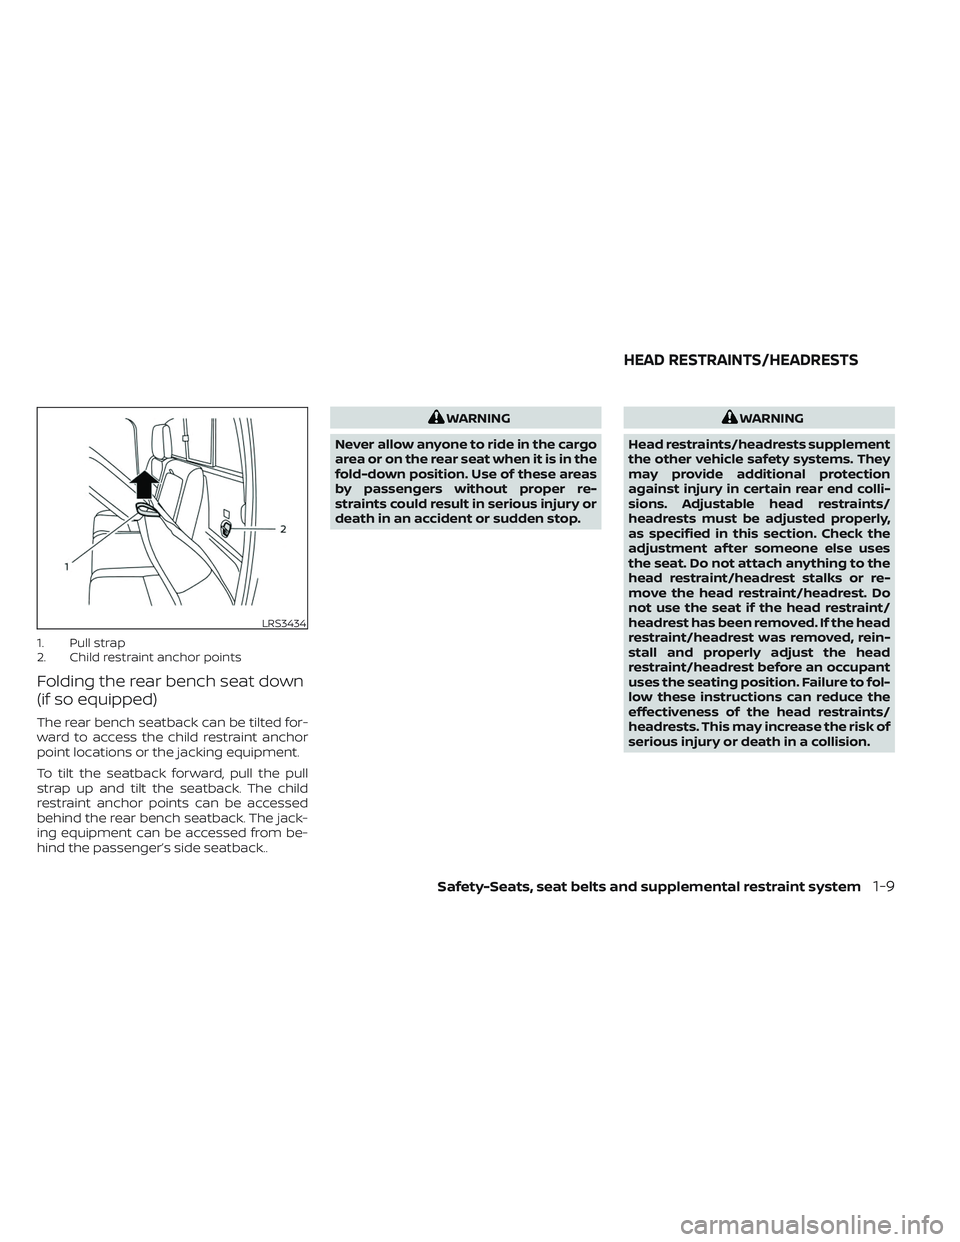
1. Pull strap
2. Child restraint anchor points
Folding the rear bench seat down
(if so equipped)
The rear bench seatback can be tilted for-
ward to access the child restraint anchor
point locations or the jacking equipment.
To tilt the seatback forward, pull the pull
strap up and tilt the seatback. The child
restraint anchor points can be accessed
behind the rear bench seatback. The jack-
ing equipment can be accessed from be-
hind the passenger’s side seatback..
WARNING
Never allow anyone to ride in the cargo
area or on the rear seat when it is in the
fold-down position. Use of these areas
by passengers without proper re-
straints could result in serious injury or
death in an accident or sudden stop.WARNING
Head restraints/headrests supplement
the other vehicle safety systems. They
may provide additional protection
against injury in certain rear end colli-
sions. Adjustable head restraints/
headrests must be adjusted properly,
as specified in this section. Check the
adjustment af ter someone else uses
the seat. Do not attach anything to the
head restraint/headrest stalks or re-
move the head restraint/headrest. Do
not use the seat if the head restraint/
headrest has been removed. If the head
restraint/headrest was removed, rein-
stall and properly adjust the head
restraint/headrest before an occupant
uses the seating position. Failure to fol-
low these instructions can reduce the
effectiveness of the head restraints/
headrests. This may increase the risk of
serious injury or death in a collision.
LRS3434
HEAD RESTRAINTS/HEADRESTS
Safety-Seats, seat belts and supplemental restraint system1-9
Page 40 of 572
THREE-POINT TYPE SEAT BELT
WITH RETRACTOR
WARNING
• Every person who drives or rides in
this vehicle should use a seat belt at
all times. Children should be in the
rear seats and in an appropriate
restraint.
• Do not ride in a moving vehicle when
the seatback is reclined. This can be
dangerous. The shoulder belt will not
be against your body. In an accident,
you could be thrown into it and re-
ceive neck or other serious injuries.
You could also slide under the lap belt
and receive serious internal injuries.
• For the most effective protection
when the vehicle is in motion, the
seat should be upright. Always sit
well back and upright in the seat with
both feet on the floor and adjust the
seat belt properly. •
Do not allow children to play with the
seat belts. Most seating positions are
equipped with Automatic Locking
Retractor (ALR) mode seat belts. If
the seat belt becomes wrapped
around a child’s neck with the ALR
mode activated, the child can be se-
riously injured or killed if the seat belt
retracts and becomes tight. This can
occur even if the vehicle is parked.
Unbuckle the seat belt to release the
child. If the seat belt cannot be un-
buckled or is already unbuckled, re-
lease the child by cutting the seat
belt with a suitable tool (such as a
knife or scissors) to release the seat
belt.
Fastening the seat belts
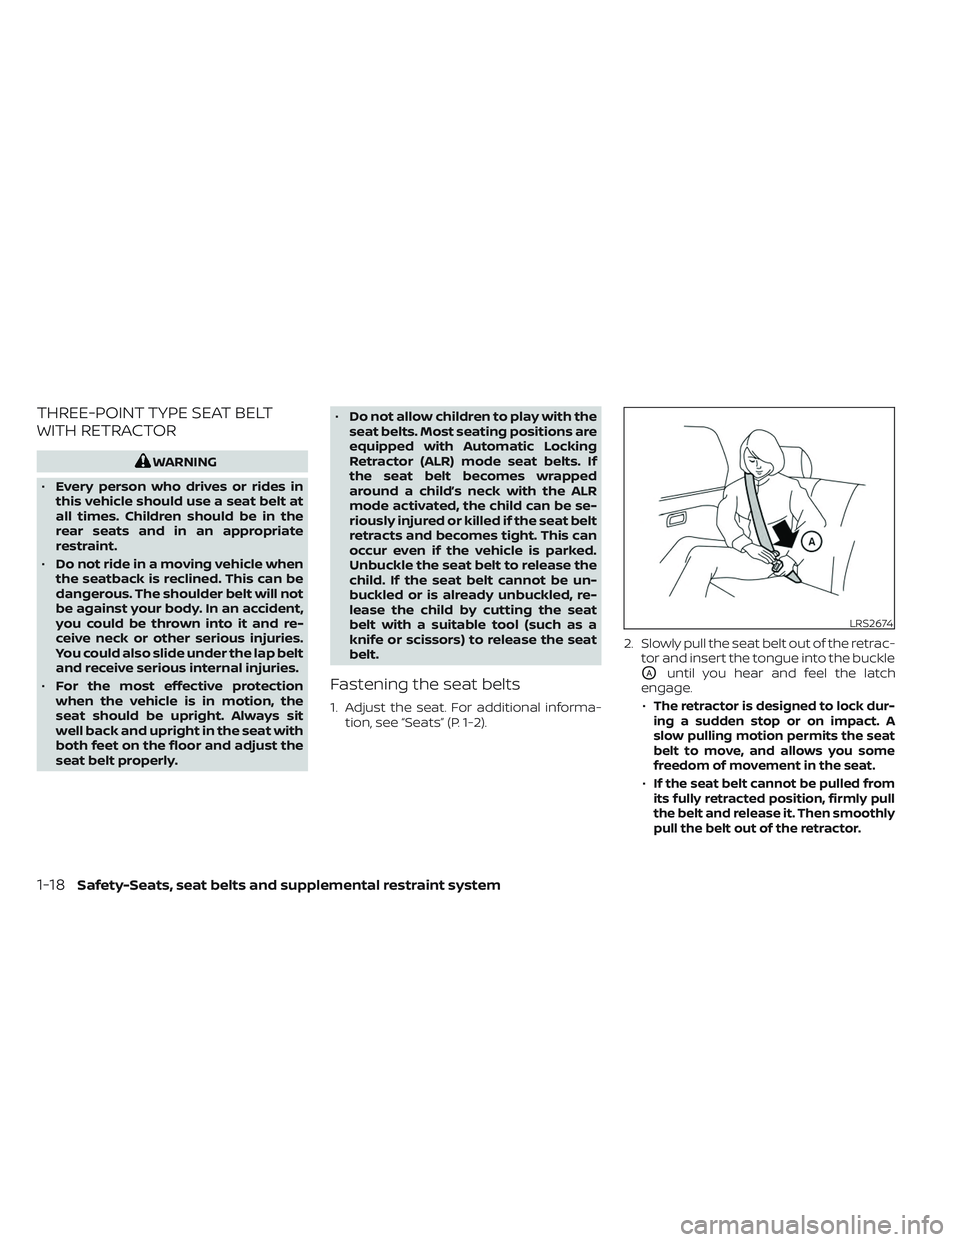
1. Adjust the seat. For additional informa- tion, see “Seats” (P. 1-2). 2. Slowly pull the seat belt out of the retrac-
tor and insert the tongue into the buckle
OAuntil you hear and feel the latch
engage.
•
The retractor is designed to lock dur-
ingasuddenstoporonimpact.A
slow pulling motion permits the seat
belt to move, and allows you some
freedom of movement in the seat.
•If the seat belt cannot be pulled from
its fully retracted position, firmly pull
the belt and release it. Then smoothly
pull the belt out of the retractor.
LRS2674
1-18Safety-Seats, seat belts and supplemental restraint system
Page 41 of 572
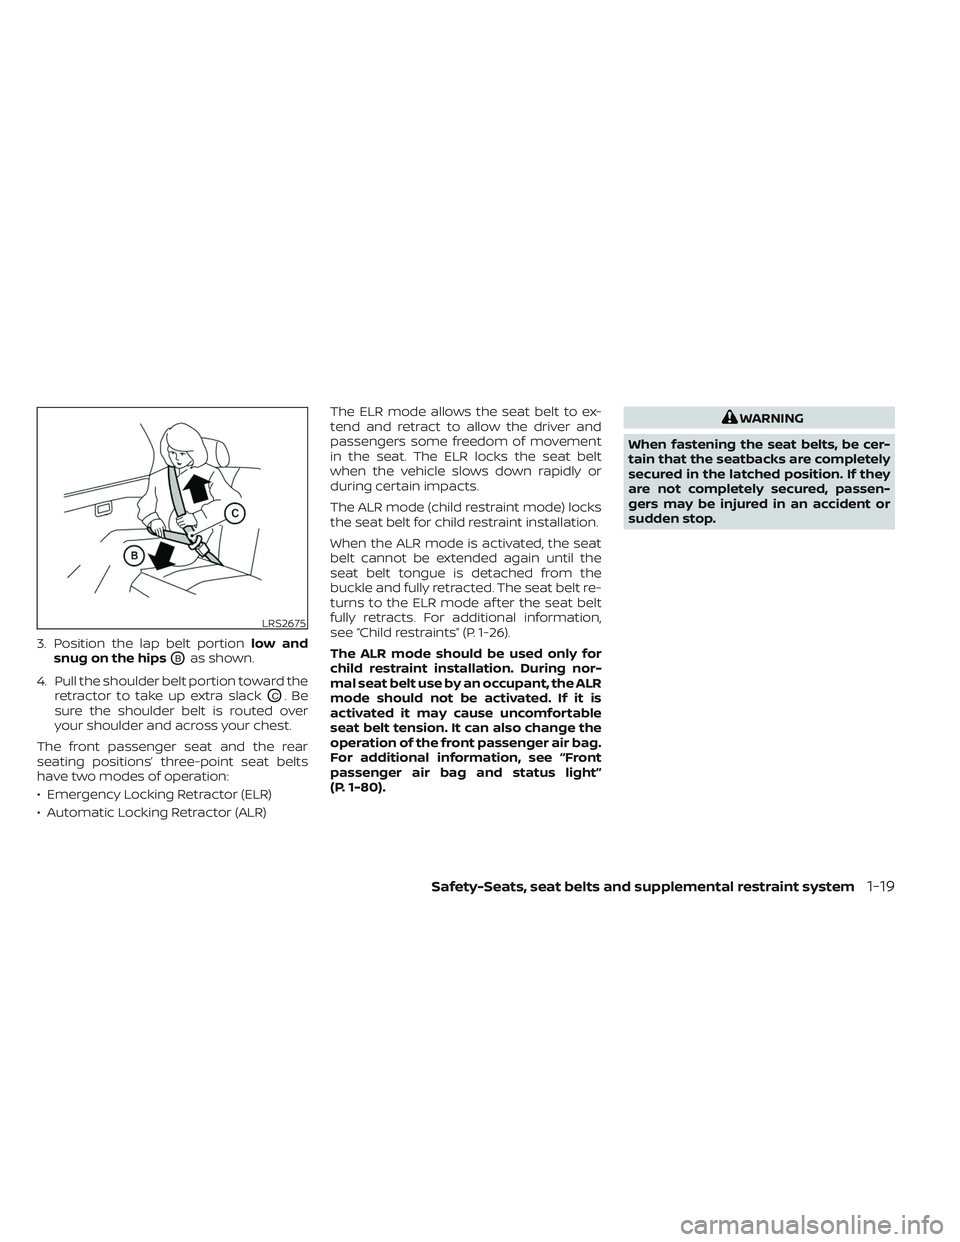
3. Position the lap belt portionlow and
snug on the hips
OBas shown.
4. Pull the shoulder belt portion toward the retractor to take up extra slack
OC.Be
sure the shoulder belt is routed over
your shoulder and across your chest.
The front passenger seat and the rear
seating positions’ three-point seat belts
have two modes of operation:
• Emergency Locking Retractor (ELR)
• Automatic Locking Retractor (ALR) The ELR mode allows the seat belt to ex-
tend and retract to allow the driver and
passengers some freedom of movement
in the seat. The ELR locks the seat belt
when the vehicle slows down rapidly or
during certain impacts.
The ALR mode (child restraint mode) locks
the seat belt for child restraint installation.
When the ALR mode is activated, the seat
belt cannot be extended again until the
seat belt tongue is detached from the
buckle and fully retracted. The seat belt re-
turns to the ELR mode af ter the seat belt
fully retracts. For additional information,
see “Child restraints” (P. 1-26).
The ALR mode should be used only for
child restraint installation. During nor-
mal seat belt use by an occupant, the ALR
mode should not be activated. If it is
activated it may cause uncomfortable
seat belt tension. It can also change the
operation of the front passenger air bag.
For additional information, see “Front
passenger air bag and status light”
(P. 1-80).
WARNING
When fastening the seat belts, be cer-
tain that the seatbacks are completely
secured in the latched position. If they
are not completely secured, passen-
gers may be injured in an accident or
sudden stop.
LRS2675
Safety-Seats, seat belts and supplemental restraint system1-19
Page 42 of 572
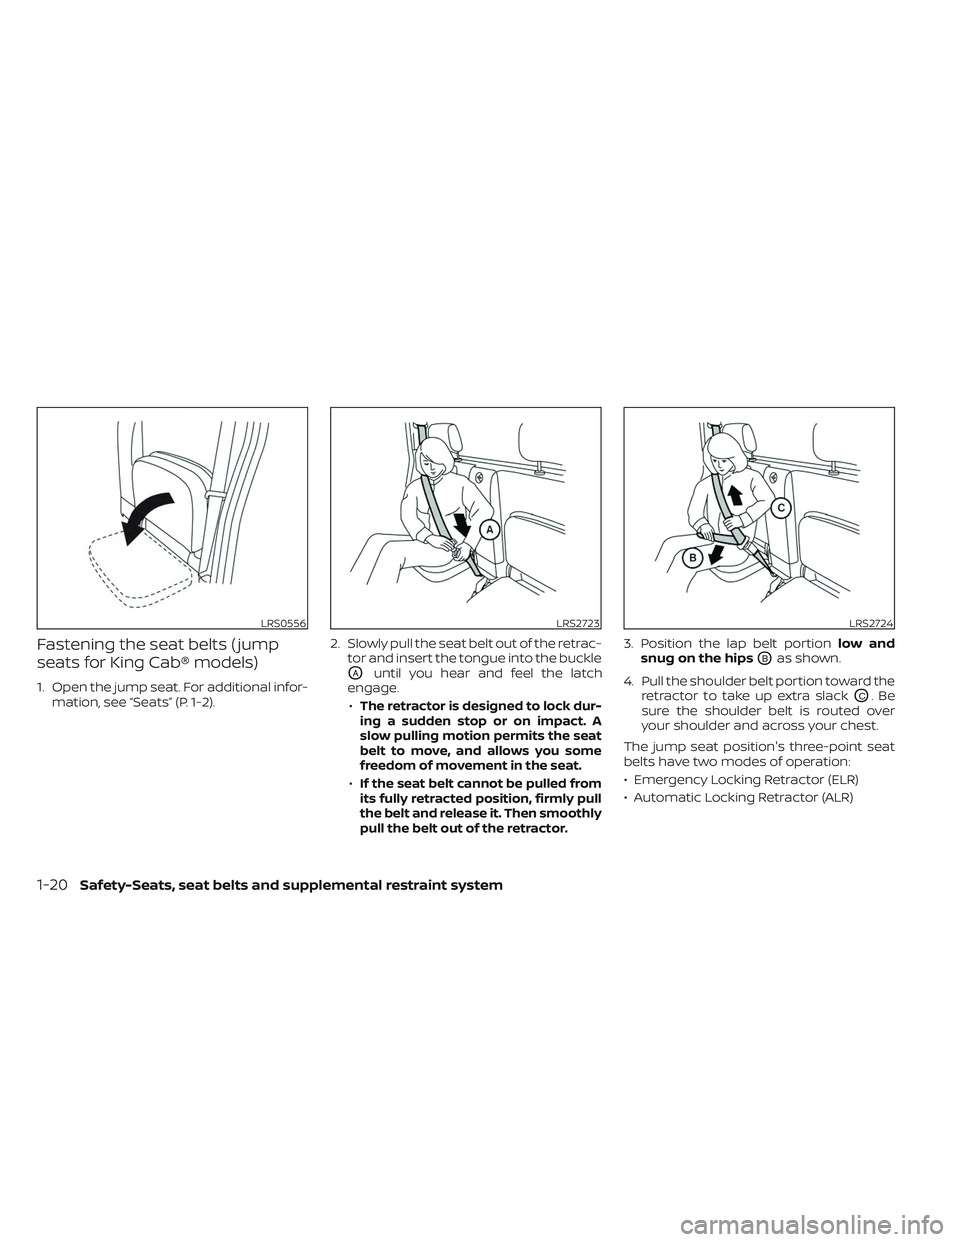
Fastening the seat belts ( jump
seats for King Cab® models)
1. Open the jump seat. For additional infor-mation, see “Seats” (P. 1-2). 2. Slowly pull the seat belt out of the retrac-
tor and insert the tongue into the buckleOAuntil you hear and feel the latch
engage.
•
The retractor is designed to lock dur-
ingasuddenstoporonimpact.A
slow pulling motion permits the seat
belt to move, and allows you some
freedom of movement in the seat.
•If the seat belt cannot be pulled from
its fully retracted position, firmly pull
the belt and release it. Then smoothly
pull the belt out of the retractor.
3. Position the lap belt portion low and
snug on the hips
OBas shown.
4. Pull the shoulder belt portion toward the retractor to take up extra slack
OC.Be
sure the shoulder belt is routed over
your shoulder and across your chest.
The jump seat position's three-point seat
belts have two modes of operation:
• Emergency Locking Retractor (ELR)
• Automatic Locking Retractor (ALR)
LRS0556LRS2723LRS2724
1-20Safety-Seats, seat belts and supplemental restraint system