USB NISSAN GT-R 2013 R35 Multi Function Display User Guide
[x] Cancel search | Manufacturer: NISSAN, Model Year: 2013, Model line: GT-R, Model: NISSAN GT-R 2013 R35Pages: 315, PDF Size: 6.96 MB
Page 136 of 315
3-8Audio system
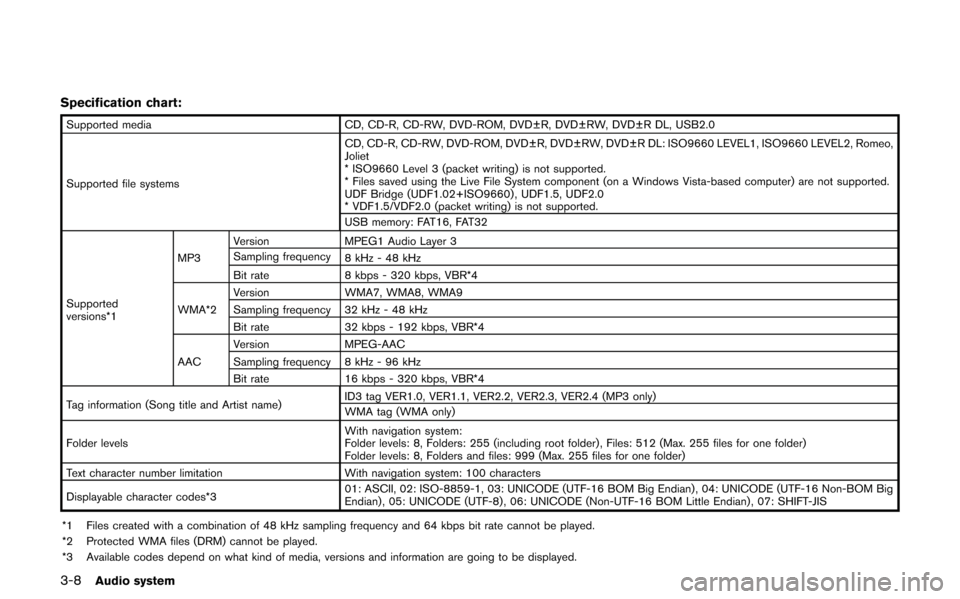
Specification chart:
Supported mediaCD, CD-R, CD-RW, DVD-ROM, DVD±R, DVD±RW, DVD±R DL, USB2.0
Supported file systems CD, CD-R, CD-RW, DVD-ROM, DVD±R, DVD±RW, DVD±R DL: ISO9660 LEVEL1, ISO9660 LEVEL2, Romeo,
Joliet
* ISO9660 Level 3 (packet writing) is not supported.
* Files saved using the Live File System component (on a Windows Vista-based computer) are not supported.
UDF Bridge (UDF1.02+ISO9660) , UDF1.5, UDF2.0
* VDF1.5/VDF2.0 (packet writing) is not supported.
USB memory: FAT16, FAT32
Supported
versions*1 MP3
Version
MPEG1 Audio Layer 3
Sampling frequency 8 kHz - 48 kHz
Bit rate 8 kbps - 320 kbps, VBR*4
WMA*2 Version
WMA7, WMA8, WMA9
Sampling frequency 32 kHz - 48 kHz
Bit rate 32 kbps - 192 kbps, VBR*4
AAC Version
MPEG-AAC
Sampling frequency 8 kHz - 96 kHz
Bit rate 16 kbps - 320 kbps, VBR*4
Tag information (Song title and Artist name) ID3 tag VER1.0, VER1.1, VER2.2, VER2.3, VER2.4 (MP3 only)
WMA tag (WMA only)
Folder levels With navigation system:
Folder levels: 8, Folders: 255 (including root folder) , Files: 512 (Max. 255 files for one folder)
Folder levels: 8, Folders and files: 999 (Max. 255 files for one folder)
Text character number limitation With navigation system: 100 characters
Displayable character codes*3 01: ASCII, 02: ISO-8859-1, 03: UNICODE (UTF-16 BOM Big Endian) , 04: UNICODE (UTF-16 Non-BOM Big
Endian) , 05: UNICODE (UTF-8) , 06: UNICODE (Non-UTF-16 BOM Little Endian) , 07: SHIFT-JIS
*1 Files created with a combination of 48 kHz sampling frequency and 64 kbps bit rate cannot be played.
*2 Protected WMA files (DRM) cannot be played.
*3 Available codes depend on what kind of media, versions and information are going to be displayed.
Page 138 of 315
3-10Audio system
Compressed Video Files
Explanation of terms:
.DivX®- DivX®refers to the DivX®codec
owned by DivX, Inc. used for a lossy
compression of video based on MPEG-4.
. AVI - AVI stands for Audio Video Interleave.
It is a standard file format originated by
Microsoft Corporation. A “.divx” encoded file
can be saved into the “.avi” file format for
playback on this system if it meets the
requirements stated in the table in this
section. However, not all the “.avi” files are
playable on this system since different
encodings can be used than the DivX
®
codec.
. ASF - ASF stands for Advanced Systems
Format. It is a file format owned by Microsoft
Corporation. Note: Only “.asf” files that meet
the requirements stated in the table in this
section can be played.
. Bit rate — Bit rate denotes the number of
bits per second used by a digital video file.
The size and quality of a compressed digital
audio file is determined by the bit rate used
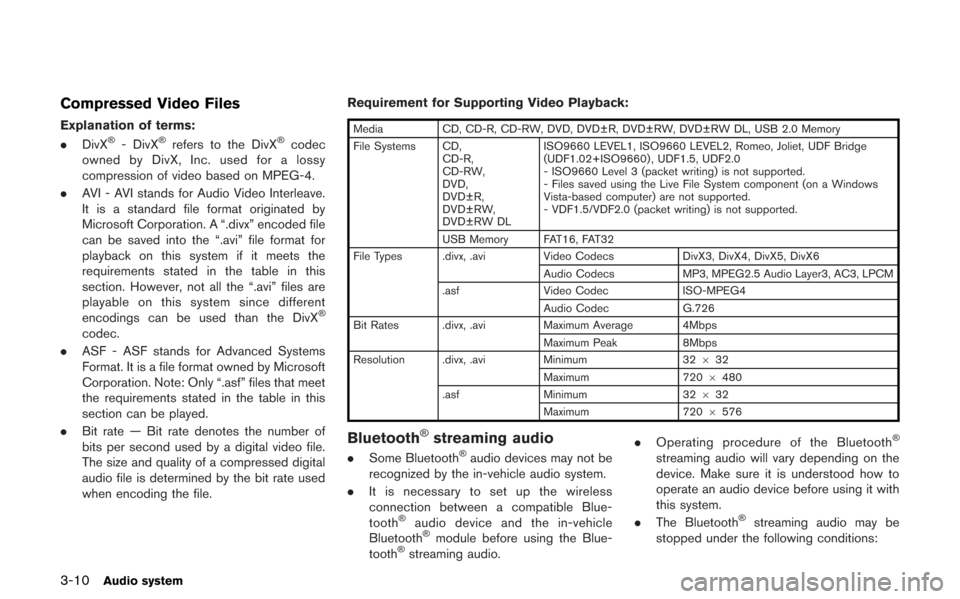
when encoding the file. Requirement for Supporting Video Playback:
Media
CD, CD-R, CD-RW, DVD, DVD±R, DVD±RW, DVD±RW DL, USB 2.0 Memory
File Systems CD, CD-R,
CD-RW,
DVD,
DVD±R,
DVD±RW,
DVD±RW DL ISO9660 LEVEL1, ISO9660 LEVEL2, Romeo, Joliet, UDF Bridge
(UDF1.02+ISO9660) , UDF1.5, UDF2.0
- ISO9660 Level 3 (packet writing) is not supported.
- Files saved using the Live File System component (on a Windows
Vista-based computer) are not supported.
- VDF1.5/VDF2.0 (packet writing) is not supported.
USB Memory FAT16, FAT32
File Types .divx, .avi Video CodecsDivX3, DivX4, DivX5, DivX6
Audio Codecs MP3, MPEG2.5 Audio Layer3, AC3, LPCM
.asf Video Codec ISO-MPEG4
Audio Codec G.726
Bit Rates .divx, .avi Maximum Average 4Mbps
Maximum Peak 8Mbps
Resolution .divx, .avi Minimum32632
Maximum 7206480
.asf Minimum 32632
Maximum 7206576
Bluetooth®streaming audio
. Some Bluetooth®audio devices may not be
recognized by the in-vehicle audio system.
. It is necessary to set up the wireless
connection between a compatible Blue-
tooth
®audio device and the in-vehicle
Bluetooth®module before using the Blue-
tooth®streaming audio. .
Operating procedure of the Bluetooth
®
streaming audio will vary depending on the
device. Make sure it is understood how to
operate an audio device before using it with
this system.
. The Bluetooth
®streaming audio may be
stopped under the following conditions:
Page 140 of 315
3-12Audio system
FM-AM-SAT RADIO WITH COM-
PACT DISC (CD) PLAYER
The satellite radio mode requires an active XM
Satellite Radio subscription. The satellite radio is
not available in Alaska, Hawaii and Guam.
It may take some time to receive the activation
signal after subscribing the XM Satellite Radio.
After receiving the activation signal, an available
channel list will be automatically updated in the
radio. For XM, push the ignition switch from
LOCK to ACC to update the channel list.
Audio main operation
Head unit:
The auto loudness circuit enhances the low and
high frequency ranges automatically in both
radio reception and CD playback.
ON·OFF/Volume control:
Push the ignition switch to the ACC or ON
position, and then push the ON·OFF button
while the system is off to turn on the last audio
source (i.e. FM or CD) , which was playing
immediately before the system was turned off.
While the system is on, pushing the ON·OFF
button turns the system off.
Turn the VOL control knob to adjust the volume.Adjusting tone quality and speaker bal-
ance:
To adjust Bass, Treble, Balance and Fade, push
the Audio control knob. When the display shows
the setting you want to change (Bass, Treble,
Balance and Fade) , rotate the Audio control
knob to set the desired setting.
“Audio settings” (page 7-3)
Switching the display:
Pushing
as follows:
iPod
®/USB ?CD/DVD ?Music Box (if so
equipped) ?Bluetooth®streaming audio (if so
equipped) ?AUX (if so equipped) ?iPod®/
USB
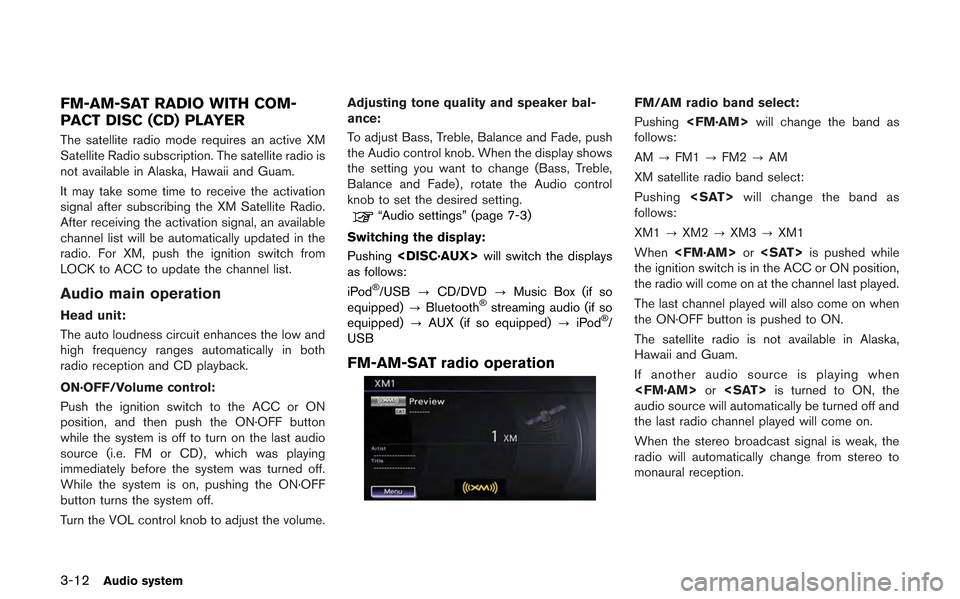
FM-AM-SAT radio operation
FM/AM radio band select:
Pushing
follows:
AM ?FM1 ?FM2 ?AM
XM satellite radio band select:
Pushing
follows:
XM1 ?XM2 ?XM3 ?XM1
When
the ignition switch is in the ACC or ON position,
the radio will come on at the channel last played.
The last channel played will also come on when
the ON·OFF button is pushed to ON.
The satellite radio is not available in Alaska,
Hawaii and Guam.
If another audio source is playing when
audio source will automatically be turned off and
the last radio channel played will come on.
When the stereo broadcast signal is weak, the
radio will automatically change from stereo to
monaural reception.
Page 146 of 315
3-18Audio system
Display:
To adjust the image quality of the screen, select
the preferred adjustment items.
Audio:
Select the preferred language for audio.
Subtitle (DVD-VIDEO, DVD-VR):
Select the preferred language for subtitles.
Display Mode (DVD-VIDEO, VIDEO-CD,
DVD-VR):
Select from the “Full”, “Wide”, “Normal” or
“Cinema” modes.
Title List (DVD-VR):
Select the preferred title from the list.
Play Mode:
Select the preferred play mode.
PG/PL Mode (DVD-VR):
Select the “PG” or “PL” mode.USB MEMORY OPERATION
Audio main operation
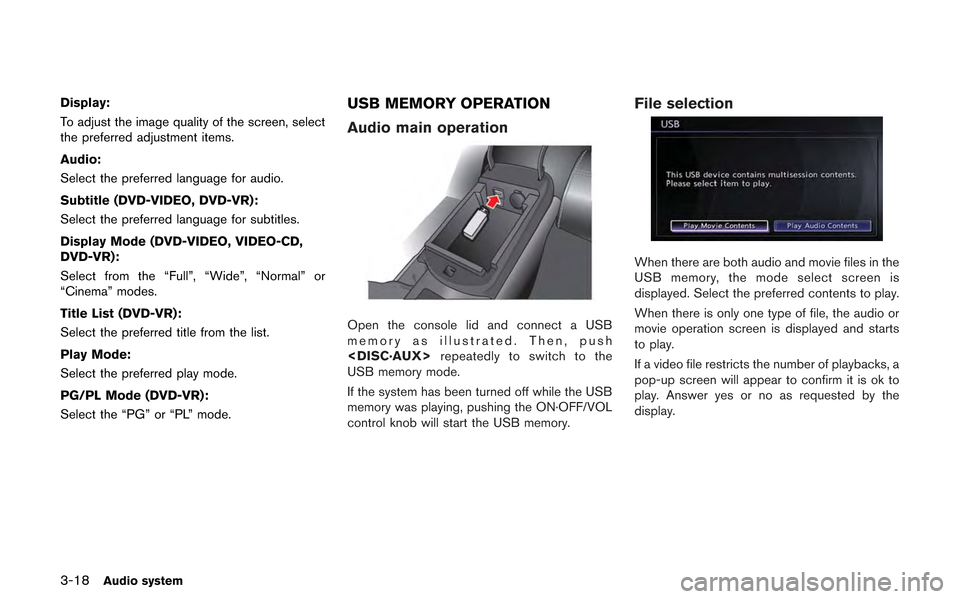
Open the console lid and connect a USB
memory as illustrated. Then, push
USB memory mode.
If the system has been turned off while the USB
memory was playing, pushing the ON·OFF/VOL
control knob will start the USB memory.
File selection
When there are both audio and movie files in the
USB memory, the mode select screen is
displayed. Select the preferred contents to play.
When there is only one type of file, the audio or
movie operation screen is displayed and starts
to play.
If a video file restricts the number of playbacks, a
pop-up screen will appear to confirm it is ok to
play. Answer yes or no as requested by the
display.
Page 147 of 315
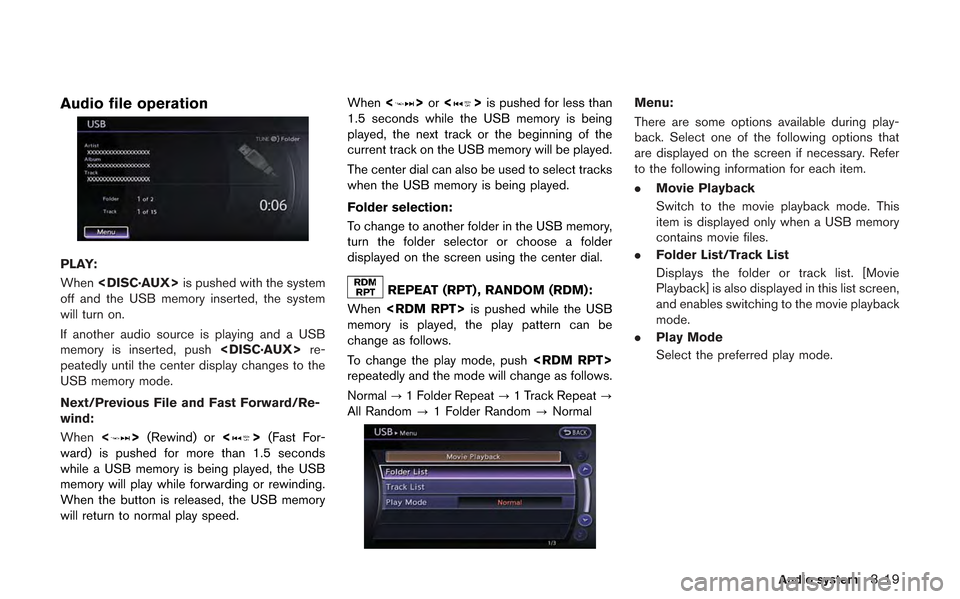
Audio file operation
PLAY:
When
off and the USB memory inserted, the system
will turn on.
If another audio source is playing and a USB
memory is inserted, push
peatedly until the center display changes to the
USB memory mode.
Next/Previous File and Fast Forward/Re-
wind:
When <
>(Rewind) or <>(Fast For-
ward) is pushed for more than 1.5 seconds
while a USB memory is being played, the USB
memory will play while forwarding or rewinding.
When the button is released, the USB memory
will return to normal play speed. When
<
>or <>is pushed for less than
1.5 seconds while the USB memory is being
played, the next track or the beginning of the
current track on the USB memory will be played.
The center dial can also be used to select tracks
when the USB memory is being played.
Folder selection:
To change to another folder in the USB memory,
turn the folder selector or choose a folder
displayed on the screen using the center dial.
REPEAT (RPT) , RANDOM (RDM):
When
memory is played, the play pattern can be
change as follows.
To change the play mode, push
repeatedly and the mode will change as follows.
Normal ?1 Folder Repeat ?1 Track Repeat ?
All Random ?1 Folder Random ?Normal
Menu:
There are some options available during play-
back. Select one of the following options that
are displayed on the screen if necessary. Refer
to the following information for each item.
. Movie Playback
Switch to the movie playback mode. This
item is displayed only when a USB memory
contains movie files.
. Folder List/Track List
Displays the folder or track list. [Movie
Playback] is also displayed in this list screen,
and enables switching to the movie playback
mode.
. Play Mode
Select the preferred play mode.
Audio system3-19
Page 148 of 315
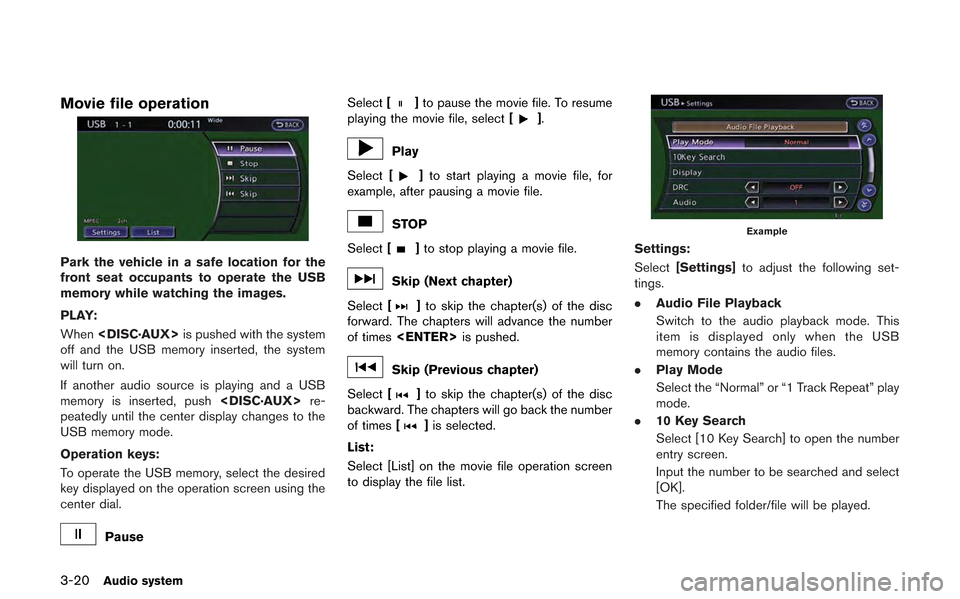
3-20Audio system
Movie file operation
Park the vehicle in a safe location for the
front seat occupants to operate the USB
memory while watching the images.
PLAY:
When
off and the USB memory inserted, the system
will turn on.
If another audio source is playing and a USB
memory is inserted, push
peatedly until the center display changes to the
USB memory mode.
Operation keys:
To operate the USB memory, select the desired
key displayed on the operation screen using the
center dial.
Pause Select
[
]to pause the movie file. To resume
playing the movie file, select [].
Play
Select [
]to start playing a movie file, for
example, after pausing a movie file.
STOP
Select [
]to stop playing a movie file.
Skip (Next chapter)
Select [
]to skip the chapter(s) of the disc
forward. The chapters will advance the number
of times
Skip (Previous chapter)
Select [
]to skip the chapter(s) of the disc
backward. The chapters will go back the number
of times [
]is selected.
List:
Select [List] on the movie file operation screen
to display the file list.
Example
Settings:
Select [Settings] to adjust the following set-
tings.
. Audio File Playback
Switch to the audio playback mode. This
item is displayed only when the USB
memory contains the audio files.
. Play Mode
Select the “Normal” or “1 Track Repeat” play
mode.
. 10 Key Search
Select [10 Key Search] to open the number
entry screen.
Input the number to be searched and select
[OK].
The specified folder/file will be played.
Page 152 of 315
3-24Audio system
Connect Bluetooth:
Connects to the Bluetooth®device. Up to 5
devices can be registered.
“Connecting procedure” (page 3-22)
Connected Devices:
Registered devices are shown on the list. Select
a Bluetooth
®device from the list, the following
options will be available.
. Select
Select [Select] to connect the selected
device to the vehicle. If there is a different
device currently connected, the selected
device will replace the current device.
. Edit
Rename the selected Bluetooth
®device
using the keypad displayed on the screen.
“How to input letters and numbers”
(page 1-16)
. Delete
Delete the selected Bluetooth
®device.
Edit Bluetooth Info:
Change the name broadcasted by this system
over Bluetooth
®. Change the PIN code that is
entered when connecting a hands free device to
this system. Replace Connected Phone:
Replace the Bluetooth
®connection with a
connected Bluetooth®cellular phone.“4. Bluetooth®Hands-Free Phone Sys-
tem”
iPod®PLAYER OPERATION
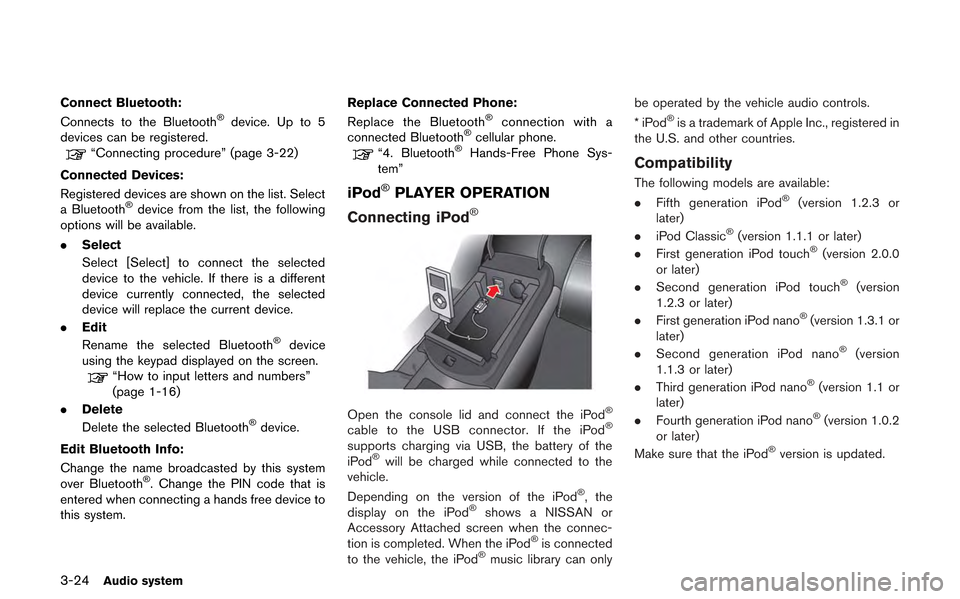
Connecting iPod
®
Open the console lid and connect the iPod®
cable to the USB connector. If the iPod®
supports charging via USB, the battery of the
iPod®will be charged while connected to the
vehicle.
Depending on the version of the iPod
®, the
display on the iPod®shows a NISSAN or
Accessory Attached screen when the connec-
tion is completed. When the iPod
®is connected
to the vehicle, the iPod®music library can only be operated by the vehicle audio controls.
*iPod
®is a trademark of Apple Inc., registered in
the U.S. and other countries.
Compatibility
The following models are available:
. Fifth generation iPod®(version 1.2.3 or
later)
. iPod Classic
®(version 1.1.1 or later)
. First generation iPod touch®(version 2.0.0
or later)
. Second generation iPod touch
®(version
1.2.3 or later)
. First generation iPod nano
®(version 1.3.1 or
later)
. Second generation iPod nano
®(version
1.1.3 or later)
. Third generation iPod nano
®(version 1.1 or
later)
. Fourth generation iPod nano
®(version 1.0.2
or later)
Make sure that the iPod
®version is updated.
Page 155 of 315
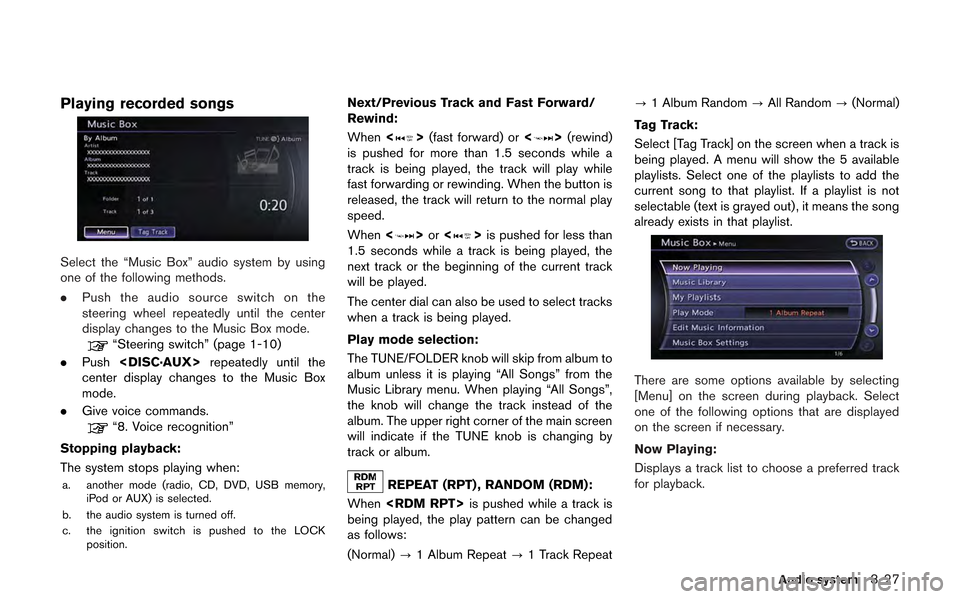
Playing recorded songs
Select the “Music Box” audio system by using
one of the following methods.
.Push the audio source switch on the
steering wheel repeatedly until the center
display changes to the Music Box mode.
“Steering switch” (page 1-10)
. Push
center display changes to the Music Box
mode.
. Give voice commands.
“8. Voice recognition”
Stopping playback:
The system stops playing when:
a. another mode (radio, CD, DVD, USB memory, iPod or AUX) is selected.
b. the audio system is turned off.
c. the ignition switch is pushed to the LOCK position.
Next/Previous Track and Fast Forward/
Rewind:
When <
>(fast forward) or <>(rewind)
is pushed for more than 1.5 seconds while a
track is being played, the track will play while
fast forwarding or rewinding. When the button is
released, the track will return to the normal play
speed.
When <
>or <>is pushed for less than
1.5 seconds while a track is being played, the
next track or the beginning of the current track
will be played.
The center dial can also be used to select tracks
when a track is being played.
Play mode selection:
The TUNE/FOLDER knob will skip from album to
album unless it is playing “All Songs” from the
Music Library menu. When playing “All Songs”,
the knob will change the track instead of the
album. The upper right corner of the main screen
will indicate if the TUNE knob is changing by
track or album.
REPEAT (RPT) , RANDOM (RDM):
When
being played, the play pattern can be changed
as follows:
(Normal) ?1 Album Repeat ?1 Track Repeat ?
1 Album Random ?All Random ?(Normal)
Tag Track:
Select [Tag Track] on the screen when a track is
being played. A menu will show the 5 available
playlists. Select one of the playlists to add the
current song to that playlist. If a playlist is not
selectable (text is grayed out), it means the song
already exists in that playlist.
There are some options available by selecting
[Menu] on the screen during playback. Select
one of the following options that are displayed
on the screen if necessary.
Now Playing:
Displays a track list to choose a preferred track
for playback.
Audio system3-27
Page 156 of 315
3-28Audio system
Music Library:
There are some options available during play-
back. Select one of the following options that
are displayed on the screen if necessary.
.Artists
Play tracks by an artist whose music is
currently being played. The artists are sorted
in alphabetical order.
. Albums
Play tracks in each album. The albums are
sorted in alphabetical order.
. All Songs
Play tracks from all recorded tracks. The
tracks are sorted in alphabetical order.
. Genres
Play tracks by a selected genre.
My Playlists:
Displays the Playlist and edits the Playlist if
necessary.
Select [Edit].
The following items are available
. Add Current Songs
Add a current track to the Playlist.
. Add Songs by Album
Displays a list of albums in alphabetical
order. Selecting an album displays all of the
tracks in the album. Select tracks from the list to add to the Playlist.
. Add Songs by Artist
Displays a list of artists in alphabetical order.
Selecting an artist displays all of the tracks
by the artist. Select tracks from the list to
add to the Playlist.
. Edit Songs Order
Reorder the tracks in the Playlist by select-
ing a track and specifying the order.
. Edit Name
Edit the name of the Playlist using the
keypad displayed on the screen.
“How to input letters and numbers”
(page 1-16)
. Delete Songs
Delete tracks in the Playlist by selecting from
the displayed song list.
Play Mode:
Choose the preferred play mode from the
following items.
. Normal
. 1 Album Repeat
. 1 Track Repeat
. 1 Playlist Random
. 1 Artist Random .
1 Album Random
. All Track Random
Edit Music Information:
Displays the following information about the
Music Box to edit if necessary.
. Edit Information of Current Song
Edit the “Track”, “Artist” and “Genre” in-
formation of the current track using the
keypad displayed on the screen.
“How to input letters and numbers”
(page 1-16)
Edit the “Mode”?information by selecting
from the list.
. Edit Information by Album
Edit the displayed name and of a selected
album and the track information in the album.
. Update Gracenote from USB Device
Update the in-vehicle Gracenote Database
using a USB memory. Search the title from a
information acquired on the Internet.
Visit www.nissanusa.com/gracenote/ for de-
tails.
. Transfer Missing Titles to USB
Transfer the information of an album re-
corded without titles to a USB memory.
Visit www.nissanusa.com/gracenote/ for de-
tails.
Page 158 of 315
3-30Audio system
violate these restrictions. If your license termi-
nates, you agree to cease any and all use of the
Gracenote Data, the Gracenote Software, and
Gracenote Servers. Gracenote reserves all
rights in Gracenote Data, the Gracenote Soft-
ware, and the Gracenote Servers, including all
ownership rights. Under no circumstances will
Gracenote become liable for any payment to you
for any information that you provide.
You agree that Gracenote, Inc. may enforce its
rights under this Agreement against you directly
in its own name.
The Gracenote service uses a unique identifier
to track queries for statistical purposes. The
purpose of a randomly assigned numeric identi-
fier is to allow the Gracenote service to count
queries without knowing anything about who
you are. For more information, see the web page
for the Gracenote Privacy Policy for the Grace-
note service.
The Gracenote Software and each item of
Gracenote Data are licensed to you “AS IS.”
Gracenote makes no representations or warran-
ties, express or implied, regarding the accuracy
of any Gracenote Data from in the Gracenote
Servers. Gracenote reserves the right to delete
data from the Gracenote Servers or to change
data categories for any cause that Gracenote
deems sufficient. No warranty is made that theGracenote Software or Gracenote Servers are
error-free or that functioning of Gracenote
Software or Gracenote Servers will be unin-
terrupted. Gracenote is not obligated to provide
you with new enhanced or additional data types
or categories that Gracenote may provide in the
future and is free to discontinue its services at
any time.
GRACENOTE DISCLAIMS ALL WARRANTIES
EXPRESS OR IMPLIED, INCLUDING, BUT
NOT LIMITED TO, IMPLIED WARRANTIES OF
MERCHANTABILITY, FITNESS FOR A PARTI-
CULAR PURPOSE, TITLE, AND NON-INFRIN-
GEMENT. GRACENOTE DOES NOT
WARRANT THE RESULTS THAT WILL BE
OBTAINED BY YOUR USE OF THE GRACE-
NOTE SOFTWARE OR ANY GRACENOTE
SERVER. IN NO CASE WILL GRACENOTE
BE LIABLE FOR ANY CONSEQUENTIAL OR
INCIDENTAL DAMAGES OR FOR ANY LOST
PROFITS OR LOST REVENUES.
Copyright:
Music recognition technology and related data
are provided by Gracenote
®. Gracenote is the
industry standard in music recognition technol-
ogy and related content delivery. For more
information, please visit www.gracenote.com.
CD and music-related data from Gracenote,
Inc., copyright
*C2000-2009 Gracenote. Gracenote Software, copyright
*C2000-2009
Gracenote. This product and service may
practice one or more of the following U.S.
Patents: #5,987,525; #6,061,680;
#6,154,773, #6,161,132, #6,230,192,
#6,230,207, #6,240,459, #6,330,593, and
other patents issued or pending. Some services
supplied under license from Open Globe, Inc.
for U.S. Patent: #6,304,523.
Gracenote and CDDB are registered trade-
marks of Gracenote. The Gracenote logo and
logotype, and the “Powered by Gracenote” logo
are trademarks of Gracenote.
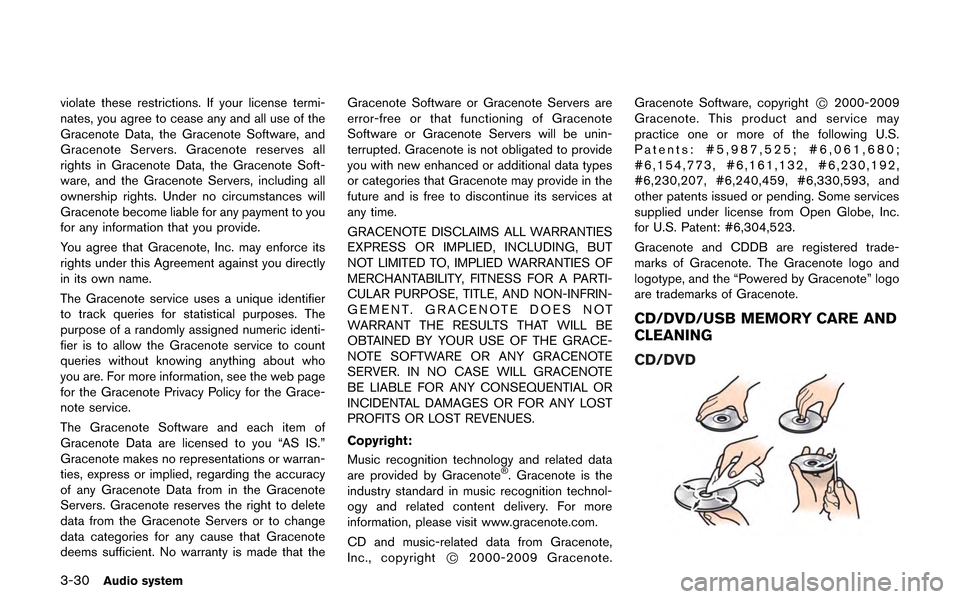
CD/DVD/USB MEMORY CARE AND
CLEANING
CD/DVD