ignition NISSAN GT-R 2013 R35 Multi Function Display User Guide
[x] Cancel search | Manufacturer: NISSAN, Model Year: 2013, Model line: GT-R, Model: NISSAN GT-R 2013 R35Pages: 315, PDF Size: 6.96 MB
Page 204 of 315
7-2Other settings
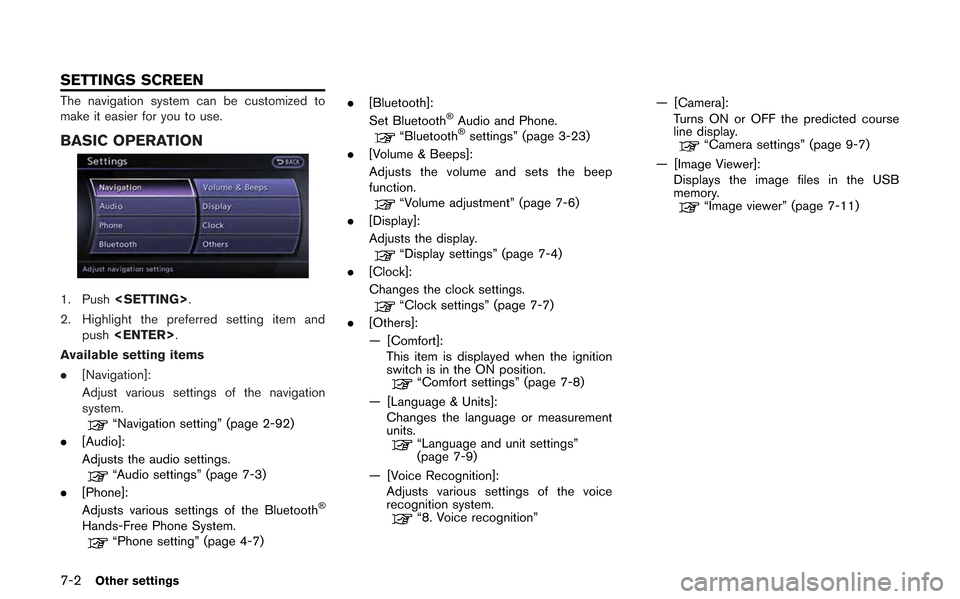
The navigation system can be customized to
make it easier for you to use.
BASIC OPERATION
1. Push
2. Highlight the preferred setting item and push
Available setting items
. [Navigation]:
Adjust various settings of the navigation
system.
“Navigation setting” (page 2-92)
. [Audio]:
Adjusts the audio settings.
“Audio settings” (page 7-3)
. [Phone]:
Adjusts various settings of the Bluetooth
®
Hands-Free Phone System.“Phone setting” (page 4-7) .
[Bluetooth]:
Set Bluetooth
®Audio and Phone.“Bluetooth®settings” (page 3-23)
. [Volume & Beeps]:
Adjusts the volume and sets the beep
function.
“Volume adjustment” (page 7-6)
. [Display]:
Adjusts the display.
“Display settings” (page 7-4)
. [Clock]:
Changes the clock settings.
“Clock settings” (page 7-7)
. [Others]:
— [Comfort]:
This item is displayed when the ignition
switch is in the ON position.
“Comfort settings” (page 7-8)
— [Language & Units]: Changes the language or measurement
units.
“Language and unit settings”
(page 7-9)
— [Voice Recognition]: Adjusts various settings of the voice
recognition system.
“8. Voice recognition” — [Camera]:
Turns ON or OFF the predicted course
line display.
“Camera settings” (page 9-7)
— [Image Viewer]: Displays the image files in the USB
memory.
“Image viewer” (page 7-11)
SETTINGS SCREEN
Page 210 of 315
![NISSAN GT-R 2013 R35 Multi Function Display User Guide 7-8Other settings
— Newfoundland
— Hawaii
— Alaska
This key does not appear on the display until the
ignition switch is pushed to the ON position.
1. Push<SETTING>.
2. Highlight [Comfort] and pu NISSAN GT-R 2013 R35 Multi Function Display User Guide 7-8Other settings
— Newfoundland
— Hawaii
— Alaska
This key does not appear on the display until the
ignition switch is pushed to the ON position.
1. Push<SETTING>.
2. Highlight [Comfort] and pu](/img/5/316/w960_316-209.png)
7-8Other settings
— Newfoundland
— Hawaii
— Alaska
This key does not appear on the display until the
ignition switch is pushed to the ON position.
1. Push
2. Highlight [Comfort] and push
3. Highlight the preferred setting item and push
selected item illuminates.
4. After setting, push
to apply the setting.
5. Push
screen. Push
Page 211 of 315
![NISSAN GT-R 2013 R35 Multi Function Display User Guide This changes the language and measurement
unit used in the system.
LANGUAGE SETTINGS
1. Push<SETTING>.
2. Highlight [Others] and push <ENTER>.
3. Highlight [Language & Units] and push <ENTER>.
4. High NISSAN GT-R 2013 R35 Multi Function Display User Guide This changes the language and measurement
unit used in the system.
LANGUAGE SETTINGS
1. Push<SETTING>.
2. Highlight [Others] and push <ENTER>.
3. Highlight [Language & Units] and push <ENTER>.
4. High](/img/5/316/w960_316-210.png)
This changes the language and measurement
unit used in the system.
LANGUAGE SETTINGS
1. Push
2. Highlight [Others] and push
3. Highlight [Language & Units] and push
4. Highlight [Select Language] and push
5. Highlight the preferred setting item andpush
selected item illuminates.
Available languages
.[English]
.[Franc¸ ais]
.[Espan ˜
ol]
NOTICE
Do not change the ignition switch
position while changing the language.
Doing so may cause a system malfunc-
tion.
UNIT SETTINGS
1. Push
2. Highlight [Others] and push
3. Highlight [Language & Units] and push
4. Highlight [Select Units] and push
Other settings7-9
LANGUAGE AND UNIT SETTINGS
Page 218 of 315
8-4Voice recognition
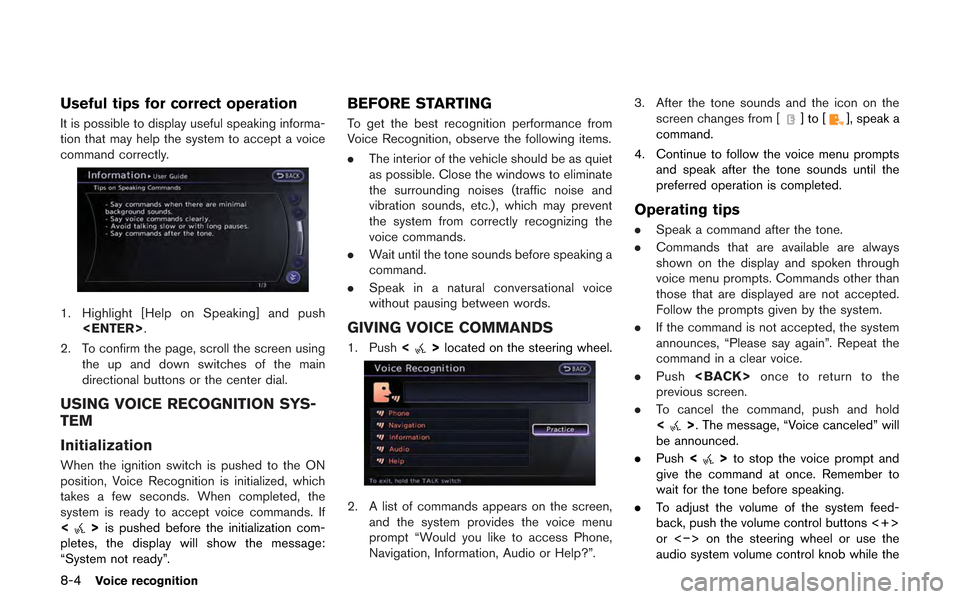
Useful tips for correct operation
It is possible to display useful speaking informa-
tion that may help the system to accept a voice
command correctly.
1. Highlight [Help on Speaking] and push
2. To confirm the page, scroll the screen using the up and down switches of the main
directional buttons or the center dial.
USING VOICE RECOGNITION SYS-
TEM
Initialization
When the ignition switch is pushed to the ON
position, Voice Recognition is initialized, which
takes a few seconds. When completed, the
system is ready to accept voice commands. If
<
>is pushed before the initialization com-
pletes, the display will show the message:
“System not ready”.
BEFORE STARTING
To get the best recognition performance from
Voice Recognition, observe the following items.
. The interior of the vehicle should be as quiet
as possible. Close the windows to eliminate
the surrounding noises (traffic noise and
vibration sounds, etc.), which may prevent
the system from correctly recognizing the
voice commands.
. Wait until the tone sounds before speaking a
command.
. Speak in a natural conversational voice
without pausing between words.
GIVING VOICE COMMANDS
1. Push <>located on the steering wheel.
2. A list of commands appears on the screen,
and the system provides the voice menu
prompt “Would you like to access Phone,
Navigation, Information, Audio or Help?”. 3. After the tone sounds and the icon on the
screen changes from [
]to[], speak a
command.
4. Continue to follow the voice menu prompts and speak after the tone sounds until the
preferred operation is completed.
Operating tips
.Speak a command after the tone.
. Commands that are available are always
shown on the display and spoken through
voice menu prompts. Commands other than
those that are displayed are not accepted.
Follow the prompts given by the system.
. If the command is not accepted, the system
announces, “Please say again”. Repeat the
command in a clear voice.
. Push
previous screen.
. To cancel the command, push and hold
<
>. The message, “Voice canceled” will
be announced.
. Push <
>to stop the voice prompt and
give the command at once. Remember to
wait for the tone before speaking.
. To adjust the volume of the system feed-
back, push the volume control buttons <+>
or <−> on the steering wheel or use the
audio system volume control knob while the
Page 232 of 315
![NISSAN GT-R 2013 R35 Multi Function Display User Guide 8-18Voice recognition
to operate the learning function through this
tutorial.
1. Highlight [Adapting the System to YourVoice] and push <ENTER>. The tutorial
starts.
2. The voice guide demonstrates the NISSAN GT-R 2013 R35 Multi Function Display User Guide 8-18Voice recognition
to operate the learning function through this
tutorial.
1. Highlight [Adapting the System to YourVoice] and push <ENTER>. The tutorial
starts.
2. The voice guide demonstrates the](/img/5/316/w960_316-231.png)
8-18Voice recognition
to operate the learning function through this
tutorial.
1. Highlight [Adapting the System to YourVoice] and push
starts.
2. The voice guide demonstrates the steps that have to be performed.
3. When the tutorial is completed, the system automatically switches to the Menu screen.
USING VOICE RECOGNITION SYS-
TEM
Initialization
When the ignition switch is pushed to the ON
position, Voice Recognition is initialized, which
takes a few seconds. When completed, the
system is ready to accept voice commands. If
<
>is pushed before the initialization com-
pletes, the display will show the message:
“System not ready”.
BEFORE STARTING
To get the best recognition performance out of
Voice Recognition, observe the following:
. The interior of the vehicle should be as quiet
as possible. Close the windows to eliminate
the surrounding noises (traffic noise and
vibration sounds, etc.), which may prevent
the system from correctly recognizing the
voice commands.
. Wait until the tone sounds before speaking a
command.
. Speak in a natural conversational voice
without pausing between words.
GIVING VOICE COMMANDS
1. Push <>located on the steering wheel.
2. A list of commands appears on the screen,
and the system announces, “Please say a
command”.
3. After the tone sounds and the icon on the screen changes from [
]to[], speak a
command.
Operating tips
. If the command is not recognized, the
system announces, “Please say again”.
Repeat the command in a clear voice.
. Push
previous screen.
. To cancel the command, push and hold
<
>. The message, “Voice canceled” will
be announced.
Page 243 of 315
the object projects over the actual backing up
course.WARNING
.Always turn and check that it is safe
to park your car before backing up.
Always back up slowly.
. Use the displayed lines as a refer-
ence. The lines are highly affected
by the number of occupants, fuel
level, vehicle position, road condi-
tion and road grade.
. If the tires are replaced with differ-
ent sized tires, the predicted course
line may not be displayed correctly.
. On a snow-covered or slippery road,
there may be a difference between
the predicted course line and the
actual course line.
. If the battery is disconnected or
becomes discharged, the predicted
course lines may be displayed in-
correctly. If this occurs, drive the
vehicle on a straight road for more
than 5 minutes.
. When the steering wheel is turned
with the ignition switch in the ACC
position, the predicted course lines
may be displayed incorrectly. .
The displayed line will appear
slightly off to the right because the
rear view camera is not installed in
the rear center of the vehicle.
. The distance guide line and the
vehicle width guide line should be
used as a reference only when the
vehicle is on a level paved surface.
The distance viewed on the monitor
is for reference only and may be
different than the actual distance
between the vehicle and displayed
objects.
. When backing up the vehicle up a
hill, objects viewed in the monitor
are further than they appear. When
backing up the vehicle down a hill,
objects viewed in the monitor are
closer than they appear. Use the
inside mirror or glance over your
shoulder to properly judge dis-
tances to other objects.
The vehicle width and predicted course
lines are wider than the actual width and
course.
Monitor system9-5
HOW TO PARK WITH PREDICTED
COURSE LINES
Page 272 of 315
10-26Multi function meter
INFO:
. The STOP WATCH function can only be
used when the clock is activated.
. If using the driver’s notes, the STOP
WATCH function is unavailable. To use the
STOP WATCH function, first finish using the
driver’s notes.
. If the ignition is in the OFF position, you will
not be able to use the STOP WATCH
function.
. If the ignition is put into the ACC or the OFF
position while using the timer, timing will
end.
. The timer will continue timing while you
display other screens until you push
. The maximum time that the system timer can
display is a recorded time of up to 9 hours
59 minutes and 59.99 seconds.
. When timing has finished, the upper timer
will reset to 00:00.0
. When the recorded time and the finished
recording time are displayed, they tempora-
rily interrupt the time recorder display and
are displayed in large numbers. The re-
corded time will disappear automatically
after 5-10 seconds. .
When screens other than the multi function
meter are displayed, the STOP WATCH
screen will not interrupt the display.
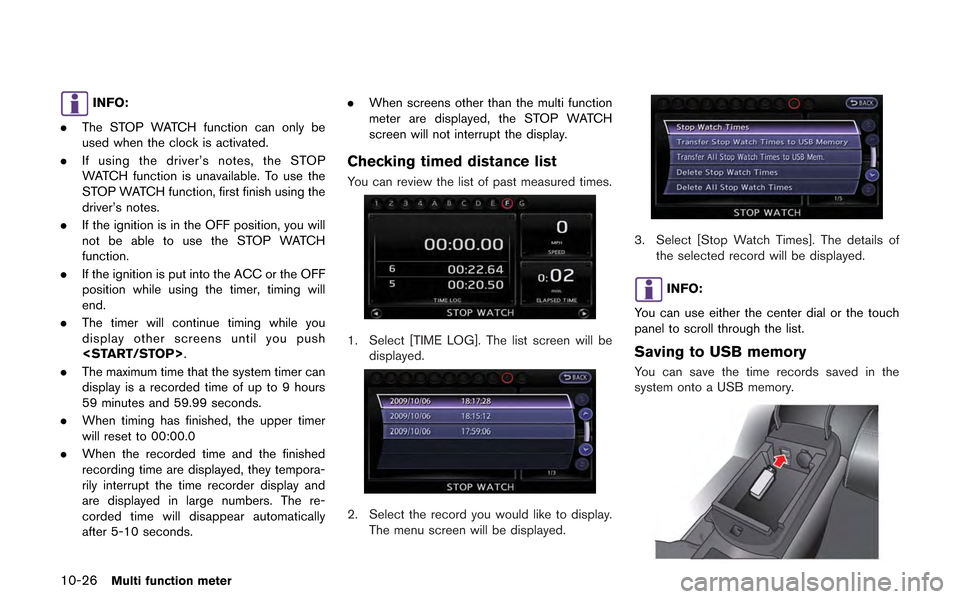
Checking timed distance list
You can review the list of past measured times.
1. Select [TIME LOG]. The list screen will be
displayed.
2. Select the record you would like to display.
The menu screen will be displayed.
3. Select [Stop Watch Times]. The details of the selected record will be displayed.
INFO:
You can use either the center dial or the touch
panel to scroll through the list.
Saving to USB memory
You can save the time records saved in the
system onto a USB memory.
Page 283 of 315
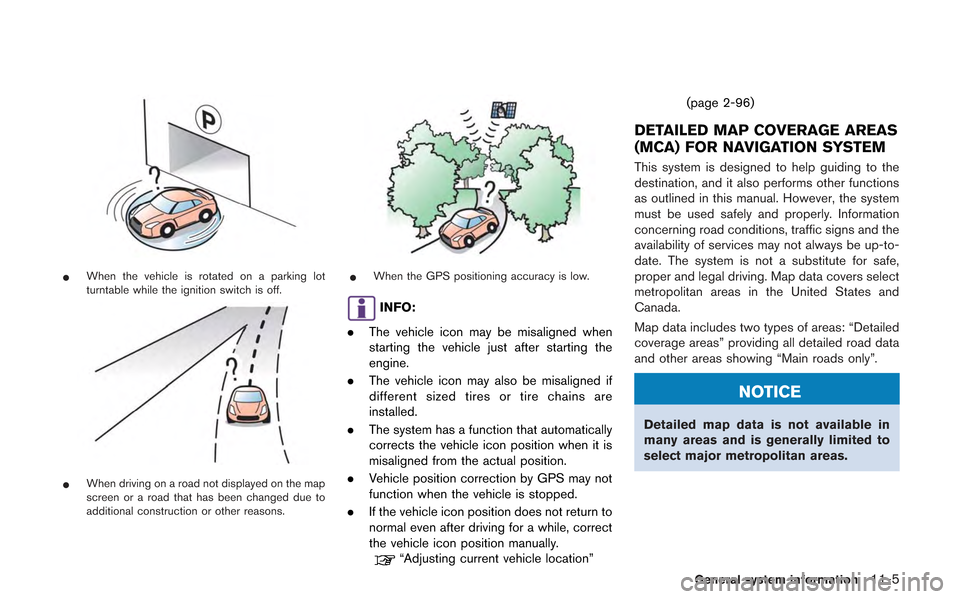
*When the vehicle is rotated on a parking lot
turntable while the ignition switch is off.
*When driving on a road not displayed on the map
screen or a road that has been changed due to
additional construction or other reasons.
*When the GPS positioning accuracy is low.
INFO:
. The vehicle icon may be misaligned when
starting the vehicle just after starting the
engine.
. The vehicle icon may also be misaligned if
different sized tires or tire chains are
installed.
. The system has a function that automatically
corrects the vehicle icon position when it is
misaligned from the actual position.
. Vehicle position correction by GPS may not
function when the vehicle is stopped.
. If the vehicle icon position does not return to
normal even after driving for a while, correct
the vehicle icon position manually.
“Adjusting current vehicle location” (page 2-96)
DETAILED MAP COVERAGE AREAS
(MCA) FOR NAVIGATION SYSTEM
This system is designed to help guiding to the
destination, and it also performs other functions
as outlined in this manual. However, the system
must be used safely and properly. Information
concerning road conditions, traffic signs and the
availability of services may not always be up-to-
date. The system is not a substitute for safe,
proper and legal driving. Map data covers select
metropolitan areas in the United States and
Canada.
Map data includes two types of areas: “Detailed
coverage areas” providing all detailed road data
and other areas showing “Main roads only”.
NOTICE
Detailed map data is not available in
many areas and is generally limited to
select major metropolitan areas.
General system information11-5
Page 300 of 315
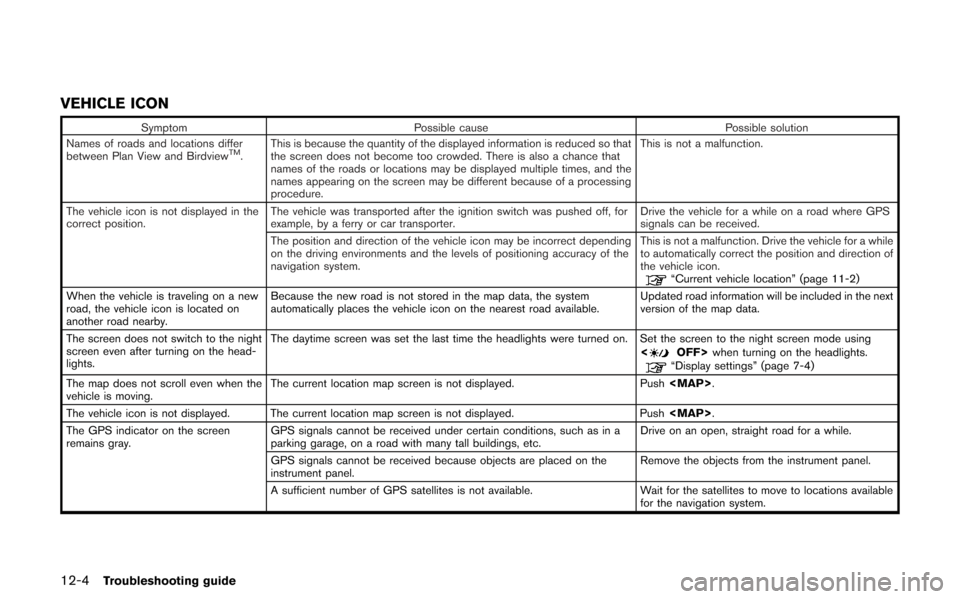
12-4Troubleshooting guide
VEHICLE ICON
SymptomPossible cause Possible solution
Names of roads and locations differ
between Plan View and Birdview
TM. This is because the quantity of the displayed information is reduced so that
the screen does not become too crowded. There is also a chance that
names of the roads or locations may be displayed multiple times, and the
names appearing on the screen may be different because of a processing
procedure. This is not a malfunction.
The vehicle icon is not displayed in the
correct position. The vehicle was transported after the ignition switch was pushed off, for
example, by a ferry or car transporter. Drive the vehicle for a while on a road where GPS
signals can be received.
The position and direction of the vehicle icon may be incorrect depending
on the driving environments and the levels of positioning accuracy of the
navigation system. This is not a malfunction. Drive the vehicle for a while
to automatically correct the position and direction of
the vehicle icon.
“Current vehicle location” (page 11-2)
When the vehicle is traveling on a new
road, the vehicle icon is located on
another road nearby. Because the new road is not stored in the map data, the system
automatically places the vehicle icon on the nearest road available.
Updated road information will be included in the next
version of the map data.
The screen does not switch to the night
screen even after turning on the head-
lights. The daytime screen was set the last time the headlights were turned on. Set the screen to the night screen mode using
<
OFF>when turning on the headlights.“Display settings” (page 7-4)
The map does not scroll even when the
vehicle is moving. The current location map screen is not displayed.
Push