display NISSAN GT-R 2014 R35 Multi Function Display Owners Manual
[x] Cancel search | Manufacturer: NISSAN, Model Year: 2014, Model line: GT-R, Model: NISSAN GT-R 2014 R35Pages: 314, PDF Size: 7.33 MB
Page 119 of 314
![NISSAN GT-R 2014 R35 Multi Function Display Owners Manual 2-92Navigation
7. Highlight [Download] and push<ENTER>.
NOTICE
Do not remove the USB memory until
the system completely imports or ex-
ports the data.
INFO:
If the USB memory already has the data for NISSAN GT-R 2014 R35 Multi Function Display Owners Manual 2-92Navigation
7. Highlight [Download] and push<ENTER>.
NOTICE
Do not remove the USB memory until
the system completely imports or ex-
ports the data.
INFO:
If the USB memory already has the data for](/img/5/367/w960_367-118.png)
2-92Navigation
7. Highlight [Download] and push
NOTICE
Do not remove the USB memory until
the system completely imports or ex-
ports the data.
INFO:
If the USB memory already has the data for a
stored address, a confirmation message is
displayed. Once overwritten, the original data
cannot be recovered.The navigation system can be set in details to
meet the preference.
BASIC OPERATION
1. Push
2. Highlight [Navigation] and push
3. Highlight the preferred setting item and push
Available setting items
. [Address Book]:
Store locations and routes, and edit the
stored items.
“Storing location” (page 2-72)
. [Map View]:
Set the display method and the direction of
the map.
“Changing map view” (page 2-11)
NAVIGATION SETTING
Page 120 of 314
![NISSAN GT-R 2014 R35 Multi Function Display Owners Manual .[Map Icons]:
Set the map icons to display on the map.
“Displaying map icons” (page 2-17)
. [Guidance Settings]:
Set the various functions for the route
guidance.
“Guidance settings” (page 2-6 NISSAN GT-R 2014 R35 Multi Function Display Owners Manual .[Map Icons]:
Set the map icons to display on the map.
“Displaying map icons” (page 2-17)
. [Guidance Settings]:
Set the various functions for the route
guidance.
“Guidance settings” (page 2-6](/img/5/367/w960_367-119.png)
.[Map Icons]:
Set the map icons to display on the map.
“Displaying map icons” (page 2-17)
. [Guidance Settings]:
Set the various functions for the route
guidance.
“Guidance settings” (page 2-62)
. [Route Settings]:
Change the routing preferences.
“Detailed route settings” (page 2-66)
. [Traffic Info Settings]:
Set the various functions of the NavTraffic
information system.
“Traffic information settings”
(page 6-11)
. [Weather Info Setting]:
Set the functions of the NavWeatherXM
information system.
“Weather information settings”
(page 6-20)
. [Speed Limit Info]:
Display speed limit information.
“Speed limit indication on map”
(page 2-93)
. [Others]:
Display other setting items.
“Other navigation settings”
(page 2-93) .
[Delete Stored Information]:
Delete stored locations and the home
setting in the Address Book.
“Delete stored items” (page 2-97)
. [Delete All Previous Destinations]:
Delete all previous destinations.
“Delete stored items” (page 2-97)
. [Delete Previous Starting Point]:
Delete all previous starting points.
“Delete stored items” (page 2-97)
. [Reset All Navigation Settings to Default]:
Reset all of the settings to default.
“Reset all navigation settings to de-
fault” (page 2-97)
SPEED LIMIT INDICATION ON MAP
Turn the [Speed Limit Info] display on or off. The
indicator light illuminates when the speed limit
display function is set to on.
1. Highlight [Speed Limit Info] and push
2. Highlight [Speed Limit Indication on Map] totoggle the function between on and off. The
indicator light illuminates when the speed
limit display function is set to on.
OTHER NAVIGATION SETTINGS
Basic Operation
Navigation2-93
Page 121 of 314
![NISSAN GT-R 2014 R35 Multi Function Display Owners Manual 2-94Navigation
1. Push<SETTING>.
2. Highlight [Navigation] and push <ENTER>.
3. Highlight [Others] and push <ENTER>.
4. Highlight the preferred setting item and push <ENTER>.
Available setting items
. NISSAN GT-R 2014 R35 Multi Function Display Owners Manual 2-94Navigation
1. Push<SETTING>.
2. Highlight [Navigation] and push <ENTER>.
3. Highlight [Others] and push <ENTER>.
4. Highlight the preferred setting item and push <ENTER>.
Available setting items
.](/img/5/367/w960_367-120.png)
2-94Navigation
1. Push
2. Highlight [Navigation] and push
3. Highlight [Others] and push
4. Highlight the preferred setting item and push
Available setting items
. [Audio Display on Map]:
Allows the audio information to be displayed
at all times.
“Displaying audio information on map
screen” (page 2-94)
. [Small Step Zoom by Dial]:
Sets the free zoom function on or off. When
this setting is on, it is possible to adjust the
scale in smaller steps than with normal scale
adjustment.
. [Map Scrolling Information]:
Sets the system so that when the map
scrolls the information about the location
aligned at the center of the cross pointer is
displayed.
“Map scrolling information”
(page 2-18)
. [Customize Nearby Places]:
Set the category of frequently visited land-
marks.
“Customizing Nearby Places”
(page 2-94) .
[Keyboard Type]:
Switches the keyboard layout for the char-
acter input screen.
“Settings keyboard layout of character
input screen” (page 2-95)
. [North Up when Zoom Out]:
When this setting is ON, the orientation of
the map is automatically changed to North
Up when the widest map scale is selected.
The orientation is changed to North Up even
when Heading Up is set.
. [Adjust Current Location]:
Corrects the position of the current location.
“Adjusting current vehicle location”
(page 2-96)
Displaying audio information on
map screen
The operating status of audio functions can be
displayed on the map screen.
1. Highlight [Others] and push
2. Highlight [Audio Display on Map] and push
the item is set.
3. Push
Page 123 of 314
![NISSAN GT-R 2014 R35 Multi Function Display Owners Manual 2-96Navigation
3. Highlight [QWERTY] and push<ENTER>.
The indicator illuminates when the item is
set.
4. Push <MAP>to return to the current
location map screen.
ABC layout
QWERTY layout
Adjusting curr NISSAN GT-R 2014 R35 Multi Function Display Owners Manual 2-96Navigation
3. Highlight [QWERTY] and push<ENTER>.
The indicator illuminates when the item is
set.
4. Push <MAP>to return to the current
location map screen.
ABC layout
QWERTY layout
Adjusting curr](/img/5/367/w960_367-122.png)
2-96Navigation
3. Highlight [QWERTY] and push
The indicator illuminates when the item is
set.
4. Push
Page 124 of 314
4. Adjust the direction of the vehicle icon.After adjusting the direction of the vehicle
icon, push
5. A message is displayed, and the adjusted
vehicle location is stored.
DELETE STORED ITEMS
Delete stored item from setting screen.
Basic Operation
1. Highlight [Navigation] and push
2. Highlight the preferred item that you want to delete and push
Available items
. [Deletes Stored Information]:
Delete the stored location and home.
. [Delete All Previous Destinations]:
Delete all previous destinations.
. [Delete Previous Start Point]:
Delete all previous start point.
RESET ALL NAVIGATION SETTINGS
TO DEFAULT
This restores various settings (display, volume
level, etc.) to the default settings.
INFO:
The memory contents, such as the stored
locations, will not be deleted.
1. Highlight [Navigation] and push
2. Highlight [Reset All Navigation Settings to Default] and push
Navigation2-97
Page 125 of 314
![NISSAN GT-R 2014 R35 Multi Function Display Owners Manual 2-98Navigation
3. A confirmation message is displayed. Con-firm the contents of the message, highlight
[Yes] and push <ENTER>. NISSAN GT-R 2014 R35 Multi Function Display Owners Manual 2-98Navigation
3. A confirmation message is displayed. Con-firm the contents of the message, highlight
[Yes] and push <ENTER>.](/img/5/367/w960_367-124.png)
2-98Navigation
3. A confirmation message is displayed. Con-firm the contents of the message, highlight
[Yes] and push
Page 131 of 314
3-4Audio system
.During cold weather or rainy days, the player
may malfunction due to the humidity. If this
occurs, remove the CD and dehumidify or
ventilate the player completely.
. The player may skip while driving on rough
roads.
. The CD player sometimes cannot function
when the passenger compartment tempera-
ture is extremely high. Decrease the tem-
perature before use.
. Only use high quality 4.7 in (12 cm) round
discs that have the “COMPACT disc DIGI-
TAL AUDIO” logo on the disc or packaging.
. Do not expose the CD to direct sunlight.
. CDs that are of poor quality, dirty, scratched,
covered with fingerprints, or that have pin
holes may not work properly.
. The following CDs may not work properly:
— Copy control compact discs (CCCD)
— Recordable compact discs (CD-R)
— Rewritable compact discs (CD-RW)
. Do not use the following CDs as they may
cause the CD player to malfunction.
— 3.1 in (8 cm) discs
— CDs that are not round
— CDs with a paper label — CDs that are warped, scratched, or have
abnormal edges
. This audio system can only play prerecorded
CDs. It has no capabilities to record or burn
CDs.
. If the CD cannot be played, one of the
following messages will be displayed.
CHECK DISC:
— Confirm that the CD is inserted correctly
(the label side is facing up, etc.).
— Confirm that the CD is not bent or warped and it is free of scratches.
PUSH EJECT:
This is an error due to the temperature inside
the player is too high. Remove the CD by
pushing the EJECT button, and after a short
time reinsert the CD. The CD can be played
when the temperature of the player returns
to normal.
UNPLAYABLE:
The file is unplayable in this audio system
(only MP3, WMA or AAC CD) .DVD (Digital Versatile Disc) player
. Do not force a compact disc into the CD/
DVD insert slot. This could damage the CD/
DVD player.
. During cold weather or rainy days, the player
may malfunction due to humidity. If this
occurs, remove the CD/DVD and dehumidify
or ventilate the player completely.
. The player may skip while driving on rough
roads.
Page 132 of 314
.The CD/DVD player sometimes cannot
function when the passenger compartment
temperature is extremely high. Decrease the
temperature before use.
. Only use high quality 4.7 in (12 cm) round
discs that have the “COMPACT disc DIGI-
TAL AUDIO” or “DVD Video” logo on the
disc or packaging.
. Do not expose the CD/DVD to direct
sunlight.
. CD/DVDs that are of poor quality, dirty,
scratched, covered with fingerprints, or that
have pinholes may not work properly.
. The following CD/DVDs are not guaranteed
to play:
— Copy control compact discs (CCCD)
— Recordable compact discs (CD-R)
— Rewritable compact discs (CD-RW)
— Recordable DVDs (DVD±R, DVD±R DL)
— Rewritable DVDs (DVD±RW, DVD±RW
DL)
. Do not use the following CD/DVDs as they
may cause the CD/DVD player to malfunc-
tion.
— 3.1 in (8 cm) discs
— CD/DVDs that are not round — CD/DVDs with a paper label
— CD/DVDs that are warped, scratched or
have abnormal edges
— This audio system can only play pre- recorded CD/DVDs. It has no capabilities
to record or burn CD/DVDs.
. If the CD/DVD cannot be played, one of the
following messages will be displayed.
Disc Read Error:
— Confirm that the CD/DVD is inserted
correctly (the label side is facing up,
etc.).
— Confirm that the CD/DVD is not bent or warped and it is free of scratches.
Please Eject Disc:
— This may be an error due to the temperature inside the player being too
high. Remove the CD/DVD by pushing
the EJECT button, and after a short time
reinsert the CD/DVD. The CD/DVD can
be played when the temperature of the
player returns to normal. If the error
persists, consult your local retailership.
Unplayable File:
— The file may be copy protected.
— The file is not MP3, WMA, AAC, M4A or DivX
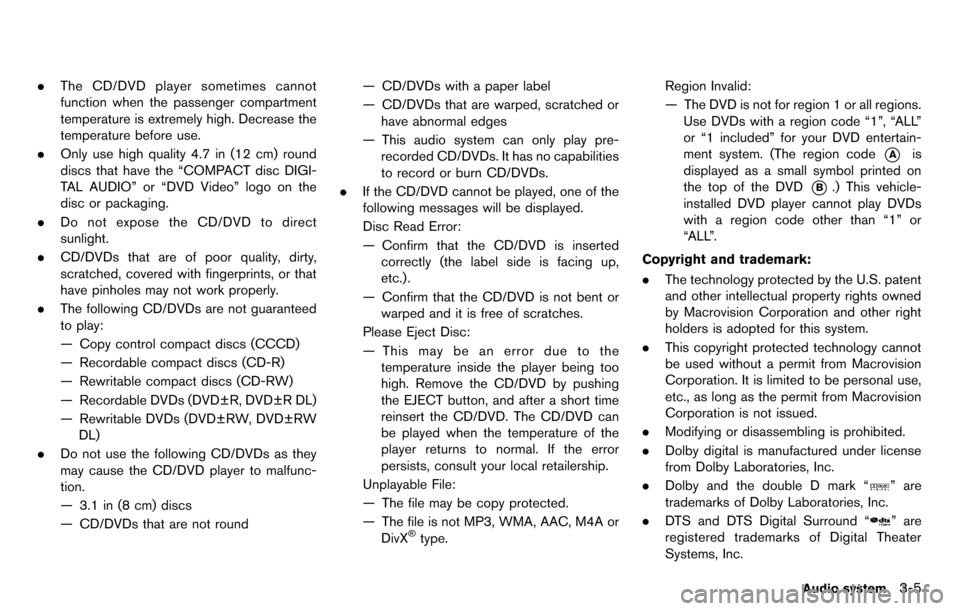
®type. Region Invalid:
— The DVD is not for region 1 or all regions.
Use DVDs with a region code “1”, “ALL”
or “1 included” for your DVD entertain-
ment system. (The region code
*Ais
displayed as a small symbol printed on
the top of the DVD
*B.) This vehicle-
installed DVD player cannot play DVDs
with a region code other than “1” or
“ALL”.
Copyright and trademark:
. The technology protected by the U.S. patent
and other intellectual property rights owned
by Macrovision Corporation and other right
holders is adopted for this system.
. This copyright protected technology cannot
be used without a permit from Macrovision
Corporation. It is limited to be personal use,
etc., as long as the permit from Macrovision
Corporation is not issued.
. Modifying or disassembling is prohibited.
. Dolby digital is manufactured under license
from Dolby Laboratories, Inc.
. Dolby and the double D mark “
” are
trademarks of Dolby Laboratories, Inc.
. DTS and DTS Digital Surround “
” are
registered trademarks of Digital Theater
Systems, Inc.
Audio system3-5
Page 134 of 314
regulatory reasons, even when the vehicle is
parked.
This system supports various USB memory
devices, USB hard drives and iPod players.
Some USB devices may not be supported by
this system.
.Partitioned USB devices may not be played
correctly.
. Some characters used in other languages
(Chinese, Japanese, etc.) are not displayed
properly on display. Using English language
characters with a USB device is recom-
mended.
General notes for USB use:
. The USB device may not function when the
passenger compartment temperature is ex-
tremely high. Lower the temperature before
use.
. During cold weather or rainy days, the player
may malfunction due to humidity. If this
occurs, remove the USB device and dehu-
midify or ventilate the USB player comple-
tely.
. Do not connect a USB device if a connector,
cable or USB port is wet. Allow the
connector, cable, and USB port to dry
completely before connecting the USB
device. (Wait for 24 hours or more until it
is dry.) If the connector and USB port are exposed to fluids other than water, evapora-
tive residue may cause a short circuit
between the connector pins and USB port.
In this case, replace the cable and USB port.
Otherwise damage to the USB device and a
loss of function may occur.
. If the cable is damaged (insulation cut,
connectors cracked, contamination such as
liquids, dust, dirt, etc. in the connectors) , do
not use the cable. Replace the cable with a
new one.
. Do not put a USB device in a location where
static electricity occurs, electrical noise is
generated or hot air from the air conditioner
blows directly on it. Doing so may cause the
data stored on the USB device to be
corrupted.
Notes for iPod use:
iPod is a trademark of Apple Inc., registered in
the U.S. and other countries.
. Improperly plugging in the iPod may cause a
checkmark to be displayed on and off
(flickering) . Always make sure that the iPod
is connected properly.
. An iPod nano (1st Generation) may remain
in fast forward or rewind mode if it is
connected during a seek operation. In this
case, please manually reset the iPod. .
An iPod nano (2nd Generation) will continue
to fast-forward or rewind if it is discon-
nected during a seek operation.
. An incorrect song title may appear when the
Play Mode is changed while using an iPod
nano (2nd Generation)
. Audiobooks may not play in the same order
as they appear on an iPod.
. Large video files cause slow responses in an
iPod. The vehicle center display may mo-
mentarily black out, but will soon recover.
. If an iPod automatically selects large video
files while in the shuffle mode, the vehicle
center display may momentarily black out,
but will soon recover.
Compressed Audio Files (MP3/
WMA/AAC/ATRAC3)
Explanation of terms:
.MP3 — MP3 is short for Moving Pictures
Experts Group Audio Layer 3. MP3 is the
most well known compressed digital audio
file format. This format allows for near “CD
quality” sound, but at a fraction of the size of
normal audio files. MP3 conversion of an
audio track can reduce the file size by
approximately a 10:1 ratio (Sampling: 44.1
kHz, Bit rate: 128 kbps) with virtually no
perceptible loss in quality. The compression
Audio system3-7
Page 135 of 314
3-8Audio system
reduces certain parts of sound that seem
inaudible to most people.
. WMA — Windows Media Audio (WMA) is a
compressed audio format created by Micro-
soft as an alternative to MP3. The WMA
codec offers greater file compression than
the MP3 codec, enabling storage of more
digital audio tracks in the same amount of
space when compared to MP3s at the same
level of quality.
. AAC/M4A — Advanced Audio Coding
(AAC) is a lossy audio compression format.
Audio files that have been encoded with
AAC are generally smaller in size and deliver
a higher quality of sound than MP3.
. Bit rate — Bit rate denotes the number of
bits per second used by a digital music file.
The size and quality of a compressed digital
audio file is determined by the bit rate used
when encoding the file.
. Sampling frequency — Sampling frequency
is the rate at which the samples of a signal
are converted from analog to digital (A/D
conversion) per second.
. Multisession — Multisession is one of the
methods for writing data to media. Writing
data once to the media is called a single
session, and writing more than once is
called a multisession. .
ID3/WMA Tag — The ID3/WMA tag is the
part of the encoded MP3 or WMA file that
contains information about the digital music
file such as song title, artist, album title,
encoding bit rate, track time duration, etc.
ID3 tag information is displayed on the
Album/Artist/Track title line on the display.
* Windows
®and Windows Media®are regis-
tered trademarks or trademarks of Microsoft
Corporation in the United States of America
and/or other countries.
Playback order:
. The folder names of folders not containing
compressed audio files are not shown in the
display.
. If there is a file in the top level of a disc/USB,
“Root Folder” is displayed.