display NISSAN GT-R 2014 R35 Multi Function Display Owners Manual
[x] Cancel search | Manufacturer: NISSAN, Model Year: 2014, Model line: GT-R, Model: NISSAN GT-R 2014 R35Pages: 314, PDF Size: 7.33 MB
Page 149 of 314
3-22Audio system
tions.
. Operation is subject to the following two
conditions:
1. This device may not cause interference and
2. This device must accept any interference, including interference that may cause un-
desired operation of the device
IC Regulatory information:
. Operation is subject to the following two
conditions:
1. This device may not cause interference, and
2. This device must accept any interference, including interference that may cause un-
desired operation of the device.
. This Class B digital apparatus meets all
requirements of the Canadian Interference-
Causing Equipment Regulations.
Bluetooth trademark:
Bluetooth®is a trademark owned
by Bluetooth SIG, Inc.
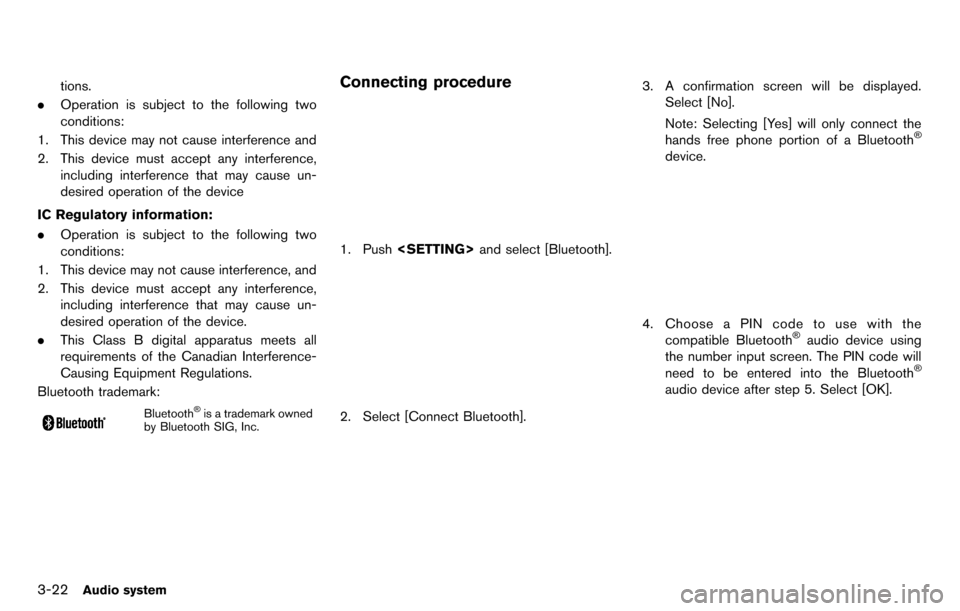
Connecting procedure
1. Push
2. Select [Connect Bluetooth].
3. A confirmation screen will be displayed.
Select [No].
Note: Selecting [Yes] will only connect the
hands free phone portion of a Bluetooth
®
device.
4. Choose a PIN code to use with thecompatible Bluetooth®audio device using
the number input screen. The PIN code will
need to be entered into the Bluetooth
®
audio device after step 5. Select [OK].
Page 150 of 314
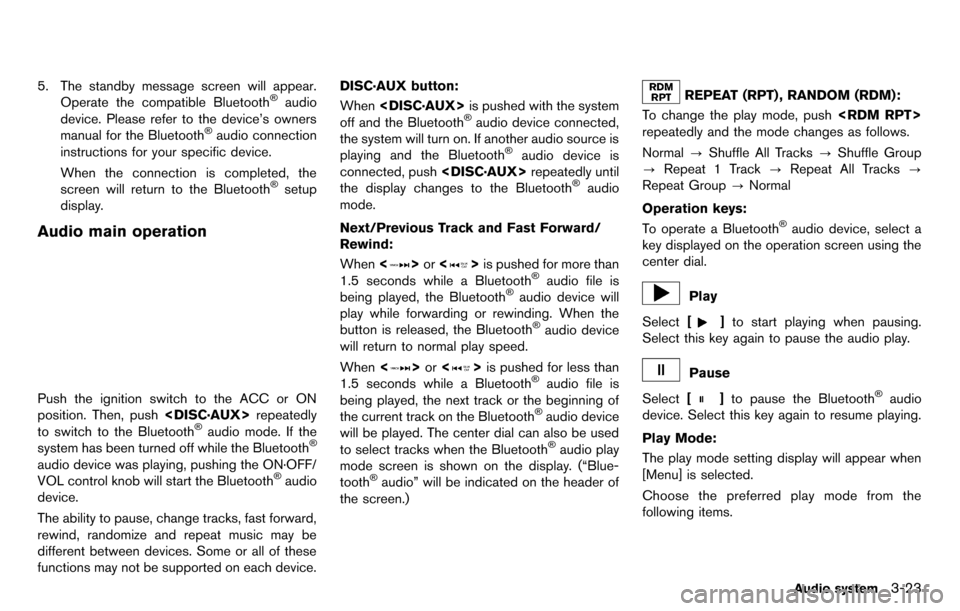
5. The standby message screen will appear.Operate the compatible Bluetooth®audio
device. Please refer to the device’s owners
manual for the Bluetooth
®audio connection
instructions for your specific device.
When the connection is completed, the
screen will return to the Bluetooth
®setup
display.
Audio main operation
Push the ignition switch to the ACC or ON
position. Then, push
to switch to the Bluetooth
®audio mode. If the
system has been turned off while the Bluetooth®
audio device was playing, pushing the ON·OFF/
VOL control knob will start the Bluetooth®audio
device.
The ability to pause, change tracks, fast forward,
rewind, randomize and repeat music may be
different between devices. Some or all of these
functions may not be supported on each device. DISC·AUX button:
When
off and the Bluetooth
®audio device connected,
the system will turn on. If another audio source is
playing and the Bluetooth
®audio device is
connected, push
the display changes to the Bluetooth
®audio
mode.
Next/Previous Track and Fast Forward/
Rewind:
When <
>or <>is pushed for more than
1.5 seconds while a Bluetooth®audio file is
being played, the Bluetooth®audio device will
play while forwarding or rewinding. When the
button is released, the Bluetooth
®audio device
will return to normal play speed.
When <
>or <>is pushed for less than
1.5 seconds while a Bluetooth®audio file is
being played, the next track or the beginning of
the current track on the Bluetooth
®audio device
will be played. The center dial can also be used
to select tracks when the Bluetooth
®audio play
mode screen is shown on the display. (“Blue-
tooth
®audio” will be indicated on the header of
the screen.)
REPEAT (RPT) , RANDOM (RDM):
To change the play mode, push
repeatedly and the mode changes as follows.
Normal ?Shuffle All Tracks ?Shuffle Group
? Repeat 1 Track ?Repeat All Tracks ?
Repeat Group ?Normal
Operation keys:
To operate a Bluetooth
®audio device, select a
key displayed on the operation screen using the
center dial.
Play
Select [
]to start playing when pausing.
Select this key again to pause the audio play.
Pause
Select [
]to pause the Bluetooth®audio
device. Select this key again to resume playing.
Play Mode:
The play mode setting display will appear when
[Menu] is selected.
Choose the preferred play mode from the
following items.
Audio system3-23
Page 151 of 314
3-24Audio system
.Shuffle
Choose “Shuffle OFF”, “Shuffle All Tracks”
and “Shuffle Group”.
. Repeat
Choose from “Repeat OFF”, “Repeat 1
Track”, “Repeat All Tracks” and “Repeat
Group”.
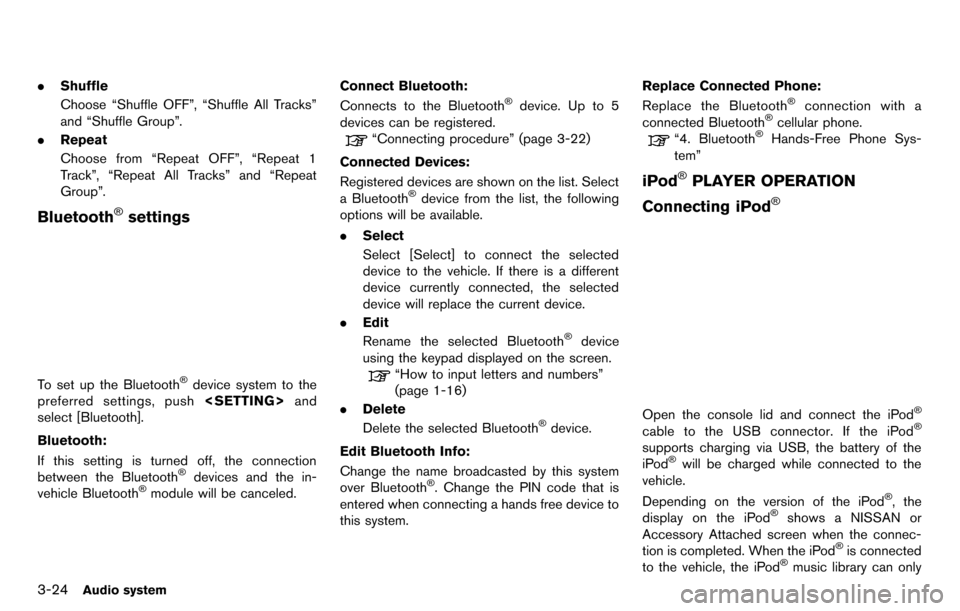
Bluetooth®settings
To set up the Bluetooth®device system to the
preferred settings, push
select [Bluetooth].
Bluetooth:
If this setting is turned off, the connection
between the Bluetooth
®devices and the in-
vehicle Bluetooth®module will be canceled. Connect Bluetooth:
Connects to the Bluetooth
®device. Up to 5
devices can be registered.
“Connecting procedure” (page 3-22)
Connected Devices:
Registered devices are shown on the list. Select
a Bluetooth
®device from the list, the following
options will be available.
. Select
Select [Select] to connect the selected
device to the vehicle. If there is a different
device currently connected, the selected
device will replace the current device.
. Edit
Rename the selected Bluetooth
®device
using the keypad displayed on the screen.
“How to input letters and numbers”
(page 1-16)
. Delete
Delete the selected Bluetooth
®device.
Edit Bluetooth Info:
Change the name broadcasted by this system
over Bluetooth
®. Change the PIN code that is
entered when connecting a hands free device to
this system. Replace Connected Phone:
Replace the Bluetooth
®connection with a
connected Bluetooth®cellular phone.
“4. Bluetooth®Hands-Free Phone Sys-
tem”
iPod®PLAYER OPERATION
Connecting iPod
®
Open the console lid and connect the iPod®
cable to the USB connector. If the iPod®
supports charging via USB, the battery of the
iPod®will be charged while connected to the
vehicle.
Depending on the version of the iPod
®, the
display on the iPod®shows a NISSAN or
Accessory Attached screen when the connec-
tion is completed. When the iPod
®is connected
to the vehicle, the iPod®music library can only
Page 152 of 314
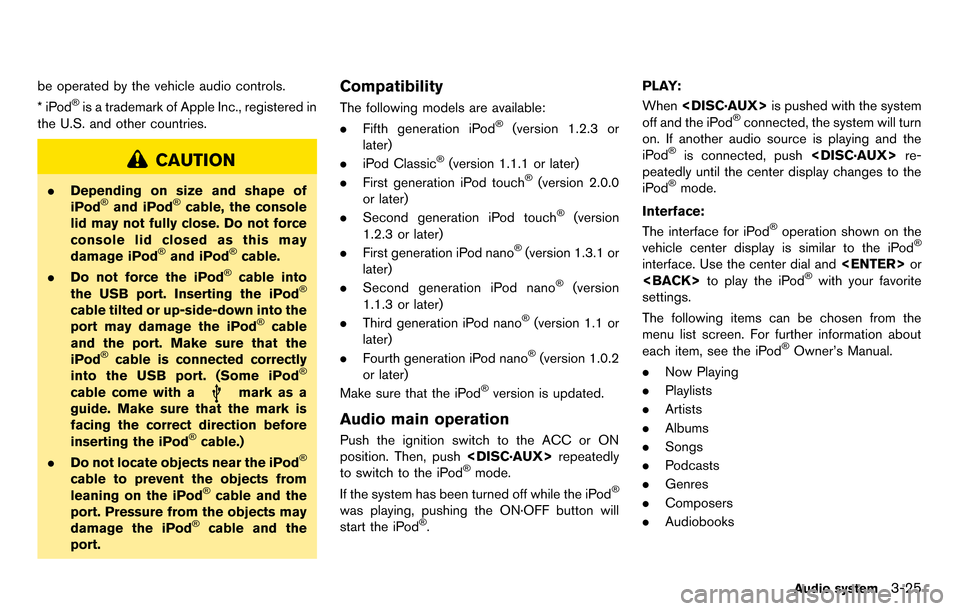
be operated by the vehicle audio controls.
*iPod®is a trademark of Apple Inc., registered in
the U.S. and other countries.
CAUTION
. Depending on size and shape of
iPod®and iPod®cable, the console
lid may not fully close. Do not force
console lid closed as this may
damage iPod
®and iPod®cable.
. Do not force the iPod®cable into
the USB port. Inserting the iPod®
cable tilted or up-side-down into the
port may damage the iPod®cable
and the port. Make sure that the
iPod
®cable is connected correctly
into the USB port. (Some iPod®
cable come with amark as a
guide. Make sure that the mark is
facing the correct direction before
inserting the iPod
®cable.)
. Do not locate objects near the iPod®
cable to prevent the objects from
leaning on the iPod®cable and the
port. Pressure from the objects may
damage the iPod
®cable and the
port.
Compatibility
The following models are available:
. Fifth generation iPod®(version 1.2.3 or
later)
. iPod Classic
®(version 1.1.1 or later)
. First generation iPod touch®(version 2.0.0
or later)
. Second generation iPod touch
®(version
1.2.3 or later)
. First generation iPod nano
®(version 1.3.1 or
later)
. Second generation iPod nano
®(version
1.1.3 or later)
. Third generation iPod nano
®(version 1.1 or
later)
. Fourth generation iPod nano
®(version 1.0.2
or later)
Make sure that the iPod
®version is updated.
Audio main operation
Push the ignition switch to the ACC or ON
position. Then, push
to switch to the iPod
®mode.
If the system has been turned off while the iPod®
was playing, pushing the ON·OFF button will
start the iPod®. PLAY:
When
off and the iPod
®connected, the system will turn
on. If another audio source is playing and the
iPod
®is connected, push
peatedly until the center display changes to the
iPod
®mode.
Interface:
The interface for iPod
®operation shown on the
vehicle center display is similar to the iPod®
interface. Use the center dial and
settings.
The following items can be chosen from the
menu list screen. For further information about
each item, see the iPod
®Owner’s Manual.
. Now Playing
. Playlists
. Artists
. Albums
. Songs
. Podcasts
. Genres
. Composers
. Audiobooks
Audio system3-25
Page 158 of 314
.If the Bluetooth®Hands-Free Phone System
seems to be malfunctioning, please visit
www.nissanusa.com/bluetooth for trouble-
shooting help.
. Some cellular phones or other devices may
cause interference or a buzzing noise to
come from the audio system speakers.
Storing the device in a different location
may reduce or eliminate the noise.
. Refer to the cellular phone Owner’s Manual
regarding the telephone pairing procedure
specific to your phone, battery charging,
cellular phone antenna, etc.
. The antenna display on the monitor will not
coincide with the antenna display of some
cellular phones.
. Keep the interior of the vehicle as quiet as
possible to hear the caller’s voice clearly as
well as to minimize its echoes.
. If reception between callers is unclear,
adjusting the incoming or outgoing call
volume may improve the clarity.REGULATORY INFORMATION
FCC Regulatory information
.CAUTION: To maintain compliance with
FCC’s RF exposure guidelines, use only
the supplied antenna. Unauthorized antenna,
modification, or attachments could damage
the transmitter and may violate FCC regula-
tions.
. Operation is subject to the following two
conditions:
1. this device may not cause interference and
2. this device must accept any interference, including interference that may cause un-
desired operation of the device
IC Regulatory information
.Operation is subject to the following two
conditions: (1) this device may not cause
interference, and (2) this device must accept
any interference, including interference that
may cause undesired operation of the
device.
. This Class B digital apparatus meets all
requirements of the Canadian Interference-
Causing Equipment Regulations. Bluetooth trademark:
Bluetooth®is a trademark owned
by Bluetooth SIG, Inc.,
VOICE COMMANDS
You can use voice commands to operate various
Bluetooth®Hands-Free Phone System features
using the NISSAN Voice Recognition system.
“8. Voice recognition”
Bluetooth®Hands-Free Phone System4-3
Page 159 of 314
![NISSAN GT-R 2014 R35 Multi Function Display Owners Manual 4-4Bluetooth®Hands-Free Phone System
CONTROL BUTTONS
&1PHONE button
&2button
CONNECTING PROCEDURE
1. Push<PHONE> or<>, and select
[Connect Phone].
2. When a PIN code appears on the screen, operate th NISSAN GT-R 2014 R35 Multi Function Display Owners Manual 4-4Bluetooth®Hands-Free Phone System
CONTROL BUTTONS
&1PHONE button
&2button
CONNECTING PROCEDURE
1. Push<PHONE> or<>, and select
[Connect Phone].
2. When a PIN code appears on the screen, operate th](/img/5/367/w960_367-158.png)
4-4Bluetooth®Hands-Free Phone System
CONTROL BUTTONS
&1PHONE button
&2button
CONNECTING PROCEDURE
1. Push
[Connect Phone].
2. When a PIN code appears on the screen, operate the compatible Bluetooth®cellular
phone to enter the PIN code.
The connecting procedure of the cellular
phone varies according to each cellular
phone. See the cellular phone Owner’s
Manual for the details. You can also visit
www.nissanusa.com/bluetooth or call NISSAN Consumer Affairs Department for
instructions on pairing NISSAN recom-
mended cellular phones.
When the connection process is completed,
the screen will return to the Phone menu
display.
PHONE SELECTION
Up to 5 cellular phones can be registered to the
system. To switch to connect another cellular
phone, push
Phone]. The registered cellular phones are
shown on the list. If you select a cellular phone
that is different from the one currently con-
nected, the newly selected phone will be
connected to the system.
QUICK DIAL
This vehicle has two phonebooks available for
hands-free use. Depending on the phone, the
system may automatically download the entire
cell phone’s phonebook into the “Phonebook”.
“Phone setting” (page 4-7)
If a phonebook does not automatically down-
load, the quick dial may be set for up to 1,000
entries. This phonebook allows the recording of
a name to speak while using voice recognition.
Page 160 of 314
![NISSAN GT-R 2014 R35 Multi Function Display Owners Manual 1. Push<PHONE> and select [Quick Dial].
2. Select [Add New] at the top of the screen.
3. Choose the method for entering the phone- book entry. For this example, select [Enter
Number by Keypad].
4. Ent NISSAN GT-R 2014 R35 Multi Function Display Owners Manual 1. Push<PHONE> and select [Quick Dial].
2. Select [Add New] at the top of the screen.
3. Choose the method for entering the phone- book entry. For this example, select [Enter
Number by Keypad].
4. Ent](/img/5/367/w960_367-159.png)
1. Push
2. Select [Add New] at the top of the screen.
3. Choose the method for entering the phone- book entry. For this example, select [Enter
Number by Keypad].
4. Enter the digits and select [OK].
“How to input letters and numbers”
(page 1-16)
5. Select [Voicetag] to record a name to speak when using NISSAN Voice Recognition
system.
6. Select [Store] and prepare to speak the name after the tone.
7. When the voicetag is successfully saved, select [OK] to save the phonebook entry.
8. After the phonebook entry is saved, it will show a screen that is ready to call the
number. Press
quick dial.
There are different methods to input a phone
number. Select one of the following options
instead of [Enter Number by Keypad] in step 3.
. [Copy from Call History]:
The system will show a list of incoming,
outgoing or missed calls that were down-
loaded from the connected cellular phone
(depending on the phone’s compatibility) .
Select one of these entries to save in the quick dial.
. [Copy from the Handset]:
The system will show the connected cellular
phone’s phonebook that was downloaded
(depending on the phone’s compatibility) .
Select one of these entries to save in the
quick dial.Editing the Quick Dial
1. Push
2. Select the desired entry from the displayed list.
3. Select [Edit].
4. Select the desired item to change.
Bluetooth®Hands-Free Phone System4-5
Page 161 of 314
![NISSAN GT-R 2014 R35 Multi Function Display Owners Manual 4-6Bluetooth®Hands-Free Phone System
The following editing items are available:
.[Entry #]:
Changes the displayed number of the
selected entry.
. [Name]:
Edit the name of the entry using the keypad
d NISSAN GT-R 2014 R35 Multi Function Display Owners Manual 4-6Bluetooth®Hands-Free Phone System
The following editing items are available:
.[Entry #]:
Changes the displayed number of the
selected entry.
. [Name]:
Edit the name of the entry using the keypad
d](/img/5/367/w960_367-160.png)
4-6Bluetooth®Hands-Free Phone System
The following editing items are available:
.[Entry #]:
Changes the displayed number of the
selected entry.
. [Name]:
Edit the name of the entry using the keypad
displayed on the screen.
. [Number]:
Edit the phone number using the keypad
displayed on the screen.
. [Type]:
Select an icon from the icon list.
. [Voicetag]:
Confirm and store the voicetag. Voicetags
allow easy dialing using the NISSAN Voice
Recognition system.
“8. Voice recognition”
To delete an entry, select [Delete] at step 3.
MAKING A CALL
To make a call, follow this procedure.
1. Push
>. The “PHONE”
screen will appear on the display.
2. Select [Phonebook] on the “PHONE” menu.
3. Select the desired entry from the list.
4. Confirm the correct entry by selecting for the correct number from the list.
5. Select [Call] to start dialing the number.
There are different methods to make a call.
Select one of the following options instead of
[Phonebook] in step 2 above.
.[Quick Dial]:
Select an entry stored in the quick dial.
. [Call History]:
Select an outgoing, incoming or missed call
downloaded from your cell phone (depend-
ing on your phone’s compatibility) .
. [Dial Number]:
Input the phone number manually using the
keypad displayed on the screen.
“How to input letters and numbers”
(page 1-16)
RECEIVING A CALL
When you hear a phone ring, the display will
change to the incoming call mode. To receive a
call, perform one of the following procedures
Page 162 of 314
![NISSAN GT-R 2014 R35 Multi Function Display Owners Manual listed below.
1. Select [Answer].
2. Push<PHONE> on the instrument panel.
3. Push <
>on the steering wheel.
There are some options available when receiving
a call. Select one of the following displaye NISSAN GT-R 2014 R35 Multi Function Display Owners Manual listed below.
1. Select [Answer].
2. Push<PHONE> on the instrument panel.
3. Push <
>on the steering wheel.
There are some options available when receiving
a call. Select one of the following displaye](/img/5/367/w960_367-161.png)
listed below.
1. Select [Answer].
2. Push
3. Push <
>on the steering wheel.
There are some options available when receiving
a call. Select one of the following displayed on
the screen.
. [Answer]:
Accept an incoming call to talk.
. [Hold Call]:
Put an incoming call on hold.
. [Reject Call]:
Reject an incoming call.
To finish the call, perform one of the
following procedures listed below.
1. Select [Hang up].
2. Push
3. Push <
>on the steering wheel.
DURING A CALL
There are some options available during a call.
Select one of the following displayed on the
screen if necessary.
. [Hang up]:
Finish the call.
. [Use Handset]:
Transfer the call to the cellular phone.
. [Mute]:
Mute your voice to the person.
. [Keypad]:
Using the touch tone, send digits to the
connected party for using services such as
voicemail.
. [Cancel Mute]:
This will appear after [Mute] is selected.
Mute will be canceled.
To adjust the person’s voice to be louder or
quieter, push the volume control switch (+ or −)on the steering wheel or turn the volume control
knob on the instrument panel while talking on
the phone. This adjustment is also available in
the SETTING mode.
PHONE SETTING
To set up the Bluetooth®Hands-Free Phone
System to your preferred settings, push
Edit Quick Dial
Quick dial registration and editing/deleting the
registered quick dial can be performed.
Delete Quick Dial
The quick dial entries can be deleted all at the
same time or one by one.
Bluetooth®Hands-Free Phone System4-7
Page 167 of 314
5-2Heater and air conditioner
WARNING
.The air conditioner cooling function
operates only when the engine is
running.
. Do not leave children or adults who
would normally require the support
of others alone in your vehicle. Pets
should not be left alone either. On
hot, sunny days, temperatures in a
closed vehicle could quickly become
high enough to cause severe or
possibly fatal injuries to people or
animals.
. Do not use the recirculation mode
for long periods as it may cause the
interior air to become stale and the
windows to fog up.
Start the engine and operate the heater and air
conditioner system.
You can individually set the driver and front
passenger side temperature using each tem-
perature control button.
HOW TO VIEW SCREEN
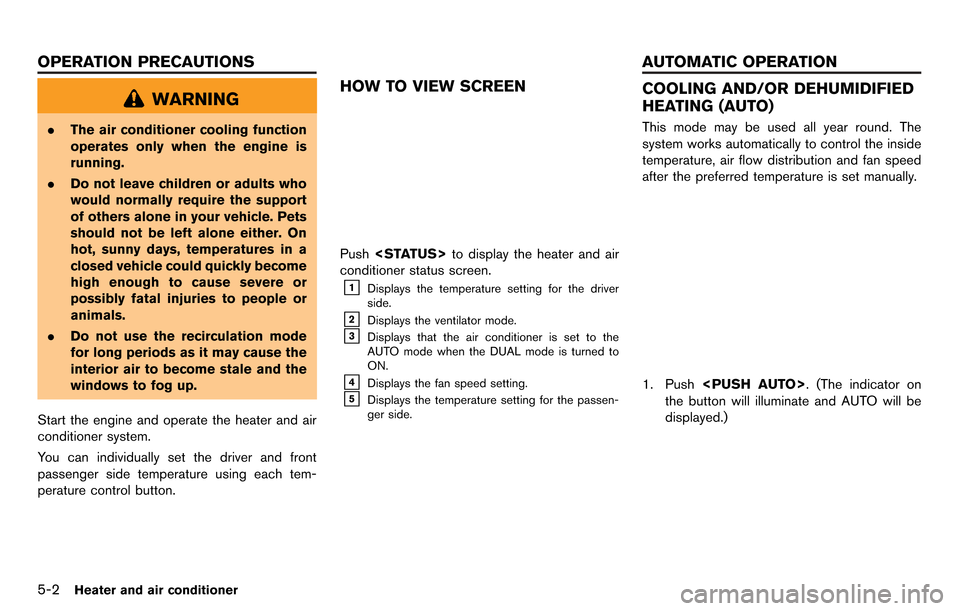
Push
conditioner status screen.
&1Displays the temperature setting for the driver
side.
&2Displays the ventilator mode.
&3Displays that the air conditioner is set to the
AUTO mode when the DUAL mode is turned to
ON.
&4Displays the fan speed setting.
&5Displays the temperature setting for the passen-
ger side.
COOLING AND/OR DEHUMIDIFIED
HEATING (AUTO)
This mode may be used all year round. The
system works automatically to control the inside
temperature, air flow distribution and fan speed
after the preferred temperature is set manually.
1. Push
the button will illuminate and AUTO will be
displayed.)
OPERATION PRECAUTIONS AUTOMATIC OPERATION