steering wheel NISSAN GT-R 2015 R35 Multi Function Display Owner's Guide
[x] Cancel search | Manufacturer: NISSAN, Model Year: 2015, Model line: GT-R, Model: NISSAN GT-R 2015 R35Pages: 298, PDF Size: 11.39 MB
Page 224 of 298
![NISSAN GT-R 2015 R35 Multi Function Display Owners Guide 3. After the tone sounds and the icon on thescreen changes from []to[], speak
“Plan View Map”.
4. Voice feedback will be provided when the command is accepted, and the map is
displayed in 2D (Plan NISSAN GT-R 2015 R35 Multi Function Display Owners Guide 3. After the tone sounds and the icon on thescreen changes from []to[], speak
“Plan View Map”.
4. Voice feedback will be provided when the command is accepted, and the map is
displayed in 2D (Plan](/img/5/423/w960_423-223.png)
3. After the tone sounds and the icon on thescreen changes from []to[], speak
“Plan View Map”.
4. Voice feedback will be provided when the command is accepted, and the map is
displayed in 2D (Plan View) .
Example 2: Setting destination
using places list
1. Push <>located on the steering wheel.
2. The system announces, “Please say a command”.
3. After the tone sounds and the icon on the screen changes from [
]to[], speak
“Places”.
4. If a route is already set, choose “Near Current Location”, “Along Route” or “Near
Destination”.
5. After the tone sounds and the icon on the screen changes again, speak “Along Route”.
6. Voice feedback will be provided when thecommand is accepted, and the list of places
of interest categories appears.
7. After the tone sounds and the icon on the screen changes again, speak “Two”.
8. Voice feedback will be provided when thecommand is accepted, and the list of places
of interest in the category specified in the
previous step appears.
9. After the tone sounds and the icon on the screen changes again, speak “One”.
10. Voice feedback will be provided when thecommand is accepted, and the system
starts calculating a route to the selected
facility.
Voice recognition8-25
Page 225 of 298
8-26Voice recognition
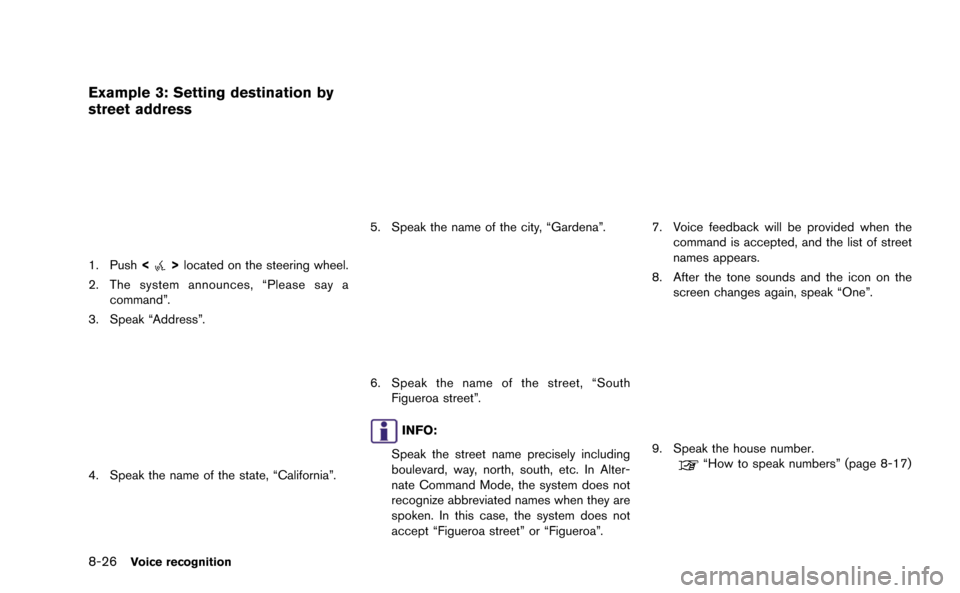
Example 3: Setting destination by
street address
1. Push<>located on the steering wheel.
2. The system announces, “Please say a command”.
3. Speak “Address”.
4. Speak the name of the state, “California”.
5. Speak the name of the city, “Gardena”.
6. Speak the name of the street, “South Figueroa street”.
INFO:
Speak the street name precisely including
boulevard, way, north, south, etc. In Alter-
nate Command Mode, the system does not
recognize abbreviated names when they are
spoken. In this case, the system does not
accept “Figueroa street” or “Figueroa”.
7. Voice feedback will be provided when the command is accepted, and the list of street
names appears.
8. After the tone sounds and the icon on the screen changes again, speak “One”.
9. Speak the house number.“How to speak numbers” (page 8-17)
Page 230 of 298
HOW TO READ DISPLAYED LINES
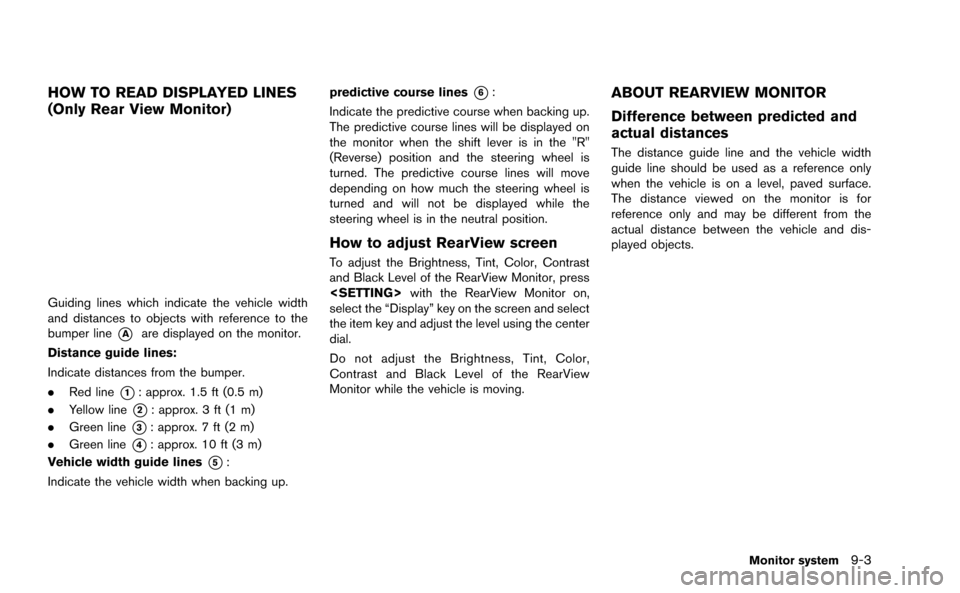
(Only Rear View Monitor)
Guiding lines which indicate the vehicle width
and distances to objects with reference to the
bumper line
*Aare displayed on the monitor.
Distance guide lines:
Indicate distances from the bumper.
. Red line
*1: approx. 1.5 ft (0.5 m)
. Yellow line
*2: approx. 3 ft (1 m)
. Green line
*3: approx. 7 ft (2 m)
. Green line
*4: approx. 10 ft (3 m)
Vehicle width guide lines
*5:
Indicate the vehicle width when backing up. predictive course lines
*6:
Indicate the predictive course when backing up.
The predictive course lines will be displayed on
the monitor when the shift lever is in the "R"
(Reverse) position and the steering wheel is
turned. The predictive course lines will move
depending on how much the steering wheel is
turned and will not be displayed while the
steering wheel is in the neutral position.
How to adjust RearView screen
To adjust the Brightness, Tint, Color, Contrast
and Black Level of the RearView Monitor, press
select the “Display” key on the screen and select
the item key and adjust the level using the center
dial.
Do not adjust the Brightness, Tint, Color,
Contrast and Black Level of the RearView
Monitor while the vehicle is moving.
ABOUT REARVIEW MONITOR
Difference between predicted and
actual distances
The distance guide line and the vehicle width
guide line should be used as a reference only
when the vehicle is on a level, paved surface.
The distance viewed on the monitor is for
reference only and may be different from the
actual distance between the vehicle and dis-
played objects.
Monitor system9-3
Page 232 of 298
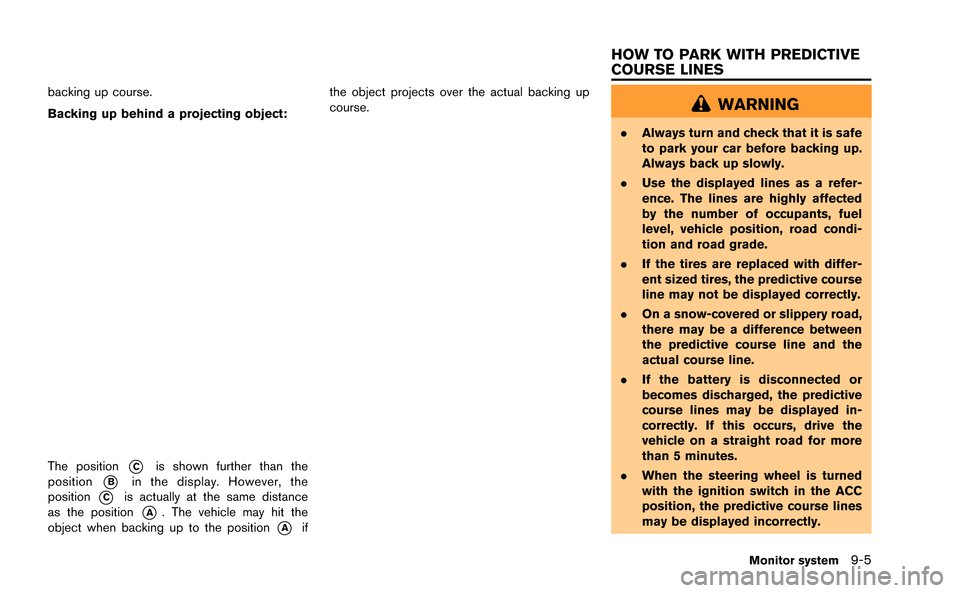
backing up course.
Backing up behind a projecting object:
The position*Cis shown further than the
position
*Bin the display. However, the
position
*Cis actually at the same distance
as the position
*A. The vehicle may hit the
object when backing up to the position
*Aif the object projects over the actual backing up
course.
WARNING
.
Always turn and check that it is safe
to park your car before backing up.
Always back up slowly.
. Use the displayed lines as a refer-
ence. The lines are highly affected
by the number of occupants, fuel
level, vehicle position, road condi-
tion and road grade.
. If the tires are replaced with differ-
ent sized tires, the predictive course
line may not be displayed correctly.
. On a snow-covered or slippery road,
there may be a difference between
the predictive course line and the
actual course line.
. If the battery is disconnected or
becomes discharged, the predictive
course lines may be displayed in-
correctly. If this occurs, drive the
vehicle on a straight road for more
than 5 minutes.
. When the steering wheel is turned
with the ignition switch in the ACC
position, the predictive course lines
may be displayed incorrectly.
Monitor system9-5
HOW TO PARK WITH PREDICTIVE
COURSE LINES
Page 233 of 298
9-6Monitor system
.The displayed line will appear
slightly off to the right because the
rear view camera is not installed in
the rear center of the vehicle.
. The distance guide line and the
vehicle width guide line should be
used as a reference only when the
vehicle is on a level paved surface.
The distance viewed on the monitor
is for reference only and may be
different than the actual distance
between the vehicle and displayed
objects.
. When backing up the vehicle up a
hill, objects viewed in the monitor
are further than they appear. When
backing up the vehicle down a hill,
objects viewed in the monitor are
closer than they appear. Use the
inside mirror or glance over your
shoulder to properly judge dis-
tances to other objects.
The vehicle width and predictive course
lines are wider than the actual width and
course.
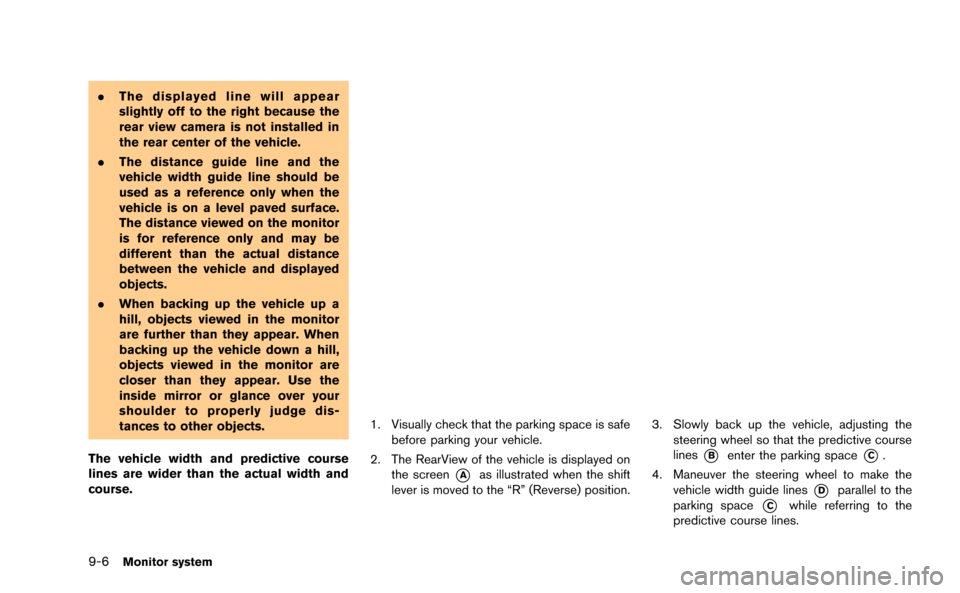
1. Visually check that the parking space is safe before parking your vehicle.
2. The RearView of the vehicle is displayed on the screen
*Aas illustrated when the shift
lever is moved to the “R” (Reverse) position.
3. Slowly back up the vehicle, adjusting the steering wheel so that the predictive course
lines
*Benter the parking space*C.
4. Maneuver the steering wheel to make the vehicle width guide lines
*Dparallel to the
parking space
*Cwhile referring to the
predictive course lines.
Page 256 of 298
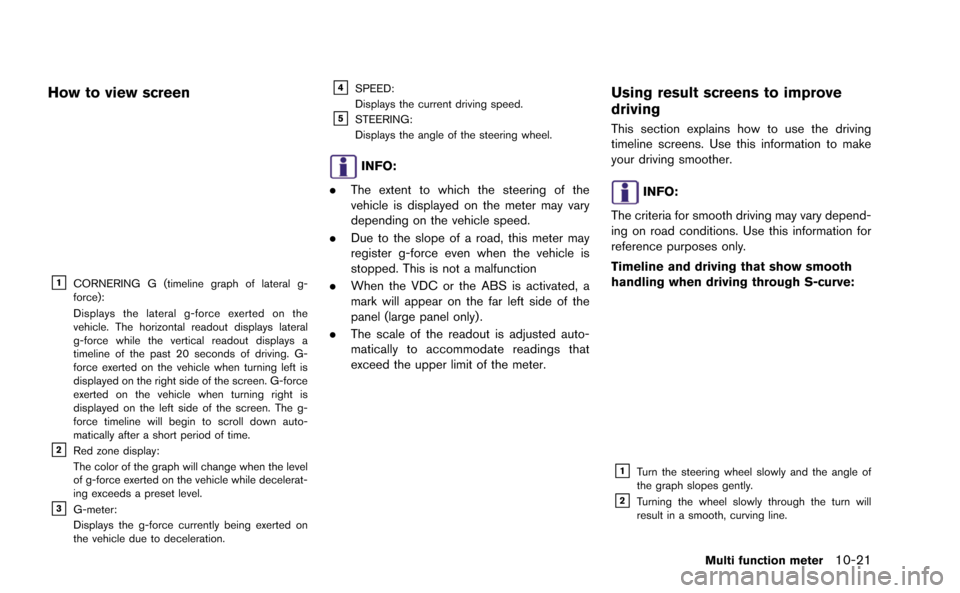
How to view screen
&1CORNERING G (timeline graph of lateral g-
force):
Displays the lateral g-force exerted on the
vehicle. The horizontal readout displays lateral
g-force while the vertical readout displays a
timeline of the past 20 seconds of driving. G-
force exerted on the vehicle when turning left is
displayed on the right side of the screen. G-force
exerted on the vehicle when turning right is
displayed on the left side of the screen. The g-
force timeline will begin to scroll down auto-
matically after a short period of time.
&2Red zone display:
The color of the graph will change when the level
of g-force exerted on the vehicle while decelerat-
ing exceeds a preset level.
&3G-meter:
Displays the g-force currently being exerted on
the vehicle due to deceleration.
&4SPEED:
Displays the current driving speed.
&5STEERING:
Displays the angle of the steering wheel.
INFO:
. The extent to which the steering of the
vehicle is displayed on the meter may vary
depending on the vehicle speed.
. Due to the slope of a road, this meter may
register g-force even when the vehicle is
stopped. This is not a malfunction
. When the VDC or the ABS is activated, a
mark will appear on the far left side of the
panel (large panel only) .
. The scale of the readout is adjusted auto-
matically to accommodate readings that
exceed the upper limit of the meter.
Using result screens to improve
driving
This section explains how to use the driving
timeline screens. Use this information to make
your driving smoother.
INFO:
The criteria for smooth driving may vary depend-
ing on road conditions. Use this information for
reference purposes only.
Timeline and driving that show smooth
handling when driving through S-curve:
&1Turn the steering wheel slowly and the angle of
the graph slopes gently.
&2Turning the wheel slowly through the turn will
result in a smooth, curving line.
Multi function meter10-21
Page 257 of 298
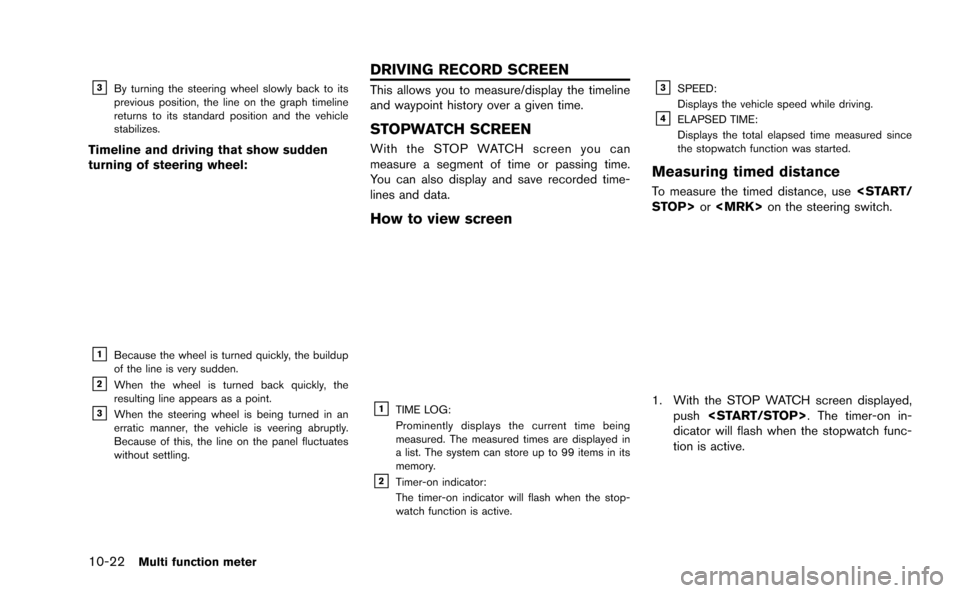
10-22Multi function meter
&3By turning the steering wheel slowly back to its
previous position, the line on the graph timeline
returns to its standard position and the vehicle
stabilizes.
Timeline and driving that show sudden
turning of steering wheel:
&1Because the wheel is turned quickly, the buildup
of the line is very sudden.
&2When the wheel is turned back quickly, the
resulting line appears as a point.
&3When the steering wheel is being turned in an
erratic manner, the vehicle is veering abruptly.
Because of this, the line on the panel fluctuates
without settling.
This allows you to measure/display the timeline
and waypoint history over a given time.
STOPWATCH SCREEN
With the STOP WATCH screen you can
measure a segment of time or passing time.
You can also display and save recorded time-
lines and data.
How to view screen
&1TIME LOG:
Prominently displays the current time being
measured. The measured times are displayed in
a list. The system can store up to 99 items in its
memory.
&2Timer-on indicator:
The timer-on indicator will flash when the stop-
watch function is active.
&3SPEED:
Displays the vehicle speed while driving.
&4ELAPSED TIME:
Displays the total elapsed time measured since
the stopwatch function was started.
Measuring timed distance
To measure the timed distance, use
1. With the STOP WATCH screen displayed,
push
dicator will flash when the stopwatch func-
tion is active.
DRIVING RECORD SCREEN
Page 291 of 298
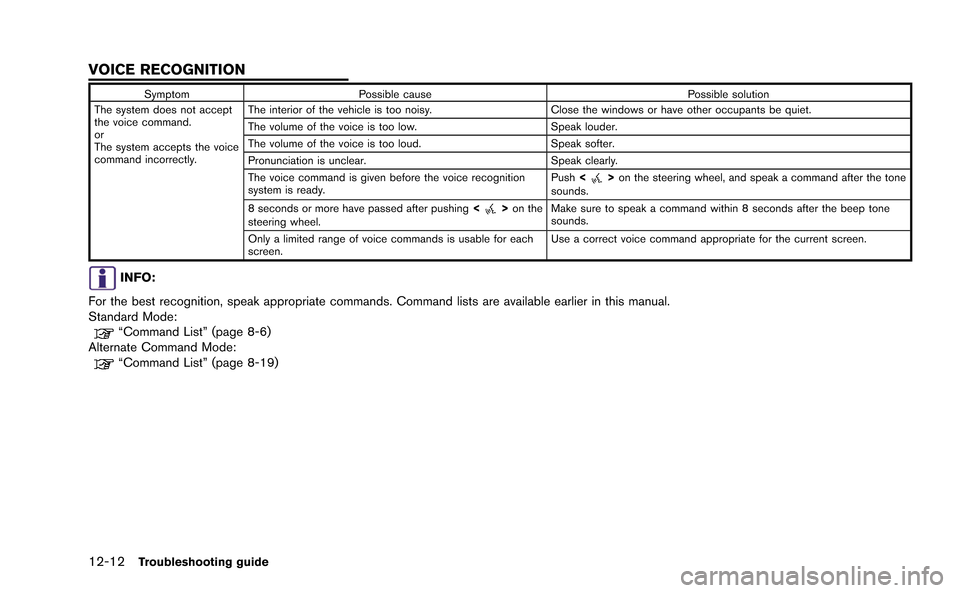
12-12Troubleshooting guide
SymptomPossible cause Possible solution
The system does not accept
the voice command.
or
The system accepts the voice
command incorrectly. The interior of the vehicle is too noisy.
Close the windows or have other occupants be quiet.
The volume of the voice is too low. Speak louder.
The volume of the voice is too loud. Speak softer.
Pronunciation is unclear. Speak clearly.
The voice command is given before the voice recognition
system is ready. Push
<
>on the steering wheel, and speak a command after the tone
sounds.
8 seconds or more have passed after pushing <
>on the
steering wheel. Make sure to speak a command within 8 seconds after the beep tone
sounds.
Only a limited range of voice commands is usable for each
screen. Use a correct voice command appropriate for the current screen.
INFO:
For the best recognition, speak appropriate commands. Command lists are available earlier in this manual.
Standard Mode:
“Command List” (page 8-6)
Alternate Command Mode:
“Command List” (page 8-19)
VOICE RECOGNITION