light NISSAN JUKE 2014 F15 / 1.G Owners Manual
[x] Cancel search | Manufacturer: NISSAN, Model Year: 2014, Model line: JUKE, Model: NISSAN JUKE 2014 F15 / 1.GPages: 402, PDF Size: 1.96 MB
Page 261 of 402
5-8Starting and driving
WARNING
The following actions can increase the
chance of losing control of the vehicle if
there is a sudden loss of tire air
pressure. Losing control of the vehicle
may cause a collision and result in
personal injury.
.The vehicle generally moves or pulls
in the direction of the flat tire.
. Do not rapidly apply the brakes.
. Do not rapidly release the accelera-
tor pedal.
. Do not rapidly turn the steering
wheel.
1. Remain calm and do not overreact.
2. Maintain a firm grip on the steering wheel with both hands and try to hold a straight
course.
3. When appropriate, slowly release the accel- erator pedal to gradually slow the vehicle.
4. Gradually steer the vehicle to a safe location off the road and away from traffic if possible.
5. Lightly apply the brake pedal to gradually stop the vehicle. 6. Turn on the hazard warning flashers and
either contact a roadside emergency service
to change the tire or see “Changing a flat
tire” (P.6-3) of this Owner’s Manual.
DRINKING ALCOHOL/DRUGS AND
DRIVING
WARNING
Never drive under the influence of
alcohol or drugs. Alcohol in the blood-
stream reduces coordination, delays
reaction time and impairs judgement.
Driving after drinking alcohol increases
the likelihood of being involved in an
accident injuring yourself and others.
Additionally, if you are injured in an
accident, alcohol can increase the se-
verity of the injury.
NISSAN is committed to safe driving. However,
you must choose not to drive under the influence
of alcohol. Every year thousands of people are
injured or killed in alcohol-related accidents.
Although the local laws vary on what is
considered to be legally intoxicated, the fact is
that alcohol affects all people differently and
most people underestimate the effects of
alcohol. Remember, drinking and driving don’t mix! And
that is true for drugs, too (over-the-counter,
prescription, and illegal drugs) . Don’t drive if
your ability to operate your vehicle is impaired by
alcohol, drugs, or some other physical condition.
DRIVING SAFETY PRECAUTIONS
Your NISSAN is designed for both normal and
off-road use. However, avoid driving in deep
water or mud as your NISSAN is mainly
designed for leisure use, unlike a conventional
off-road vehicle.
Remember that Two-Wheel Drive (2WD) mod-
els are less capable than All-Wheel Drive
(AWD) models for rough road driving and
extrication when stuck in deep snow, mud, or
the like.
Please observe the following precautions:
WARNING
.
Drive carefully when off the road
and avoid dangerous areas. Every
person who drives or rides in this
vehicle should be seated with their
seat belt fastened. This will keep
you and your passengers in position
when driving over rough terrain.
Page 262 of 402
.Do not drive across steep slopes.
Instead drive either straight up or
straight down the slopes. Off-road
vehicles can tip over sideways much
more easily than they can forward or
backward.
. Many hills are too steep for any
vehicle. If you drive up them, you
may stall. If you drive down them,
you may not be able to control your
speed. If you drive across them, you
may roll over.
. Do not shift ranges while driving on
downhill grades as this could cause
loss of control of the vehicle.
. Stay alert when driving to the top of
a hill. At the top there could be a
drop-off or other hazard that could
cause an accident.
. If your engine stalls or you cannot
make it to the top of a steep hill,
never attempt to turn around. Your
vehicle could tip or roll over. Always
back straight down in R (Reverse)
range. Never back down in N (Neu-
tral) , using only the brake, as this
could cause loss of control. .
Heavy braking going down a hill
could cause your brakes to overheat
and fade, resulting in loss of control
and an accident. Apply brakes
lightly and use a low range to
control your speed.
. Unsecured cargo can be thrown
around when driving over rough
terrain. Properly secure all cargo
so it will not be thrown forward
and cause injury to you or your
passengers.
. To avoid raising the center of gravity
excessively, do not exceed the rated
capacity of the roof rack (if so
equipped) and evenly distribute the
load. Secure heavy loads in the
cargo area as far forward and as
low as possible. Do not equip the
vehicle with tires larger than speci-
fied in this manual. This could cause
your vehicle to roll over.
. Do not grip the inside or spokes of
the steering wheel when driving off-
road. The steering wheel could
move suddenly and injure your
hands. Instead drive with your fin-
gers and thumbs on the outside of
the rim. .
Before operating the vehicle, ensure
that the driver and all passengers
have their seat belts fastened.
. Always drive with the floor mats in
place as the floor may became hot.
. Lower your speed when encounter-
ing strong crosswinds. With a higher
center of gravity, your NISSAN is
more affected by strong side winds.
Slower speeds ensure better vehicle
control.
. Do not drive beyond the perfor-
mance capability of the tires, even
with AWD engaged.
. For AWD equipped vehicles, do not
attempt to raise two wheels off the
ground and shift the transmission to
any drive or reverse position with
the engine running. Doing so may
result in drivetrain damage or un-
expected vehicle movement which
could result in serious vehicle da-
mage or personal injury.
. Do not attempt to test an AWD
equipped vehicle on a 2-wheel dy-
namometer (such as the dynam-
ometers used by some states for
emissions testing) , or similar equip-
Starting and driving5-9
Page 263 of 402
5-10Starting and driving
ment even if the other two wheels
are raised off the ground. Make sure
you inform test facility personnel
that your vehicle is equipped with
AWD before it is placed on a
dynamometer. Using the wrong test
equipment may result in drivetrain
damage or unexpected vehicle
movement which could result in
serious vehicle damage or personal
injury.
. When a wheel is off the ground due
to an unlevel surface, do not spin
the wheel excessively (AWD model) .
. Accelerating quickly, sharp steering
maneuvers or sudden braking may
cause loss of control.
. If at all possible, avoid sharp turning
maneuvers, particularly at high
speeds. Your vehicle has a higher
center of gravity than a conventional
passenger car. The vehicle is not
designed for cornering at the same
speeds as conventional passenger
cars. Failure to operate this vehicle
correctly could result in loss of
control and/or a rollover accident.
. Always use tires of the same type,
size, brand, construction (bias, bias- belted or radial) , and tread pattern
on all four wheels. Install traction
devices on the front wheels when
driving on slippery roads and drive
carefully.
. Be sure to check the brakes imme-
diately after driving in mud or water.
See “Brake system” (P.5-39) for wet
brakes.
. Avoid parking your vehicle on steep
hills. If you get out of the vehicle
and it rolls forward, backward or
sideways, you could be injured.
. Whenever you drive off-road
through sand, mud or water as deep
as the wheel hub, more frequent
maintenance may be required. See
the maintenance information in the
“NISSAN Service and Maintenance
Guide”.
. Spinning the front wheels on slip-
pery surfaces may cause the AWD
warning light to flash and the AWD
system to automatically switch from
the AWD mode to the 2WD mode.
This could reduce traction. Be espe-
cially careful when towing a trailer
(AWD model) .WARNING
Never remove or turn the key to the
LOCK position while driving. This may
cause the driver to lose control of the
vehicle and could result in serious
vehicle damage or personal injury.
IGNITION SWITCH (models without
Intelligent Key system)
Page 264 of 402
SSD0392
CONTINUOUSLY VARIABLE TRANS-
MISSION (CVT)
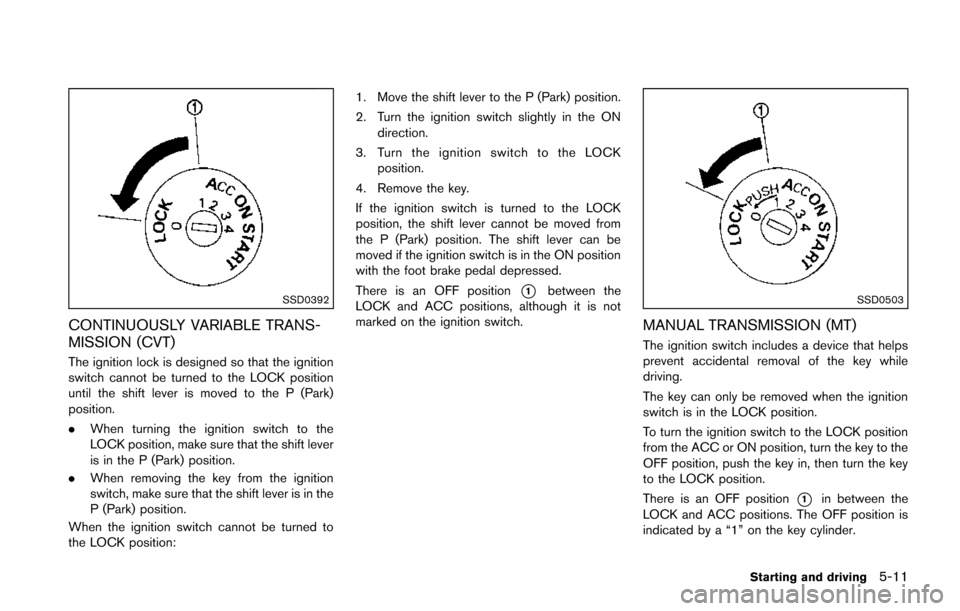
The ignition lock is designed so that the ignition
switch cannot be turned to the LOCK position
until the shift lever is moved to the P (Park)
position.
.When turning the ignition switch to the
LOCK position, make sure that the shift lever
is in the P (Park) position.
. When removing the key from the ignition
switch, make sure that the shift lever is in the
P (Park) position.
When the ignition switch cannot be turned to
the LOCK position: 1. Move the shift lever to the P (Park) position.
2. Turn the ignition switch slightly in the ON
direction.
3. Turn the ignition switch to the LOCK position.
4. Remove the key.
If the ignition switch is turned to the LOCK
position, the shift lever cannot be moved from
the P (Park) position. The shift lever can be
moved if the ignition switch is in the ON position
with the foot brake pedal depressed.
There is an OFF position
*1between the
LOCK and ACC positions, although it is not
marked on the ignition switch.SSD0503
MANUAL TRANSMISSION (MT)
The ignition switch includes a device that helps
prevent accidental removal of the key while
driving.
The key can only be removed when the ignition
switch is in the LOCK position.
To turn the ignition switch to the LOCK position
from the ACC or ON position, turn the key to the
OFF position, push the key in, then turn the key
to the LOCK position.
There is an OFF position
*1in between the
LOCK and ACC positions. The OFF position is
indicated by a “1” on the key cylinder.
Starting and driving5-11
Page 266 of 402
.The cargo room area is not included in the
operating range but the Intelligent Key may
function.
. If the Intelligent Key is placed on the
instrument panel, inside the glove box or
door pocket, the Intelligent Key may not
function.
. If the Intelligent Key is placed near the door
or window outside the vehicle, the Intelligent
Key may function.
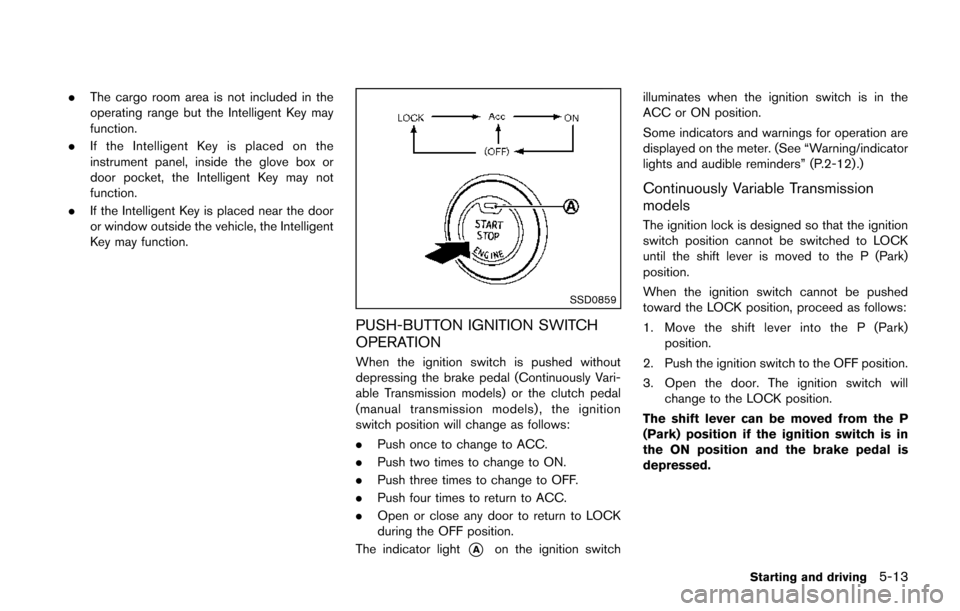
SSD0859
PUSH-BUTTON IGNITION SWITCH
OPERATION
When the ignition switch is pushed without
depressing the brake pedal (Continuously Vari-
able Transmission models) or the clutch pedal
(manual transmission models), the ignition
switch position will change as follows:
.Push once to change to ACC.
. Push two times to change to ON.
. Push three times to change to OFF.
. Push four times to return to ACC.
. Open or close any door to return to LOCK
during the OFF position.
The indicator light
*Aon the ignition switch illuminates when the ignition switch is in the
ACC or ON position.
Some indicators and warnings for operation are
displayed on the meter. (See “Warning/indicator
lights and audible reminders” (P.2-12) .)
Continuously Variable Transmission
models
The ignition lock is designed so that the ignition
switch position cannot be switched to LOCK
until the shift lever is moved to the P (Park)
position.
When the ignition switch cannot be pushed
toward the LOCK position, proceed as follows:
1. Move the shift lever into the P (Park)
position.
2. Push the ignition switch to the OFF position.
3. Open the door. The ignition switch will change to the LOCK position.
The shift lever can be moved from the P
(Park) position if the ignition switch is in
the ON position and the brake pedal is
depressed.
Starting and driving5-13
Page 268 of 402
4. Push the ignition switch while depressingthe brake pedal within 10 seconds after the
chime sounds. The engine will start.
After step 3 is performed, when the ignition
switch is pushed without depressing the brake
pedal, the ignition switch position will change to
ACC.
NOTE:
. When the ignition switch is pushed to
the ACC or ON position or the engine is
started by the above procedures, the
Intelligent Key system warning light
may blink in yellow even if the Intelli-
gent Key is inside the vehicle. This is
not a malfunction. To stop the warning
light from blinking, touch the ignition
switch with the Intelligent Key again.
. If the Intelligent Key system warning
light in the meter is blinking in green,
replace the battery as soon as possible.
(See “Key battery replacement” (P.8-
22) .) .
Make sure the area around the vehicle is
clear.
. Check fluid levels such as engine oil, cool-
ant, brake fluid, and window washer fluid as
frequently as possible, or at least whenever
you refuel.
. Check that all windows and lights are clean.
. Visually inspect tires for their appearance
and condition. Also check tires for proper
inflation.
. Lock all doors.
. Position seat and adjust head restraints.
. Adjust inside and outside mirrors.
. Fasten seat belts and ask all passengers to
do likewise.
. Check the operation of warning lights when
the ignition switch is placed in the ON
position. (See “Warning/indicator lights and
audible reminders” (P.2-12) .)MODELS WITHOUT INTELLIGENT KEY
SYSTEM
1. Apply the parking brake.
2.Continuously Variable Transmission
(CVT) models:
Move the shift lever to the P (Park) or N
(Neutral) position. (P is recommended.)
The starter is designed so that it does not
operate unless the shift lever is in either of
the above positions.
Manual Transmission (MT) models:
Move the shift lever to the N (Neutral)
position. Depress the clutch pedal fully to
the floor.
The starter is designed not to operate unless
the clutch pedal is fully depressed.
3. Crank the engine with your foot off the
accelerator pedal by turning the ignition
switch to START. Release the switch when
the engine starts. If the engine starts, but
fails to run, repeat the above procedure.
.If the engine is very hard to start in
extremely cold weather or when restart-
ing, depress the accelerator pedal a little
(approximately 1/3 to the floor) and hold
it and then crank the engine. Release the
accelerator pedal when the engine starts.
Starting and driving5-15
BEFORE STARTING THE ENGINE STARTING THE ENGINE
Page 274 of 402
M1 (1st):
Use this position when climbing steep hills
slowly or driving slowly through deep snow,
sand or mud, or for maximum engine braking on
steep downhill grades.
.Remember not to drive at high speeds for
extended periods of time in lower than M6
(except for NISMO and NISMO RS models) ,
M7 (NISMO models) or M8 (NISMO RS
models) range. This reduces fuel economy.
. In the manual shift mode, the transmis-
sion may not shift to the selected
range. This helps maintain driving per-
formance and reduces the chance of
vehicle damage or loss of control.
When this situation occurs, the Con-
tinuously Variable Transmission (CVT)
position indicator light will blink and
the chime will sound.
. In the manual shift mode, the transmis-
sion automatically shifts down to 1st
gear before the vehicle comes to a
stop. When accelerating again, it is
necessary to shift up to the desired
range.
. When the CVT fluid temperature is extre-
mely low, the manual shift mode may not
work and automatically shift as a drive mode.
This is not a malfunction. In this case, return the shift lever to the D position and drive for
a while and then shift to the manual shift
mode.
. When the CVT fluid temperature is high, the
shift range may upshift at a lower engine
speed than usual. This is not a malfunction.
Accelerator downshift — In D position —
For passing or hill climbing, fully depress the
accelerator pedal to the floor. This shifts the
transmission down into a lower gear, depending
on the vehicle speed.
High fluid temperature protection mode
This transmission has a high fluid temperature
protection mode. If the fluid temperature be-
comes too high (for example, when climbing
steep grades in high temperature with heavy
loads), engine power and, under some condi-
tions, vehicle speed will be decreased auto-
matically to reduce the chance of transmission
damage. Vehicle speed can be controlled with
the accelerator pedal, but the engine and vehicle
speed may be limited.
Fail-safe
If the vehicle is driven under extreme
conditions, such as excessive wheel spin-
ning and subsequent hard braking, the
fail-safe system may be activated. The MIL
may illuminate to indicate the fail-safe
mode is activated. (See “Malfunction In-
dicator Light (MIL)” (P.2-18) .) This will
occur even if all electrical circuits are
functioning properly. In this case, place
the ignition switch in the OFF position and
wait for 10 seconds. Then turn the switch
back to the ON position. The vehicle
should return to its normal operating
condition. If it does not return to its normal
operating condition, have a NISSAN dealer
check the transmission and repair if ne-
cessary.
WARNING
When the high fluid temperature pro-
tection mode or fail-safe operation
occurs, vehicle speed may be gradually
reduced. The reduced speed may be
lower than other traffic, which could
increase the chance of a collision. Be
especially careful when driving. If ne-
cessary, pull to the side of the road at a
Starting and driving5-21
Page 275 of 402
5-22Starting and driving
safe place and allow the transmission
to return to normal operation, or have it
repaired if necessary.
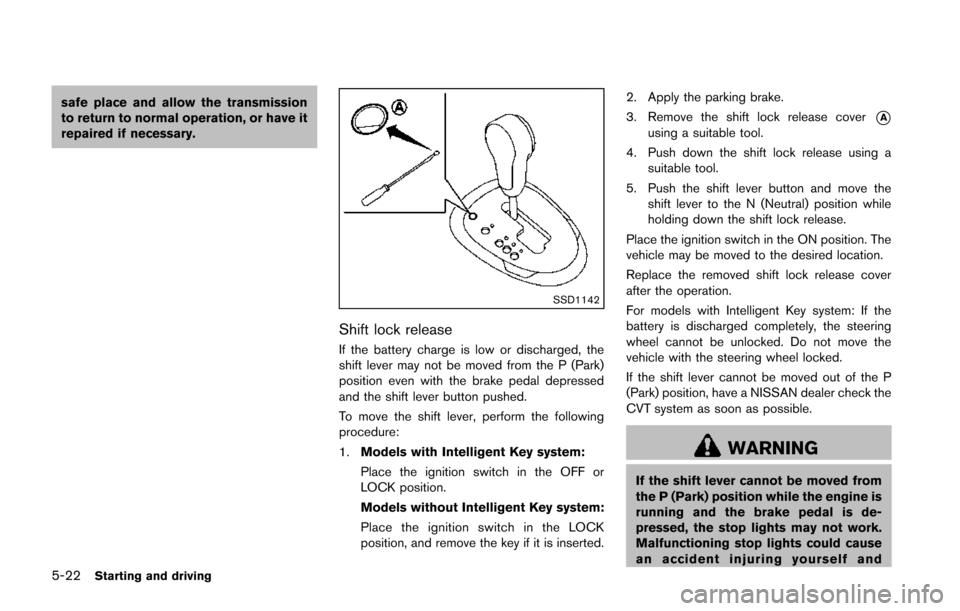
SSD1142
Shift lock release
If the battery charge is low or discharged, the
shift lever may not be moved from the P (Park)
position even with the brake pedal depressed
and the shift lever button pushed.
To move the shift lever, perform the following
procedure:
1.Models with Intelligent Key system:
Place the ignition switch in the OFF or
LOCK position.
Models without Intelligent Key system:
Place the ignition switch in the LOCK
position, and remove the key if it is inserted. 2. Apply the parking brake.
3. Remove the shift lock release cover
*Ausing a suitable tool.
4. Push down the shift lock release using a suitable tool.
5. Push the shift lever button and move the shift lever to the N (Neutral) position while
holding down the shift lock release.
Place the ignition switch in the ON position. The
vehicle may be moved to the desired location.
Replace the removed shift lock release cover
after the operation.
For models with Intelligent Key system: If the
battery is discharged completely, the steering
wheel cannot be unlocked. Do not move the
vehicle with the steering wheel locked.
If the shift lever cannot be moved out of the P
(Park) position, have a NISSAN dealer check the
CVT system as soon as possible.
WARNING
If the shift lever cannot be moved from
the P (Park) position while the engine is
running and the brake pedal is de-
pressed, the stop lights may not work.
Malfunctioning stop lights could cause
an accident injuring yourself and
Page 276 of 402
others.
MANUAL TRANSMISSION (MT)
WARNING
.Do not downshift abruptly on slip-
pery roads. This may cause a loss of
control.
. Do not over-rev the engine when
shifting to a lower gear. This may
cause a loss of control or engine
damage.
. When the high fluid temperature
protection mode or fail-safe opera-
tion occurs, vehicle speed may be
gradually reduced. The reduced
speed may be lower than other
traffic, which could increase the
chance of a collision. Be especially
careful when driving. If necessary,
pull to the side of the road at a safe
place and allow the transmission to
return to normal operation, or have
it repaired if necessary.
CAUTION
.Do not rest your foot on the clutch
pedal while driving. This may da-
mage the clutch.
. Fully depress the clutch pedal be-
fore shifting to help prevent trans-
mission damage.
. Stop your vehicle completely before
shifting into R (Reverse) .
. When the vehicle is stopped for a
period of time, for example at a stop
light, shift to N (Neutral) and release
the clutch pedal with the foot brake
applied.
SSD0552
Shifting
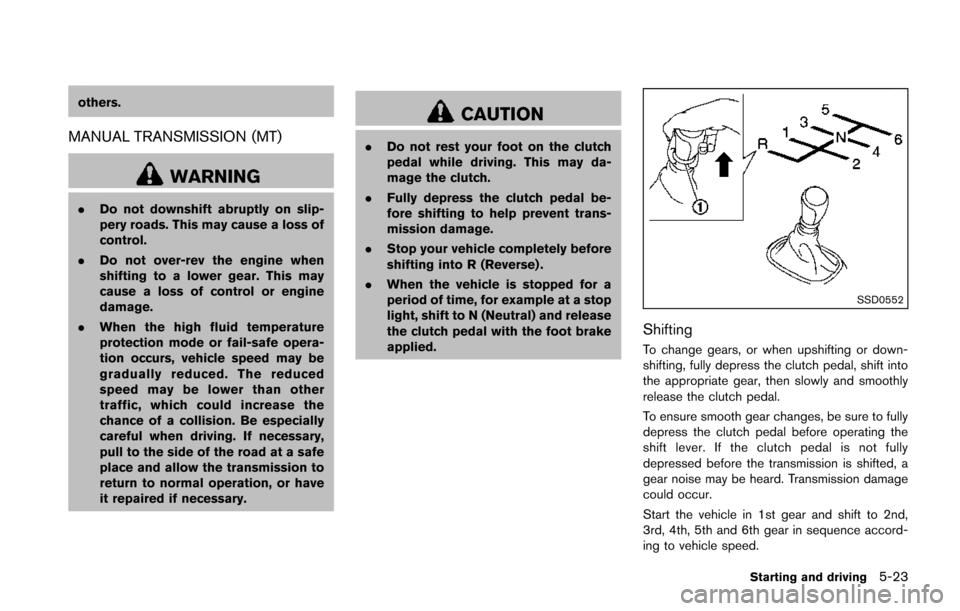
To change gears, or when upshifting or down-
shifting, fully depress the clutch pedal, shift into
the appropriate gear, then slowly and smoothly
release the clutch pedal.
To ensure smooth gear changes, be sure to fully
depress the clutch pedal before operating the
shift lever. If the clutch pedal is not fully
depressed before the transmission is shifted, a
gear noise may be heard. Transmission damage
could occur.
Start the vehicle in 1st gear and shift to 2nd,
3rd, 4th, 5th and 6th gear in sequence accord-
ing to vehicle speed.
Starting and driving5-23
Page 282 of 402
screen.
WARNING
.Be sure the parking brake is fully
released before driving. Failure to
do so can cause brake failure and
lead to an accident.
. Do not release the parking brake
from outside the vehicle.
. Do not use the shift lever in place of
the parking brake. When parking, be
sure the parking brake is fully
engaged.
. Do not leave children unattended in
a vehicle. They could release the
parking brake and cause an acci-
dent.
SPA2110
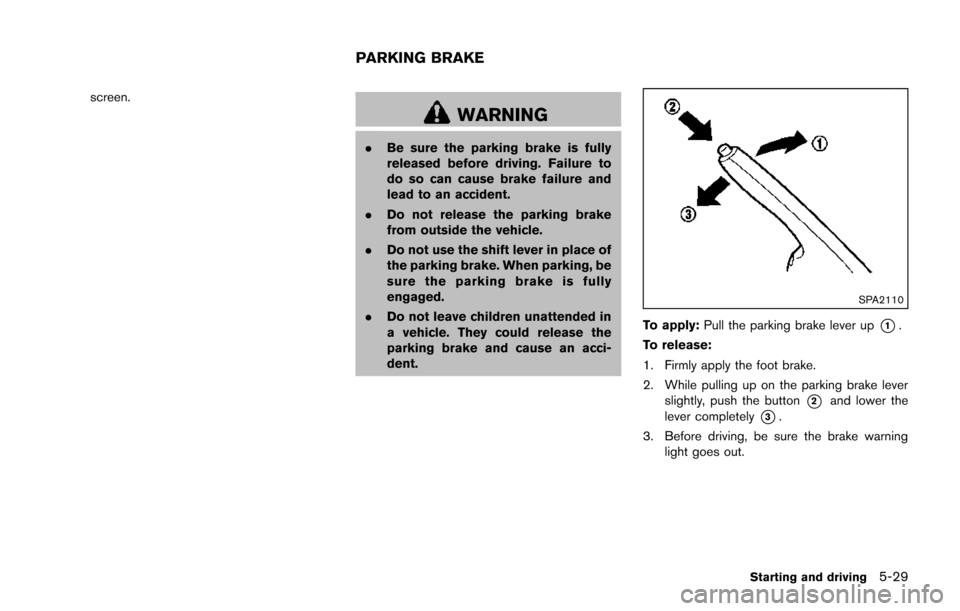
To apply: Pull the parking brake lever up*1.
To release:
1. Firmly apply the foot brake.
2. While pulling up on the parking brake lever slightly, push the button
*2and lower the
lever completely
*3.
3. Before driving, be sure the brake warning light goes out.
Starting and driving5-29
PARKING BRAKE