door lock NISSAN JUKE 2014 F15 / 1.G Owner's Guide
[x] Cancel search | Manufacturer: NISSAN, Model Year: 2014, Model line: JUKE, Model: NISSAN JUKE 2014 F15 / 1.GPages: 402, PDF Size: 1.96 MB
Page 144 of 402
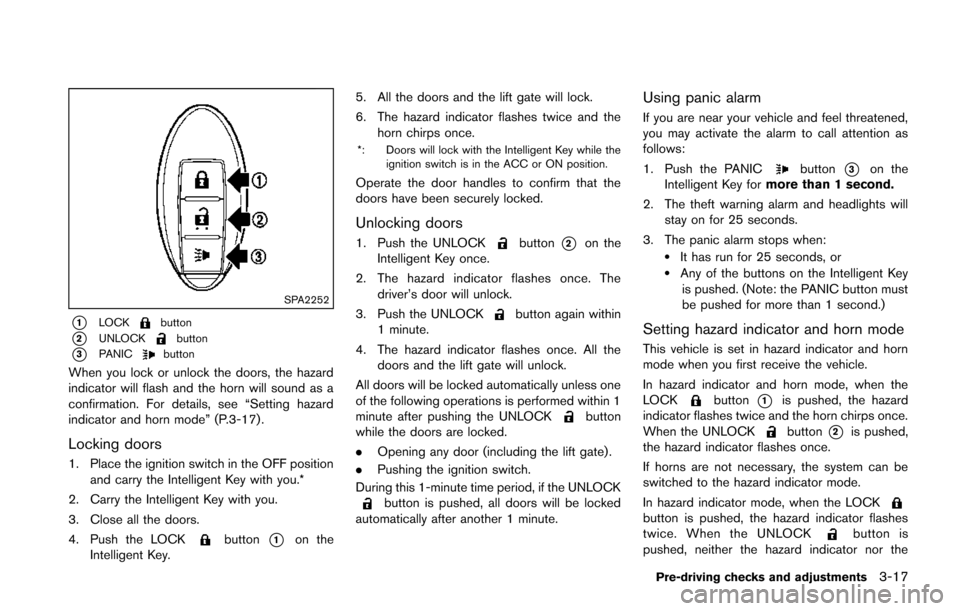
SPA2252
*1LOCKbutton
*2UNLOCKbutton
*3PANICbutton
When you lock or unlock the doors, the hazard
indicator will flash and the horn will sound as a
confirmation. For details, see “Setting hazard
indicator and horn mode” (P.3-17) .
Locking doors
1. Place the ignition switch in the OFF positionand carry the Intelligent Key with you.*
2. Carry the Intelligent Key with you.
3. Close all the doors.
4. Push the LOCK
button*1on the
Intelligent Key. 5. All the doors and the lift gate will lock.
6. The hazard indicator flashes twice and the
horn chirps once.
*: Doors will lock with the Intelligent Key while the
ignition switch is in the ACC or ON position.
Operate the door handles to confirm that the
doors have been securely locked.
Unlocking doors
1. Push the UNLOCKbutton*2on the
Intelligent Key once.
2. The hazard indicator flashes once. The driver’s door will unlock.
3. Push the UNLOCK
button again within
1 minute.
4. The hazard indicator flashes once. All the doors and the lift gate will unlock.
All doors will be locked automatically unless one
of the following operations is performed within 1
minute after pushing the UNLOCK
button
while the doors are locked.
. Opening any door (including the lift gate) .
. Pushing the ignition switch.
During this 1-minute time period, if the UNLOCK
button is pushed, all doors will be locked
automatically after another 1 minute.
Using panic alarm
If you are near your vehicle and feel threatened,
you may activate the alarm to call attention as
follows:
1. Push the PANIC
button*3on the
Intelligent Key for more than 1 second.
2. The theft warning alarm and headlights will stay on for 25 seconds.
3. The panic alarm stops when:
.It has run for 25 seconds, or.Any of the buttons on the Intelligent Key is pushed. (Note: the PANIC button must
be pushed for more than 1 second.)
Setting hazard indicator and horn mode
This vehicle is set in hazard indicator and horn
mode when you first receive the vehicle.
In hazard indicator and horn mode, when the
LOCK
button*1is pushed, the hazard
indicator flashes twice and the horn chirps once.
When the UNLOCK
button*2is pushed,
the hazard indicator flashes once.
If horns are not necessary, the system can be
switched to the hazard indicator mode.
In hazard indicator mode, when the LOCK
button is pushed, the hazard indicator flashes
twice. When the UNLOCKbutton is
pushed, neither the hazard indicator nor the
Pre-driving checks and adjustments3-17
Page 145 of 402
3-18Pre-driving checks and adjustments
horn operates.Hazard indicator and horn mode:
Operation
DOOR LOCKDOOR UNLOCK
Pushing door handle request switch or lift gate request switch HAZARD -
twice
OUTSIDE CHIME - twiceHAZARD -
once
OUTSIDE CHIME - once
Pushing
orbutton HAZARD -
twice
HORN - once HAZARD -
once
HORN - none
Hazard indicator mode:
Operation DOOR LOCKDOOR UNLOCK
Pushing door handle request switch or lift gate request switch HAZARD -
twice
OUTSIDE CHIME - none HAZARD - none
OUTSIDE CHIME - none
Pushing
orbutton HAZARD -
twice
HORN - none HAZARD - none
HORN - none
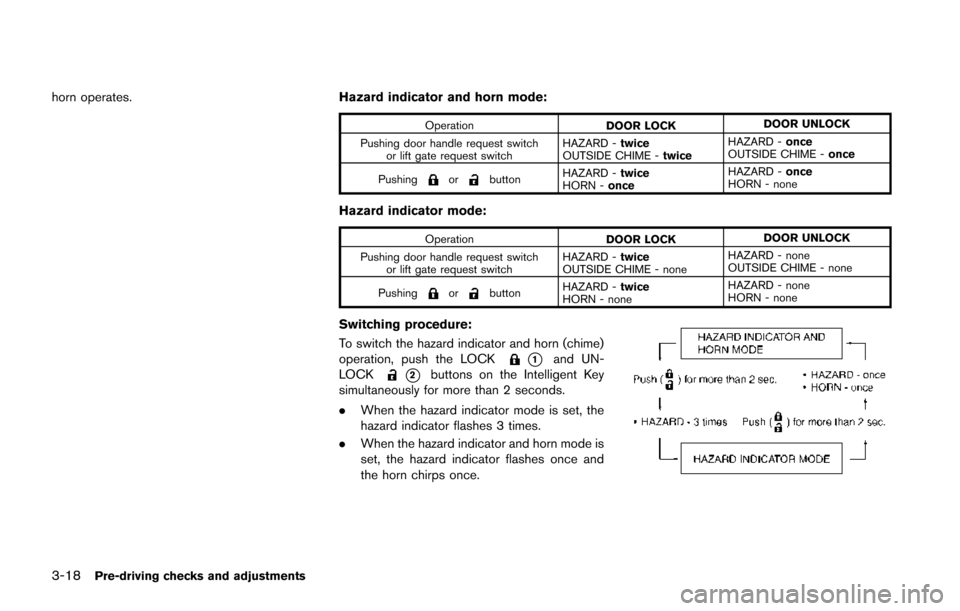
Switching procedure:
To switch the hazard indicator and horn (chime)
operation, push the LOCK
*1and UN-
LOCK
*2buttons on the Intelligent Key
simultaneously for more than 2 seconds.
. When the hazard indicator mode is set, the
hazard indicator flashes 3 times.
. When the hazard indicator and horn mode is
set, the hazard indicator flashes once and
the horn chirps once.
Page 147 of 402
3-20Pre-driving checks and adjustments
WARNING
.Always be sure the lift gate has
been closed securely to prevent it
from opening while driving.
. Do not drive with the lift gate open.
This could allow dangerous exhaust
gases to be drawn into the vehicle.
See “Exhaust gas (carbon monox-
ide)” (P.5-3) of this manual.
. Do not leave children unattended
inside the vehicle. They could un-
knowingly activate switches or con-
trols. Unattended children could
become involved in serious acci-
dents.
. Make sure that all passengers have
their hands, etc. inside the vehicle
before closing the lift gate.
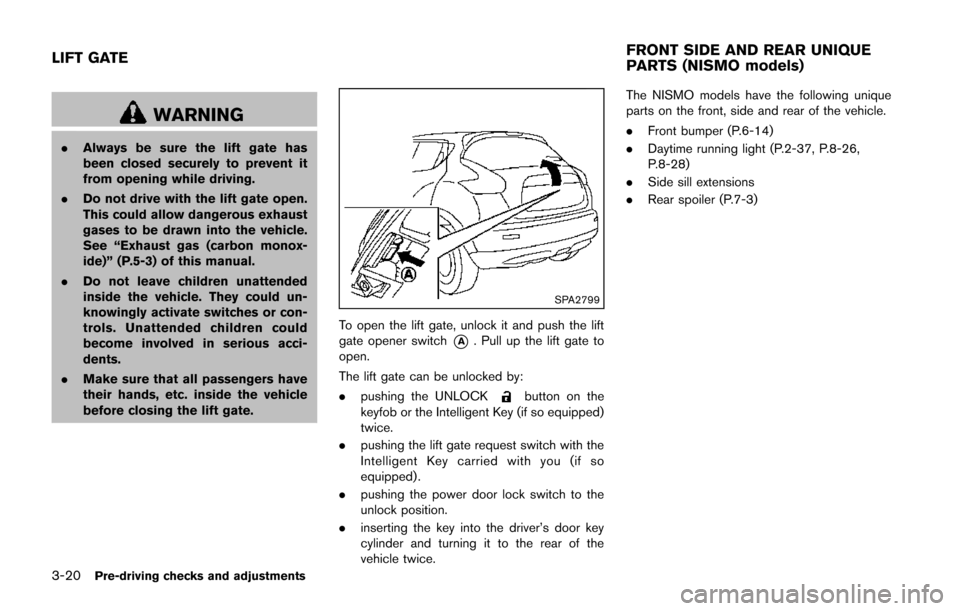
SPA2799
To open the lift gate, unlock it and push the lift
gate opener switch
*A. Pull up the lift gate to
open.
The lift gate can be unlocked by:
. pushing the UNLOCK
button on the
keyfob or the Intelligent Key (if so equipped)
twice.
. pushing the lift gate request switch with the
Intelligent Key carried with you (if so
equipped) .
. pushing the power door lock switch to the
unlock position.
. inserting the key into the driver’s door key
cylinder and turning it to the rear of the
vehicle twice. The NISMO models have the following unique
parts on the front, side and rear of the vehicle.
.
Front bumper (P.6-14)
. Daytime running light (P.2-37, P.8-26,
P.8-28)
. Side sill extensions
. Rear spoiler (P.7-3)
LIFT GATE FRONT SIDE AND REAR UNIQUE
PARTS (NISMO models)
Page 148 of 402
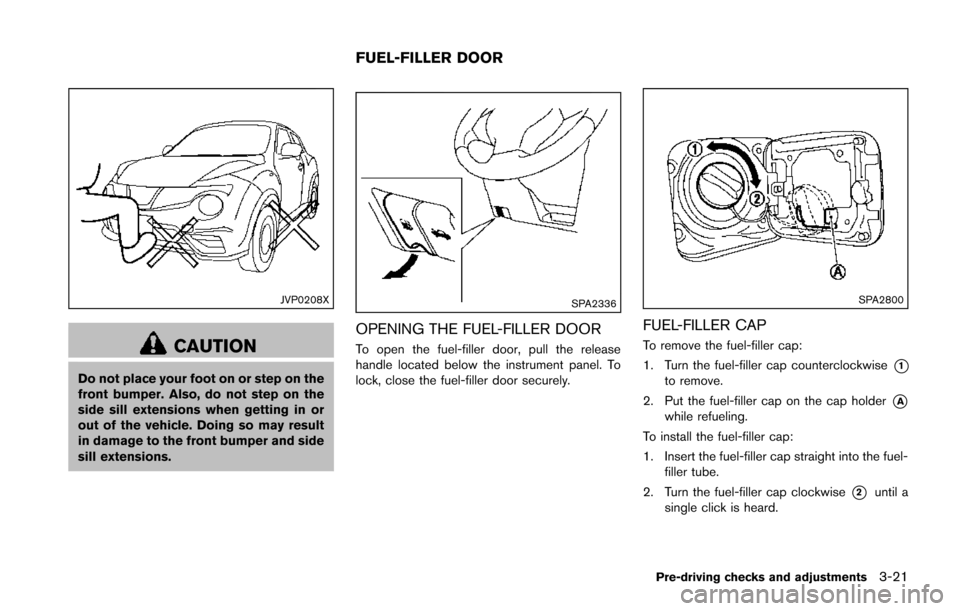
JVP0208X
CAUTION
Do not place your foot on or step on the
front bumper. Also, do not step on the
side sill extensions when getting in or
out of the vehicle. Doing so may result
in damage to the front bumper and side
sill extensions.
SPA2336
OPENING THE FUEL-FILLER DOOR
To open the fuel-filler door, pull the release
handle located below the instrument panel. To
lock, close the fuel-filler door securely.
SPA2800
FUEL-FILLER CAP
To remove the fuel-filler cap:
1. Turn the fuel-filler cap counterclockwise
*1to remove.
2. Put the fuel-filler cap on the cap holder
*Awhile refueling.
To install the fuel-filler cap:
1. Insert the fuel-filler cap straight into the fuel- filler tube.
2. Turn the fuel-filler cap clockwise
*2until a
single click is heard.
Pre-driving checks and adjustments3-21
FUEL-FILLER DOOR
Page 237 of 402
4-82Heater, air conditioner, audio and phone systems
SPEAKER ADAPTATION (SA) MODE
Speaker Adaptation allows up to two out-of
dialect users to train the system to improve
recognition accuracy. By repeating a number of
commands, the users can create a voice model
of their own voice that is stored in the system.
The system is capable of storing a different
speaker adaptation model for each connected
phone.
Training procedure
1. Position the vehicle in a reasonably quietoutdoor location.
2. Sit in the driver’s seat with the engine running, the parking brake on, and the
transmission in Park.
3. Push and hold the
button for more than
5 seconds.
4. The system announces: “Push the PHONE SEND (
) button for the hands-free
phone system to enter the speaker adapta-
tion mode or push the PHONE END (
)
button to select a different language.”
5. Push the
button.
For information on selecting a different
language, see “Choosing a language” (P.4-
76). 6. If the connected phone is already in use, the
system will prompt you to overwrite. Follow
the instructions provided by the system.
7. When preparation is complete and you are ready to begin, push the
button.
8. The SA mode will be explained. Follow the instructions provided by the system.
9. When training is finished, the system will tell you an adequate number of phrases have
been recorded.
10. The system will announce that speaker adaptation has been completed and the
system is ready.
The SA mode will stop if:
. The
button is pushed for more than 5
seconds in SA mode.
. The vehicle is driven during SA mode.
. The ignition switch is turned to the OFF or
LOCK position.
Training phrases
During the SA mode, the system instructs you to
say the following phrases.
(The system will prompt you for each phrase.)
. phonebook transfer entry
. dial 30429 .
delete call back number
. incoming
. transfer entry
. 8 pause 9 3 2 pause 7
. delete all entries
. call 7 2409
. phonebook delete entry
. next entry
. dial star 2170
. yes
. no
. select
. missed
. dial 85692
. Bluetooth on
. Outgoing
. call 3 1902
. 9 7 pause pause 3 0 8
. cancel
. call back number
. call star 2095
. delete phone
. dial 83051
. Record name
. 4 3 pause 2 9 pause 0
Page 255 of 402

Freeing a frozen door lock ............................................. 5-43
Anti-freeze ........................................................................\
.. 5-43
Battery ........................................................................\
......... 5-43
Draining of coolant water ............................................... 5-43 Tire equipment ................................................................ 5-43
Special winter equipment ............................................ 5-43
Driving on snow or ice ................................................. 5-43
Engine block heater (if so equipped) ....................... 5-44
Page 266 of 402
.The cargo room area is not included in the
operating range but the Intelligent Key may
function.
. If the Intelligent Key is placed on the
instrument panel, inside the glove box or
door pocket, the Intelligent Key may not
function.
. If the Intelligent Key is placed near the door
or window outside the vehicle, the Intelligent
Key may function.
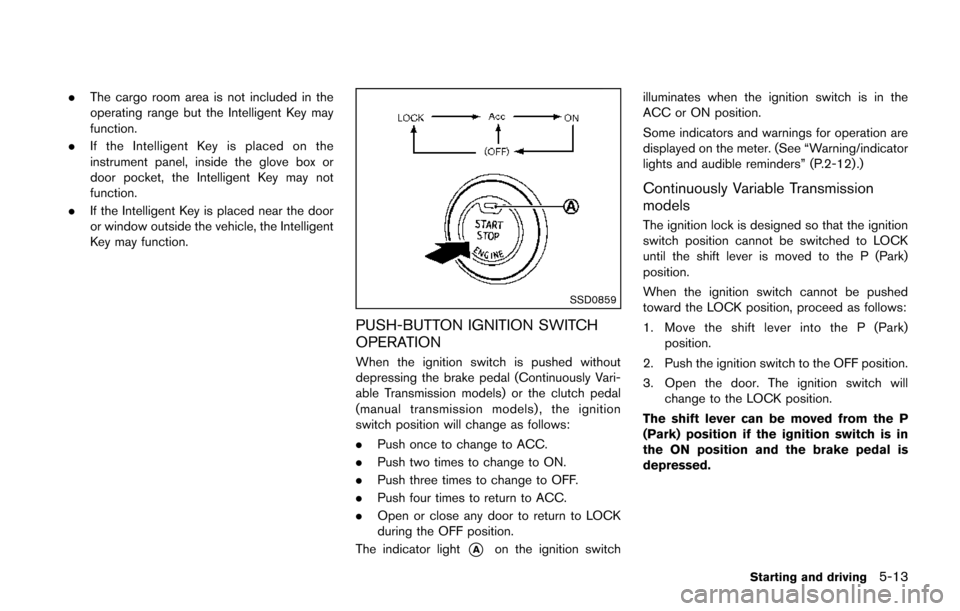
SSD0859
PUSH-BUTTON IGNITION SWITCH
OPERATION
When the ignition switch is pushed without
depressing the brake pedal (Continuously Vari-
able Transmission models) or the clutch pedal
(manual transmission models), the ignition
switch position will change as follows:
.Push once to change to ACC.
. Push two times to change to ON.
. Push three times to change to OFF.
. Push four times to return to ACC.
. Open or close any door to return to LOCK
during the OFF position.
The indicator light
*Aon the ignition switch illuminates when the ignition switch is in the
ACC or ON position.
Some indicators and warnings for operation are
displayed on the meter. (See “Warning/indicator
lights and audible reminders” (P.2-12) .)
Continuously Variable Transmission
models
The ignition lock is designed so that the ignition
switch position cannot be switched to LOCK
until the shift lever is moved to the P (Park)
position.
When the ignition switch cannot be pushed
toward the LOCK position, proceed as follows:
1. Move the shift lever into the P (Park)
position.
2. Push the ignition switch to the OFF position.
3. Open the door. The ignition switch will change to the LOCK position.
The shift lever can be moved from the P
(Park) position if the ignition switch is in
the ON position and the brake pedal is
depressed.
Starting and driving5-13
Page 268 of 402
4. Push the ignition switch while depressingthe brake pedal within 10 seconds after the
chime sounds. The engine will start.
After step 3 is performed, when the ignition
switch is pushed without depressing the brake
pedal, the ignition switch position will change to
ACC.
NOTE:
. When the ignition switch is pushed to
the ACC or ON position or the engine is
started by the above procedures, the
Intelligent Key system warning light
may blink in yellow even if the Intelli-
gent Key is inside the vehicle. This is
not a malfunction. To stop the warning
light from blinking, touch the ignition
switch with the Intelligent Key again.
. If the Intelligent Key system warning
light in the meter is blinking in green,
replace the battery as soon as possible.
(See “Key battery replacement” (P.8-
22) .) .
Make sure the area around the vehicle is
clear.
. Check fluid levels such as engine oil, cool-
ant, brake fluid, and window washer fluid as
frequently as possible, or at least whenever
you refuel.
. Check that all windows and lights are clean.
. Visually inspect tires for their appearance
and condition. Also check tires for proper
inflation.
. Lock all doors.
. Position seat and adjust head restraints.
. Adjust inside and outside mirrors.
. Fasten seat belts and ask all passengers to
do likewise.
. Check the operation of warning lights when
the ignition switch is placed in the ON
position. (See “Warning/indicator lights and
audible reminders” (P.2-12) .)MODELS WITHOUT INTELLIGENT KEY
SYSTEM
1. Apply the parking brake.
2.Continuously Variable Transmission
(CVT) models:
Move the shift lever to the P (Park) or N
(Neutral) position. (P is recommended.)
The starter is designed so that it does not
operate unless the shift lever is in either of
the above positions.
Manual Transmission (MT) models:
Move the shift lever to the N (Neutral)
position. Depress the clutch pedal fully to
the floor.
The starter is designed not to operate unless
the clutch pedal is fully depressed.
3. Crank the engine with your foot off the
accelerator pedal by turning the ignition
switch to START. Release the switch when
the engine starts. If the engine starts, but
fails to run, repeat the above procedure.
.If the engine is very hard to start in
extremely cold weather or when restart-
ing, depress the accelerator pedal a little
(approximately 1/3 to the floor) and hold
it and then crank the engine. Release the
accelerator pedal when the engine starts.
Starting and driving5-15
BEFORE STARTING THE ENGINE STARTING THE ENGINE
Page 296 of 402
FREEING A FROZEN DOOR LOCK
To prevent a door lock from freezing, apply
deicer through the key hole. If the lock becomes
frozen, heat the key before inserting it into the
key hole or use the remote keyless entry keyfob.
ANTI-FREEZE
In the winter when it is anticipated that the
outside temperature will drop below 328F(08C) ,
check the anti-freeze to assure proper winter
protection. For additional information, see “En-
gine cooling system” (P.8-7) .
BATTERY
If the battery is not fully charged during
extremely cold weather conditions, the battery
fluid may freeze and damage the battery. To
maintain maximum efficiency, the battery should
be checked regularly. For additional information,
see “Battery” (P.8-13) .
DRAINING OF COOLANT WATER
If the vehicle is to be left outside without anti-
freeze, drain the cooling system, including the
engine block. Refill before operating the vehicle.
For details, see “Engine cooling system” (P.8-7) .
TIRE EQUIPMENT
SUMMER tires have a tread designed to provide
superior performance on dry pavement. How-
ever, the performance of these tires will be
substantially reduced in snowy and icy condi-
tions. If you operate your vehicle on snowy or icy
roads, NISSAN recommends the use of MUD &
SNOW or ALL SEASON tires on all four wheels.
Consult a NISSAN dealer for the tire type, size,
speed rating and availability information.
For additional traction on icy roads, studded
tires may be used. However, some U.S. states
and Canadian provinces prohibit their use.
Check local, state and provincial laws before
installing studded tires.
Skid and traction capabilities of studded
snow tires, on wet or dry surfaces, may be
poorer than that of non-studded snow
tires.
Tire chains may be used. For details, see “Tire
chains” (P.8-38) of this manual.
All-Wheel Drive (AWD) model
If you install snow tires, they must also be the
same size, brand, construction and tread pattern
on all four wheels.
SPECIAL WINTER EQUIPMENT
It is recommended that the following items be
carried in the vehicle during winter:
. A scraper and stiff-bristled brush to remove
ice and snow from the windows and wiper
blades.
. A sturdy, flat board to be placed under the
jack to give it firm support.
. A shovel to dig the vehicle out of snow-
drifts.
. Extra window washer fluid to refill the
reservoir tank.
DRIVING ON SNOW OR ICE
WARNING
. Wet ice (328F, 0 8C and freezing rain) ,
very cold snow or ice can be slick
and very hard to drive on. The
vehicle will have much less traction
or “grip” under these conditions. Try
to avoid driving on wet ice until the
road is salted or sanded.
. Whatever the condition, drive with
caution. Accelerate and slow down
with care. If accelerating or down-
shifting too fast, the drive wheels
will lose even more traction.
Starting and driving5-43
COLD WEATHER DRIVING
Page 323 of 402
8-2Maintenance and do-it-yourself
Some day-to-day and regular maintenance is
essential to maintain your vehicle good mechan-
ical condition, as well as its emission and engine
performance.
It is the owner’s responsibility to make sure that
the scheduled maintenance, as well as general
maintenance, is performed.
As the vehicle owner, you are the only one who
can ensure that your vehicle receives the proper
maintenance care. You are a vital link in the
maintenance chain.
SCHEDULED MAINTENANCE
For your convenience, both required and op-
tional scheduled maintenance items are de-
scribed and listed in your “NISSAN Service and
Maintenance Guide”. You must refer to that
guide to ensure that necessary maintenance is
performed on your vehicle at regular intervals.
GENERAL MAINTENANCE
General maintenance includes those items
which should be checked during normal day-
to-day operation. They are essential for proper
vehicle operation. It is your responsibility to
perform these procedures regularly as pre-
scribed.
Performing general maintenance checks re-
quires minimal mechanical skill and only a few
general automotive tools.These checks or inspections can be done by
yourself, a qualified technician or, if you prefer, a
NISSAN dealer.
WHERE TO GO FOR SERVICE
If maintenance service is required or your vehicle
appears to malfunction, have the systems
checked and serviced by a NISSAN dealer.
NISSAN technicians are well-trained specialists
and are kept up-to-date with the latest service
information through technical bulletins, service
tips, and in-dealership information systems.
They are completely qualified to work on
NISSAN vehicles
beforework begins.
You can be confident that a NISSAN dealer’s
service department performs the best job to
meet the maintenance requirements on your
vehicle. During the normal day-to-day operation of the
vehicle, general maintenance should be per-
formed regularly as prescribed in this section. If
you detect any unusual sounds, vibrations or
smell, be sure to check for the cause or have a
NISSAN dealer do it promptly. In addition, you
should notify a NISSAN dealer if you think that
repairs are required.
When performing any checks or maintenance
work, see “Maintenance precautions” (P.8-5) .
EXPLANATION OF MAINTENANCE
ITEMS
Additional information on the following
items with “*” is found later in this section.
Outside the vehicle
The maintenance items listed here should be
performed from time to time, unless otherwise
specified.
Doors and engine hood:
Check that all doors
and the engine hood operate properly. Also
ensure that all latches lock securely. Lubricate
hinges, latches, latch pins, rollers and links if
necessary. Make sure that the secondary latch
keeps the hood from opening when the primary
latch is released.
When driving in areas using road salt or other
corrosive materials, check lubrication frequently.
Lights*: Clean the headlights on a regular basis.
MAINTENANCE REQUIREMENT GENERAL MAINTENANCE