weight NISSAN KICKS 2023 Owners Manual
[x] Cancel search | Manufacturer: NISSAN, Model Year: 2023, Model line: KICKS, Model: NISSAN KICKS 2023Pages: 558, PDF Size: 6.25 MB
Page 12 of 558
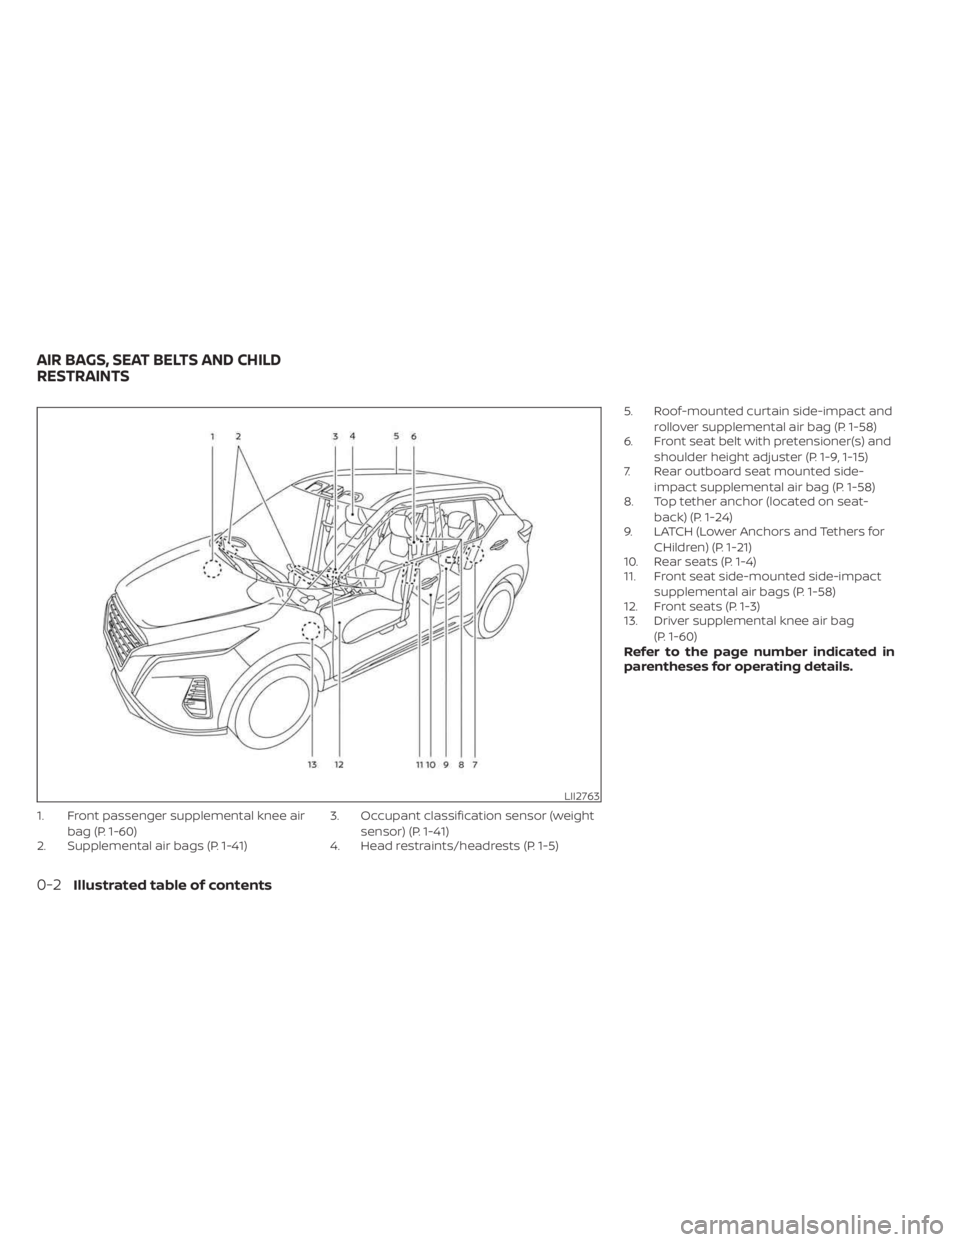
1. Front passenger supplemental knee airbag (P. 1-60)
2. Supplemental air bags (P. 1-41) 3. Occupant classification sensor (weight
sensor) (P. 1-41)
4. Head restraints/headrests (P. 1-5) 5. Roof-mounted curtain side-impact and
rollover supplemental air bag (P. 1-58)
6. Front seat belt with pretensioner(s) and
shoulder height adjuster (P. 1-9, 1-15)
7. Rear outboard seat mounted side-
impact supplemental air bag (P. 1-58)
8. Top tether anchor (located on seat-
back) (P. 1-24)
9. LATCH (Lower Anchors and Tethers for
CHildren) (P. 1-21)
10. Rear seats (P. 1-4)
11. Front seat side-mounted side-impact
supplemental air bags (P. 1-58)
12. Front seats (P. 1-3)
13. Driver supplemental knee air bag
(P. 1-60)
Refer to the page number indicated in
parentheses for operating details.
LII2763
AIR BAGS, SEAT BELTS AND CHILD
RESTRAINTS
0-2Illustrated table of contents
Page 40 of 558
INFANTS
Infants up to at least 1 year old should be
placed in a rear-facing child restraint.
NISSAN recommends that infants be
placed in child restraints that comply with
Federal Motor Vehicle Safety Standards or
Canadian Motor Vehicle Safety Standards.
You should choose a child restraint that fits
your vehicle and always follow the manu-
facturer's instructions for installation and
use.
SMALL CHILDREN
Children that are over 1 year old and weigh
at least 20 lbs. (9 kg) should remain in a
rear-facing child restraint as long as pos-
sible up to the height or weight limit of the
child restraint. Children who outgrow the
height or weight limit of the rear-facing
child restraint and are at least 1 year old
should be secured in a forward-facing child
restraint with a harness. Refer to the manu-
facturer’s instructions for minimum and
maximum weight and height recommen-
dations. NISSAN recommends that small
children be placed in child restraints that
comply with Federal Motor Vehicle Safety
Standards or Canadian Motor Vehicle
Safety Standards. You should choose achild restraint that fits your vehicle and
always follow the manufacturer’s instruc-
tions for installation and use.
LARGER CHILDREN
Children should remain in a forward-facing
child restraint with a harness until they reach
the maximum height or weight limit allowed
by the child restraint manufacturer.
Once a child outgrows the height or weight
limit of the harness-equipped forward-
facing child restraint, NISSAN recommends
that the child be placed in a commercially
available booster seat to obtain proper
seat belt fit. For a seat belt to fit properly, the
booster seat should raise the child so that
the shoulder belt is properly positioned
across the chest and the top, middle por-
tion of the shoulder. The shoulder belt
should not cross the neck or face and
should not fall off the shoulder. The lap belt
should lie snugly across the lower hips or
upper thighs, not the abdomen.
A booster seat can only be used in seating
positions that have a three-point type seat
belt. The booster seat should fit the vehicle
seat and have a label certif ying that it com-
plies with Federal Motor Vehicle Safety
Standards or Canadian Motor Vehicle
Safety Standards. Once the child has
grown so the shoulder belt is no longer on
or near the face and neck and the lap belt
can be positioned properly across the
lower hips or upper thighs, use the seat belt
without the booster seat.
A booster seat should be used until the
child can pass the seat belt fit test below:
• Are the child’s back and hips against the
vehicle seatback?
• Is the child able to sit without slouching?
• Do the child’s knees bend easily over the front edge of the seat with feet flat on the
floor?
• Can the child safely wear the seat belt (lap belt low and snug across the hips and
shoulder belt across mid-chest and
shoulder)?
• Is the child able to use the properly ad- justed head restraint/headrest?
• Will the child be able to stay in position for the entire ride?
1-18Safety-Seats, seat belts and supplemental restraint system
Page 43 of 558
• If the child restraint is compatible withyour vehicle, place your child in the child
restraint and check the various adjust-
ments to be sure the child restraint is
compatible with your child. Choose a
child restraint that is designed for your
child's height and weight. Always follow
all recommended procedures.
• If the combined weight of the child and child restraint is less than 65 lbs. (29.5 kg),
you may use the LATCH anchors to install
the child restraint (not both at the same
time).
• If the combined weight of the child and child restraint is greater than 65 lbs.
(29.5 kg), use the vehicle's seat belt (not
the lower anchors) to install the child
restraint.
•
Be sure to follow the child restraint manu-
facturer's instructions for installation.
All U.S. states and Canadian provinces or
territories require that infants and small
children be restrained in an approved
child restraint at all times while the ve-
hicle is being operated. Canadian law re-
quires the top tether strap on forward-
facing child restraints be secured to the
designated anchor point on the vehicle.
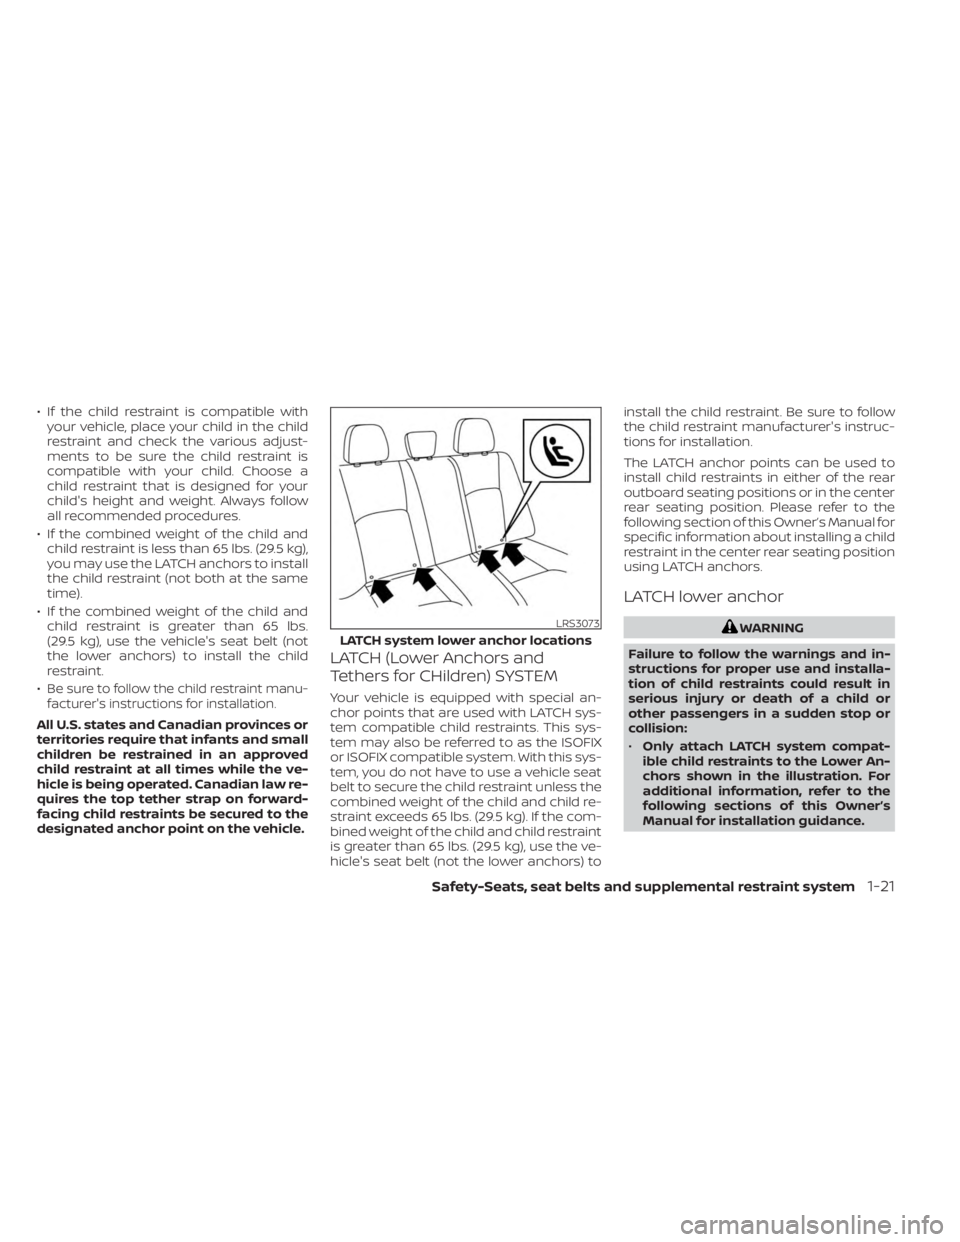
LATCH (Lower Anchors and
Tethers for CHildren) SYSTEM
Your vehicle is equipped with special an-
chor points that are used with LATCH sys-
tem compatible child restraints. This sys-
tem may also be referred to as the ISOFIX
or ISOFIX compatible system. With this sys-
tem, you do not have to use a vehicle seat
belt to secure the child restraint unless the
combined weight of the child and child re-
straint exceeds 65 lbs. (29.5 kg). If the com-
bined weight of the child and child restraint
is greater than 65 lbs. (29.5 kg), use the ve-
hicle's seat belt (not the lower anchors) to install the child restraint. Be sure to follow
the child restraint manufacturer's instruc-
tions for installation.
The LATCH anchor points can be used to
install child restraints in either of the rear
outboard seating positions or in the center
rear seating position. Please refer to the
following section of this Owner’s Manual for
specific information about installing a child
restraint in the center rear seating position
using LATCH anchors.
LATCH lower anchor
WARNING
Failure to follow the warnings and in-
structions for proper use and installa-
tion of child restraints could result in
serious injury or death of a child or
other passengers in a sudden stop or
collision:
• Only attach LATCH system compat-
ible child restraints to the Lower An-
chors shown in the illustration. For
additional information, refer to the
following sections of this Owner’s
Manual for installation guidance.LRS3073
LATCH system lower anchor locations
Safety-Seats, seat belts and supplemental restraint system1-21
Page 47 of 558
Do not use the lower anchors if the com-
bined weight of the child and the child re-
straint exceeds 65 lbs. (29.5 kg). If the com-
bined weight of the child and the child
restraint is greater than 65 lbs. (29.5 kg), use
the vehicle's seat belt (not the lower an-
chors) to install the child restraint. Be sure
to follow the child restraint manufacturer's
instructions for installation.
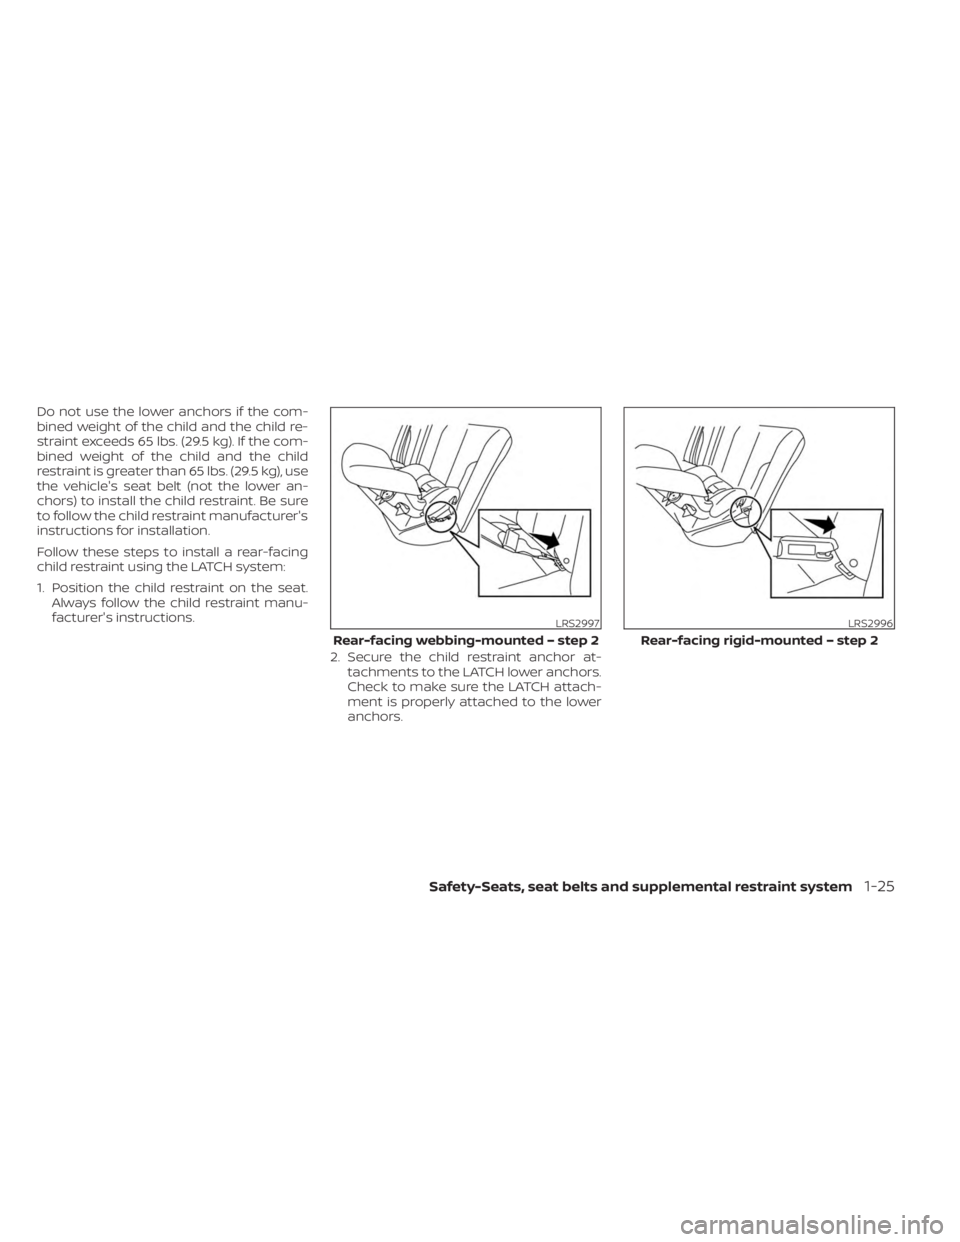
Follow these steps to install a rear-facing
child restraint using the LATCH system:
1. Position the child restraint on the seat.Always follow the child restraint manu-
facturer's instructions.
2. Secure the child restraint anchor at-tachments to the LATCH lower anchors.
Check to make sure the LATCH attach-
ment is properly attached to the lower
anchors.
LRS2997
Rear-facing webbing-mounted – step 2
LRS2996
Rear-facing rigid-mounted – step 2
Safety-Seats, seat belts and supplemental restraint system1-25
Page 49 of 558
Do not use the lower anchors if the com-
bined weight of the child and the child re-
straint exceeds 65 lbs. (29.5 kg). If the com-
bined weight of the child and the child
restraint is greater than 65 lbs. (29.5 kg), use
the vehicle's seat belt (not the lower an-
chors) to install the child restraint. Be sure
to follow the child restraint manufacturer's
instructions for installation.
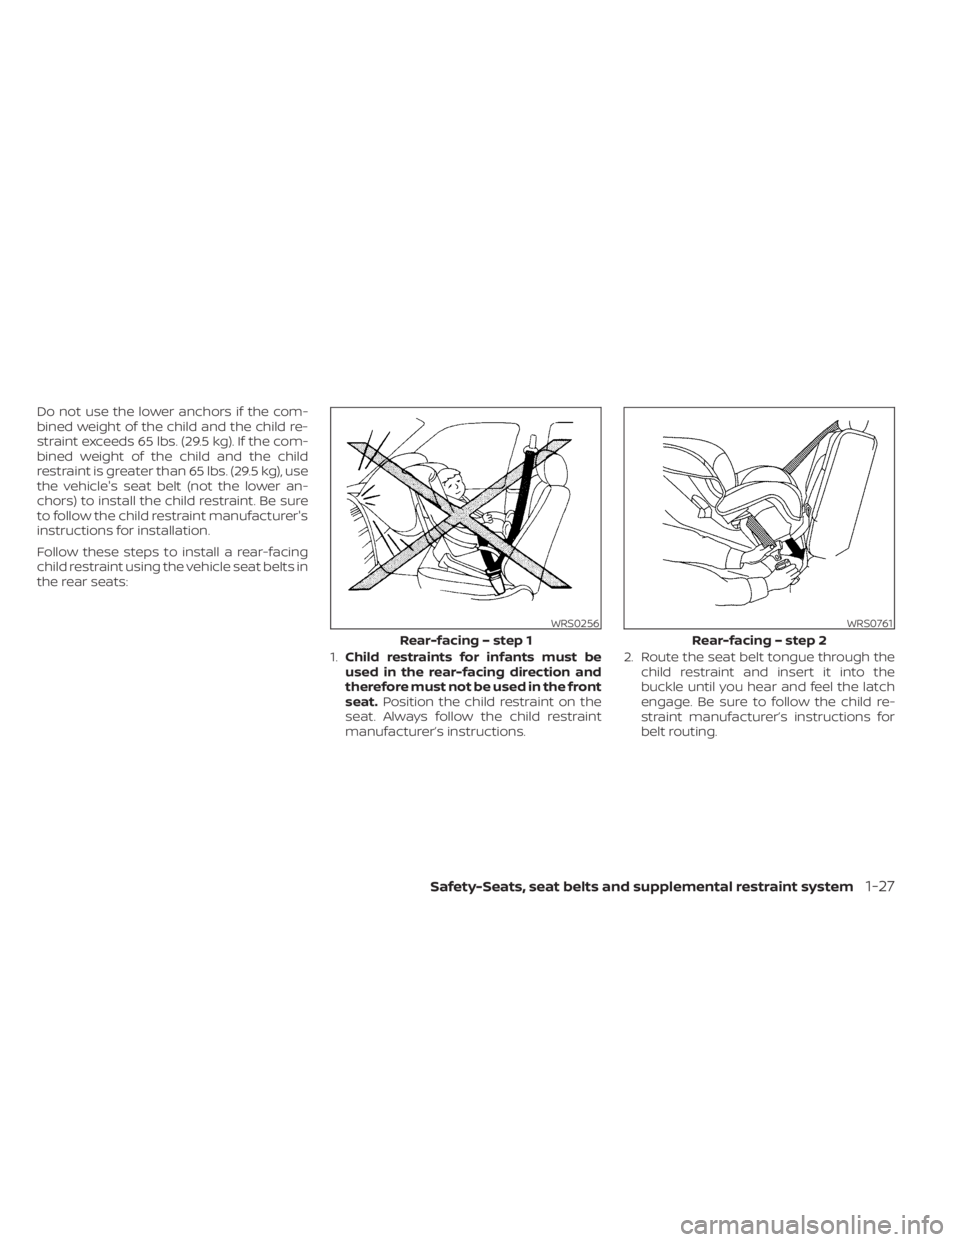
Follow these steps to install a rear-facing
child restraint using the vehicle seat belts in
the rear seats:1.Child restraints for infants must be
used in the rear-facing direction and
therefore must not be used in the front
seat. Position the child restraint on the
seat. Always follow the child restraint
manufacturer’s instructions. 2. Route the seat belt tongue through the
child restraint and insert it into the
buckle until you hear and feel the latch
engage. Be sure to follow the child re-
straint manufacturer’s instructions for
belt routing.
WRS0256
Rear-facing – step 1
WRS0761
Rear-facing – step 2
Safety-Seats, seat belts and supplemental restraint system1-27
Page 51 of 558
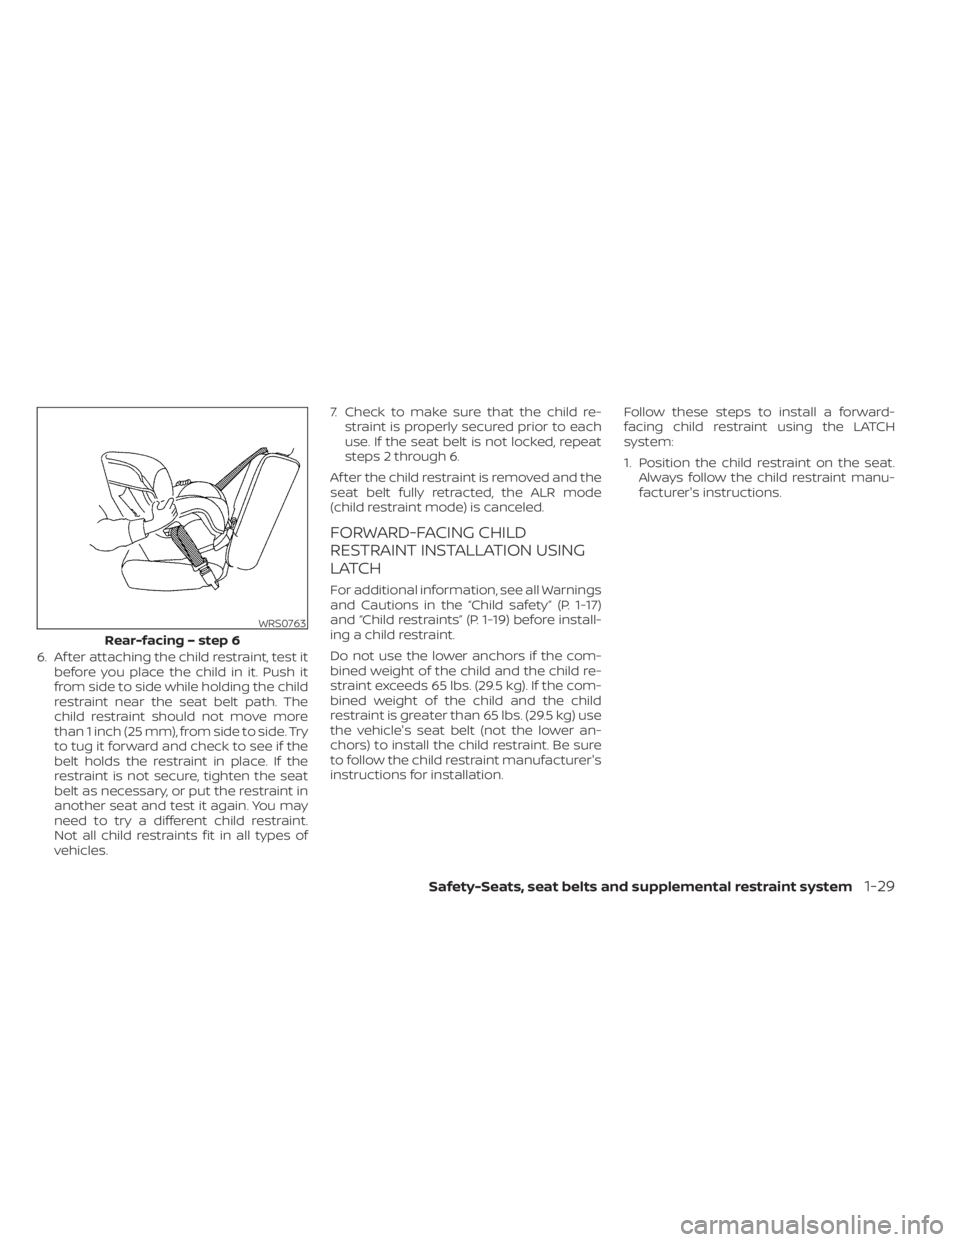
6. Af ter attaching the child restraint, test itbefore you place the child in it. Push it
from side to side while holding the child
restraint near the seat belt path. The
child restraint should not move more
than 1 inch (25 mm), from side to side. Try
to tug it forward and check to see if the
belt holds the restraint in place. If the
restraint is not secure, tighten the seat
belt as necessary, or put the restraint in
another seat and test it again. You may
need to try a different child restraint.
Not all child restraints fit in all types of
vehicles. 7. Check to make sure that the child re-
straint is properly secured prior to each
use. If the seat belt is not locked, repeat
steps 2 through 6.
Af ter the child restraint is removed and the
seat belt fully retracted, the ALR mode
(child restraint mode) is canceled.
FORWARD-FACING CHILD
RESTRAINT INSTALLATION USING
LATCH
For additional information, see all Warnings
and Cautions in the “Child safety” (P. 1-17)
and “Child restraints” (P. 1-19) before install-
ing a child restraint.
Do not use the lower anchors if the com-
bined weight of the child and the child re-
straint exceeds 65 lbs. (29.5 kg). If the com-
bined weight of the child and the child
restraint is greater than 65 lbs. (29.5 kg) use
the vehicle's seat belt (not the lower an-
chors) to install the child restraint. Be sure
to follow the child restraint manufacturer's
instructions for installation. Follow these steps to install a forward-
facing child restraint using the LATCH
system:
1. Position the child restraint on the seat.
Always follow the child restraint manu-
facturer's instructions.
WRS0763
Rear-facing – step 6
Safety-Seats, seat belts and supplemental restraint system1-29
Page 55 of 558
FORWARD-FACING CHILD
RESTRAINT INSTALLATION USING
THE SEAT BELTS
WARNING
The three-point seat belt with Auto-
matic Locking Retractor (ALR) must be
used when installing a child restraint.
Failure to use the ALR mode will result
in the child restraint not being properly
secured. The restraint could tip over or
be loose and cause injury to a child in a
sudden stop or collision. Also, it can
change the operation of the front pas-
senger air bag. For additional informa-
tion, see “Front passenger air bag and
status light” (P. 1-52). For additional information, see all Warnings
and Cautions in the “Child safety” (P. 1-17)
and “Child restraints” (P. 1-19) before install-
ing a child restraint.
Do not use the lower anchors if the com-
bined weight of the child and the child re-
straint exceeds 65 lbs. (29.5 kg). If the com-
bined weight of the child and the child
restraint is greater than 65 lbs. (29.5 kg) use
the vehicle's seat belt (not the lower an-
chors) to install the child restraint. Be sure
to follow the child restraint manufacturer's
instructions for installation. Follow these steps to install a forward-
facing child restraint using the vehicle seat
belt in the rear seats or in the front passen-
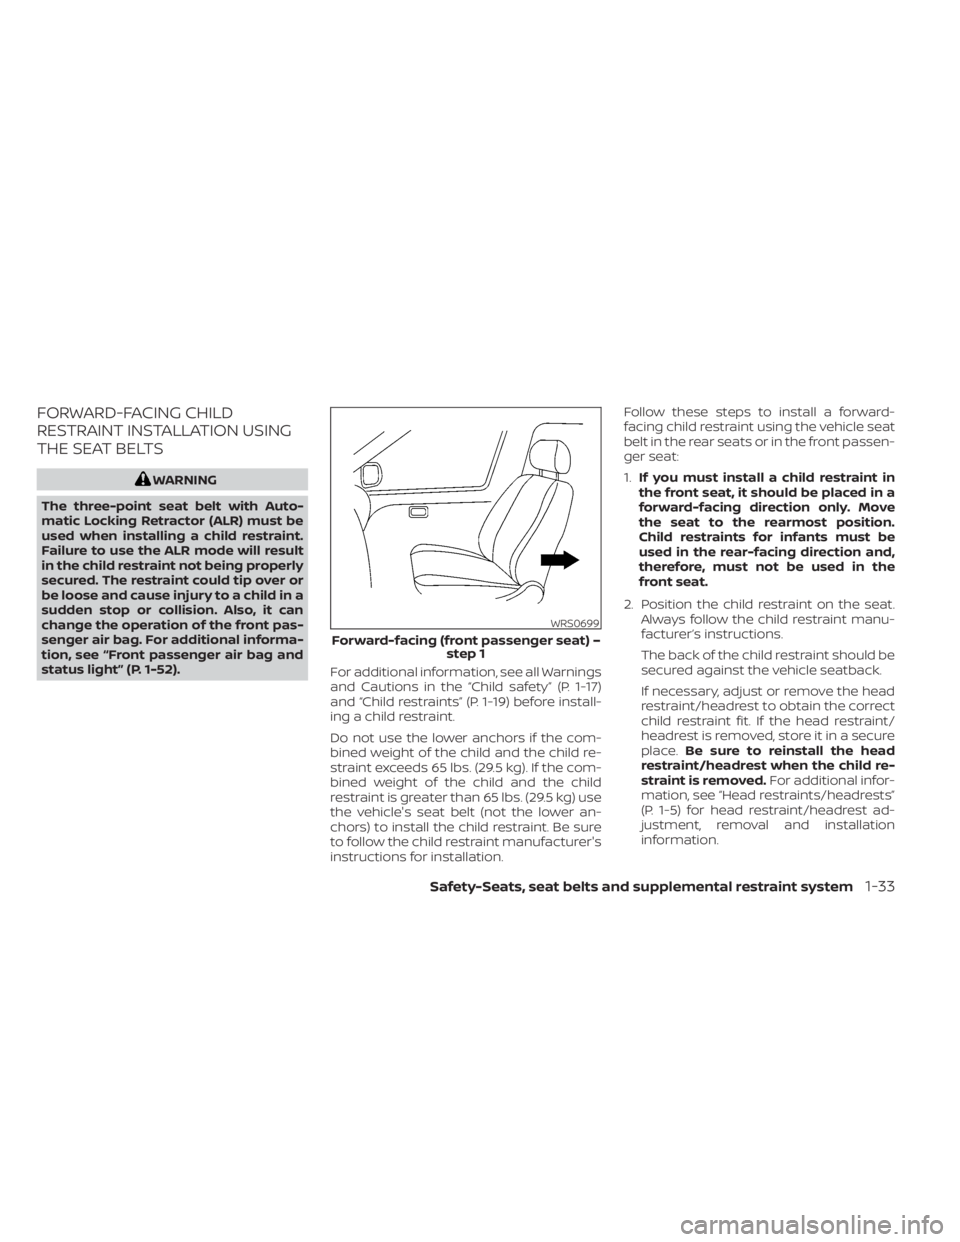
ger seat:
1.
If you must install a child restraint in
the front seat, it should be placed in a
forward-facing direction only. Move
the seat to the rearmost position.
Child restraints for infants must be
used in the rear-facing direction and,
therefore, must not be used in the
front seat.
2. Position the child restraint on the seat. Always follow the child restraint manu-
facturer’s instructions.
The back of the child restraint should be
secured against the vehicle seatback.
If necessary, adjust or remove the head
restraint/headrest to obtain the correct
child restraint fit. If the head restraint/
headrest is removed, store it in a secure
place. Be sure to reinstall the head
restraint/headrest when the child re-
straint is removed. For additional infor-
mation, see “Head restraints/headrests”
(P. 1-5) for head restraint/headrest ad-
justment, removal and installation
information.
WRS0699
Forward-facing (front passenger seat) – step 1
Safety-Seats, seat belts and supplemental restraint system1-33
Page 66 of 558
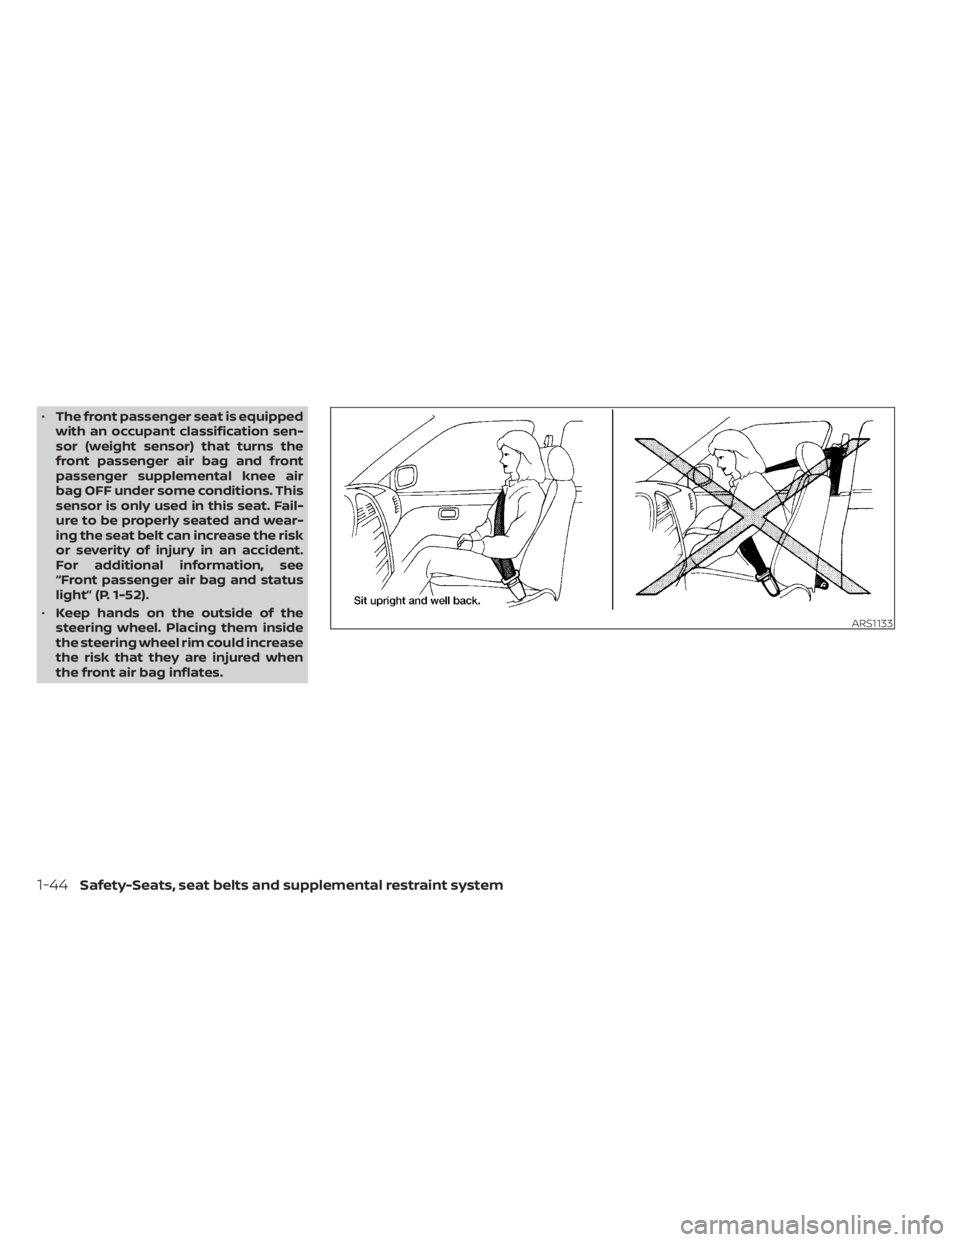
•The front passenger seat is equipped
with an occupant classification sen-
sor (weight sensor) that turns the
front passenger air bag and front
passenger supplemental knee air
bag OFF under some conditions. This
sensor is only used in this seat. Fail-
ure to be properly seated and wear-
ing the seat belt can increase the risk
or severity of injury in an accident.
For additional information, see
“Front passenger air bag and status
light” (P. 1-52).
• Keep hands on the outside of the
steering wheel. Placing them inside
the steering wheel rim could increase
the risk that they are injured when
the front air bag inflates.
ARS1133
1-44Safety-Seats, seat belts and supplemental restraint system
Page 71 of 558
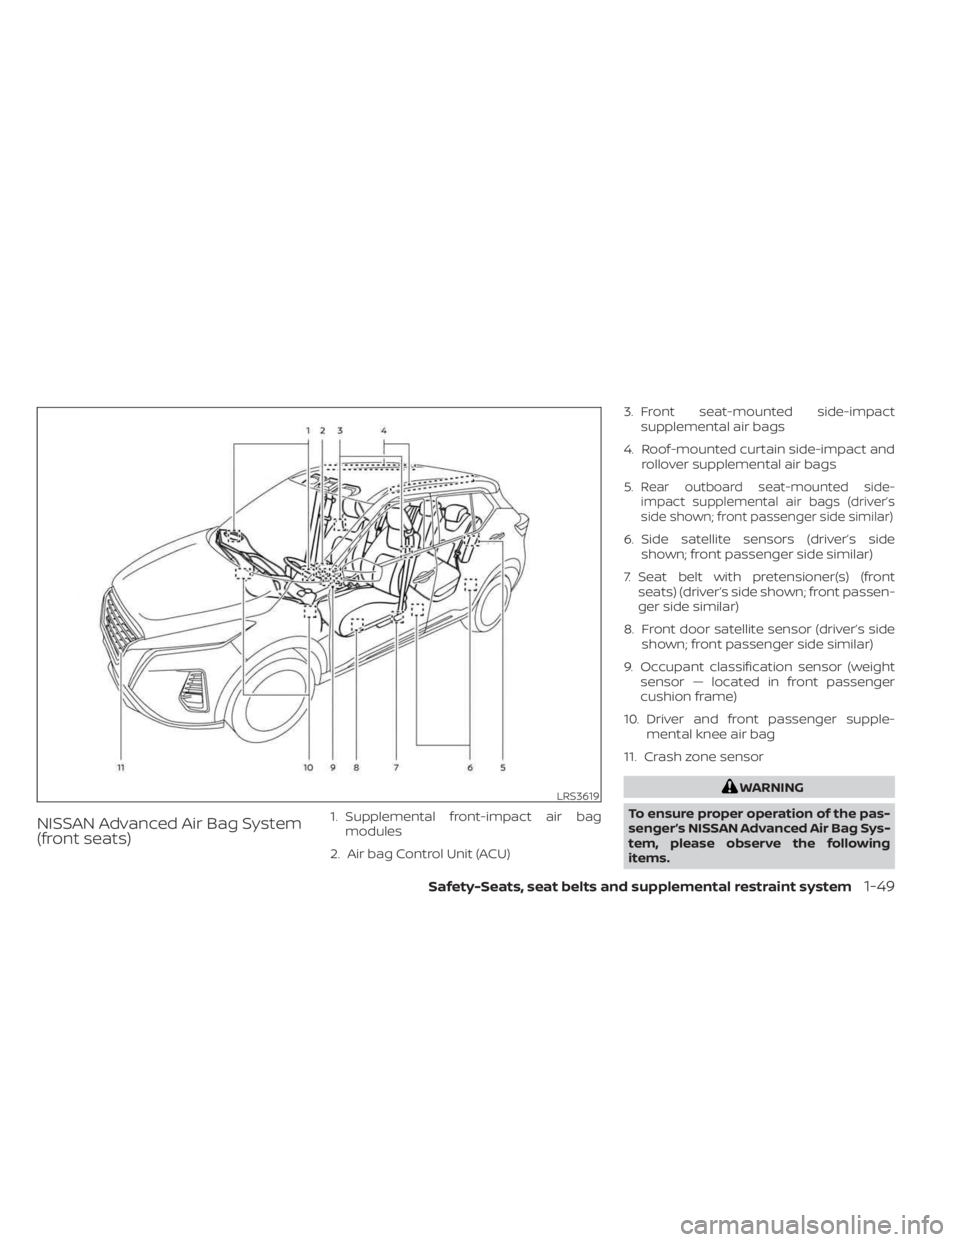
NISSAN Advanced Air Bag System
(front seats)1. Supplemental front-impact air bagmodules
2. Air bag Control Unit (ACU) 3. Front seat-mounted side-impact
supplemental air bags
4. Roof-mounted curtain side-impact and rollover supplemental air bags
5.
Rear outboard seat-mounted side-
impact supplemental air bags (driver’s
side shown; front passenger side similar)
6. Side satellite sensors (driver’s side shown; front passenger side similar)
7. Seat belt with pretensioner(s) (front seats) (driver’s side shown; front passen-
ger side similar)
8. Front door satellite sensor (driver’s side shown; front passenger side similar)
9. Occupant classification sensor (weight sensor — located in front passenger
cushion frame)
10. Driver and front passenger supple- mental knee air bag
11. Crash zone sensor
WARNING
To ensure proper operation of the pas-
senger’s NISSAN Advanced Air Bag Sys-
tem, please observe the following
items.LRS3619
Safety-Seats, seat belts and supplemental restraint system1-49
Page 73 of 558
damage (or lack of it) is not always an indi-
cation of proper front air bag system
operation.
The NISSAN Advanced Air Bag System
monitors information from the crash zone
sensor, the Air bag Control Unit (ACU), seat
belt buckle sensors and occupant classifi-
cation sensor (weight sensor). Inflator op-
eration is based on the severity of a colli-
sion and seat belt usage for the driver. For
the front passenger, the occupant classifi-
cation sensors are also monitored. Based
on information from the sensors, only one
front air bag may inflate in a crash, depend-
ing on the crash severity and whether the
front occupants are belted or unbelted. Ad-
ditionally, the front passenger air bag and
front passenger supplemental knee air
bag may be automatically turned OFF un-
der some conditions, depending on the
weight detected on the front passenger
seat and how the seat belt is used. If the
front passenger air bag and front passen-
ger supplemental knee air bag are OFF, the
front passenger air bag status light will be
illuminated. For additional information, see
“Front passenger air bag and status light”
(P. 1-52). One front air bag inflating does not
indicate improper performance of the
system.If you have any questions about your air
bag system, it is recommended that you
visit a NISSAN dealer. If you are considering
modification of your vehicle due to a dis-
ability, you may also contact NISSAN. Con-
tact information is contained in the front of
this Owner's Manual.
When a front air bag inflates, a fairly loud
noise may be heard, followed by the re-
lease of smoke. This smoke is not harmful
and does not indicate a fire. Care should be
taken to not inhale it, as it may cause irrita-
tion and choking. Those with a history of a
breathing condition should get fresh air
promptly.
Front air bags, along with the use of seat
belts, help to cushion the impact force on
the face and chest of the front occupants.
They can help save lives and reduce seri-
ous injuries. However, an inflating front air
bag may cause facial abrasions or other
injuries. Front air bags, other than the driv-
er’s and front passenger’s supplemental
knee air bag, do not provide restraint to the
lower body.
Even with NISSAN Advanced Air Bags, seat
belts should be correctly worn and the
driver and front passenger seated upright
as far as practical away from the steering
wheel or instrument panel. The front air
bags inflate quickly in order to help protect
the front occupants. Because of this, the
force of the front air bag inflating can in-
crease the risk of injury if the occupant is
too close to, or is against, the front air bag
module during inflation.
The front air bags deflate quickly af ter a
collision.
The front air bags operate only when the
ignition switch is placed in the ON
position.
Af ter placing the ignition switch in the
ON position, the supplemental air bag
warning light illuminates. The supple-
mental air bag warning light will turn off
af ter about 7 seconds if the system is
operational.
Safety-Seats, seat belts and supplemental restraint system1-51