NISSAN LATIO 2007 Service Repair Manual
LATIO 2007
NISSAN
NISSAN
https://www.carmanualsonline.info/img/5/57361/w960_57361-0.png
NISSAN LATIO 2007 Service Repair Manual
Trending: water pump, oil capacities, length, manual transmission, sunroof, bulb, radiator
Page 1791 of 2896
EI-26
CENTER MUD GUARD
Revision: June 20062007 Versa
CENTER MUD GUARDPFP:76850
Removal and InstallationEIS0096T
REMOVAL
1. Remove center mud guard screws, front and rear.
2. Remove center mud guard bolts at bottom edge and release double-faced adhesive tape from body side.
3. Open front and rear doors, then using a suitable tool, remove the clips and remove the center mud guard
from the body side.
4. Remove the sill cover cap clips, then remove sill cover cap.
INSTALLATION
Installation is in the reverse order of removal.
NOTE:
�Always replace double-faced adhesive tape on back of center mud guard when installing.
�Do not wash vehicle within 24 hours after installation.
1. Clip C205 2. Sill cover cap 3. Center mud guard
4. Double-faced adhesive tape Clip C101
LIIA2571E
Page 1792 of 2896
DOOR FINISHER
EI-27
C
D
E
F
G
H
J
K
L
MA
B
EI
Revision: June 20062007 Versa
DOOR FINISHERPFP:80900
Removal and InstallationEIS0096V
FRONT DOOR
Removal
1. Open front door and front door window.
2. Disconnect the negative battery cable.
3. Release the front door inside handle escutcheon pawls, then
slide the escutcheon rearward to remove from front door fin-
isher.
1. Power window and door lock/unlock
switch finisher2. Front door finisher 3. Inside handle escutcheon
Clip C101
LIIA2572E
PIIB6040E
Page 1793 of 2896
EI-28
DOOR FINISHER
Revision: June 20062007 Versa
4. Insert a trim stick (A) or suitable tool into back edge of front door
power window and door lock/unlock switch finisher. Lift upward
to release the clips and remove.
5. Disconnect front door power window and door lock/unlock
switch harness connector.
6. Remove the (2) front door finisher screws.
7. Release the clips, then lift front door finisher upward to remove it
from door body panel.
Installation
Installation is in the reverse order of removal.
WIIA1237E
PIIB6042E
SIIA0810E
Page 1794 of 2896
DOOR FINISHER
EI-29
C
D
E
F
G
H
J
K
L
MA
B
EI
Revision: June 20062007 Versa
REAR DOOR
Removal
1. Open rear door and rear door window.
2. Disconnect the negative battery cable.
3. Release the rear door inside handle escutcheon pawls, then
slide the escutcheon rearward to remove from rear door finisher.
4. Insert a trim stick (A), or suitable tool into back edge of rear door
power window switch finisher. Lift upward to release the clips
and remove.
1. Rear power window switch finisher 2. Rear door finisher 3. Inside handle escutcheon
Clip C101
LIIA2573E
PIIB6040E
WIIA1238E
Page 1795 of 2896
EI-30
DOOR FINISHER
Revision: June 20062007 Versa
5. Disconnect rear door power window switch harness connector.
6. Remove rear door finisher screw.
7. Release the clips, then lift rear door finisher upward to remove it
from door body panel.
Installation
Installation is in the reverse order of removal.
SIIA0810E
Page 1796 of 2896

BACK DOOR TRIM
EI-31
C
D
E
F
G
H
J
K
L
MA
B
EI
Revision: June 20062007 Versa
BACK DOOR TRIMPFP:90900
Removal and InstallationEIS009AF
REMOVAL
CAUTION:
�Insert a suitable tool between panel on vehicle and clips (as
indicated with arrow) to release clips.
�Use a suitable tool when removing metal clips from gar-
nishes.
�Be careful not to damage the body while prying to release
clips.
�Make sure clips are properly aligned in panel holes on body
when installing, then press them in completely.
1. Open back door.
2. Release the clips, then lift upward to release the pawls and
remove the back door finisher lower.
3. Release the clips, then remove back door side garnish RH/LH.
4. Release the clips, then remove back door finisher upper from the back door.
INSTALLATION
Installation is in the reverse order of removal.
1. Back door finisher upper 2. Back door weatherstrip 3. Back door side garnish (RH)
4. Cover 5. Back door finisher lower 6. Back door side garnish (LH)
7. Back door Pawl Metal clip
Clip C101⇐Vehicle front
LIIA2577E
SIIA0810E
Page 1797 of 2896
EI-32
BODY SIDE TRIM
Revision: June 20062007 Versa
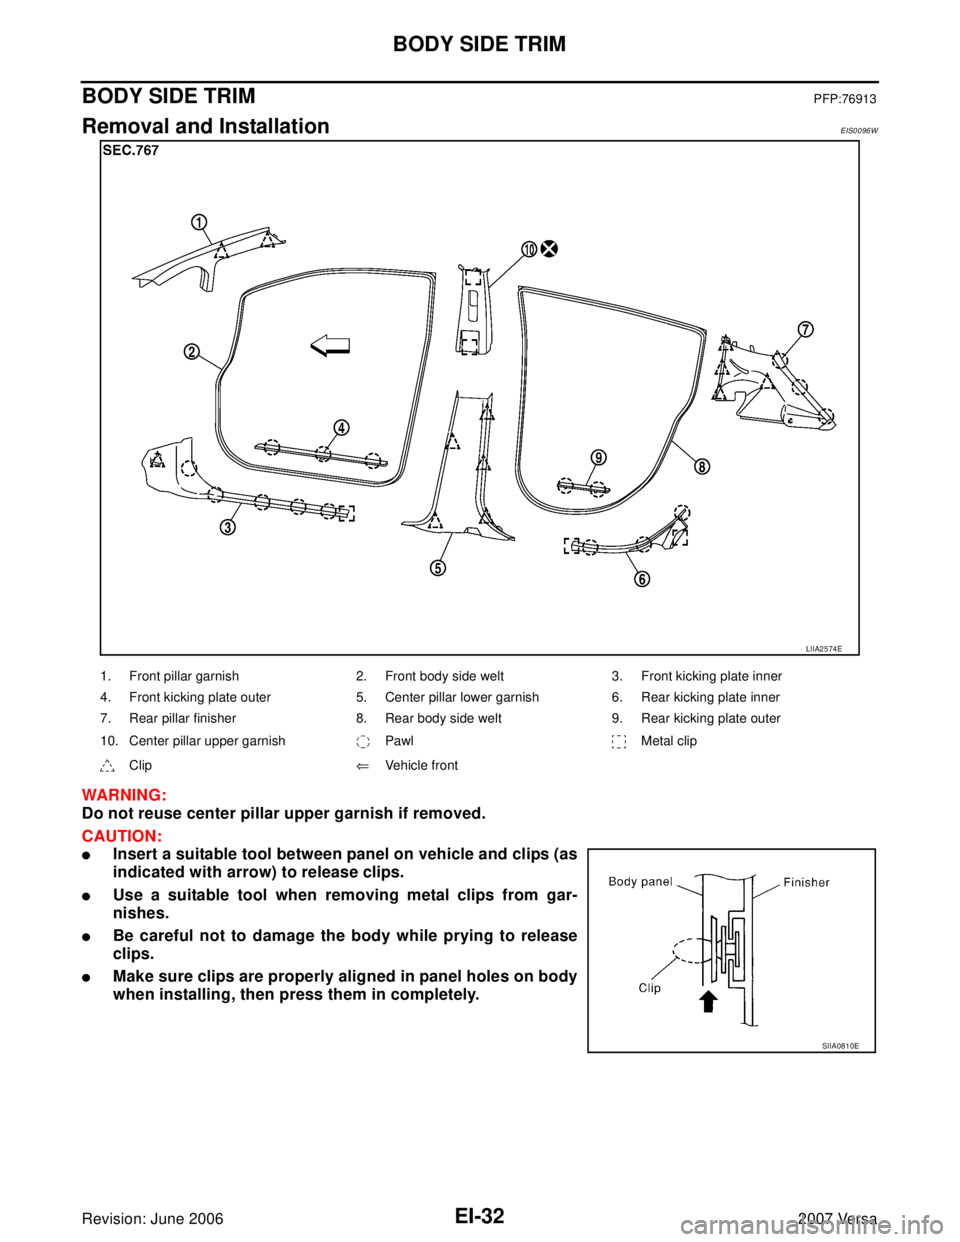
BODY SIDE TRIMPFP:76913
Removal and InstallationEIS0096W
WAR NIN G:
Do not reuse center pillar upper garnish if removed.
CAUTION:
�Insert a suitable tool between panel on vehicle and clips (as
indicated with arrow) to release clips.
�Use a suitable tool when removing metal clips from gar-
nishes.
�Be careful not to damage the body while prying to release
clips.
�Make sure clips are properly aligned in panel holes on body
when installing, then press them in completely.
LIIA2574E
1. Front pillar garnish 2. Front body side welt 3. Front kicking plate inner
4. Front kicking plate outer 5. Center pillar lower garnish 6. Rear kicking plate inner
7. Rear pillar finisher 8. Rear body side welt 9. Rear kicking plate outer
10. Center pillar upper garnish Pawl Metal clip
Clip⇐Vehicle front
SIIA0810E
Page 1798 of 2896
BODY SIDE TRIM
EI-33
C
D
E
F
G
H
J
K
L
MA
B
EI
Revision: June 20062007 Versa
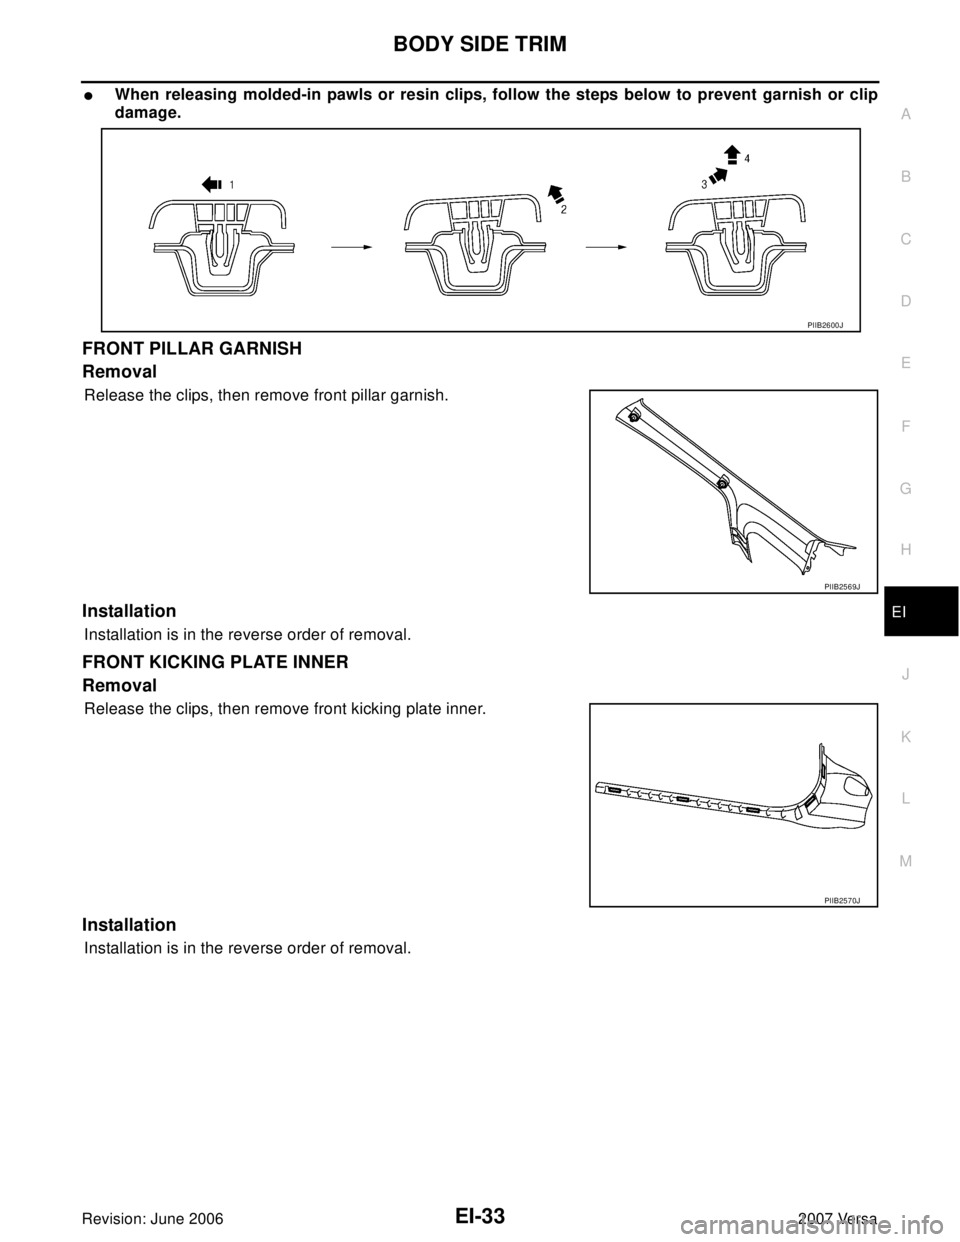
�When releasing molded-in pawls or resin clips, follow the steps below to prevent garnish or clip
damage.
FRONT PILLAR GARNISH
Removal
Release the clips, then remove front pillar garnish.
Installation
Installation is in the reverse order of removal.
FRONT KICKING PLATE INNER
Removal
Release the clips, then remove front kicking plate inner.
Installation
Installation is in the reverse order of removal.
PIIB2600J
PIIB2569J
PIIB2570J
Page 1799 of 2896
EI-34
BODY SIDE TRIM
Revision: June 20062007 Versa
FRONT KICKING PLATE OUTER
Removal
Release the clips, then remove front kicking plate outer.
Installation
Installation is in the reverse order of removal.
REAR KICKING PLATE INNER
Removal
Release the clips, then remove rear kicking plate inner.
Installation
Installation is in the reverse order of removal.
REAR KICKING PLATE OUTER
Removal
Release the clips, then remove rear kicking plate outer.
Installation
Installation is in the reverse order of removal.
CENTER PILLAR LOWER GARNISH
Removal
1. Remove front kicking plate inner. Refer to EI-33, "FRONT KICKING PLATE INNER" .
2. Remove rear kicking plate inner. Refer to EI-34, "
REAR KICKING PLATE INNER" .
3. Remove front and rear body side welts.
PIIB2571J
PIIB2573J
PIIB2572J
Page 1800 of 2896
BODY SIDE TRIM
EI-35
C
D
E
F
G
H
J
K
L
MA
B
EI
Revision: June 20062007 Versa
4. Release the clips, then remove center pillar lower garnish.
Installation
Installation is in the reverse order of removal.
PIIB2574J
Trending: headlamp, stop start, service indicator, tire pressure reset, headrest, glove box, sport mode


 or suitable tool into back edge of front door
power window and door lock/unlock switch finisher. Lift upward
to release the")