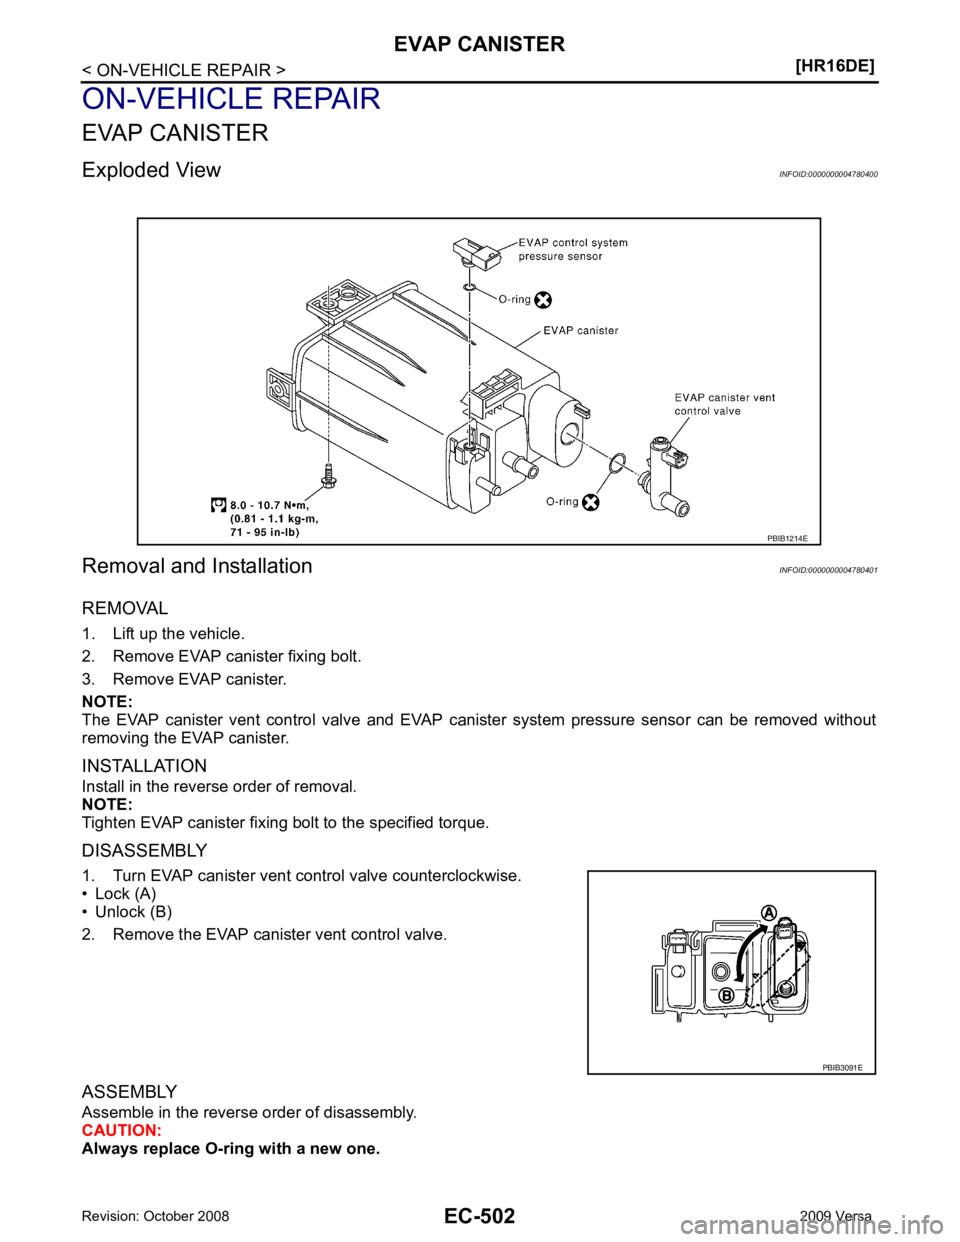
NISSAN LATIO 2009 Service Repair Manual
LATIO 2009
NISSAN
NISSAN
https://www.carmanualsonline.info/img/5/57359/w960_57359-0.png
NISSAN LATIO 2009 Service Repair Manual
Trending: fuel tank removal, headrest, buttons, service reset, battery replacement, heater, fuel pressure
Page 1851 of 4331
EC
NP
O
•
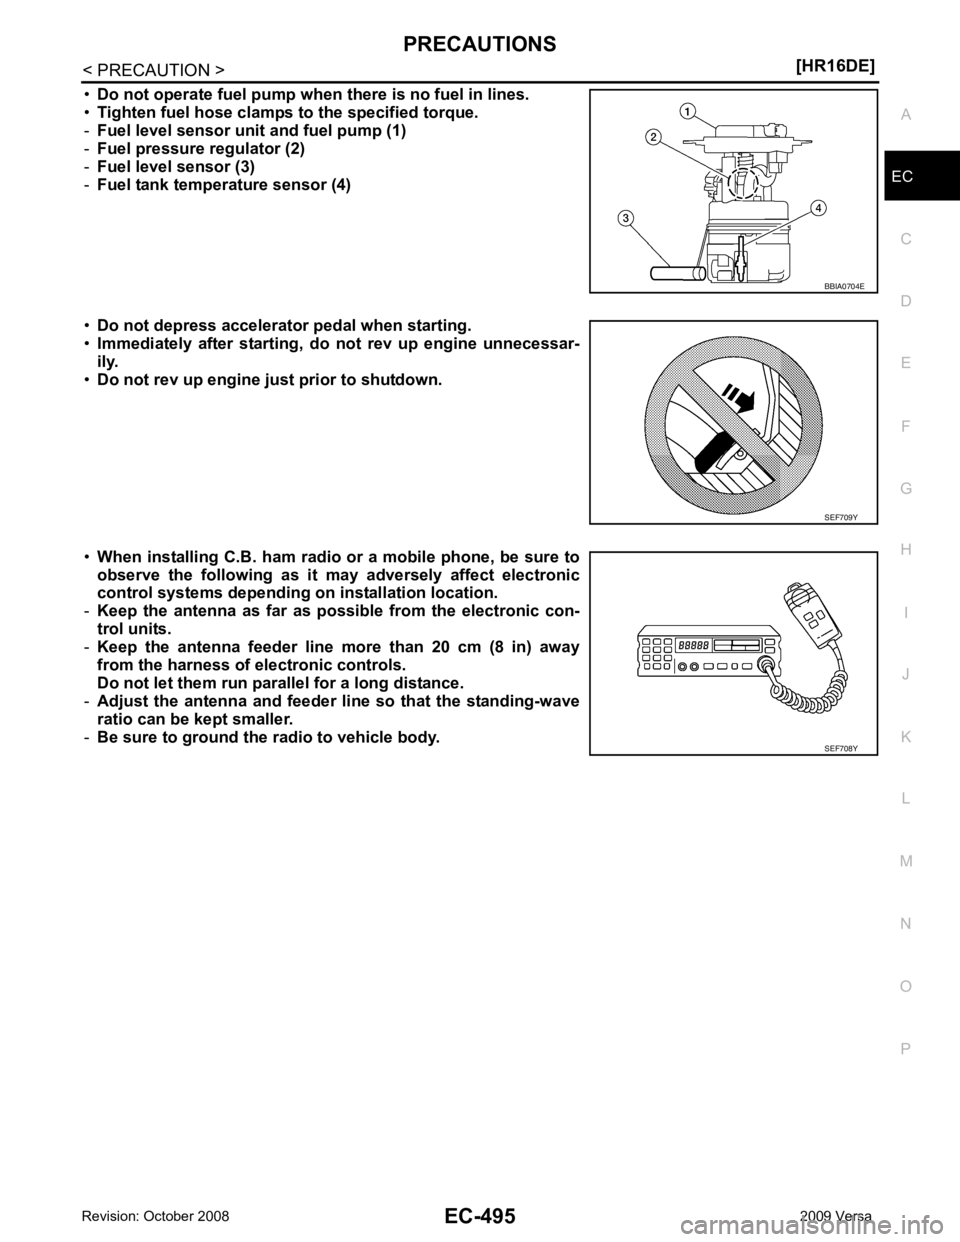
Do not operate fuel pump when there is no fuel in lines.
• Tighten fuel hose clamps to the specified torque.
- Fuel level sensor unit and fuel pump (1)
- Fuel pressure regulator (2)
- Fuel level sensor (3)
- Fuel tank temperature sensor (4)
• Do not depress accelerator pedal when starting.
• Immediately after starting, do not rev up engine unnecessar-
ily.
• Do not rev up engine ju st prior to shutdown.
• When installing C.B. ham radio or a mobile phone, be sure to
observe the following as it may adversely affect electronic
control systems depending on installation location.
- Keep the antenna as far as possible from the electronic con-
trol units.
- Keep the antenna feeder line more than 20 cm (8 in) away
from the harness of electronic controls.
Do not let them run para llel for a long distance.
- Adjust the antenna and feeder line so that the standing-wave
ratio can be kept smaller.
- Be sure to ground the radio to vehicle body.
Page 1852 of 4331
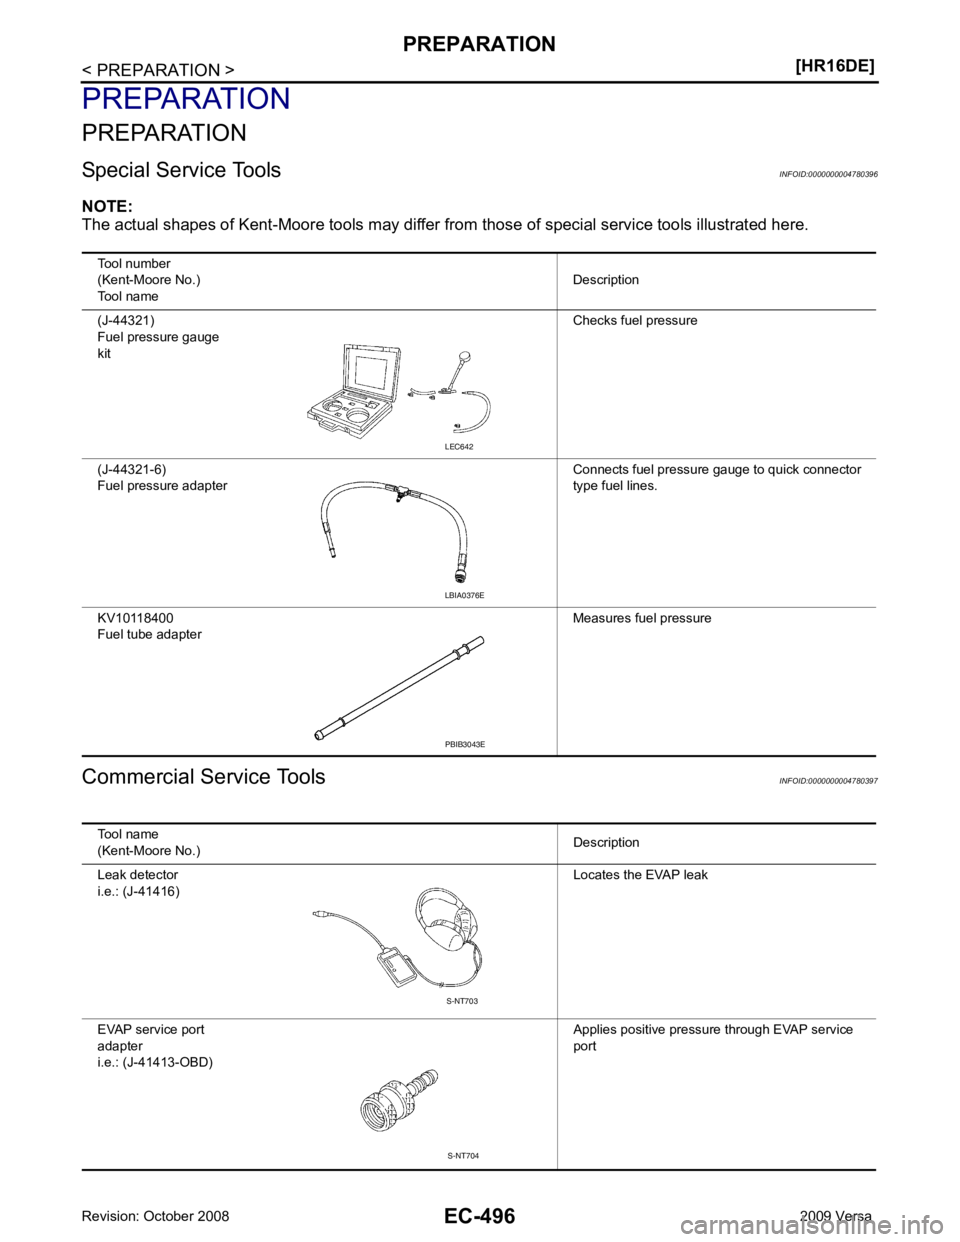
LBIA0376E
PBIB3043E
Tool name
(Kent-Moore No.) Description
Leak detector
i.e.: (J-41416) Locates the EVAP leak
EVAP service port
adapter
i.e.: (J-41413-OBD) Applies positive pressure through EVAP service
port S-NT704
Page 1853 of 4331
EC
NP
O
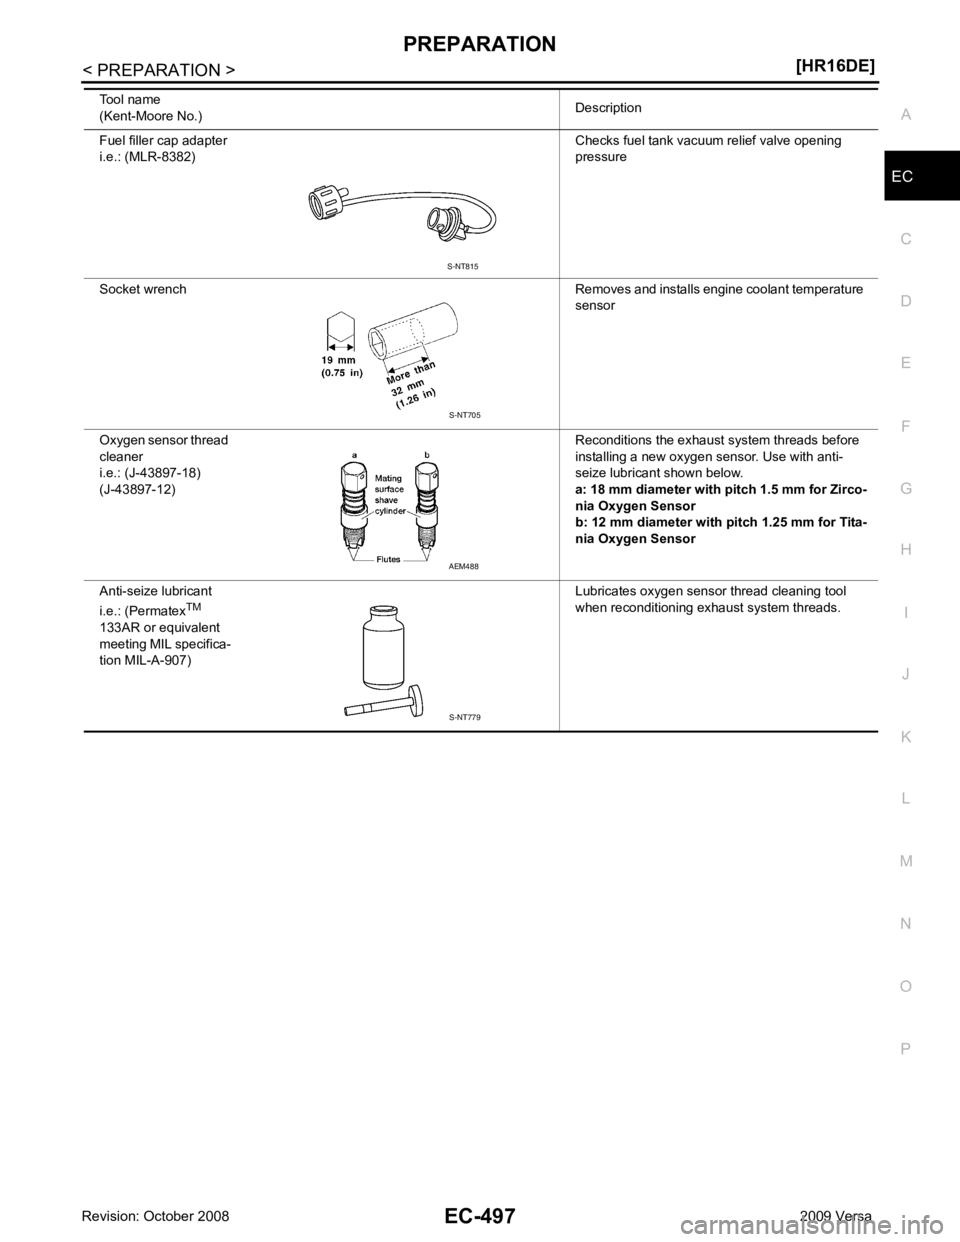
Fuel filler cap adapter
i.e.: (MLR-8382) Checks fuel tank vacuum relief valve opening
pressure
Socket wrench Removes and installs engine coolant temperature sensor
Oxygen sensor thread
cleaner
i.e.: (J-43897-18)
(J-43897-12) Reconditions the exhaust system threads before
installing a new oxygen sensor. Use with anti-
seize lubricant shown below.
a: 18 mm diameter with pitch 1.5 mm for Zirco-
nia Oxygen Sensor
b: 12 mm diameter with pitch 1.25 mm for Tita-
nia Oxygen Sensor
Anti-seize lubricant
i.e.: (Permatex TM
133AR or equivalent
meeting MIL specifica-
tion MIL-A-907) Lubricates oxygen sensor thread cleaning tool
when reconditioning exhaust system threads.
Tool name
(Kent-Moore No.) DescriptionS-NT705
AEM488
S-NT779
Page 1854 of 4331
Removal and Installation " .
• Do not twist or kink fuel hose because it is plastic hose.
Page 1855 of 4331
EC
NP
O
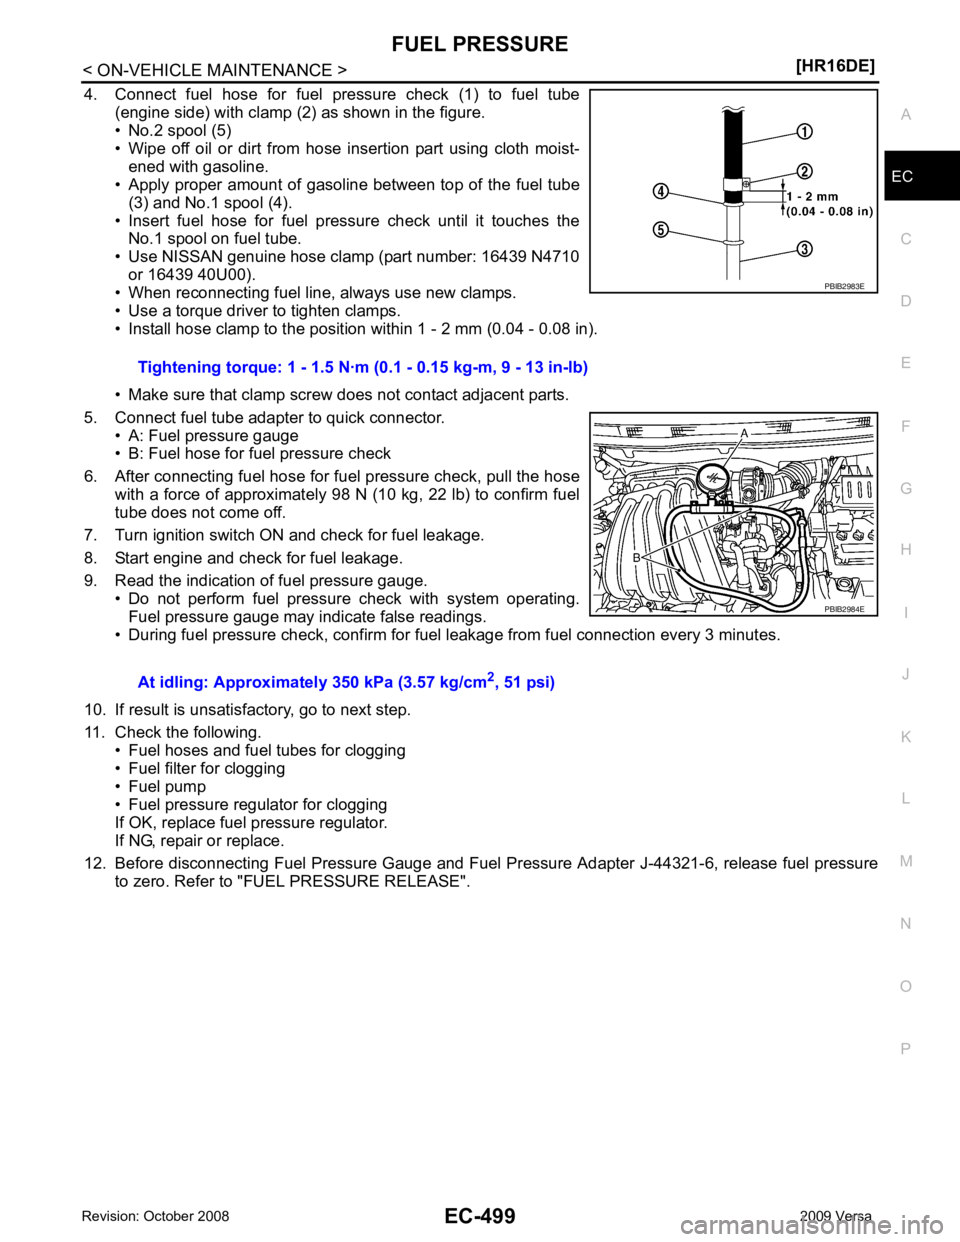
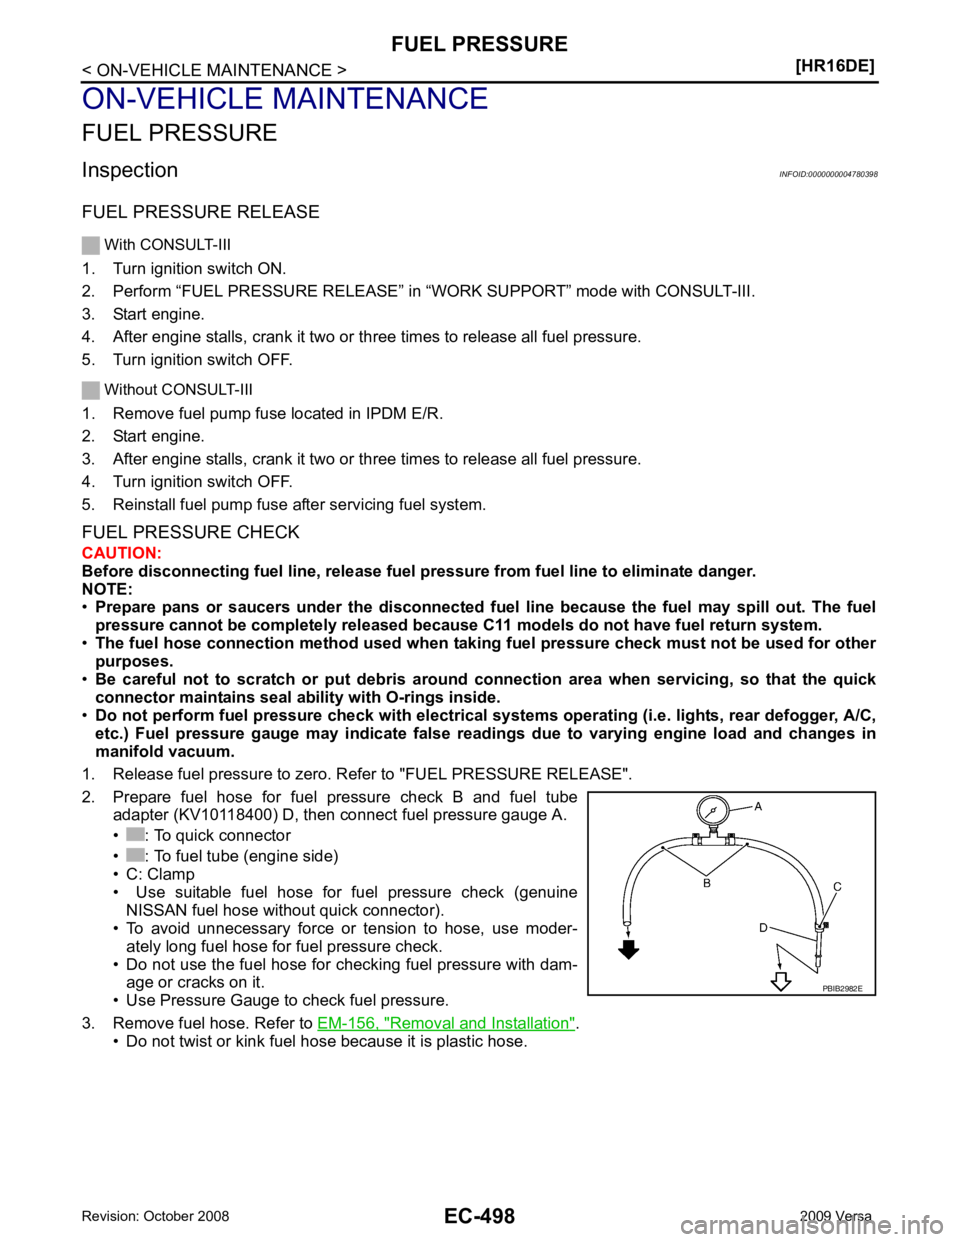
4. Connect fuel hose for fuel pressure check (1) to fuel tube
(engine side) with clamp (2) as shown in the figure.
• No.2 spool (5)
• Wipe off oil or dirt from hose insertion part using cloth moist-
ened with gasoline.
• Apply proper amount of gasoline between top of the fuel tube
(3) and No.1 spool (4).
• Insert fuel hose for fuel pressure check until it touches the No.1 spool on fuel tube.
• Use NISSAN genuine hose clamp (part number: 16439 N4710 or 16439 40U00).
• When reconnecting fuel line, always use new clamps.
• Use a torque driver to tighten clamps.
• Install hose clamp to the positi on within 1 - 2 mm (0.04 - 0.08 in).
• Make sure that clamp screw does not contact adjacent parts.
5. Connect fuel tube adapter to quick connector. • A: Fuel pressure gauge
• B: Fuel hose for fuel pressure check
6. After connecting fuel hose for fuel pressure check, pull the hose with a force of approximately 98 N (10 kg, 22 lb) to confirm fuel
tube does not come off.
7. Turn ignition switch ON and check for fuel leakage.
8. Start engine and check for fuel leakage.
9. Read the indication of fuel pressure gauge. • Do not perform fuel pressure check with system operating.
Fuel pressure gauge may indicate false readings.
• During fuel pressure check, confirm for f uel leakage from fuel connection every 3 minutes.
10. If result is unsatisfactory, go to next step.
11. Check the following. • Fuel hoses and fuel tubes for clogging
• Fuel filter for clogging
• Fuel pump
• Fuel pressure regulator for clogging
If OK, replace fuel pressure regulator.
If NG, repair or replace.
12. Before disconnecting Fuel Pressure Gauge and Fuel Pressure Adapter J-44321-6, release fuel pressure
to zero. Refer to "FUEL PRESSURE RELEASE". Tightening torque: 1 - 1.5 N·m
(0.1 - 0.15 kg-m, 9 - 13 in-lb)
At idling: Approximately 350 kPa (3.57 kg/cm 2
, 51 psi) PBIB2984E
Page 1856 of 4331
System Description " .
WITHOUT CONSULT-III
1. Install EVAP service port adapter [commercial service tool: (J- 41413-OBD)] and pressure pump to EVAP service port.
2. Apply battery voltage between the terminals of EVAP canister vent control valve to ma ke a closed EVAP system.
3. To locate the leak, deliver positive pressure to the EVAP system until pressure gauge points reach 1.38 to 2.76 kPa (0.014 to
0.028 kg/cm 2
, 0.2 to 0.4 psi).
4. Remove EVAP service port adapter [commercial service tool: (J- 41413-OBD)] and hose with pressure pump. SEF200U
SEF462UA
Page 1857 of 4331
EVAP LEAK CHECK
EC-501
< ON-VEHICLE MAINTENANCE >
[HR16DE] C
D E
F
G H
I
J
K L
M A EC
NP
O
5. Locate the leak using a leak detector [commercial service tool:
(J-41416)]. Refer to EC-74, " System Description " .
SEF200U
Page 1858 of 4331
Page 1859 of 4331
EC
NP
O
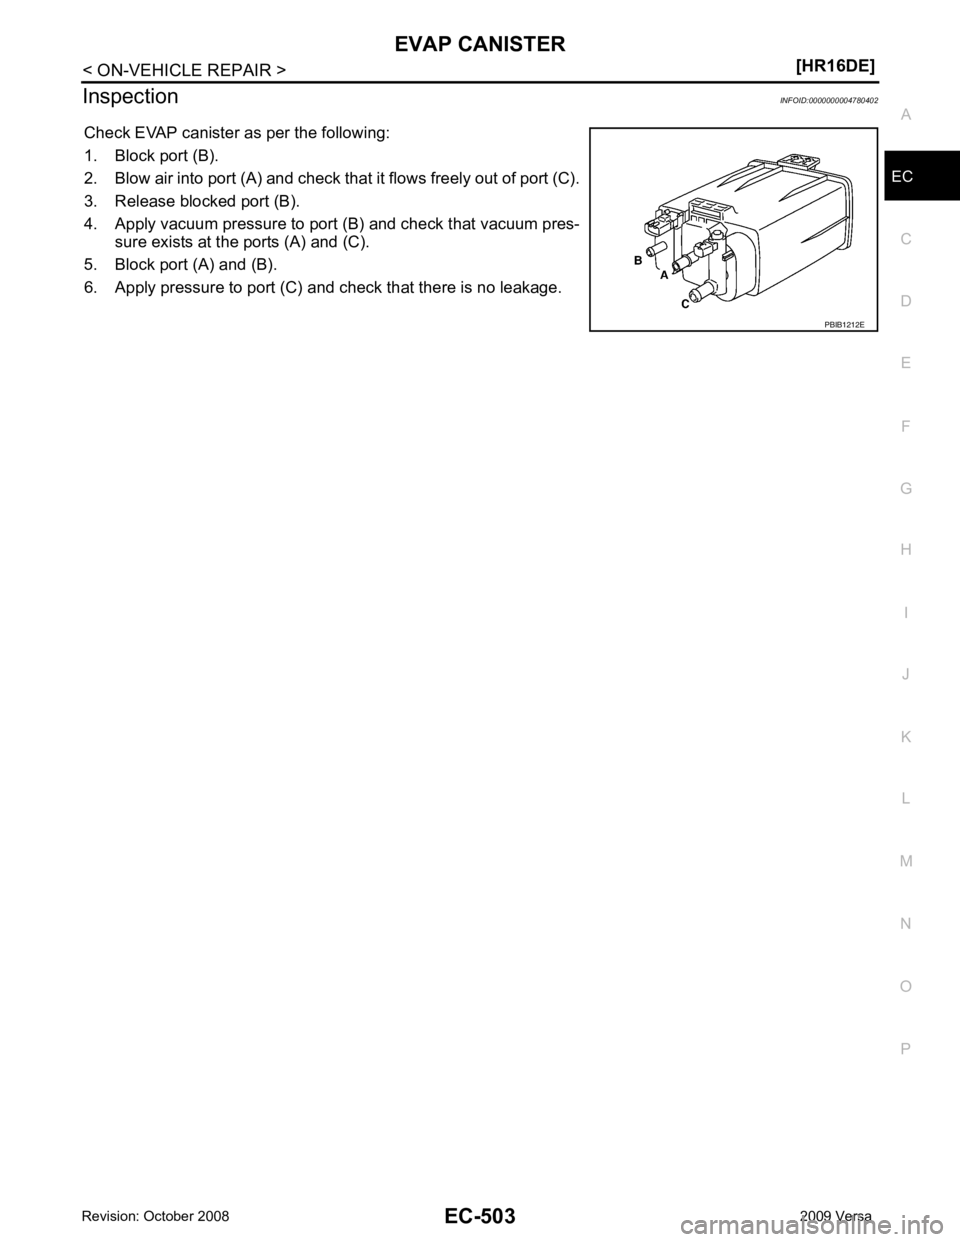
Inspection
INFOID:0000000004780402
Check EVAP canister as per the following:
1. Block port (B).
2. Blow air into port (A) and check that it flows freely out of port (C).
3. Release blocked port (B).
4. Apply vacuum pressure to port (B) and check that vacuum pres-
sure exists at the ports (A) and (C).
5. Block port (A) and (B).
6. Apply pressure to port (C) and check that there is no leakage.
Page 1860 of 4331
Transmission Condition Specification
A/T No load* (in P or N position) 6 ± 5 °BTDC
M/T No load* (in Neutral position) 6 ± 5 °BTDC Condition Specification (U
sing CONSULT-III or GST)
At idle 10 – 35 %
At 2,500 rpm 10 – 35 %Supply voltage
Battery voltage (11 – 14 V)
Output voltage at idle 0.9 – 1.3V*
Mass air flow (Using CONSULT-III or GST) 1.0 – 4.0 g·m/sec at idle*
2.0 – 10.0 g·m/sec at 2,500 rpm*
Trending: fuel consumption, heating, transmission, mirror controls, bulb, spare tire, water pump

![NISSAN LATIO 2009 Service Repair Manual System Description " .
WITHOUT CONSULT-III
1. Install EVAP service port adapter [commercial service tool: (J- 41413-OBD)] and pressure pump to EVAP service port.
2. Apply battery voltage b NISSAN LATIO 2009 Service Repair Manual System Description " .
WITHOUT CONSULT-III
1. Install EVAP service port adapter [commercial service tool: (J- 41413-OBD)] and pressure pump to EVAP service port.
2. Apply battery voltage b](/img/5/57359/w960_57359-1855.png)
![NISSAN LATIO 2009 Service Repair Manual EVAP LEAK CHECK
EC-501
< ON-VEHICLE MAINTENANCE >
[HR16DE] C
D E
F
G H
I
J
K L
M A EC
NP
O
5. Locate the leak using a leak detector [commercial service tool:
(J-41416)]. Refer to EC-74, " Sy NISSAN LATIO 2009 Service Repair Manual EVAP LEAK CHECK
EC-501
< ON-VEHICLE MAINTENANCE >
[HR16DE] C
D E
F
G H
I
J
K L
M A EC
NP
O
5. Locate the leak using a leak detector [commercial service tool:
(J-41416)]. Refer to EC-74, " Sy](/img/5/57359/w960_57359-1856.png)
