interior lights NISSAN LEAF 2020 Owner´s Manual
[x] Cancel search | Manufacturer: NISSAN, Model Year: 2020, Model line: LEAF, Model: NISSAN LEAF 2020Pages: 596, PDF Size: 4.33 MB
Page 174 of 596
Dynamic driver assistance switch
(for vehicles without ProPILOT Assist)
(if so equipped)................................. 2-59
Steering Assist switch (for models with
ProPILOT Assist) (if so equipped) ................2-59
Rear Door Alert ................................. 2-60
Power outlet ................................... 2-61
Storage ........................................ 2-61
Seatback Pocket ............................ 2-61
Storagetray................................. 2-62
Glovebox ................................... 2-62
Console box ................................. 2-63
Overhead sunglasses storage ...............2-63
Cup holders ................................. 2-64
Tonneau cover (if so equipped) ..............2-65
Stowing golf bags ........................... 2-66
Windows ....................................... 2-66
Power windows ............................. 2-66Interior lights
................................... 2-69
Console light (if so equipped) ................2-69
Map lights ................................... 2-69
Room light .................................. 2-70
Cargo light .................................. 2-70
HomeLink® Universal Transceiver
(if so equipped) ................................. 2-71
Programming HomeLink® ...................2-71
Programming HomeLink® for Canadian
customers and gate openers ...............2-73
Operating the HomeLink® Universal
Transceiver ..................................2-74
Programming trouble-diagnosis ............2-74
Clearing the programmed information ......2-74
Reprogramming a single HomeLink®
button ...................................... 2-75
If your vehicle is stolen ......................2-75
Page 242 of 596
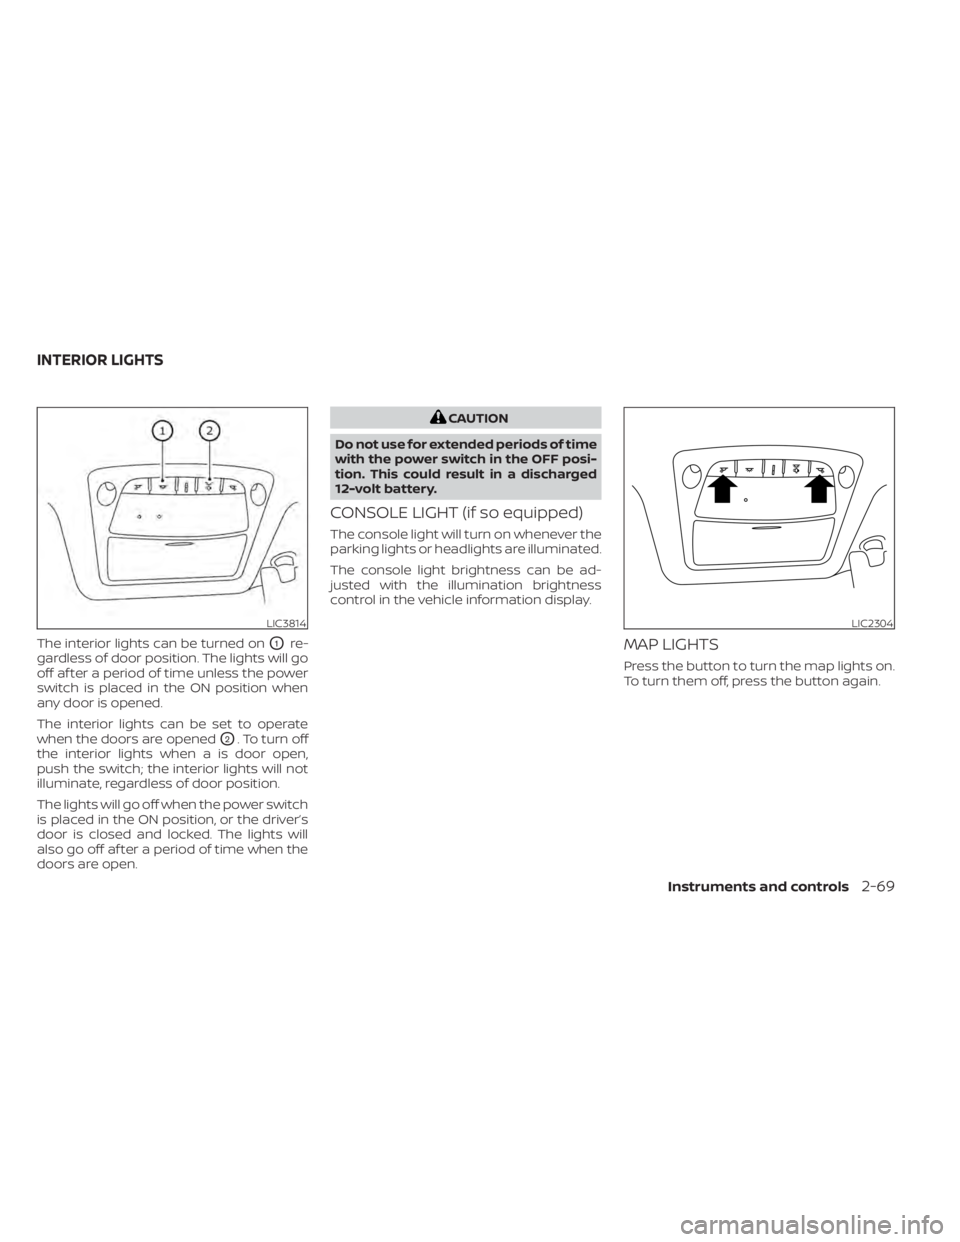
The interior lights can be turned onO1re-
gardless of door position. The lights will go
off af ter a period of time unless the power
switch is placed in the ON position when
any door is opened.
The interior lights can be set to operate
when the doors are opened
O2. To turn off
the interior lights when a is door open,
push the switch; the interior lights will not
illuminate, regardless of door position.
The lights will go off when the power switch
is placed in the ON position, or the driver’s
door is closed and locked. The lights will
also go off af ter a period of time when the
doors are open.
CAUTION
Do not use for extended periods of time
with the power switch in the OFF posi-
tion. This could result in a discharged
12-volt battery.
CONSOLE LIGHT (if so equipped)
The console light will turn on whenever the
parking lights or headlights are illuminated.
The console light brightness can be ad-
justed with the illumination brightness
control in the vehicle information display.
MAP LIGHTS
Press the button to turn the map lights on.
To turn them off, press the button again.
LIC3814LIC2304
INTERIOR LIGHTS
Instruments and controls2-69
Page 243 of 596
ROOM LIGHT
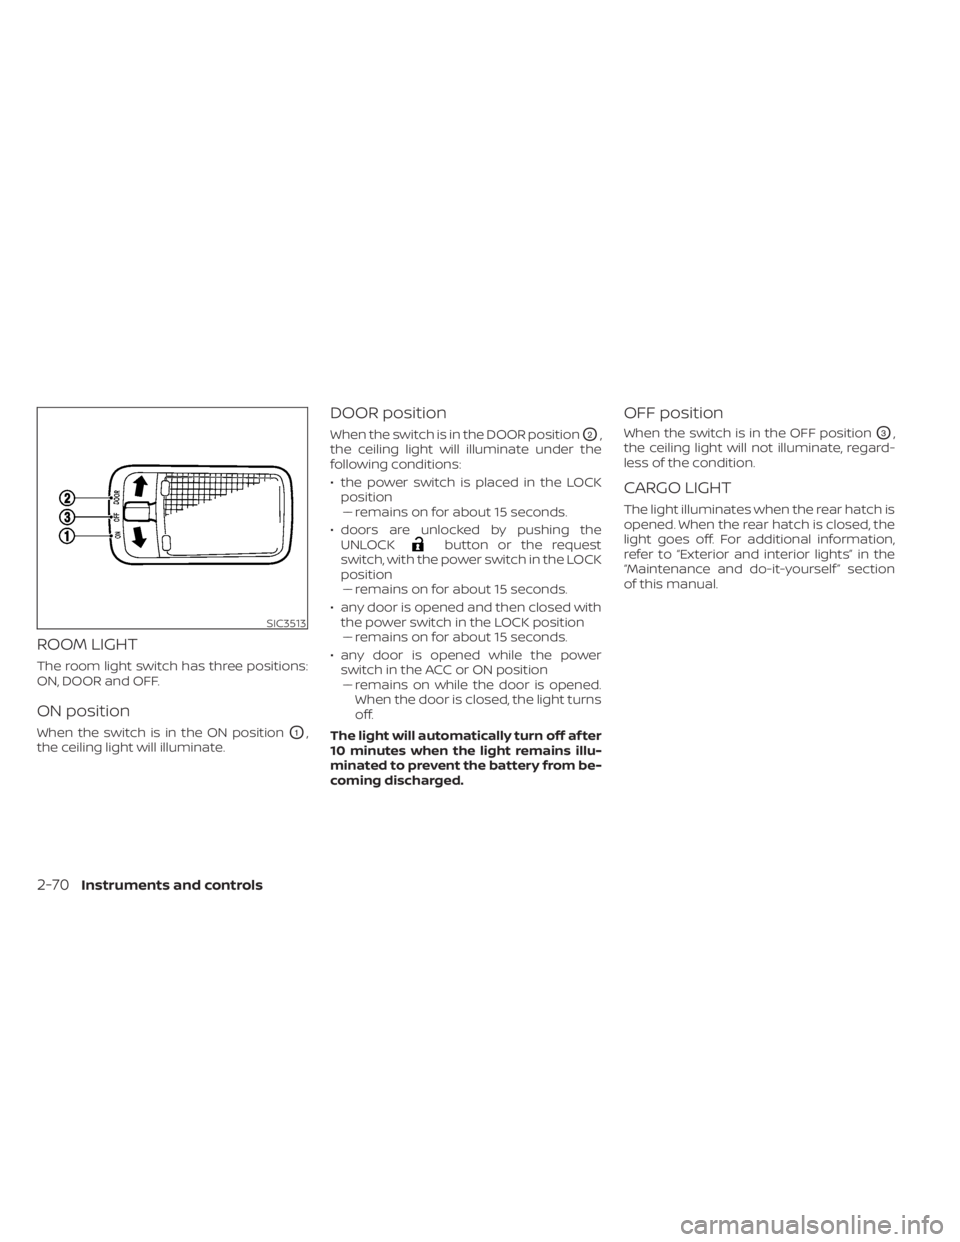
The room light switch has three positions:
ON, DOOR and OFF.
ON position
When the switch is in the ON positionO1,
the ceiling light will illuminate.
DOOR position
When the switch is in the DOOR positionO2,
the ceiling light will illuminate under the
following conditions:
• the power switch is placed in the LOCK position–– remains on for about 15 seconds.
• doors are unlocked by pushing the UNLOCK
button or the request
switch, with the power switch in the LOCK
position –– remains on for about 15 seconds.
• any door is opened and then closed with the power switch in the LOCK position–– remains on for about 15 seconds.
• any door is opened while the power switch in the ACC or ON position– – remains on while the door is opened.
When the door is closed, the light turns
off.
The light will automatically turn off af ter
10 minutes when the light remains illu-
minated to prevent the battery from be-
coming discharged.
OFF position
When the switch is in the OFF positionO3,
the ceiling light will not illuminate, regard-
less of the condition.
CARGO LIGHT
The light illuminates when the rear hatch is
opened. When the rear hatch is closed, the
light goes off. For additional information,
refer to “Exterior and interior lights” in the
“Maintenance and do-it-yourself ” section
of this manual.
SIC3513
2-70Instruments and controls
Page 264 of 596
CAUTION
When locking the doors using the Intel-
ligent Key, be sure not to leave the key
in the vehicle.
Locking doors
1. Place the power switch in the LOCK position.
2. Close all doors.
3. Press the
button on the Intelli-
gent Key.
4. The hazard warning lights flash twice and the horn beeps once.
5. All doors and the rear hatch will be locked.
WARNING
Af ter locking the doors using the Intel-
ligent Key, be sure that the doors have
been securely locked by operating the
door handles. Failure to follow these in-
structions may result in inadvertently
unlocking the doors, which may de-
crease the safety and security of your
vehicle.
Unlocking doors
1. Press thebutton on the Intelligent
Key to unlock the driver’s door.
2. The hazard warning lights flash once.
3. Press the
button again within 1
minute to unlock all doors and rear
hatch.
All doors and rear hatch will be locked au-
tomatically unless one of the following op-
erations is performed within 1 minute af ter
pressing the
button:
• Opening any doors or rear hatch.
• Pushing the power switch.
The interior light illuminates for a period of
time when a door is unlocked and the
room light switch is in the DOOR position.
The light can be turned off without waiting
by performing one of the following opera-
tions:
• Placing the power switch in the ON posi- tion.
• Locking the doors with the Intelligent Key.
• Switching the room light switch to the OFF position.
Opening charge port lid
The charge port lid may be opened by
pressing and holding thebutton.
For additional information, refer to "Open-
ing charge port lid" in this section.
Using panic alarm
If you are near your vehicle and feel threat-
ened, you may activate the alarm to call
attention as follows:
1. Press the
button on the Intelligent
Key for more than 1 second.
2. The panic alarm and headlights will stay on for a period of time.
3. The panic alarm stops when: • It has run for a period of time, or
• Any of the buttons on the IntelligentKey is pushed. (Note: The
button
must be pushed for more than 1 sec-
ond.)
Pre-driving checks and adjustments3-15
Page 317 of 596
9. Press thebutton to set Cli-
mate Temperature and then press the
OK button.
10. * Press the
button to select
"Days" and then press the OK button.
The current day of the week is dis-
played with an underline.
Press the
button to select the
days of the week you wish to activate
the Climate Control system and then
press the OK button. The indicator light
of the selected button will turn on.
11. * Af ter setting the day of the week, press the Back button and return to the pre-
vious screen.
The set day of the week is lit in white.
12. Af ter the setting is complete, place the power switch in the OFF position, and
then connect the charge connector to
the vehicle.
* models with Navigation System Info
The Climate Ctrl. Timer does not activate if
the charge connector is not connected to
the vehicle. When the “Battery Operation
OK” is turned on and the charging connec-
tor is not connected to the vehicle, the Cli-
mate Ctrl. Timer will activate for 15 minutes.
When the outside temperature is high, the
interior temperature may not reach the set
temperature within the 15 minutes.
Turn "Battery Operation OK" to OFF when it
is not necessary to operate air condition-
ing timer in order to prevent Li-ion battery
from discharging.
For models without Navigation System, the
Climate Ctrl. Timer operates repeatedly ev-
ery day once it is turned on.
Operating tips for using Climate
Ctrl. Timer
• The Climate Ctrl. Timer will only start
when the power switch is in the LOCK/
OFF or ACC position. • To turn off the Climate Ctrl. Timer func-
tion, turn off the “Climate Ctrl. Timer1” and
"Climate Ctrl. Timer2" setting in the video
information display using the
button on the steering wheel. The start
and stop time settings will not be deleted
even if the Climate Ctrl. Timer function is
turned off.
• While the Climate Ctrl. Timer is operating, the Climate Ctrl. Timer indicator and the
charging status indicator lights flash. If
the Climate Ctrl. Timer is set to activate,
the Climate Ctrl. Timer indicator illumi-
nates.*
• If the Climate Ctrl. Timer starts operating while the vehicle is being charged, the
time required for charging will be longer.
• Operating the Climate Ctrl. Timer or re- mote climate control in an environment
where the temperature is low may de-
crease the rate of battery charge.
4-40Monitor, climate, audio, phone and voice recognition systems
Page 352 of 596
•Do not use the LDW system under the
following conditions as it may not
function properly:
– During bad weather (rain, fog,
snow, etc.).
– When driving on slippery roads,
such as on ice or snow.
– When driving on winding or un-
even roads.
– When there is a lane closure due to
road repairs.
– When driving in a makeshif t or
temporary lane.
– When driving on roads where the
lane width is too narrow.
– When driving without normal tire
conditions (for example, tire wear,
low tire pressure, installation of
spare tire, tire chains, nonstan-
dard wheels).
– When the vehicle is equipped with
non-original brake parts or sus-
pension parts.
– When you are towing a trailer or
other vehicle. •
The system may not function prop-
erly under the following conditions:
– On roads where there are multiple
parallel lane markers; lane mark-
ers that are faded or not painted
clearly; yellow painted lane mark-
ers; non-standard lane markers;
or lane markers covered with wa-
ter, dirt, snow, etc.
– On roads where the discontinued
lane markers are still detectable.
– On roads where there are sharp
curves.
– On roads where there are sharply
contrasting objects, such as shad-
ows, snow, water, wheel ruts,
seams or lines remaining af ter
road repairs. (The LDW system
could detect these items as lane
markers.)
– On roads where the traveling lane
merges or separates.
– When the vehicle’s traveling direc-
tion does not align with the lane
marker.
– When traveling close to the ve-
hicle in front of you, which ob-
structs the lane camera unit de-
tection range. –
When rain, snow, dirt or an object
adheres to the windshield in front
of the lane camera unit.
– When the headlights are not
bright due to dirt on the lens or if
the aiming is not adjusted
properly.
– When strong light enters the lane
camera unit (for example, the light
directly shines on the front of the
vehicle at sunrise or sunset).
– When a sudden change in bright-
ness occurs (for example, when
the vehicle enters or exits a tunnel
or under a bridge).
SYSTEM TEMPORARILY
UNAVAILABLE
If the vehicle is parked in direct sunlight
under high temperature conditions (over
approximately 104°F [40°C]) and then
started, the LDW system may be deacti-
vated automatically and the following
message will appear in the vehicle infor-
mation display: “Unavailable: High Cabin
Temperature.”
When the interior temperature is reduced,
the LDW system will resume operating au-
tomatically
Starting and driving5-29
Page 520 of 596
8 Maintenance and do-it yourself
Maintenance requirement.......................8-2
Scheduled maintenance .....................8-2
General maintenance ........................8-2
Where to go for service .......................8-2
General maintenance ...........................8-2
Explanation of maintenance items ...........8-2
Maintenance precautions .......................8-5
Motor compartment check locations ...........8-7
Cooling system .................................8-8
Checking coolant level .......................8-9
Changing coolant ............................8-9
Reduction gear fluid ............................ 8-10
Brake fluid ...................................... 8-10
Windshield-washer fluid .........................8-11
12-volt battery .................................. 8-12
Jump starting ............................... 8-14
Windshield wiper blades ........................8-14
Cleaning .................................... 8-14
Replacing ................................... 8-14Rear window wiper blade
...................8-17
Brakes ......................................... 8-17
Brake pad wear warning ....................8-17
Fuses .......................................... 8-18
Motor compartment ........................ 8-18
Passenger compartment ...................8-21
Nissan Intelligent Key® battery replacement ....8-22
Lights .......................................... 8-24
Headlights .................................. 8-25
Fog lights (if so equipped) ...................8-25
Exterior and interior lights ...................8-26
Wheels and tires ............................... 8-28
Tire pressure ................................ 8-28
Tire labeling ................................. 8-33
Types of tires ................................ 8-35
Tire chains .................................. 8-36
Changing wheels and tires ..................8-37
Emergency tire puncture repair kit ..........8-39
Page 545 of 596
Replacing the fog light bulb
If fog light bulb replacement is required, it is
recommended that you visit a NISSAN cer-
tified LEAF dealer for this service.
EXTERIOR AND INTERIOR LIGHTS
ItemWattage ( W ) Bulb No.
Headlight assembly (Type A) (if so equipped)* High* 60HB3
Low* 55H11
Park/Turn signal* 28/87444NA
Side marker* ——
Headlight assembly (Type B) (if so equipped)* High* ——
Low* ——
Daytime running (if so equipped)* ——
Park/Turn signal* 28/87444NA
Side marker* ——
Front fog light (if so equipped)* 35H8
Charge port lid light* ——
Rear combination light Turn signal 21WY21W
Stop/Tail* ——
Back-up 16W16W
Side marker* ——
License plate light* 5W5W
Map light* ——
Door mirror turn signal light (if so equipped)* ——
High-mounted stop light* ——
Vanity mirror light* 1.8—
Glove box light* 1.4—
Room light* 8—
Cargo light 5W5W
* It is recommended that you visit a NISSAN certified LEAF dealer for replacement.
NOTE:
Always check with the Parts Department at a NISSAN certified LEAF dealer for the
latest information about parts.
8-26Maintenance and do-it yourself
Page 587 of 596
Intelligent Lane Intervention (I-LI)......5-31Intelligent Ride Control...........5-162Intelligent Trace Control..........5-162Interior light replacement..........8-26Interior lights..................2-69ISOFIX child restraints.............1-23
J
Jump starting.................6-10
K
Key fob battery replacement........8-22Keyless entry
With Intelligent Key system
(See Intelligent Key system)
.......3-14KeysFor Intelligent Key system.........3-2Keys, For Intelligent Key system.......3-7
L
LabelsAir bag warning labels..........1-62Air conditioner specification label. . . .9-9Emission control information label. . .9-8F.M.V.S.S./C.M.V.S.S. certification label. .9-8Motor serial number............9-8Tire and Loading Information
label.................. .8-31, 9-9
Vehicle identification number (VIN)
plate......................9-7Lane Departure Warning (LDW).......5-26LATCH (Lower Anchors and Tethers for
CHildren) System...............1-23License plate, Installing front license
plate....................... .9-9Light
Air bag warning light........1-62, 2-21Bulb replacement.........8-24,8-25Ceiling light.................2-70Fog light bulb replacement.......8-25Fog light switch..............2-55Headlights..................8-25Headlights bulb replacement......8-25Headlight switch..............2-49Indicator lights...............2-22Interior lights................2-69Low tire pressure warning light.....2-19Map lights................. .2-69Warning/indicator lights and audible
reminders..................2-14Warning lights................2-15Lights, Exterior and interior light
replacement..................8-26Li-ion battery...............EV-2, 2-7Li-ion battery available charge gauge. . .2-9Li-ion battery status check........CH-49Li-ion battery temperature gauge......2-7Li-ion battery warmer............EV-5Loading information
(Refer to vehicle loading information). . .9-10Lock
Automatic door lock............3-6
Child safety rear door lock.........3-6Door locks................. .3-4Power door locks...........3-4, 3-6Rear hatch lock...............3-19Low tire pressure warning light.......2-19Low tire pressure warning system
(Refer to Tire Pressure Monitoring System
(TPMS))
..................... .5-4
M
Maintenance
12-volt battery...............8-12General maintenance...........8-2Indicators for maintenance.......2-38Inside the vehicle..............8-3Maintenance precautions.........8-5Maintenance requirements........8-2Outside the vehicle.............8-2Seat belt maintenance..........1-17Map lights.................. .2-69Mechanical key (Intelligent Key system). .3-3Meters and gauges
Instrument brightness control.....2-54MirrorAutomatic anti-glare inside mirror. . .3-25Outside mirrors..............3-26Vanity mirror................3-25Motor...................... .9-5Before starting system..........5-14Starting the traction motor.......5-15Motor compartment..............8-7Motor serial number..............9-8
10-4Index