power steering NISSAN LEAF 2022 Owner´s Manual
[x] Cancel search | Manufacturer: NISSAN, Model Year: 2022, Model line: LEAF, Model: NISSAN LEAF 2022Pages: 618, PDF Size: 4.3 MB
Page 192 of 618
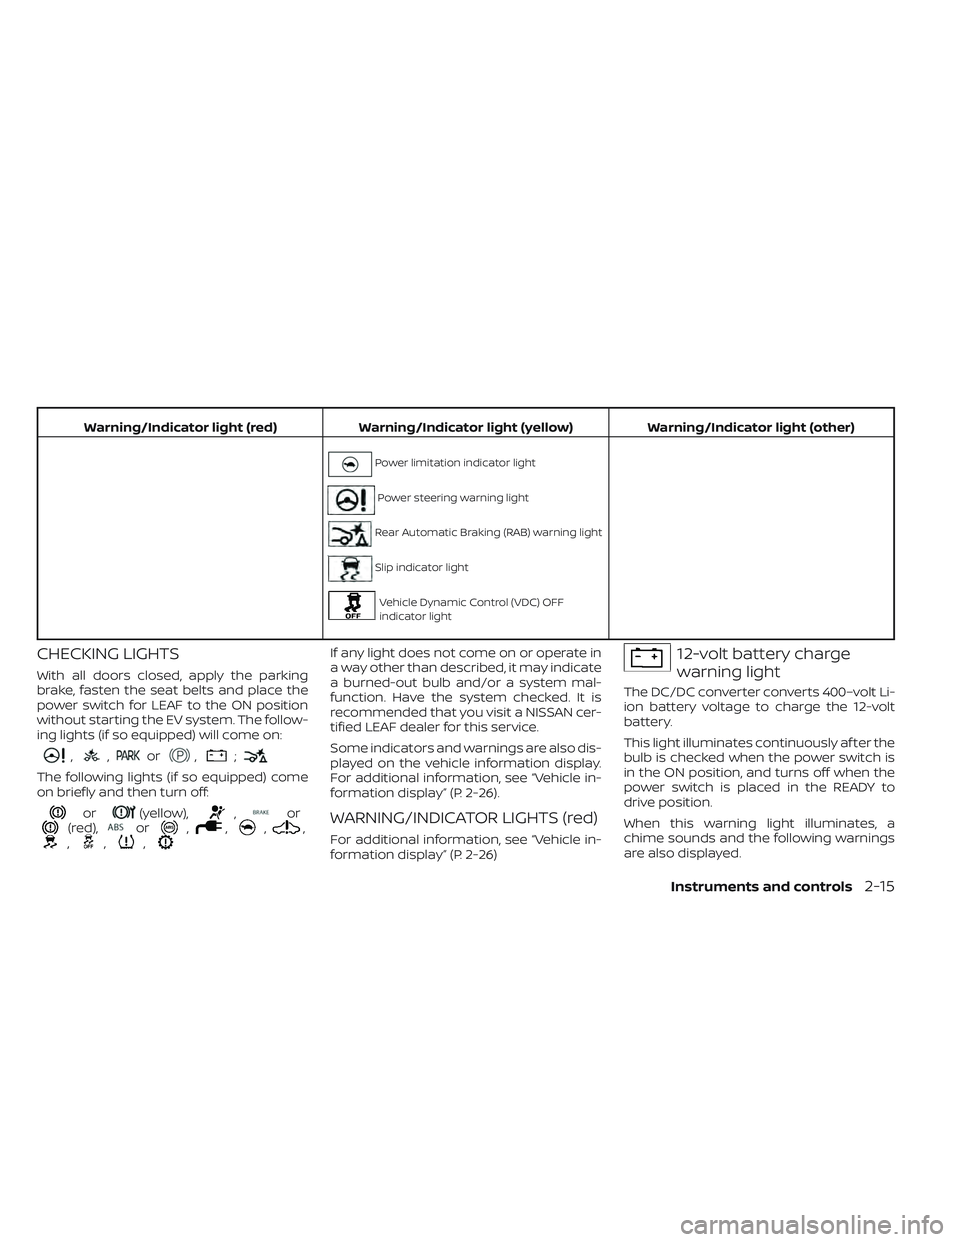
Warning/Indicator light (red)Warning/Indicator light (yellow) Warning/Indicator light (other)
Power limitation indicator light
Power steering warning light
Rear Automatic Braking (RAB) warning light
Slip indicator light
Vehicle Dynamic Control (VDC) OFF
indicator light
CHECKING LIGHTS
With all doors closed, apply the parking
brake, fasten the seat belts and place the
power switch for LEAF to the ON position
without starting the EV system. The follow-
ing lights (if so equipped) will come on:
,,or,;
The following lights (if so equipped) come
on briefly and then turn off:
or(yellow),,or(red),or,,,,,,,
If any light does not come on or operate in
a way other than described, it may indicate
a burned-out bulb and/or a system mal-
function. Have the system checked. It is
recommended that you visit a NISSAN cer-
tified LEAF dealer for this service.
Some indicators and warnings are also dis-
played on the vehicle information display.
For additional information, see “Vehicle in-
formation display” (P. 2-26).
WARNING/INDICATOR LIGHTS (red)
For additional information, see “Vehicle in-
formation display” (P. 2-26)
12-volt battery charge
warning light
The DC/DC converter converts 400–volt Li-
ion battery voltage to charge the 12-volt
battery.
This light illuminates continuously af ter the
bulb is checked when the power switch is
in the ON position, and turns off when the
power switch is placed in the READY to
drive position.
When this warning light illuminates, a
chime sounds and the following warnings
are also displayed.
Instruments and controls2-15
Page 198 of 618
Low tire pressure warning
If the vehicle is being driven with low tire
pressure, the warning light will illuminate.
The “Tire Pressure Low— Add Air” warning
also appears on the vehicle information
display.
When the low tire pressure warning light
illuminates, you should stop and adjust the
tire pressure to the recommended COLD
tire pressure shown on the Tire and Load-
ing Information label. The low tire pressure
warning light does not automatically turn
off when the tire pressure is adjusted. Af ter
the tire is inflated to the recommended
pressure, the vehicle must be driven at
speeds above 16 mph (25 km/h) to activate
the TPMS and turn off the low tire pressure
warning light. Use a tire pressure gauge to
check the tire pressure.
The “Tire Pressure Low— Add Air” warning
appears each time the power switch is
placed in the ON position as long as the low
tire pressure warning light remains
illuminated.
For additional information, see “Vehicle in-
formation display” (P. 2-26, “Tire Pressure
Monitoring System (TPMS)” (P. 5-4) and
(P. 6-3).TPMS malfunction
If the TPMS is not functioning properly, the
low tire pressure warning light will flash for
approximately 1 minute when the power
switch is placed in the ON position. The
light will remain on af ter the 1 minute. Have
the system checked. It is recommended
that you visit a NISSAN certified LEAF dealer
for this service. The “Tire Pressure Low—
Add Air” warning does not appear if the low
tire pressure warning light illuminates to
indicate a TPMS malfunction.
For additional information, see “Vehicle infor-
mation display” (P. 2-26, “Tire Pressure Moni-
toring System (TPMS)” (P. 5-4 and (P. 6-3).
WARNING
• Radio waves could adversely affect
electric medical equipment. Those
who use a pacemaker should contact
the electric medical equipment
manufacturer for the possible influ-
ences before use.
• If the light does not illuminate when
the power switch is placed in the ON
position, have the vehicle checked. It
is recommended that you visit a
NISSAN certified LEAF dealer as soon
as possible for this service. •
If the light illuminates while driving,
avoid sudden steering maneuvers or
abrupt braking, reduce vehicle
speed, pull off the road to a safe loca-
tion and stop the vehicle as soon as
possible. Driving with under-inflated
tires may permanently damage the
tires and increase the likelihood of
tire failure. Serious vehicle damage
could occur and may lead to an acci-
dent and could result in serious per-
sonal injury or death. Check the tire
pressure for all four tires. Adjust the
tire pressure to the recommended
COLD tire pressure shown on the Tire
and Loading Information label to
turn the low tire pressure warning
light OFF. If the light still illuminates
while driving af ter adjusting the tire
pressure, a tire may be flat or the
TPMS may be malfunctioning. If you
have a flat tire, replace it with a re-
placement tire as soon as possible. If
no tire is flat and all tires are properly
inflated, have the vehicle checked.
It is recommended that you visit a
NISSAN certified LEAF dealer for this
service.
Instruments and controls2-21
Page 200 of 618
The indicator illuminates when a part in the
EV system has malfunctioned. If the indica-
tor illuminates in a situation other than
those described above, or if it does not turn
off, there may be a system malfunction.
Have the system checked. It is recom-
mended that you visit a NISSAN certified
LEAF dealer for this service.
WARNING
Power limitation mode can result in re-
duced power and vehicle speed. The re-
duced speed may be lower than other
traffic, which could increase the chance
of a collision. Be especially careful
when driving. If the vehicle cannot
maintain a safe driving speed, pull to
the side of the road in a safe area.
Charge the Li-ion battery if the charge
is low or allow the Li-ion battery to cool.
NOTE:
You can reduce charging time and keep
the Li-ion battery temperature lower if
you:
• Charge more frequently in smaller amounts, and
• Keep the battery at a higher level of charge.
Power steering
warning light
When the power switch is in the ON posi-
tion, the electric power steering warning
light illuminates and turns off when the
power switch is placed in the READY to
drive position. This indicates the electric
power steering system is operational.
If the electric power steering warning light
illuminates while the READY to drive indica-
tor light is ON, it may indicate the electric
power steering system is not functioning
properly and may need servicing. Have the
electric power steering system checked. It
is recommended that you visit a NISSAN
certified LEAF dealer for this service.
When the electric power steering warning
light illuminates while the READY to drive
indicator is ON, the power assist to the
steering will cease operation but you will
still have control of the vehicle. At this time,
greater steering efforts are required to op-
erate the steering wheel, especially in
sharp turns and at low speeds.
For additional information, see “Power
steering system” (P. 5-161).
Rear Automatic Braking
(RAB) warning light
This light comes on when the power switch
is placed in the ON position. It turns off af ter
the EV system is started.
This light illuminates when the RAB system
is turned off in the vehicle information
display.
If the light illuminates when the RAB sys-
tem is on, it may indicate that the system is
unavailable. For additional information, see
“Rear Automatic Braking (RAB)” (P. 5-136).
Slip indicator light
This indicator light will blink when the VDC
system or the traction control system is
operating, thus alerting that the vehicle is
nearing its traction limits. The road surface
may be slippery.
You may feel or hear the system working;
this is normal. The light will blink for a few
seconds af ter the VDC system stops limit-
ing wheel spin.
The indicator light also comes on when
you place the power switch in the ON
position.
Instruments and controls2-23
Page 234 of 618
NOTE:
The heated seats consume less power
than the heater and can be used to either
help extend vehicle range by reducing
heater use or to maximize comfort by
supplementing the heater.
WARNING
Do not use or allow occupants to use
the seat heater if you or the occupants
cannot monitor elevated seat tem-
peratures or have an inability to feel
pain in those body parts in contact with
the seat. Use of the seat heater by such
people could result in serious injury.
CAUTION
• Do not use the seat heater for ex-
tended periods or when no one is us-
ing the seat.
•
Do not put anything on the seat which
insulates heat, such as a blanket,
cushion, seat cover, etc. Otherwise, the
seat may become overheated.
• Do not place anything hard or heavy
on the seat or pierce it with a pin or
similar object. This may result in
damage to the heater. •
Any liquid spilled on the heated seat
should be removed immediately with
a dry cloth.
• When cleaning the seat, never use
gasoline, thinner, or any similar
materials.
• If any malfunctions are found or the
heated seat does not operate, turn
the switch off and have the system
checked. It is recommended that you
visit a NISSAN certified LEAF dealer
for this service.
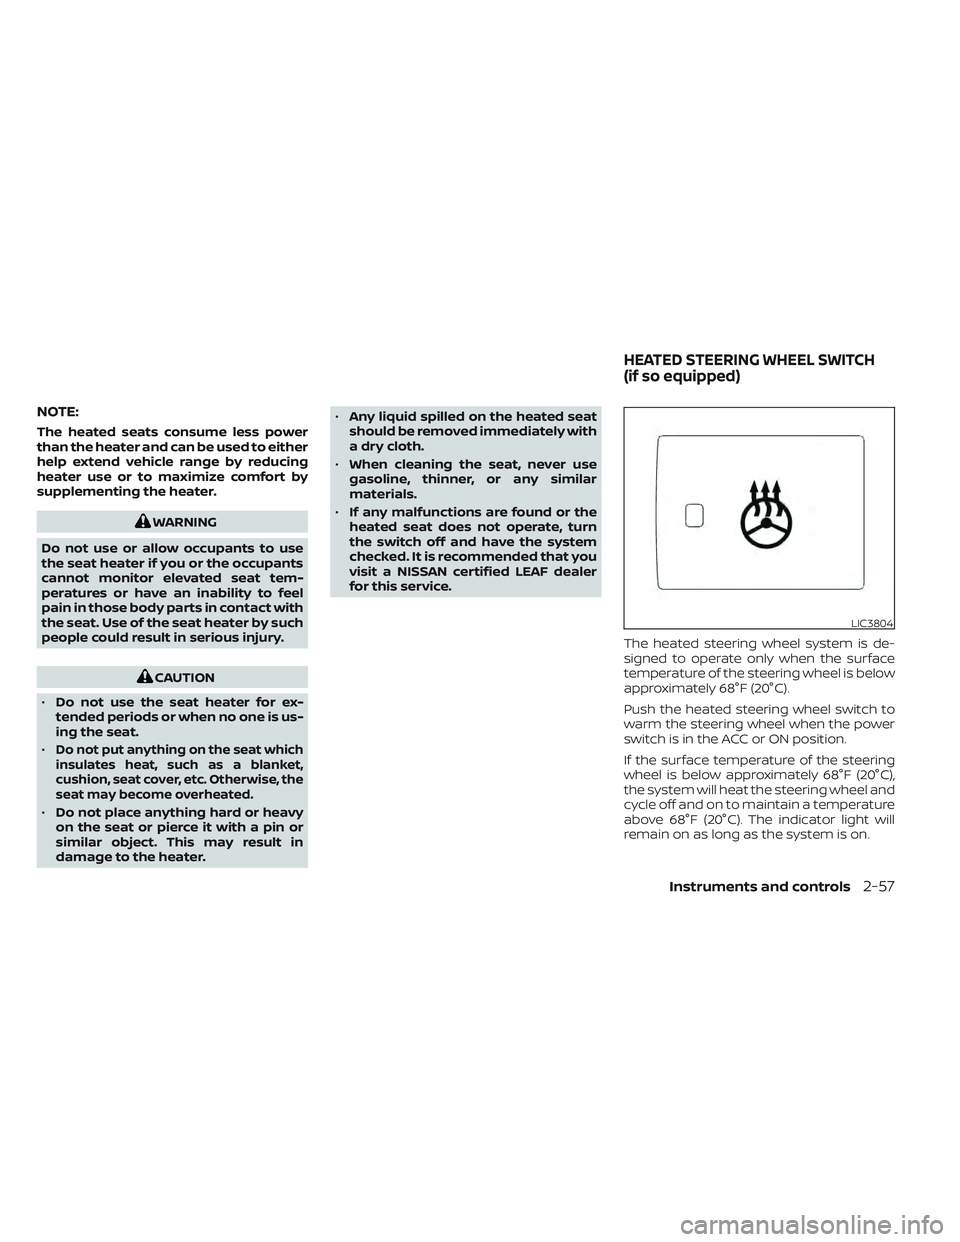
The heated steering wheel system is de-
signed to operate only when the surface
temperature of the steering wheel is below
approximately 68°F (20°C).
Push the heated steering wheel switch to
warm the steering wheel when the power
switch is in the ACC or ON position.
If the surface temperature of the steering
wheel is below approximately 68°F (20°C),
the system will heat the steering wheel and
cycle off and on to maintain a temperature
above 68°F (20°C). The indicator light will
remain on as long as the system is on.
LIC3804
HEATED STEERING WHEEL SWITCH
(if so equipped)
Instruments and controls2-57
Page 235 of 618
Push the switch again to turn the heated
steering wheel system off manually. The
indicator light turns off.
NOTE:
• If the surface temperature of the steer-ing wheel is above 68°F (20°C) when the
switch is turned on, the system will not
heat the steering wheel. This is not a
malfunction.
• If the outside temperature is low (ap- proximately 50°F (10°C) or less) and the
Climate Control Timer or Remote Cli-
mate Control are used, the steering
wheel heater will automatically oper-
ate in the following conditions.– When using the Climate Control Timer: Operates from approximately
15 minutes before the set departure
time until the set departure time.
– When using Remote Climate Control: Operates 15 minutes af ter Remote
Climate Control starts.
• The heated steering wheel consumes less power than the heater and can be
used to either help extend vehicle
range by reducing heater use or to
maximize comfort by supplementing
the heater. The Emergency Call (SOS) system button
is used in combination with a
NissanConnect® Services powered by
SiriusXM® subscription to call for assis-
tance in case of an emergency.
Pressing the button will (with a paid sub-
scription) reach a Response Specialist that
will provide assistance based on the situa-
tion described by the vehicle’s occupant.
For additional information, or to enroll your
vehicle, refer to www.NissanUSA.com/
connect or call 855–426–6628.
To open the charge port lid, push the
charge port lid switch. For additional infor-
mation, see “Charge port lid” (P. 3-20).
LIC3913LIC3808
EMERGENCY CALL (SOS) BUTTON
(if so equipped)
CHARGE PORT LID SWITCH
2-58Instruments and controls
Page 254 of 618
3 Pre-driving checks and adjustments
Keys.............................................3-2NISSAN Intelligent Key® .......................3-2
NISSAN Vehicle Immobilizer System
keys..........................................3-3
Doors ...........................................3-4
Locking with key .............................3-5
Locking with inside lock knob ................3-5
Locking with power door lock switch .........3-5
Automatic door locks ........................3-6
Child safety rear door lock ....................3-6
NISSAN Intelligent Key® system ..................3-6
Operating range .............................3-8
Door locks/unlocks precaution ...............3-8
NISSAN Intelligent Key® Operation ............3-9
How to use the remote keyless entry
function ..................................... 3-12
12-volt battery saver system ................3-16
Warning signals ............................. 3-16Troubleshooting guide
......................3-16
Hood ........................................... 3-18
Rear hatch ..................................... 3-19
Secondary rear hatch release ...............3-19
Charge port lid ................................. 3-20
Opening charge port lid .....................3-20
Charge port cap ............................ 3-22
Steering wheel ................................. 3-22
Tilt and telescopic operation ................3-23
Sun visors ...................................... 3-23
Vanity mirrors ............................... 3-24
Mirrors ......................................... 3-24
Manual anti-glare rearview mirror
(if so equipped) .............................. 3-24
Automatic anti-glare rearview mirror
(if so equipped) .............................. 3-24
Outside mirrors ............................. 3-25
Page 286 of 618
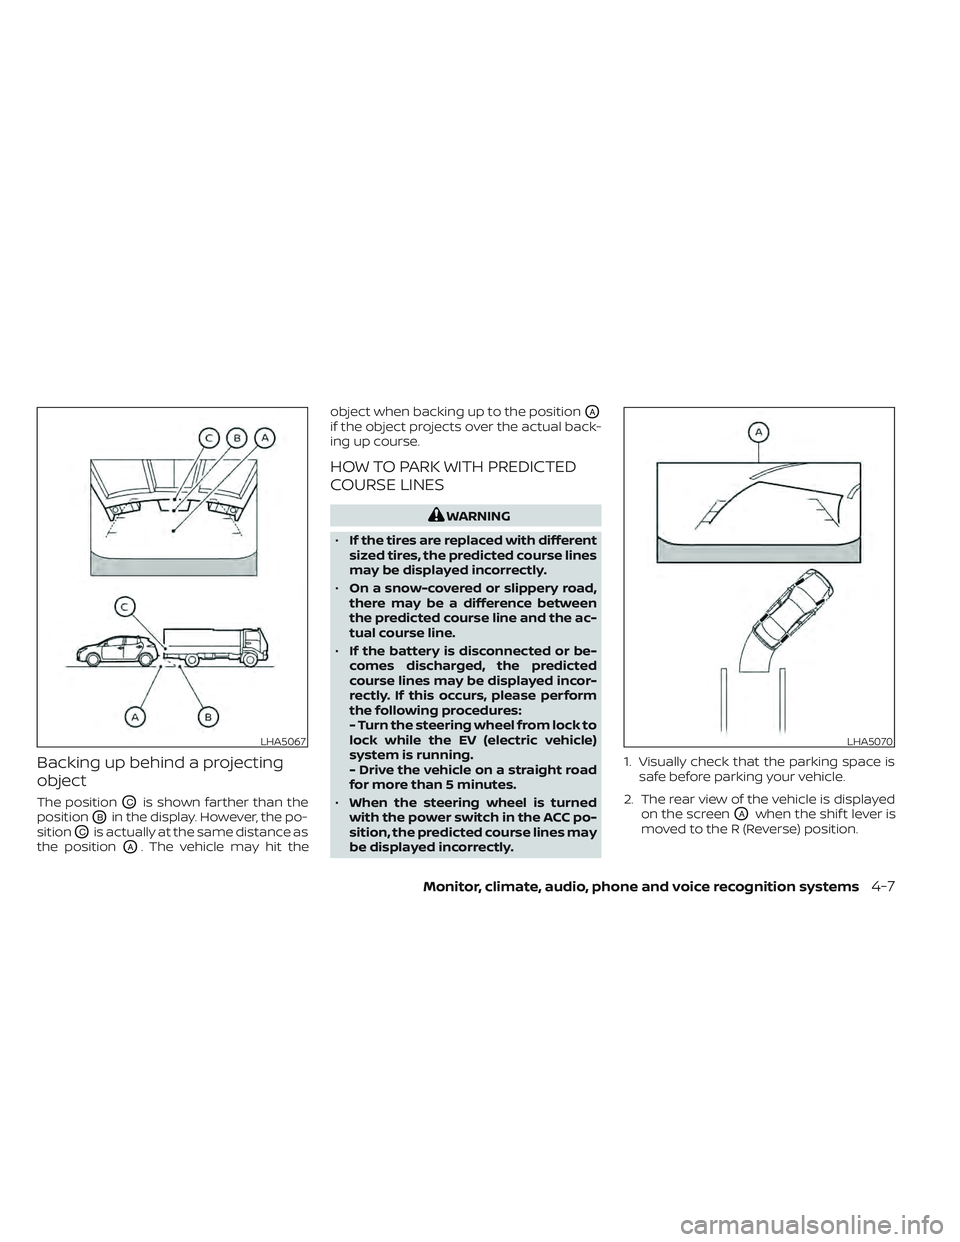
Backing up behind a projecting
object
The positionOCis shown farther than the
position
OBin the display. However, the po-
sition
OCis actually at the same distance as
the position
OA. The vehicle may hit the object when backing up to the position
OA
if the object projects over the actual back-
ing up course.
HOW TO PARK WITH PREDICTED
COURSE LINES
WARNING
• If the tires are replaced with different
sized tires, the predicted course lines
may be displayed incorrectly.
• On a snow-covered or slippery road,
there may be a difference between
the predicted course line and the ac-
tual course line.
• If the battery is disconnected or be-
comes discharged, the predicted
course lines may be displayed incor-
rectly. If this occurs, please perform
the following procedures:
- Turn the steering wheel from lock to
lock while the EV (electric vehicle)
system is running.
- Drive the vehicle on a straight road
for more than 5 minutes.
• When the steering wheel is turned
with the power switch in the ACC po-
sition, the predicted course lines may
be displayed incorrectly. 1. Visually check that the parking space is
safe before parking your vehicle.
2. The rear view of the vehicle is displayed on the screen
OAwhen the shif t lever is
moved to the R (Reverse) position.
LHA5067LHA5070
Monitor, climate, audio, phone and voice recognition systems4-7
Page 296 of 618
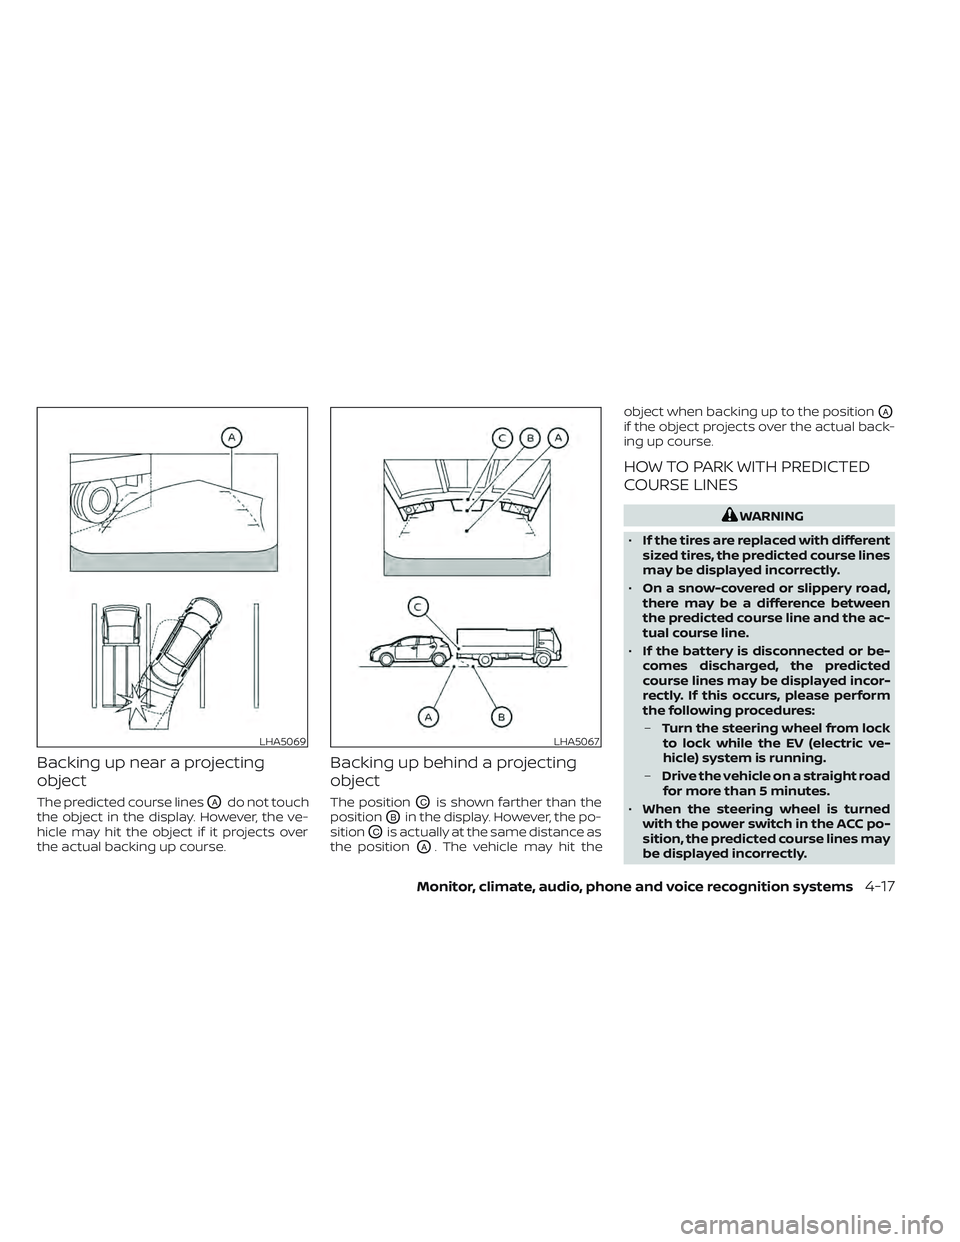
Backing up near a projecting
object
The predicted course linesOAdo not touch
the object in the display. However, the ve-
hicle may hit the object if it projects over
the actual backing up course.
Backing up behind a projecting
object
The positionOCis shown farther than the
position
OBin the display. However, the po-
sition
OCis actually at the same distance as
the position
OA. The vehicle may hit the object when backing up to the position
OA
if the object projects over the actual back-
ing up course.
HOW TO PARK WITH PREDICTED
COURSE LINES
WARNING
• If the tires are replaced with different
sized tires, the predicted course lines
may be displayed incorrectly.
• On a snow-covered or slippery road,
there may be a difference between
the predicted course line and the ac-
tual course line.
• If the battery is disconnected or be-
comes discharged, the predicted
course lines may be displayed incor-
rectly. If this occurs, please perform
the following procedures:
– Turn the steering wheel from lock
to lock while the EV (electric ve-
hicle) system is running.
– Drive the vehicle on a straight road
for more than 5 minutes.
• When the steering wheel is turned
with the power switch in the ACC po-
sition, the predicted course lines may
be displayed incorrectly.
LHA5069LHA5067
Monitor, climate, audio, phone and voice recognition systems4-17
Page 297 of 618
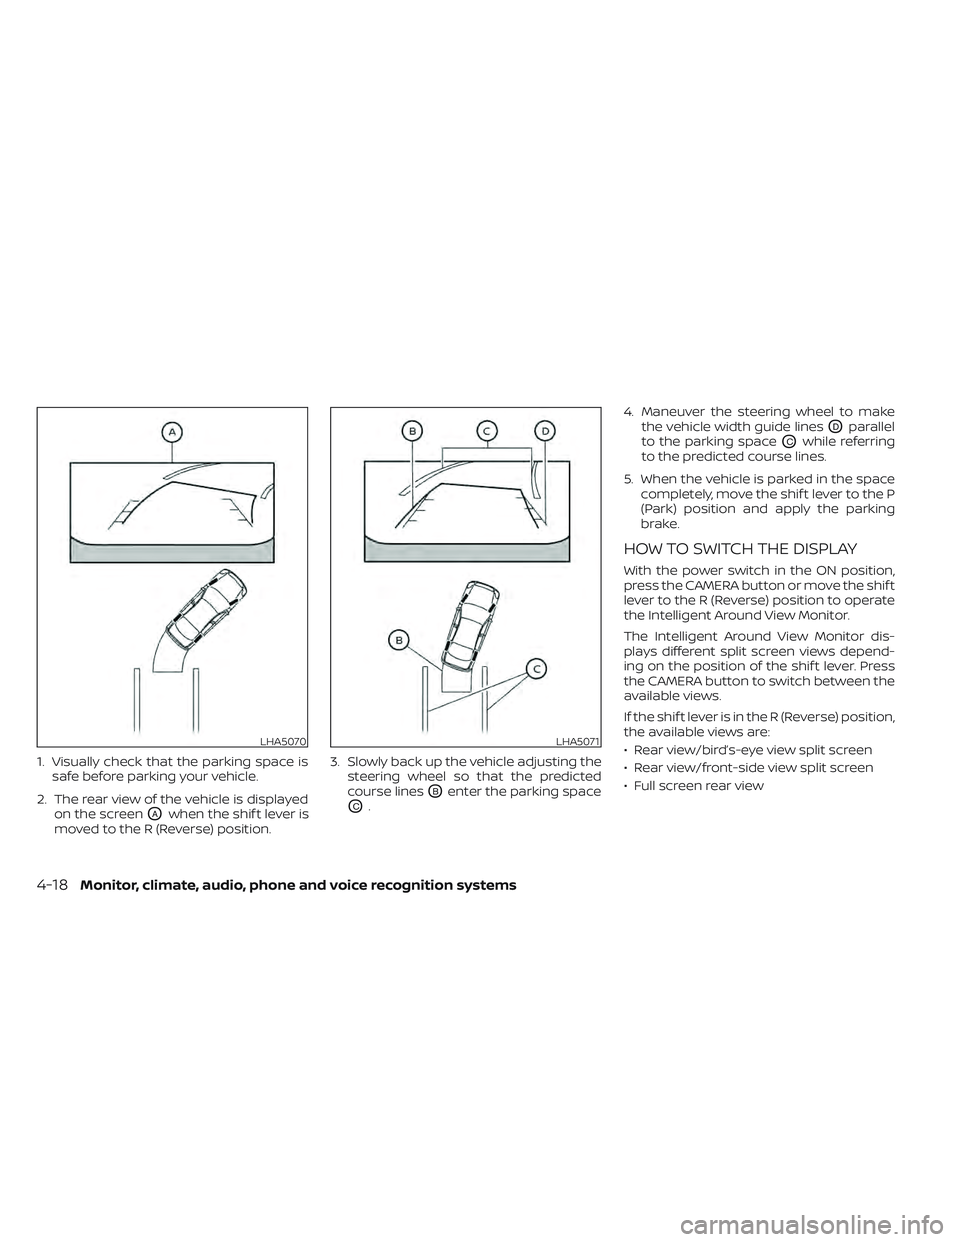
1. Visually check that the parking space issafe before parking your vehicle.
2. The rear view of the vehicle is displayed on the screen
OAwhen the shif t lever is
moved to the R (Reverse) position. 3. Slowly back up the vehicle adjusting the
steering wheel so that the predicted
course lines
OBenter the parking space
OC. 4. Maneuver the steering wheel to make
the vehicle width guide lines
ODparallel
to the parking space
OCwhile referring
to the predicted course lines.
5. When the vehicle is parked in the space completely, move the shif t lever to the P
(Park) position and apply the parking
brake.
HOW TO SWITCH THE DISPLAY
With the power switch in the ON position,
press the CAMERA button or move the shif t
lever to the R (Reverse) position to operate
the Intelligent Around View Monitor.
The Intelligent Around View Monitor dis-
plays different split screen views depend-
ing on the position of the shif t lever. Press
the CAMERA button to switch between the
available views.
If the shif t lever is in the R (Reverse) position,
the available views are:
• Rear view/bird’s-eye view split screen
• Rear view/front-side view split screen
• Full screen rear view
LHA5070LHA5071
4-18Monitor, climate, audio, phone and voice recognition systems
Page 319 of 618
5. Press thebutton to select “De-
parture time” and then press the OK
button.
6. Press the
button to set “Hour”
and then press the OK button.
7. Press the
button to set “Minute”
and then press the OK button. The set-
ting can be changed with an increment
step of 10 minutes.
8. Press the
button to select
“Climate Temperature” and then press
the OK button.
9. Press the
button to set Cli-
mate Temperature and then press the
OK button.
10. * Press the
button to select
"Days" and then press the OK button.
The current day of the week is dis-
played with an underline.
Press the
button to select the
days of the week you wish to activate
the Climate Control system and then
press the OK button. The indicator light
of the selected button will turn on. 11. * Af ter setting the day of the week, press
the Back button and return to the pre-
vious screen.
The set day of the week is lit in white.
12. Af ter the setting is complete, place the power switch in the OFF position, and
then connect the charge connector to
the vehicle.
* models with Navigation System
Info
The Climate Ctrl. Timer does not activate if
the charge connector is not connected to
the vehicle. When the “Battery Operation
OK” is turned on and the charging connec-
tor is not connected to the vehicle, the Cli-
mate Ctrl. Timer will activate for 15 minutes.
When the outside temperature is high, the
interior temperature may not reach the set
temperature within the 15 minutes.
Turn "Battery Operation OK" to OFF when it
is not necessary to operate air condition-
ing timer in order to prevent Li-ion battery
from discharging.
For models without Navigation System, the
Climate Ctrl. Timer operates repeatedly ev-
ery day once it is turned on.
Operating tips for using Climate
Ctrl. Timer
• The Climate Ctrl. Timer will only start when the power switch is in the LOCK/
OFF or ACC position.
• To turn off the Climate Ctrl. Timer func- tion, turn off the “Climate Ctrl. Timer1” and
"Climate Ctrl. Timer2" setting in the video
information display using the
button on the steering wheel. The start
and stop time settings will not be deleted
even if the Climate Ctrl. Timer function is
turned off.
• While the Climate Ctrl. Timer is operating, the Climate Ctrl. Timer indicator and the
charging status indicator lights flash. If
the Climate Ctrl. Timer is set to activate,
the Climate Ctrl. Timer indicator
illuminates.*
• If the Climate Ctrl. Timer starts operating while the vehicle is being charged, the
time required for charging will be longer.
• Operating the Climate Ctrl. Timer or re- mote climate control in an environment
where the temperature is low may de-
crease the rate of battery charge.
4-40Monitor, climate, audio, phone and voice recognition systems