key NISSAN LEAF 2022 Owner´s Manual
[x] Cancel search | Manufacturer: NISSAN, Model Year: 2022, Model line: LEAF, Model: NISSAN LEAF 2022Pages: 618, PDF Size: 4.3 MB
Page 287 of 618
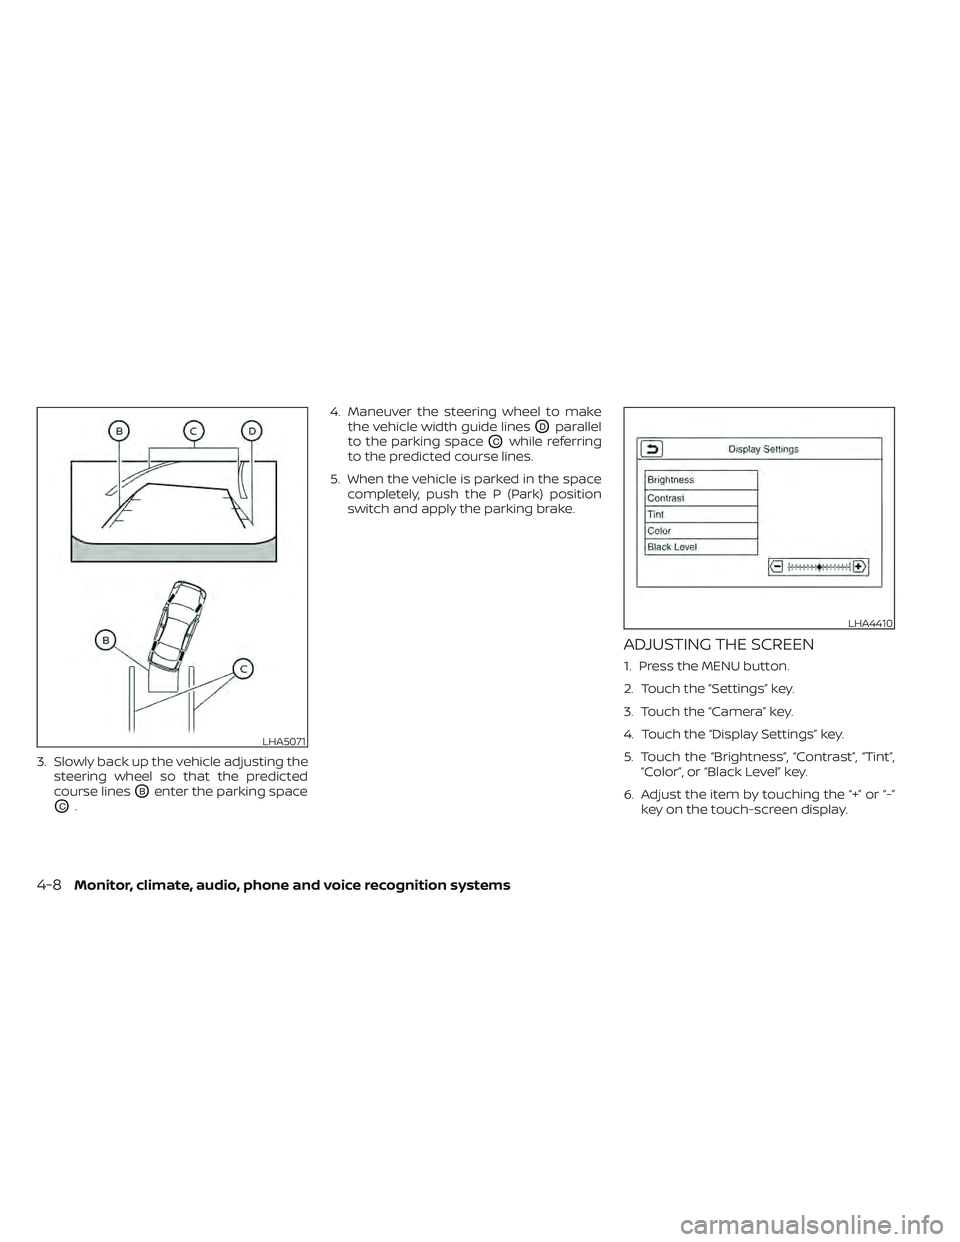
3. Slowly back up the vehicle adjusting thesteering wheel so that the predicted
course lines
OBenter the parking space
OC. 4. Maneuver the steering wheel to make
the vehicle width guide lines
ODparallel
to the parking space
OCwhile referring
to the predicted course lines.
5. When the vehicle is parked in the space completely, push the P (Park) position
switch and apply the parking brake.
ADJUSTING THE SCREEN
1. Press the MENU button.
2. Touch the ”Settings” key.
3. Touch the “Camera” key.
4. Touch the “Display Settings” key.
5. Touch the “Brightness”, “Contrast”, “Tint”,“Color”, or “Black Level” key.
6. Adjust the item by touching the “+” or “-” key on the touch-screen display.
LHA5071
LHA4410
4-8Monitor, climate, audio, phone and voice recognition systems
Page 288 of 618
NOTE:Do not adjust any of the display set-
tings of the RearView Monitor while
the vehicle is moving. Make sure the
parking brake is firmly applied.
HOW TO TURN ON AND OFF
PREDICTED COURSE LINES
To toggle ON and OFF the predicted course
lines while in the P (Park) position:
1. Touch the “Settings” key.
2. Touch the “Camera” key.
3. Touch the “Predicted Course Lines” keyto turn the feature ON or OFF.
Pressing the CAMERA button while the shif t
lever is in the R (Reverse) position can also
turn on and off the predicted course lines.
REARVIEW MONITOR SYSTEM
LIMITATIONS
WARNING
Listed below are the system limitations
for RearView Monitor. Failure to oper-
ate the vehicle in accordance with
these system limitations could result in
serious injury or death. •
The system cannot completely elimi-
nate blind spots and may not show
every object.
• Underneath the bumper and the cor-
ner areas of the bumper cannot be
viewed on the RearView Monitor be-
cause of its monitoring range limita-
tion. The system will not show small
objects below the bumper, and may
not show objects close to the bum-
per or on the ground.
• Objects viewed in the RearView
Monitor differ from actual distance
because a wide-angle lens is used.
• Objects in the RearView Monitor will
appear visually opposite compared
to when viewed in the rearview and
outside mirrors.
• Use the displayed lines as a refer-
ence. The lines are highly affected by
the number of occupants, fuel level,
vehicle position, road conditions and
road grade.
• Make sure that the rear hatch is se-
curely closed when backing up.
• Do not put anything on the rearview
camera. The rearview camera is in-
stalled above the license plate. •
When washing the vehicle with high
pressure water, be sure not to spray it
around the camera. Otherwise, water
may enter the camera unit causing
water condensation on the lens, a
malfunction, fire or an electric shock.
• Do not strike the camera. It is a preci-
sion instrument. Otherwise, it may
malfunction or cause damage result-
ing in a fire or an electric shock.
The following are operating limitations and
do not represent a system malfunction:
• When the temperature is extremely high or low, the screen may not clearly display
objects.
• When strong light directly shines on the camera, objects may not be displayed
clearly.
• Vertical lines may be seen in objects on the screen. This is due to strong reflected
light from the bumper.
• The screen may flicker under fluorescent light.
• The colors of objects on the RearView Monitor may differ somewhat from the
actual color of objects.
• Objects on the monitor may not be clear in a dark environment.
Monitor, climate, audio, phone and voice recognition systems4-9
Page 298 of 618
If the shif t lever is in the P (Park) and D
(Drive) position, the available views are:
• Front view/bird’s-eye view split screen
• Front view/front-side view split screen
The display will switch from the Intelligent
Around View Monitor screen when:
• The shif t lever is in the D (Drive) positionand the vehicle speed increases above
approximately 6 mph (10 km/h).
• A different screen is selected.
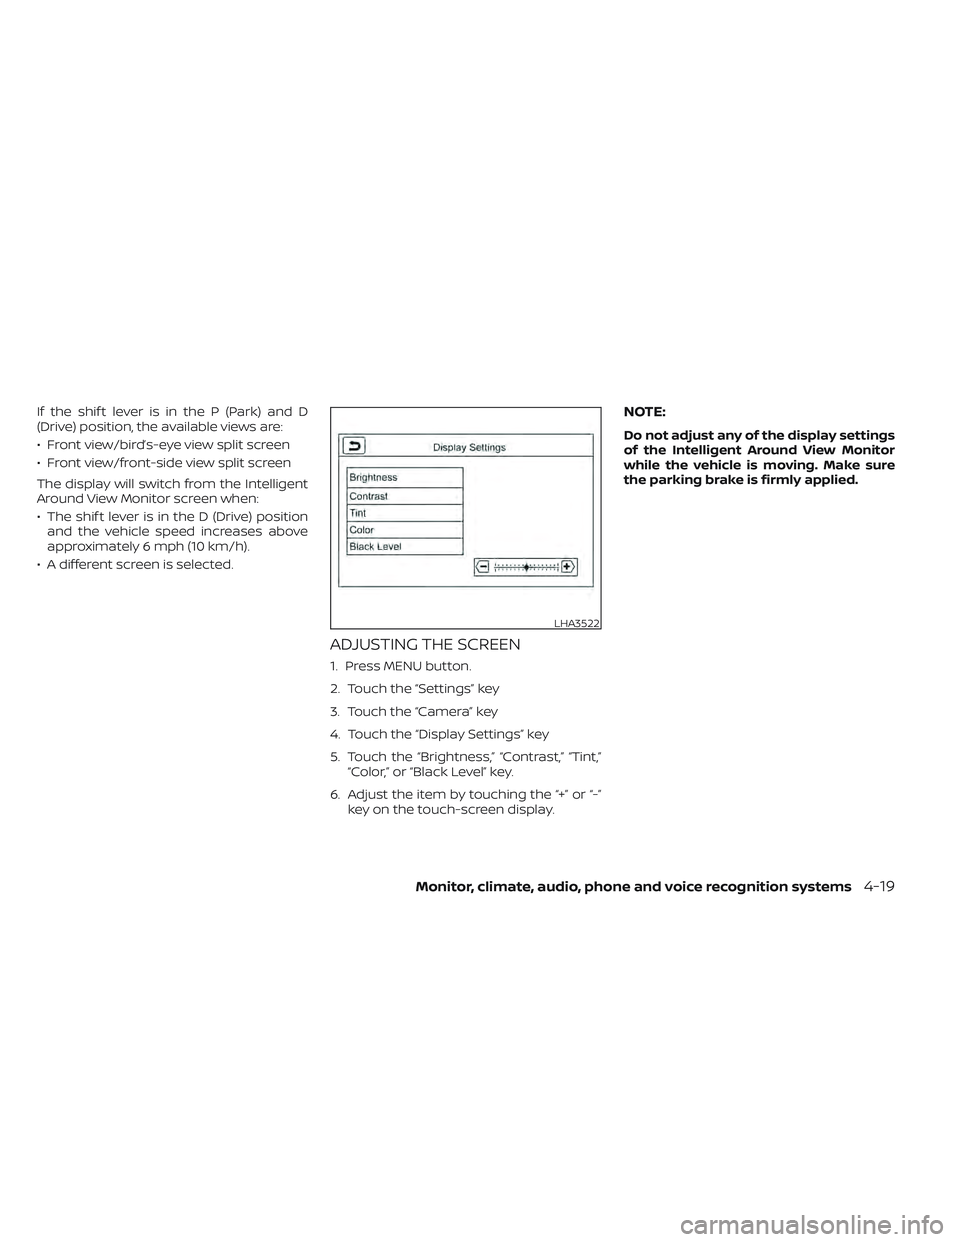
ADJUSTING THE SCREEN
1. Press MENU button.
2. Touch the “Settings” key
3. Touch the “Camera” key
4. Touch the “Display Settings” key
5. Touch the “Brightness,” “Contrast,” “Tint,” “Color,” or “Black Level” key.
6. Adjust the item by touching the “+” or “-” key on the touch-screen display.
NOTE:
Do not adjust any of the display settings
of the Intelligent Around View Monitor
while the vehicle is moving. Make sure
the parking brake is firmly applied.
LHA3522
Monitor, climate, audio, phone and voice recognition systems4-19
Page 325 of 618
5 Starting and driving
Precautions when starting and driving..........5-4
Tire Pressure Monitoring System
(TPMS) .......................................5-4
Avoiding collision and rollover ................5-7
Off-roadrecovery ............................5-8
Rapid air pressure loss .......................5-8
Drinking alcohol/drugs and driving ...........5-9
Push-button power switch ......................5-9
NISSAN Intelligent Key® system ..............5-10
Operating range for EV start function .......5-10
Power switch operation ......................5-11
Power switch positions ......................5-12
Emergency EV shut off ......................5-12
NISSAN Intelligent Key® battery
discharge ................................... 5-12
NISSAN Vehicle Immobilizer System .........5-13
Before starting the EV system ..................5-13
Starting the EV system ......................... 5-14
Driving the vehicle .............................. 5-14
Electric shif t control system .................5-14
Parking brake .................................. 5-18
Pedal type ................................... 5-19
Switch type (models with electronic
parking brake system) ......................5-19
e-Pedal system ................................ 5-21
e-Pedal system operation ...................5-21e-Pedal system limitations
..................5-24
System malfunction ......................... 5-24
Lane Departure Warning (LDW) .................5-25
LDW system operation ......................5-26
How to enable/disable the LDW system .....5-27
LDW system limitations .....................5-27
System temporarily unavailable .............5-28
System malfunction ......................... 5-29
System maintenance .......................5-29
Intelligent Lane Intervention (I-LI) ...............5-30
I-LI system operation ........................ 5-31
How to enable/disable the I-LI system ......5-32
I-LI system limitations .......................5-33
System temporarily unavailable .............5-34
System malfunction ......................... 5-35
S
ystem maintenance ....................... 5-35
Blind Spot Warning (BSW) .......................5-36
BSW system operation ......................5-37
How to enable/disable the BSW system .....5-38
BSW system limitations .....................5-39
BSW driving situations .......................5-40
System temporarily unavailable .............5-43
System maintenance .......................5-44
Intelligent Blind Spot Intervention (I-BSI) ........5-45
I-BSI system operation ......................5-47
How to enable/disable the I-BSI system .....5-48
Page 335 of 618
NISSAN INTELLIGENT KEY®
SYSTEM
The Intelligent Key system allows the driver
to start the EV system without taking the
key out of a pocket or purse. The operating
environment and/or conditions may affect
Intelligent Key system operation.
Some indicators and warnings for opera-
tion are displayed on the vehicle informa-
tion display. For additional information, see
“Vehicle information display” (P. 2-26).
CAUTION
• Be sure to carry the Intelligent Key
with you when operating the vehicle.
• Never leave the Intelligent Key inside
the vehicle when you leave the
vehicle.
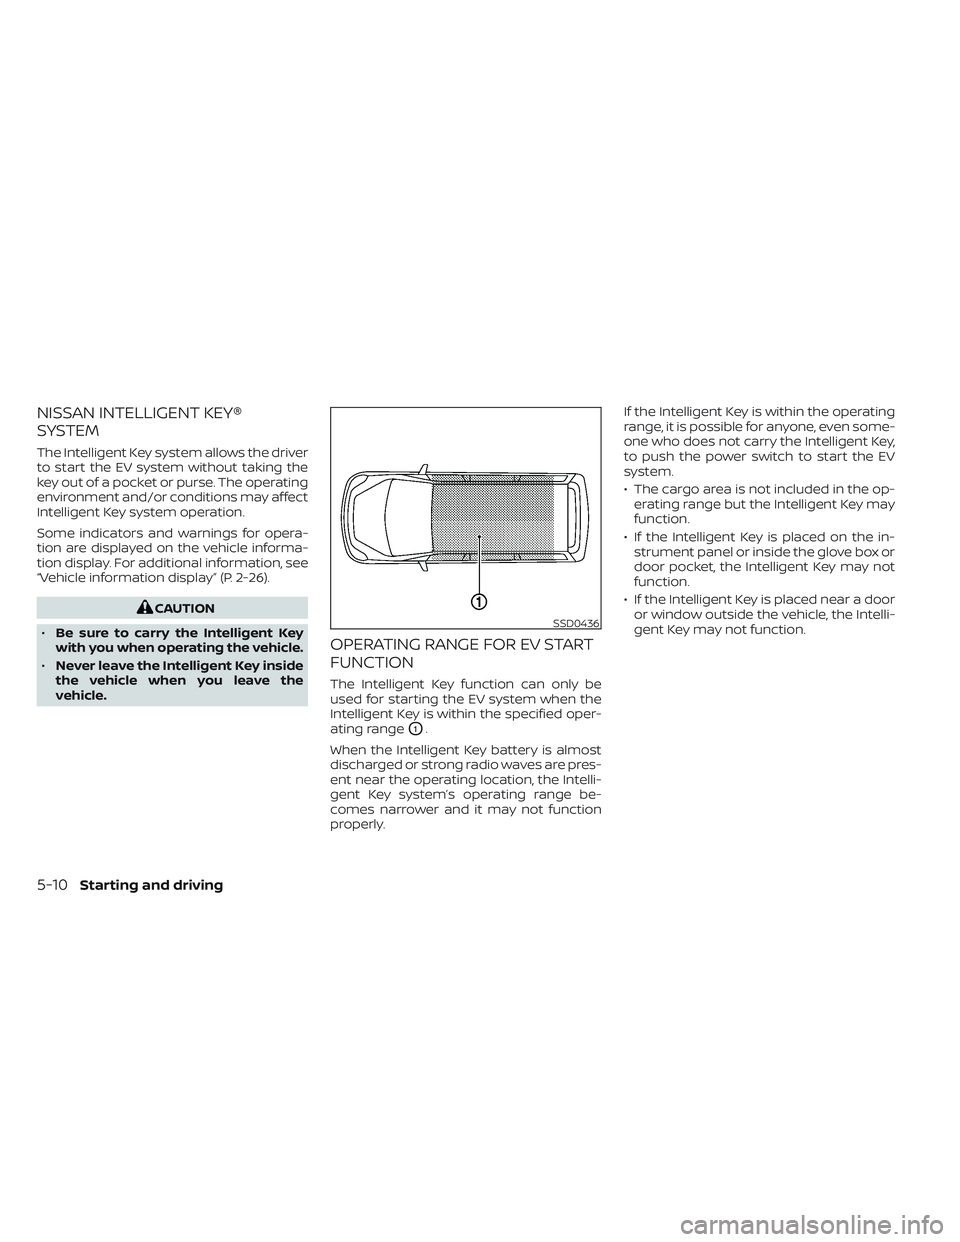
OPERATING RANGE FOR EV START
FUNCTION
The Intelligent Key function can only be
used for starting the EV system when the
Intelligent Key is within the specified oper-
ating range
O1.
When the Intelligent Key battery is almost
discharged or strong radio waves are pres-
ent near the operating location, the Intelli-
gent Key system’s operating range be-
comes narrower and it may not function
properly. If the Intelligent Key is within the operating
range, it is possible for anyone, even some-
one who does not carry the Intelligent Key,
to push the power switch to start the EV
system.
• The cargo area is not included in the op-
erating range but the Intelligent Key may
function.
• If the Intelligent Key is placed on the in- strument panel or inside the glove box or
door pocket, the Intelligent Key may not
function.
• If the Intelligent Key is placed near a door or window outside the vehicle, the Intelli-
gent Key may not function.
SSD0436
5-10Starting and driving
Page 337 of 618
POWER SWITCH POSITIONS
LOCK (Normal parking position)
The power switch can only be locked in this
position.
The power switch will be unlocked when it
is placed in the ACC position while the
driver is carrying the Intelligent Key.
ACC (Accessories)
This position activates electrical accesso-
ries, such as the radio, when the EV system
is off.
ON
This position turns on the EV system and
electrical accessories.
READY (Normal operating
position)
This position turns on the EV system and
electrical accessories and the vehicle can
be driven.
OFF
This position turns off the EV system.The power switch cannot be placed in the
LOCK position until the vehicle is in the P
(Park) position.
CAUTION
Do not leave the vehicle with the power
switch in the ACC position for an ex-
tended period of time. This can dis-
charge the 12-volt battery.
NOTE:
If the power switch is pushed quickly or
is pushed twice quickly, the switch may
not function even if a chime sound is
heard. Push the switch again more
slowly.
EMERGENCY EV SHUT OFF
To shut off the EV system in an emergency
situation while driving, perform the follow-
ing procedure:
• Rapidly push the power switch three con- secutive times in less than 1.5 seconds, or
• Push and hold the power switch for more than 2 seconds.
NISSAN INTELLIGENT KEY®
BATTERY DISCHARGE
If the Intelligent Key battery is discharged
or environmental conditions interfere with
the Intelligent Key operation, start the EV
system in the READY to drive mode accord-
ing to the following procedure:
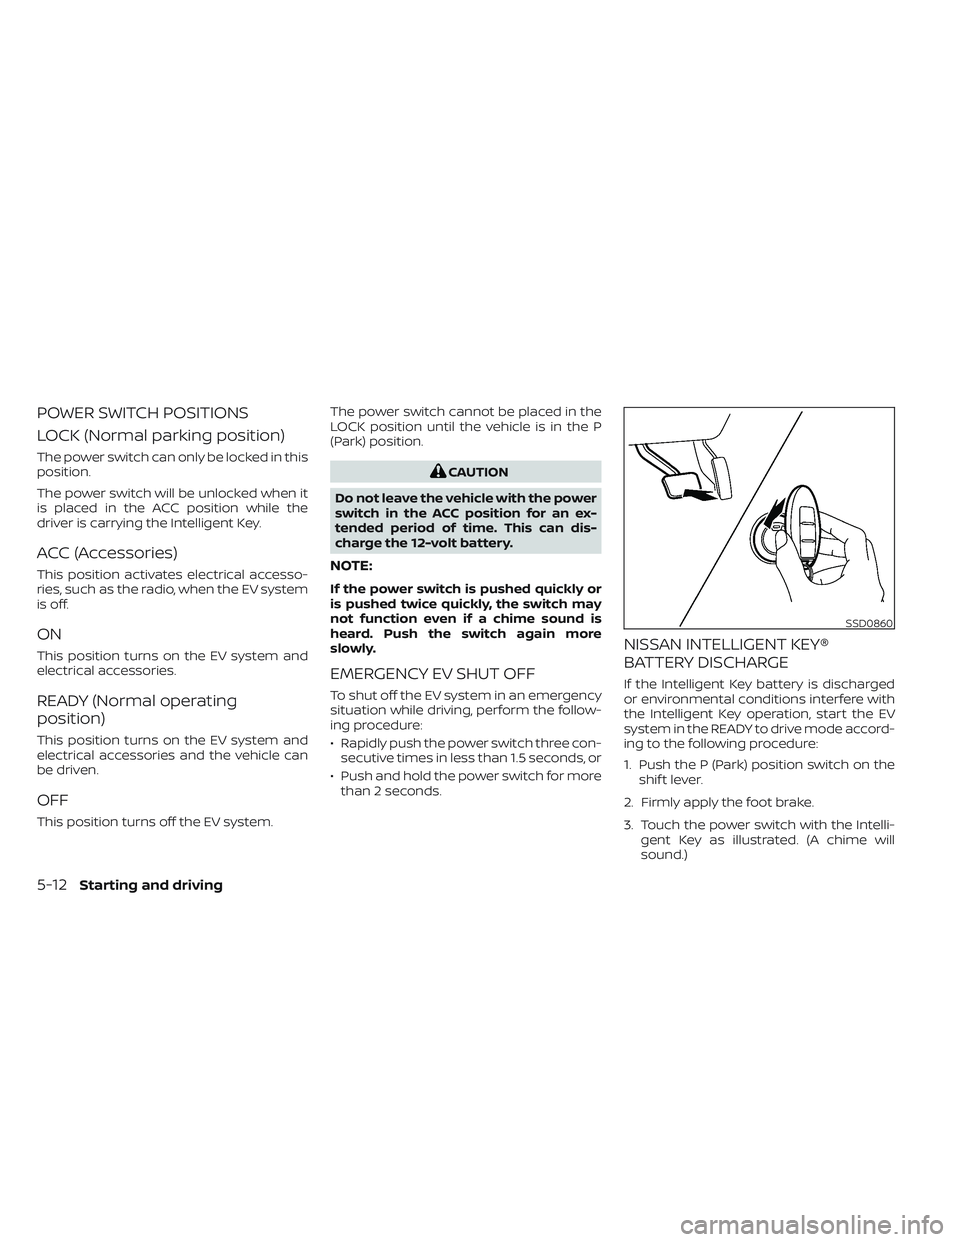
1. Push the P (Park) position switch on the shif t lever.
2. Firmly apply the foot brake.
3. Touch the power switch with the Intelli- gent Key as illustrated. (A chime will
sound.)
SSD0860
5-12Starting and driving
Page 338 of 618
4. Push the power switch while depressingthe brake pedal within 10 seconds af ter
the chime sounds. The power switch
position changes to the READY to drive
mode.
Af ter step 3 is performed, if the power
switch is pushed without depressing the
brake pedal, the power switch position will
change to ACC.
NOTE:
• When the power switch is placed in the ACC or ON position or READY to drive
mode by the above procedure, the EV
system operation for discharged Intel-
ligent Key system indicator appears on
the vehicle information display even if
the Intelligent Key is inside the vehicle.
This is not a malfunction. To stop the
warning indicator from blinking, touch
the power switch with the Intelligent
Key again.
• If the Intelligent Key battery discharge indicator appears on the vehicle infor-
mation display, replace the battery as
soon as possible. For additional infor-
mation, see “NISSAN Intelligent Key®
battery replacement” (P. 8-19).
NISSAN VEHICLE IMMOBILIZER
SYSTEM
The NISSAN Vehicle Immobilizer System
will not allow the power switch to be placed
in the READY to drive position without the
use of the registered key.
If the power switch fails to place the vehicle
into the READY to drive position using the
registered key, it may be due to interfer-
ence caused by another registered key, an
automated toll road device or automated
payment device on the key ring. Restart the
EV system using the following procedure:
1. Leave the power switch in the ON posi- tion for approximately 5 seconds.
2. Place the power switch in the OFF posi- tion and wait approximately 10 seconds.
3. Repeat steps 1 and 2 again.
4. Place the power switch in the READY to drive position while holding the device
(which may have caused the interfer-
ence) separate from the registered key.
If this procedure allows the power
switch to be placed in the READY to drive
mode, NISSAN recommends placing the
registered key on a separate key ring to
avoid interference from other devices. • Make sure that the area around the ve-
hicle is clear.
• Check fluid levels such as coolant, brake fluid, and windshield-washer fluid as fre-
quently as possible.
• Check that all windows and lights are clean.
• Visually inspect tires for their appearance and condition. Also check tires for proper
inflation.
• Check that all doors are closed.
• Position the seat and adjust the head restraints/headrests.
• Adjust the inside and outside mirrors.
• Fasten seat belts and ask all passengers to do likewise.
• Check the operation of the warning lights when the power switch is pushed to the
ON position. For additional information,
see “Warning lights, indicator lights and
audible reminders” (P. 2-14).
BEFORE STARTING THE EV SYSTEM
Starting and driving5-13
Page 339 of 618
1. Confirm the parking brake is applied.
2. Confirm that the vehicle is in the P (Park)position.
When the power switch is placed in the
ON position, the EV is designed not to
operate unless the shif t lever is in the P
(Park) or N (Neutral) position.
The Intelligent Key must be carried
with you when operating the power
switch.
3. Depress the brake pedal and push the power switch to place the EV system in
the READY to drive position.
To place the vehicle in the READY to drive
position immediately, push and release
the power switch while depressing the
brake pedal with the power switch in any
position. The READY to drive indicator
light
in the meter illuminates.
4. To stop the EV system, push the P (Park) position switch on the shif t lever, and
place the power switch in the OFF
position.
NOTE:
Care should be taken to avoid situations
that can lead to potential battery dis-
charge and potential no-start conditions
such as:
1. Installation or extended use of elec-tronic accessories that consume bat-
tery power when the EV system is not
running (phone chargers, GPS, DVD
players, etc.).
2. The vehicle is not driven regularly and/or only driven short distances.
In these cases, the battery may need to
be charged to maintain battery health.
ELECTRIC SHIFT CONTROL
SYSTEM
This vehicle is electronically controlled to
produce maximum available power and
smooth operation.
The recommended operating procedures
for this vehicle are shown on the following
pages.
Starting the vehicle
1. Af ter placing the vehicle in the READY to drive position, fully depress the foot
brake pedal before moving the shif t lever
to the D (Drive) position.
The shif t lever of this vehicle is de-
signed so that the foot brake pedal
must be depressed before shif ting
from the P (Park) position to any driv-
ing position while the power switch is
in the ON position.
The shif t lever cannot be moved out of
the P (Park) position and into any of
the other positions if the power switch
is placed in the LOCK, OFF or ACC posi-
tion or if the Intelligent Key is
removed.
STARTING THE EV SYSTEM DRIVING THE VEHICLE
5-14Starting and driving
Page 493 of 618
WARNING
The Intelligent Ride Control may not be
effective depending on the driving con-
dition. Always drive carefully and
attentively.
When the Intelligent Ride Control is operat-
ing, you may hear a noise and sense slight
deceleration. This is normal and indicates
that the Intelligent Ride Control is operat-
ing properly.
If the “Chassis Control System Error: See
Owner’s Manual” warning message ap-
pears in the vehicle information display, it
may indicate that the Intelligent Ride Con-
trol is not functioning properly. Have the
system checked as soon as possible. It is
recommended that you visit a NISSAN cer-
tified LEAF dealer for this service. The RSS sounds a tone to inform the driver
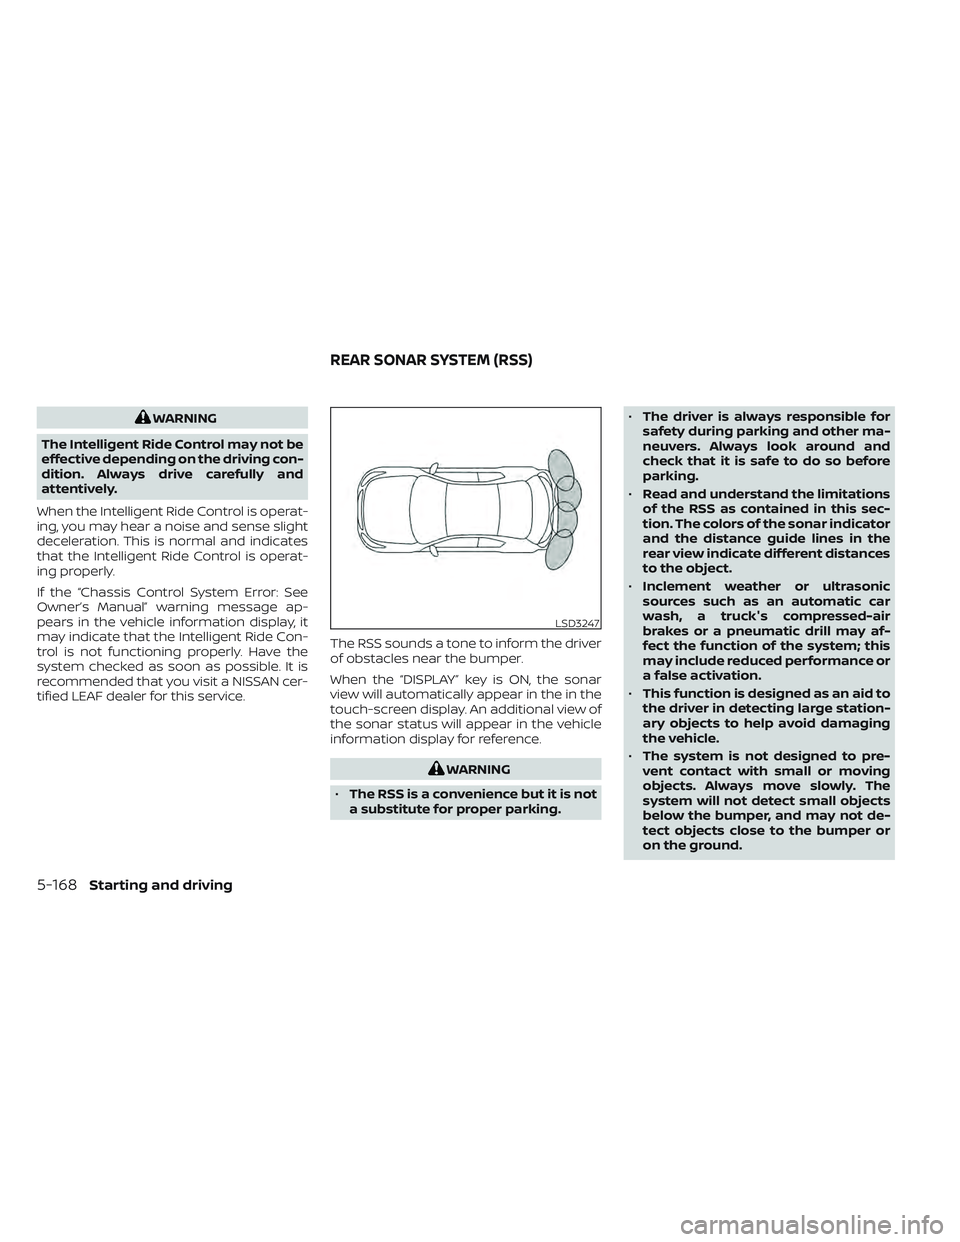
of obstacles near the bumper.
When the “DISPLAY” key is ON, the sonar
view will automatically appear in the in the
touch-screen display. An additional view of
the sonar status will appear in the vehicle
information display for reference.
WARNING
• The RSS is a convenience but it is not
a substitute for proper parking. •
The driver is always responsible for
safety during parking and other ma-
neuvers. Always look around and
check that it is safe to do so before
parking.
• Read and understand the limitations
of the RSS as contained in this sec-
tion. The colors of the sonar indicator
and the distance guide lines in the
rear view indicate different distances
to the object.
• Inclement weather or ultrasonic
sources such as an automatic car
wash, a truck's compressed-air
brakes or a pneumatic drill may af-
fect the function of the system; this
may include reduced performance or
a false activation.
• This function is designed as an aid to
the driver in detecting large station-
ary objects to help avoid damaging
the vehicle.
• The system is not designed to pre-
vent contact with small or moving
objects. Always move slowly. The
system will not detect small objects
below the bumper, and may not de-
tect objects close to the bumper or
on the ground.
LSD3247
REAR SONAR SYSTEM (RSS)
5-168Starting and driving
Page 499 of 618
FREEING A FROZEN DOOR LOCK
To prevent a door lock from freezing, apply
deicer through the key hole. If the lock be-
comes frozen, heat the key before inserting
it into the key hole or use the remote key-
less entry key fob.
ANTIFREEZE
In the winter when it is possible that the
outside temperature will drop below 32°F
(0°C), check the antifreeze to ensure proper
winter protection. For additional informa-
tion, see “Cooling system” (P. 8-5).
12-VOLT BATTERY
If the 12-volt battery is not fully charged
during extremely cold weather conditions,
the 12-volt battery fluid may freeze and
damage the 12-volt battery. To maintain
maximum efficiency, the 12-volt battery
should be checked regularly. For additional
information, see “12-volt battery” (P. 8-9).
DRAINING OF COOLANT WATER
If the vehicle is to be lef t outside without
antifreeze, drain the cooling system. Refill
before operating the vehicle. For additional
information, see “Cooling system” (P. 8-5).
TIRE EQUIPMENT
SUMMER tires have a tread designed to
provide superior performance on dry
pavement. However, the performance of
these tires will be substantially reduced in
snowy and icy conditions. If you operate
your vehicle on snowy or icy roads, NISSAN
recommends the use of MUD & SNOW or
ALL SEASON tires on all four wheels. It is
recommended that you visit a NISSAN cer-
tified LEAF dealer for the tire type, size,
speed rating and availability information.
For additional traction on icy roads, stud-
ded tires may be used. However, some U.S.
states and Canadian provinces prohibit
their use. Check local, state and provincial
laws before installing studded tires.
Skid and traction capabilities of studded
snow tires, on wet or dry surfaces, may
be poorer than that of non-studded
snow tires.
Tire chains may be used. For additional in-
formation, see “Tire chains” (P. 8-33).
SPECIAL WINTER EQUIPMENT
It is recommended that the following items
be carried in the vehicle during winter:
• A scraper and stiff-bristled brush to re-move ice and snow from the windows
and wiper blades.
• A shovel to dig the vehicle out of snow-drif ts.
• Extra windshield-washer fluid to refill the reservoir tank.
DRIVING ON SNOW OR ICE
WARNING
• Wet ice (32°F, 0°C and freezing rain),
very cold snow or ice can be slick and
very hard to drive on. The vehicle will
have much less traction or “grip” un-
der these conditions. Try to avoid
driving on wet ice until the road is
salted or sanded.
• Whatever the conditions, drive with
caution. Accelerate and slow down
with care. If accelerating too fast, the
drive wheels will lose even more
traction.
5-174Starting and driving