NISSAN MAXIMA 1999 A32 / 4.G Owners Manual
MAXIMA 1999 A32 / 4.G
NISSAN
NISSAN
https://www.carmanualsonline.info/img/5/633/w960_633-0.png
NISSAN MAXIMA 1999 A32 / 4.G Owners Manual
Trending: jump start, display, remote start, warning lights, ESP, tow bar, tire pressure
Page 181 of 233
ENGINE COMPARTMENTIf any electrical equipment does not operate,
check for an open fuse.
1. Be sure the ignition key and headlight
switch are OFF.
2. Open the engine hood.
3. Remove the fusible link cover.
4. Remove the fuse with the fuse puller.
5. If the fuse is open, replace it with a new
fuse.
6. If a new fuse also opens, have the electricalsystem checked and repaired by your
NISSAN dealer.
Fusible linksIf any electrical equipment does not operate
and fuses are in good condition, check the
fusible links. If any of these fusible links are
melted, replace only with genuine NISSAN
parts.
SDI0126
SDI0128
8-22
Do-it-yourself
Z
01.1.22/A32-D/V5.0
X
Page 182 of 233
PASSENGER COMPARTMENTIf any electrical equipment does not operate,
check for an open fuse.
1. Be sure the ignition key and the headlight
switch are OFF.
2. Pull to open the fuse box lid.
3. Remove the fuse with the fuse puller.
4. If the fuse is open, replace it with a new
fuse.
5. If a new fuse also opens, have the electrical
system checked and repaired by your
NISSAN dealer.
SDI0335
Do-it-yourself
8-23
Z
01.1.22/A32-D/V5.0
X
Page 183 of 233
SDI0735
LIGHTS8-24
Do-it-yourself
Z
01.1.22/A32-D/V5.0
X
Page 184 of 233

HEADLIGHTSThe headlight is a semi-sealed beam type
which uses a replaceable headlight (halogen)
bulb. A bulb can be replaced from inside the
engine compartment without removing the
headlight assembly.High pressure halogen gas is sealed
inside the halogen bulb. The bulb may
break if the glass envelope is scratched
or the bulb is dropped.
Hold the plastic base when handling the
bulb. Never touch the glass envelope.
Replacing the headlight bulb1. Disconnect the battery negative cable.
2. Disconnect the electrical connector from
the rear end of the bulb.
3. Turn the bulb retaining ring counterclock-
wise until it is free from the headlight reflec-
tor, then remove it.
4. Remove the headlight bulb. Do not shake
or rotate the bulb when removing it.
5. Insert the bulb into the headlight reflector
with the flat side of the plastic base facing
upward.
6. Install the bulb retaining ring and turn it
clockwise until it stops.
7. Push the electrical connector into the bulb
plastic base until it snaps and stops.
8. Connect the battery negative cable. Aiming
is not necessary after replacing the bulb.
When aiming adjustment is necessary, con-
tact your NISSAN dealer.
SDI0129
Do-it-yourself
8-25
Z
01.1.22/A32-D/V5.0
X
Page 185 of 233
IDo not touch the bulb.
IUse the same number and wattage as
originally installed:
Wattage 65/45
Bulb no. 9004
IDo not leave the bulb out of the head-
light reflector for a long period of time
as dust, moisture, and smoke may
enter the headlight body and affect
the performance of the headlight.
EXTERIOR AND INTERIOR LIGHTS
Item Wattage (W) Bulb No.
Clearance 27/8 1157
Front turn signal light 27 1156
Front side marker light 3.8 194
Front fog light (if so equipped) 55
Rear combination light
Turn signal 27 1156
Stop/Tail 27/8 1157
Back-up 18 921
Side marker light 3.8 194
License plate light 5
High-mounted stop light (if so
equipped)18 921
Interior light 10
Front personal light 10
Step light 2.7 161
Trunk light 3.4 158
Vanity mirror light (if so equipped) 1.4 Ð
8-26
Do-it-yourself
Z
01.1.22/A32-D/V5.0
X
Page 186 of 233
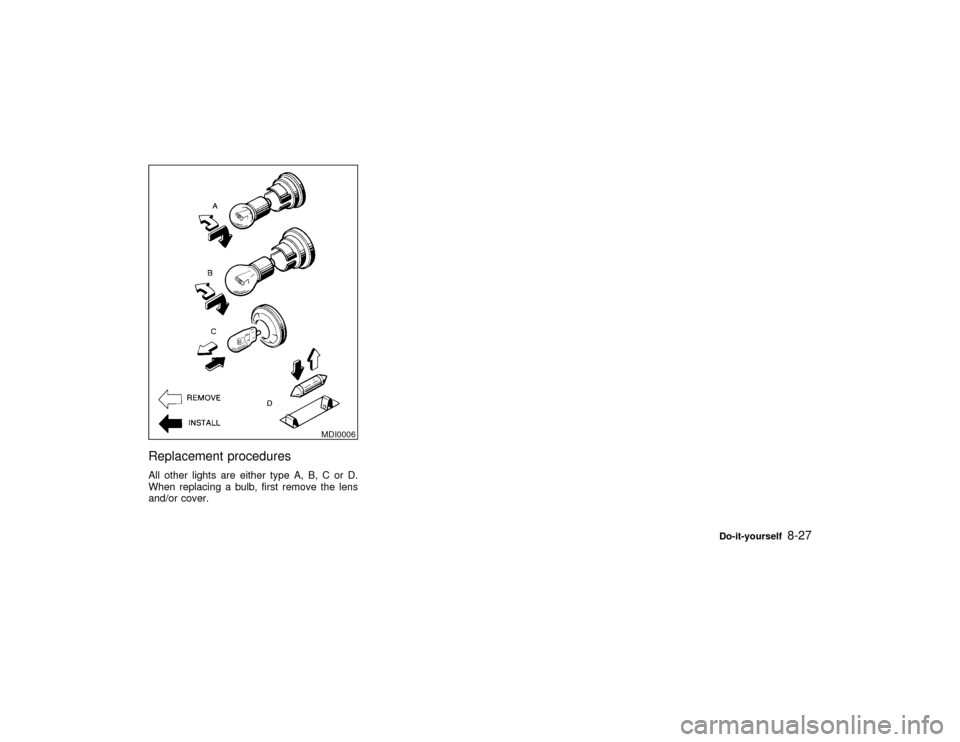
Replacement proceduresAll other lights are either type A, B, C or D.
When replacing a bulb, first remove the lens
and/or cover.
MDI0006
Do-it-yourself
8-27
Z
01.1.22/A32-D/V5.0
X
Page 187 of 233
SDI0131A
8-28
Do-it-yourself
Z
01.1.22/A32-D/V5.0
X
Page 188 of 233
SDI0736
SDI0737
SDI0503A
Do-it-yourself
8-29
Z
01.1.22/A32-D/V5.0
X
Page 189 of 233
SDI0784
8-30
Do-it-yourself
Z
01.1.22/A32-D/V5.0
X
Page 190 of 233
If you have a flat tire, see ªFlat tireº in the
ª6. In case of emergencyº section.TIRE PRESSURE
Maximum inflation pressureDo not exceed the maximum inflation pres-
sures shown on the side wall of the tire.Tire inflation pressurePeriodically check the tire pressure (including
spare). Incorrect tire pressure may adversely
affect tire life and vehicle handling. Tire pres-
sure should be checked when tires are COLD.
Tires are considered COLD after the vehicle
has been parked for 3 or more hours, or driven
SDI0756
SDI0333A
DI1033M
TIRES AND WHEELS
Do-it-yourself
8-31
Z
01.1.22/A32-D/V5.0
X
Trending: key, fuel cap release, Cruise control, airbag off, phone, timing belt, fog light


