light NISSAN MAXIMA 2001 A33 / 5.G Service Manual
[x] Cancel search | Manufacturer: NISSAN, Model Year: 2001, Model line: MAXIMA, Model: NISSAN MAXIMA 2001 A33 / 5.GPages: 247, PDF Size: 1.99 MB
Page 96 of 247
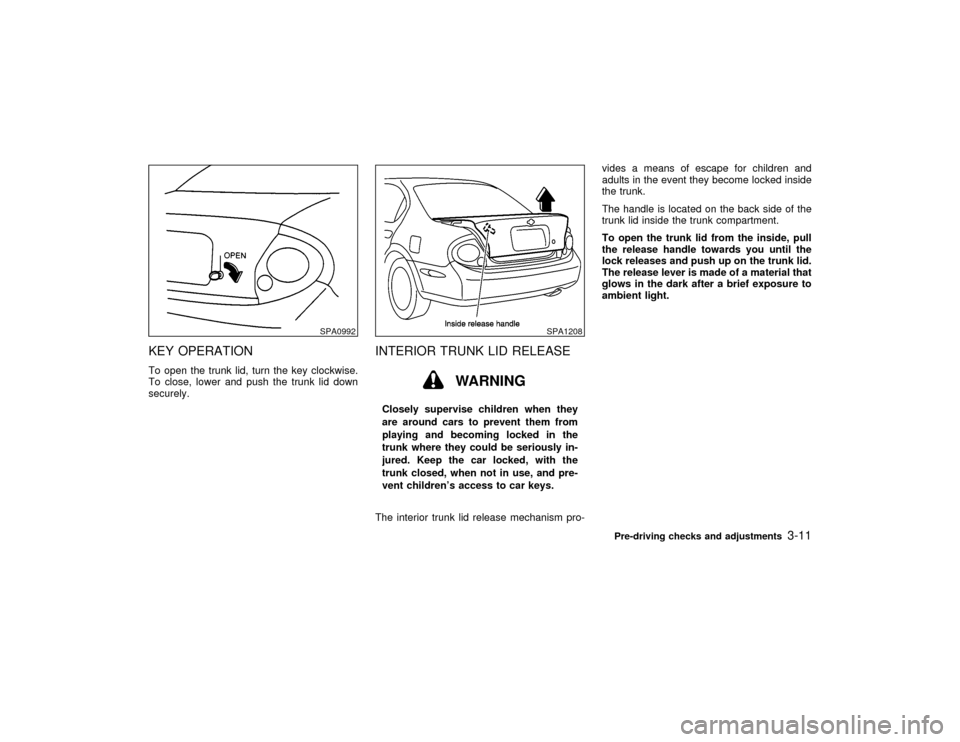
KEY OPERATIONTo open the trunk lid, turn the key clockwise.
To close, lower and push the trunk lid down
securely.
INTERIOR TRUNK LID RELEASE
WARNING
Closely supervise children when they
are around cars to prevent them from
playing and becoming locked in the
trunk where they could be seriously in-
jured. Keep the car locked, with the
trunk closed, when not in use, and pre-
vent children's access to car keys.
The interior trunk lid release mechanism pro-vides a means of escape for children and
adults in the event they become locked inside
the trunk.
The handle is located on the back side of the
trunk lid inside the trunk compartment.
To open the trunk lid from the inside, pull
the release handle towards you until the
lock releases and push up on the trunk lid.
The release lever is made of a material that
glows in the dark after a brief exposure to
ambient light.
SPA0992
SPA1208
Pre-driving checks and adjustments
3-11
Z
00.1.17/A33-D/V5.0
X
Page 99 of 247
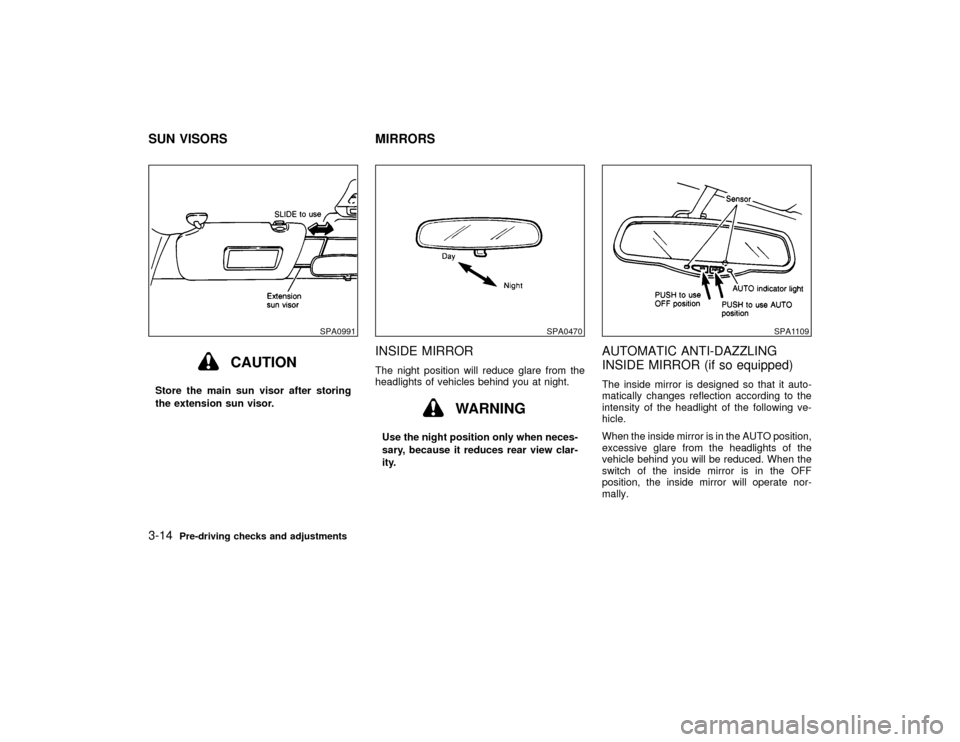
CAUTION
Store the main sun visor after storing
the extension sun visor.
INSIDE MIRRORThe night position will reduce glare from the
headlights of vehicles behind you at night.
WARNING
Use the night position only when neces-
sary, because it reduces rear view clar-
ity.
AUTOMATIC ANTI-DAZZLING
INSIDE MIRROR (if so equipped)The inside mirror is designed so that it auto-
matically changes reflection according to the
intensity of the headlight of the following ve-
hicle.
When the inside mirror is in the AUTO position,
excessive glare from the headlights of the
vehicle behind you will be reduced. When the
switch of the inside mirror is in the OFF
position, the inside mirror will operate nor-
mally.
SPA0991
SPA0470
SPA1109
SUN VISORS MIRRORS3-14
Pre-driving checks and adjustments
Z
00.1.17/A33-D/V5.0
X
Page 105 of 247

indicator and air recirculation lights will turn on.Air recirculation buttonOFF position:
Outside air is drawn into the passenger com-
partment.
Use the off position for normal heater, or air
conditioner operation.
ON position (Indicator light ON):
Interior air is recirculated inside the vehicle.
Push the air recirculation button to the ON
position when driving on a dusty road or to
avoid traffic fumes and for maximum cooling
when using the air conditioner.Air conditioning buttonStart the engine, move the fan control dial to
the desired (1 to 4) position and push the air
conditioning button to turn on the air condi-
tioner. The indicator light will come on when
the air conditioner is on. To stop the air con-
ditioner, push the switch again to return it to
the original position.
The air conditioner cooling function oper-
ates only when the engine is running.
HEATER OPERATION
HeatingThis mode is used to direct hot air from the
floor outlets. Some air will also come from the
defrost vents.
1. Push the air recirculation button to the OFF
position for normal heating.
2. Push the
button in.
3. Turn on the fan control dial.
4. Move the temperature control lever to the
desired position between the middle and
the HOT position.
For quick heating, move the air recirculation
button to the ON position. Be sure to return the
air recirculation button to the OFF position for
normal heating.
VentilationThis mode directs outside air from the side and
center vents.
1. Push the air recirculation button to the OFF
position.
2. Push the
button in.
3. Turn on the fan control dial.4. Move the temperature control lever to the
desired position.
Defrosting or defoggingThis mode is used to defrost/defog the win-
dows.
1. Push the
button in.
2. Turn on the fan control dial.
3. Move the temperature control lever to the
desired position between the middle and
the HOT position.
ITo quickly remove ice or fog from the
windows, turn on the fan control dial to 4
and the temperature control lever to the full
HOT position.
IWhen thebutton is pushed, the air
conditioner will automatically be turned on
to defog the windshield, and the air recircu-
late mode will automatically be turned off.
Outside air is drawn into the passenger
compartment to improve the defogging per-
formance.
4-4
Heater, air conditioner and audio systems
Z
00.1.17/A33-D/V5.0
X
Page 106 of 247

Bi-level heatingThis mode directs outside air from the side and
center vents and hot air from the floor outlets.
1. Push the air recirculation button to the OFF
position.
2. Push the
button in.
3. Turn on the fan control dial.
4. Normally move the temperature control le-
ver to the midpoint between HOT and
COLD.
Heating and defoggingThis mode heats the interior and defogs the
windshield.
1. Push the
button in.
2. Turn on the fan control dial.
3. Move the temperature control lever to the
desired position between the middle and
the HOT position.
Operating tipsIClear snow and ice from the wiper
blades and air inlet in front of the wind-
shield. This will improve heater opera-
tion.
IWhen the
button is pushed, the airrecirculate mode will automatically be
turned off.
Outside air is drawn into the passenger
compartment to improve the defogging per-
formance.
AIR CONDITIONER OPERATIONStart the engine, move the fan control dial to
the desired (1 to 4) position and push in the air
conditioning button to activate the air condi-
tioner. When the air conditioner is on, cooling
and dehumidifying functions will be added to
the heater operation.CoolingThis mode is used to cool and dehumidify.
1. Push the air recirculation button to the OFF
position.
2. Push the
button in.
3. Turn on the fan control dial.
4. Push on the air conditioning button. The
indicator light will come on.
5. Move the temperature control lever to the
desired position.
For quick cooling when the outside tempera-
ture is high, move the air recirculation button to
the ON position. Be sure to return the airrecirculation button to the OFF position for
normal cooling.
Dehumidified heatingThis mode is used to heat and dehumidify.
1. Push the air recirculation button to the OFF
position.
2. Push the
button in.
3. Turn on the fan control dial.
4. Push on the air conditioning button. The
indicator light will come on.
5. Move the temperature control lever to the
desired position.
Dehumidified defoggingThis mode is used to defog the windows and
dehumidify.
1. Push the
button in.
2. Turn on the fan control dial.
3. Push on the air conditioning button. The
indicator light will come on.
4. Move the temperature control lever to the
desired position.
When thebutton is pushed, the air con-
ditioner will automatically be turned on to de-
Heater, air conditioner and audio systems
4-5
Z
00.1.17/A33-D/V5.0
X
Page 111 of 247

1. Push the AUTO button on. (AUTO will be
displayed.)
2. Turn the temperature set dial to the left or
right to set the desired temperature.
IAdjust the temperature set dial to about
75ÉF (24ÉC) for normal operation.
IThe temperature of the passenger compart-
ment will be maintained automatically. Air
flow distribution and fan speed are also
controlled automatically.Heating (ECON)The air conditioner does not activate. When
you need to heat only, use this mode.
1. Push the ECON (Economy) button on.
(ECON will be displayed.)
2. Turn the temperature set dial to the left or
right to set the desired temperature.
IThe temperature of the passenger compart-
ment will be maintained automatically. Air
flow distribution and fan speed are also
controlled automatically.
IDo not set the temperature lower than the
outside air temperature. Otherwise the sys-
tem may not work properly.
INot recommended if windows fog up.
Dehumidified defogging1. Push the DEF button
on. (The indica-
tor light on the button will come on.)
2. Turn the temperature set dial to the left or
right to set the desired temperature.
ITo quickly remove ice from the outside of
the windows, push the manual fan control
button
and set to the maximum posi-
tion.
IAs soon as possible after the windshield is
clean, push the AUTO button to return to
the auto mode.
IWhen the DEF button
is pushed, the
air conditioner will automatically be turned
on at outside temperatures above 23ÉF
(þ5ÉC) to defog the windshield, and the air
recirculate mode will automatically be
turned off.
Outside air is drawn into the passenger
compartment to improve the defogging per-
formance.
MANUAL OPERATION
Fan speed controlPush the fan control button
to manually
control the fan speed.Push the AUTO button to return to automatic
control of the fan speed.
Air recirculationPush the air recirculation button
to recir-
culate interior air inside the vehicle. The indi-
cator light on the switch will come on.
Push it again to make the air inlet controlled
automatically (FRESH, REC/FRE and
RECIRCULATION). The indicator will go out.
The air recirculation button will not be acti-
vated when the air conditioner is in DEF mode.
Air flow controlPushing the manual air flow control button
selects the air outlet to:
: Air flows from center and side ventila-
tors.: Air flows from center and side ventila-
tors and foot outlets.: Air flows mainly from foot outlets.: Air flow from defroster and foot out-
lets.
To turn system offPush the OFF button.
4-10
Heater, air conditioner and audio systems
Z
00.1.17/A33-D/V5.0
X
Page 113 of 247
Turn the ignition key to ACC or ON and press
the power on switch to turn on the radio. If you
listen to the radio with the engine not running,
the key should be turned to the ACC position.
Radio reception is affected by station signal
strength, distance from radio transmitter, build-
ings, bridges, mountains and other external
influences. Intermittent changes in reception
quality normally are caused by these external
influences.
Using a cellular phone in or near the ve-
hicle may influence radio reception quality.Radio receptionYour radio system is equipped with state-of-
the-art electronic circuits to enhance radio
reception. These circuits are designed to ex-
tend reception range, and to enhance the
quality of that reception.
However there are some general characteris-
tics of both FM and AM radio signals that can
affect radio reception quality in a moving ve-
hicle, even when the finest equipment is used.
These characteristics are completely normal in
a given reception area, and do not indicate any
malfunction in your radio system.
Remember that a moving vehicle is not the
ideal place to listen to a radio. Because of the
movement, reception conditions will constantlychange. Buildings, terrain, signal distance and
interference from other vehicles can work
against ideal reception. Described below are
some of the factors that can affect your radio
reception.
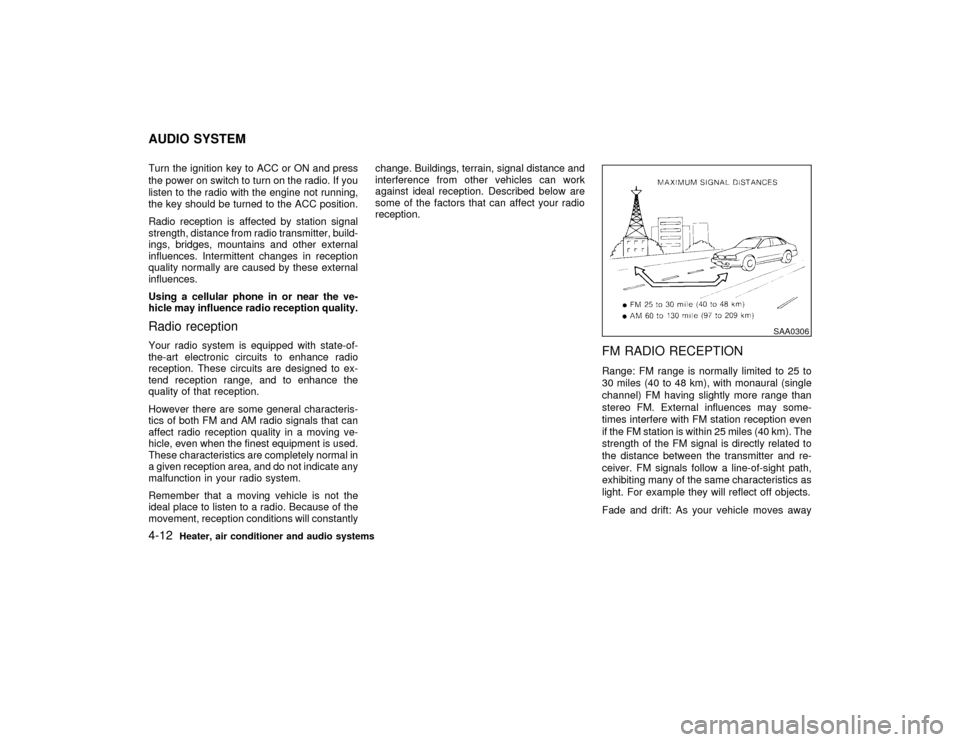
FM RADIO RECEPTIONRange: FM range is normally limited to 25 to
30 miles (40 to 48 km), with monaural (single
channel) FM having slightly more range than
stereo FM. External influences may some-
times interfere with FM station reception even
if the FM station is within 25 miles (40 km). The
strength of the FM signal is directly related to
the distance between the transmitter and re-
ceiver. FM signals follow a line-of-sight path,
exhibiting many of the same characteristics as
light. For example they will reflect off objects.
Fade and drift: As your vehicle moves away
SAA0306
AUDIO SYSTEM4-12
Heater, air conditioner and audio systems
Z
00.1.17/A33-D/V5.0
X
Page 114 of 247

from a station transmitter, the signals will tend
to fade and/or drift.
Static and flutter: During signal interference
from buildings, large hills or due to antenna
position, usually in conjunction with increased
distance from the station transmitter, static or
flutter can be heard. This can be reduced by
adjusting the treble control counterclockwise
to reduce treble response.
Multipath reception: Because of the reflective
characteristics of FM signals, direct and re-
flected signals reach the receiver at the same
time. The signals may cancel each other,
resulting in momentary flutter or loss of sound.AM RADIO RECEPTIONAM signals, because of their low frequency,
can bend around objects and skip along the
ground. In addition, the signals can be
bounced off the ionosphere and bent back to
earth. Because of these characteristics. AM
signals are also subject to interference as they
travel from transmitter to receiver.
Fading: Occurs while the vehicle is passing
through freeway underpasses or in areas with
many tall buildings. It can also occur for sev-
eral seconds during ionospheric turbulence
even in areas where no obstacles exist.
Static: Caused by thunderstorms, electricalpower lines, electric signs and even traffic
lights.
AUDIO OPERATION
PRECAUTIONS
Cassette playerITo maintain good quality sound,
NISSAN recommends using cassette
tapes of 60 minutes or shorter in length.
ICassette tapes should be removed from
the player when not in use. Store cas-
settes in their protective cases and away
from direct sunlight, heat, dust, mois-
ture and magnetic sources.
IDirect sunlight can cause the cassette to
become deformed. The use of deformed
cassettes may cause the cassette to jam
in the player.
IDo not use cassettes with labels which
are peeling and loose. If used, the label
could jam in the player.
IIf a cassette has loose tape, insert a
pencil through one of the cassette hubs
and rewind the tape firmly around the
hubs. Loose tape may cause tape jam-
ming and wavering sound quality.
IOver a period of time, the playbackhead, capstan and pinch roller may col-
lect a tape coating residue as the tape is
played. This residue accumulation can
cause weak or wavering sound, and
should be removed periodically with a
head cleaning tape. If the residue is not
removed periodically, the player may
need to be disassembled for cleaning.
Heater, air conditioner and audio systems
4-13
Z
00.1.17/A33-D/V5.0
X
Page 115 of 247
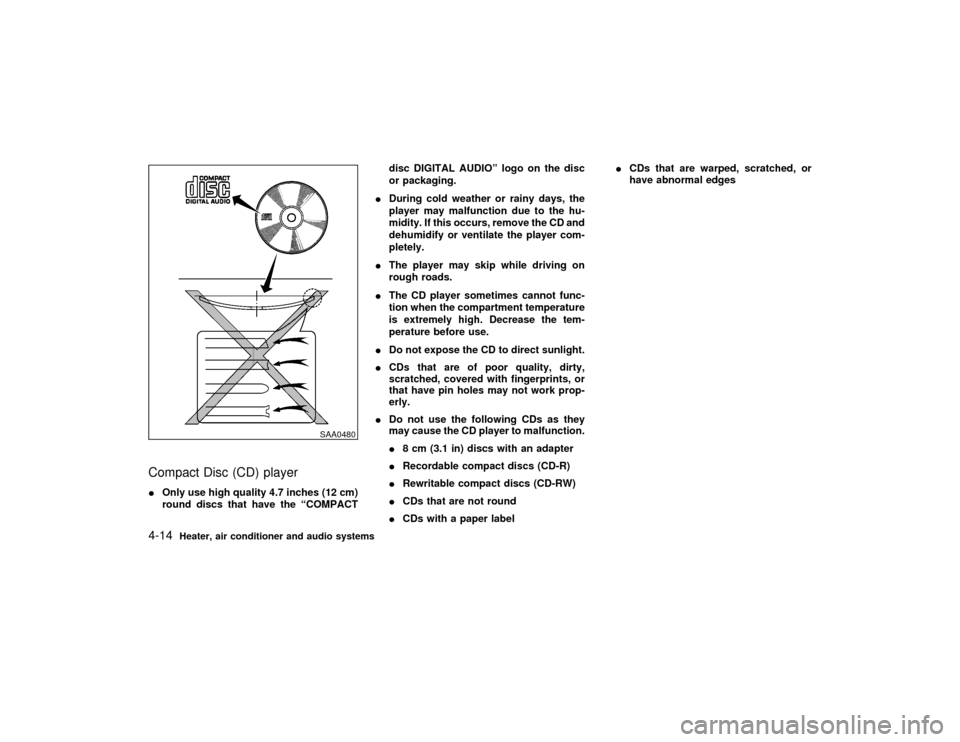
Compact Disc (CD) playerIOnly use high quality 4.7 inches (12 cm)
round discs that have the ªCOMPACTdisc DIGITAL AUDIOº logo on the disc
or packaging.
IDuring cold weather or rainy days, the
player may malfunction due to the hu-
midity. If this occurs, remove the CD and
dehumidify or ventilate the player com-
pletely.
IThe player may skip while driving on
rough roads.
IThe CD player sometimes cannot func-
tion when the compartment temperature
is extremely high. Decrease the tem-
perature before use.
IDo not expose the CD to direct sunlight.
ICDs that are of poor quality, dirty,
scratched, covered with fingerprints, or
that have pin holes may not work prop-
erly.
IDo not use the following CDs as they
may cause the CD player to malfunction.
I8 cm (3.1 in) discs with an adapter
IRecordable compact discs (CD-R)
IRewritable compact discs (CD-RW)
ICDs that are not round
ICDs with a paper labelICDs that are warped, scratched, or
have abnormal edges
SAA0480
4-14
Heater, air conditioner and audio systems
Z
00.1.17/A33-D/V5.0
X
Page 119 of 247
squares illuminate on the right side of the
display window.
CAUTION
Do not force the cassette tape into the
tape door. This could cause player dam-
age.
The cassette tape automatically changes di-
rections to play the other side when the first
side is complete. At this time, the moving
digital squares illuminate on the left side of the
display window.
PLAY/STOP:
Push the PLAY/STOP button while the cas-
sette tape is playing to stop the tape. Push the
button again to play the tape.
FF (fast forward), REW
(rewind):
Push either the FF or REW button for the
desired direction.
The FF or REW symbol illuminates in the
display.
To stop the FF or REW function, press the FFor REW button again, or the PLAY/STOP
button.
APS (automatic program
search) FF, APS REW:
Push either the APS FF or APS REW button
while the cassette tape is playing. The tape
runs quickly, stops, then plays the next selec-
tion. Either the FF or REW symbol flashes in
the display while searching for the selection.
This system searches at the blank intervals
between selections. If there is a blank interval
within one selection or there is no interval
between selections, the system may not stop
in the desired or expected location.
PROG (program):
Push the PROG button. The moving digital
squares illuminate on either the right or left
side of the display window to indicate the side
of program play.Dolby NR (Noise Reduction):
Push the Dolby NR
button for Dolby NR
encoded tapes to reduce high frequency tape
noise. The
indicator light comes on.
Dolby NR is manufactured under license from
Dolby Laboratories Licensing Corporation.
DOLBY NR and the double-D symbol
are trademarks of Dolby Laboratories
Licensing Corporation.
Metal or chrome tape usage:
The cassette player is automatically set to high
performance play when playing a metal or
chrome cassette tape.Ejecting the cassette tape:
Push the EJECT button. The cassette tape
automatically comes out.
4-18
Heater, air conditioner and audio systems
Z
00.1.17/A33-D/V5.0
X
Page 122 of 247
TUNE buttons down for more than 0.5 sec-
onds.
SEEK/SCAN tuning:
SEEK tuning:
Push the SEEK/SCAN tuning button
or
for less than 1.5 seconds. SEEK tuning
begins from high to low or low to high frequen-
cies and stops at the next broadcasting sta-
tion.
SCAN tuning:
Push the SEEK/SCAN tuning button
or
for more than 1.5 seconds. SCAN tuning
begins from high to low or low to high frequen-
cies and stops at each broadcasting station for
10 seconds. Pushing the button again during
this 10 seconds period will stop SCAN tuning
and the radio will remain tuned to that station.
If the SEEK/SCAN tuning button is not pushed
within 10 seconds, SCAN tuning moves to the
next station.Station memory operations:
Twelve stations can be set for the FM band
(six for FM1, six for FM2).
Six stations can be set for the AM band.
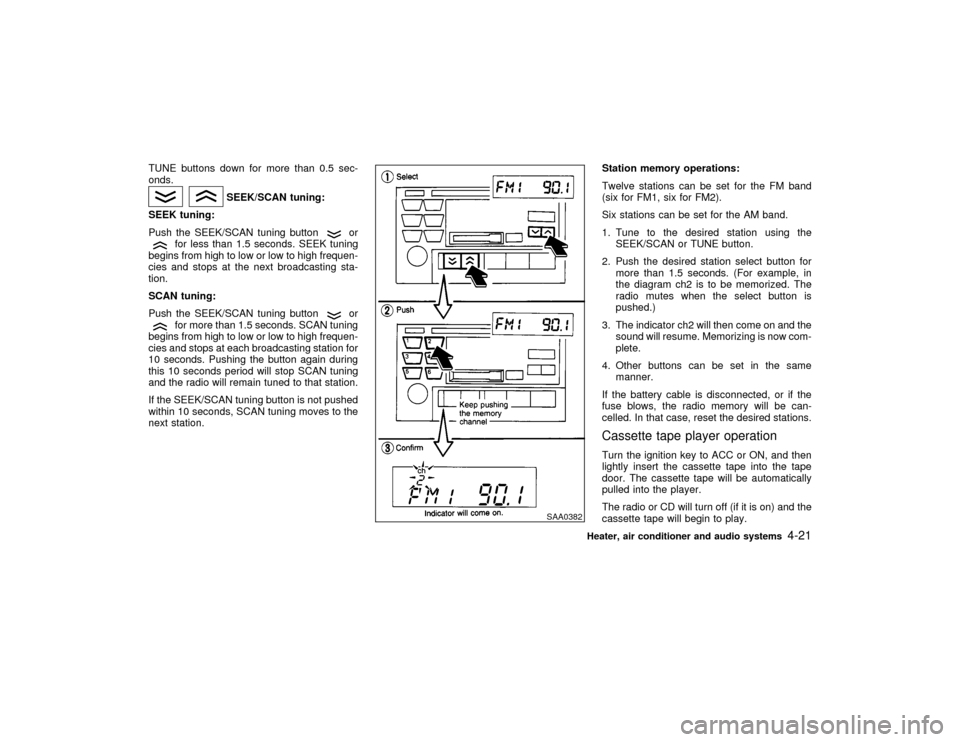
1. Tune to the desired station using the
SEEK/SCAN or TUNE button.
2. Push the desired station select button for
more than 1.5 seconds. (For example, in
the diagram ch2 is to be memorized. The
radio mutes when the select button is
pushed.)
3. The indicator ch2 will then come on and the
sound will resume. Memorizing is now com-
plete.
4. Other buttons can be set in the same
manner.
If the battery cable is disconnected, or if the
fuse blows, the radio memory will be can-
celled. In that case, reset the desired stations.
Cassette tape player operationTurn the ignition key to ACC or ON, and then
lightly insert the cassette tape into the tape
door. The cassette tape will be automatically
pulled into the player.
The radio or CD will turn off (if it is on) and the
cassette tape will begin to play.
SAA0382
Heater, air conditioner and audio systems
4-21
Z
00.1.17/A33-D/V5.0
X