check engine NISSAN MAXIMA 2003 A33 / 5.G Owner's Manual
[x] Cancel search | Manufacturer: NISSAN, Model Year: 2003, Model line: MAXIMA, Model: NISSAN MAXIMA 2003 A33 / 5.GPages: 247, PDF Size: 2.74 MB
Page 177 of 247

Your new NISSAN has been designed to have
minimum maintenance requirements with
longer service intervals to save you both time
and money. However, some day-to-day and
regular maintenance is essential to maintain
your NISSAN's good mechanical condition, as
well as its emission and engine performance.
It is the owner's responsibility to make sure
that scheduled maintenance, as well as gen-
eral maintenance, is performed.
As the vehicle owner, you are the only one
who can ensure that your vehicle receives the
proper maintenance care. You are a vital link
in the maintenance chain.
Scheduled maintenance:
For your convenience, both required and op-
tional scheduled maintenance items are de-
scribed and listed in your ªService and Main-
tenance Guideº. You must refer to that guide to
ensure that necessary maintenance is per-
formed on your NISSAN at regular intervals.
General maintenance:
General maintenance includes those items
which should be checked during normal day-
to-day operation of the vehicle. They are es-
sential if your vehicle is to continue to operate
properly. It is your responsibility to perform
these procedures regularly as prescribed.Performing general maintenance checks re-
quire minimal mechanical skill and only a few
general automotive tools.
These checks or inspections can be done by
yourself, a qualified technician or, if you prefer,
your NISSAN dealer.
Where to go for service:
If maintenance service is required or your
vehicle appears to malfunction, have the sys-
tems checked and tuned by an authorized
NISSAN dealer.
NISSAN technicians are well-trained special-
ists and are kept up to date with the latest
service information through technical bulletins,
service tips, and in-dealership training pro-
grams. They are completely qualified to work
on NISSAN vehiclesbeforethey work on your
vehicle, rather than after they have worked on
it.
You can be confident that your NISSAN deal-
er's service department performs the best job
to meet the maintenance requirements of your
vehicle Ð in a reliable and economic way.During the normal day-to-day operation of the
vehicle, general maintenance should be per-
formed regularly as prescribed in this section.
If you detect any unusual sounds, vibrations or
smell, be sure to check for the cause or have
your NISSAN dealer check it promptly. In
addition, you should notify your NISSAN
dealer if you think that repairs are required.
When performing any checks or maintenance
work, closely observe the ªMaintenance pre-
cautionsº later in this section.
EXPLANATION OF GENERAL
MAINTENANCE ITEMSAdditional information on the following
items with ª*º is found later in this section.Outside the vehicleThe maintenance items listed here should be
performed from time to time, unless otherwise
specified.
Tires*:Check the pressure with a gauge at
least once a month and always prior to long
distance trips. If necessary, adjust the pres-
sure in all tires, including the spare, to the
pressure specified. Check carefully for dam-
age, cuts or excessive wear.
Wheel nuts*:When checking the tires, make
sure no nuts are missing, and check for any
MAINTENANCE REQUIREMENTS GENERAL MAINTENANCE8-2
Maintenance and do-it-yourself
Z
02.7.12/A33-D/V5.0
X
Page 178 of 247

loose nuts. Tighten if necessary.
Tire rotation*:Tires should be rotated every
7,500 miles (12,000 km).
Wheel alignment and balance:If the vehicle
pulls to either side while driving on a straight
and level road, or if you detect uneven or
abnormal tire wear, there may be a need for
wheel alignment.
If the steering wheel or seat vibrates at normal
highway speeds, wheel balancing may be
needed.
For additional information regarding tires, refer
to ªImportant Tire Safety Informationº in the
Warranty Information Booklet (US) or ªTire
Safety Informationº in the Warranty and Road-
side Assistance Information booklet (Canada).
Windshield:Clean the windshield on a regu-
lar basis. Check the windshield at least every
six months for cracks or other damage. Have a
damaged windshield repaired by a qualified
repair facility.
Windshield wiper blades*:Check for cracks
or wear if they do not wipe properly.
Doors and engine hood:Check that all doors
and the engine hood operate smoothly as well
as the trunk lid or back hatch. Also make sure
that all latches lock securely. Lubricate if nec-essary. Make sure that the secondary latch
keeps the hood from opening when the pri-
mary latch is released.
When driving in areas using road salt or other
corrosive materials, check lubrication fre-
quently.
Lights*:Clean the headlights on a regular
basis. Make sure that the headlights, stop
lights, tail lights, turn signal lights, and other
lights are all operating properly and installed
securely. Also check headlight aim.
Inside the vehicleThe maintenance items listed here should be
checked on a regular basis, such as when
performing periodic maintenance, cleaning the
vehicle, etc.
Warning lights and chimes:Make sure that
all warning lights and chimes are operating
properly.
Windshield wiper and washer*:Check that
the wipers and washer operate properly and
that the wipers do not streak.
Windshield defroster:Check that the air
comes out of the defroster outlets properly and
in good quantity when operating the heater or
air conditioner.
Steering wheel:Check for changes in thesteering conditions, such as excessive free
play, hard steering or strange noises.
Seats:Check seat position controls such as
seat adjusters, seatback recliner, etc. to en-
sure they operate smoothly and that all latches
lock securely in every position. Check that the
head restraints move up and down smoothly
and that the locks (if equipped) hold securely
in all latched positions.
Seat belts:Check that all parts of the seat belt
system (for example, buckles, anchors, adjust-
ers and retractors) operate properly and
smoothly, and are installed securely. Check
the belt webbing for cuts, fraying, wear or
damage.
Accelerator pedal:Check the pedal for
smooth operation and make sure the pedal
does not catch or require uneven effort. Keep
the floor mats away from the pedal.
Clutch pedal*:Make sure the pedal operates
smoothly and check that it has the proper free
play.
Brakes:Check that the brakes do not pull the
vehicle to one side when applied.
Brake pedal and booster*:Check the pedal
for smooth operation and make sure it has the
proper distance under it when depressed fully.
Check the brake booster function. Be sure to
Maintenance and do-it-yourself
8-3
Z
02.7.12/A33-D/V5.0
X
Page 179 of 247

keep floor mats away from the pedal.
Parking brake*:Check that the lever has the
proper travel and make sure that the vehicle is
held securely on a fairly steep hill when only
the parking brake is applied.
Automatic transaxle P (Park) position
mechanism:On a fairly steep hill check that
the vehicle is held securely with the selector
lever in the P (Park) position without applying
any brakes.Under the hood and the vehicleThe maintenance items listed here should be
checked periodically (for example, each time
you check the engine oil or refuel).
Windshield washer fluid*:Check that there
is adequate fluid in the tank.
Engine coolant level*:Check the coolant
level when the engine is cold.
Radiator and hoses:Check the front of the
radiator and clean off any dirt, insects, leaves,
etc., that may have accumulated. Make sure
the hoses have no cracks, deformation, dete-
rioration or loose connections.
Brake and clutch fluid levels*:Make sure
that the brake and clutch fluid levels are be-
tween the MAX and MIN lines on the reservoir.Battery*:Check the fluid level in each cell. It
should be between the MAX and MIN lines.
Vehicles operated in high temperatures or
under severe conditions require frequent
checks of the battery fluid level.
Engine drive belts*:Make sure that no belt is
frayed, worn, cracked or oily.
Engine oil level*:Check the level on the
dipstick after parking the vehicle on a level
spot and turning off the engine.
Power steering fluid level* and lines:Check
the level in the reservoir tank with the engine
off. Check the lines for proper attachment,
leaks, cracks, etc.
Automatic transaxle fluid level*:Check the
level on the dipstick after putting the selector
lever in P (Park) position with the engine idling.
Exhaust system:Make sure there are no
loose supports, cracks or holes. If the sound of
the exhaust seems unusual or there is a smell
of exhaust fumes, immediately locate the
trouble and correct it. (See ªPrecautions when
starting and drivingº in the ª5. Starting and
drivingº section for exhaust gas (carbon mon-
oxide).)
Underbody:The underbody is frequently ex-
posed to corrosive substances such as those
used on icy roads or to control dust. It is veryimportant to remove these substances, other-
wise rust will form on the floor pan, frame, fuel
lines and around the exhaust system. At the
end of winter, the underbody should be thor-
oughly flushed with plain water, being careful
to clean those areas where mud and dirt may
accumulate. For additional information, see
ªCleaning exteriorº in the ª7. Appearance and
careº section.
Fluid leaks:Check under the vehicle for fuel,
oil, water or other fluid leaks after the vehicle
has been parked for a while. Water dripping
from the air conditioner after use is normal. If
you should notice any leaks or if gasoline
fumes are evident, check for the cause and
have it corrected immediately.8-4
Maintenance and do-it-yourself
Z
02.7.12/A33-D/V5.0
X
Page 182 of 247

SDI1337
ENGINE COMPARTMENT CHECK
LOCATIONS
Maintenance and do-it-yourself
8-7
Z
02.7.12/A33-D/V5.0
X
Page 183 of 247
The engine cooling system is filled at the
factory with a high-quality, year-round, anti-
freeze coolant solution. The anti-freeze solu-
tion contains rust and corrosion inhibitors,
therefore additional cooling system additives
are not necessary.
CAUTION
When adding or replacing coolant, be
sure to use only a genuine NISSAN anti-
freeze coolant or equivalent with the
proper mixture ratio of 50% anti-freeze
and 50% demineralized water/distilled
water. The use of other types of coolant
solutions may damage your engine
cooling system.Outside temperature
down to
Anti-
freezeDeminer-
alized
water/
distilled
water ÉC ÉF
þ35 þ30 50% 50%
WARNING
INever remove the radiator cap when
the engine is hot. Serious burns
could be caused by high pressure
fluid escaping from the radiator. Wait
until the engine and radiator cool
down.
ISee ªIf your vehicle overheatsº in the
ª6. In case of emergencyº section.
IThe radiator is equipped with a pres-
sure cap. To prevent engine damage,
use only a genuine NISSAN radiator
cap.
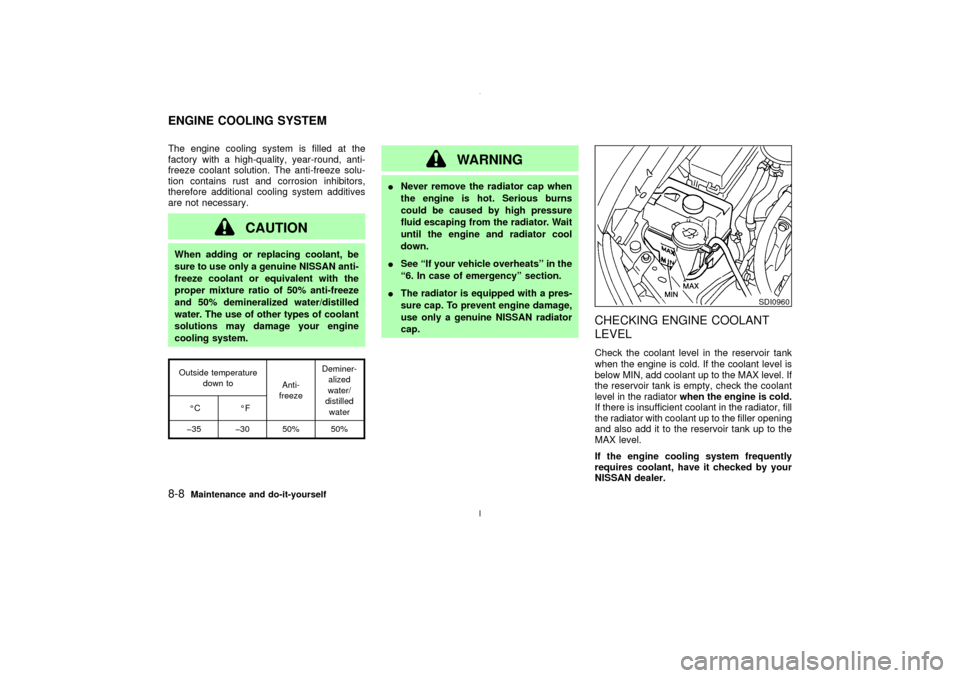
CHECKING ENGINE COOLANT
LEVELCheck the coolant level in the reservoir tank
when the engine is cold. If the coolant level is
below MIN, add coolant up to the MAX level. If
the reservoir tank is empty, check the coolant
level in the radiatorwhen the engine is cold.
If there is insufficient coolant in the radiator, fill
the radiator with coolant up to the filler opening
and also add it to the reservoir tank up to the
MAX level.
If the engine cooling system frequently
requires coolant, have it checked by your
NISSAN dealer.
SDI0960
ENGINE COOLING SYSTEM8-8
Maintenance and do-it-yourself
Z
02.7.12/A33-D/V5.0
X
Page 184 of 247
CHANGING ENGINE COOLANTIMajor cooling system repairs should be
performed by your NISSAN dealer. The
service procedures can be found in the
appropriate NISSAN Service Manual.IImproper servicing can result in reduced
heater performance and engine overheat-
ing.
WARNING
ITo avoid being scalded, never change
the coolant when the engine is hot.
INever remove the radiator cap when
the engine is hot. Serious burns
could be caused by high pressure
fluid escaping from the radiator.
IAvoid direct skin contact with used
coolant. If skin contact is made, wash
thoroughly with soap or hand cleaner
as soon as possible.
IKeep coolant out of reach of children
and pets.
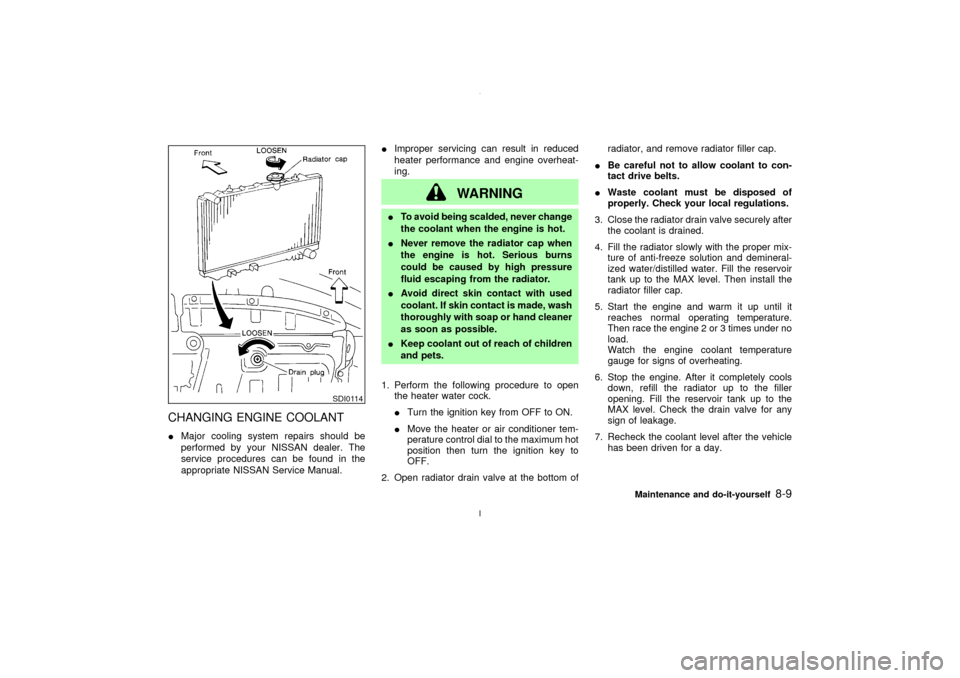
1. Perform the following procedure to open
the heater water cock.
ITurn the ignition key from OFF to ON.
IMove the heater or air conditioner tem-
perature control dial to the maximum hot
position then turn the ignition key to
OFF.
2. Open radiator drain valve at the bottom ofradiator, and remove radiator filler cap.
IBe careful not to allow coolant to con-
tact drive belts.
IWaste coolant must be disposed of
properly. Check your local regulations.
3. Close the radiator drain valve securely after
the coolant is drained.
4. Fill the radiator slowly with the proper mix-
ture of anti-freeze solution and demineral-
ized water/distilled water. Fill the reservoir
tank up to the MAX level. Then install the
radiator filler cap.
5. Start the engine and warm it up until it
reaches normal operating temperature.
Then race the engine 2 or 3 times under no
load.
Watch the engine coolant temperature
gauge for signs of overheating.
6. Stop the engine. After it completely cools
down, refill the radiator up to the filler
opening. Fill the reservoir tank up to the
MAX level. Check the drain valve for any
sign of leakage.
7. Recheck the coolant level after the vehicle
has been driven for a day.
SDI0114
Maintenance and do-it-yourself
8-9
Z
02.7.12/A33-D/V5.0
X
Page 185 of 247
CHECKING ENGINE OIL LEVEL1. Park the vehicle on a level surface and
apply parking brake.
2. Run the engine until it reaches operating
temperature.
3. Turn off the engine.Wait more than 10
minutes for the oil to drain back into the
oil pan.
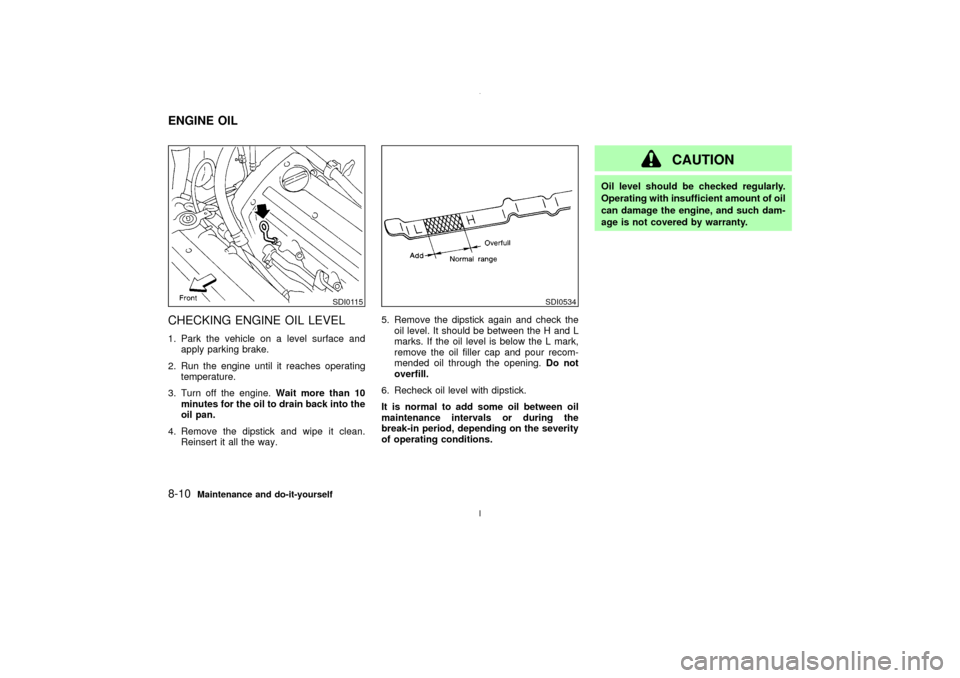
4. Remove the dipstick and wipe it clean.
Reinsert it all the way.5. Remove the dipstick again and check the
oil level. It should be between the H and L
marks. If the oil level is below the L mark,
remove the oil filler cap and pour recom-
mended oil through the opening.Do not
overfill.
6. Recheck oil level with dipstick.
It is normal to add some oil between oil
maintenance intervals or during the
break-in period, depending on the severity
of operating conditions.
CAUTION
Oil level should be checked regularly.
Operating with insufficient amount of oil
can damage the engine, and such dam-
age is not covered by warranty.
SDI0115
SDI0534
ENGINE OIL8-10
Maintenance and do-it-yourself
Z
02.7.12/A33-D/V5.0
X
Page 186 of 247
CHANGING ENGINE OIL1. Park the vehicle on a level surface and
apply the parking brake.
2. Run the engine until it reaches operating
temperature.
3. Turn the engine off and wait more than 10
minutes.
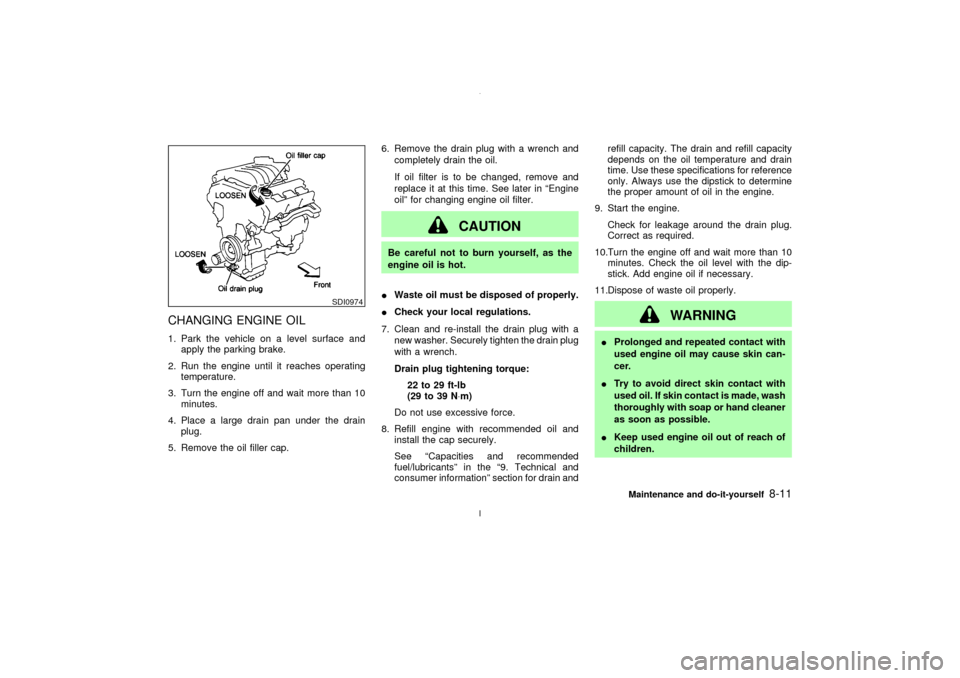
4. Place a large drain pan under the drain
plug.
5. Remove the oil filler cap.6. Remove the drain plug with a wrench and
completely drain the oil.
If oil filter is to be changed, remove and
replace it at this time. See later in ªEngine
oilº for changing engine oil filter.
CAUTION
Be careful not to burn yourself, as the
engine oil is hot.
IWaste oil must be disposed of properly.
ICheck your local regulations.
7. Clean and re-install the drain plug with a
new washer. Securely tighten the drain plug
with a wrench.
Drain plug tightening torque:
22 to 29 ft-lb
(29 to 39 N×m)
Do not use excessive force.
8. Refill engine with recommended oil and
install the cap securely.
See ªCapacities and recommended
fuel/lubricantsº in the ª9. Technical and
consumer informationº section for drain andrefill capacity. The drain and refill capacity
depends on the oil temperature and drain
time. Use these specifications for reference
only. Always use the dipstick to determine
the proper amount of oil in the engine.
9. Start the engine.
Check for leakage around the drain plug.
Correct as required.
10.Turn the engine off and wait more than 10
minutes. Check the oil level with the dip-
stick. Add engine oil if necessary.
11.Dispose of waste oil properly.
WARNING
IProlonged and repeated contact with
used engine oil may cause skin can-
cer.
ITry to avoid direct skin contact with
used oil. If skin contact is made, wash
thoroughly with soap or hand cleaner
as soon as possible.
IKeep used engine oil out of reach of
children.
SDI0974
Maintenance and do-it-yourself
8-11
Z
02.7.12/A33-D/V5.0
X
Page 187 of 247
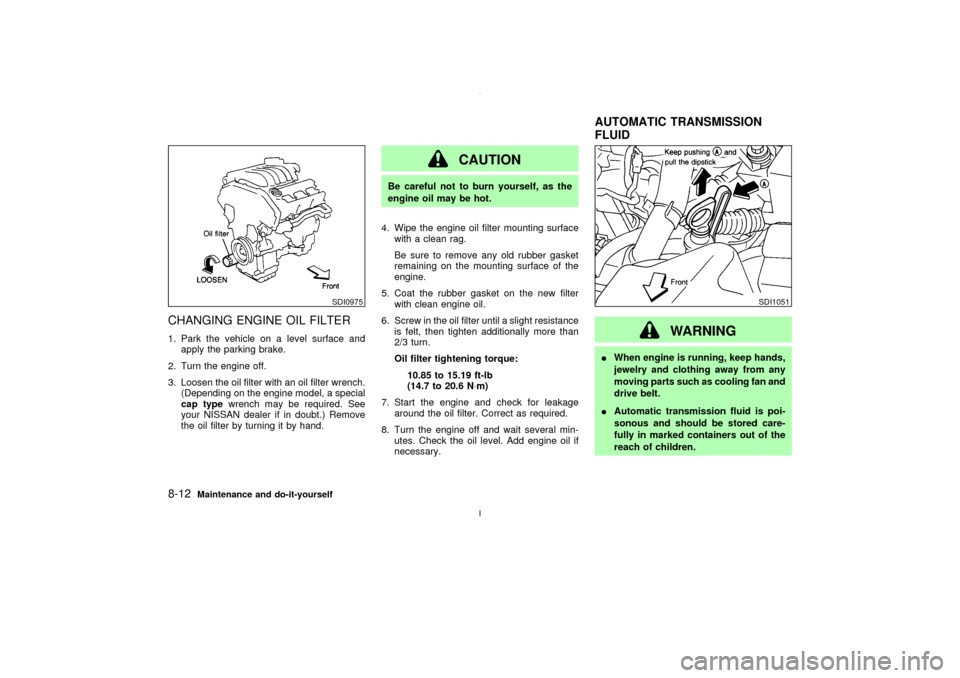
CHANGING ENGINE OIL FILTER1. Park the vehicle on a level surface and
apply the parking brake.
2. Turn the engine off.
3. Loosen the oil filter with an oil filter wrench.
(Depending on the engine model, a special
cap typewrench may be required. See
your NISSAN dealer if in doubt.) Remove
the oil filter by turning it by hand.
CAUTION
Be careful not to burn yourself, as the
engine oil may be hot.
4. Wipe the engine oil filter mounting surface
with a clean rag.
Be sure to remove any old rubber gasket
remaining on the mounting surface of the
engine.
5. Coat the rubber gasket on the new filter
with clean engine oil.
6. Screw in the oil filter until a slight resistance
is felt, then tighten additionally more than
2/3 turn.
Oil filter tightening torque:
10.85 to 15.19 ft-lb
(14.7 to 20.6 N×m)
7. Start the engine and check for leakage
around the oil filter. Correct as required.
8. Turn the engine off and wait several min-
utes. Check the oil level. Add engine oil if
necessary.
WARNING
IWhen engine is running, keep hands,
jewelry and clothing away from any
moving parts such as cooling fan and
drive belt.
IAutomatic transmission fluid is poi-
sonous and should be stored care-
fully in marked containers out of the
reach of children.
SDI0975
SDI1051
AUTOMATIC TRANSMISSION
FLUID
8-12
Maintenance and do-it-yourself
Z
02.7.12/A33-D/V5.0
X
Page 188 of 247
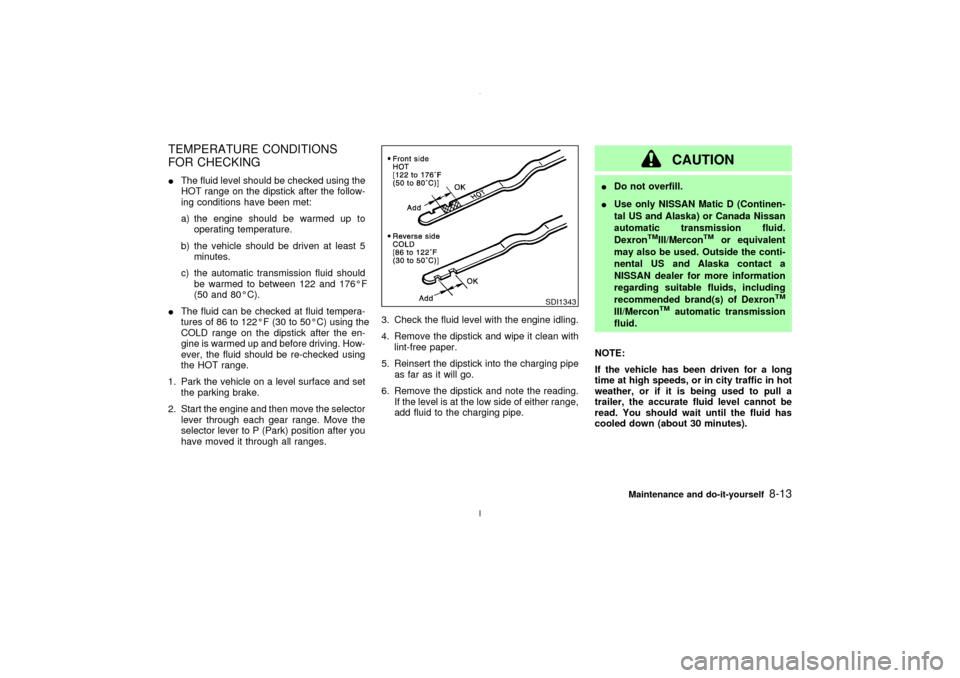
TEMPERATURE CONDITIONS
FOR CHECKINGIThe fluid level should be checked using the
HOT range on the dipstick after the follow-
ing conditions have been met:
a) the engine should be warmed up to
operating temperature.
b) the vehicle should be driven at least 5
minutes.
c) the automatic transmission fluid should
be warmed to between 122 and 176ÉF
(50 and 80ÉC).
IThe fluid can be checked at fluid tempera-
tures of 86 to 122ÉF (30 to 50ÉC) using the
COLD range on the dipstick after the en-
gine is warmed up and before driving. How-
ever, the fluid should be re-checked using
the HOT range.
1. Park the vehicle on a level surface and set
the parking brake.
2. Start the engine and then move the selector
lever through each gear range. Move the
selector lever to P (Park) position after you
have moved it through all ranges.3. Check the fluid level with the engine idling.
4. Remove the dipstick and wipe it clean with
lint-free paper.
5. Reinsert the dipstick into the charging pipe
as far as it will go.
6. Remove the dipstick and note the reading.
If the level is at the low side of either range,
add fluid to the charging pipe.
CAUTION
IDo not overfill.
IUse only NISSAN Matic D (Continen-
tal US and Alaska) or Canada Nissan
automatic transmission fluid.
Dexron
TMIII/Mercon
TM
or equivalent
may also be used. Outside the conti-
nental US and Alaska contact a
NISSAN dealer for more information
regarding suitable fluids, including
recommended brand(s) of Dexron
TM
III/Mercon
TM
automatic transmission
fluid.
NOTE:
If the vehicle has been driven for a long
time at high speeds, or in city traffic in hot
weather, or if it is being used to pull a
trailer, the accurate fluid level cannot be
read. You should wait until the fluid has
cooled down (about 30 minutes).
SDI1343
Maintenance and do-it-yourself
8-13
Z
02.7.12/A33-D/V5.0
X