NISSAN MAXIMA 2004 A34 / 6.G Repair Manual
Manufacturer: NISSAN, Model Year: 2004, Model line: MAXIMA, Model: NISSAN MAXIMA 2004 A34 / 6.GPages: 280, PDF Size: 3.99 MB
Page 61 of 280

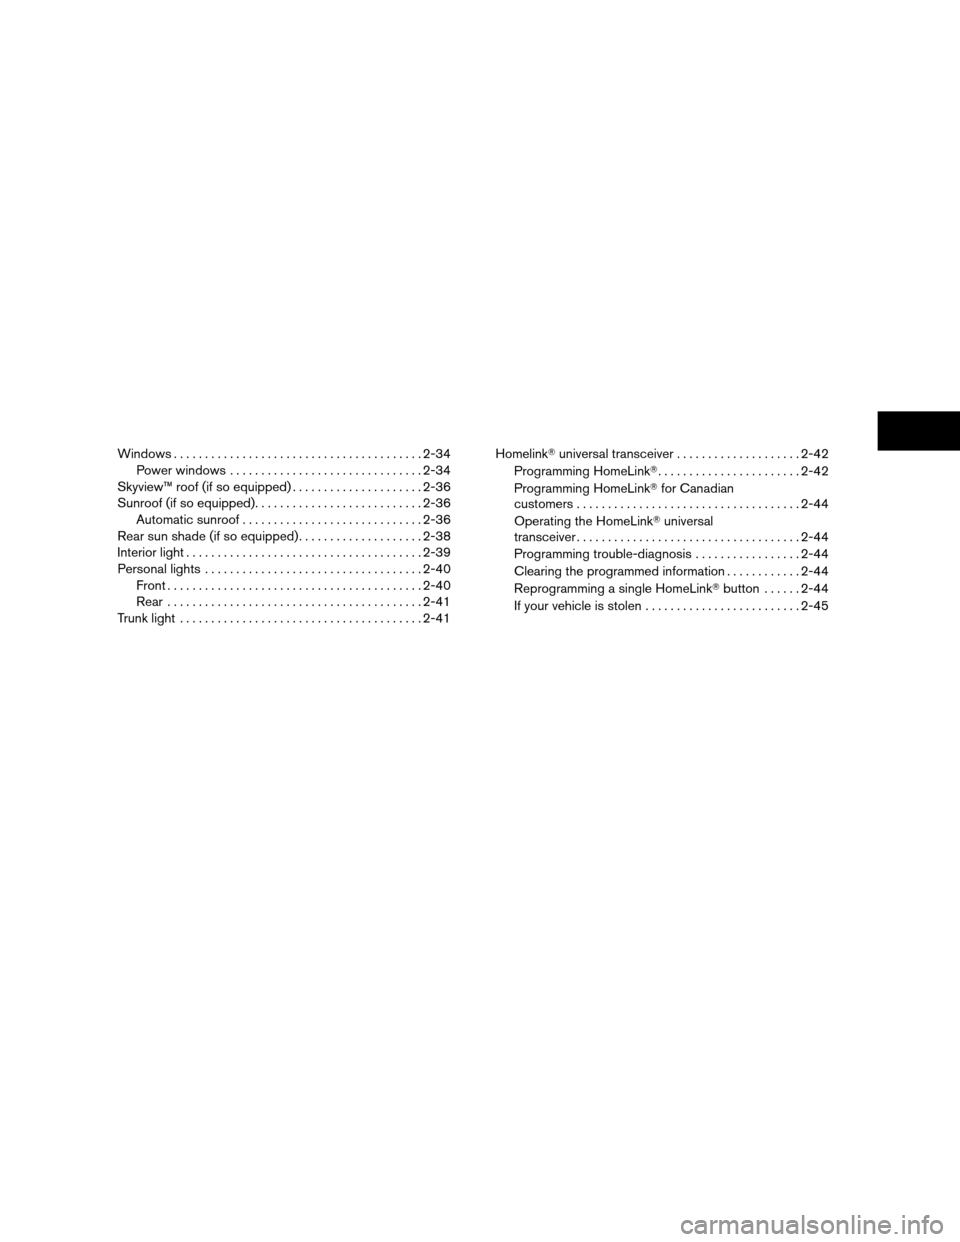
Windows........................................2-34
Power windows...............................2-34
Skyview™ roof (if so equipped).....................2-36
Sunroof (if so equipped)...........................2-36
Automatic sunroof.............................2-36
Rear sun shade (if so equipped)....................2-38
Interior light......................................2-39
Personal lights...................................2-40
Front.........................................2-40
Rear.........................................2-41
Trunk light.......................................2-41HomelinkTuniversal transceiver....................2-42
Programming HomeLinkT.......................2-42
Programming HomeLinkTfor Canadian
customers....................................2-44
Operating the HomeLinkTuniversal
transceiver....................................2-44
Programming trouble-diagnosis.................2-44
Clearing the programmed information............2-44
Reprogramming a single HomeLinkTbutton......2-44
If your vehicle is stolen.........................2-45
ZREVIEW COPY:Ð2004 Maxima(max)
Owners Manual(owners)ÐUSA English(nna)
10/20/03Ðarosenma
X
Page 62 of 280

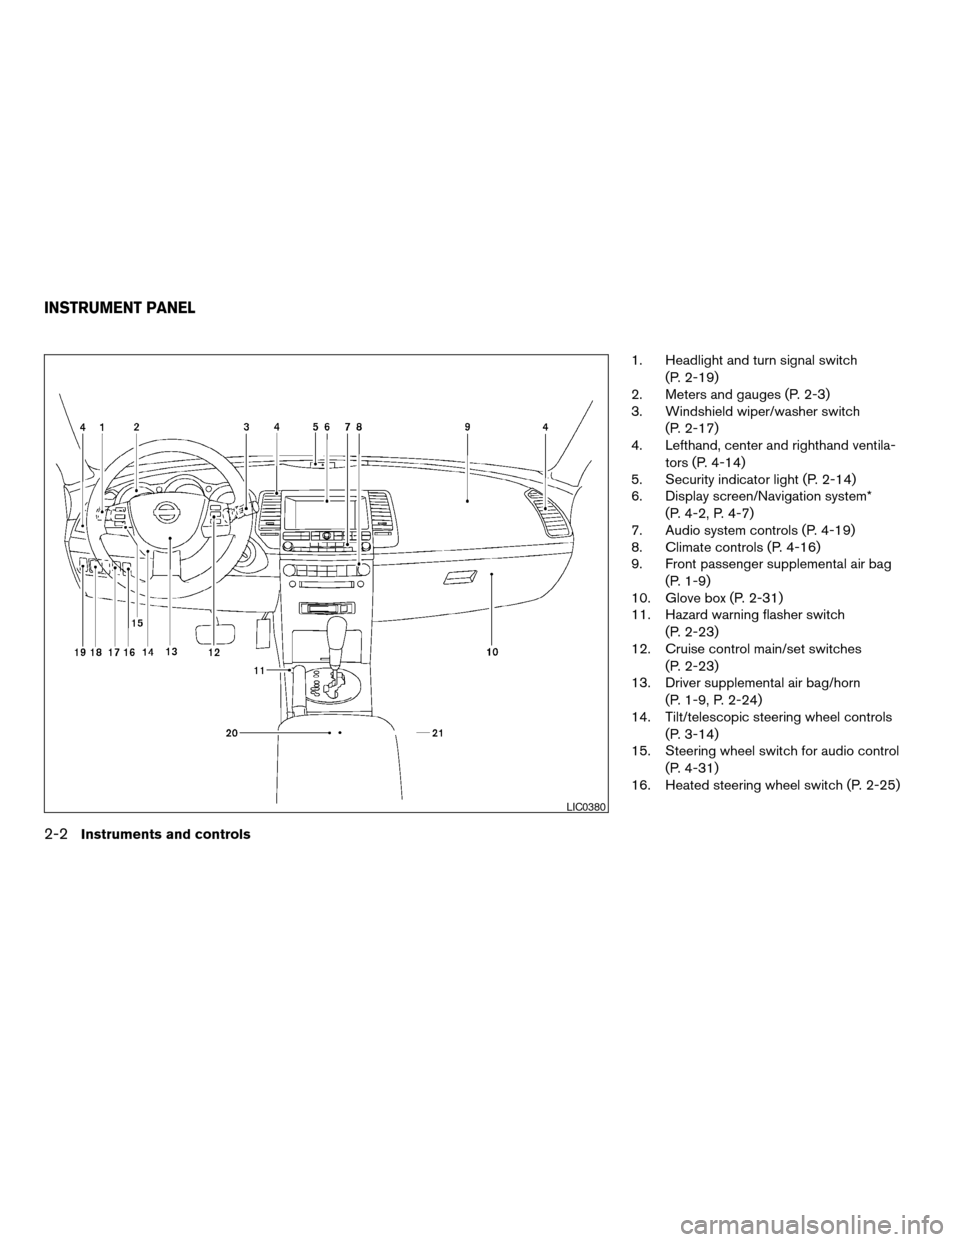
1. Headlight and turn signal switch
(P. 2-19)
2. Meters and gauges (P. 2-3)
3. Windshield wiper/washer switch
(P. 2-17)
4. Lefthand, center and righthand ventila-
tors (P. 4-14)
5. Security indicator light (P. 2-14)
6. Display screen/Navigation system*
(P. 4-2, P. 4-7)
7. Audio system controls (P. 4-19)
8. Climate controls (P. 4-16)
9. Front passenger supplemental air bag
(P. 1-9)
10. Glove box (P. 2-31)
11. Hazard warning flasher switch
(P. 2-23)
12. Cruise control main/set switches
(P. 2-23)
13. Driver supplemental air bag/horn
(P. 1-9, P. 2-24)
14. Tilt/telescopic steering wheel controls
(P. 3-14)
15. Steering wheel switch for audio control
(P. 4-31)
16. Heated steering wheel switch (P. 2-25)
LIC0380
INSTRUMENT PANEL
2-2Instruments and controls
ZREVIEW COPY:Ð2004 Maxima(max)
Owners Manual(owners)ÐUSA English(nna)
10/20/03Ðarosenma
X
Page 63 of 280

17. Vehicle dynamic control (VDC) off
switch (if so equipped) or Traction con-
trol system (TCS) off switch (if so
equipped) (P. 2-26, P. 2-26)
18. Outside mirror controls (P. 3-17)
19. Instrument brightness control (P. 2-22)
20. Heated seat switch (if so equipped)
(P. 2-24)
21. Rear sunshade switch (if so equipped)
(P. 2-38)
*: Refer to the separate Navigation System Own-
er’s Manual (if so equipped) .
See the page number indicated in paren-
theses for operating details.
1. Warning/indicator lights
2. Speedometer
3. Tachometer
4. Warning/indicator lights
5. Change button for trip odometer
6. Engine coolant temperature gauge7. Odometer (total/twin trip)
8. Fuel gauge
LIC0381
METERS AND GAUGES
Instruments and controls2-3
ZREVIEW COPY:Ð2004 Maxima(max)
Owners Manual(owners)ÐUSA English(nna)
10/20/03Ðarosenma
X
Page 64 of 280

1. Speedometer
2. Odometer/twin trip display
3. Change button
SPEEDOMETER AND ODOMETER
Speedometer
The speedometer indicates vehicle speed in
miles per hour (MPH) and kilometers per hour
(km/h) .
Odometer/Twin trip odometer
The odometer/twin trip odometer is displayed
when the ignition key is in the ON position.The odometer records the total distance the ve-
hicle has been driven.
The twin trip odometer records the distance of
individual trips.Changing the display:
Pushing the change button changes the display
as follows:
Trip
!Trip!Trip
Resetting the trip odometer:
Pushing the change button for more than 1 sec-
ond resets the trip odometer to zero.
LIC0382LIC0432
2-4Instruments and controls
ZREVIEW COPY:Ð2004 Maxima(max)
Owners Manual(owners)ÐUSA English(nna)
10/07/03Ðtbrooks
X
Page 65 of 280

TACHOMETER
The tachometer indicates engine speed in revo-
lutions per minute (r/min) . Do not rev engine into
the red zone
s1.
CAUTION
When engine speed approaches the red
zone, shift to a higher gear. Operating the
engine in the red zone may cause serious
engine damage.
ENGINE COOLANT TEMPERATURE
GAUGE
The gauge indicates the engine coolant tempera-
ture. The engine coolant temperature is within the
normal range
s1when the gauge needle points
within the zone shown in the illustration.
The engine coolant temperature varies with the
outside air temperature and driving conditions.
CAUTION
If the gauge indicates engine coolant tem-
perature over the normal range, stop the
vehicle as soon as safely possible. If the
engine is overheated, continued opera-
tion of the vehicle may seriously damage
the engine. See “If your vehicle over-
heats” in the “In case of emergency” sec-
tion for immediate action required.
LIC0383LIC0384
Instruments and controls2-5
ZREVIEW COPY:Ð2004 Maxima(max)
Owners Manual(owners)ÐUSA English(nna)
10/07/03Ðtbrooks
X
Page 66 of 280

FUEL GAUGE
The gauge indicates theapproximatefuel level
in the tank.
The gauge may move slightly during braking,
turning, acceleration, or going up or down hills.
The gauge needle returns to E (Empty) after the
ignition key is turned to OFF.
The low fuel warning light comes on when the
amount of fuel in the tank is getting low.
Refill the fuel tank before the gauge regis-
ters E (Empty) .The
indicates that the fuel filler lid is
located on the driver’s side of the vehicle.
CAUTION
cIf the vehicle runs out of fuel,
the
malfunction indicator lamp
(MIL) may come on. Refuel as soon as
possible. After a few driving trips,
the
lamp should turn off. If the
lamp remains on after a few driving
trips, have the vehicle inspected by a
NISSAN dealer.
cFor additional information, see “Mal-
function indicator lamp (MIL)” later in
this section.When the COMPASS switch is in the ON posi-
tion, the compass display
s1will indicate the
direction the vehicle is heading.
N: north
E: east
S: south
W: west
If the display reads “C”, calibrate the compass by
driving the vehicle in three complete circles at
less than 5 MPH (8 km/h) .
You can also calibrate the compass by driving
your vehicle on your everyday route. The com-
pass will be calibrated once it has tracked three
complete circles.
LIC0385LIC0422
COMPASS DISPLAY (if so equipped)
2-6Instruments and controls
ZREVIEW COPY:Ð2004 Maxima(max)
Owners Manual(owners)ÐUSA English(nna)
10/07/03Ðtbrooks
X
Page 67 of 280

ZONE VARIATION CHANGE
PROCEDURE
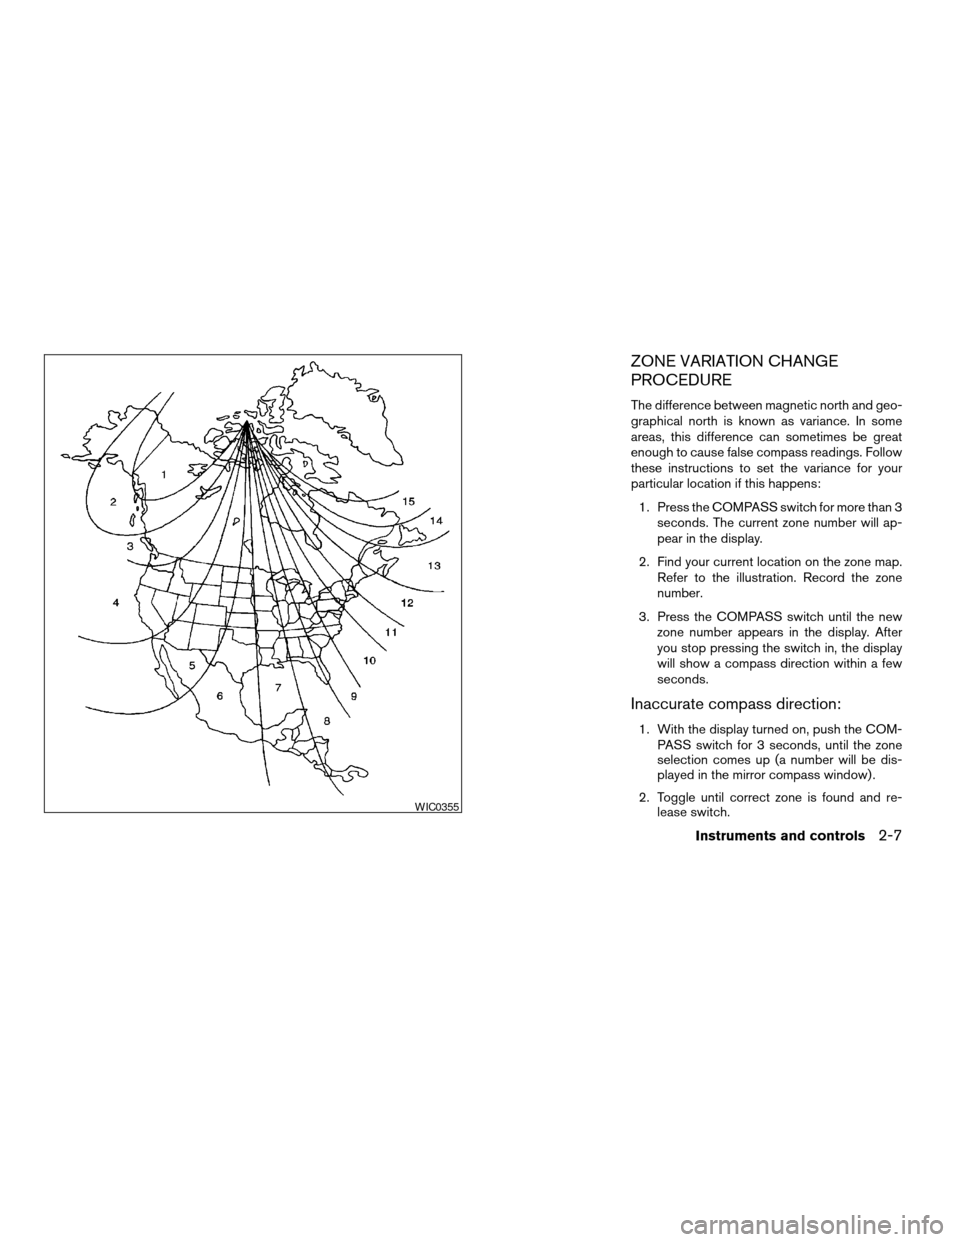
The difference between magnetic north and geo-
graphical north is known as variance. In some
areas, this difference can sometimes be great
enough to cause false compass readings. Follow
these instructions to set the variance for your
particular location if this happens:
1. Press the COMPASS switch for more than 3
seconds. The current zone number will ap-
pear in the display.
2. Find your current location on the zone map.
Refer to the illustration. Record the zone
number.
3. Press the COMPASS switch until the new
zone number appears in the display. After
you stop pressing the switch in, the display
will show a compass direction within a few
seconds.
Inaccurate compass direction:
1. With the display turned on, push the COM-
PASS switch for 3 seconds, until the zone
selection comes up (a number will be dis-
played in the mirror compass window) .
2. Toggle until correct zone is found and re-
lease switch.
WIC0355
Instruments and controls2-7
ZREVIEW COPY:Ð2004 Maxima(max)
Owners Manual(owners)ÐUSA English(nna)
10/07/03Ðtbrooks
X
Page 68 of 280

3. The display will show all segments, and re-
turn to the normal compass mode within 10
seconds of no switch activity.
4. If the vehicle changes zone, repeat steps 1
through 3. See map.
cIf the compass deviates from the correct
indication soon after repeated adjustment,
have the compass checked at an authorized
dealer.
cThe compass may not indicate the correct
compass point in tunnels or while driving up
or down a steep hill. (The compass returns
to the correct compass point when the ve-
hicle moves to an area where the geomag-
netism is stabilized.)
CAUTION
cDo not install a ski rack, antenna, etc.,
which are attached to the vehicle by
means of a magnet. They affect the op-
eration of the compass.
cWhen cleaning the mirror, use a paper
towel or similar material dampened
with glass cleaner. Do not spray glass
cleaner directly on the mirror as it may
cause the liquid cleaner to enter the
mirror housing.
2-8Instruments and controls
ZREVIEW COPY:Ð2004 Maxima(max)
Owners Manual(owners)ÐUSA English(nna)
10/07/03Ðtbrooks
X
Page 69 of 280

orAnti-lock brake warning lightLow windshield washer fluid warning lightHigh beam indicator light (Blue)
Automatic transmission check warning light (if
so equipped)Seat belt warning light and chimeMalfunction indicator lamp (MIL)
orBrake warning lightSupplemental air bag warning lightSlip indicator light (if so equipped)
Charge warning lightTrunk lid open warning lightTraction control system off indicator light (if so
equipped)
Door open warning lightAutomatic transmission position indicator light
(A/T models only)Turn signal/hazard indicator lights
Engine oil pressure warning lightCRUISE main switch indicator lightVehicle dynamic control off indicator light (if so
equipped)
Low fuel warning lightCruise SET switch indicator light
CHECKING BULBS
With all doors closed, apply the parking brake
and turn the ignition key to the ON position
without starting the engine. The following lights
will come on:
,or,,,
If equipped, the following lights come on briefly
and then go off:
or,,,,,
If any light fails to come on, it may indicate
a burned-out bulb or an open circuit in the
electrical system. Have the system repaired
promptly.
WARNING LIGHTS
orAnti-lock brake
warning light
If the light comes on while the engine is running,
it may indicate the anti-lock brake system is not
functioning properly. Have the system checked
by a NISSAN dealer.
WARNING/INDICATOR LIGHTS AND
AUDIBLE REMINDERS
Instruments and controls2-9
ZREVIEW COPY:Ð2004 Maxima(max)
Owners Manual(owners)ÐUSA English(nna)
10/20/03Ðskoniecz
X
Page 70 of 280

Turn off the engine, and start it again by
slowly turning the ignition key (quickly do-
ing so may cause the ABS light to stay on
when there is nothing wrong) . If the light
stays on, have the system checked by a
NISSAN dealer.
If an abnormality occurs in the system, the anti-
lock function ceases, but the regular braking
system continues to operate.
If the light comes on while you are driving,
contact a NISSAN dealer for repair.
Automatic transmission check
warning light (if so equipped)
When the ignition switch is turned ON, the light
comes on for about 2 seconds. If the light blinks
for approximately 8 seconds, it may indicate the
automatic transmission system is not functioning
properly. Have your NISSAN dealer check and
repair the transmission.
orBrake warning light
This light functions for both the parking brake and
the foot brake systems.
When the ignition key is in the ON position, the
light comes on when the parking brake is applied,
and also warns of a low brake fluid level. If the
light comes on while the engine is running withthe parking brake not applied, stop the vehicle
and perform the following:
1. Check the brake fluid level. Add brake fluid
as necessary. See “Brake and clutch fluid” in
the “Maintenance and do-it-yourself” sec-
tion of this manual.
2. If the brake fluid level is correct, have the
brake system checked by a NISSAN dealer.
WARNING
cYour brake system may not be working
properly if the warning light is on. Driv-
ing could be dangerous. If you judge it
to be safe, drive carefully to the nearest
service station for repairs. Otherwise,
have your vehicle towed because driv-
ing it could be dangerous.
cPressing the brake pedal with the en-
gine stopped and/or a low brake fluid
level may increase your stopping dis-
tance and braking will require greater
pedal effort as well as pedal travel.
cIf the brake fluid level is below the
MINIMUM or MIN mark on the brake
fluid reservoir, do not drive until the
brake system has been checked at a
NISSAN dealer.
Charge warning light
If this light comes on while the engine is running,
it may indicate the charging system is not func-
tioning properly. Turn the engine off and check
the generator belt. If the belt is loose, broken,
missing, or if the light remains on, see a NISSAN
dealer immediately.
CAUTION
Do not continue driving if the generator
belt is loose, broken or missing.
Door open warning light
This light comes on when any of the doors are not
closed securely while the ignition key is in the ON
position.
Engine oil pressure warning
light
This light warns of low engine oil pressure. If the
light flickers or comes on during normal driving,
pull off the road in a safe area, stop the engine
immediatelyand call a NISSAN dealer or other
authorized repair shop.
The engine oil pressure warning light is not
designed to indicate a low oil level.Use the
2-10Instruments and controls
ZREVIEW COPY:Ð2004 Maxima(max)
Owners Manual(owners)ÐUSA English(nna)
10/07/03Ðtbrooks
X