display NISSAN MAXIMA 2012 A35 / 7.G Quick Reference Guide
[x] Cancel search | Manufacturer: NISSAN, Model Year: 2012, Model line: MAXIMA, Model: NISSAN MAXIMA 2012 A35 / 7.GPages: 20, PDF Size: 2.04 MB
Page 2 of 20
*See your Owner’s Manual for information.
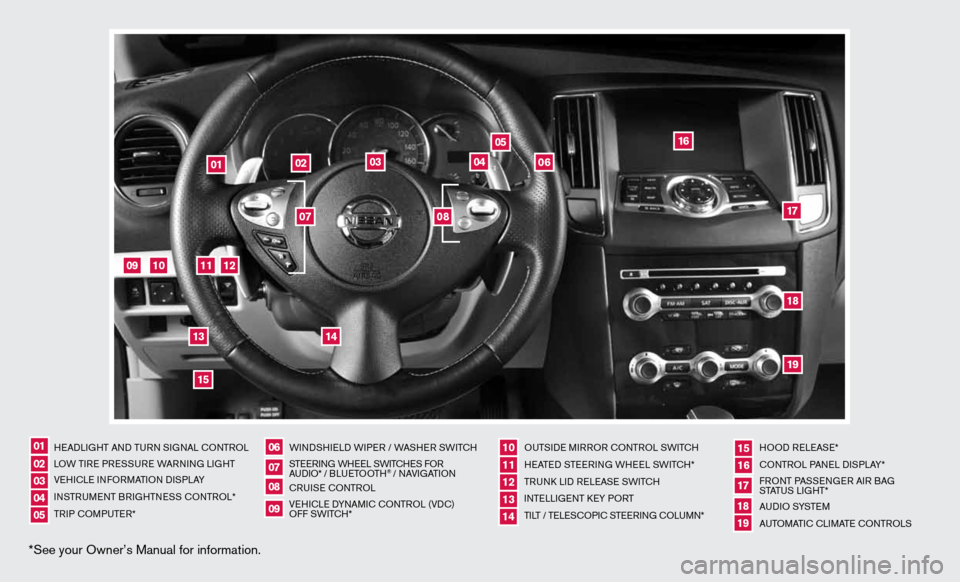
HeAd LiGHT And Tu Rn S iG nAL c OnTROL
LOW T iRe PRe SSuRe WARnin G LiGHT
V e H icL e inf ORMAT iOn diSPLAY
in STR uM enT BR iGHTne SS cOnTROL*
TR iP c OMP uTeR* W
ind SHieL d W iPeR / WASHeR SW iT c H
ST eeRin G WHeeL SW iT c He S f OR
A udi O* / B L u eTO OTH
® / nAVi GATiOn
cR uiSe cOn TROL
Ve Hic Le d YnAM ic cOnTROL (Vdc)
Off SWi TcH* Ou
TSide MiRROR cOn TROL SWiTcH
H eATed STee Rin G WH eeL SW iTc H*
TR unk Lid R eLeAS e SW iTc H
inTe LLiGenT keY PORT
Ti LT / Te LeSc OP ic STee Rin G c OLu Mn* HOO
d ReLeAS e*
cOn TROL PA neL diSPLAY*
f RO nT PASS enGeR Ai R BAG
STATu S LiGHT*
A u d i O SYST eM
A uTOMATic c LiMATe c OnTROLS
07
02
06
0501
08
03
1110121314
1617181915
09
04
02
03
05
04
01
06
09
10
11
14
12
1315
16
171819
07
08
Page 3 of 20
TABLe Of cOnTenTS
Ess Ential i nformation
Loose fuel cap . . . . . . . . . . . . . . . . . . . . . . . . . . . . . . . . . . . .\
. . . . . . . . . . . . 2
Tire Pressure Monitoring System (TPMS) .......................... 2
Heated Steering Wheel (if so equipped) ............................3
first DrivE fEatur Es
ni SSAn intelligent k ey
® System.................................. 4
Trunk Lid Release ............................................... 5
Seat Adjustments .............................................. 5
Automatic drive Positioner (if so equipped) ......................... 6
Outside Mirror control Switch .................................... 6
Starting/Stopping the engine ..................................... 7
Headlight control Switch ........................................ 7
Windshield Wiper/Washer Switch ................................. 8
Automatic climate controls (if so equipped) ........................ 8
f M/AM/XM
® Satellite Radio with cd/ dVd Player (if so equipped) .....10
cruise control ................................................ 11
fuel-filler door ................................................ 11
s yst Em GuiDE
Vehicle information display ...................................... 12
Bluetooth
® Hands-free Phone System (if so equipped) ...............12
System Operating Tips ....................................... 12
Bluetooth
® System without navigation (if so equipped) ............ 13
Bluetooth® System with navigation (if so equipped) ...............15
navigation System (if so equipped) ...............................17
d Vd Player (if so equipped) ..................................... 17
HomeLink
® universal Transceiver (if so equipped) ...................17
• A cellular telephone should not be used for any purpose while
driving so full attention may be given to vehicle operation.
• Always wear your seat belt.
• Supplemental air bags do not replace proper seat belt usage.
• Children 12 and under should always ride in the rear seat
properly secured in child restraints or seat belts according to
their age and weight.
• Do not drink and drive.
f or more information, refer to the “safety –– seats, seat belts and
supplemental restraint system (section 1)”, the “monitor, climate,
audio, phone and voice recognition systems (section 4)” and the
“starting and driving (section 5)” of your Owner’s Manual.
Additional information about your vehicle is also available in your Owner’s Manual, navigation System Owner’s Manual and at www.nissanusa.com. To view detailed
instructional videos, go to
www.nissanownersinfo.mobi/2012/maxima or snap this barcode with an appropriate barcode reader.
Page 4 of 20
tirE Pr Essur E monitorin G systEm (tPms)
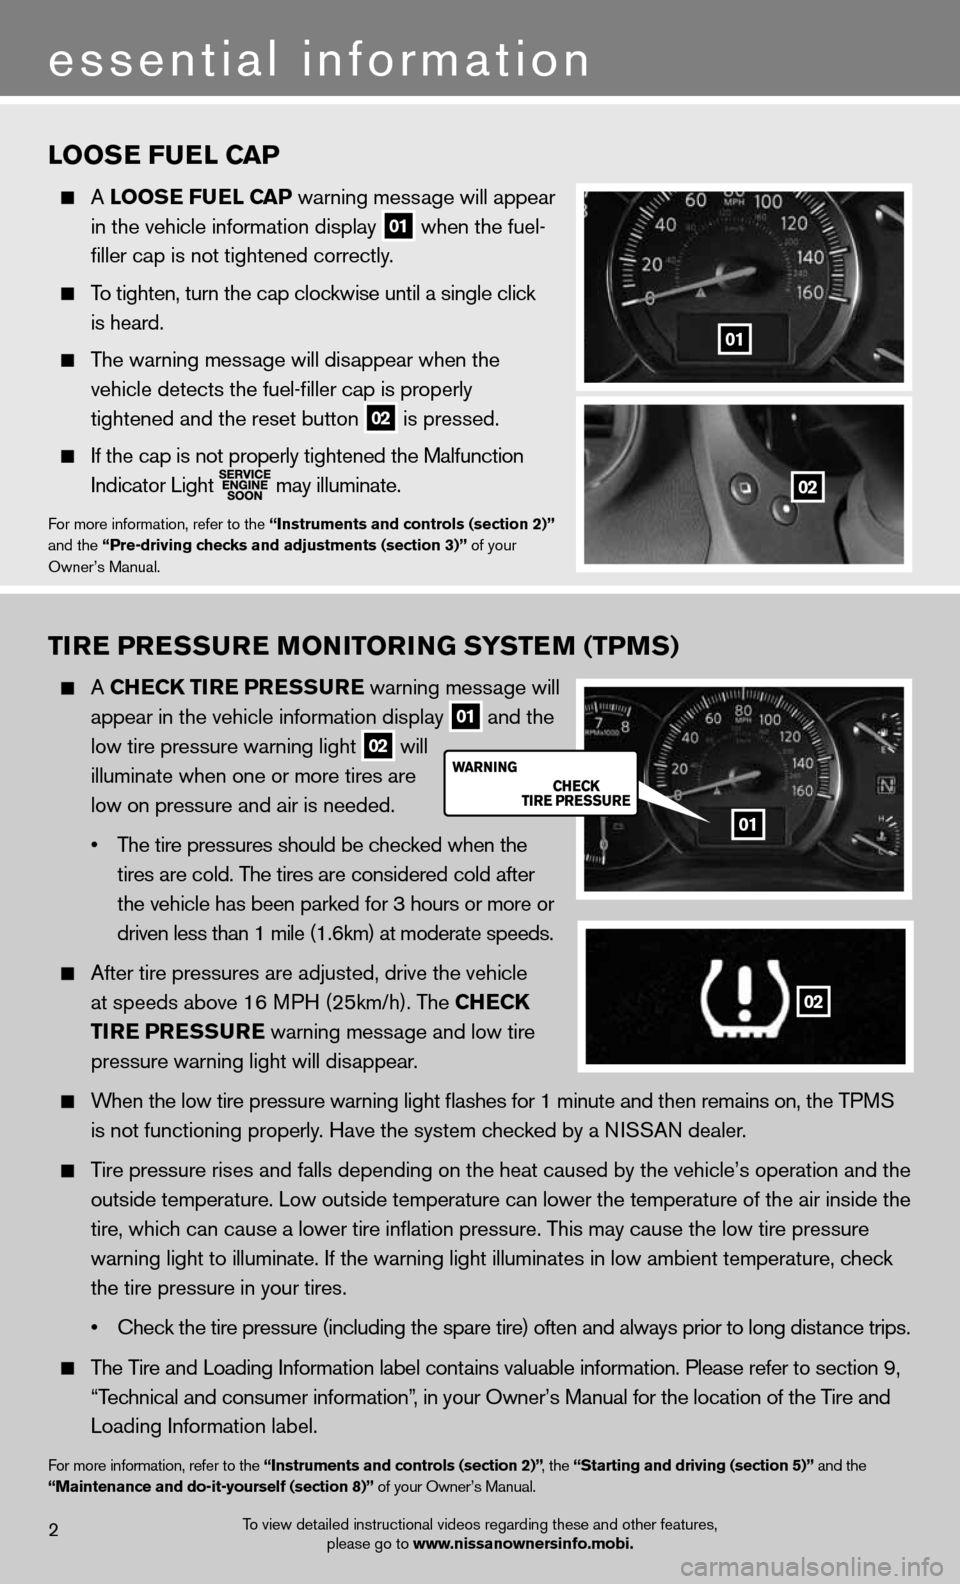
A ChEC k tirE PrEssurE warning message will
appear in the vehicle information display
01 and the
low tire pressure warning light
02 will
illuminate when one or more tires are
low on pressure and air is needed.
• The tire pressures should be checked when the
tires are cold. The tires are considered cold after
the vehicle has been parked for 3 hours or more or
driven less than 1 mile (1.6km) at moderate speeds.
After tire pressures are adjusted, drive the vehicle
at speeds above 16 MPH (25km/h). The Ch ECk
tirE P rEssurE warning message and low tire
pressure warning light will disappear.
When the low tire pressure warning light flashes for 1 minute and then \
remains on, the TPMS
is not functioning properly. Have the system checked by a NISSAN dealer.
Tire pressure rises and falls depending on the heat caused by the vehicle’s operation and the
outside temperature. Low outside temperature can lower the temperature o\
f the air inside the
tire, which can cause a lower tire inflation pressure. This may cause the low tire pressure
warning light to illuminate. If the warning light illuminates in low ambient temperature, check
the tire pressure in your tires.
• Check the tire pressure (including the spare tire) often and always prior to long distance trips.
The Tire and Loading Information label contains valuable information. Please refer to section 9,
“Technical and consumer information”, in your Owner’s Manual for the location of the Tire and
Loading Information label.
for more information, refer to the “instruments and controls (section 2)” , the “starting and driving (section 5)” and the
“maintenance and do-it-yourself (section 8)” of your Owner’s Manual.
loos E fuEl C aP
A loos E fuEl CaP warning message will appear
in the vehicle information display
01 when the fuel-
filler cap is not tightened correctly.
To tighten, turn the cap clockwise until a single click
is heard.
The warning message will disappear when the
vehicle detects the fuel-filler cap is properly
tightened and the reset button
02 is pressed.
if the cap is not properly tightened the Malfunction
indicator Light
may illuminate.
f
or more information, refer to the “instruments and controls (section 2)”
and the “Pre-driving checks and adjustments (section 3)” of your
Owner’s Manual.
To view detailed instructional videos regarding these and other features, please go to www.nissanownersinfo.mobi.
essential information
2
02
01
02
01
Page 6 of 20
4
first drive features
01
To view detailed instructional videos regarding these and other features, please go to www.nissanownersinfo.mobi.
nissan intE lliGE nt k Ey® syst Em
The ni SSAn intelligent k ey® system allows you to lock or
unlock the vehicle, open the trunk and start the engine.
n OTe: it is important to make sure the intelligent k ey is
with you (that is, in your pocket or purse).
The operating range of the intelligent k ey is within
31.5 in (80 cm) from each request switch.
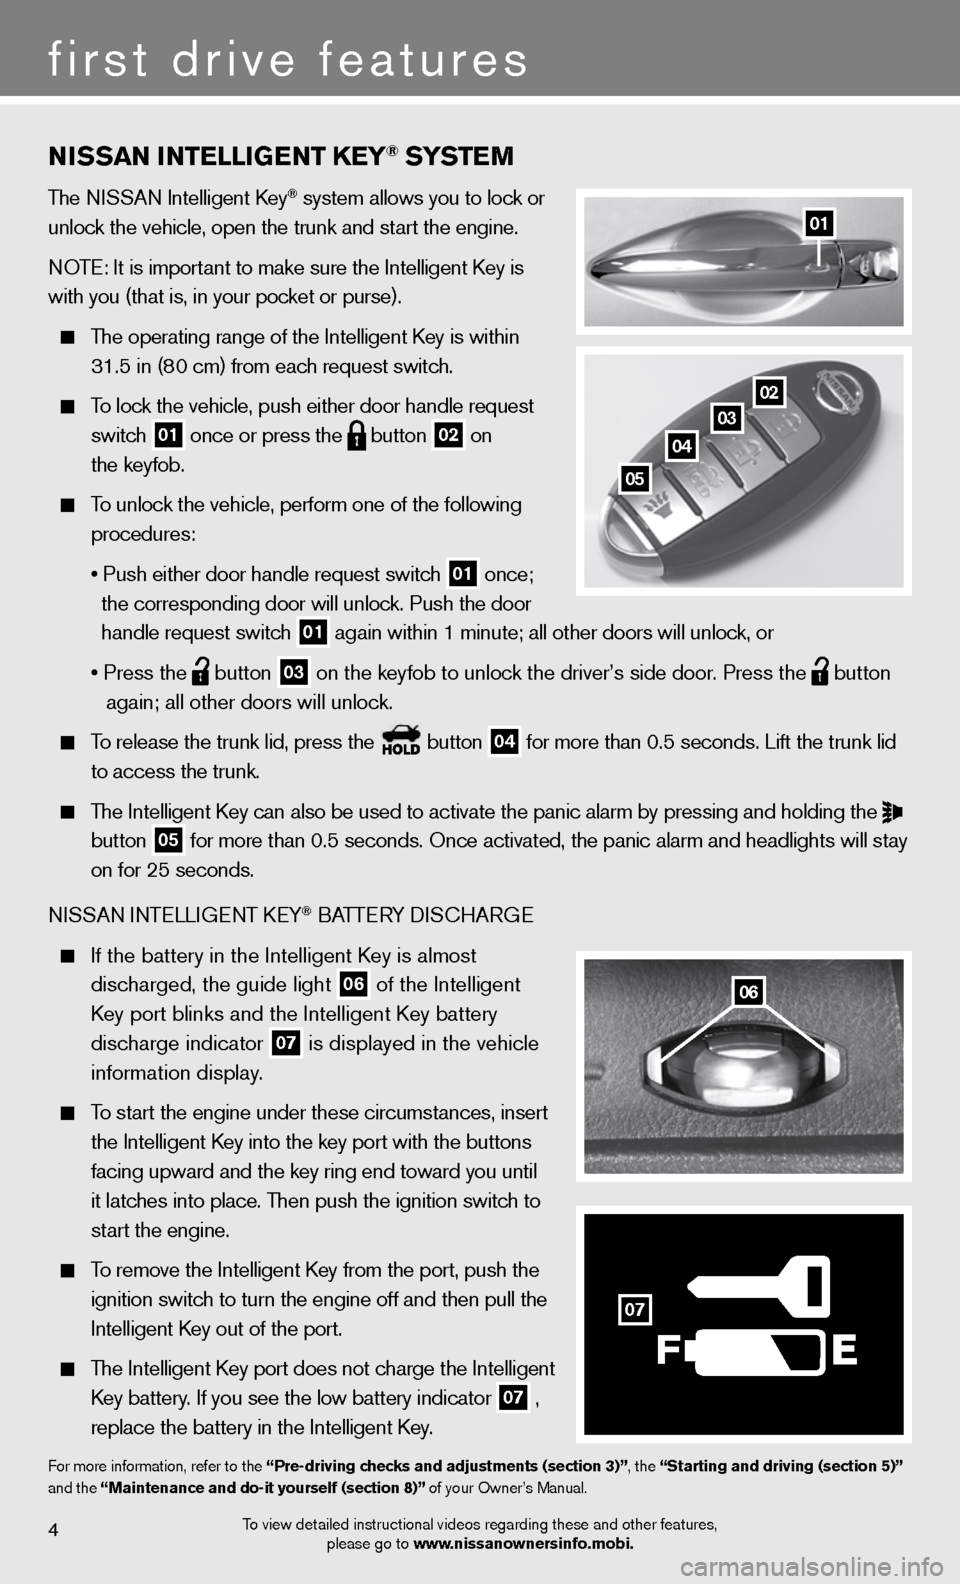
To lock the vehicle, push either door handle request
switch
01 once or press the
button
02 on
the keyfob.
To unlock the vehicle, perform one of the following
procedures:
• Push either door handle request switch
01 once;
the corresponding door will unlock. Push the door
handle request switch
01 again within 1 minute; all other doors will unlock, or
• Press the
button
03 on the keyfob to unlock the driver’s side door. Press the
button
again; all other doors will unlock.
To release the trunk lid, press the button
04 for more than 0.5 seconds. Lift the trunk lid
to access the trunk.
The Intelligent Key can also be used to activate the panic alarm by pressing and holding the
button
05 for more than 0.5 seconds. Once activated, the panic alarm and headlight\
s will stay
on for 25 seconds.
ni SSAn inTe LLiGenT keY
® BATTe RY diSc HARG e
If the battery in the Intelligent Key is almost
discharged, the guide light
06 of the intelligent
Key port blinks and the Intelligent Key battery
discharge indicator
07 is displayed in the vehicle
information display.
To start the engine under these circumstances, insert
the Intelligent Key into the key port with the buttons
facing upward and the key ring end toward you until
it latches into place. Then push the ignition switch to
start the engine.
To remove the intelligent k ey from the port, push the
ignition switch to turn the engine off and then pull the
intelligent k ey out of the port.
The intelligent k ey port does not charge the intelligent
Key battery. If you see the low battery indicator
07 ,
replace the battery in the Intelligent Key.
for more information, refer to the “Pre-driving checks and adjustments (section 3)”, the “starting and driving (section 5)”
and the “maintenance and do-it yourself (section 8)” of your Owner’s Manual.
0203
04
05
06
F
07
Page 12 of 20
10
first drive features
To view detailed instructional videos regarding these and other features, please go to www.nissanownersinfo.mobi.
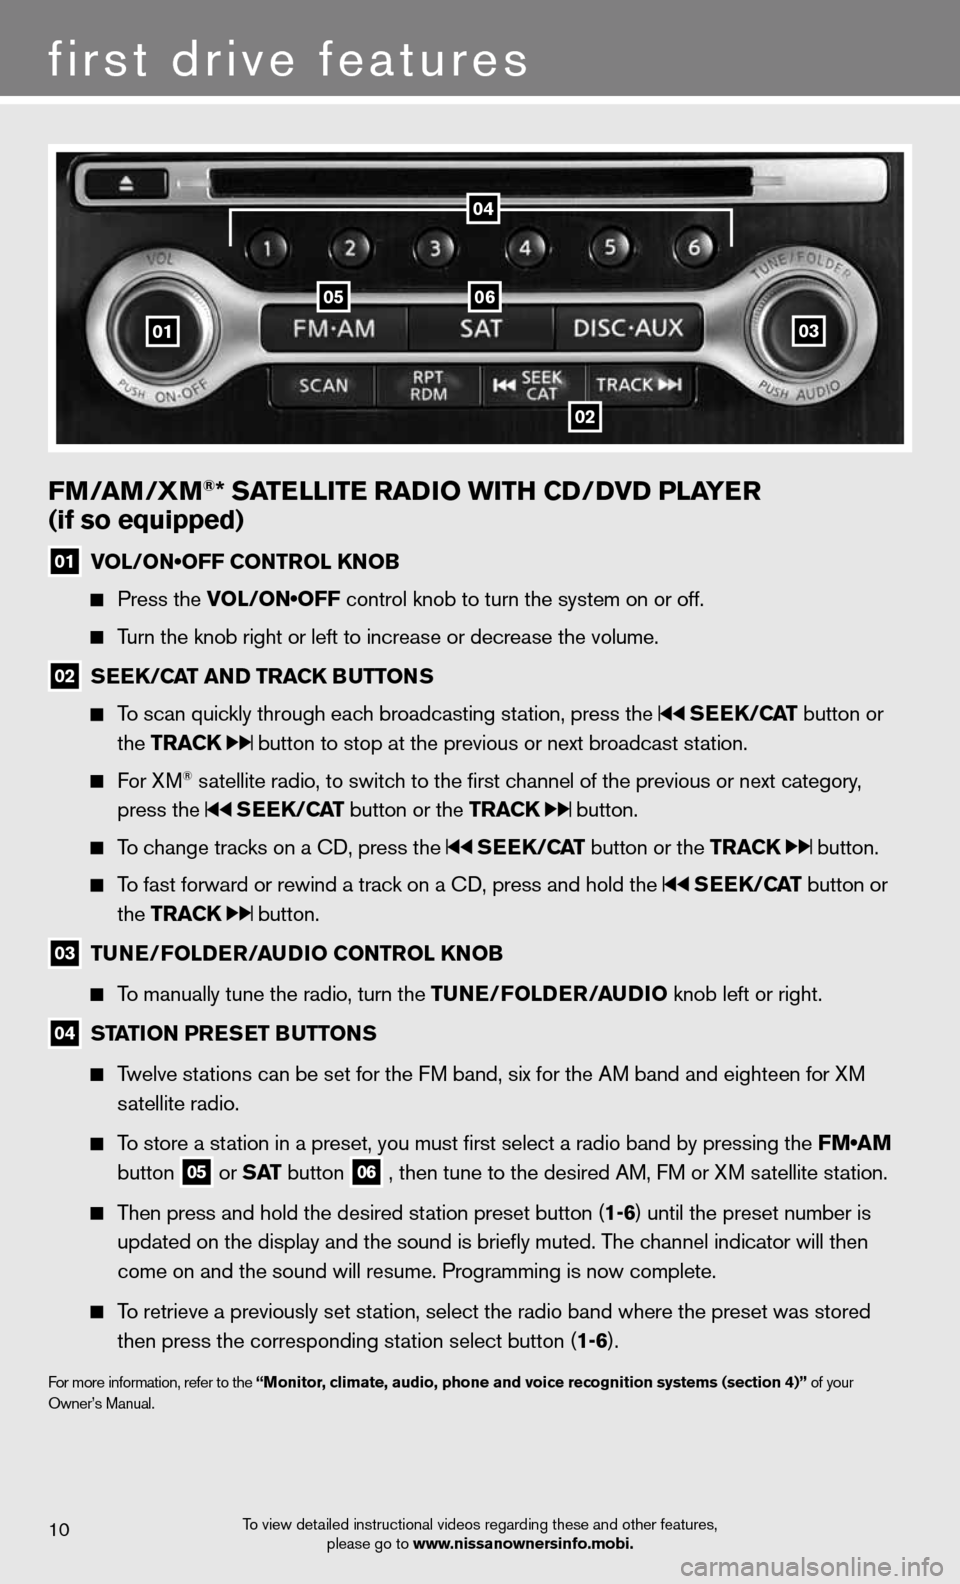
fm/am /Xm®* satE llitE raD io With CD/DvD PlayE r
(if so equipped)
01 VOL/ON•OFF CONTROL KNOB
Press the VOL/ON•OFF control knob to turn the system on or off.
Turn the knob right or left to increase or decrease the volume.
02 s
EE k/C at an D tra Ck Buttons
To scan quickly through each broadcasting station, press the sEEk /Cat button or
the tra Ck
button to stop at the previous or next broadcast station.
f or XM® satellite radio, to switch to the first channel of the previous or next category,
press the
sEEk /Cat button or the tra Ck button.
To change tracks on a cd, press the sEEk /Cat button or the tra Ck button.
To fast forward or rewind a track on a cd, press and hold the sEEk /Cat button or
the tra Ck
button.
03 tun
E/folDE r/au Dio Control knoB
To manually tune the radio, turn the tunE/fol DEr/auDio knob left or right.
04 station Pr
Es Et B uttons
Twelve stations can be set for the FM band, six for the AM band and eighteen for XM
satellite radio.
To store a station in a preset, you must first select a radio band by pressing the FM•AM
button
05 or
s at button
06 , then tune to the desired AM, f
M or XM satellite station.
Then press and hold the desired station preset button (1-6) until the preset number is
updated on the display and the sound is briefly muted. The channel indicator will then
come on and the sound will resume. Programming is now complete.
To retrieve a previously set station, select the radio band where the preset was stored
then press the corresponding station select button (1-6).
for more information, refer to the “monitor, climate, audio, phone and voice recognition systems (section 4)” of your
Owner’s Manual.
01
0506
02
03
04
Page 14 of 20
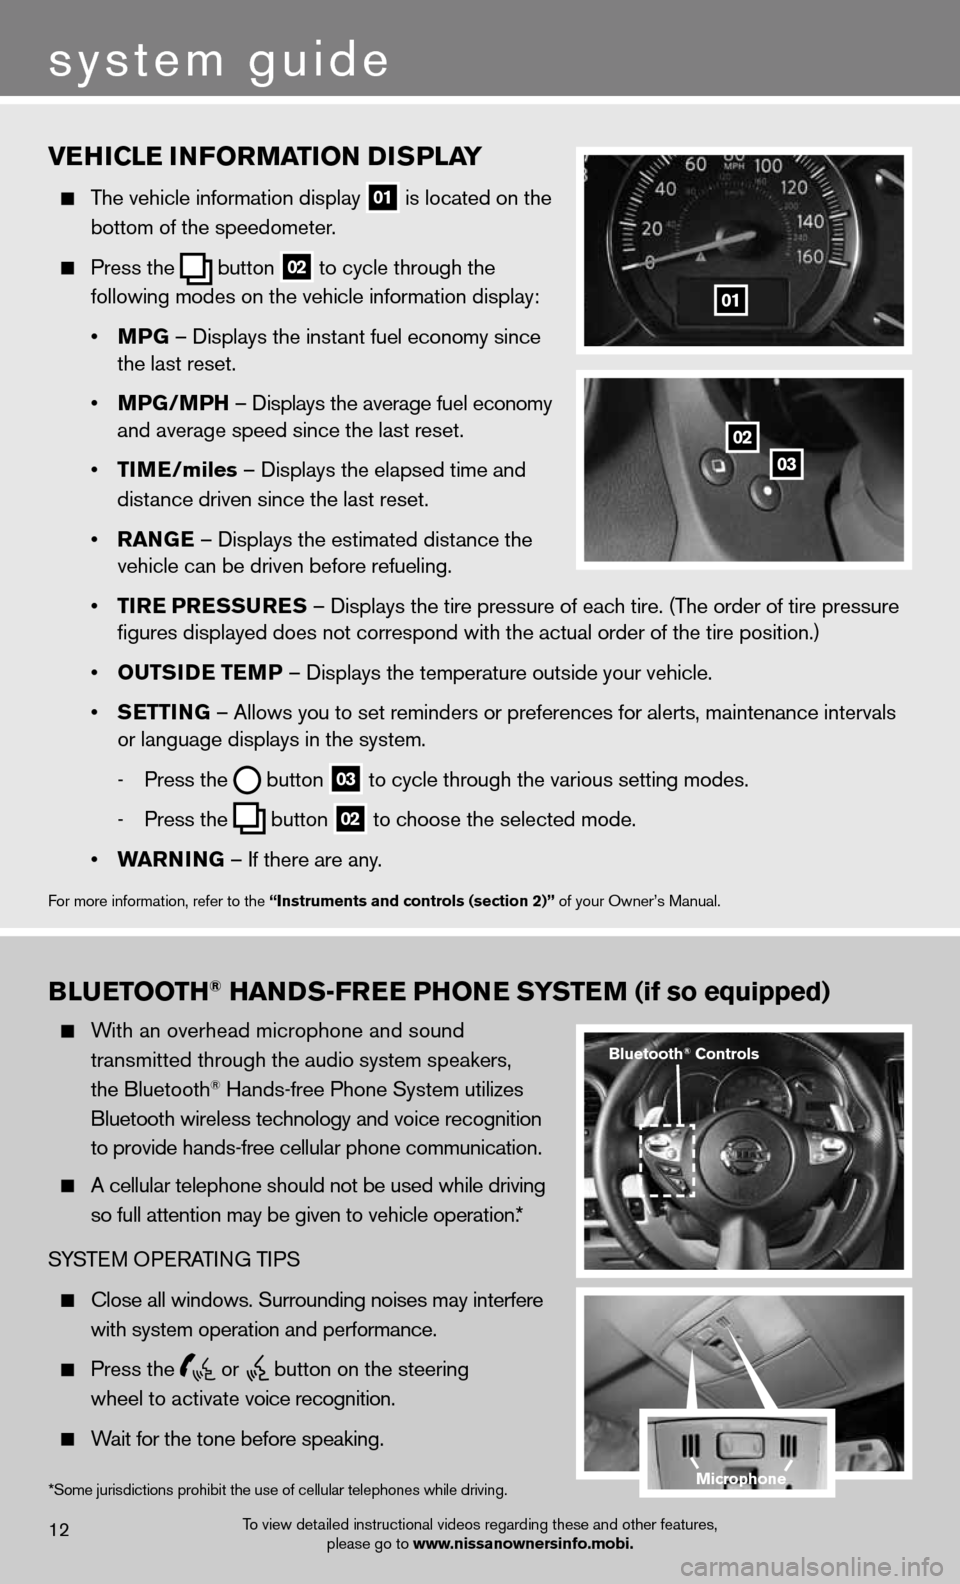
vEhiClE information D isPlay
The vehicle information display
01 is located on the
bottom of the speedometer.
Press the
button
02 to cycle through the
following modes on the vehicle information display:
• mPG – displays the instant fuel economy since
the last reset.
• mPG/mP h – displays the average fuel economy
and average speed since the last reset.
• tim E/miles – displays the elapsed time and
distance driven since the last reset.
• ran GE – displays the estimated distance the
vehicle can be driven before refueling.
• tirE P rEssurEs – displays the tire pressure of each tire. (The order of tire pressure
figures displayed does not correspond with the actual order of the tir\
e position.)
• outsi DE tEmP – displays the temperature outside your vehicle.
• sEttin G – Allows you to set reminders or preferences for alerts, maintenance\
intervals
or language displays in the system.
- Press the
button
03 to cycle through the various setting modes.
- Press the
button
02 to choose the selected mode.
• Warnin G – if there are any.
for more information, refer to the “instruments and controls (section 2)” of your Owner’s Manual.
01
B lu Etooth® han Ds-fr EE Phon E systEm (if so equipped)
With an overhead microphone and sound
transmitted through the audio system speakers,
the Bluetooth
® Hands-free Phone System utilizes
Bluetooth wireless technology and voice recognition
to provide hands-free cellular phone communication.
A cellular telephone should not be used while driving
so full attention may be given to vehicle operation.*
SYSTe M OPeRATin G TiPS
close all windows. Surrounding noises may interfere
with system operation and performance.
Press the
or
button on the steering
wheel to activate voice recognition.
Wait for the tone before speaking.
system guide
To view detailed instructional videos regarding these and other features,
please go to www.nissanownersinfo.mobi.12
*Some jurisdictions prohibit the use of cellular telephones while driving.
Bluetooth® Controls
02
03
microphone
Page 17 of 20
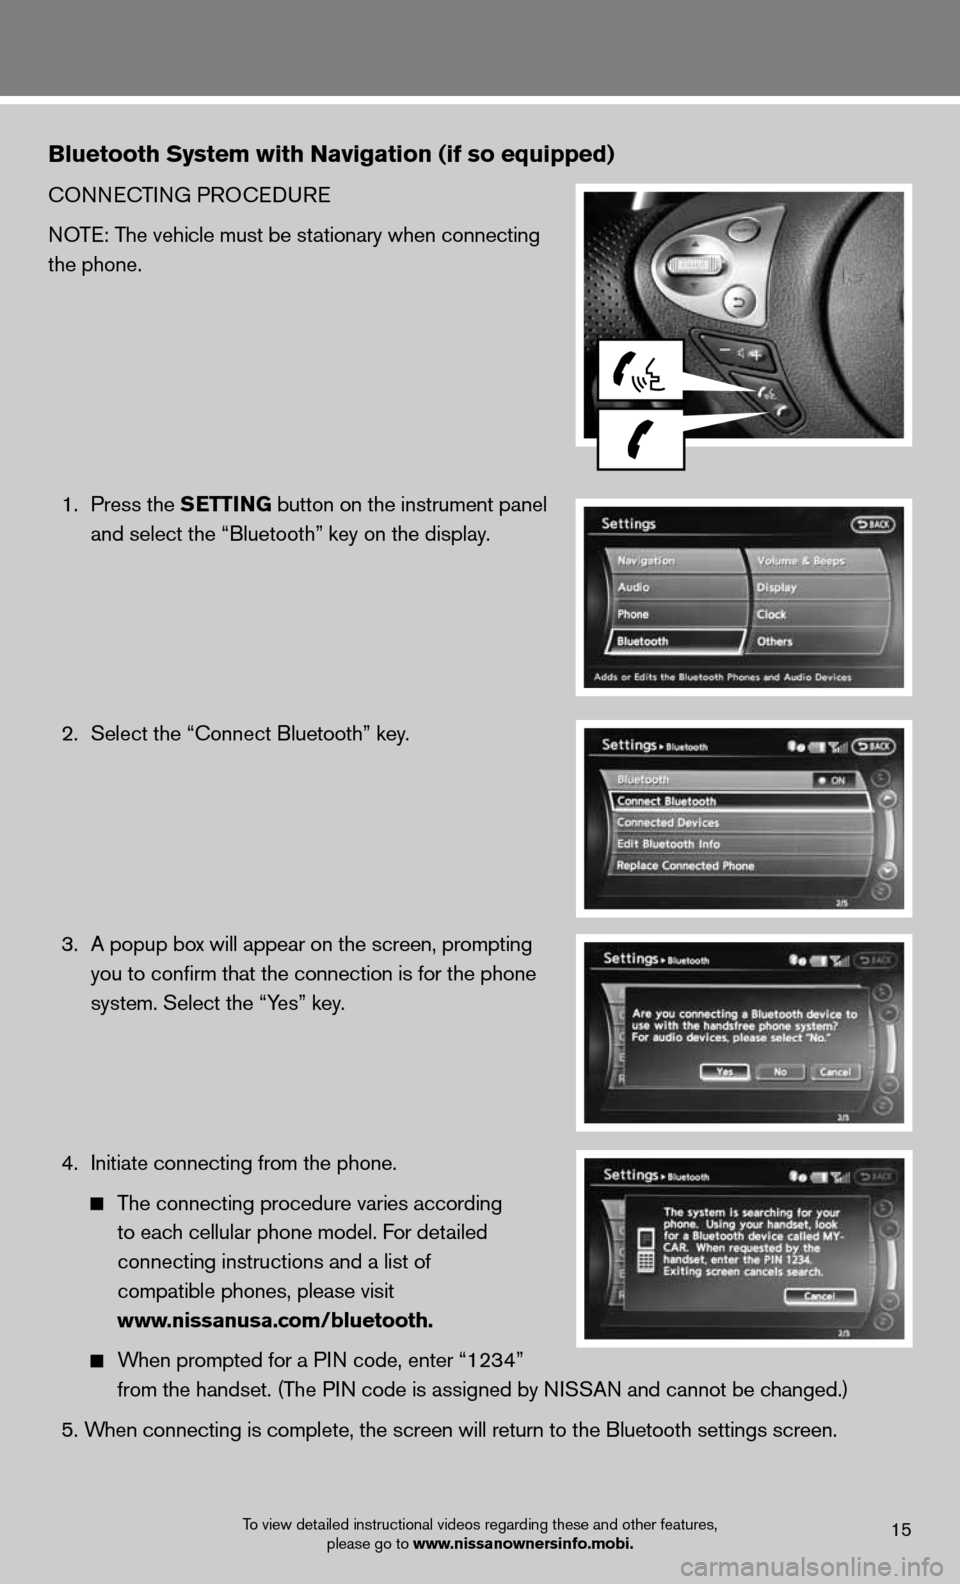
Bluetooth system with navigation (if so equipped)
cOnnecTinG PROcedu Re
NOTE: The vehicle must be stationary when connecting
the phone.
1. Press the s EttinG button on the instrument panel
and select the “Bluetooth” key on the display.
2. Select the “connect Bluetooth” key.
3. A popup box will appear on the screen, prompting
you to confirm that the connection is for the phone
system. Select the “Yes” key.
4. initiate connecting from the phone.
The connecting procedure varies according
to each cellular phone model. f or detailed
connecting instructions and a list of
compatible phones, please visit
www.nissanusa.com/bluetooth.
When prompted for a P in code, enter “1234”
from the handset. (The PIN code is assigned by NISSAN and cannot be changed.)
5. When connecting is complete, the screen will return to the Bluetooth sett\
ings screen.
To view detailed instructional videos regarding these and other features,
please go to www.nissanownersinfo.mobi.15
Page 18 of 20
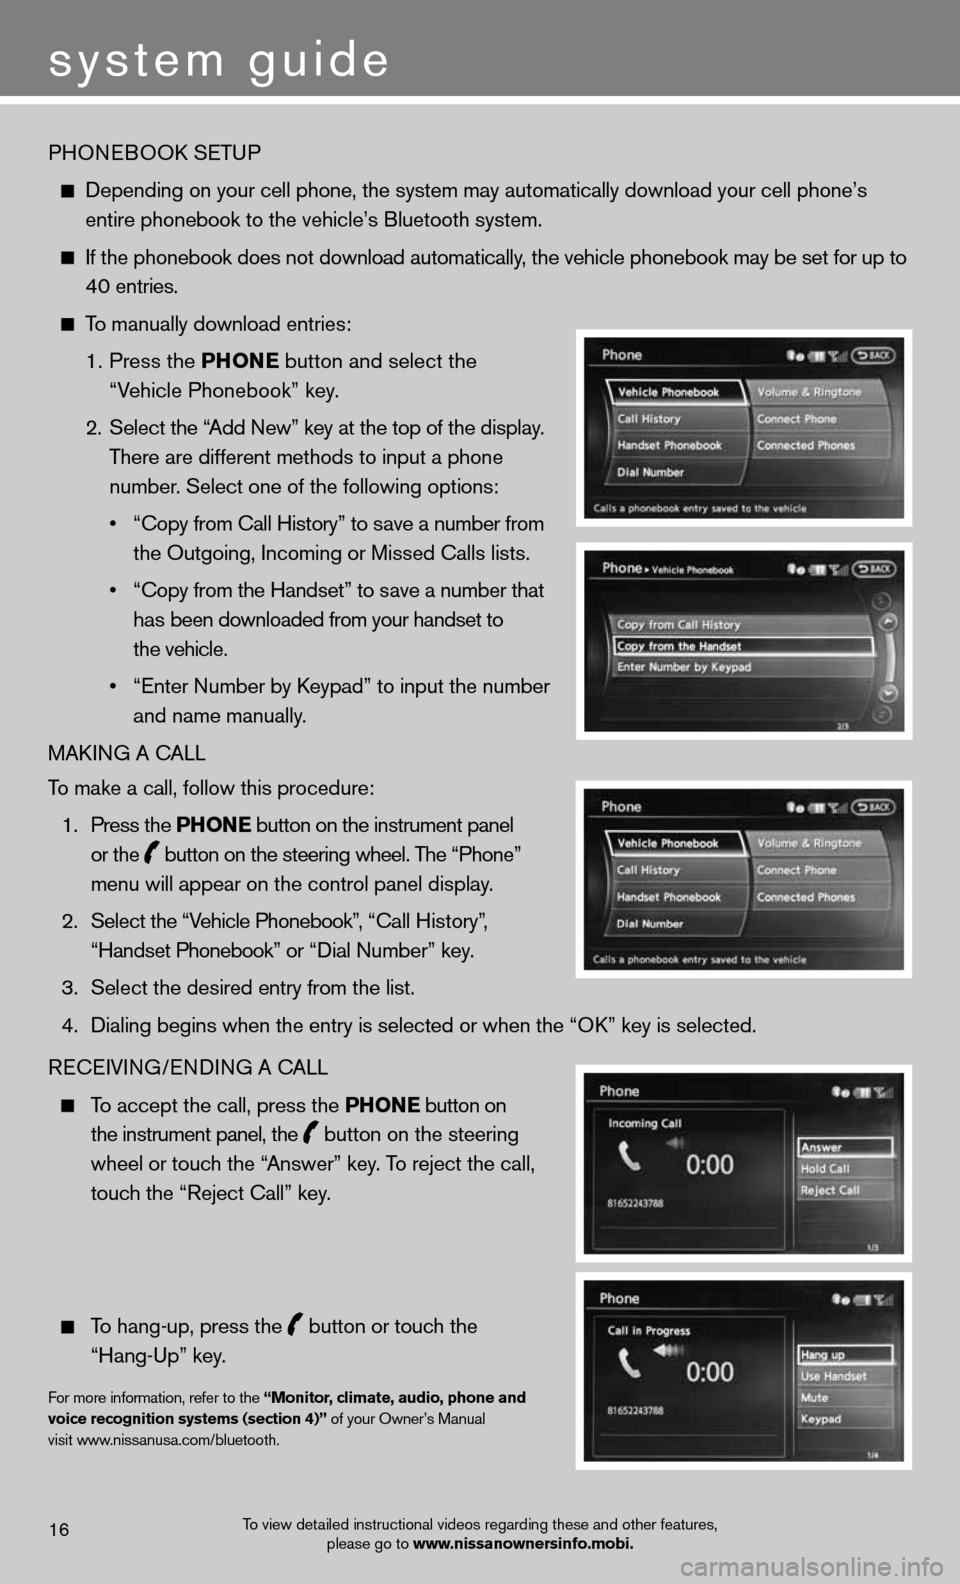
PHOneBOOk SeTu P
depending on your cell phone, the system may automatically download your \
cell phone’s
entire phonebook to the vehicle’s Bluetooth system.
If the phonebook does not download automatically, the vehicle phonebook may be set for up to
40 entries.
To manually download entries:
1. Press the Phon E
button and select the
“Vehicle Phonebook” key.
2. Select the “Add new” key at the top of the display.
There are different methods to input a phone
number. Select one of the following options:
• “Copy from Call History” to save a number from
the Outgoing, incoming or Missed calls lists.
• “Copy from the Handset” to save a number that
has been downloaded from your handset to
the vehicle.
• “Enter Number by Keypad” to input the number
and name manually.
MAkin G A cALL
To make a call, follow this procedure:
1. Press the Phon E button on the instrument panel
or the
button on the steering wheel. The “Phone”
menu will appear on the control panel display.
2. Select the “Vehicle Phonebook”, “Call History”,
“Handset Phonebook” or “Dial Number” key.
3. Select the desired entry from the list.
4. Dialing begins when the entry is selected or when the “OK” key is selected.
Recei Vin G/endin G A cALL
To accept the call, press the Phon E button on
the instrument panel, the
button on the steering
wheel or touch the “Answer” key. To reject the call,
touch the “Reject call” key.
To hang-up, press the
button or touch the
“Hang-up” key.
for more information, refer to the “monitor, climate, audio, phone and
voice recognition systems (section 4)” of your Owner’s Manual
visit www.nissanusa.com/bluetooth.
To view detailed instructional videos regarding these and other features, please go to www.nissanownersinfo.mobi.16
system guide
Page 19 of 20
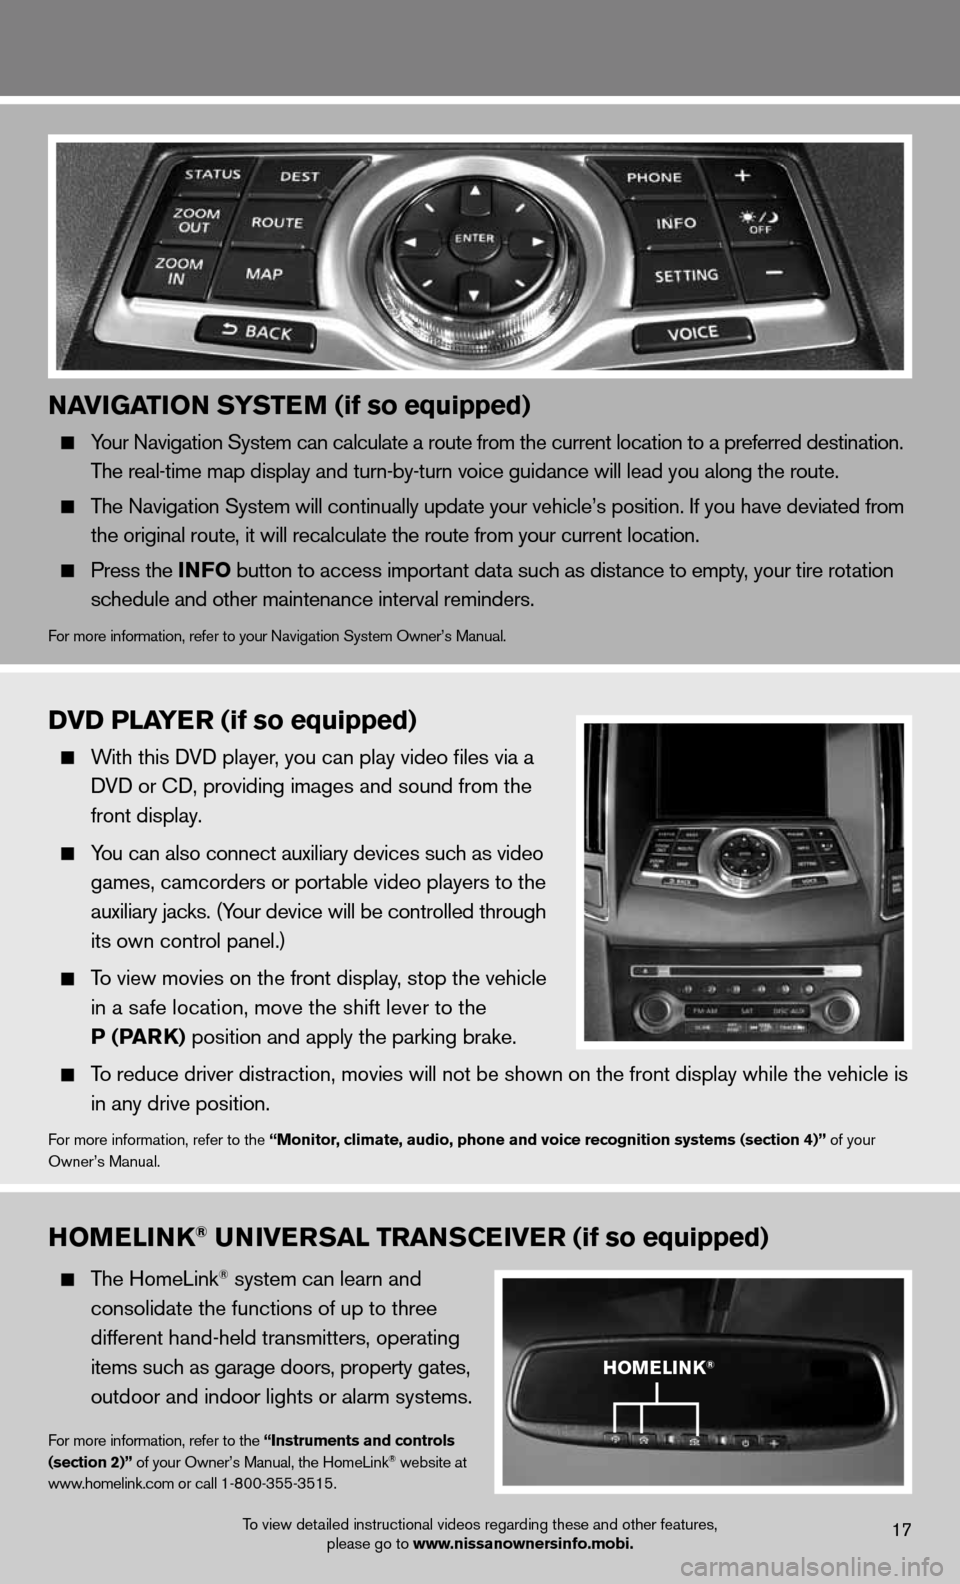
naviGation systE m (if so equipped)
Your navigation System can calculate a route from the current location to a pr\
eferred destination.
The real-time map display and turn-by-turn voice guidance will lead you along the route.
The navigation System will continually update your vehicle’s position. if you have deviated from
the original route, it will recalculate the route from your current loca\
tion.
Press the info button to access important data such as distance to empty, your tire rotation
schedule and other maintenance interval reminders.
for more information, refer to your navigation System Owner’s Manual.
homElink® univE rsal trans CEivE r (if so equipped)
The HomeLink® system can learn and
consolidate the functions of up to three
different hand-held transmitters, operating
items such as garage doors, property gates,
outdoor and indoor lights or alarm systems.
for more information, refer to the “instruments and controls
(section 2)” of your Owner’s Manual, the HomeLink® website at
www.homelink.com or call 1-800-355-3515.
DvD PlayE r (if so equipped)
With this d Vd player, you can play video files via a
d Vd or cd, providing images and sound from the
front display.
You can also connect auxiliary devices such as video
games, camcorders or portable video players to the
auxiliary jacks. (Your device will be controlled through
its own control panel.)
To view movies on the front display, stop the vehicle
in a safe location, move the shift lever to the
P (Park) position and apply the parking brake.
To reduce driver distraction, movies will not be shown on the front display while the vehicle is
in any drive position.
for more information, refer to the “monitor, climate, audio, phone and voice recognition systems (section 4)” of your
Owner’s Manual.
homElink®
To view detailed instructional videos regarding these and other features, please go to www.nissanownersinfo.mobi.17