key NISSAN MAXIMA 2012 A35 / 7.G Quick Reference Guide
[x] Cancel search | Manufacturer: NISSAN, Model Year: 2012, Model line: MAXIMA, Model: NISSAN MAXIMA 2012 A35 / 7.GPages: 20, PDF Size: 2.04 MB
Page 2 of 20
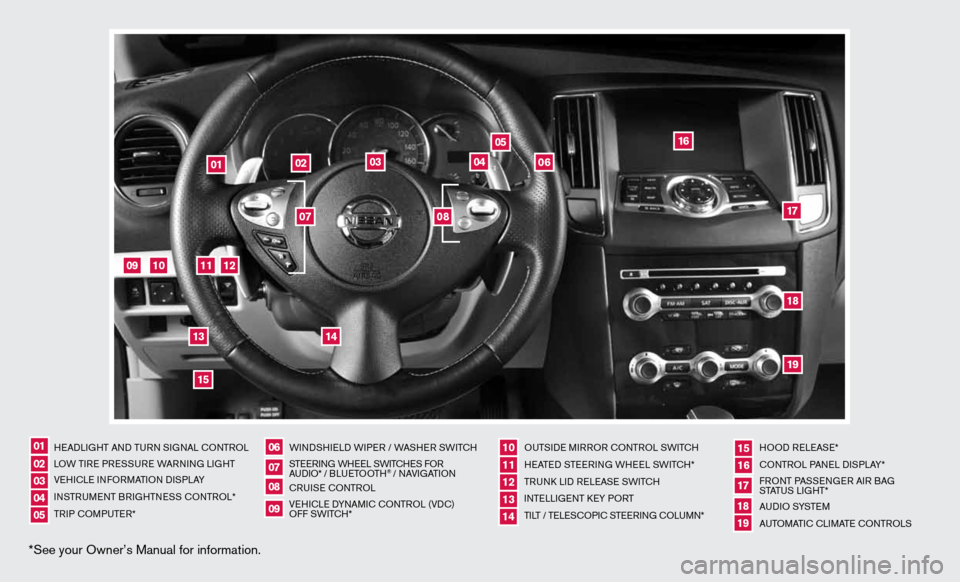
*See your Owner’s Manual for information.
HeAd LiGHT And Tu Rn S iG nAL c OnTROL
LOW T iRe PRe SSuRe WARnin G LiGHT
V e H icL e inf ORMAT iOn diSPLAY
in STR uM enT BR iGHTne SS cOnTROL*
TR iP c OMP uTeR* W
ind SHieL d W iPeR / WASHeR SW iT c H
ST eeRin G WHeeL SW iT c He S f OR
A udi O* / B L u eTO OTH
® / nAVi GATiOn
cR uiSe cOn TROL
Ve Hic Le d YnAM ic cOnTROL (Vdc)
Off SWi TcH* Ou
TSide MiRROR cOn TROL SWiTcH
H eATed STee Rin G WH eeL SW iTc H*
TR unk Lid R eLeAS e SW iTc H
inTe LLiGenT keY PORT
Ti LT / Te LeSc OP ic STee Rin G c OLu Mn* HOO
d ReLeAS e*
cOn TROL PA neL diSPLAY*
f RO nT PASS enGeR Ai R BAG
STATu S LiGHT*
A u d i O SYST eM
A uTOMATic c LiMATe c OnTROLS
07
02
06
0501
08
03
1110121314
1617181915
09
04
02
03
05
04
01
06
09
10
11
14
12
1315
16
171819
07
08
Page 6 of 20
4
first drive features
01
To view detailed instructional videos regarding these and other features, please go to www.nissanownersinfo.mobi.
nissan intE lliGE nt k Ey® syst Em
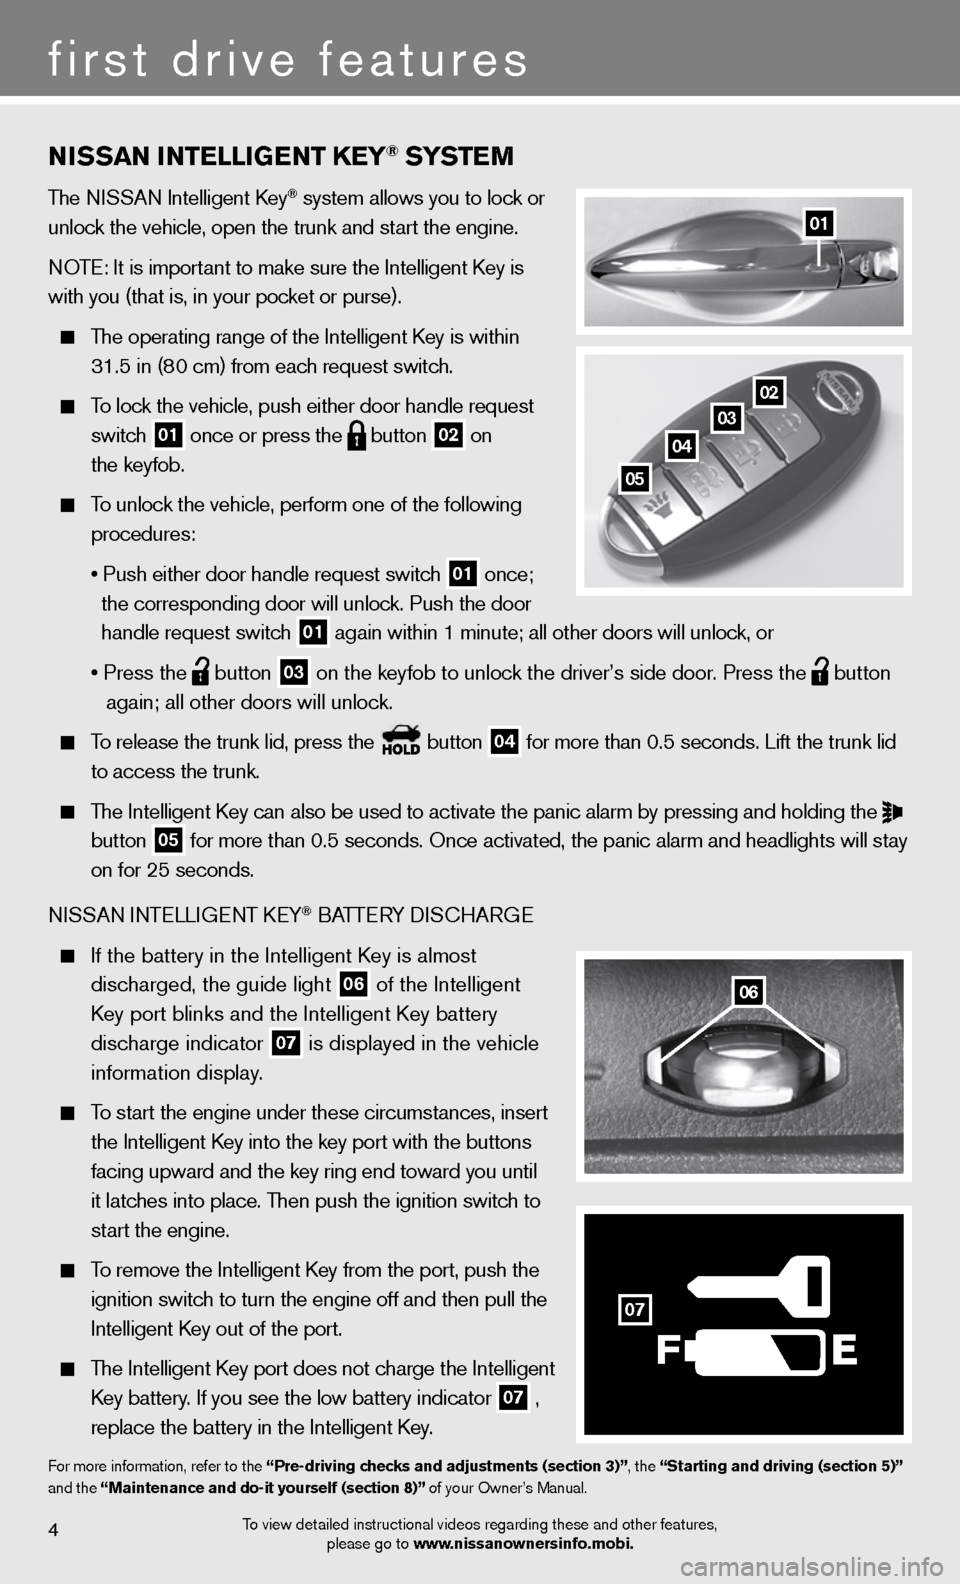
The ni SSAn intelligent k ey® system allows you to lock or
unlock the vehicle, open the trunk and start the engine.
n OTe: it is important to make sure the intelligent k ey is
with you (that is, in your pocket or purse).
The operating range of the intelligent k ey is within
31.5 in (80 cm) from each request switch.
To lock the vehicle, push either door handle request
switch
01 once or press the
button
02 on
the keyfob.
To unlock the vehicle, perform one of the following
procedures:
• Push either door handle request switch
01 once;
the corresponding door will unlock. Push the door
handle request switch
01 again within 1 minute; all other doors will unlock, or
• Press the
button
03 on the keyfob to unlock the driver’s side door. Press the
button
again; all other doors will unlock.
To release the trunk lid, press the button
04 for more than 0.5 seconds. Lift the trunk lid
to access the trunk.
The Intelligent Key can also be used to activate the panic alarm by pressing and holding the
button
05 for more than 0.5 seconds. Once activated, the panic alarm and headlight\
s will stay
on for 25 seconds.
ni SSAn inTe LLiGenT keY
® BATTe RY diSc HARG e
If the battery in the Intelligent Key is almost
discharged, the guide light
06 of the intelligent
Key port blinks and the Intelligent Key battery
discharge indicator
07 is displayed in the vehicle
information display.
To start the engine under these circumstances, insert
the Intelligent Key into the key port with the buttons
facing upward and the key ring end toward you until
it latches into place. Then push the ignition switch to
start the engine.
To remove the intelligent k ey from the port, push the
ignition switch to turn the engine off and then pull the
intelligent k ey out of the port.
The intelligent k ey port does not charge the intelligent
Key battery. If you see the low battery indicator
07 ,
replace the battery in the Intelligent Key.
for more information, refer to the “Pre-driving checks and adjustments (section 3)”, the “starting and driving (section 5)”
and the “maintenance and do-it yourself (section 8)” of your Owner’s Manual.
0203
04
05
06
F
07
Page 9 of 20
7To view detailed instructional videos regarding these and other features, please go to www.nissanownersinfo.mobi.
startinG/stoPPin G thE EnG in E
Depress the brake pedal.
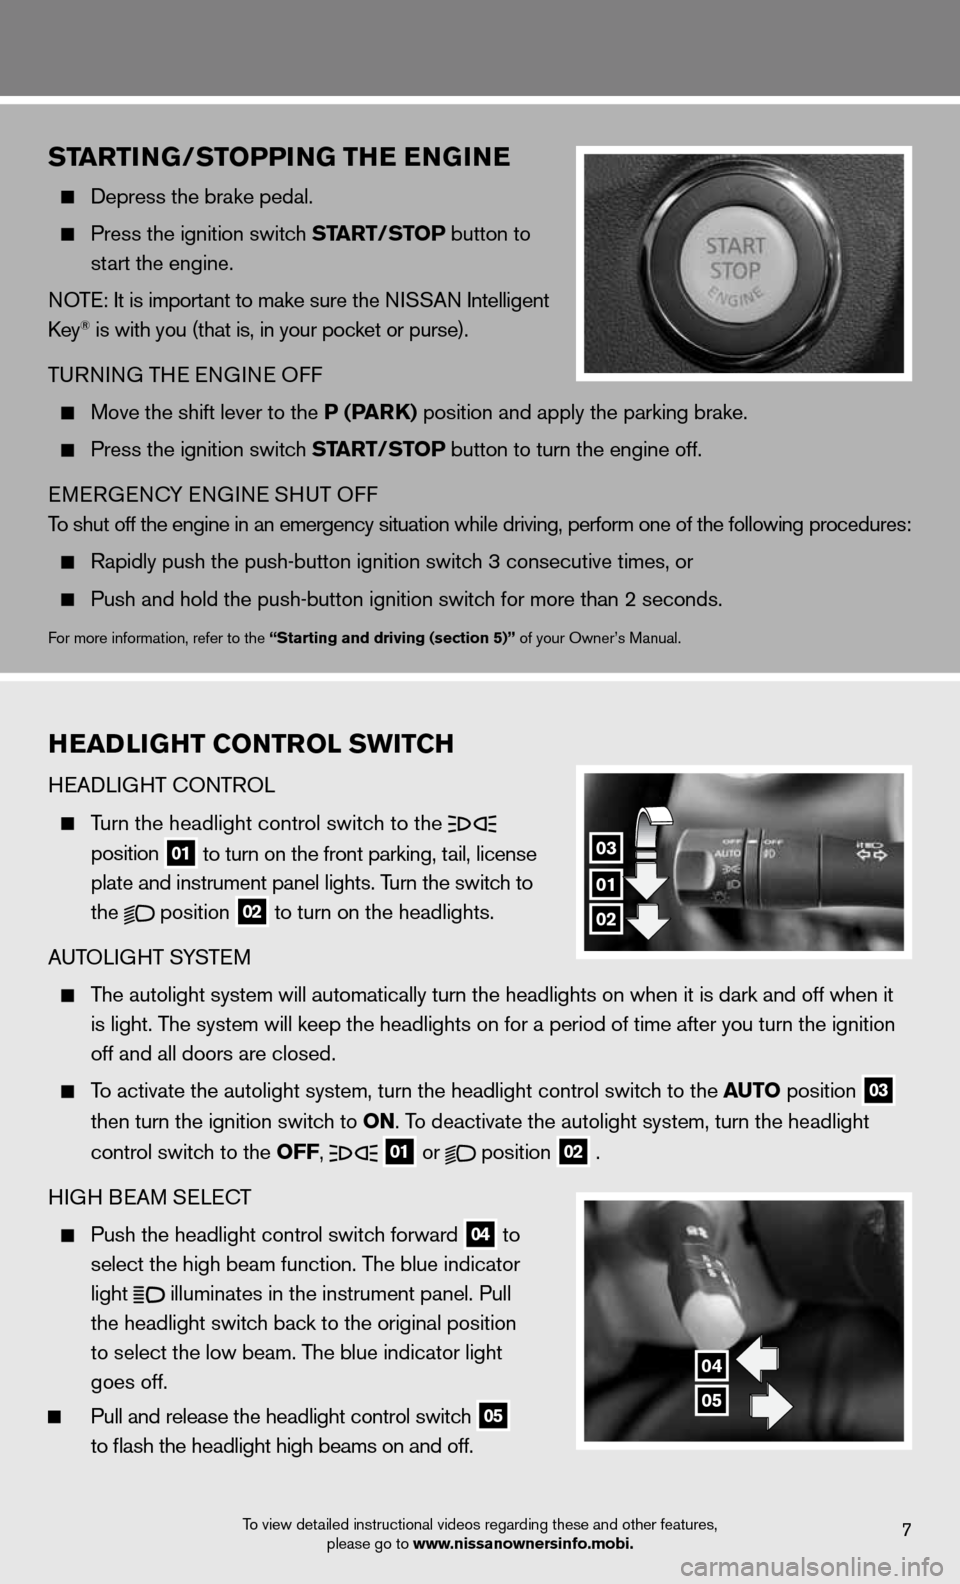
Press the ignition switch start/ stoP button to
start the engine.
n OTe: it is important to make sure the ni SSAn intelligent
key
® is with you (that is, in your pocket or purse).
T uRnin G THe enGine Off
Move the shift lever to the P (P ark) position and apply the parking brake.
Press the ignition switch start/ stoP button to turn the engine off.
eMeRGenc Y enGine SHuT Off
To shut off the engine in an emergency situation while driving, perform o\
ne of the following procedures:
Rapidly push the push-button ignition switch 3 consecutive times, or
Push and hold the push-button ignition switch for more than 2 seconds.
for more information, refer to the “starting and driving (section 5)” of your Owner’s Manual.
h EaD liGht Control sWit Ch
H eAd LiGHT c OnTROL
Turn the headlight control switch to the
position
01 to turn on the front parking, tail, license
plate and instrument panel lights. Turn the switch to
the
position
02 to turn on the headlights.
A uTOLi GHT SYSTe M
The autolight system will automatically turn the headlights on when it is\
dark and off when it
is light. The system will keep the headlights on for a period of time after you tur\
n the ignition
off and all doors are closed.
To activate the autolight system, turn the headlight control switch to the auto position
03
then turn the ignition switch to on. To deactivate the autolight system, turn the headlight
control switch to the off,
01 or
position
02 .
H iGH B eAM S eLec T
Push the headlight control switch forward
04 to
select the high beam function. The blue indicator
light
illuminates in the instrument panel. Pull
the headlight switch back to the original position
to select the low beam. The blue indicator light
goes off.
Pull and release the headlight control switch
05
to flash the headlight high beams on and off.
01
03
02
04
05
Page 15 of 20
Begin speaking a command within 5 seconds of the tone.
Speak in a clear and natural voice without pausing between words.
Look straight ahead and avoid speaking too loudly or too softly.
To go back to the previous command, say “Go back”.
To cancel a voice recognition session, say “Exit” or press and hold the
or
button.
To interrupt the system voice and give a command quickly, press the
or
button.
When speaking Phonebook names, please be aware some phones require the last name to be
spoken before the first name. For example, “Michael Smith” may be spoken as “Smith Michael”.
To increase or decrease the volume of the voice prompts, push the volume \
control switches
or
+ on the steering wheel or turn the VOL/ON•OFF control knob on the audio system
while the system is responding.
if the Voice Recognition system does not recognize your voice commands, train th\
e system
using the Speaker Adaptation Mode. See your Owner’s Manual for detailed information.
Some commands are not available while the vehicle is in motion.
The “Help” command can be used to hear a list of available commands at any time.
Please refer to the cellular phone manufacturer’s Owner’s Manual f\
or detailed information
regarding your Bluetooth phone.
Bluetooth system without navigation (if so equipped)
cOnnec TinG PROcedu Re
NOTE: The vehicle must be stationary when connecting
the phone.
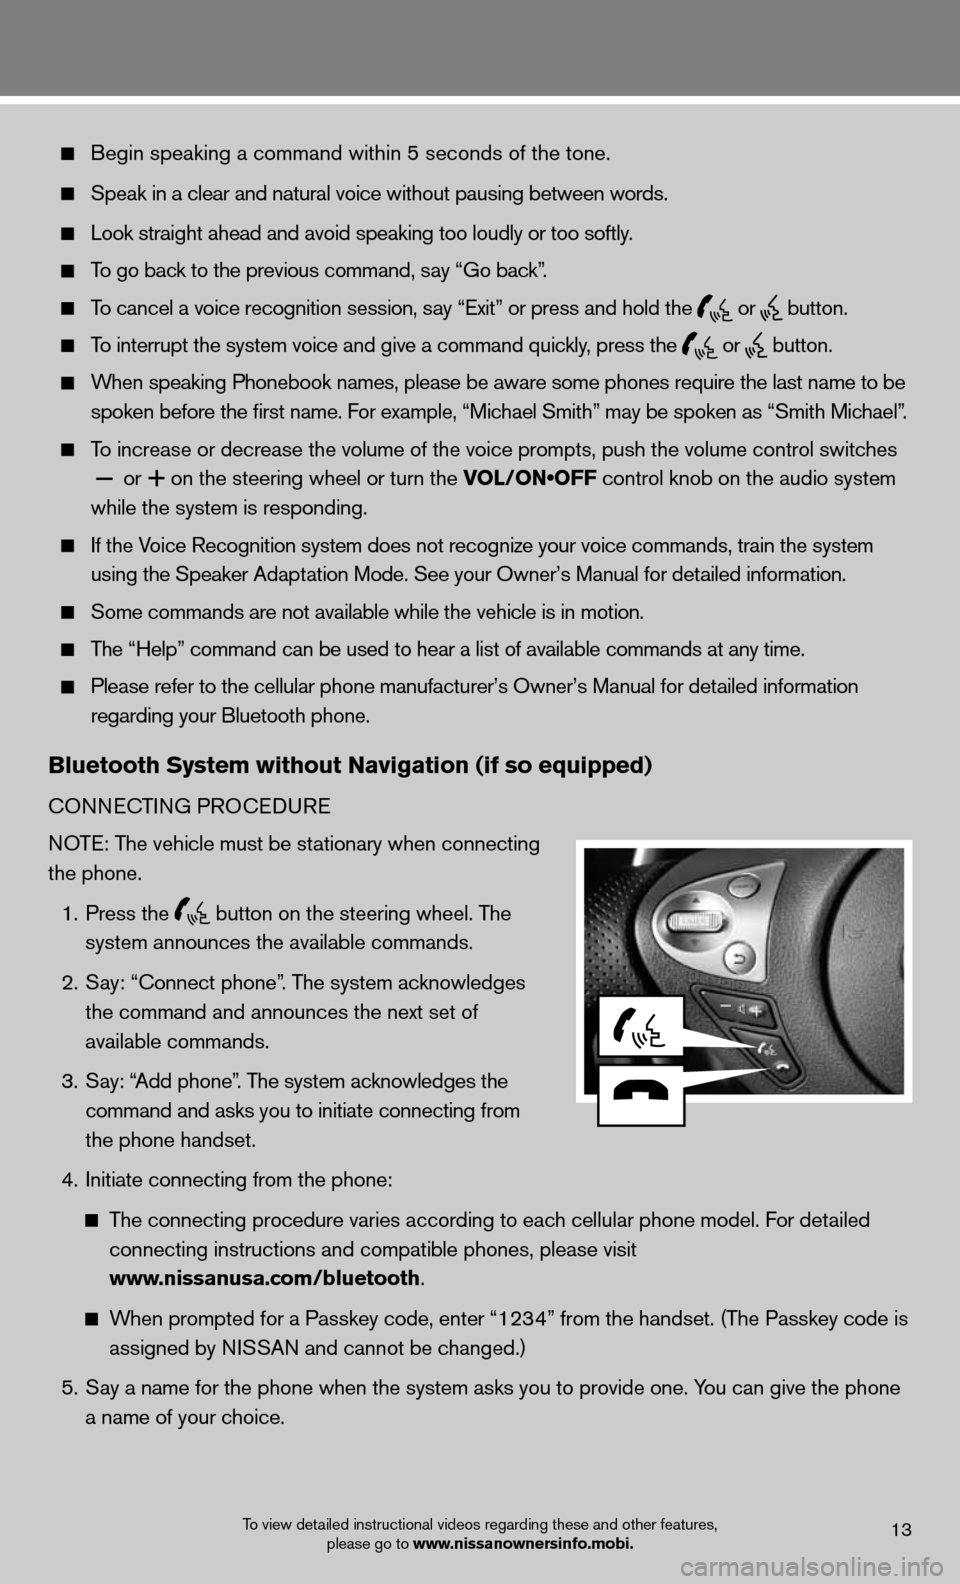
1. Press the
button on the steering wheel. The
system announces the available commands.
2. Say: “connect phone”. The system acknowledges
the command and announces the next set of
available commands.
3. Say: “Add phone”. The system acknowledges the
command and asks you to initiate connecting from
the phone handset.
4. initiate connecting from the phone:
The connecting procedure varies according to each cellular phone model. f or detailed
connecting instructions and compatible phones, please visit
www.nissanusa.com/bluetooth.
When prompted for a Passkey code, enter “1234” from the handset. (The Passkey code is
assigned by NISSAN and cannot be changed.)
5. Say a name for the phone when the system asks you to provide one. You can give the phone
a name of your choice.
To view detailed instructional videos regarding these and other features,
please go to www.nissanownersinfo.mobi.13
Page 17 of 20
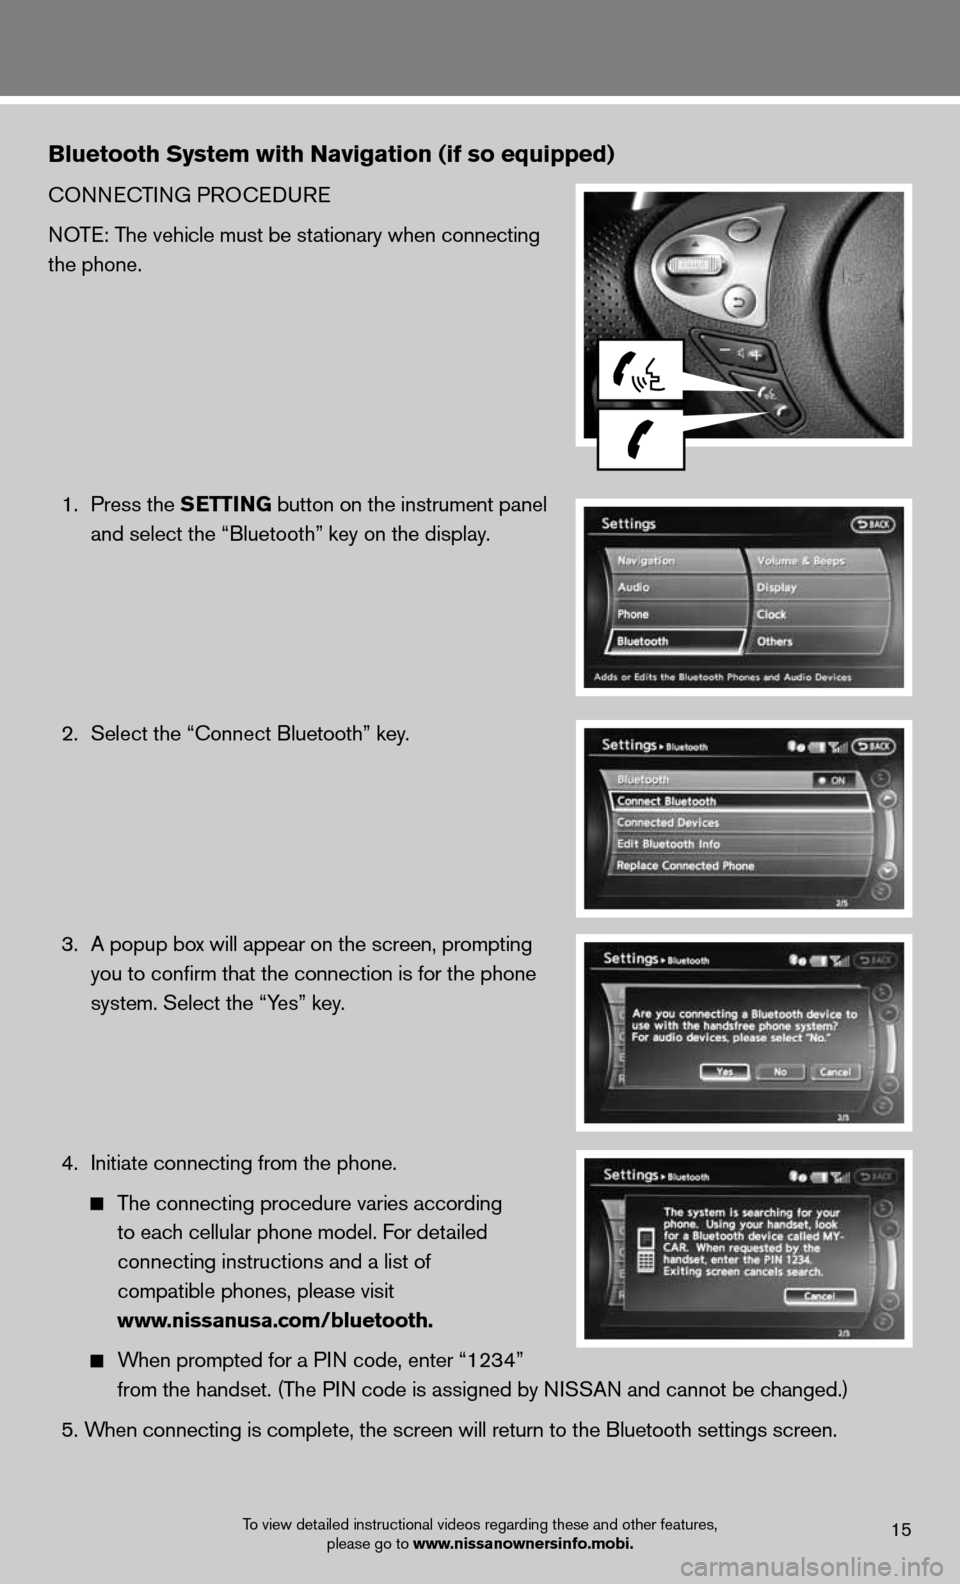
Bluetooth system with navigation (if so equipped)
cOnnecTinG PROcedu Re
NOTE: The vehicle must be stationary when connecting
the phone.
1. Press the s EttinG button on the instrument panel
and select the “Bluetooth” key on the display.
2. Select the “connect Bluetooth” key.
3. A popup box will appear on the screen, prompting
you to confirm that the connection is for the phone
system. Select the “Yes” key.
4. initiate connecting from the phone.
The connecting procedure varies according
to each cellular phone model. f or detailed
connecting instructions and a list of
compatible phones, please visit
www.nissanusa.com/bluetooth.
When prompted for a P in code, enter “1234”
from the handset. (The PIN code is assigned by NISSAN and cannot be changed.)
5. When connecting is complete, the screen will return to the Bluetooth sett\
ings screen.
To view detailed instructional videos regarding these and other features,
please go to www.nissanownersinfo.mobi.15
Page 18 of 20
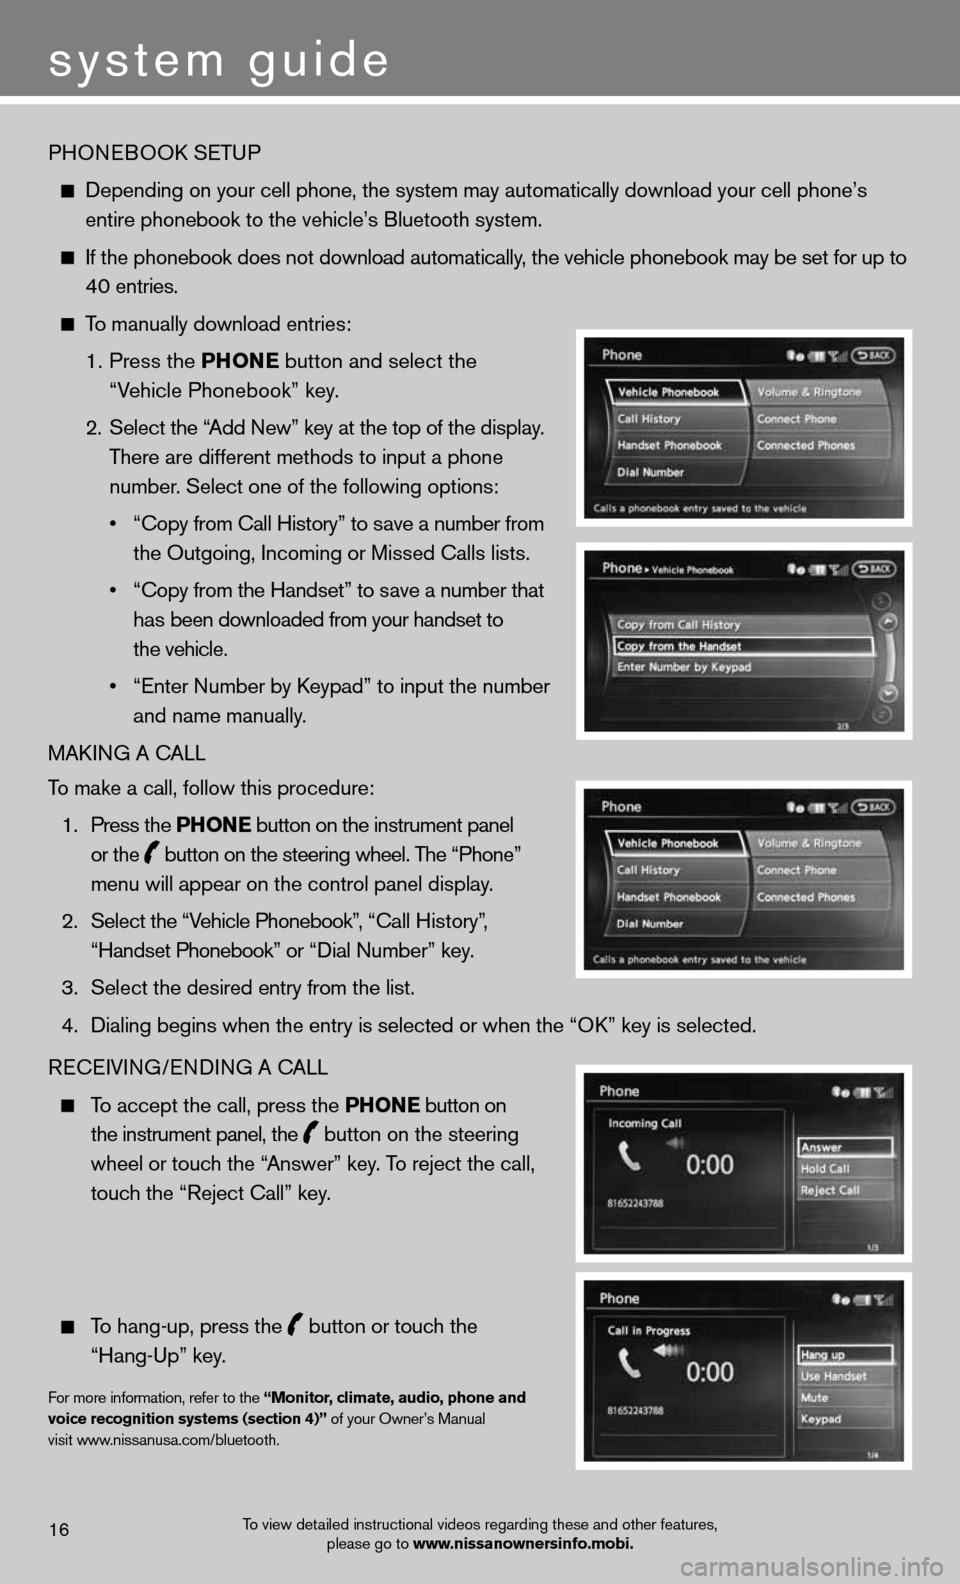
PHOneBOOk SeTu P
depending on your cell phone, the system may automatically download your \
cell phone’s
entire phonebook to the vehicle’s Bluetooth system.
If the phonebook does not download automatically, the vehicle phonebook may be set for up to
40 entries.
To manually download entries:
1. Press the Phon E
button and select the
“Vehicle Phonebook” key.
2. Select the “Add new” key at the top of the display.
There are different methods to input a phone
number. Select one of the following options:
• “Copy from Call History” to save a number from
the Outgoing, incoming or Missed calls lists.
• “Copy from the Handset” to save a number that
has been downloaded from your handset to
the vehicle.
• “Enter Number by Keypad” to input the number
and name manually.
MAkin G A cALL
To make a call, follow this procedure:
1. Press the Phon E button on the instrument panel
or the
button on the steering wheel. The “Phone”
menu will appear on the control panel display.
2. Select the “Vehicle Phonebook”, “Call History”,
“Handset Phonebook” or “Dial Number” key.
3. Select the desired entry from the list.
4. Dialing begins when the entry is selected or when the “OK” key is selected.
Recei Vin G/endin G A cALL
To accept the call, press the Phon E button on
the instrument panel, the
button on the steering
wheel or touch the “Answer” key. To reject the call,
touch the “Reject call” key.
To hang-up, press the
button or touch the
“Hang-up” key.
for more information, refer to the “monitor, climate, audio, phone and
voice recognition systems (section 4)” of your Owner’s Manual
visit www.nissanusa.com/bluetooth.
To view detailed instructional videos regarding these and other features, please go to www.nissanownersinfo.mobi.16
system guide