stop start NISSAN MAXIMA 2013 A35 / 7.G User Guide
[x] Cancel search | Manufacturer: NISSAN, Model Year: 2013, Model line: MAXIMA, Model: NISSAN MAXIMA 2013 A35 / 7.GPages: 444, PDF Size: 3.18 MB
Page 225 of 444
●Artist name displays the name of the artist of
the song playing.
● Album title displays the title of the album of
the song playing.
FM/AM radio operation
FM/AM band select:
Pressing the AM·FM button will change the band
as follows:
AM →FM1 →FM2 →AM
When the AM·FM button is pressed while the
ignition switch is in the ACC or ON position, the
radio will come on at the station last played.
The last station played will also come on when
the VOL/ON·OFF control knob is pressed ON.
If a compact disc is playing when the AM·FM
button is pressed, the compact disc will auto-
matically be turned off and the last radio station
played will come on.
The FM stereo indicator ST will illuminate during
FM stereo reception. When the stereo broadcast
signal is weak, the radio will automatically change
from stereo to monaural reception.
TUNE/FOLDER (Tuning) knob:
To manually tune the radio, turn the
TUNE/FOLDER knob to the right or left.
SEEK/CAT and TRACK tuning buttons:
Press the SEEK/CAT
button or the
TRACK
button to tune from high to low or
low to high frequencies and stop at the next
broadcasting station.
SCAN tuning:
Press the SCAN button to stop at each broad-
casting station for 5 seconds. Pressing the
SCAN button again during this 5-second period
will stop scan tuning and the radio will remain
tuned to that station. If the SCAN button is not
pressed within 5 seconds, scan tuning moves to
the next station.
1 to 6 Station memory operations:
Twelve stations can be set for the FM band (6 for
FM1, 6 for FM2) and six stations can be set for
the AM band.
1. Choose the radio band AM, FM1 or FM2 using the AM·FM select button.
2. Tune to the desired station using manual, SEEK or SCAN tuning. Press and hold any
of the desired station memory buttons (1 –
6) until a beep sound is heard. 3. The channel indicator will then come on and
the sound will resume. Programming is now
complete.
4. Other buttons can be set in the same man- ner.
If the battery cable is disconnected or if the fuse
opens, the radio memory will be canceled. In that
case, reset the desired stations.
Compact disc (CD) changer operation
Place the ignition switch in the ACC or ON
position and press the LOAD button, then press
one of the CD insert (1 – 6) slots. Insert the
compact disc into the slot with the label side
facing up. The compact disc will be guided auto-
matically into the slot and start playing.
If the radio is already operating, it will automati-
cally turn off and the compact disc will play.
If the system has been turned off while a compact
disc was playing, pressing the VOL/ON·OFF
control knob will start the compact disc.
LOAD button:
To insert a CD in the CD changer, press the
LOAD button for less than 1.5 seconds. Select
the loading slot by pressing the CD insert select
button (1 – 6) , then insert the CD.
4-66Monitor, climate, audio, phone and voice recognition systems
Page 226 of 444
To insert 6 CDs to the CD changer, press the
LOAD button for more than 1.5 seconds.
The slot numbers (1 – 6) will illuminate on the
display when CDs are loaded into the changer.
DISC button:
When the DISC button is pressed with the sys-
tem off and a compact disc loaded, the system
will turn on and the compact disc will start to play.
When the DISC button is pressed with a com-
pact disc loaded with the radio playing, the radio
will automatically be turned off and the compact
disc will start to play.
SEEK/CAT and TRACKbuttons:
When the SEEK/CATbutton is pressed
while a compact disc is playing, the track being
played returns to its beginning. Press several times
to skip back through tracks. The compact disc will
go back the number of times the button is pressed.
When the TRACK
button is pressed while
the compact disc is playing, the next track will start
to play from its beginning. Press several times to
skip through tracks. The compact disc will advance
the number of times the button is pressed. (When
the last track on the compact disc is skipped
through, the first track will be played.)
SEEK/CAT and TRACK
(Rewind·Fast Forward)
buttons:
Press and hold the SEEK/CAT
(rewind)
button or the TRACK
(fast forward) button
while a compact disc is playing, the compact disc
will play while rewinding or fast forwarding. When
the button is released, the compact disc will
return to normal play speed.
TUNE/FOLDER knob
While playing an MP3/WMA CD, turn the
TUNE/FOLDER knob right or left to scan forward
or backward through available folders.
CD select buttons:
To play another CD that has been loaded, press a
CD select button (1 – 6) .
RPT/RDM button:
When the RPT/RDM button is pressed while the
compact disc is playing, the play pattern can be
changed as follows:
CD:
All Disc Repeat →1 Disc Repeat →1 Track
Repeat →All Disc Random →1 Disc Random →
All Disc Repeat MP3/WMA CD:
All Disc Repeat
→1 Disc Repeat →1 Folder
Repeat →1 Track Repeat →All Disc Random →
1 Disc Random →1 Folder Random →All Disc
Repeat
All Disc Repeat: All discs loaded will be re-
peated.
1 Disc Repeat: The disc that is currently playing
will be repeated.
1 Track Repeat: The track that is currently playing
will be repeated.
1 Folder Repeat: The folder that is currently being
accessed will be repeated.
All Disc Random: All discs loaded will be played
in a mixed order.
1 Disc Random: The tracks on the disc that is
currently playing will be played in a mixed order.
1 Folder Random: The tracks in the folder that is
currently being accessed will be played in a
mixed order.
SCAN button:
While listening to a CD, press the SCAN button
to preview the first 10 seconds of each track on
the CD playing. Pressing the SCAN button again
during this 10 second period stops the scan and
the CD remains on that track.
Monitor, climate, audio, phone and voice recognition systems4-67
Page 231 of 444
When the AUX button is pressed while the igni-
tion switch is in the ACC or ON position, the
radio will come on at the station last played.
The last station played will also come on when
the VOL/ON·OFF control knob is pressed ON.
*When the AUX button is pressed, the satellite
radio mode will be skipped unless an optional
satellite receiver and antenna are installed and a
SiriusXM Satellite Radio service subscription is
active. Satellite radio is not available in Alaska,
Hawaii and Guam.
If a compact disc is playing when the AUX button
is pressed, the compact disc will automatically be
turned off and the last radio station played will
come on.
TUNE/FOLDER (Tuning) knob:
To manually tune the radio, turn the
TUNE/FOLDER knob to the right or left.
SEEK/CAT and TRACKtuning buttons:
Press the SEEK/CAT
button or the
TRACK
button to tune from high to low or
low to high frequencies and stop at the next
broadcasting station. SCAN tuning:
Press the SCAN button to stop at each broad-
casting station for 5 seconds. Pressing the
SCAN button again during this five second pe-
riod will stop scan tuning and the radio will remain
tuned to that station. If the SCAN button is not
pressed within 5 seconds, scan tuning moves to
the next station.
1 to 6 Station memory operations:
Six stations can be set for the AM band. Twelve
stations can be set for the FM band (6 for FM1, 6
for FM2) . Eighteen stations can be set for the XM
band (6 for XM1, 6 for XM2, 6 for XM3) .
1. Choose the radio band AM, FM1 or FM2 using the FM·AM select button or choose
the satellite band SAT1 or SAT2 using the
AUX button.
2. Tune to the desired station using manual, SEEK or SCAN tuning. Press and hold any
of the desired station memory buttons (1 –
6) until a beep sound is heard.
3. The channel indicator will then come on and the sound will resume. Programming is now
complete.
4. Other buttons can be set in the same man- ner. If the battery cable is disconnected, or if the fuse
opens, the radio memory will be canceled. In that
case, reset the desired stations.
Radio data system (RDS):
RDS stands for Radio Data System, and is a data
information service transmitted by some radio
stations on the FM band (not AM band) . Cur-
rently, most RDS stations are in large cities, but
many stations are now considering broadcasting
RDS data.
RDS can display:
● Station call sign, such as “WHFR 98.3”.
● Station name, such as “The Groove”.
● Music or programming type such as “Clas-
sical”, “Country”, or “Rock”.
When the “Text” key is selected with the NISSAN
controller on the display while the radio is playing,
additional information is displayed on the screen.
If the station broadcasts RDS information, the
RDS icon is displayed.Compact disc (CD) player operation
Place the ignition in the ACC or ON position and
insert the compact disc into the slot with the label
side facing up. The compact disc will be guided
automatically into the slot and start playing.
4-72Monitor, climate, audio, phone and voice recognition systems
Page 243 of 444
DIGITAL VERSATILE DISC (DVD)
PLAYER OPERATION (models with
Navigation System)
Precautions
Start the engine when using the DVD entertain-
ment system.
Movies will not be shown on the front display
while the vehicle is in any drive position to reduce
driver distraction. Audio is available when a movie
is played. To view movies on the front display,
stop the vehicle in a safe location, move the shift
selector to the P (Park) position and apply the
parking brake.
WARNING
●The driver must not attempt to operate
the DVD system or wear the head-
phones while the vehicle is in motion so
that full attention may be given to ve-
hicle operation.
● Do not attempt to modify the system to
display a movie on the front screen
while the vehicle is being driven. Doing
so may distract the driver and may
cause a collision and serious personal
injury or death.
CAUTION
● Only operate the DVD while the vehicle
engine is running. Operating the DVD
for extended periods of time with the
engine OFF can discharge the vehicle
battery.
● Do not allow the system to get wet.
Excessive moisture such as spilled liq-
uids may cause the system to
malfunction.
● While playing VIDEO-CD media, this
DVD player does not guarantee com-
plete functionality of all VIDEO-CD
formats.
Playing a DVD
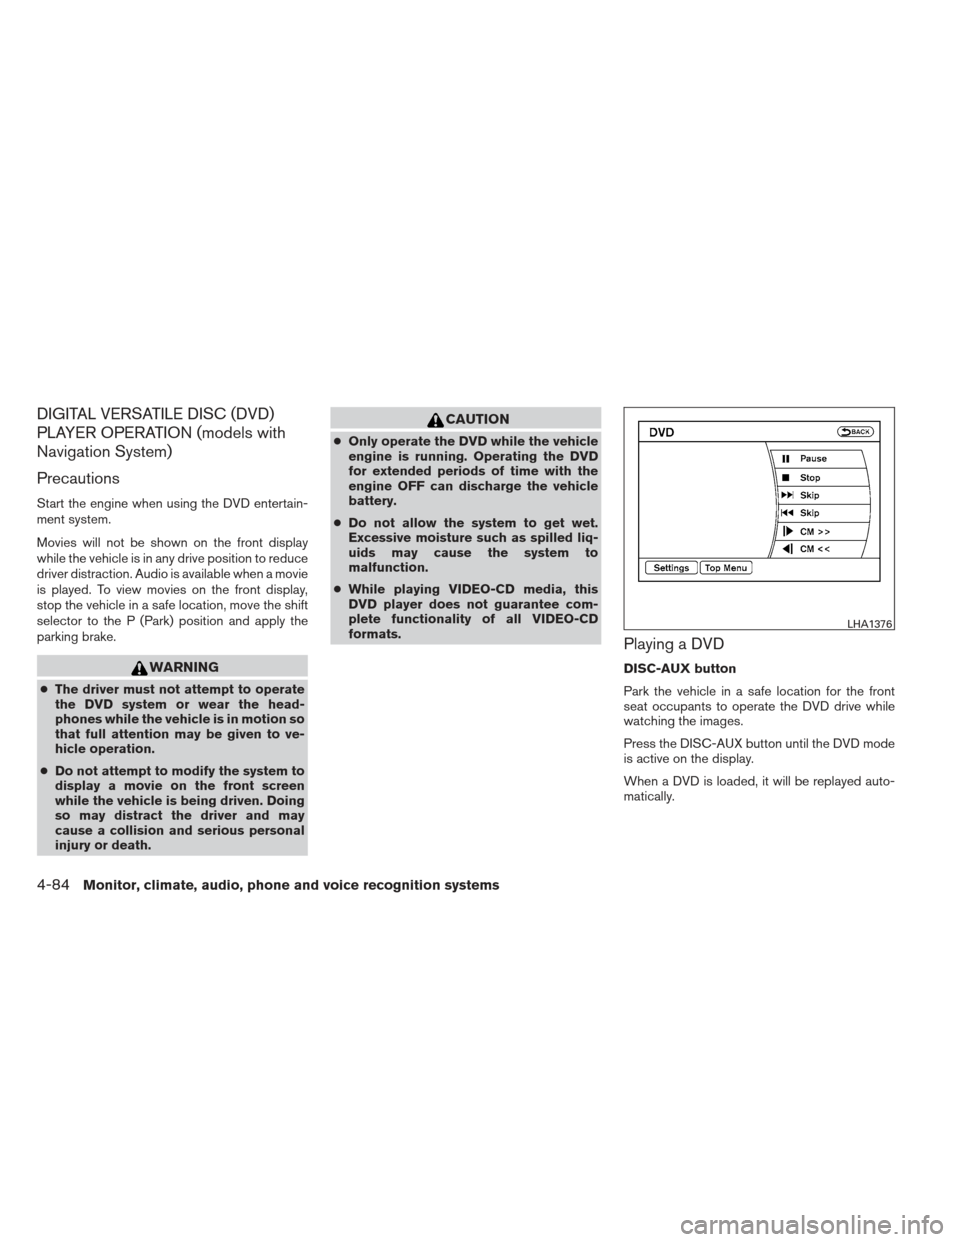
DISC-AUX button
Park the vehicle in a safe location for the front
seat occupants to operate the DVD drive while
watching the images.
Press the DISC-AUX button until the DVD mode
is active on the display.
When a DVD is loaded, it will be replayed auto-
matically.
LHA1376
4-84Monitor, climate, audio, phone and voice recognition systems
Page 244 of 444
The operation screen will be turned on when the
DISC-AUX button is pressed while a DVD is
playing. The operation screen will turn off auto-
matically after a period of time. To turn it on again,
press the DISC-AUX button.
DVD operation keys
When the DVD is playing without the operation
screen being shown, you may use the touch-
screen to select items from the displayed video.
You may also use the NISSAN controller to select
an item from the displayed video. When the op-
eration screen is being shown, use the NISSAN
controller or the touchscreen to select an item
from the displayed menus.
PAUSE:
Select the
key to pause the DVD. To re-
sume playing the DVD, use the
key.
PLAY:
Select the
key to start playing the DVD or
resume playing the DVD after it has been paused.
STOP:
Select the
key to stop playing the DVD.
NEXT/PREVIOUS
CHAPTER:
Select the
key to skip the chapter(s) of the
disc forward. Select the
key to skip the
chapter(s) of the disc backward. The chapters
will advance forward or backward the number of
times the respective key is touched or selected
with the NISSAN controller.
CM SKIP:
This function is only for DVD-VIDEO and DVD-
VR. Select the
orkey to fast forward
or rewind a set interval of time based on the CM
settings. For more information, see “DVD set-
tings” in this section.
Top Menu:
When the “Top Menu” key is selected while the
DVD is playing, the top menu specific to each
disc will be displayed. For details, see the instruc-
tions attached to the disc.
DVD settings
Select the “Settings” key to adjust the following
settings:
● Key (DVD-VIDEO)
Displays the operation keys for the specific
DVD menu. – Select the directional keys to move the
cursor on the DVD menu.
– Select the “Enter” key to fix the selected menu item.
– Select the “Move” key to move the loca- tion of the operation keys on the screen.
– Select the “Back” key to return to the previous menu screen.
– Select the “Hide” key to hide the opera- tion keys.
● Title Menu (DVD-VIDEO)
Some menus specific to each disc will be
shown. For details, see the instructions at-
tached to the disc.
● Title Search (DVD-VIDEO, DVD-VR)
The scene with the specified title will be
displayed the number of times the “+” or “-”
side is selected.
● Group Search (VIDEO CD)
The scene with the specified group will be
displayed the number of times the “+” or “-”
side is selected.
Monitor, climate, audio, phone and voice recognition systems4-85
Page 250 of 444
Operation keys:
To operate the USB memory, select the desired
key displayed on the display screen.●
Pause:
Select the
key to pause the movie file.
To resume playing the movie file, use
the
key.
●
Play:
Select the
key to start playing the
movie file or resume the movie file if it has
been paused.
●
Stop:
Select the
key to stop playing the
movie file.
●
Next Chapter/Fast Forward:
Select the
key to skip the chapter(s)
of the disc forward. The chapters will ad-
vance the number of times the key is se-
lected. Press and hold the key to fast for-
ward the chapter. ●
Previous Chapter/Rewind:
Select the
key to skip the chapter(s)
of the disc backward. The chapters will go
back the number of times the key is selected.
Press and hold the key to rewind the chap-
ter.
List:
Select the “List” key on the movie file operation
screen to display the file list.
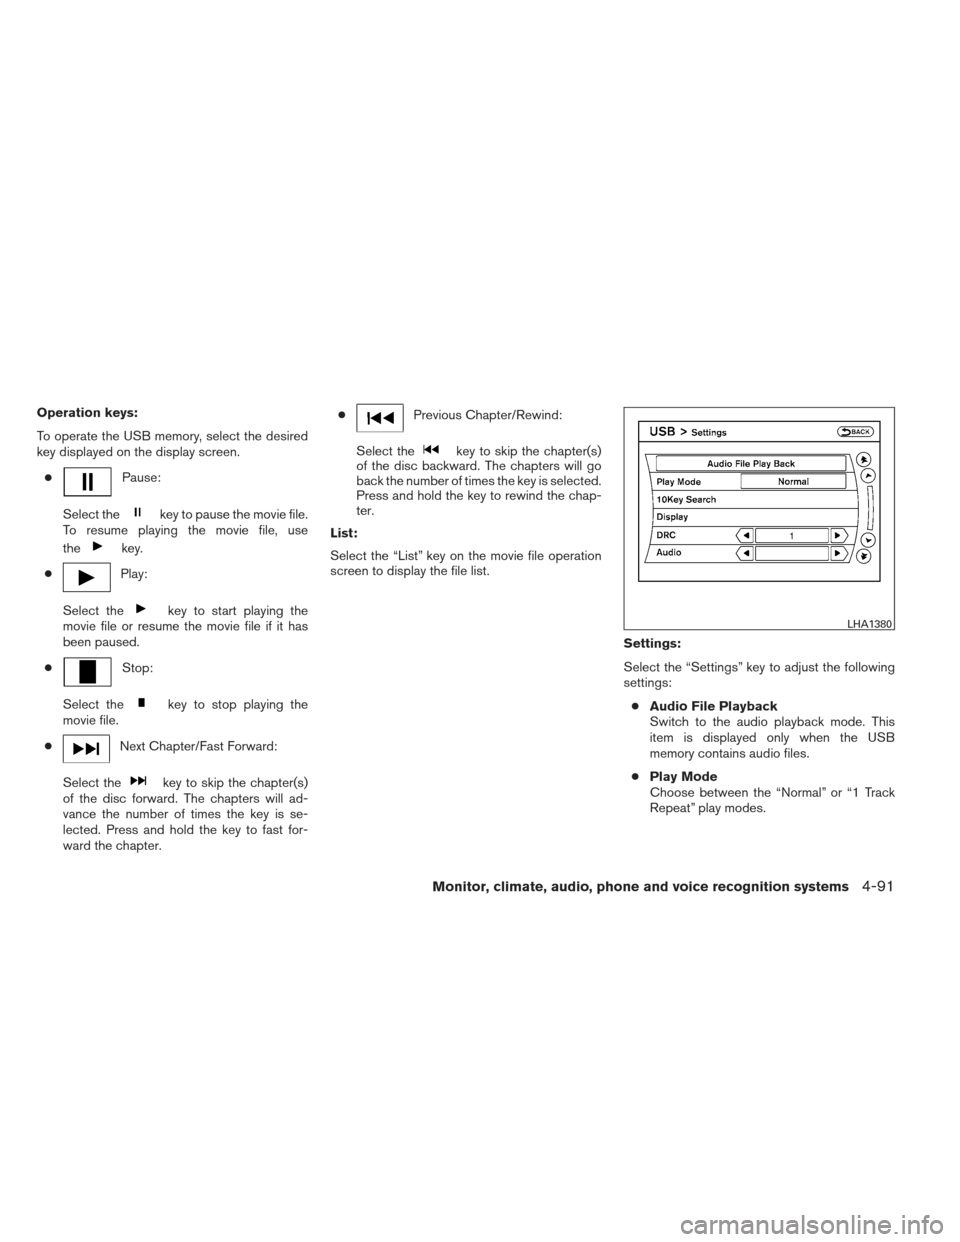
Settings:
Select the “Settings” key to adjust the following
settings:● Audio File Playback
Switch to the audio playback mode. This
item is displayed only when the USB
memory contains audio files.
● Play Mode
Choose between the “Normal” or “1 Track
Repeat” play modes.
LHA1380
Monitor, climate, audio, phone and voice recognition systems4-91
Page 263 of 444
When installing a CB, ham radio or car phone in
your vehicle, be sure to observe the following
precautions; otherwise, the new equipment may
adversely affect the engine control system and
other electronic parts.
WARNING
●A cellular phone should not be used for
any purpose while driving so full atten-
tion may be given to vehicle operation.
Some jurisdictions prohibit the use of
cellular phones while driving.
● If you must make a call while your ve-
hicle is in motion, the hands free cellu-
lar phone operational mode (if so
equipped) is highly recommended. Ex-
ercise extreme caution at all times so
full attention may be given to vehicle
operation.
● If you are unable to devote full attention
to vehicle operation while talking on
the phone, pull off the road to a safe
location and stop your vehicle.
CAUTION
● Keep the antenna as far away as pos-
sible from the electronic control
modules.
● Keep the antenna wire more than 8 in
(20 cm) away from the electronic con-
trol system harnesses. Do not route the
antenna wire next to any harness.
● Adjust the antenna standing-wave ratio
as recommended by the manufacturer.
● Connect the ground wire from the CB
radio chassis to the body.
● For details, consult a NISSAN dealer.
WARNING
●Use a phone after stopping your vehicle
in a safe location. If you have to use a
phone while driving, exercise extreme
caution at all times so full attention may
be given to vehicle operation.
● If you are unable to devote full attention
to vehicle operation while talking on
the phone, pull off the road to a safe
location and stop your vehicle.
CAUTION
To avoid discharging the vehicle battery,
use a phone after starting the engine.
CAR PHONE OR CB RADIO BLUETOOTH® HANDS-FREE PHONE
SYSTEM WITHOUT NAVIGATION
SYSTEM (if so equipped)
4-104Monitor, climate, audio, phone and voice recognition systems
Page 277 of 444
WARNING
●Use a phone after stopping your vehicle
in a safe location. If you have to use a
phone while driving, exercise extreme
caution at all times so full attention may
be given to vehicle operation.
● If you are unable to devote full attention
to vehicle operation while talking on
the phone, pull off the road to a safe
location and stop your vehicle.
CAUTION
To avoid discharging the vehicle battery,
use a phone after starting the engine.
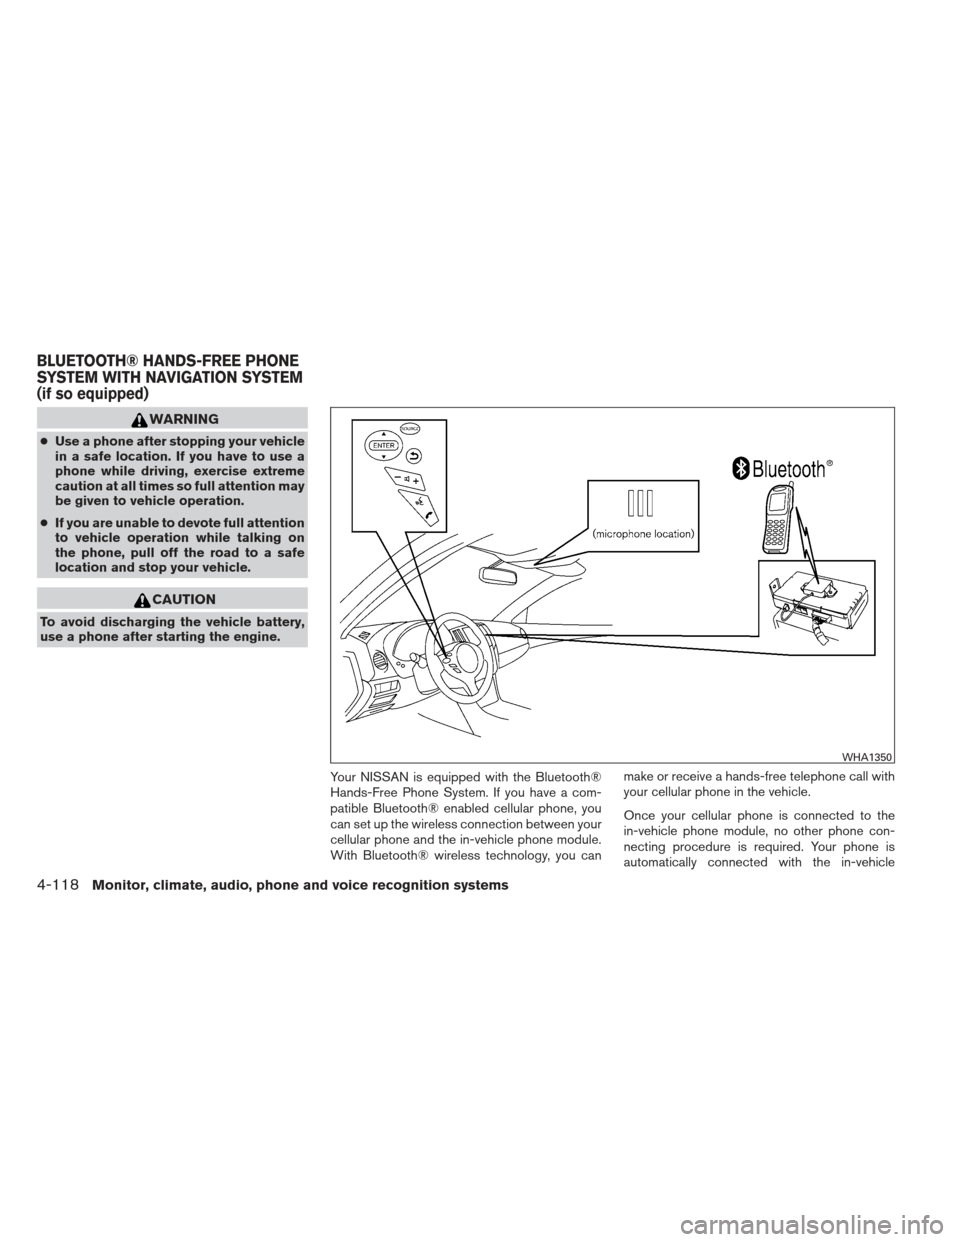
Your NISSAN is equipped with the Bluetooth®
Hands-Free Phone System. If you have a com-
patible Bluetooth® enabled cellular phone, you
can set up the wireless connection between your
cellular phone and the in-vehicle phone module.
With Bluetooth® wireless technology, you can make or receive a hands-free telephone call with
your cellular phone in the vehicle.
Once your cellular phone is connected to the
in-vehicle phone module, no other phone con-
necting procedure is required. Your phone is
automatically connected with the in-vehicle
WHA1350
BLUETOOTH® HANDS-FREE PHONE
SYSTEM WITH NAVIGATION SYSTEM
(if so equipped)
4-118Monitor, climate, audio, phone and voice recognition systems
Page 314 of 444
WARNING
●The exhaust gas and the exhaust sys-
tem are very hot. Keep people, animals
or flammable materials away from the
exhaust system components.
● Do not stop or park the vehicle over
flammable materials such as dry grass,
waste paper or rags. They may ignite
and cause a fire.
CAUTION
● Do not use leaded gasoline. Deposits
from leaded gasoline will seriously re-
duce the three-way catalyst’s ability to
help reduce exhaust pollutants.
● Keep your engine tuned up. Malfunc-
tions in the ignition, fuel injection, or
electrical systems can cause overrich
fuel flow into the three-way catalyst,
causing it to overheat. Do not keep driv-
ing if the engine misfires, or if notice-
able loss of performance or other un-
usual operating conditions are
detected. Have the vehicle inspected
promptly by a NISSAN dealer.
● Avoid driving with an extremely low fuel
level. Running out of fuel could cause
the engine to misfire, damaging the
three-way catalyst. ●
Do not race the engine while warming it
up.
● Do not push or tow your vehicle to start
the engine.
TIRE PRESSURE MONITORING
SYSTEM (TPMS)
Each tire, including the spare (if provided) ,
should be checked monthly when cold and in-
flated to the inflation pressure recommended by
the vehicle manufacturer on the vehicle placard
or tire inflation pressure label. (If your vehicle has
tires of a different size than the size indicated on
the vehicle placard or tire inflation pressure label,
you should determine the proper tire inflation
pressure for those tires.)
As an added safety feature, your vehicle has been
equipped with a tire pressure monitoring system
(TPMS) that illuminates a low tire pressure telltale
when one or more of your tires is significantly
under-inflated. Accordingly, when the low tire
pressure telltale illuminates, you should stop and
check your tires as soon as possible, and inflate
them to the proper pressure. Driving on a signifi-
cantly under-inflated tire causes the tire to over-
heat and can lead to tire failure. Under-inflation
also reduces fuel efficiency and tire tread life, and
may affect the vehicle’s handling and stopping
ability. Please note that the TPMS is not a substitute for
proper tire maintenance, and it is the driver’s
responsibility to maintain correct tire pressure,
even if under-inflation has not reached the level to
trigger illumination of the TPMS low tire pressure
telltale.
Your vehicle has also been equipped with a
TPMS malfunction indicator to indicate when the
system is not operating properly. The TPMS mal-
function indicator is combined with the low tire
pressure telltale. When the system detects a
malfunction, the telltale will flash for approxi-
mately one minute and then remain continuously
illuminated. This sequence will continue upon
subsequent vehicle start-ups as long as the mal-
function exists. When the malfunction indicator is
illuminated, the system may not be able to detect
or signal low tire pressure as intended. TPMS
malfunctions may occur for a variety of reasons,
including the installation of replacement or alter-
nate tires or wheels on the vehicle that prevent
the TPMS from functioning properly. Always
check the TPMS malfunction telltale after replac-
ing one or more tires or wheels on your vehicle to
ensure that the replacement or alternate tires and
wheels allow the TPMS to continue to function
properly.
Starting and driving5-3
Page 315 of 444
Additional information:● The TPMS does not monitor the tire
pressure of the spare tire.
● The TPMS will activate only when the vehicle
is driven at speeds above 16 MPH
(25 km/h). Also, this system may not detect a
sudden drop in tire pressure (for example a
flat tire while driving) .
● The low tire pressure warning light does not
automatically turn off when the tire pressure
is adjusted. After all 4 tires are inflated to the
recommended pressure, the vehicle must be
driven at speeds above 16 MPH (25 km/h)
to activate the TPMS and turn off the low tire
pressure warning light. Use a tire pressure
gauge to check the tire pressure.
● The CHECK TIRE PRESSURE warning ap-
pears in the vehicle information display when
the low tire pressure warning light is illumi-
nated and low tire pressure is detected. The
CHECK TIRE PRESSURE warning turns off
when the low tire pressure warning light
turns off.
● The CHECK TIRE PRESSURE warning
does not appear if the low tire pressure
warning light illuminates to indicate a TPMS
malfunction. ●
Tire pressure rises and falls depending on
the heat caused by the vehicle’s operation
and the outside temperature. Low outside
temperature can lower the temperature of
the air inside the tire which can cause a
lower tire inflation pressure. This may cause
the low tire pressure warning light to illumi-
nate. If the warning light illuminates, check
the tire pressure for all four tires.
● The Tire and Loading Information label (also
referred to as the vehicle placard or tire
inflation pressure label) is located in the
driver’s door opening.
For additional information, see “Low tire pressure
warning light” in the “Instruments and controls”
section and “Tire Pressure Monitoring System
(TPMS)” in the “In case of emergency” section.WARNING
●If the low tire pressure warning light illu-
minates while driving, avoid sudden
steering maneuvers or abrupt braking,
reduce vehicle speed, pull off the road to
a safe location and stop the vehicle as
soon as possible. Driving with under-
inflated tires may permanently damage
the tires and increase the likelihood of
tire failure. Serious vehicle damage
could occur and may lead to an accident
and could result in serious personal in-
jury. Check the tire pressure for all four
tires. Adjust the tire pressure to the rec-
ommended COLD tire pressure shown on
the Tire and Loading Information label to
turn the low tire pressure warning light
OFF. If you have a flat tire, replace it with
a spare tire as soon as possible. (See
“Flat tire” in the “In case of emergency”
section for changing a flat tire.)
●When a spare tire is mounted or a wheel is
replaced, tire pressure will not be indi-
cated, the TPMS will not function and the
low tire pressure warning light will flash
for approximately 1 minute. The light will
remain on after 1 minute. Contact your
NISSAN dealer as soon as possible for
tire replacement and/or system resetting.
5-4Starting and driving