steering NISSAN MAXIMA 2017 A36 / 8.G Quick Reference Guide
[x] Cancel search | Manufacturer: NISSAN, Model Year: 2017, Model line: MAXIMA, Model: NISSAN MAXIMA 2017 A36 / 8.GPages: 38, PDF Size: 3.15 MB
Page 2 of 38
*See your Owner’s Manual for information.
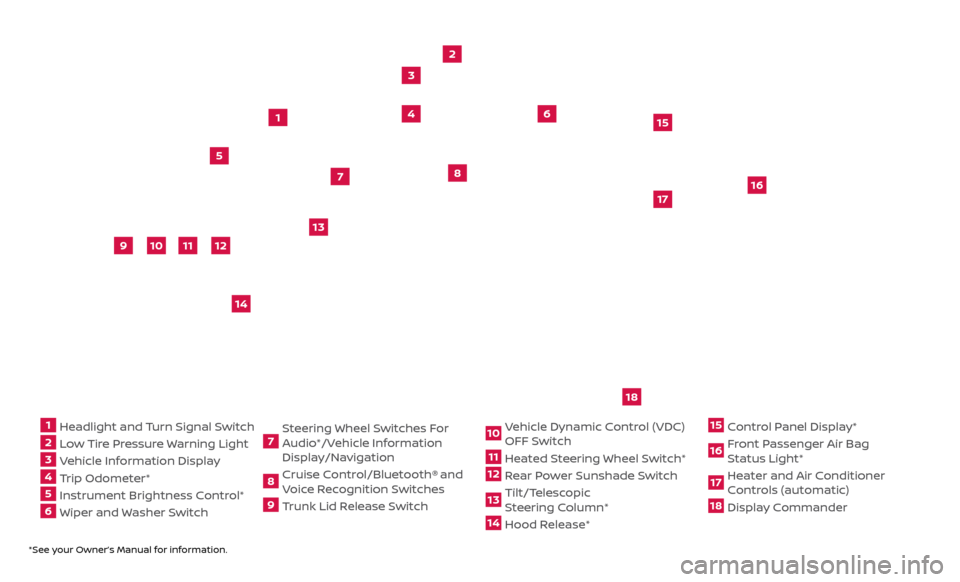
1 Headlight and Turn Signal Switch2 Low Tire Pressure Warning Light3 Vehicle Information Display4 Trip Odometer*5 Instrument Brightness Control* 6 Wiper and Washer Switch
7 Steering Wheel Switches For
Audio*/Vehicle Information
Display/Navigation8 Cruise Control/Bluetooth®
and
Voice Recognition Switches
9 Trunk Lid Release Switch
10 Vehicle Dynamic Control (VDC) OFF Switch11 Heated Steering Wheel Switch*12 Rear Power Sunshade Switch13 Tilt/Telescopic
S teering Column*14 Hood Release*
15 Control Panel Display*16 Front Passenger Air Bag Status Light*17 Heater and Air Conditioner Controls (automatic)18 Display Commander
2
3
5
4
1
6
10
11
9
12
13
14
15
16
17
7
8
Underneath
instrument
panel
18
Page 3 of 38
Please see your Owner’s Manual for important safety information and system
operation limitations.
•
A c
ellular telephone should not be used for any purpose while
driving so full attention may be given to vehicle operation.
•
A
lways wear your seat belt.
•
Supplemental air bags do not r
eplace proper seat belt usage.
•
Childr
en 12 and under should always ride in the rear seat properly secured
in child restraints or seat belts according to their age and weight.
•
Do not drink and driv
e.
For more information, refer to the “Safety — Seats, seat belts and supplemental restraint system
(section 1)”, the “Monitor, climate, audio, phone and voice recognition systems (section 4)” and the
“Starting and driving (section 5)” of your Owner’s Manual.
Additional information about your vehicle is also available in your Owner’s Manual,
Navigation System Owner’s Manual and at www.NissanUSA.com.
NEW SYSTEM FEATURESHow to Use Your Maxima’s Touch-screen Display .....................................2
Ar ound View® Monitor (AVM) with Moving Object Detection (MOD) (if so equipped)..3
Blind Spot
Warning (BSW) (if so equipped)
.............................................5
Pr
edictive Forward Collision Warning (PFCW) (if so equipped) .........................
5
F
orward Emergency Braking (FEB) (if so equipped) ...................................
5
V
ehicle Dynamic Control (VDC) ........................................................
6
NissanC
onnect
SM Services Powered by SiriusXM™ (if so equipped)....................6
SiriusXM
Travel Link and SiriusXM Traffic ..............................................8
Displa
y Commander ...................................................................
8
ESSENTIAL INFORMATIONTire Pressure Monitoring System (TPMS) with Easy-Fill Tire Alert .....................9
L oose Fuel Cap........................................................................\
10
F
uel-filler Door .......................................................................\
.
10
He
ated Steering Wheel (if so equipped)
...............................................10
Clock Set/A
djustment .................................................................
11
FIRST DRIVE FEATURESNissan Intelligent Key® System .......................................................12
T runk Lid Release .....................................................................14
Se
at Adjustments
.....................................................................15
A
utomatic Drive Positioner (if so equipped) ..........................................
16
Outside Mirr
or Control Switch ........................................................
16
S
tarting/Stopping the Engine ........................................................
17
He
adlight Control Switch
.............................................................17
Wiper and
Washer Switch
.............................................................18
Moonr
oof/Rear Sunshade Switch (if so equipped) ...................................
19
He
ater and Air Conditioner (automatic) ..............................................
20
FM/AM/SiriusXM® Satel
lite Radio with CD Player
.....................................22
USB (Univ
ersal Serial Bus) Connection Port/AUX Jack and iPod® Interface
(if so equipped)
........................................................................\
23
F
ront Armrest/Center Console Storage Box
..........................................24
Cruise C
ontrol (if so equipped)
........................................................24
Intel
ligent Cruise Control (ICC) (if so equipped)
.......................................25
SYSTEM GUIDEVehicle Information Display...........................................................26
Apple C arPlay™ (if so equipped) ......................................................27
Hands-fr
ee Text Messaging Assistant ................................................
28
Bluetooth® Hands-fr
ee Phone System ...............................................
29 S
ystem Operating Tips
.............................................................29
Bluetooth® S
treaming Audio
..........................................................32
Na
vigation System
....................................................................33
HomeLink®
Universal Transceiver
.....................................................35
TABLE OF CONTENTS
Page 12 of 38

10
ESSENTIAL INFORMATION
FUEL-FILLER DOOR
To open the fuel-filler door, push the right side of the fuel-filler door to release.
The fuel-filler door is located on the driver’s side of the vehicle.
Please see your Owner’s Manual for important safety information, system
limitations, and additional operating and feature information.
For more information, refer to the “Pre-driving checks and adjustments (section 3)” of your
Owner’s Manual.
HEATED STEERING WHEEL (if so equipped)
Once activated, your heated steering wheel will automatically turn on and off to maintain
a temperature above 68°F (20°C).
When the sur face temperature of the steering
wheel is above 68°F (20°C) and the switch
1 is turned on, the system will not heat the
steering wheel. This does not indicate a malfunction.
Please see your Owner’s Manual for important safety information, system limitations, and additional
operating and feature information.
For more information, refer to the “Instruments and controls (section 2)” of your Owner’s Manual.
LOOSE FUEL CAP
A LOOSE FUEL CAP warning message will
appear in the vehicle information display
1
when the fuel-filler cap is not
tightened correctly.
To tighten, turn the cap clockwise until a single click is heard.
If the cap is not properly tightened, the Malfunction Indicator Light
may illuminate.
Please see your Owner’s Manual for important safety information, system limitations, and additional
operating and feature information.
For more information, refer to the “Instruments and controls (section 2)” and the “Pre-driving checks
and adjustments (section 3)” of your Owner’s Manual.
1
1
To view detailed instructional videos regarding these and other features, please go to www.nissanownersinfo.mobi.
Page 16 of 38
14
AUTO UNLOCK
In the Vehicle Settings menu in the vehicle information display, there are three
options to choose from for the auto unlock function:
•
OFF - A
uto Unlock is disabled.
•
IGNITION OFF - A
ll doors unlock when the ignition is turned off.
•
SHIFT
TO PARK - All doors unlock when the shif t lever is moved to the
P (PARK) position.
NISSAN INTELLIGENT KEY® BATTERY DISCHARGE
If the bat tery of the I-Key is discharged or
environmental conditions interfere with the
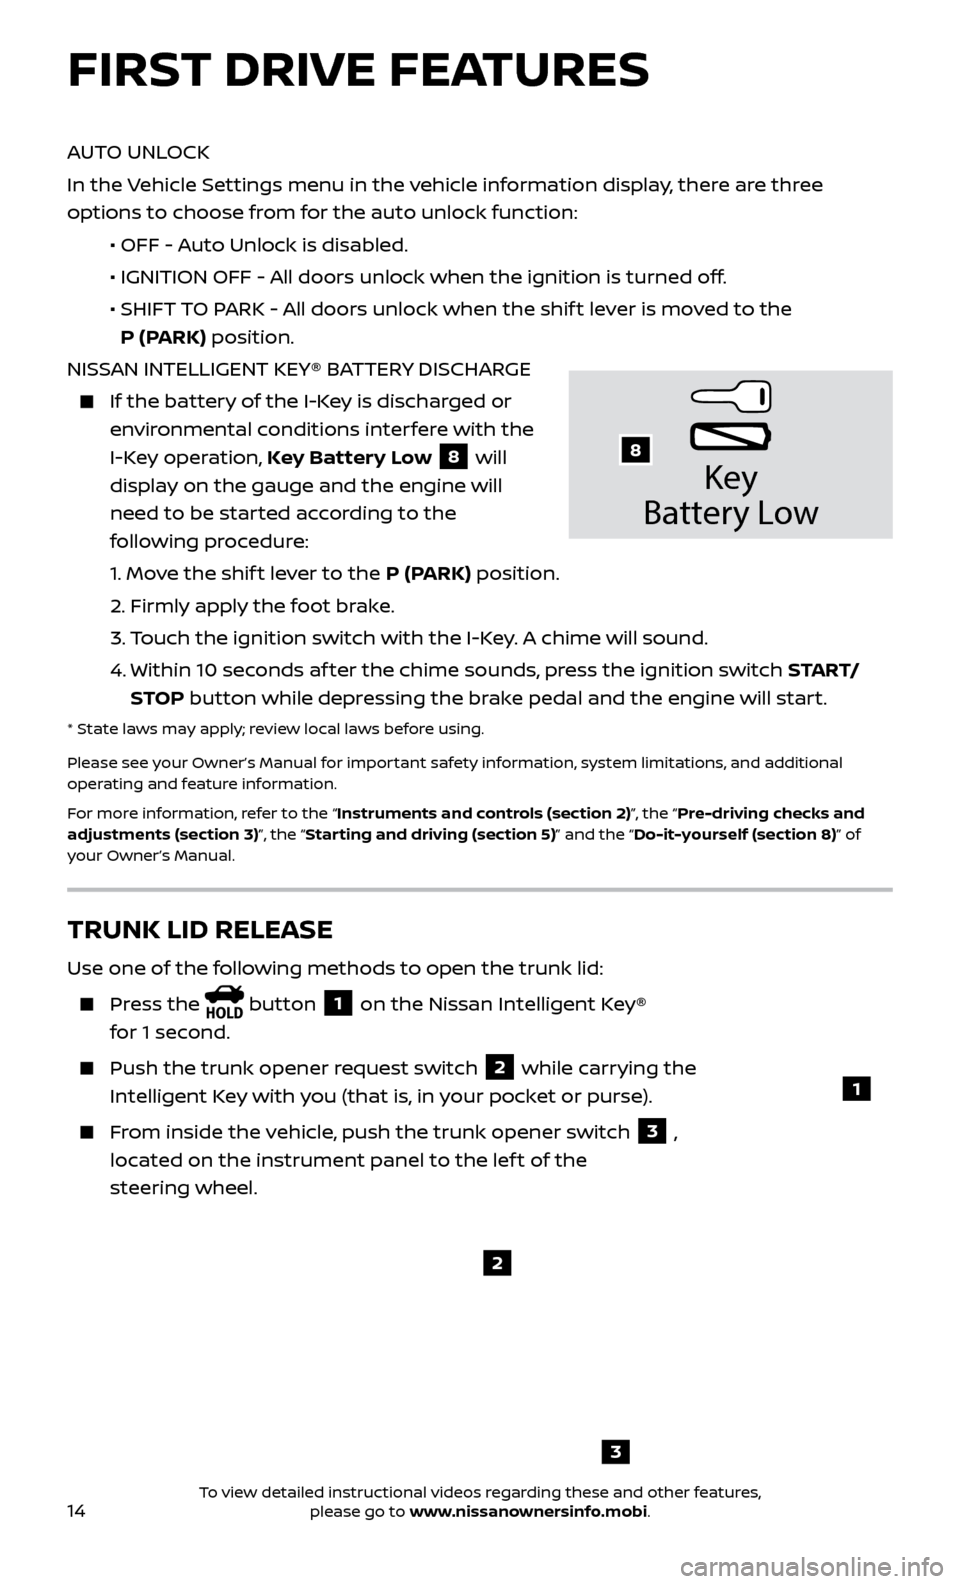
I-Key operation, Key Battery Low
8 will
display on the gauge and the engine will
need to be started according to the
following procedure:
1.
Move the shif t lever to the P (PARK) position.
2.
Firmly apply the foot brake.
3.
T
ouch the ignition switch with the I-Key. A chime will sound.
4.
Within 10 sec
onds af ter the chime sounds, press the ignition switch S TA R T/
STOP button while depressing the brake pedal and the engine will start.
* State laws may apply; review local laws before using.
Please see your Owner’s Manual for important safety information, system limitations, and additional
operating and feature information.
For more information, refer to the “Instruments and controls (section 2)”, the “Pre-driving checks and
adjustments (section 3)”, the “Starting and driving (section 5)” and the “Do-it-yourself (section 8)” of
your Owner’s Manual.
Key
Battery Lo w
8
FIRST DRIVE FEATURES
3
TRUNK LID RELEASE
Use one of the following methods to open the trunk lid:
Press the button 1 on the Nissan Intelligent Key®
for 1 second.
Push the trunk opener r equest switch 2 while carrying the
Intelligent Key with you (that is, in your pocket or purse).
From inside the vehicle, push the trunk opener switch 3 ,
located on the instrument panel to the lef t of the
steering wheel.
1
2
To view detailed instructional videos regarding these and other features, please go to www.nissanownersinfo.mobi.
Page 18 of 38

16
AUTOMATIC DRIVE POSITIONER (if so equipped)
Two positions for the driver’s seat, steering column (if so equipped) and outside mirrors
can be stored in the automatic drive
positioner memory.
Follow this procedure to set the memory positions:
•
Plac
e the ignition switch in the ON or ACC position. (The vehicle should be
stopped while setting the memory.)
•
A
djust the driver’s seat, steering column (if so equipped) and outside mirrors to
the desired positions using the adjusting switches for each feature.
•
Push the
SET switch, and within 5 seconds, push the memory switch (1 or 2).
• The indic
ator light for the memory switch you select will illuminate for
approximately 5 seconds, and a chime will sound when the memory is stored.
• The driv
er’s seat, steering column (if so equipped) and outside mirror positions
are now set to your preferences.
These memoriz ed positions can also be linked to your Nissan Intelligent Key®.
Please see your Owner’s Manual for important safety information, system limitations, and additional
operating and feature information.
For more information, refer to the “Pre-driving checks and adjustments (section 3)” of your
Owner’s Manual.
OUTSIDE MIRROR CONTROL SWITCH
To select the right or lef t side mirror, slide the
mirror control switch
1 right or lef t.
To adjust the mirror angle, move the control switch up, down, right or lef t.
To prevent accidentally moving the mirror, slide the mirror control switch
1 to the
center (neutral) position.
REVERSE TILT-DOWN FEATURE (if so equipped)
The reverse tilt-down feature will turn both outside mirror surfaces downward to
provide better rear visibility close to the vehicle.
1.
Apply the brake.
2.
Place the ignition switch in the ON position.
1
FIRST DRIVE FEATURES
To raise the seatback, lif t up each seatback and push it to the upright position until it is latched.
Please see your Owner’s Manual for important safety information, system limitations, and additional
operating and feature information.
For more information, refer to the “Safety — Seats, seat belts and supplemental restraint system
(section 1)” of your Owner’s Manual.
To view detailed instructional videos regarding these and other features, please go to www.nissanownersinfo.mobi.
Page 21 of 38
19
6
MOONROOF/REAR SUNSHADE SWITCH (if so equipped)
OPENING/CLOSING THE MOONROOF AND SUNSHADE
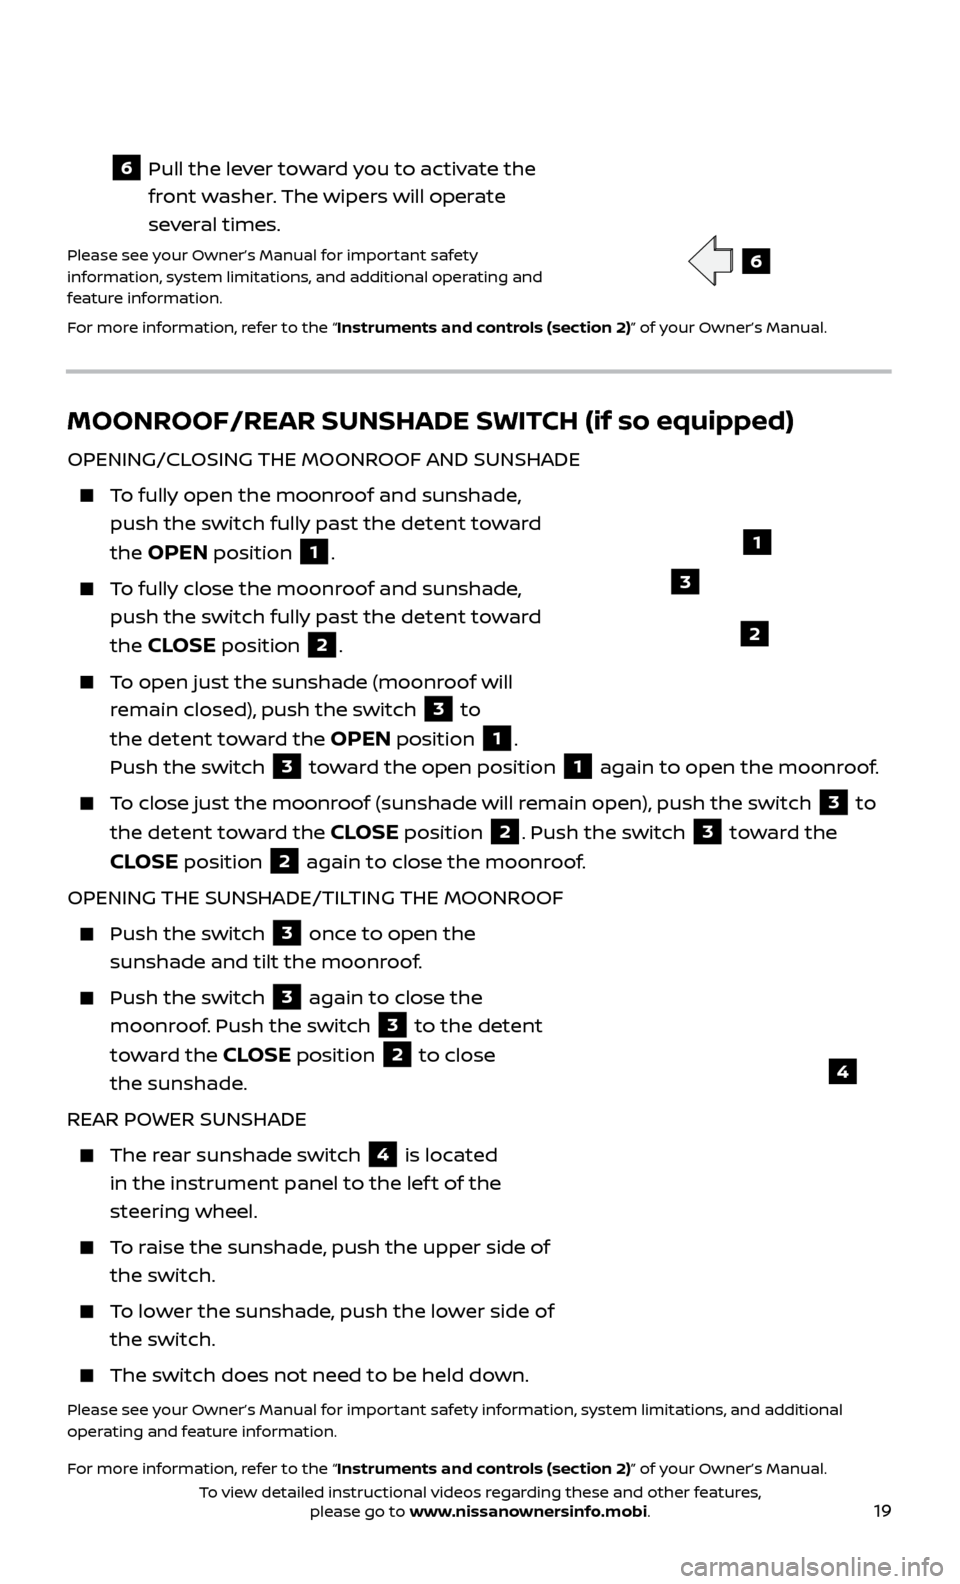
To fully open the moonroof and sunshade, push the switch fully past the detent toward
the
OPEN position 1.
To fully close the moonroof and sunshade, push the switch fully past the detent toward
the
CLOSE position 2.
To open just the sunshade (moonroof will remain closed), push the switch
3 to
the detent toward the
OPEN position 1.
Push the switch
3 toward the open position 1 again to open the moonroof.
To close just the moonroof (sunshade will remain open), push the switch 3 to
the detent toward the
CLOSE position 2. Push the switch 3 toward the
CLOSE position 2 again to close the moonroof.
OPENING THE SUNSHADE/TILTING THE MOONROOF
Push the switch 3 once to open the
sunshade and tilt the moonroof.
Push the switch 3 again to close the
moonroof. Push the switch
3 to the detent
toward the
CLOSE position 2 to close
the sunshade.
REAR POWER SUNSHADE
The rear sunshade switch 4 is located
in the instrument panel to the lef t of the
steering wheel.
To raise the sunshade, push the upper side of the switch.
To lower the sunshade, push the lower side of the switch.
The switch does not need to be held do wn.
Please see your Owner’s Manual for important safety information, system limitations, and additional
operating and feature information.
For more information, refer to the “Instruments and controls (section 2)” of your Owner’s Manual.
4
1
2
3
6 Pull the lever toward you to activate the
front washer. The wipers will operate
several times.
Please see your Owner’s Manual for important safety
information, system limitations, and additional operating and
feature information.
For more information, refer to the “Instruments and controls (section 2)” of your Owner’s Manual.
To view detailed instructional videos regarding these and other features, please go to www.nissanownersinfo.mobi.
Page 26 of 38
24
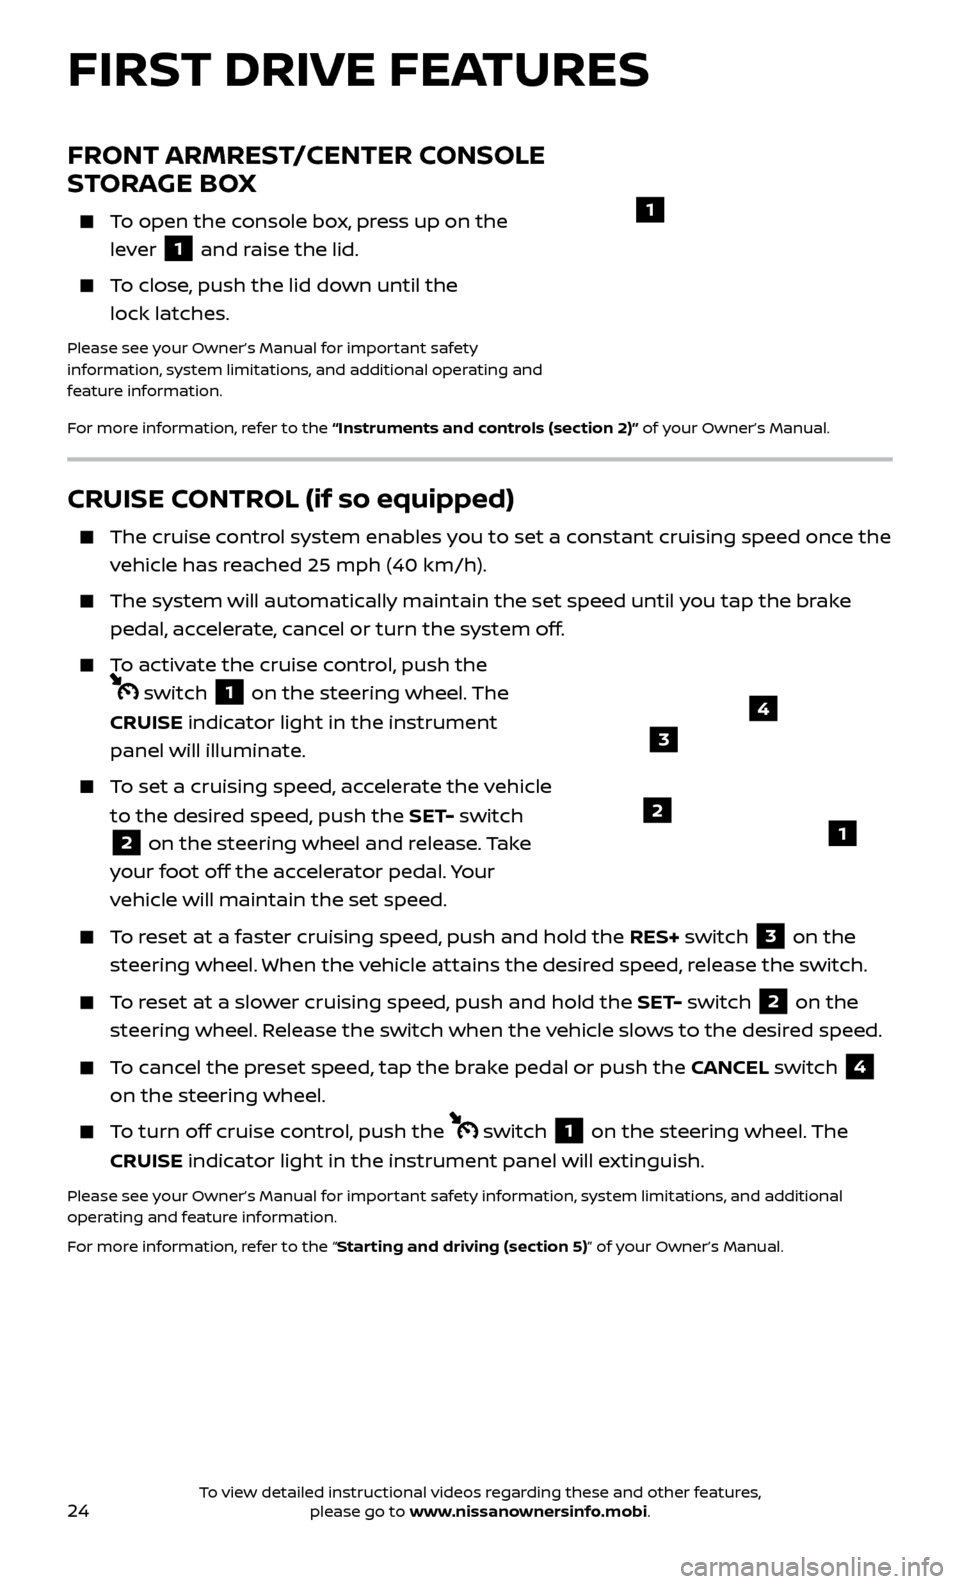
CRUISE CONTROL (if so equipped)
The cruise control system enables you to set a constant cruising speed once the
vehicle has reached 25 mph (40 km/h).
The system wil l automatically maintain the set speed until you tap the brake
pedal, accelerate, cancel or turn the system off.
To activate the cruise control, push the
switch 1 on the steering wheel. The
CRUISE indicator light in the instrument
panel will illuminate.
To set a cruising speed, accelerate the vehicle to the desired speed, push the SET- switch
2 on the steering wheel and release. Take
your foot off the accelerator pedal. Your
vehicle will maintain the set speed.
To reset at a faster cruising speed, push and hold the RES+ switch 3 on the
steering wheel. When the vehicle attains the desired speed, release the switch.
To reset at a slower cruising speed, push and hold the SET- switch 2 on the
steering wheel. Release the switch when the vehicle slows to the desired speed.
To cancel the preset speed, tap the brake pedal or push the CANCEL switch 4
on the steering wheel.
To turn off cruise control, push the switch 1 on the steering wheel. The
CRUISE indicator light in the instrument panel will extinguish.
Please see your Owner’s Manual for important safety information, system limitations, and additional
operating and feature information.
For more information, refer to the “Starting and driving (section 5)” of your Owner’s Manual.
12
3
4
FRONT ARMREST/CENTER CONSOLE
STORAGE BOX
To open the console box, press up on the lever
1 and raise the lid.
To close, push the lid down until the lock latches.
Please see your Owner’s Manual for important safety
information, system limitations, and additional operating and
feature information.
For more information, refer to the “Instruments and controls (section 2)” of your Owner’s Manual.
1
FIRST DRIVE FEATURES
To view detailed instructional videos regarding these and other features, please go to www.nissanownersinfo.mobi.
Page 27 of 38
25
INTELLIGENT CRUISE CONTROL (ICC) (if so equipped)
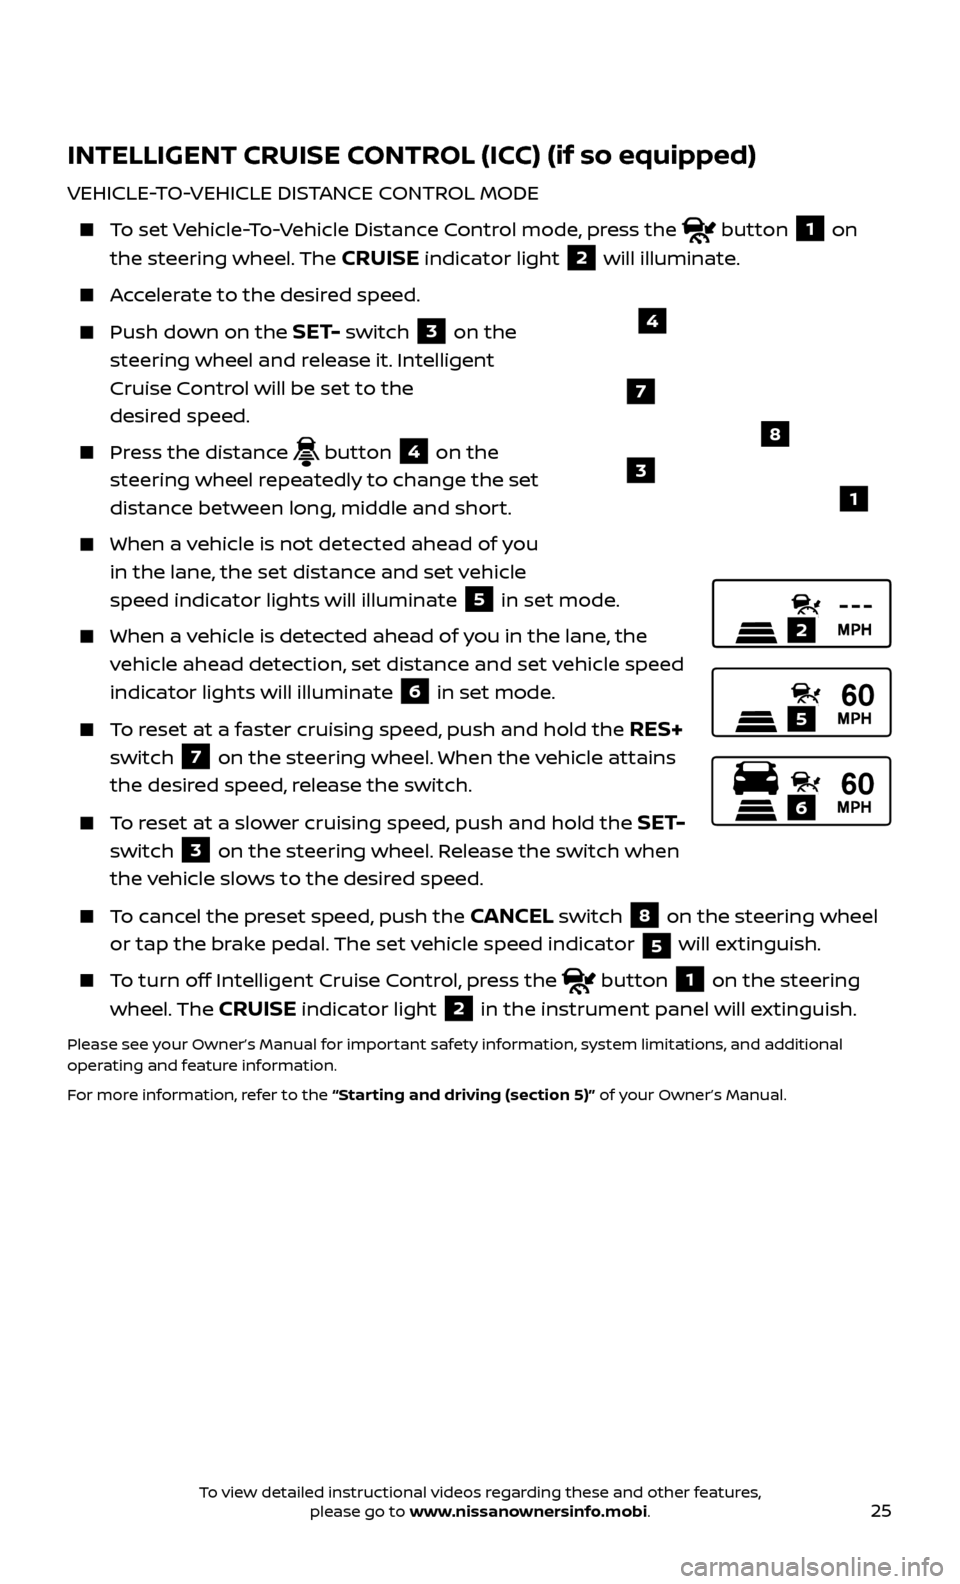
VEHICLE-TO-VEHICLE DISTANCE CONTROL MODE
To set Vehicle-To-Vehicle Distance Control mode, press the button 1 on
the steering wheel. The
CRUISE indicator light 2 will illuminate.
Accelerate to the desired speed.
Push down on the SET- switch 3 on the
steering wheel and release it. Intelligent
Cruise Control will be set to the
desired speed.
Press the distance button 4 on the
steering wheel repeatedly to change the set
distance between long, middle and short.
When a v ehicle is not detected ahead of you
in the lane, the set distance and set vehicle
speed indicator lights will illuminate
5 in set mode.
When a v ehicle is detected ahead of you in the lane, the
vehicle ahead detection, set distance and set vehicle speed
indicator lights will illuminate
6 in set mode.
To reset at a faster cruising speed, push and hold the RES+
switch
7 on the steering wheel. When the vehicle attains
the desired speed, release the switch.
To reset at a slower cruising speed, push and hold the SET-
switch
3 on the steering wheel. Release the switch when
the vehicle slows to the desired speed.
To cancel the preset speed, push the CANCEL switch 8 on the steering wheel
or tap the brake pedal. The set vehicle speed indicator
5 will extinguish.
To turn off Intelligent Cruise Control, press the button 1 on the steering
wheel. The
CRUISE indicator light 2 in the instrument panel will extinguish.
Please see your Owner’s Manual for important safety information, system limitations, and additional
operating and feature information.
For more information, refer to the “Starting and driving (section 5)” of your Owner’s Manual.
2
5
6
1
4
8
7
3
To view detailed instructional videos regarding these and other features, please go to www.nissanownersinfo.mobi.
Page 28 of 38
26
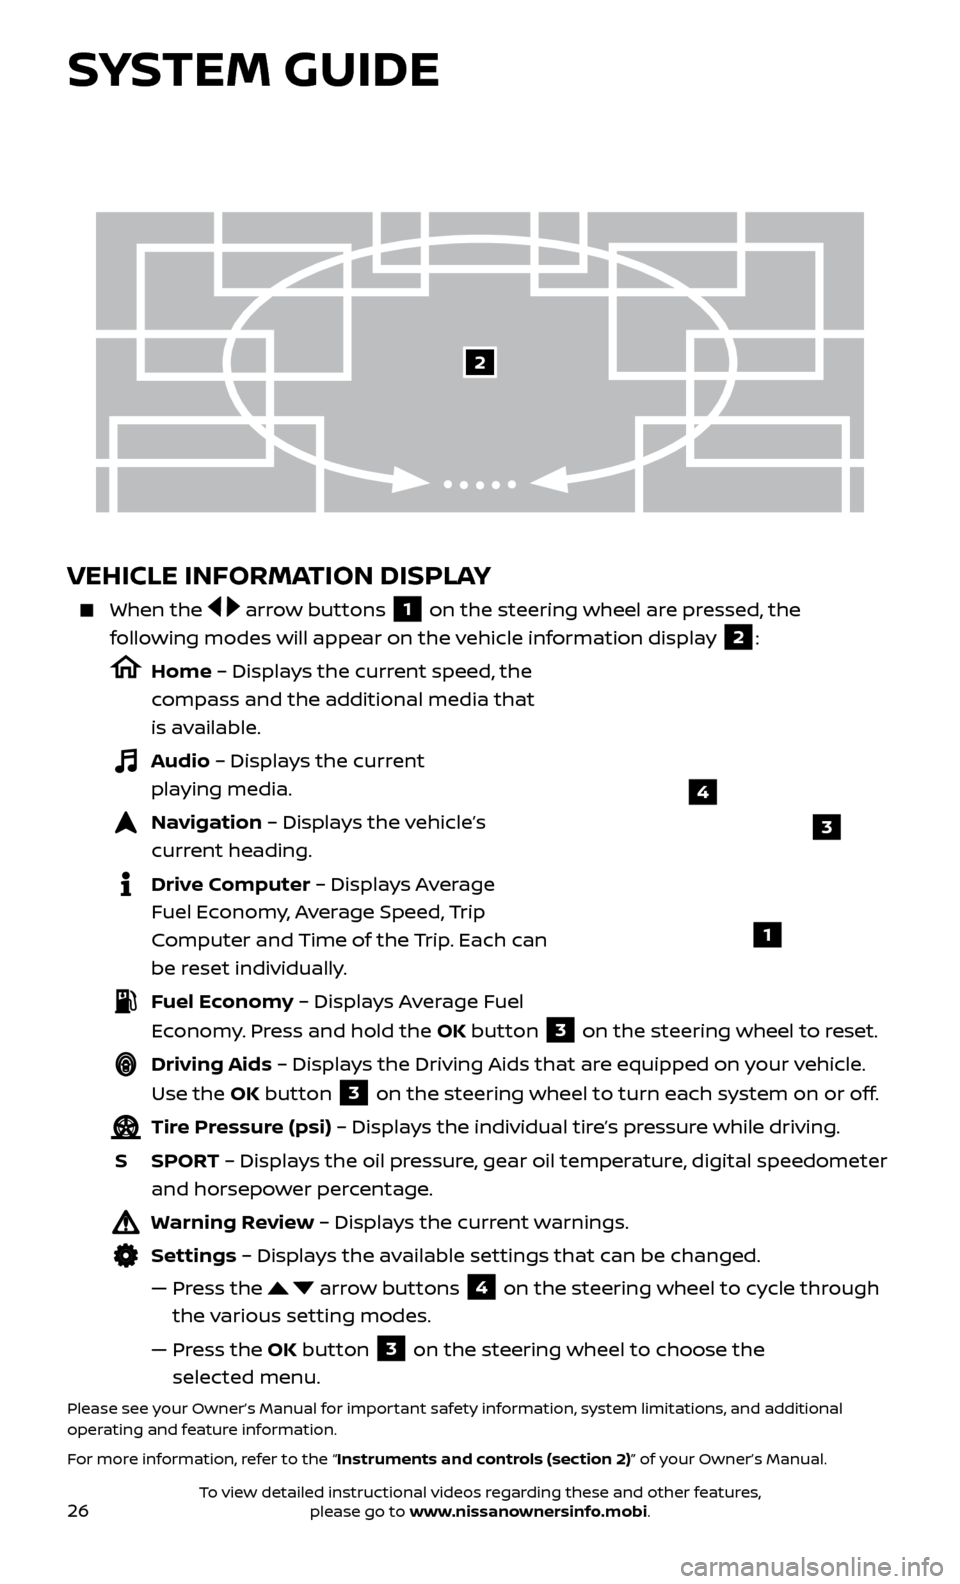
VEHICLE INFORMATION DISPLAY
When the arrow buttons 1 on the steering wheel are pressed, the
following modes will appear on the vehicle information display
2:
Home – Displays the current speed, the
compass and the additional media that
is available.
Audio – Displays the current playing media.
Navigation – Displays the vehicle’s curr ent heading.
Drive Computer – Displays Average Fuel Economy, Average Speed, Trip
Computer and Time of the Trip. Each can
be reset individually.
Fuel Economy – Displays Average Fuel Economy. Press and hold the OK button
3 on the steering wheel to reset.
Driving Aids – Displays the Driving Aids that are equipped on your vehicle.
Use the OK button
3 on the steering wheel to turn each system on or off.
Tire Pressure (psi) – Displays the individual tire’s pressure while driving.
S
SPOR
T – Displays the oil pressure, gear oil temperature, digital speedometer
and horsepower percentage.
Warning Review – Displays the current warnings.
Settings – Displays the available settings that can be changed.
—
Pr
ess the
arrow buttons 4 on the steering wheel to cycle through
the various setting modes.
—
Pr
ess the OK button
3 on the steering wheel to choose the
selected menu.
Please see your Owner’s Manual for important safety information, system limitations, and additional
operating and feature information.
For more information, refer to the “Instruments and controls (section 2)” of your Owner’s Manual.
3
1
2
SYSTEM GUIDE
4
To view detailed instructional videos regarding these and other features, please go to www.nissanownersinfo.mobi.
Page 30 of 38

28
SYSTEM GUIDE
HANDS-FREE TEXT MESSAGING ASSISTANT*
This text messaging feature allows for sending and receiving text messages through
the vehicle’s interface.
Using predefined or custom messages, send a text to an entry stored in your Bluetooth®
Hands-free Phone System.
Once enabled, the text message, sender and delivery time are shown on the control panel
display when the vehicle speed is less than 5 mph (8 km/h).
Text messages have the option of being read aloud.
Once the vehicle is in motion, text messages can only be replied to using the Voice Recognition
button on the steering wheel.
Text messages can be created manually when the vehicle is not in motion.
Custom te xt messages must be created in advance.
• To exit the Apple CarPlay™ screen and display the other screens, press the
MENU button or one of the other buttons on the control panel and touch
the preferred menus.
• T
o return to the Apple CarPlay™ screen, touch the “
Info” key 3 on the
Launch Bar and then touch the Apple CarPlay™ key 2.
When connected to Apple CarPlay™, Siri® Eyes Free operation can also be accessed.
There are two ways to start a Siri® Eyes Free session.
1.
Pr
ess and hold the
button on the steering wheel.
2.
T
ouch and hold the
key 4 at the lower lef t corner of the Apple
CarPlay™ screen.
Press the button on the steering wheel or touch the key 4 at the lower
lef t corner of the Apple CarPlay™ screen to end Siri® Eyes Free operation.
Keep the interior of the vehicle as quiet as possible. Close the windows to eliminate the surrounding noises (traffic noises, vibration sounds, etc.), which
may prevent the system from recognizing the voice commands correctly.
Some Siri® E yes Free functions may not be available during driving.
For functions that can be used with Siri® Eyes Free, please refer to the
Apple® website.
Nissan Phone menu and Nissan Voice Recognition cellular phone commands will
not be available when Apple CarPlay™ is active.
Please see your Owner’s Manual for important safety information, system limitations, and additional
operating and feature information.
For more information, refer to the ”Getting started (section 2)” and the ”Information (section 5)” of your
Navigation System Owner’s Manual.
To view detailed instructional videos regarding these and other features, please go to www.nissanownersinfo.mobi.