trunk lock NISSAN MAXIMA 2021 Owner´s Manual
[x] Cancel search | Manufacturer: NISSAN, Model Year: 2021, Model line: MAXIMA, Model: NISSAN MAXIMA 2021Pages: 476, PDF Size: 3.32 MB
Page 12 of 476

1. Rear window defroster switch (P. 2-45)
2. Interior trunk lid release (P. 3-21)
3. High-mounted stop light (P. 8-23)4. Exterior trunk lid release/request but-
ton (P. 3-16)
Rearview camera (P. 4-3, 4-21)
Trunk lid (P. 3-21) 5. Rear sonar sensors (P. 5-116)
6. Replacing bulbs (P. 8-23)
7. Fuel-filler door (P. 3-22)
Fuel recommendation (P. 10-3)
8. Child safety rear door locks (P. 3-4)
Refer to the page number indicated in
parentheses for operating details.
LIC4608
EXTERIOR REAR
0-4Illustrated table of contents
Page 24 of 476

1. Move the front passenger seat to themost forward position.
2. Open the access cover on the rear par- cel shelf.
3. Push down on the button
O1on the rear
parcel shelf.
4. Fold down the passenger’s side seat- back
O2.
WARNING
• Never allow anyone to ride in the
cargo area or on the rear seat when it
is in the fold-down position. Use of
these areas by passengers without
proper restraints could result in seri-
ous injury or death in an accident or
sudden stop.
• Properly secure all cargo with ropes
or straps to help prevent it from slid-
ing or shif ting. Do not place cargo
higher than the seatbacks. In a sud-
den stop or collision, unsecured
cargo could cause personal injury. •
When returning the seatbacks to the
upright position, be certain they are
completely secured in the latched
position. If they are not completely
secured, passengers may be injured
in an accident or sudden stop.
• Closely supervise children when they
are around cars to prevent them
from playing and becoming locked in
the trunk where they could be seri-
ously injured. Keep the car locked,
with the rear seatback and trunk lid
securely latched when not in use, and
prevent children's access to car keys.
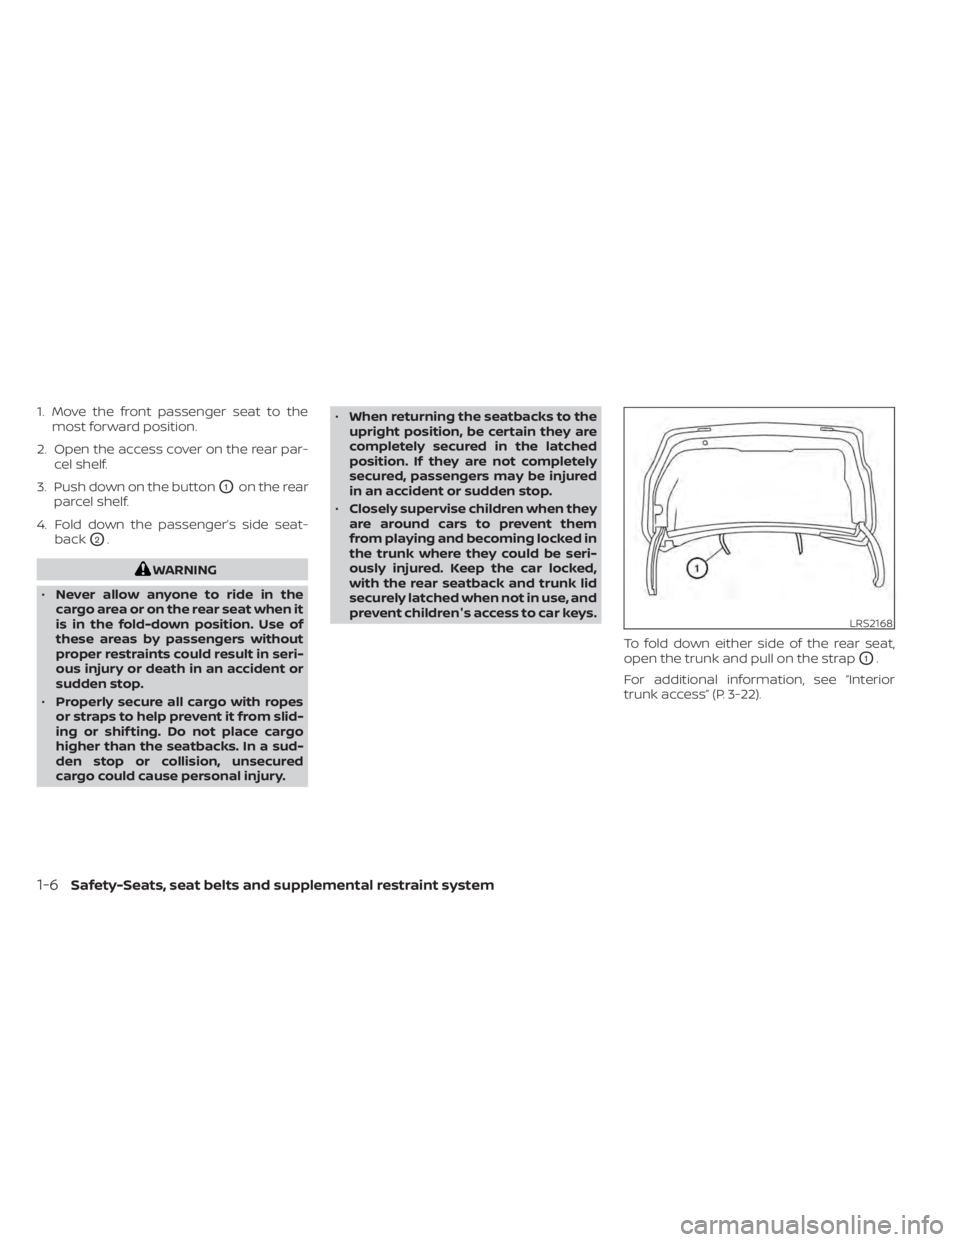
To fold down either side of the rear seat,
open the trunk and pull on the strap
O1.
For additional information, see “Interior
trunk access” (P. 3-22).
LRS2168
1-6Safety-Seats, seat belts and supplemental restraint system
Page 100 of 476

Operation
The MIL will come on in one of two ways:
• MIL on steady — An emission control sys-tem malfunction has been detected.
Check the fuel-filler cap if the Loose Fuel
Cap warning appears in the vehicle infor-
mation display. If the fuel-filler cap is loose
or missing, tighten or install the cap and
continue to drive the vehicle. The
light should turn off af ter a few driving
trips. If thelight does not turn off
af ter a few driving trips, have the vehicle
inspected. It is recommended that you
visit a NISSAN dealer for this service. You
do not need to have your vehicle towed
to the dealer.
• MIL blinking — An engine misfire has been detected which may damage the emis-
sion control system. To reduce or avoid
emission control system damage:– do not drive at speeds above 45 mph (72 km/h).
– avoid hard acceleration or deceleration.
– avoid steep uphill grades.
– if possible, reduce the amount of cargo being hauled or towed. The MIL may stop blinking and come on
steady. Have the vehicle inspected. It is rec-
ommended that you visit a NISSAN dealer
for this service. You do not need to have
your vehicle towed to the dealer.
CAUTION
Continued vehicle operation without
having the emission control system
checked and repaired as necessary
could lead to poor driveability, reduced
fuel economy, and possible damage to
the emission control system.
Master warning light
The master warning light illuminates
whenever there is an active warning that
can be reviewed in the “warnings review”
content page in the meter, or if there is a
red-level warning being displayed (which
cannot be dismissed). The master warning
light will illuminate red if a red-level warning
is being displayed, or yellow otherwise.
• Push Engine Start Lock Warning
• No Key Detected
• Incorrect Key
• Door/Trunk Open (vehicle stationary)
• Trunk Open (vehicle moving) • Low Washer Fluid
• I-Key System Fault
• Low Tire Pressure
• CVT Warning
• Sonar Parking Sensor Error
• Chassis Control warning (if so equipped)
• Loose Fuel Cap warning
• Traffic Sign Recognition system fault (see
owner’s manual) (if so equipped)
• Driver Attention Alert system fault (if so equipped)
For additional information, see “Vehicle in-
formation display” (P. 2-17).Power steering warning
light
WARNING
• If the engine is not running or is
turned off while driving, the power
assist for the steering will not work.
Steering will be harder to operate.
2-14Instruments and controls
Page 126 of 476

The system helps deter vehicle thef t but
cannot prevent it, nor can it prevent the
thef t of interior or exterior vehicle compo-
nents in all situations. Always secure your
vehicle even if parking for a brief period.
Never leave your Intelligent Key in the ve-
hicle, and always lock the vehicle when un-
attended. Be aware of your surroundings,
and park in secure, well-lit areas whenever
possible.
Many devices offering additional protec-
tion, such as component locks, identifica-
tion markers, and tracking systems, are
available at auto supply stores and spe-
cialty shops. A NISSAN dealer may also offer
such equipment. Check with your insur-
ance company to see if you may be eligible
for discounts for various thef t protection
features.
How to arm the vehicle security
system
1. Close all windows.(The system can be
armed even if the windows are open.)
2. Remove the Intelligent Key from the vehicle. 3. Close all doors, hood and trunk. Lock all
doors. The doors can be locked with the
Intelligent Key or door handle request
switch.
4. Confirm that the
security indicator
light stays on for about 30 seconds. The
vehicle security system is now pre-
armed. The vehicle security system will
automatically shif t into the armed
phase. The
security light begins to
flash once every three seconds. If during
the pre-armed phase one of the follow-
ing occurs, the system will not arm:
• Any door is unlocked with the Intelligent Key or door request switch.
• Ignition switch is placed in ACC or ON position.
• Even when the driver and/or passen-
gers are in the vehicle, the system will
activate with all the doors, hood and
trunk lid locked with the ignition switch
placed in the LOCK position. When plac-
ing the ignition switch in the ACC or ON
position, the system will be released.
Vehicle security system activation
The vehicle security system will give the
following alarm:
• The headlights blink and the horn sounds intermittently but synchronously.
• The alarm automatically turns off af ter a period of time. However, the alarm reacti-
vates if the vehicle is tampered with
again.
The alarm is activated by:
• opening any door or hood without using the Intelligent Key (even if the door is un-
locked by releasing the door inside lock
knob).
How to stop an activated alarm
The alarm stops only by pushing thebutton on the Intelligent Key, or pushing the
request switch on the driver's or passen-
ger's door with the Intelligent Key in range
of the door handle.
2-40Instruments and controls
Page 144 of 476

The Rear Door Alert system functions un-
der certain conditions to indicate there
may be an object or passenger in the rear
seat(s). Check the seat(s) before exiting the
vehicle.
The Rear Door Alert system is initially dis-
abled. The driver can enable the system
using the vehicle information display. For
additional information, see “Vehicle infor-
mation display warnings and indicators”
(P. 2-26).
When the system is enabled:
• The system is activated when a rear dooris opened and closed within 10 minutes of
the vehicle being driven. When the driver
door is closed and the system is acti-
vated, a visual message appears in the
vehicle information display. For additional
information, see “Rear Door Alert is acti-
vated” (P. 2-26).
• If a rear door is opened and closed but the vehicle is not driven within approxi-
mately 10 minutes, the system will not be
activated. A rear door must be opened
and closed and the car driven within 10
minutes for the system to activate. When the Rear Door Alert system is acti-
vated:
• When the driver puts the vehicle in the P
(Park) position, a notification message
appears in the vehicle information dis-
play with the options to “Dismiss Mes-
sage” or “Disable Alert” if desired.• Select “Disable Alert” to temporarily disable for that stop.
• No selection or ‘Dismiss Message” will keep the alert enabled for that stop.
• If the alert is enabled when a driver exits the vehicle, a message will appear in the
vehicle information display that states
“Check Rear Seat for All Articles.”
If “Horn & Alert” setting is selected:
• An audible horn sound will occur af ter a short time unless a rear door is
opened and closed within a short time
to deactivate the alert.
• If the doors are locked before the alert is deactivated by opening a rear door,
the horn will sound.
• If the trunk is opened before a rear door is opened, the horn will be de-
layed until af ter the trunk is closed.NOTE:
If “Alert Only ” setting is selected, the
message alert will still be shown in the
vehicle information display but the horn
will not sound.
WARNING
• If the driver selects “Disable Alert”, no
audible alert will be provided regard-
less of rear door open/close status.
• There may be times when there is an
object or passenger in the rear
seat(s) but the audible alert does not
sound. For example, this may occur if
rear seat passengers enter or exit the
vehicle during a trip.
• The system does not directly detect
objects or passengers in the rear
seat(s). Instead, it can detect when a
rear door is opened and closed, indi-
cating that there may be something
in the rear seat(s).
NOTE:
There may be times when the horn
sounds but there are no objects or pas-
sengers in the rear seat(s).
For additional information, see “Rear Door
Alert is activated” (P. 2-26)
REAR DOOR ALERT
2-58Instruments and controls
Page 159 of 476

PERSONAL LIGHTS
To turn the rear personal lights on, push the
switch. To turn them off, push the switch
again.The light illuminates when the trunk lid is
opened. When the trunk lid is closed, the
light goes off. For additional information,
see “Exterior and interior lights” (P. 8-24).
The HomeLink® Universal Transceiver pro-
vides a convenient way to consolidate the
functions of up to three individual hand-
held transmitters into one built-in device.
HomeLink® Universal Transceiver:
• Will operate most radio frequency de-
vices such as garage doors, gates, home
and office lighting, entry door locks and
security systems.
• Is powered by your vehicle's battery. No separate batteries are required. If the ve-
hicle's battery is discharged or is discon-
nected, HomeLink® will retain all
programming.
When the HomeLink® Universal Trans-
ceiver is programmed, retain the original
transmitter for future programming pro-
cedures (Example: new vehicle pur-
chases). Upon sale of the vehicle, the
programmed HomeLink® Universal
Transceiver buttons should be erased for
security purposes. For additional infor-
mation, see “Programming HomeLink®”
(P. 2-74).
LIC3907
TRUNK LIGHT HOMELINK® UNIVERSAL
TRANSCEIVER (if so equipped)
Instruments and controls2-73
Page 165 of 476

3 Pre-driving checks and adjustments
Keys.............................................3-2NISSAN Intelligent Key® .......................3-2
NISSAN Vehicle Immobilizer System
keys..........................................3-4
Doors ...........................................3-4
Locking with key .............................3-5
Locking with power door lock switch .........3-6
Automatic door locks ........................3-6
Child safety rear door lock ....................3-6
NISSAN Intelligent Key® .......................... 3-7
Operating range .............................3-8
Door locks/unlocks precaution ...............3-8
NISSAN Intelligent Key® Operation ............3-9
How to use the remote keyless entry
function ..................................... 3-13
Warning signals ............................. 3-15
Troubleshooting guide ......................3-16
Remote Engine Start ........................... 3-18
Remote Engine Start operating range .......3-18
Remote starting the vehicle .................3-18
Extending engine run time ..................3-19
Canceling a Remote Engine Start ...........3-19
Conditions the Remote Engine Start will
notwork .................................... 3-19Hood
........................................... 3-20
Trunk lid ........................................ 3-21
Opener operation ........................... 3-21
Interior trunk lid release .....................3-21
Interior trunk access ........................ 3-22
Fuel-filler door .................................. 3-22
Opening the fuel-filler door ..................3-22
Fuel-filler cap ................................ 3-23
Steering wheel ................................. 3-24
Manual operation (if so equipped) ...........3-25
Automatic operation (if so equipped) ........3-25
Sun visors ...................................... 3-26
Vanity mirrors ............................... 3-27
Mirrors ......................................... 3-27
Automatic anti-glare rearview mirror ........3-27
Outside mirrors ............................. 3-28
Memory seat (if so equipped) ...................3-30
Memory storage function (key-link) ..........
3-30
Memor
y storage function (switch) ...........3-31
Entry/exit function .......................... 3-32
System operation ........................... 3-32
Page 172 of 476

OPERATING RANGE
The Intelligent Key functions can only be
used when the Intelligent Key is within the
specified operating range from the request
switch
O1.
NOTE:
If all doors are already unlocked, opening
the trunk does NOT require an Intelligent
Key to be in range of the trunk request
switch or rear of the vehicle.
When the Intelligent Key battery is dis-
charged or strong radio waves are present
near the operating location, the Intelligent
Key operating range becomes narrower,
and the Intelligent Key may not function
properly.
The operating range is within 31.50 in (80
cm) from each request switch
O1.
If the Intelligent Key is too close to the door
glass, handle or rear bumper, the request
switches may not function.
When the Intelligent Key is within the oper-
ating range, it is possible for anyone, even
someone who does not carry the Intelli-
gent Key, to push the request switch to
lock/unlock the doors within range.
DOOR LOCKS/UNLOCKS
PRECAUTION
• Do not push the door handle request switch with the Intelligent Key held in your
hand as illustrated. The close distance to
the door handle will cause the Intelligent
Key system to have difficulty recognizing
that the Intelligent Key is outside the
vehicle.
• Af ter locking with the door handle re- quest switch, verif y the doors are se-
curely locked by testing them.
LPD2073
LPD2554
3-8Pre-driving checks and adjustments
Page 176 of 476

• Switching the Auto Room Lamp featureto the OFF position in the “Vehicle Set-
tings” menu on the vehicle information
display. For additional information, see
“Vehicle information display” (P. 2-17).
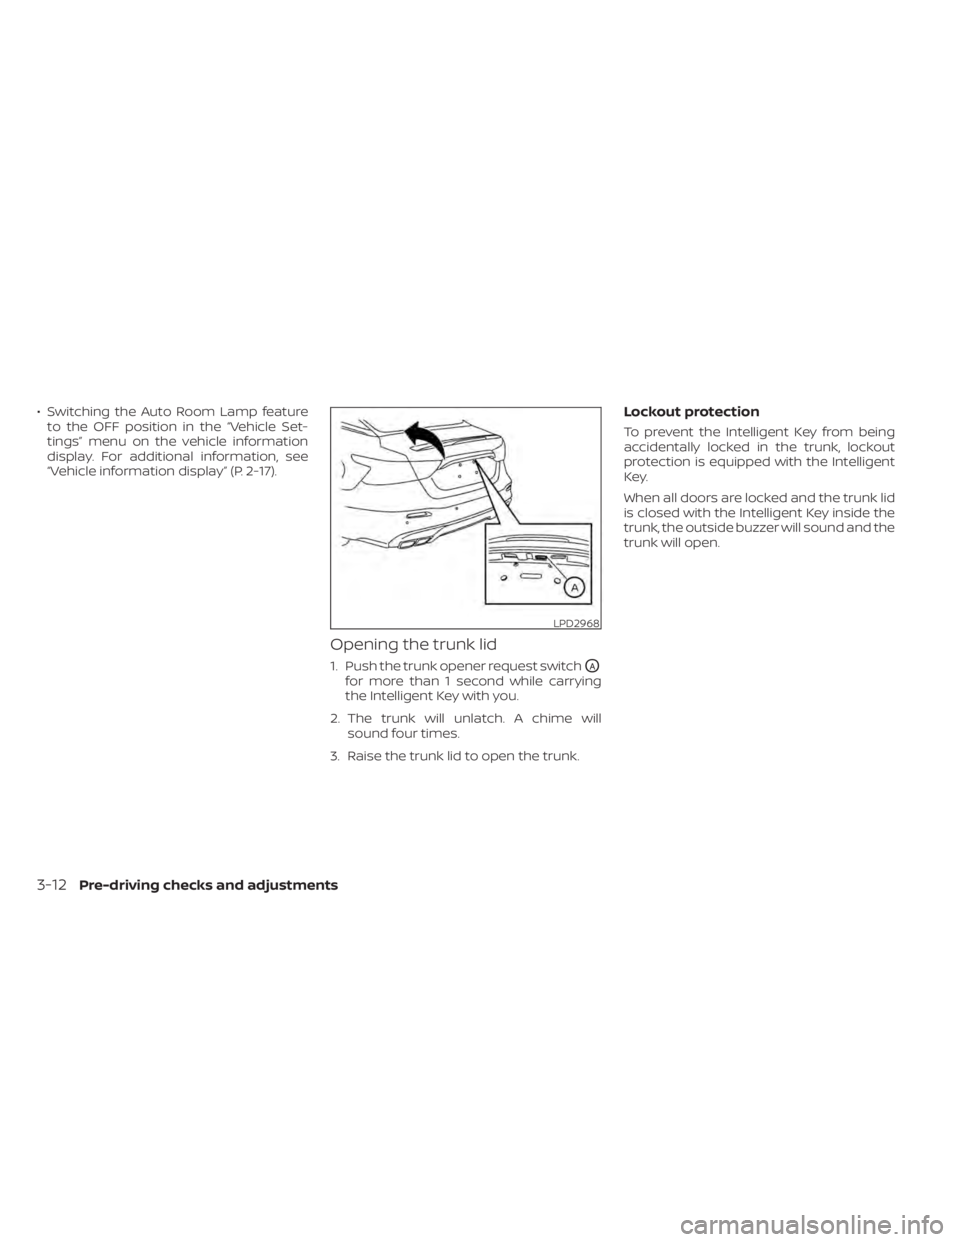
Opening the trunk lid
1. Push the trunk opener request switchOA
for more than 1 second while carrying
the Intelligent Key with you.
2. The trunk will unlatch. A chime will sound four times.
3. Raise the trunk lid to open the trunk.
Lockout protection
To prevent the Intelligent Key from being
accidentally locked in the trunk, lockout
protection is equipped with the Intelligent
Key.
When all doors are locked and the trunk lid
is closed with the Intelligent Key inside the
trunk, the outside buzzer will sound and the
trunk will open.
LPD2968
3-12Pre-driving checks and adjustments
Page 177 of 476

HOW TO USE THE REMOTE
KEYLESS ENTRY FUNCTION
The remote keyless entry function can op-
erate all door locks using the remote key-
less function of the Intelligent Key. The re-
mote keyless function can operate at a
distance of 33 f t (10 m) away from the ve-hicle. The operating distance depends
upon the conditions around the vehicle.
The remote keyless entry function will not
function under the following conditions:
• When the Intelligent Key is not within the
operational range.
• When the Intelligent Key battery is discharged.
CAUTION
When locking the doors using the Intel-
ligent Key, be sure not to leave the key
in the vehicle.
Locking doors
1. Place the ignition switch in the LOCK position.
2. Close all doors.
3. Press the
button on the Intelli-
gent Key.
4. The hazard indicator lights flash twice and the horn beeps once.
5. All doors and the trunk will be locked.
WARNING
Af ter locking the doors using the Intel-
ligent Key, be sure that the doors have
been securely locked by operating the
door handles. Failure to follow these in-
structions may result in inadvertently
unlocking the doors, which may de-
crease the safety and security of your
vehicle.
Unlocking doors
1. Press thebutton on the Intelligent
Key.
2. The hazard indicator lights flash once and the driver’s door will unlock.
3. Press the
button again within 1
minute to unlock all doors and trunk.
NOTE:
The Selective Unlock feature can be
changed using the “Vehicle Settings”
menu on the vehicle information display.
For additional information, see “Vehicle
information display ” (P. 2-17).
LPD3603
1.(remote engine start) button
2.
(lock) button
3.
(unlock) button
4.
(trunk) button
5.
(panic) button
Pre-driving checks and adjustments3-13