turn signal NISSAN MURANO 2008 Owners Manual
[x] Cancel search | Manufacturer: NISSAN, Model Year: 2008, Model line: MURANO, Model: NISSAN MURANO 2008Pages: 444, PDF Size: 6.09 MB
Page 8 of 444
Black plate (5,1)
Model "Z51-D" EDITED: 2008/ 6/ 26
SSI0373
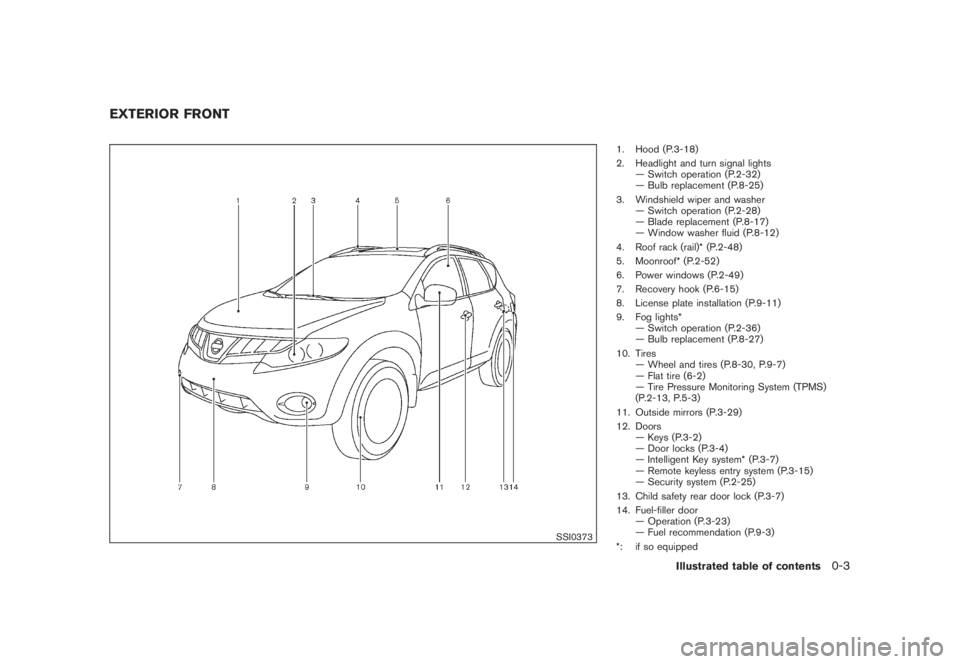
1. Hood (P.3-18)
2. Headlight and turn signal lights
— Switch operation (P.2-32)
— Bulb replacement (P.8-25)
3. Windshield wiper and washer
— Switch operation (P.2-28)
— Blade replacement (P.8-17)
— Window washer fluid (P.8-12)
4. Roof rack (rail)* (P.2-48)
5. Moonroof* (P.2-52)
6. Power windows (P.2-49)
7. Recovery hook (P.6-15)
8. License plate installation (P.9-11)
9. Fog lights*
— Switch operation (P.2-36)
— Bulb replacement (P.8-27)
10. Tires
— Wheel and tires (P.8-30, P.9-7)
— Flat tire (6-2)
— Tire Pressure Monitoring System (TPMS)
(P.2-13, P.5-3)
11. Outside mirrors (P.3-29)
12. Doors
— Keys (P.3-2)
— Door locks (P.3-4)
— Intelligent Key system* (P.3-7)
— Remote keyless entry system (P.3-15)
— Security system (P.2-25)
13. Child safety rear door lock (P.3-7)
14. Fuel-filler door
— Operation (P.3-23)
— Fuel recommendation (P.9-3)
*: if so equipped
EXTERIOR FRONT
Illustrated table of contents
0-3
Page 11 of 444
Black plate (8,1)
Model "Z51-D" EDITED: 2008/ 6/ 26
SSI0376
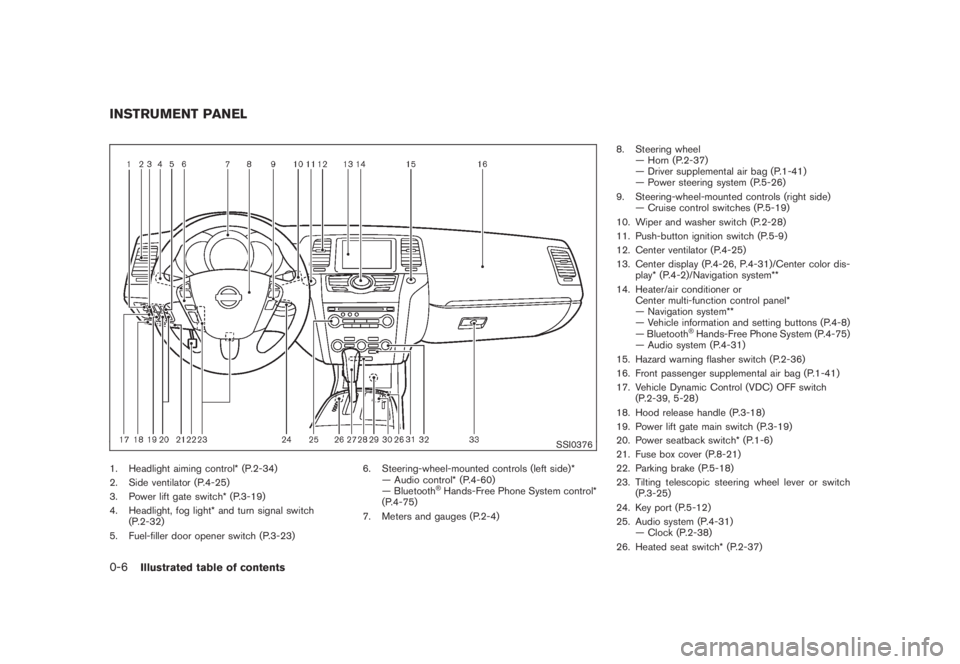
1. Headlight aiming control* (P.2-34)
2. Side ventilator (P.4-25)
3. Power lift gate switch* (P.3-19)
4. Headlight, fog light* and turn signal switch
(P.2-32)
5. Fuel-filler door opener switch (P.3-23)6. Steering-wheel-mounted controls (left side)*
— Audio control* (P.4-60)
— Bluetooth
®Hands-Free Phone System control*
(P.4-75)
7. Meters and gauges (P.2-4)8. Steering wheel
— Horn (P.2-37)
— Driver supplemental air bag (P.1-41)
— Power steering system (P.5-26)
9. Steering-wheel-mounted controls (right side)
— Cruise control switches (P.5-19)
10. Wiper and washer switch (P.2-28)
11. Push-button ignition switch (P.5-9)
12. Center ventilator (P.4-25)
13. Center display (P.4-26, P.4-31)/Center color dis-
play* (P.4-2)/Navigation system**
14. Heater/air conditioner or
Center multi-function control panel*
— Navigation system**
— Vehicle information and setting buttons (P.4-8)
— Bluetooth
®Hands-Free Phone System (P.4-75)
— Audio system (P.4-31)
15. Hazard warning flasher switch (P.2-36)
16. Front passenger supplemental air bag (P.1-41)
17. Vehicle Dynamic Control (VDC) OFF switch
(P.2-39, 5-28)
18. Hood release handle (P.3-18)
19. Power lift gate main switch (P.3-19)
20. Power seatback switch* (P.1-6)
21. Fuse box cover (P.8-21)
22. Parking brake (P.5-18)
23. Tilting telescopic steering wheel lever or switch
(P.3-25)
24. Key port (P.5-12)
25. Audio system (P.4-31)
— Clock (P.2-38)
26. Heated seat switch* (P.2-37)
INSTRUMENT PANEL0-6
Illustrated table of contents
Page 72 of 444
Black plate (7,1)
2 Instruments and controls
Model "Z51-D" EDITED: 2008/ 6/ 23
Instrument panel................................................ 2-2
Meters and gauges............................................. 2-4
Speedometer and odometer............................. 2-5
Tachometer................................................... 2-6
Engine coolant temperature gauge..................... 2-6
Fuel gauge................................................... 2-7
Compass (if so equipped).................................... 2-7
Zone variation change procedure....................... 2-9
Warning/indicator lights and audible reminders....... 2-10
Checking bulbs........................................... 2-10
Warning lights............................................. 2-10
Indicator lights............................................. 2-15
Audible reminders........................................ 2-17
Dot matrix liquid crystal display............................ 2-17
Indicators for operation.................................. 2-18
Indicators for maintenance.............................. 2-20
Trip computer.............................................. 2-21
Security systems.............................................. 2-25
Vehicle security system (if so equipped)............ 2-25
NISSAN Vehicle Immobilizer System................. 2-27
Windshield wiper and washer switch.................... 2-28
Rain-sensing auto wiper system
(if so equipped).......................................... 2-29
Rear window wiper and washer switch.................. 2-30
Rear window and outside mirror defroster switch..... 2-31Headlight and turn signal switch.......................... 2-32
Xenon headlights (if so equipped).................... 2-32
Headlight switch.......................................... 2-32
Turn signal switch........................................ 2-36
Fog light switch (if so equipped)...................... 2-36
Hazard warning flasher switch............................. 2-36
Horn............................................................. 2-37
Heated seats (if so equipped)............................. 2-37
Clock............................................................ 2-38
Models without color display........................... 2-38
Models with color display............................... 2-39
Vehicle Dynamic Control (VDC) OFF switch........... 2-39
Power outlet................................................... 2-39
Cigarette lighter and ashtray (if so equipped).......... 2-41
Storage......................................................... 2-41
Cup holders................................................ 2-41
Sunglasses holder........................................ 2-42
Glove box.................................................. 2-43
Console box............................................... 2-44
Storage box (if so equipped).......................... 2-45
Cargo floor box........................................... 2-45
Luggage side box......................................... 2-46
Cargo cover (if so equipped).......................... 2-46
Luggage hooks (if so equipped)...................... 2-47
Roof rack (if so equipped).............................. 2-48
Page 74 of 444
Black plate (70,1)
Model "Z51-D" EDITED: 2008/ 6/ 26
SSI0376
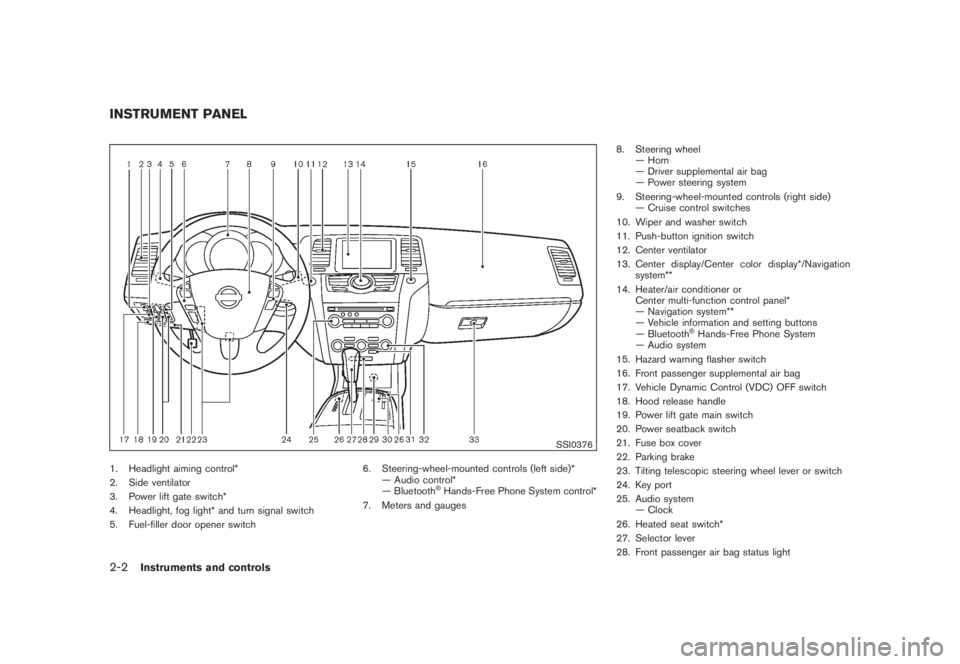
1. Headlight aiming control*
2. Side ventilator
3. Power lift gate switch*
4. Headlight, fog light* and turn signal switch
5. Fuel-filler door opener switch6. Steering-wheel-mounted controls (left side)*
— Audio control*
— Bluetooth
®Hands-Free Phone System control*
7. Meters and gauges8. Steering wheel
— Horn
— Driver supplemental air bag
— Power steering system
9. Steering-wheel-mounted controls (right side)
— Cruise control switches
10. Wiper and washer switch
11. Push-button ignition switch
12. Center ventilator
13. Center display/Center color display*/Navigation
system**
14. Heater/air conditioner or
Center multi-function control panel*
— Navigation system**
— Vehicle information and setting buttons
— Bluetooth
®Hands-Free Phone System
— Audio system
15. Hazard warning flasher switch
16. Front passenger supplemental air bag
17. Vehicle Dynamic Control (VDC) OFF switch
18. Hood release handle
19. Power lift gate main switch
20. Power seatback switch
21. Fuse box cover
22. Parking brake
23. Tilting telescopic steering wheel lever or switch
24. Key port
25. Audio system
— Clock
26. Heated seat switch*
27. Selector lever
28. Front passenger air bag status light
INSTRUMENT PANEL2-2
Instruments and controls
Page 82 of 444
Black plate (78,1)
Model "Z51-D" EDITED: 2008/ 6/ 26
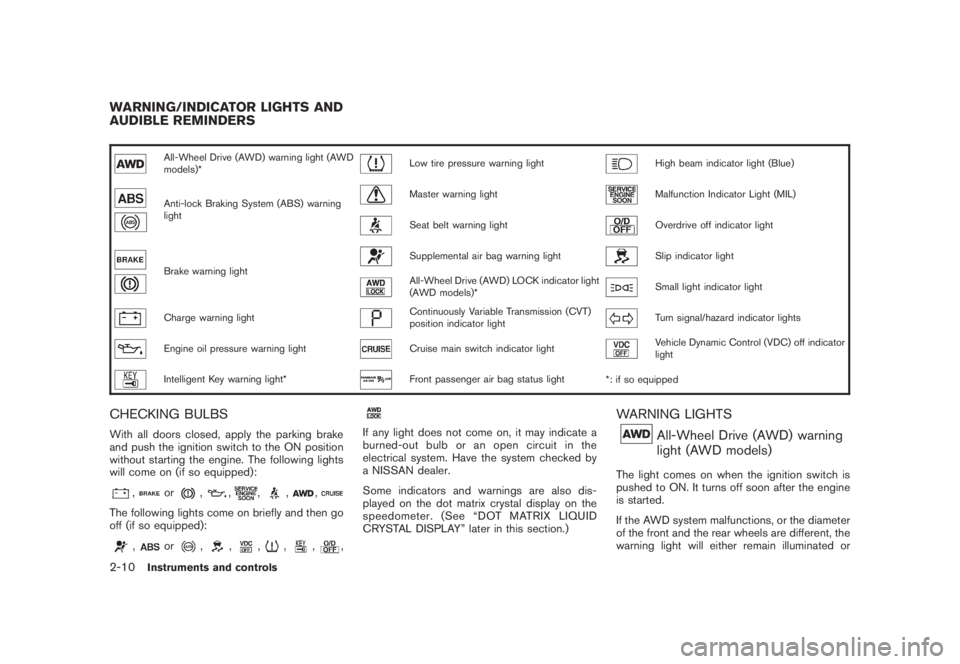
All-Wheel Drive (AWD) warning light (AWD
models)*
Low tire pressure warning light
High beam indicator light (Blue)
Anti-lock Braking System (ABS) warning
light
Master warning light
Malfunction Indicator Light (MIL)
Seat belt warning light
Overdrive off indicator light
Brake warning light
Supplemental air bag warning light
Slip indicator light
All-Wheel Drive (AWD) LOCK indicator light
(AWD models)*
Small light indicator light
Charge warning light
Continuously Variable Transmission (CVT)
position indicator light
Turn signal/hazard indicator lights
Engine oil pressure warning light
Cruise main switch indicator light
Vehicle Dynamic Control (VDC) off indicator
light
Intelligent Key warning light*
Front passenger air bag status light
*: if so equipped
CHECKING BULBSWith all doors closed, apply the parking brake
and push the ignition switch to the ON position
without starting the engine. The following lights
will come on (if so equipped):
,
or
,
,
,
,
,
The following lights come on briefly and then go
off (if so equipped):
,
or
,
,
,
,
,
,
If any light does not come on, it may indicate a
burned-out bulb or an open circuit in the
electrical system. Have the system checked by
a NISSAN dealer.
Some indicators and warnings are also dis-
played on the dot matrix crystal display on the
speedometer. (See “DOT MATRIX LIQUID
CRYSTAL DISPLAY” later in this section.)
WARNING LIGHTS
All-Wheel Drive (AWD) warning
light (AWD models)
The light comes on when the ignition switch is
pushed to ON. It turns off soon after the engine
is started.
If the AWD system malfunctions, or the diameter
of the front and the rear wheels are different, the
warning light will either remain illuminated or
WARNING/INDICATOR LIGHTS AND
AUDIBLE REMINDERS2-10
Instruments and controls
Page 88 of 444
Black plate (84,1)
Model "Z51-D" EDITED: 2008/ 6/ 26
emission control system and/or CVT mal-
function has been detected. Check the fuel-
filler cap. If the fuel-filler cap is loose or
missing, tighten or install the cap and
continue to drive the vehicle. The
light
should turn off after a few driving trips. If the
light does not turn off after a few
driving trips, have the vehicle inspected by a
NISSAN dealer. You do not need to have
your vehicle towed to the dealer.
.Malfunction indicator light blinking — An
engine misfire has been detected which may
damage the emission control system.
To reduce or avoid emission control system
damage:
a) Do not drive at speeds above 45 MPH
(72 km/h) .
b) Avoid hard acceleration or deceleration.
c) Avoid steep uphill grades.
d) If possible, reduce the amount of cargo
being hauled or towed.
The malfunction indicator light may stop
blinking and remain on.
Have the vehicle inspected by a NISSAN
dealer. You do not need to have your vehicle
towed to the dealer.
CAUTION
Continued vehicle operation without
having the emission control system
and/or CVT system checked and re-
paired as necessary could lead to poor
driveability, reduced fuel economy, and
possible damage to the emission con-
trol system.
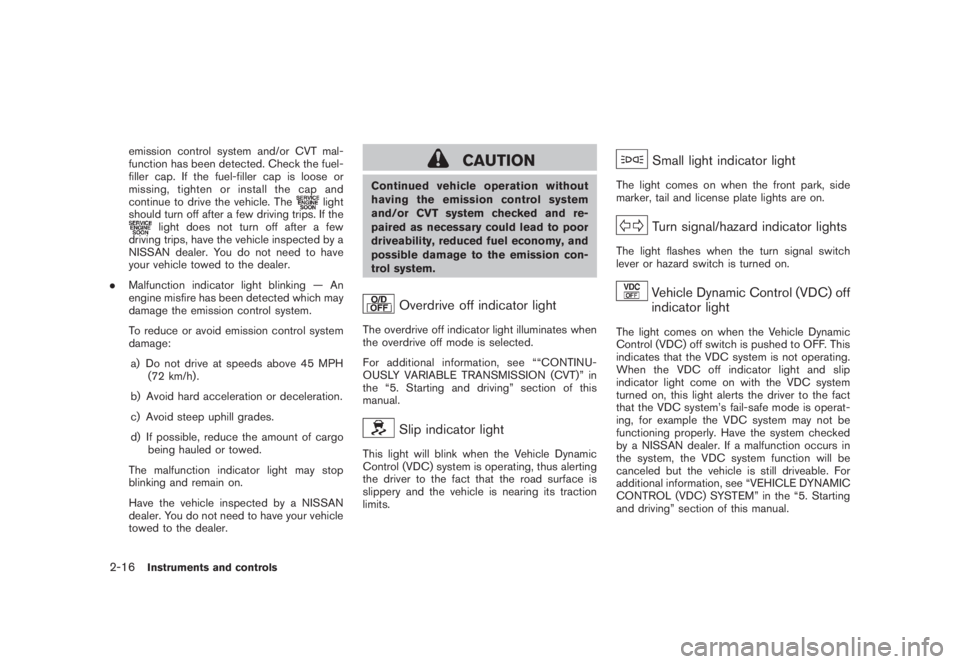
Overdrive off indicator light
The overdrive off indicator light illuminates when
the overdrive off mode is selected.
For additional information, see ““CONTINU-
OUSLY VARIABLE TRANSMISSION (CVT)” in
the “5. Starting and driving” section of this
manual.
Slip indicator light
This light will blink when the Vehicle Dynamic
Control (VDC) system is operating, thus alerting
the driver to the fact that the road surface is
slippery and the vehicle is nearing its traction
limits.
Small light indicator light
The light comes on when the front park, side
marker, tail and license plate lights are on.
Turn signal/hazard indicator lights
The light flashes when the turn signal switch
lever or hazard switch is turned on.
Vehicle Dynamic Control (VDC) off
indicator light
The light comes on when the Vehicle Dynamic
Control (VDC) off switch is pushed to OFF. This
indicates that the VDC system is not operating.
When the VDC off indicator light and slip
indicator light come on with the VDC system
turned on, this light alerts the driver to the fact
that the VDC system’s fail-safe mode is operat-
ing, for example the VDC system may not be
functioning properly. Have the system checked
by a NISSAN dealer. If a malfunction occurs in
the system, the VDC system function will be
canceled but the vehicle is still driveable. For
additional information, see “VEHICLE DYNAMIC
CONTROL (VDC) SYSTEM” in the “5. Starting
and driving” section of this manual.
2-16
Instruments and controls
Page 104 of 444
Black plate (100,1)
Model "Z51-D" EDITED: 2008/ 6/ 26
XENON HEADLIGHTS (if so equipped)
WARNINGHIGH VOLTAGE
.When xenon headlights are on, they
produce a high voltage. To prevent
an electric shock, never attempt to
modify or disassemble. Always have
your xenon headlights replaced at a
NISSAN dealer.
.Xenon headlights provide consider-
ably more light than conventional
headlights. If they are not correctly
aimed, they might temporarily blind
an oncoming driver or the driver
ahead of you and cause a serious
accident. If headlights are not aimed
correctly, immediately take your ve-
hicle to a NISSAN dealer and have
the headlights adjusted correctly.
When the xenon headlight is initially turned on,
its brightness or color varies slightly. However,
the color and brightness will soon stabilize.
.The life of xenon headlights will be
shortened by frequent on-off opera-
tion. It is generally desirable not to turnoff the headlights for short intervals
(for example, when the vehicle stops at
a traffic signal) . Even when the daytime
running lights are active (Canada only) ,
the xenon headlights do not turn on.
This way the life of the xenon head-
lights is not reduced.
.If the xenon headlight bulb is close to
burning out, the brightness will drasti-
cally decrease, the light will start
blinking, or the color of the light will
become reddish. If one or more of the
above signs appear, contact a NISSAN
dealer.
See “Headlight aiming control” later in this
section for information about adjusting the light
axis.
SIC3668
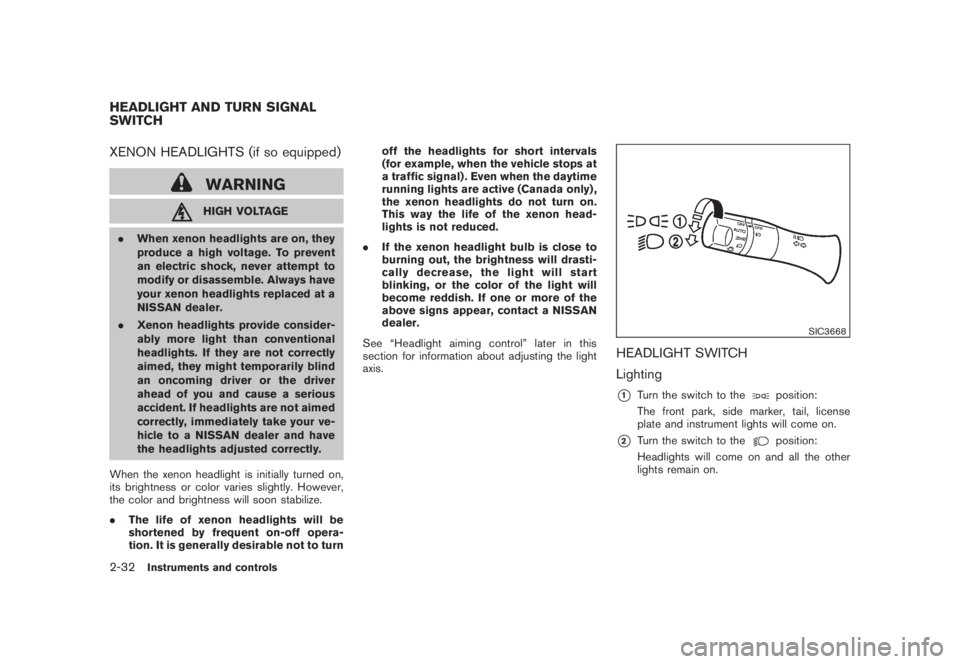
HEADLIGHT SWITCH
Lighting*1
Turn the switch to the
position:
The front park, side marker, tail, license
plate and instrument lights will come on.
*2
Turn the switch to the
position:
Headlights will come on and all the other
lights remain on.
HEADLIGHT AND TURN SIGNAL
SWITCH2-32
Instruments and controls
Page 108 of 444
Black plate (104,1)
Model "Z51-D" EDITED: 2008/ 6/ 26
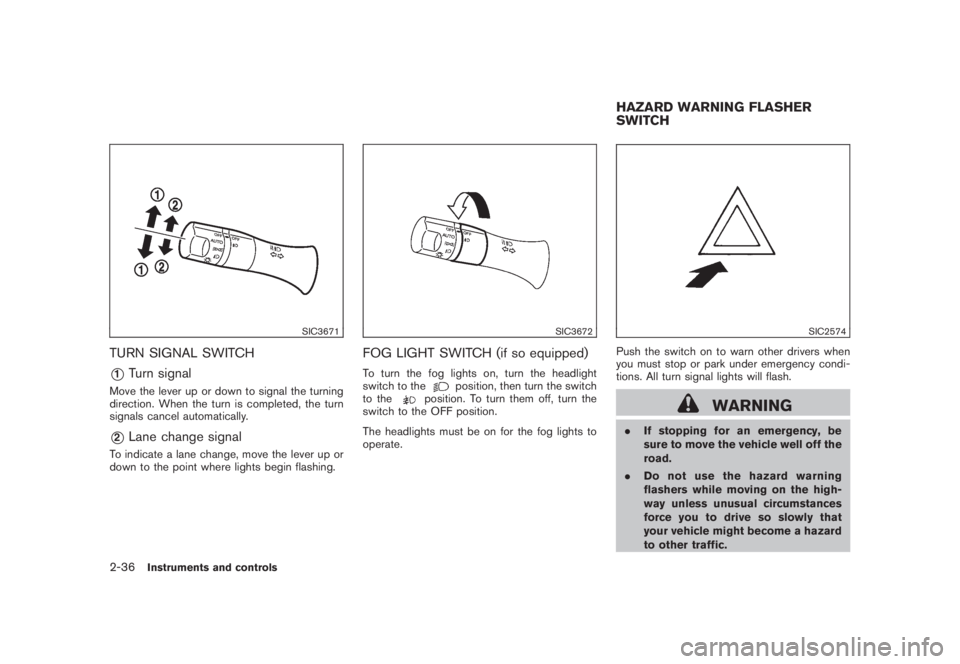
SIC3671
TURN SIGNAL SWITCH*1
Turn signal
Move the lever up or down to signal the turning
direction. When the turn is completed, the turn
signals cancel automatically.*2
Lane change signal
To indicate a lane change, move the lever up or
down to the point where lights begin flashing.
SIC3672
FOG LIGHT SWITCH (if so equipped)To turn the fog lights on, turn the headlight
switch to the
position, then turn the switch
to the
position. To turn them off, turn the
switch to the OFF position.
The headlights must be on for the fog lights to
operate.
SIC2574
Push the switch on to warn other drivers when
you must stop or park under emergency condi-
tions. All turn signal lights will flash.
WARNING
.If stopping for an emergency, be
sure to move the vehicle well off the
road.
.Do not use the hazard warning
flashers while moving on the high-
way unless unusual circumstances
force you to drive so slowly that
your vehicle might become a hazard
to other traffic.HAZARD WARNING FLASHER
SWITCH
2-36
Instruments and controls
Page 109 of 444
Black plate (105,1)
Model "Z51-D" EDITED: 2008/ 6/ 26
.Turn signals do not work when the
hazard warning flasher lights are
on.
The flasher can be actuated with the ignition
switch in any position.
Some state laws may prohibit the use of
the hazard warning flasher switch while
driving.
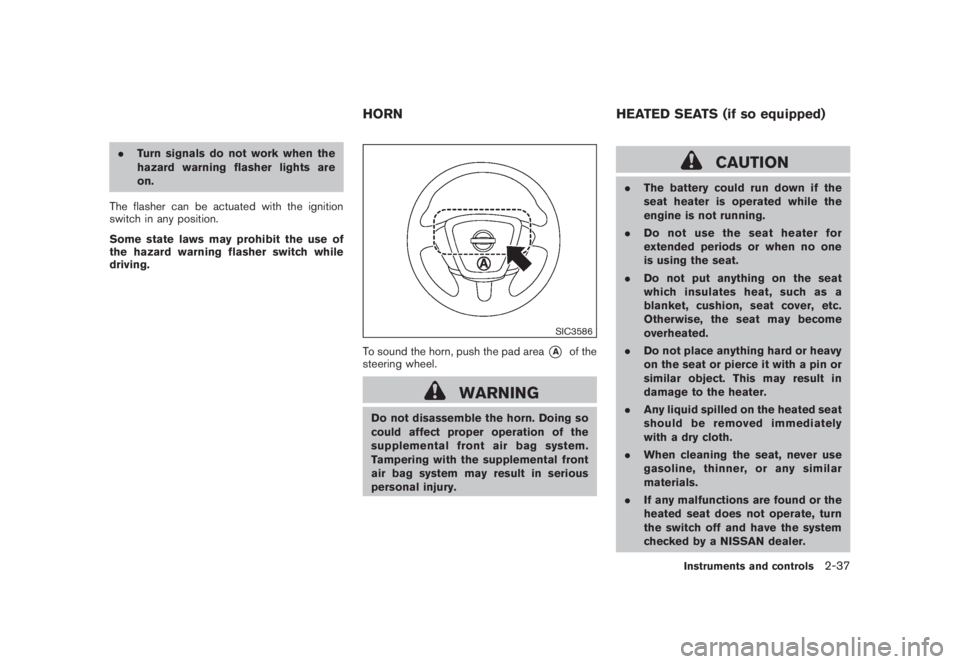
SIC3586
To sound the horn, push the pad area
*A
of the
steering wheel.
WARNING
Do not disassemble the horn. Doing so
could affect proper operation of the
supplemental front air bag system.
Tampering with the supplemental front
air bag system may result in serious
personal injury.
CAUTION
.The battery could run down if the
seat heater is operated while the
engine is not running.
.Do not use the seat heater for
extended periods or when no one
is using the seat.
.Do not put anything on the seat
which insulates heat, such as a
blanket, cushion, seat cover, etc.
Otherwise, the seat may become
overheated.
.Do not place anything hard or heavy
on the seat or pierce it with a pin or
similar object. This may result in
damage to the heater.
.Any liquid spilled on the heated seat
should be removed immediately
with a dry cloth.
.When cleaning the seat, never use
gasoline, thinner, or any similar
materials.
.If any malfunctions are found or the
heated seat does not operate, turn
the switch off and have the system
checked by a NISSAN dealer.
HORN HEATED SEATS (if so equipped)
Instruments and controls
2-37
Page 130 of 444
Black plate (126,1)
Model "Z51-D" EDITED: 2008/ 6/ 26
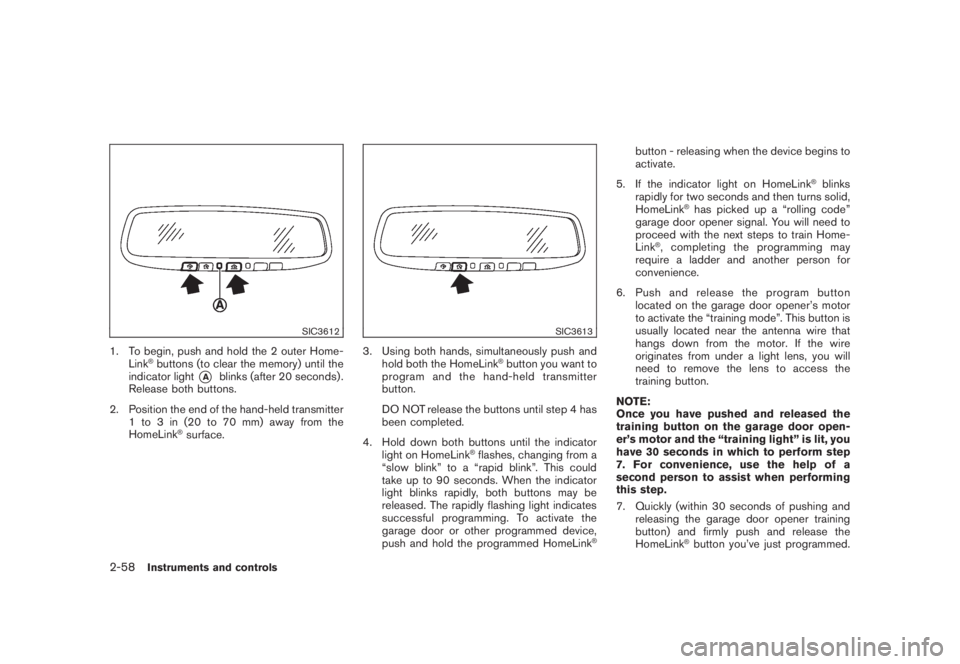
SIC3612
1. To begin, push and hold the 2 outer Home-
Link
®buttons (to clear the memory) until the
indicator light
*A
blinks (after 20 seconds) .
Release both buttons.
2. Position the end of the hand-held transmitter
1 to 3 in (20 to 70 mm) away from the
HomeLink
®surface.
SIC3613
3. Using both hands, simultaneously push and
hold both the HomeLink
®button you want to
program and the hand-held transmitter
button.
DO NOT release the buttons until step 4 has
been completed.
4. Hold down both buttons until the indicator
light on HomeLink
®flashes, changing from a
“slow blink” to a “rapid blink”. This could
take up to 90 seconds. When the indicator
light blinks rapidly, both buttons may be
released. The rapidly flashing light indicates
successful programming. To activate the
garage door or other programmed device,
push and hold the programmed HomeLink
®
button - releasing when the device begins to
activate.
5. If the indicator light on HomeLink
®blinks
rapidly for two seconds and then turns solid,
HomeLink
®has picked up a “rolling code”
garage door opener signal. You will need to
proceed with the next steps to train Home-
Link
®, completing the programming may
require a ladder and another person for
convenience.
6. Push and release the program button
located on the garage door opener’s motor
to activate the “training mode”. This button is
usually located near the antenna wire that
hangs down from the motor. If the wire
originates from under a light lens, you will
need to remove the lens to access the
training button.
NOTE:
Once you have pushed and released the
training button on the garage door open-
er’s motor and the “training light” is lit, you
have 30 seconds in which to perform step
7. For convenience, use the help of a
second person to assist when performing
this step.
7. Quickly (within 30 seconds of pushing and
releasing the garage door opener training
button) and firmly push and release the
HomeLink
®button you’ve just programmed.
2-58
Instruments and controls