battery NISSAN MURANO 2009 Owner´s Manual
[x] Cancel search | Manufacturer: NISSAN, Model Year: 2009, Model line: MURANO, Model: NISSAN MURANO 2009Pages: 443, PDF Size: 3.95 MB
Page 14 of 443
Black plate (11,1)
Model "Z51-D" EDITED: 2007/ 10/ 2
SDI2172
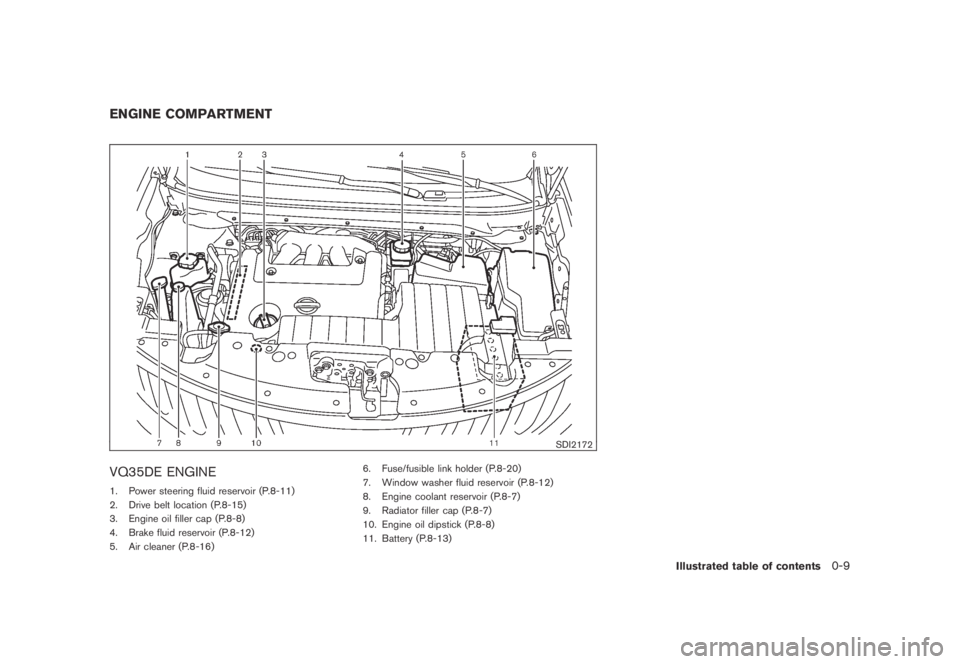
VQ35DE ENGINE
1. Power steering fluid reservoir (P.8-11)
2. Drive belt location (P.8-15)
3. Engine oil filler cap (P.8-8)
4. Brake fluid reservoir (P.8-12)
5. Air cleaner (P.8-16)6. Fuse/fusible link holder (P.8-20)
7. Window washer fluid reservoir (P.8-12)
8. Engine coolant reservoir (P.8-7)
9. Radiator filler cap (P.8-7)
10. Engine oil dipstick (P.8-8)
11. Battery (P.8-13)
ENGINE COMPARTMENT
Illustrated table of contents0-9
Page 18 of 443
Black plate (16,1)
Model "Z51-D" EDITED: 2007/ 10/ 2
SSS0793
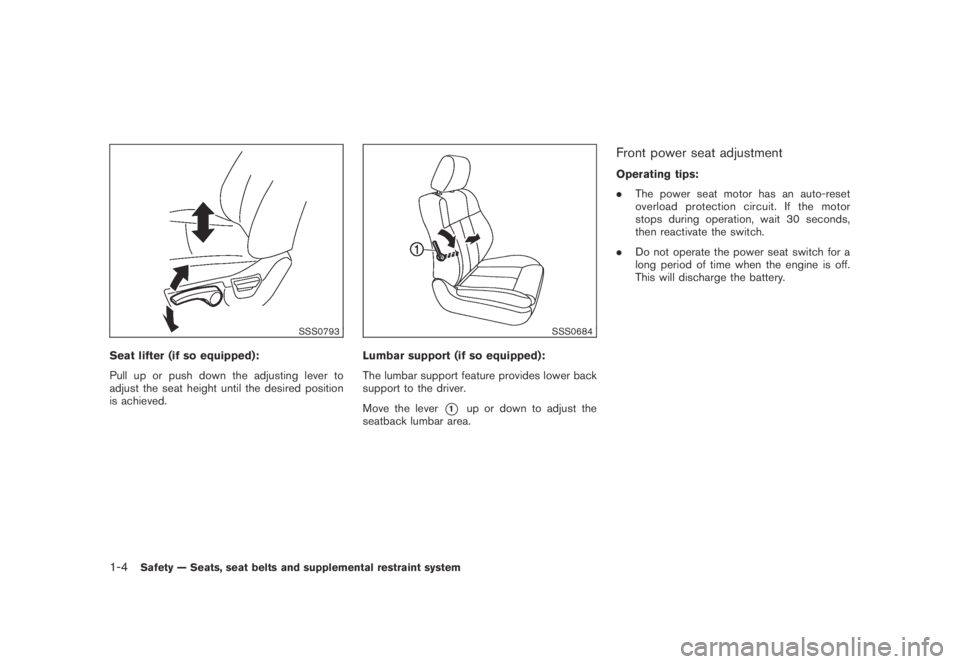
Seat lifter (if so equipped):
Pull up or push down the adjusting lever to
adjust the seat height until the desired position
is achieved.
SSS0684
Lumbar support (if so equipped):
The lumbar support feature provides lower back
support to the driver.
Move the lever
*1up or down to adjust the
seatback lumbar area.
Front power seat adjustment
Operating tips:
.The power seat motor has an auto-reset
overload protection circuit. If the motor
stops during operation, wait 30 seconds,
then reactivate the switch.
.Do not operate the power seat switch for a
long period of time when the engine is off.
This will discharge the battery.
1-4Safety — Seats, seat belts and supplemental restraint system
Page 89 of 443
Black plate (87,1)
Model "Z51-D" EDITED: 2007/ 10/ 2
If this indicator appears, insert the key into the
key port in the correct direction. (See “PUSH-
BUTTON IGNITION SWITCH” in the “5. Start-
ing and driving” section.)
4. Key removal indicator
This indicator appears when the driver’s door is
opened with the ignition switch in the OFF or
LOCK position and the key placed in the key
port. A key reminder chime also sounds.
If this indicator appears, remove the key from the
key port and take it with you when leaving the
vehicle.
5. NO KEY warning
This warning appears in either of the following
conditions.
No key inside the vehicle:
With Intelligent Key system:
The warning appears when the door is closed
with the key left outside the vehicle and the
ignition switch in the ACC or ON position. Make
sure that the key is inside the vehicle.
Without Intelligent Key system:
The warning appears when the key is removed
from the key port and the ignition switch is in the
ACC or ON position. Make sure that the key is
inserted into the key port.Unregistered key:
The warning appears when the ignition switch is
pushed from the LOCK position and the key
cannot be recognized by the system. You cannot
start the engine with an unregistered key. Use
the registered key.
See “INTELLIGENT KEY SYSTEM” in the “3.
Pre-driving checks and adjustments” section for
more details.
6. SHIFT “P” warning
This warning appears when the ignition switch is
pushed to stop the engine with the selector lever
in any position except the P (Park) position.
If this warning appears, move the selector lever
to the P (Park) position or push the ignition
switch to the ON position.
An inside warning chime will also sound. (See
“INTELLIGENT KEY SYSTEM” in the “3. Pre-
driving checks and adjustments” section.)
7. “PUSH” warning
This warning appears when the selector lever is
moved to the P (Park) position with the ignition
switch in the ACC position after the SHIFT “P”
warning appears.
To push the ignition switch to the OFF position,
perform the following procedure:SHIFT “P” warning?(Move the selector
lever to “P”)?PUSH warning?(Push
the ignition switch?ignition switch position
is turned to ON)?PUSH warning?
(Push the ignition switch?ignition switch
position is turned to OFF)
8. Key battery discharge indicator
This indicator appears when the key battery is
running out of power.
If this indicator appears, replace the battery with
a new one. (See “BATTERY REPLACEMENT” in
the “8. Maintenance and do-it-yourself” section.)
9. Parking brake release warning
This warning appears when the vehicle speed is
above 4 MPH (7 km/h) and the parking brake is
applied.
10. Low fuel warning
This warning appears when the fuel level in the
tank is getting low. Refuel as soon as it is
convenient, preferably before the fuel gauge
reaches the empty (E) position.
There is a small reserve of fuel remaining
in the tank when the fuel gauge reaches
the empty (E) position.
Instruments and controls2-19
Page 104 of 443
Black plate (102,1)
Model "Z51-D" EDITED: 2007/ 10/ 2
SIC3670
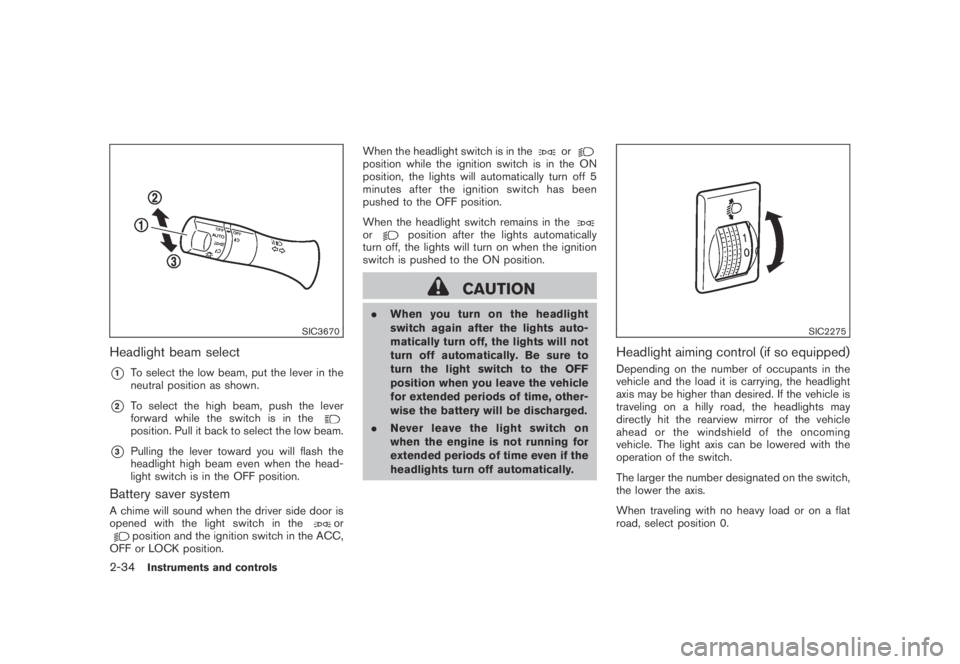
Headlight beam select
*1To select the low beam, put the lever in the
neutral position as shown.
*2To select the high beam, push the lever
forward while the switch is in the
position. Pull it back to select the low beam.
*3Pulling the lever toward you will flash the
headlight high beam even when the head-
light switch is in the OFF position.
Battery saver system
A chime will sound when the driver side door is
opened with the light switch in theorposition and the ignition switch in the ACC,
OFF or LOCK position.When the headlight switch is in the
orposition while the ignition switch is in the ON
position, the lights will automatically turn off 5
minutesaftertheignitionswitchhasbeen
pushed to the OFF position.
When the headlight switch remains in the
orposition after the lights automatically
turn off, the lights will turn on when the ignition
switch is pushed to the ON position.
CAUTION
.When you turn on the headlight
switch again after the lights auto-
matically turn off, the lights will not
turn off automatically. Be sure to
turn the light switch to the OFF
position when you leave the vehicle
for extended periods of time, other-
wise the battery will be discharged.
.Never leave the light switch on
when the engine is not running for
extended periods of time even if the
headlights turn off automatically.
SIC2275
Headlight aiming control (if so equipped)
Depending on the number of occupants in the
vehicle and the load it is carrying, the headlight
axis may be higher than desired. If the vehicle is
traveling on a hilly road, the headlights may
directly hit the rearview mirror of the vehicle
ahead or the windshield of the oncoming
vehicle. The light axis can be lowered with the
operation of the switch.
The larger the number designated on the switch,
the lower the axis.
When traveling with no heavy load or on a flat
road, select position 0.
2-34Instruments and controls
Page 107 of 443
Black plate (105,1)
Model "Z51-D" EDITED: 2007/ 10/ 2
.Turn signals do not work when the
hazard warning flasher lights are
on.
The flasher can be actuated with the ignition
switch in any position.
Some state laws may prohibit the use of
the hazard warning flasher switch while
driving.
SIC3586
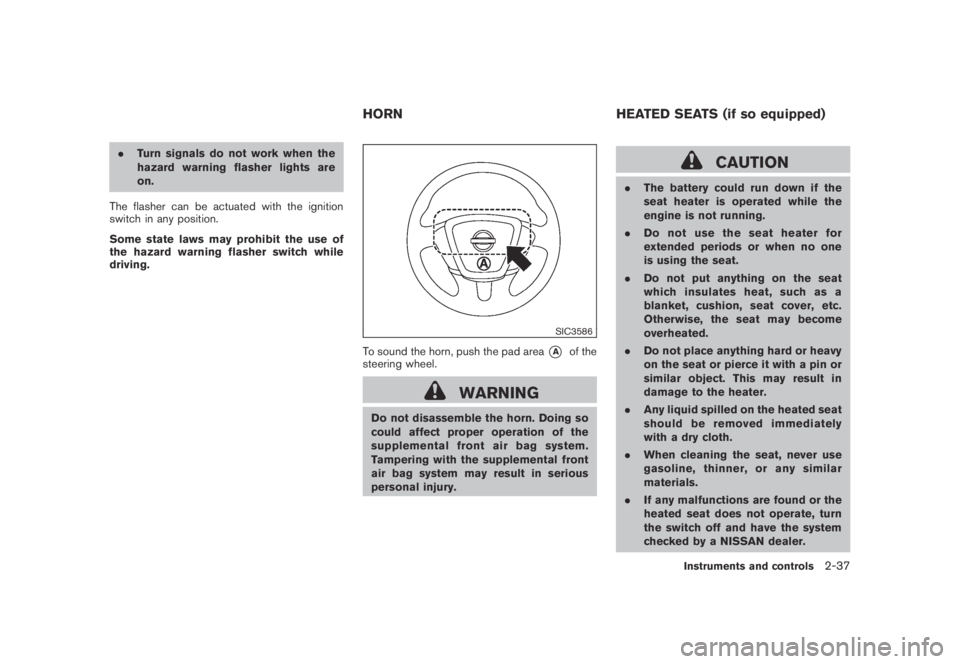
To sound the horn, push the pad area*Aof the
steering wheel.
WARNING
Do not disassemble the horn. Doing so
could affect proper operation of the
supplemental front air bag system.
Tampering with the supplemental front
air bag system may result in serious
personal injury.
CAUTION
.The battery could run down if the
seat heater is operated while the
engine is not running.
.Do not use the seat heater for
extended periods or when no one
is using the seat.
.Do not put anything on the seat
which insulates heat, such as a
blanket, cushion, seat cover, etc.
Otherwise, the seat may become
overheated.
.Do not place anything hard or heavy
on the seat or pierce it with a pin or
similar object. This may result in
damage to the heater.
.Any liquid spilled on the heated seat
should be removed immediately
with a dry cloth.
.When cleaning the seat, never use
gasoline, thinner, or any similar
materials.
.If any malfunctions are found or the
heated seat does not operate, turn
the switch off and have the system
checked by a NISSAN dealer.
HORN HEATED SEATS (if so equipped)
Instruments and controls2-37
Page 110 of 443
Black plate (108,1)
Model "Z51-D" EDITED: 2007/ 10/ 2
SIC3652Console box — Type A
SIC3653Console box — Type B
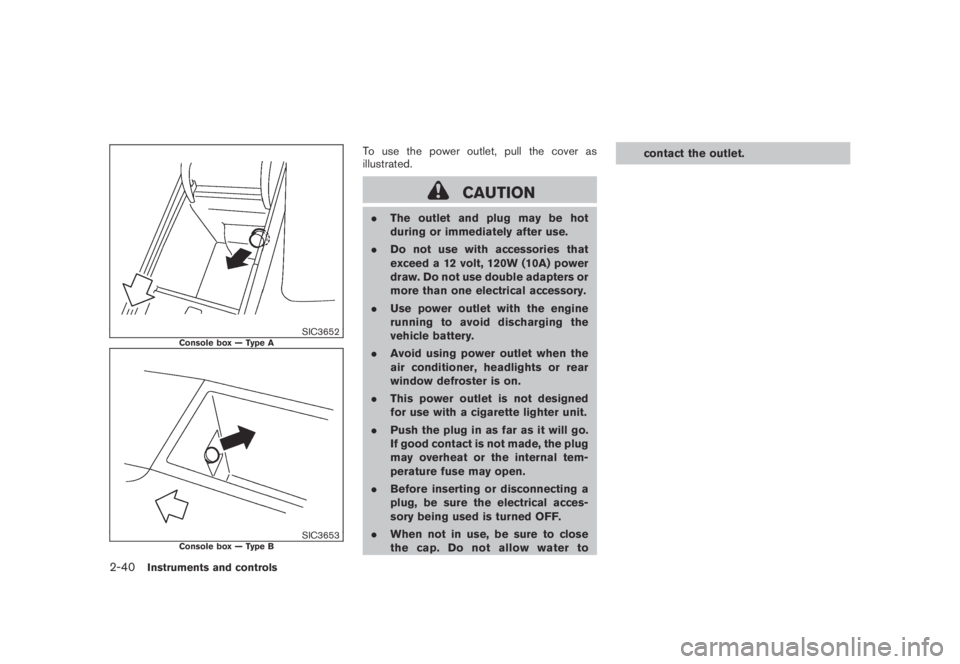
To use the power outlet, pull the cover as
illustrated.
CAUTION
.The outlet and plug may be hot
during or immediately after use.
.Do not use with accessories that
exceed a 12 volt, 120W (10A) power
draw. Do not use double adapters or
more than one electrical accessory.
.Use power outlet with the engine
running to avoid discharging the
vehicle battery.
.Avoid using power outlet when the
air conditioner, headlights or rear
window defroster is on.
.This power outlet is not designed
for use with a cigarette lighter unit.
.Push the plug in as far as it will go.
If good contact is not made, the plug
may overheat or the internal tem-
perature fuse may open.
.Before inserting or disconnecting a
plug, be sure the electrical acces-
sory being used is turned OFF.
.When not in use, be sure to close
the cap. Do not allow water tocontact the outlet.
2-40Instruments and controls
Page 125 of 443
Black plate (123,1)
Model "Z51-D" EDITED: 2007/ 10/ 2
— remain on for about 15 seconds.
.doors are unlocked by pushing the UN-
LOCK button on the Intelligent Key or door
handle request switch with the ignition
switch in the LOCK position
— remain on for about 15 seconds.
.any door is opened and then closed with the
ignition switch in the LOCK position
— remain on for about 15 seconds.
.any door is opened with the ignition switch
in the ACC or ON position
— remain on while the door is opened.
When the door is closed, the lights go off.
The lights will also turn off after 30
minutes when the lights remain illumi-
nated after the ignition switch has been
pushed to the OFF or LOCK position to
prevent the battery from becoming dis-
charged.
When the auto interior illumination is set to the
OFF position (see “VEHICLE INFORMATION
AND SETTINGS” in the “4. Monitor, heater, air
conditioner, audio, phone and voice recognition
systems” section) , the lights will illuminate under
the following condition:
.any door is opened with the ignition switch
in any position— remain on while the door is opened.
When the door is closed, the lights go off.
OFF position
When the switch is in the OFF position*3, the
lights will not illuminate, regardless of the
condition.
CAUTION
Do not use for extended periods of time
with the engine stopped. This could
result in a discharged battery.
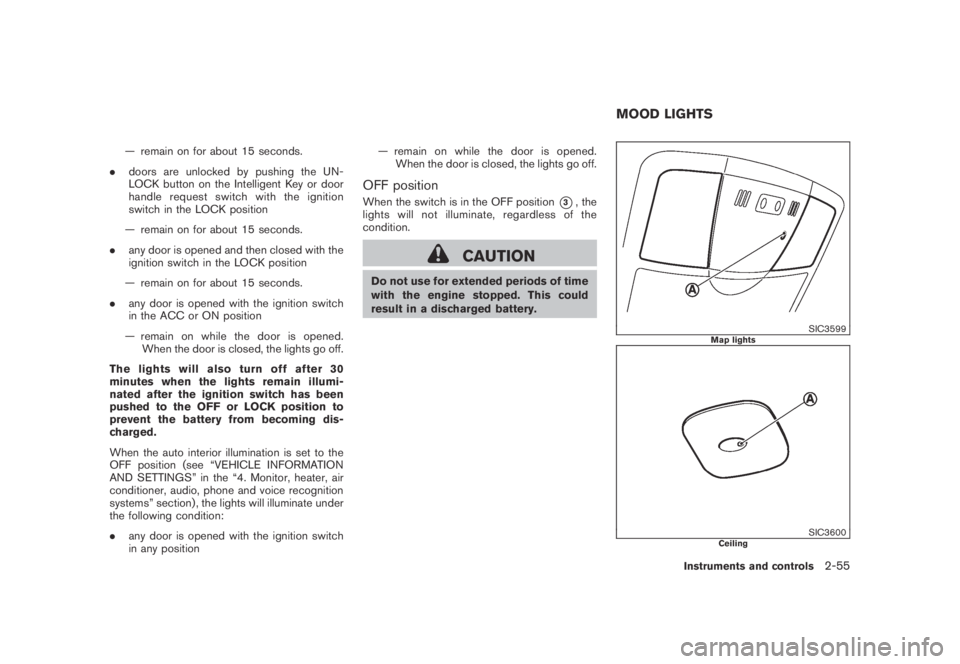
SIC3599Map lights
SIC3600Ceiling
MOOD LIGHTS
Instruments and controls2-55
Page 126 of 443
Black plate (124,1)
Model "Z51-D" EDITED: 2007/ 10/ 2
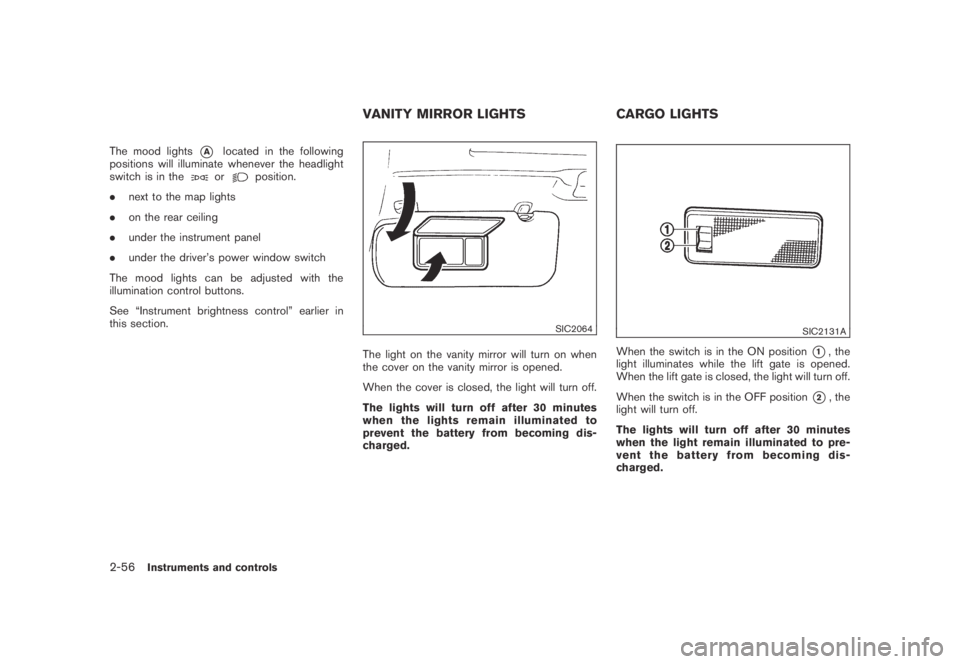
The mood lights*Alocated in the following
positions will illuminate whenever the headlight
switch is in the
orposition.
.next to the map lights
.on the rear ceiling
.under the instrument panel
.under the driver’s power window switch
The mood lights can be adjusted with the
illumination control buttons.
See “Instrument brightness control” earlier in
this section.
SIC2064
The light on the vanity mirror will turn on when
the cover on the vanity mirror is opened.
When the cover is closed, the light will turn off.
The lights will turn off after 30 minutes
when the lights remain illuminated to
prevent the battery from becoming dis-
charged.
SIC2131A
When the switch is in the ON position*1, the
light illuminates while the lift gate is opened.
When the lift gate is closed, the light will turn off.
When the switch is in the OFF position
*2, the
light will turn off.
The lights will turn off after 30 minutes
when the light remain illuminated to pre-
vent the battery from becoming dis-
charged.
VANITY MIRROR LIGHTS CARGO LIGHTS
2-56Instruments and controls
Page 127 of 443
Black plate (125,1)
Model "Z51-D" EDITED: 2007/ 10/ 2
HomeLink®Universal Transceiver provides a
convenient way to consolidate the functions of
up to three individual hand-held transmitters into
one built-in device.
HomeLink
®Universal Transceiver:
.Will operate most Radio Frequency (RF)
devices such as garage doors, gates, home
and office lighting, entry door locks and
security systems.
.Is powered by your vehicle’s battery. No
separate batteries are required. If the
vehicle’s battery is discharged or is dis-
connected, HomeLink
®will retain all pro-
gramming.
Once HomeLink
®Universal Transceiver is
programmed, retain the original transmit-
ter for future programming procedures
(Example: new vehicle purchases) . Upon
sale of the vehicle, the programmed
HomeLink
®Universal Transceiver buttons
should be erased for security purposes.
For additional information, see “PRO-
GRAMMING HomeLink
®” later in this sec-
tion.
WARNING
.Do not use HomeLink®Universal
Transceiver with any garage door
opener that lacks safety stop andreverse features as required by
federal safety standards. (These
standards became effective for
opener models manufactured after
April 1, 1982.) A garage door opener
which cannot detect an object in the
path of a closing garage door and
then automatically stop and reverse,
does not meet current federal safety
standards. Using a garage door
opener without these features in-
creases the risk of serious injury or
death.
.During programming procedure,
your garage door or security gate
may open or close. Make sure that
people and objects are clear of the
garage door, gate, etc. that you are
programming.
.Your vehicle’s engine should be
turned off while programming
HomeLink
®Universal Transceiver.
PROGRAMMING HomeLink®
To program your HomeLink®Transceiver to
operate a garage door, gate, or entry door
opener, home or office lighting, you need to be
at the same location as the device. Note:
Garage door openers (manufactured after1996) have “rolling code protection”. To pro-
gram a garage door opener equipped with
“rolling code protection”; you will need to use
a ladder to get up to the garage door opener
motor to be able to access the “smart or learn”
program button.
HomeLink®UNIVERSAL
TRANSCEIVER (if so equipped)
Instruments and controls2-57
Page 129 of 443
Black plate (127,1)
Model "Z51-D" EDITED: 2007/ 10/ 2
Push and release the HomeLink®button up
to three times to complete the training.
8. Your HomeLink
®button should now be
programmed. To program the remaining
HomeLink
®buttons for additional door or
gate openers, follow steps 2 through 8 only.
NOTE:
Do not repeat step 1 unless you want to
“clear” all previously programmed Home-
Link
®buttons.
If you have any questions or are having difficulty
programming your HomeLink
®buttons, please
refer to the HomeLink®web site at: www.
homelink.com or call 1-800-355-3515.
PROGRAMMING HomeLink®FOR CA-
NADIAN CUSTOMERS
Prior to 1992, D.O.C. regulations required
hand-held transmitters to stop transmitting after
2 seconds. To program your hand-held trans-
mitter to HomeLink
®, continue to push and hold
the HomeLink®button (note steps 2 through 4
under “Programming HomeLink®”) while you
push and re-push (“cycle”) your hand-held
transmitter every 2 seconds until the indicator
light flashes rapidly (indicating successful pro-
gramming) .
NOTE:
If programming a garage door opener, etc.,it is advised to unplug the device during
the “cycling” process to prevent possible
damage to the garage door opener com-
ponents.
OPERATING THE HomeLink®UNIVER-
SAL TRANSCEIVER
HomeLink®Universal Transceiver (once pro-
grammed) may now be used to activate the
garage door, etc. To operate, simply push the
appropriate programmed HomeLink
®Universal
Transceiver button. The red indicator light will
illuminate while the signal is being transmitted.
PROGRAMMING TROUBLE-DIAGNO-
SIS
If HomeLink®does not quickly learn the hand-
held transmitter information:
.replace the hand-held transmitter batteries
with new batteries.
.position the hand-held transmitter with its
battery area facing away from the Home-
Link
®surface.
.push and hold both the HomeLink
®and
hand-held transmitter buttons without inter-
ruption.
.position the hand-held transmitter 2 to 5 in
(50 to 127 mm) away from the HomeLink
®
surface. Hold the transmitter in that positionfor up to 15 seconds. If HomeLink
®is not
programmed within that time, try holding the
transmitter in another position - keeping the
indicator light in view at all times.
If you continue to have programming difficulties,
please contact the NISSAN Consumer Affairs
Department. The phone numbers are located in
the Foreword of this Owner’s Manual.
CLEARING THE PROGRAMMED IN-
FORMATION
Individual buttons cannot be cleared, however to
clear all programming, push and hold the two
outside buttons and release when the indicator
light begins to flash (in approximately 20
seconds) .
REPROGRAMMING A SINGLE Home-
Link®BUTTON
To reprogram a HomeLink®Universal Transcei-
ver button, complete the following.
1. PushandholdthedesiredHomeLink
®
button.Do notrelease the button until step
4 has been completed.
2. When the indicator light begins to flash
slowly (after 20 seconds) , position the
hand-held transmitter 2 to 5 in (50 to 127
mm) away from the HomeLink
®surface.
3. Push and hold the hand-held transmitter
Instruments and controls2-59