key NISSAN MURANO 2017 3.G Quick Reference Guide
[x] Cancel search | Manufacturer: NISSAN, Model Year: 2017, Model line: MURANO, Model: NISSAN MURANO 2017 3.GPages: 38, PDF Size: 6.75 MB
Page 14 of 38
13
12
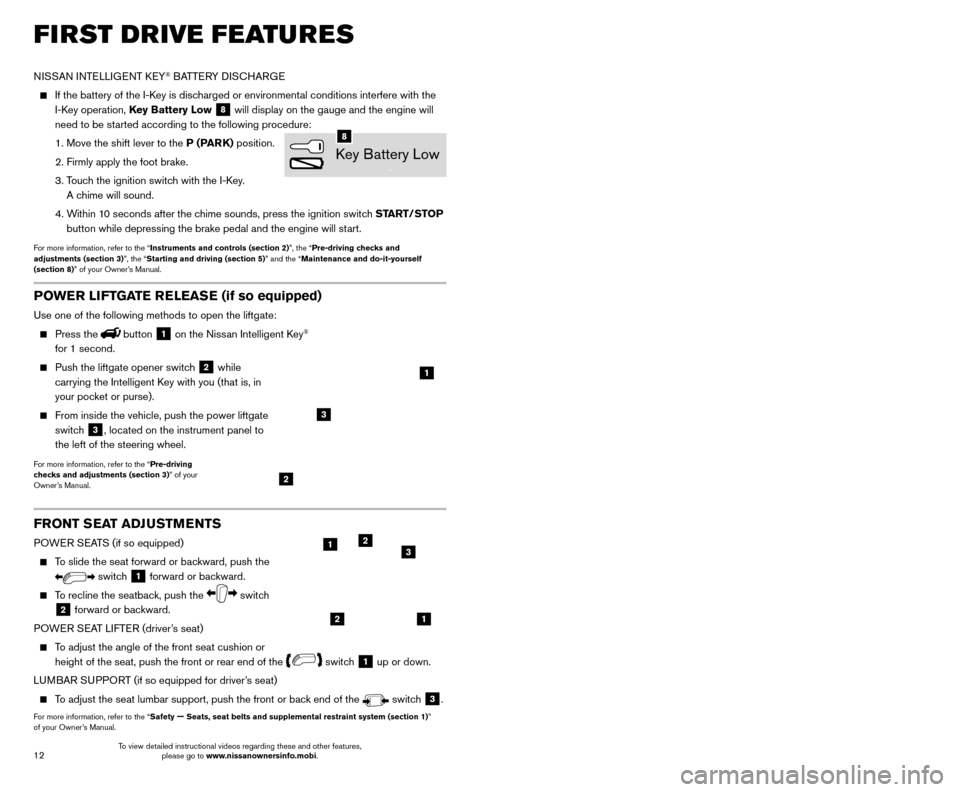
FRONT SEAT ADJUSTMENTS
POWER SEATS (if so equipped)
To slide the seat forward or backward, push the
switch 1 forward or backward.
To recline the seatback, push the switch
2 forward or backward.
POWER SEAT LIFTER (driver’s seat)
To adjust the angle of the front seat cushion or height of the seat, push the front or rear end of the
switch 1 up or down.
LUMBAR SUPPORT (if so equipped for driver’s seat)
To adjust the seat lumbar support, push the front or back end of the switch 3.
For more information, refer to the “Safety — Seats, seat belts and supplemental restraint system (sectio\
n 1)”
of your Owner’s Manual.
AUTOMATIC DRIVE POSITIONER (if so equipped)
Automatic Drive P ositioner provides two methods for storing the driver’s seat, steering
column (if so equipped) and outside mirror positions. Once enabled, th\
e Key-Linked
System automatically retains the driver’s last positions for that specific Intelligent Key
when the ignition switch is turned from ON to
OFF. The Automatic Drive Positioner Switch
can store two additional positions which are
independent of the Key-Linked System.
KEY-LINKED SYSTEM
Follow the process below to set up Key-Link:
•
Unloc
k the vehicle with the desired
Intelligent Key while the ignition
switch is in the OFF position.
•
Place the ignition switc
h in the ON position.
•
In the vehicle information display
,
navigate to the Settings menu and select
“Key-Linked Settings”
1.
•
In the K
ey-Linked Settings menu, press the OK
button on the steering wheel to turn the system ON or OFF
2.
Once the system is on, the driver ’s seat, the
outside mirrors and the steering column
(if so equipped) positions are linked to the
Intelligent Key every time when the ignition is
turned from ON to OFF .
Follow the same procedure if you want to link a
2nd, 3rd or 4th Intelligent Key.
AUTOMATIC DRIVE POSITIONER SWITCHES
In addition to the K ey-Link feature, two additional driver preferences can be saved
using the memory switches 1
3 or 2 4.
Follow this procedure to set the memory positions:
•
Place the ignition switc
h to the ON or ACC position. The vehicle should be stopped
while setting the memory.
•
Adjust the driver
’s seat, steering column (if so equipped) and outside mirrors to the
desired positions using the adjustment switches for each feature.
•
Push the
SET switch
5, and within 5 seconds, push the memory
switch 1
3 or 2 4.
•
T
he indicator light for the selected switch will illuminate for 5 seconds and a chime
will sound indicating the memory has been successfully stored.
For more information, refer to the “Instruments and controls (section 2)” and the “Pre-driving checks and
adjustments (section 3)” of your Owner’s Manual.
FIRST DRIVE FEATURES
NISSAN INTELLIGENT KEY® BATTERY DISCHARGE
If the battery of the I-K ey is discharged or environmental conditions interfere with the
I-Key operation, Key Battery Low
8 will display on the gauge and the engine will
need to be started according to the following procedure:
1. Move the shift lever to the
P (PARK) position.
2. Firmly apply the foot brake.
3.
T
ouch the ignition switch with the I-Key.
A chime will sound.
4.
W
ithin 10 seconds after the chime sounds, press the ignition switch START/STOP
button while depressing the brake pedal and the engine will start.
For more information, refer to the “Instruments and controls (section 2)”, the “Pre-driving checks and
adjustments (section 3)”, the “Starting and driving (section 5)” and the “Maintenance and do-it-yourself
(section 8)” of your Owner’s Manual.
Key Battery Low
8
21
123
POWER LIFTGATE RELEASE (if so equipped)
Use one of the following methods to open the liftgate:
Press thebutton 1 on the Nissan Intelligent Key®
for 1 second.
Push the liftgate opener switc h 2 while
carrying the Intelligent Key with you (that is, in
your pocket or purse).
From inside the vehicle, push the power liftgate
switc h
3, located on the instrument panel to
the left of the steering wheel.
For more information, refer to the “Pre-driving
checks and adjustments (section 3)” of your
Owner’s Manual.
1
2
3
2
1
34
5
To view detailed instructional videos regarding these and other features, please go to www.nissanownersinfo.mobi. To view detailed instructional videos regarding these and other features,
please go to www.nissanownersinfo.mobi.
Page 15 of 38
13
12
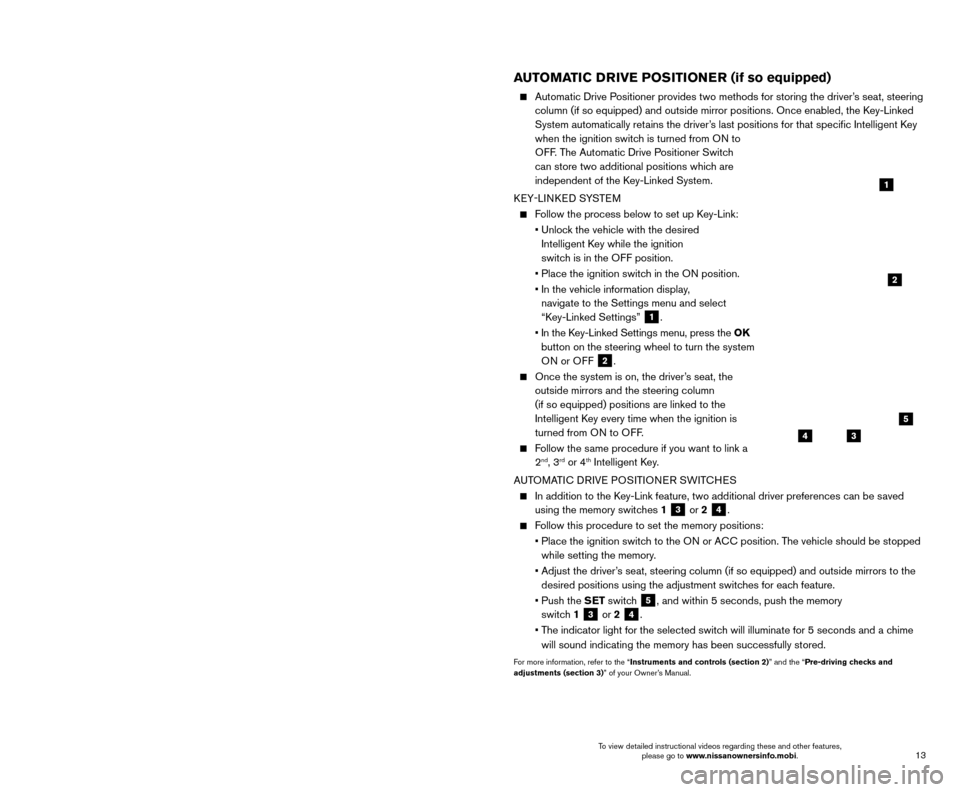
FRONT SEAT ADJUSTMENTS
POWER SEATS (if so equipped)
To slide the seat forward or backward, push the
switch 1 forward or backward.
To recline the seatback, push the switch
2 forward or backward.
POWER SEAT LIFTER (driver’s seat)
To adjust the angle of the front seat cushion or height of the seat, push the front or rear end of the
switch 1 up or down.
LUMBAR SUPPORT (if so equipped for driver’s seat)
To adjust the seat lumbar support, push the front or back end of the switch 3.
For more information, refer to the “Safety — Seats, seat belts and supplemental restraint system (sectio\
n 1)”
of your Owner’s Manual.
AUTOMATIC DRIVE POSITIONER (if so equipped)
Automatic Drive P ositioner provides two methods for storing the driver’s seat, steering
column (if so equipped) and outside mirror positions. Once enabled, th\
e Key-Linked
System automatically retains the driver’s last positions for that specific Intelligent Key
when the ignition switch is turned from ON to
OFF. The Automatic Drive Positioner Switch
can store two additional positions which are
independent of the Key-Linked System.
KEY-LINKED SYSTEM
Follow the process below to set up Key-Link:
•
Unloc
k the vehicle with the desired
Intelligent Key while the ignition
switch is in the OFF position.
•
Place the ignition switc
h in the ON position.
•
In the vehicle information display
,
navigate to the Settings menu and select
“Key-Linked Settings”
1.
•
In the K
ey-Linked Settings menu, press the OK
button on the steering wheel to turn the system ON or OFF
2.
Once the system is on, the driver ’s seat, the
outside mirrors and the steering column
(if so equipped) positions are linked to the
Intelligent Key every time when the ignition is
turned from ON to OFF .
Follow the same procedure if you want to link a
2nd, 3rd or 4th Intelligent Key.
AUTOMATIC DRIVE POSITIONER SWITCHES
In addition to the K ey-Link feature, two additional driver preferences can be saved
using the memory switches 1
3 or 2 4.
Follow this procedure to set the memory positions:
•
Place the ignition switc
h to the ON or ACC position. The vehicle should be stopped
while setting the memory.
•
Adjust the driver
’s seat, steering column (if so equipped) and outside mirrors to the
desired positions using the adjustment switches for each feature.
•
Push the
SET switch
5, and within 5 seconds, push the memory
switch 1
3 or 2 4.
•
T
he indicator light for the selected switch will illuminate for 5 seconds and a chime
will sound indicating the memory has been successfully stored.
For more information, refer to the “Instruments and controls (section 2)” and the “Pre-driving checks and
adjustments (section 3)” of your Owner’s Manual.
FIRST DRIVE FEATURES
NISSAN INTELLIGENT KEY® BATTERY DISCHARGE
If the battery of the I-K ey is discharged or environmental conditions interfere with the
I-Key operation, Key Battery Low
8 will display on the gauge and the engine will
need to be started according to the following procedure:
1. Move the shift lever to the
P (PARK) position.
2. Firmly apply the foot brake.
3.
T
ouch the ignition switch with the I-Key.
A chime will sound.
4.
W
ithin 10 seconds after the chime sounds, press the ignition switch START/STOP
button while depressing the brake pedal and the engine will start.
For more information, refer to the “Instruments and controls (section 2)”, the “Pre-driving checks and
adjustments (section 3)”, the “Starting and driving (section 5)” and the “Maintenance and do-it-yourself
(section 8)” of your Owner’s Manual.
Key Battery Low
8
21
123
POWER LIFTGATE RELEASE (if so equipped)
Use one of the following methods to open the liftgate:
Press thebutton 1 on the Nissan Intelligent Key®
for 1 second.
Push the liftgate opener switc h 2 while
carrying the Intelligent Key with you (that is, in
your pocket or purse).
From inside the vehicle, push the power liftgate
switc h
3, located on the instrument panel to
the left of the steering wheel.
For more information, refer to the “Pre-driving
checks and adjustments (section 3)” of your
Owner’s Manual.
1
2
3
2
1
34
5
To view detailed instructional videos regarding these and other features, please go to www.nissanownersinfo.mobi. To view detailed instructional videos regarding these and other features,
please go to www.nissanownersinfo.mobi.
Page 16 of 38

15
14
FIRST DRIVE FEATURES
OUTSIDE MIRROR CONTROL SWITCH
To select the right or left side mirror, slide the
control switch
1 right or left.
To adjust the mirror angle, move the control switch
2 up, down, right or left.
To prevent accidentally moving the mirror, slide the switch to the center (neutral) position.
REVERSE TILT-DOWN FEATURE (if so equipped)
The reverse tilt-down feature will turn both outside mirror surfaces down\
ward to provide
better rear visibility close to the vehicle.
1. Apply the brake.
2. Push the ignition switc
h to the ON position.
3.
Move the shift lever to the
R (REVERSE) position.
4.
B
oth outside mirror surfaces will turn downward. (The mirror control switch
1 must
be out of the center [neutral] position.)
The outside mirror surfaces will return to their original positions when \
one of the following
conditions has occurred:
The shift lever is moved to any position other than R (REVERSE).
The outside mirror control switch is set to the center (neutral) position.
The ignition switch is pushed to the OFF position.
For more information, refer to the “Pre-driving checks and adjustments (section 3)” of your Owner’s Manual.
1
STARTING/STOPPING THE ENGINE
It is import ant to make sure the Nissan Intelligent
Key® is with you (that is, in your
pocket or purse).
Depress the brake pedal.
Press the ignition switc h START/STOP button
to start the engine.
TURNING THE ENGINE OFF
Move the shift lever to the P (PARK) position.
Press the ignition switch START/STOP button to turn the engine off.
For more information, refer to the “Starting and driving (section 5)” of your Owner’s Manual.
2
REAR SEAT ADJUSTMENTS
FOLDING DOWN THE REAR SEAT
To fold the seats flat, release the connector
tongue of the rear center seat belt from the
buckle then store the connector and seat belt
tongues in the retractor base on the ceiling
1.
Fold the seatback forward using either the pull strap
2, located on the outside edge of
the rear seat, or the release lever
3 in the
cargo area.
To raise the seatback manually, lift up each seatback and push it to the upright position until
it is latched.
To raise the seatback automatically (if so equipped), push and hold the power seatback switch
4 located in the cargo area,
or the corresponding seat switch5 on the lower side of the
instrument panel.
•
A beep sounds once and the seatbac
k begins to move automatically.
•
A beep sounds twice when the seatbac
k is fully returned to the upright
seating position.
RECLINING THE REAR SEATS
Brace the bac k of the seat with your arm while pulling on the strap. The seatback will
release quickly.
Pull the reclining strap 2, and move the seatback to the desired angle.
Release the reclining strap after positioning the seat at the desired an\
gle.
For more information, refer to the “Safety – Seats, seat belts and supplemental restraint system (sectio\
n 1) ”
of your Owner’s Manual.
4
21
3
5
HEADLIGHT CONTROL SWITCH
HEADLIGHT CONTROL
Turn the headlight control switch to the
position
1 to turn on the front parking, side
marker, tail, license plate and instrument panel
lights. Turn the switch to the
position 2
to turn on the headlights.
AUTOLIGHT SYSTEM
The autolight system will automatically turn the headlights on when it is dark and off when it is light. The system will keep
the headlights on for a period of time after you turn the ignition off a\
nd all doors
are closed.
To activate the autolight system, turn the headlight control switch to the AUTO position
3 then push the ignition switch to ON. To deactivate the autolight system, turn the
headlight control switch to the OFF position,
position 1 or position 2.
HIGH BEAM SELECT
With the headlights ON (either by selecting the AUTO
3 or position), push the headlight
control switch forward
4 to select the high
beam function.
1
3
2
45
To view detailed instructional videos regarding these and other features, please go to www.nissanownersinfo.mobi. To view detailed instructional videos regarding these and other features,
please go to www.nissanownersinfo.mobi.
Page 17 of 38

15
14
FIRST DRIVE FEATURES
OUTSIDE MIRROR CONTROL SWITCH
To select the right or left side mirror, slide the
control switch
1 right or left.
To adjust the mirror angle, move the control switch
2 up, down, right or left.
To prevent accidentally moving the mirror, slide the switch to the center (neutral) position.
REVERSE TILT-DOWN FEATURE (if so equipped)
The reverse tilt-down feature will turn both outside mirror surfaces down\
ward to provide
better rear visibility close to the vehicle.
1. Apply the brake.
2. Push the ignition switc
h to the ON position.
3.
Move the shift lever to the
R (REVERSE) position.
4.
B
oth outside mirror surfaces will turn downward. (The mirror control switch
1 must
be out of the center [neutral] position.)
The outside mirror surfaces will return to their original positions when \
one of the following
conditions has occurred:
The shift lever is moved to any position other than R (REVERSE).
The outside mirror control switch is set to the center (neutral) position.
The ignition switch is pushed to the OFF position.
For more information, refer to the “Pre-driving checks and adjustments (section 3)” of your Owner’s Manual.
1
STARTING/STOPPING THE ENGINE
It is import ant to make sure the Nissan Intelligent
Key® is with you (that is, in your
pocket or purse).
Depress the brake pedal.
Press the ignition switc h START/STOP button
to start the engine.
TURNING THE ENGINE OFF
Move the shift lever to the P (PARK) position.
Press the ignition switch START/STOP button to turn the engine off.
For more information, refer to the “Starting and driving (section 5)” of your Owner’s Manual.
2
REAR SEAT ADJUSTMENTS
FOLDING DOWN THE REAR SEAT
To fold the seats flat, release the connector
tongue of the rear center seat belt from the
buckle then store the connector and seat belt
tongues in the retractor base on the ceiling
1.
Fold the seatback forward using either the pull strap
2, located on the outside edge of
the rear seat, or the release lever
3 in the
cargo area.
To raise the seatback manually, lift up each seatback and push it to the upright position until
it is latched.
To raise the seatback automatically (if so equipped), push and hold the power seatback switch
4 located in the cargo area,
or the corresponding seat switch5 on the lower side of the
instrument panel.
•
A beep sounds once and the seatbac
k begins to move automatically.
•
A beep sounds twice when the seatbac
k is fully returned to the upright
seating position.
RECLINING THE REAR SEATS
Brace the bac k of the seat with your arm while pulling on the strap. The seatback will
release quickly.
Pull the reclining strap 2, and move the seatback to the desired angle.
Release the reclining strap after positioning the seat at the desired an\
gle.
For more information, refer to the “Safety – Seats, seat belts and supplemental restraint system (sectio\
n 1) ”
of your Owner’s Manual.
4
21
3
5
HEADLIGHT CONTROL SWITCH
HEADLIGHT CONTROL
Turn the headlight control switch to the
position
1 to turn on the front parking, side
marker, tail, license plate and instrument panel
lights. Turn the switch to the
position 2
to turn on the headlights.
AUTOLIGHT SYSTEM
The autolight system will automatically turn the headlights on when it is dark and off when it is light. The system will keep
the headlights on for a period of time after you turn the ignition off a\
nd all doors
are closed.
To activate the autolight system, turn the headlight control switch to the AUTO position
3 then push the ignition switch to ON. To deactivate the autolight system, turn the
headlight control switch to the OFF position,
position 1 or position 2.
HIGH BEAM SELECT
With the headlights ON (either by selecting the AUTO
3 or position), push the headlight
control switch forward
4 to select the high
beam function.
1
3
2
45
To view detailed instructional videos regarding these and other features, please go to www.nissanownersinfo.mobi. To view detailed instructional videos regarding these and other features,
please go to www.nissanownersinfo.mobi.
Page 20 of 38
19
18
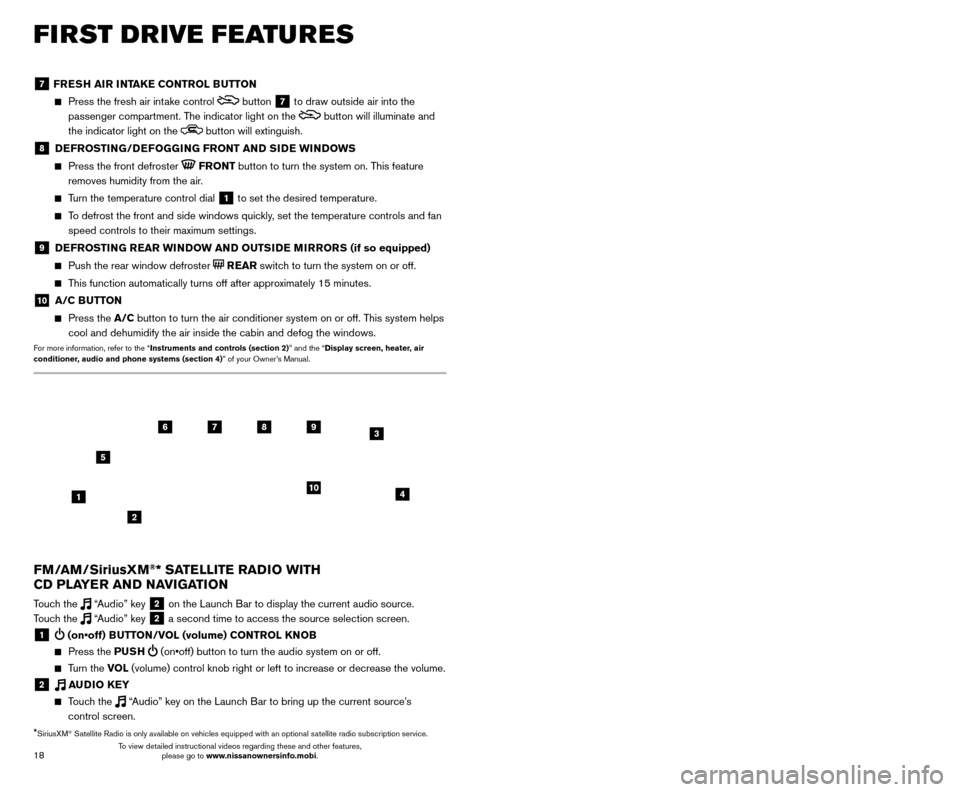
7 FRESH AIR INTAKE CONTROL BUTTON
Press the fresh air int ake control button 7 to draw outside air into the
passenger compartment. The indicator light on the
button will illuminate and
the indicator light on the
button will extinguish.
8 DEFROSTING/DEFOGGING FRONT AND SIDE WINDOWS
Press the front defroster FRONT button to turn the system on. This feature
removes humidity from the air.
Turn the temperature control dial 1 to set the desired temperature.
To defrost the front and side windows quickly, set the temperature controls and fan speed controls to their maximum settings.
9 DEFROSTING REAR WINDOW AND OUTSIDE MIRRORS (if so equipped)
Push the rear window defroster REAR switch to turn the system on or off.
This function automatically turns off after approximately 15 minutes.
10 A/C BUTTON
Press the A/C button to turn the air conditioner system on or off. This system helps
cool and dehumidify the air inside the cabin and defog the windows.
For more information, refer to the “Instruments and controls (section 2)” and the “Display screen, heater, air
conditioner, audio and phone systems (section 4)” of your Owner’s Manual.
FIRST DRIVE FEATURES
3 / (seek and cat/track) BUTTONS
To scan quickly through each broadcasting station, press the or button to
move to the previous or next broadcast station.
For satellite radio to switch to the first channel of the previous or next category, press the
or button.
To change tracks on a CD, press the or button.
To rewind or fast forward a track on a CD, press and hold the or button.
4 PUSH SOUND BUTTON/TUNE/SCROLL KNOB
Press the PU SH SOUND button to cycle through the audio settings individually
and use the TUNE/SCROLL knob to adjust the current setting.
Touch the “Settings” key on the Launch Bar and then touch the “Sound” key to
view all audio settings.
To manually tune the radio, turn the TUNE/SCROLL knob left or right.
5 AUDIO (source) BUTTON
Pressing this button will give access to the AM, FM, SXM, CD, USB1/iPod,
USB2/iPod, Bluetooth Audio or AUX audio source.
Twelve memory stations can be set for the FM band, six for the AM band and 18 for
satellite radio. These appear at the bottom of the screen when one of these sources
is selected.
To store a station in a preset, you must first select a radio band by touching the “AM”
6, “FM” 7 or “SXM” key 8 then tune to the desired AM, FM or satellite
radio station. Next, touch and hold the desired station preset key (1-6) until you
hear a beep. The channel indicator will then display, and the sound will resume.
Programing is now complete.
To retrieve a previously set station, select the radio band where the preset was stored then touch the corresponding station select key (1-6).
6 AM KEY / 7 FM KEY
Touch the “AM” 6 or “FM” 7 key. Next, the touch “AM Menu” or “FM Menu” key
to view the station list or turn HD mode on or off.
Tag favorite songs to save to an iPod®.
•
Apple® website: If you are listening to a radio station that supports iTunes
Tagging, you can tag a song you hear so you can preview and purchase it later on
the iTunes Store. Songs that can be tagged are marked with a tag icon next to the
song title or on the “Now Playing” screen.
8 SXM KEY
Touch the “SXM” key 8. Next, touch the “SXM Menu” key to bring up the
categories, favorites and replay options.
9 CD KEY
Touch the “CD Menu” key to view track list.
10 AUX KEY
A cable with 1/8-in (3.5 mm) stereo mini plugs is required for audio p\
laybac k.
For more information, refer to the “Audio system (section 3)” of your Navigation System Owner’s Manual.
4
6789
10
2
3
1
5
*SiriusXM® Satellite Radio is only available on vehicles equipped with an optional s\
atellite radio subscription service.
FM/AM/SiriusXM®* SATELLITE RADIO WITH
CD PLAYER AND NAVIGATION
Touch the “Audio” key 2 on the Launch Bar to display the current audio source.
Touch the “Audio” key 2 a second time to access the source selection screen.
1 (on•off) BUTTON/VOL (volume) CONTROL KNOB
Press the PU SH (on•off) button to turn the audio system on or off.
Turn the VO L (volume) control knob right or left to increase or decrease the volum\
e.
2 AUDIO KEY
Touch the “Audio” key on the Launch Bar to bring up the current source’s
control screen.
To view detailed instructional videos regarding these and other features, please go to www.nissanownersinfo.mobi. To view detailed instructional videos regarding these and other features,
please go to www.nissanownersinfo.mobi.
Page 21 of 38
19
18
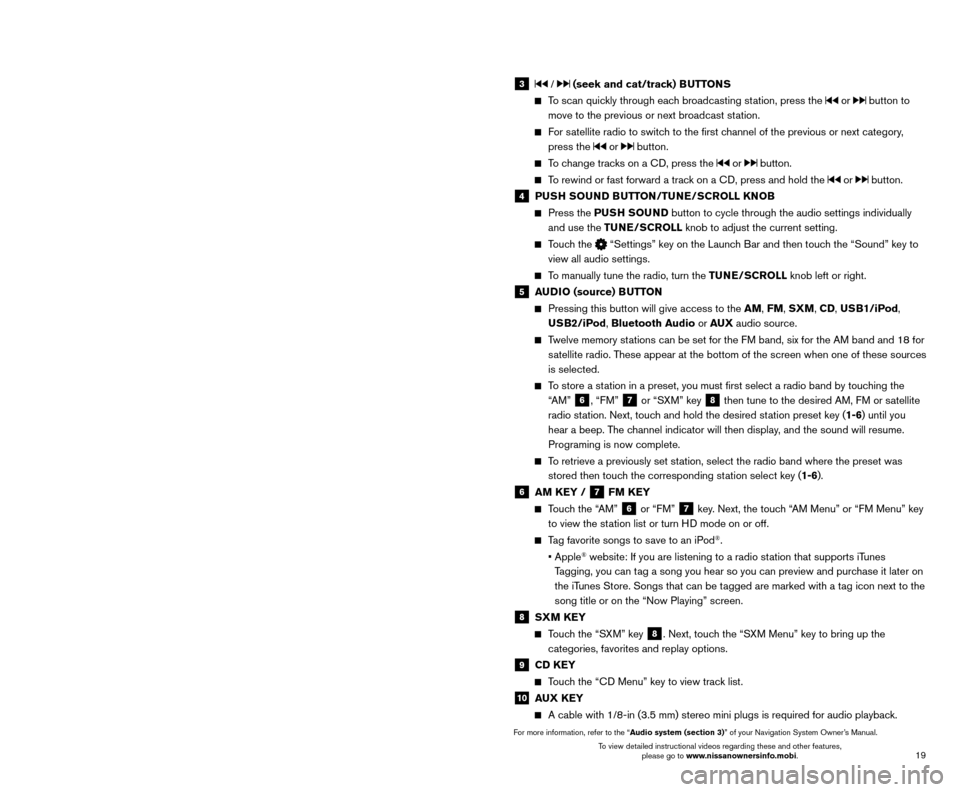
7 FRESH AIR INTAKE CONTROL BUTTON
Press the fresh air int ake control button 7 to draw outside air into the
passenger compartment. The indicator light on the
button will illuminate and
the indicator light on the
button will extinguish.
8 DEFROSTING/DEFOGGING FRONT AND SIDE WINDOWS
Press the front defroster FRONT button to turn the system on. This feature
removes humidity from the air.
Turn the temperature control dial 1 to set the desired temperature.
To defrost the front and side windows quickly, set the temperature controls and fan speed controls to their maximum settings.
9 DEFROSTING REAR WINDOW AND OUTSIDE MIRRORS (if so equipped)
Push the rear window defroster REAR switch to turn the system on or off.
This function automatically turns off after approximately 15 minutes.
10 A/C BUTTON
Press the A/C button to turn the air conditioner system on or off. This system helps
cool and dehumidify the air inside the cabin and defog the windows.
For more information, refer to the “Instruments and controls (section 2)” and the “Display screen, heater, air
conditioner, audio and phone systems (section 4)” of your Owner’s Manual.
FIRST DRIVE FEATURES
3 / (seek and cat/track) BUTTONS
To scan quickly through each broadcasting station, press the or button to
move to the previous or next broadcast station.
For satellite radio to switch to the first channel of the previous or next category, press the
or button.
To change tracks on a CD, press the or button.
To rewind or fast forward a track on a CD, press and hold the or button.
4 PUSH SOUND BUTTON/TUNE/SCROLL KNOB
Press the PU SH SOUND button to cycle through the audio settings individually
and use the TUNE/SCROLL knob to adjust the current setting.
Touch the “Settings” key on the Launch Bar and then touch the “Sound” key to
view all audio settings.
To manually tune the radio, turn the TUNE/SCROLL knob left or right.
5 AUDIO (source) BUTTON
Pressing this button will give access to the AM, FM, SXM, CD, USB1/iPod,
USB2/iPod, Bluetooth Audio or AUX audio source.
Twelve memory stations can be set for the FM band, six for the AM band and 18 for
satellite radio. These appear at the bottom of the screen when one of these sources
is selected.
To store a station in a preset, you must first select a radio band by touching the “AM”
6, “FM” 7 or “SXM” key 8 then tune to the desired AM, FM or satellite
radio station. Next, touch and hold the desired station preset key (1-6) until you
hear a beep. The channel indicator will then display, and the sound will resume.
Programing is now complete.
To retrieve a previously set station, select the radio band where the preset was stored then touch the corresponding station select key (1-6).
6 AM KEY / 7 FM KEY
Touch the “AM” 6 or “FM” 7 key. Next, the touch “AM Menu” or “FM Menu” key
to view the station list or turn HD mode on or off.
Tag favorite songs to save to an iPod®.
•
Apple® website: If you are listening to a radio station that supports iTunes
Tagging, you can tag a song you hear so you can preview and purchase it later on
the iTunes Store. Songs that can be tagged are marked with a tag icon next to the
song title or on the “Now Playing” screen.
8 SXM KEY
Touch the “SXM” key 8. Next, touch the “SXM Menu” key to bring up the
categories, favorites and replay options.
9 CD KEY
Touch the “CD Menu” key to view track list.
10 AUX KEY
A cable with 1/8-in (3.5 mm) stereo mini plugs is required for audio p\
laybac k.
For more information, refer to the “Audio system (section 3)” of your Navigation System Owner’s Manual.
4
6789
10
2
3
1
5
*SiriusXM® Satellite Radio is only available on vehicles equipped with an optional s\
atellite radio subscription service.
FM/AM/SiriusXM®* SATELLITE RADIO WITH
CD PLAYER AND NAVIGATION
Touch the “Audio” key 2 on the Launch Bar to display the current audio source.
Touch the “Audio” key 2 a second time to access the source selection screen.
1 (on•off) BUTTON/VOL (volume) CONTROL KNOB
Press the PU SH (on•off) button to turn the audio system on or off.
Turn the VO L (volume) control knob right or left to increase or decrease the volum\
e.
2 AUDIO KEY
Touch the “Audio” key on the Launch Bar to bring up the current source’s
control screen.
To view detailed instructional videos regarding these and other features, please go to www.nissanownersinfo.mobi. To view detailed instructional videos regarding these and other features,
please go to www.nissanownersinfo.mobi.
Page 22 of 38
21
20
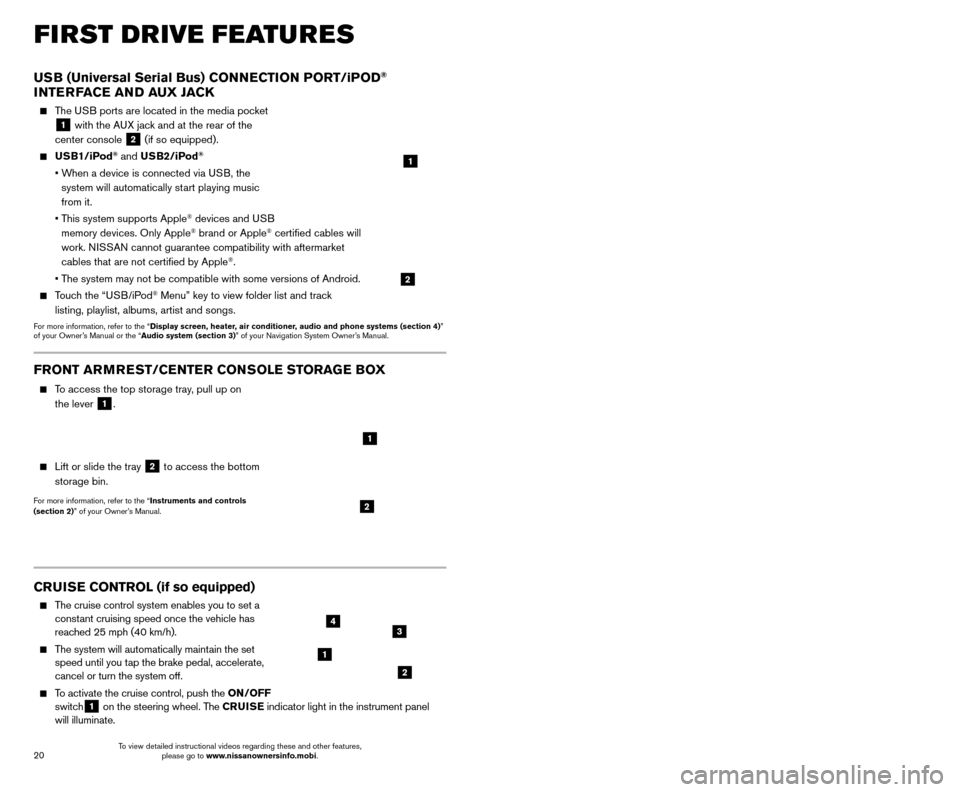
CRUISE CONTROL (if so equipped)
The cruise control system enables you to set a
constant cruising speed once the vehicle has
reached 25 mph (40 km/h).
The system will automatically maintain the set speed until you tap the brake pedal, accelerate,
cancel or turn the system off.
To activate the cruise control, push the ON/OFF
switch1 on the steering wheel. The CRUISE
indicator light in the instrument panel
will illuminate.
USB (Universal Serial Bus) CONNECTION PORT/iPOD®
INTERFACE AND AUX JACK
The USB ports are located in the media pocket
1 with the AUX jack and at the rear of the
center console
2 (if so equipped).
USB1/iPod® and USB2/iPod®
• When a device is connected via USB, the
system will automatically start playing music
from it.
•
T
his system supports Apple
® devices and USB
memory devices. Only Apple® brand or Apple® certified cables will
work. NISSAN cannot guarantee compatibility with aftermarket
cables that are not certified by Apple
®.
• T
he system may not be compatible with some versions of Android.
Touch the “USB/iPod® Menu” key to view folder list and track
listing, playlist, albums, artist and songs.
For more information, refer to the “Display screen, heater, air conditioner, audio and phone systems (section 4)”
of your Owner’s Manual or the “Audio system (section 3)” of your Navigation System Owner’s Manual.
1
2
FIRST DRIVE FEATURES
To set a cruising speed, accelerate the vehicle to the desired speed, pus\
h the
SET/- switch 2 on the steering wheel and release. Take your foot off the accelerator
pedal. Your vehicle will maintain the set speed.
To reset at a faster cruising speed, push and hold the RES/+ switch 3 on the
steering wheel. When the vehicle attains the desired speed, release the switch.
To reset at a slower cruising speed, push and hold the SET/- switch 2 on the steering
wheel. Release the switch when the vehicle slows to the desired speed.
To cancel the preset speed, tap the brake pedal or push the CANCEL switch 4
on the steering wheel.
To turn off cruise control, push the ON/OFF switch 1 on the steering wheel. The
CRUISE indicator light in the instrument panel will extinguish.
For more information, refer to the “Starting and driving (section 5)” of your Owner’s Manual.
1
2
34
FRONT ARMREST /CENTER CONSOLE STORAGE BOX
To access the top storage tray, pull up on
the lever
1.
Lift or slide the tray 2 to access the bottom
storage bin.
For more information, refer to the “Instruments and controls
(section 2)” of your Owner’s Manual.2
1
INTELLIGENT CRUISE CONTROL (ICC) (if so equipped)
VEHICLE-TO-VEHICLE DISTANCE CONTROL MODE
To set Vehicle-To-Vehicle Distance Control mode, press the CRUISE ON/OFF button
1 on the steering wheel. The CRUISE
indicator light 2 will illuminate.
Accelerate to the desired speed.
Push down on the SET/- switch 3 on the
steering wheel and release it. ICC will be set to
the desired speed.
Press the dist ance button 4 on the steering
wheel repeatedly to change the set distance
between long, middle and short.
When a vehicle is not detected ahead of you in the lane, the set distance and set vehicle speed
indicator lights will illuminate
5 in set mode.
When a vehicle is detected ahead of you in the lane, the vehicle ahead detection, set distance and set vehicle speed indicator
lights will illuminate
6 in set mode.
To reset at a faster cruising speed, push and hold the RES/+
switch
7 on the steering wheel. When the vehicle attains the
desired speed, release the switch.
To reset at a slower cruising speed, push and hold the SET/- switch
3 on the steering wheel. Release the switch when the vehicle slows
to the desired speed.
To cancel the preset speed, push the CANCEL switch 8 on the steering wheel or
tap the brake pedal. The set vehicle speed indicator
5 will extinguish.
To turn off ICC, press the CRUISE ON/OFF button 1 on the steering wheel. The
CRUISE indicator light 2 in the instrument panel will extinguish.
For more information, refer to the “Starting and driving (section 5)” of your Owner’s Manual.
2
5
6
1
4
87
3
To view detailed instructional videos regarding these and other features, please go to www.nissanownersinfo.mobi. To view detailed instructional videos regarding these and other features,
please go to www.nissanownersinfo.mobi.
Page 23 of 38
21
20
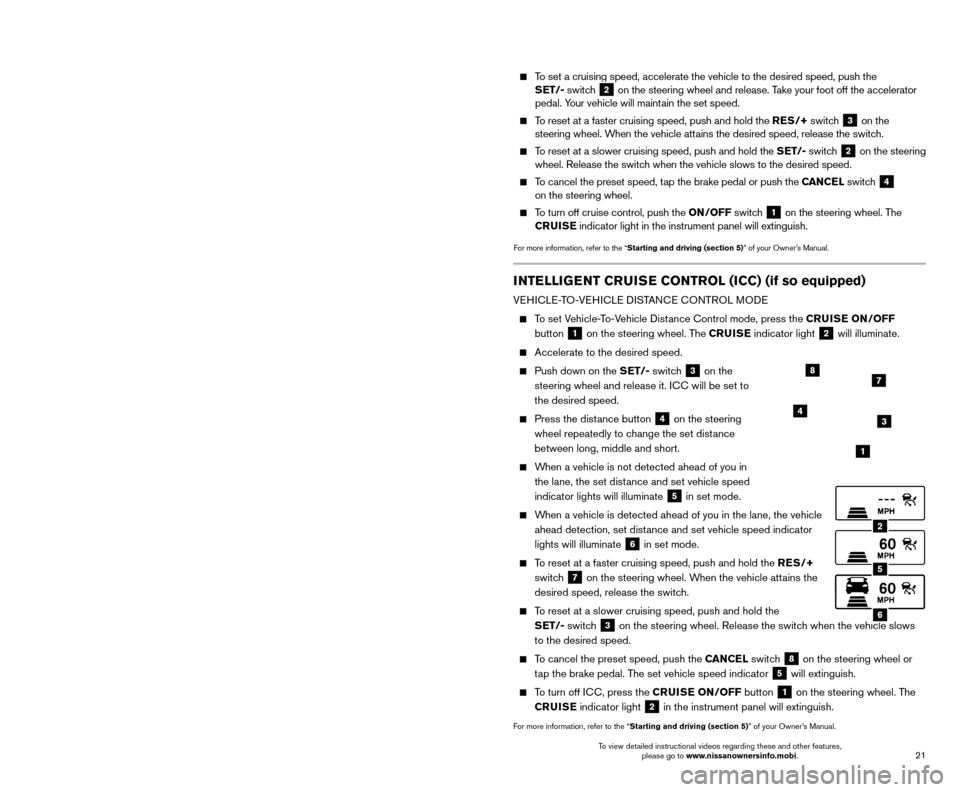
CRUISE CONTROL (if so equipped)
The cruise control system enables you to set a
constant cruising speed once the vehicle has
reached 25 mph (40 km/h).
The system will automatically maintain the set speed until you tap the brake pedal, accelerate,
cancel or turn the system off.
To activate the cruise control, push the ON/OFF
switch1 on the steering wheel. The CRUISE
indicator light in the instrument panel
will illuminate.
USB (Universal Serial Bus) CONNECTION PORT/iPOD®
INTERFACE AND AUX JACK
The USB ports are located in the media pocket
1 with the AUX jack and at the rear of the
center console
2 (if so equipped).
USB1/iPod® and USB2/iPod®
• When a device is connected via USB, the
system will automatically start playing music
from it.
•
T
his system supports Apple
® devices and USB
memory devices. Only Apple® brand or Apple® certified cables will
work. NISSAN cannot guarantee compatibility with aftermarket
cables that are not certified by Apple
®.
• T
he system may not be compatible with some versions of Android.
Touch the “USB/iPod® Menu” key to view folder list and track
listing, playlist, albums, artist and songs.
For more information, refer to the “Display screen, heater, air conditioner, audio and phone systems (section 4)”
of your Owner’s Manual or the “Audio system (section 3)” of your Navigation System Owner’s Manual.
1
2
FIRST DRIVE FEATURES
To set a cruising speed, accelerate the vehicle to the desired speed, pus\
h the
SET/- switch 2 on the steering wheel and release. Take your foot off the accelerator
pedal. Your vehicle will maintain the set speed.
To reset at a faster cruising speed, push and hold the RES/+ switch 3 on the
steering wheel. When the vehicle attains the desired speed, release the switch.
To reset at a slower cruising speed, push and hold the SET/- switch 2 on the steering
wheel. Release the switch when the vehicle slows to the desired speed.
To cancel the preset speed, tap the brake pedal or push the CANCEL switch 4
on the steering wheel.
To turn off cruise control, push the ON/OFF switch 1 on the steering wheel. The
CRUISE indicator light in the instrument panel will extinguish.
For more information, refer to the “Starting and driving (section 5)” of your Owner’s Manual.
1
2
34
FRONT ARMREST /CENTER CONSOLE STORAGE BOX
To access the top storage tray, pull up on
the lever
1.
Lift or slide the tray 2 to access the bottom
storage bin.
For more information, refer to the “Instruments and controls
(section 2)” of your Owner’s Manual.2
1
INTELLIGENT CRUISE CONTROL (ICC) (if so equipped)
VEHICLE-TO-VEHICLE DISTANCE CONTROL MODE
To set Vehicle-To-Vehicle Distance Control mode, press the CRUISE ON/OFF button
1 on the steering wheel. The CRUISE
indicator light 2 will illuminate.
Accelerate to the desired speed.
Push down on the SET/- switch 3 on the
steering wheel and release it. ICC will be set to
the desired speed.
Press the dist ance button 4 on the steering
wheel repeatedly to change the set distance
between long, middle and short.
When a vehicle is not detected ahead of you in the lane, the set distance and set vehicle speed
indicator lights will illuminate
5 in set mode.
When a vehicle is detected ahead of you in the lane, the vehicle ahead detection, set distance and set vehicle speed indicator
lights will illuminate
6 in set mode.
To reset at a faster cruising speed, push and hold the RES/+
switch
7 on the steering wheel. When the vehicle attains the
desired speed, release the switch.
To reset at a slower cruising speed, push and hold the SET/- switch
3 on the steering wheel. Release the switch when the vehicle slows
to the desired speed.
To cancel the preset speed, push the CANCEL switch 8 on the steering wheel or
tap the brake pedal. The set vehicle speed indicator
5 will extinguish.
To turn off ICC, press the CRUISE ON/OFF button 1 on the steering wheel. The
CRUISE indicator light 2 in the instrument panel will extinguish.
For more information, refer to the “Starting and driving (section 5)” of your Owner’s Manual.
2
5
6
1
4
87
3
To view detailed instructional videos regarding these and other features, please go to www.nissanownersinfo.mobi. To view detailed instructional videos regarding these and other features,
please go to www.nissanownersinfo.mobi.
Page 26 of 38
25
24
SYSTEM GUIDE
BLUETOOTH® HANDS-FREE
PHONE SYSTEM1
A cellular telephone should not be used
while driving so full attention may be given to
vehicle operation.
2
SYSTEM OPERATING TIPS
Press the button on the steering wheel to interrupt the voice prompts at any time\
and speak a command after the tone.
The “Help” command can be used to hear a list of available commands\
at any time.
Reduce bac kground noise as much as possible by closing windows and pointing
HVAC vents away from the ceiling.
Bluetooth®
Controls
NISSANCONNECTSM MOBILE APPS1 (if so equipped)
Press the MENU button on the control panel, touch the “Info” key on the Launch Bar
and then touch the NissanConnectsm Mobile Apps key.
Integrates popular smartphone apps and services into your vehicle.
-
T
o enroll in NissanConnect Mobile Apps, start by creating a Nissan Owner’s Portal
account at owners.NissanUSA.com.
-
Next, download the Niss
anConnect Mobile Apps companion app from Google Play
or the Apple App Store.
-
Launc
h the app and sign-in with the email user name and password you created \
when registering on the Nissan Owner’s Portal website.
For more information on how to pair your cellular phone and set up NissanConnect Mobile Apps, visit: www.NissanUSA.com/connect/support.
1 Only use features when s afe to do so. App availability is dependent upon vehicle model, trim lev\
el, packaging,
and/or options. See www.NissanUSA.com/Connect for complete app availability details. Compatible smartphone
required. Cellular network and GPS signals not available in all areas and/or at all times. NISSAN is not responsible for
associated costs, if any, for continued operation due to cellular network or other third party termination/changes. Cellular
or other third party provider may terminate/restrict respective service \
without notice. Subscription Agreement required.
See www.NissanUSA.com/connect for details. Text rates and/or data usage may apply.
2 iPhone is registered trademark of Apple, Inc. All rights reserved. iPhon\
e not included.3 Android® is a registered trademark of Google, Inc.4 Availability of specific features is dependent upon the cellular phone’\
s Bluetooth® support. Please refer to your cellular
phone’s Owner’s Manual for details. Bluetooth® word mark and logos are owned by Bluetooth SIG, Inc., and any use of
such marks by NISSAN is under license. See www.NissanUSA.com/bluetooth for details.
For more information, refer to the “Display screen, heater, air conditioner, audio and phone systems (section 4)”
of your Owner’s Manual or the “Information (section 5)” of your Navigation System Owner’s Manual.
Speak naturally without long pauses and without raising your voice.
If you experience difficulty with the V oice
Recognition System recognizing a contact
name, please try saying both the first and last
name of the contact as this improves
recognition accuracy.
To cancel a Voice Recognition session, say “Cancel” or “Quit” or press and hold the
button on the steering wheel for
5 seconds.
For more detailed information and instructions, refer to your cellular phone’s Owner’s Manual and visit www.NissanUSA.com/bluetooth.
1 Availability of specific features is dependent upon the cellular phone’\
s Bluetooth® support. Please refer to your cellular
phone’s Owner’s Manual for details. Bluetooth® word mark and logos are owned by Bluetooth SIG, Inc., and any use of
such marks by NISSAN is under license. See www.NissanUSA.com/bluetooth for details.
2 Some jurisdictions prohibit the use of cellular telephones while drivin\
g.
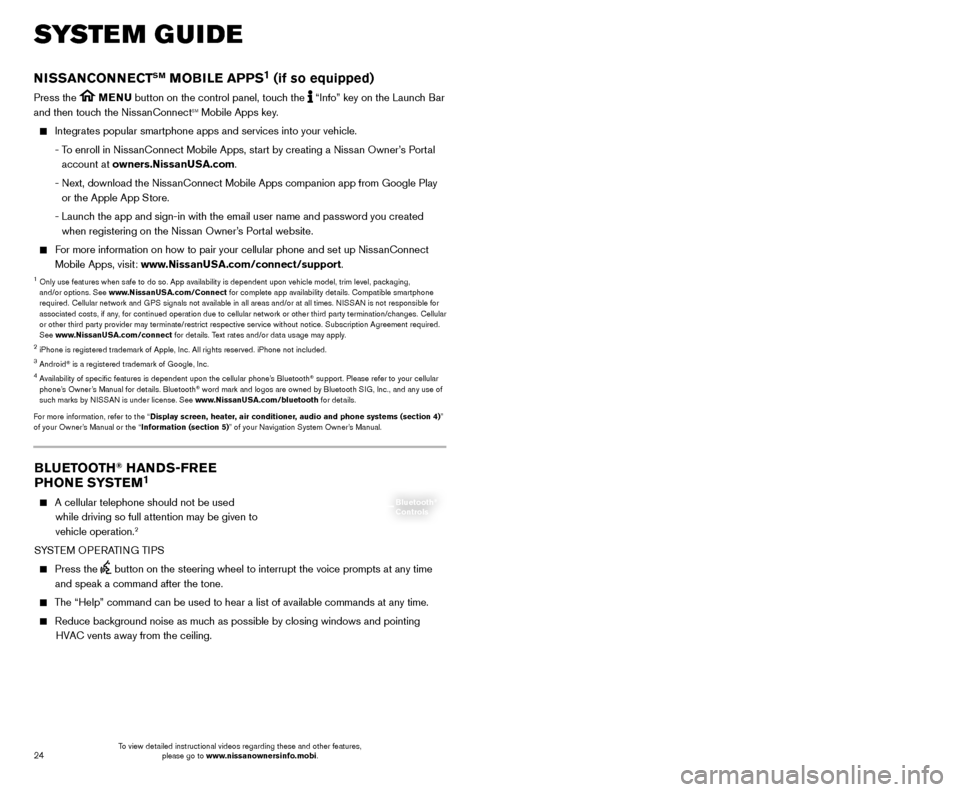
BLUETOOTH® SYSTEM WITH NAVIGATION1,2 (if so equipped)
Bluetooth®,2 Streaming Audio allows you to use a compatible Bluetooth®,2 cellular
phone to play audio files on your device. Your compatible cellular phone can be
connected to the vehicle’s audio system, allowing audio files to play through the vehicle’s speakers.
CONNECTING PROCEDURE
The vehicle must be stationary when connecting the cellular phone.
1.
Press the
button on the steering wheel and
touch the “Connect Phone” key.
2.
Initiate connecting from the cellular phone.
•
T
he connecting procedure varies
according to each cellular phone model. For detailed connecting instructions and a list of compatible cellular phones, please visit
www.NissanUSA.com/bluetooth.
•
W
hen prompted, confirm the PIN on the display
with the PIN shown on the handset. If your
device does not support Secure Simple Pairing and requests you to input a PIN, enter “1234” from the handset.
•
Some cellular phones may require you to accept cert
ain permissions in order to enable
features on your Bluetooth
® system. During the
Bluetooth® pairing process, please check your cellular phone’s display for a pop-up
with the request to grant phonebook access.
Microphone
To view detailed instructional videos regarding these and other features, please go to www.nissanownersinfo.mobi. To view detailed instructional videos regarding these and other features,
please go to www.nissanownersinfo.mobi.
Page 27 of 38
25
24
SYSTEM GUIDE
BLUETOOTH® HANDS-FREE
PHONE SYSTEM1
A cellular telephone should not be used
while driving so full attention may be given to
vehicle operation.
2
SYSTEM OPERATING TIPS
Press the button on the steering wheel to interrupt the voice prompts at any time\
and speak a command after the tone.
The “Help” command can be used to hear a list of available commands\
at any time.
Reduce bac kground noise as much as possible by closing windows and pointing
HVAC vents away from the ceiling.
Bluetooth®
Controls
NISSANCONNECTSM MOBILE APPS1 (if so equipped)
Press the MENU button on the control panel, touch the “Info” key on the Launch Bar
and then touch the NissanConnectsm Mobile Apps key.
Integrates popular smartphone apps and services into your vehicle.
-
T
o enroll in NissanConnect Mobile Apps, start by creating a Nissan Owner’s Portal
account at owners.NissanUSA.com.
-
Next, download the Niss
anConnect Mobile Apps companion app from Google Play
or the Apple App Store.
-
Launc
h the app and sign-in with the email user name and password you created \
when registering on the Nissan Owner’s Portal website.
For more information on how to pair your cellular phone and set up NissanConnect Mobile Apps, visit: www.NissanUSA.com/connect/support.
1 Only use features when s afe to do so. App availability is dependent upon vehicle model, trim lev\
el, packaging,
and/or options. See www.NissanUSA.com/Connect for complete app availability details. Compatible smartphone
required. Cellular network and GPS signals not available in all areas and/or at all times. NISSAN is not responsible for
associated costs, if any, for continued operation due to cellular network or other third party termination/changes. Cellular
or other third party provider may terminate/restrict respective service \
without notice. Subscription Agreement required.
See www.NissanUSA.com/connect for details. Text rates and/or data usage may apply.
2 iPhone is registered trademark of Apple, Inc. All rights reserved. iPhon\
e not included.3 Android® is a registered trademark of Google, Inc.4 Availability of specific features is dependent upon the cellular phone’\
s Bluetooth® support. Please refer to your cellular
phone’s Owner’s Manual for details. Bluetooth® word mark and logos are owned by Bluetooth SIG, Inc., and any use of
such marks by NISSAN is under license. See www.NissanUSA.com/bluetooth for details.
For more information, refer to the “Display screen, heater, air conditioner, audio and phone systems (section 4)”
of your Owner’s Manual or the “Information (section 5)” of your Navigation System Owner’s Manual.
Speak naturally without long pauses and without raising your voice.
If you experience difficulty with the V oice
Recognition System recognizing a contact
name, please try saying both the first and last
name of the contact as this improves
recognition accuracy.
To cancel a Voice Recognition session, say “Cancel” or “Quit” or press and hold the
button on the steering wheel for
5 seconds.
For more detailed information and instructions, refer to your cellular phone’s Owner’s Manual and visit www.NissanUSA.com/bluetooth.
1 Availability of specific features is dependent upon the cellular phone’\
s Bluetooth® support. Please refer to your cellular
phone’s Owner’s Manual for details. Bluetooth® word mark and logos are owned by Bluetooth SIG, Inc., and any use of
such marks by NISSAN is under license. See www.NissanUSA.com/bluetooth for details.
2 Some jurisdictions prohibit the use of cellular telephones while drivin\
g.
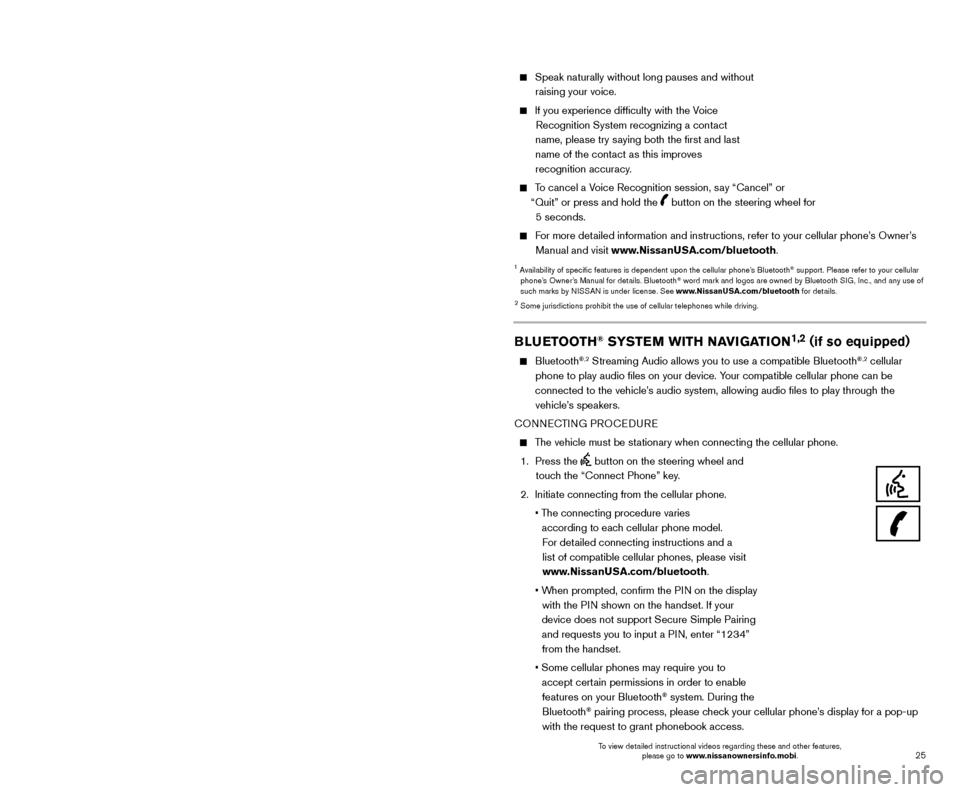
BLUETOOTH® SYSTEM WITH NAVIGATION1,2 (if so equipped)
Bluetooth®,2 Streaming Audio allows you to use a compatible Bluetooth®,2 cellular
phone to play audio files on your device. Your compatible cellular phone can be
connected to the vehicle’s audio system, allowing audio files to play through the vehicle’s speakers.
CONNECTING PROCEDURE
The vehicle must be stationary when connecting the cellular phone.
1.
Press the
button on the steering wheel and
touch the “Connect Phone” key.
2.
Initiate connecting from the cellular phone.
•
T
he connecting procedure varies
according to each cellular phone model. For detailed connecting instructions and a list of compatible cellular phones, please visit
www.NissanUSA.com/bluetooth.
•
W
hen prompted, confirm the PIN on the display
with the PIN shown on the handset. If your
device does not support Secure Simple Pairing and requests you to input a PIN, enter “1234” from the handset.
•
Some cellular phones may require you to accept cert
ain permissions in order to enable
features on your Bluetooth
® system. During the
Bluetooth® pairing process, please check your cellular phone’s display for a pop-up
with the request to grant phonebook access.
Microphone
To view detailed instructional videos regarding these and other features, please go to www.nissanownersinfo.mobi. To view detailed instructional videos regarding these and other features,
please go to www.nissanownersinfo.mobi.