oil level NISSAN MURANO 2023 Owners Manual
[x] Cancel search | Manufacturer: NISSAN, Model Year: 2023, Model line: MURANO, Model: NISSAN MURANO 2023Pages: 518, PDF Size: 5.46 MB
Page 103 of 518
CAUTION
Do not continue driving if the drive belt
is loose, broken or missing.
Engine oil pressure
warning light
This light warns of low engine oil pressure.
If the light flickers or comes on during nor-
mal driving, pull off the road in a safe area,
stop the engine immediatelyand call a
NISSAN dealer or other authorized repair
shop.
The engine oil pressure warning light is
not designed to indicate a low oil level.
Use the dipstick to check the oil level.
For additional information, see “Engine oil”
(P. 8-6).
CAUTION
Running the engine with the engine oil
pressure warning light on could cause
serious damage to the engine almost
immediately. Such damage is not cov-
ered by the NISSAN New Vehicle Limited
Warranty. Turn off the engine as soon
as it is safe to do so.
Master warning light
When the ignition switch is in the ON posi-
tion, the master warning light illuminates
if any of the following are displayed on the
vehicle information display:
• Parking brake release warning
• Door open warning (when vehicle is moving)
• Shif t into Park warning
• LED Headlight Failure warning (when red warning exists)
For additional information, see “Vehicle in-
formation display” (P. 2-18).
Seat belt warning light and
chime
• The light and chime remind you to fasten the seat belts.
• The seat belt warning light will illuminate when the ignition switch is pushed to the
ON position if the driver’s seat belt is not
fastened, or if the front passenger seat
belt is not fastened when occupied.
• The seat belt warning light will also illumi- nate if a rear passenger seat belt is
changed from fastened to unfastened. • If the driver’s seat belt is not fastened
when the ignition switch is pushed to the
ON position, the chime will sound shortly.
• If the vehicle is driven above 9 mph (15 km/h) in the conditions that illuminate
the seat belt warning light, the lamp will
begin to blink and the chime will sound
for over one minute, or until the seat belt
is fastened again.
NOTE:
•The warning light and/or chime may
activate if an object is placed in the un-
occupied front passenger seat. In this
case, please remove the object from
the front passenger seat.
• The warning light and/or chime may
activate if any seat belt is unfastened
before the vehicle comes to a complete
stop. Please remain fastened until the
vehicle has come to a complete stop.
Security indicator light
This light blinks when the ignition switch is
placed in the OFF, LOCK or ACC position.
The blinking security indicator light indi-
cates that the security systems equipped
on the vehicle are operational.
Instruments and controls2-11
Page 238 of 518
OPERATING TIPS
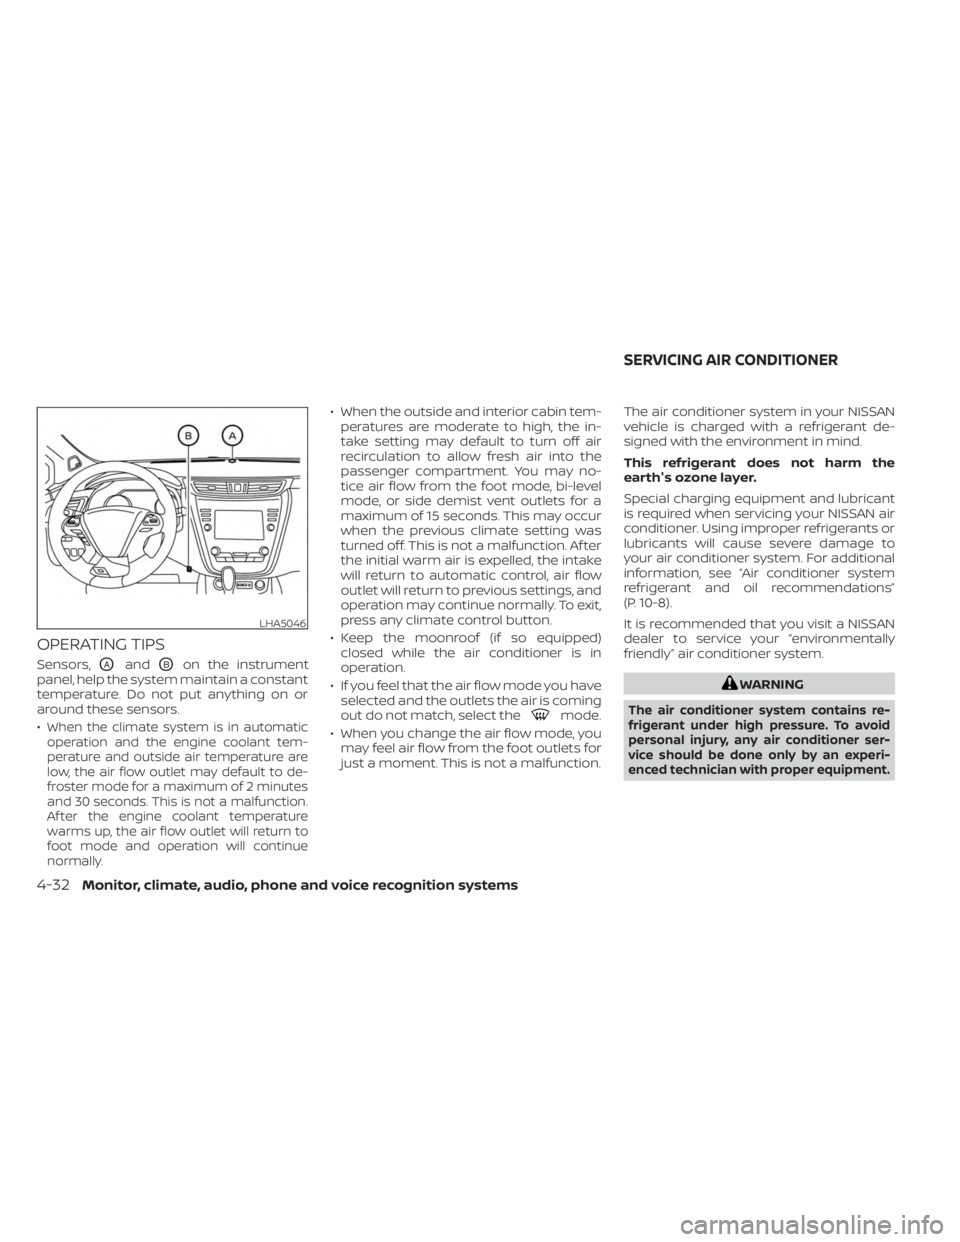
Sensors,OAandOBon the instrument
panel, help the system maintain a constant
temperature. Do not put anything on or
around these sensors.
•
When the climate system is in automatic
operation and the engine coolant tem-
perature and outside air temperature are
low, the air flow outlet may default to de-
froster mode for a maximum of 2 minutes
and 30 seconds. This is not a malfunction.
Af ter the engine coolant temperature
warms up, the air flow outlet will return to
foot mode and operation will continue
normally.
• When the outside and interior cabin tem- peratures are moderate to high, the in-
take setting may default to turn off air
recirculation to allow fresh air into the
passenger compartment. You may no-
tice air flow from the foot mode, bi-level
mode, or side demist vent outlets for a
maximum of 15 seconds. This may occur
when the previous climate setting was
turned off. This is not a malfunction. Af ter
the initial warm air is expelled, the intake
will return to automatic control, air flow
outlet will return to previous settings, and
operation may continue normally. To exit,
press any climate control button.
• Keep the moonroof (if so equipped) closed while the air conditioner is in
operation.
• If you feel that the air flow mode you have selected and the outlets the air is coming
out do not match, select the
mode.
• When you change the air flow mode, you may feel air flow from the foot outlets for
just a moment. This is not a malfunction. The air conditioner system in your NISSAN
vehicle is charged with a refrigerant de-
signed with the environment in mind.
This refrigerant does not harm the
earth's ozone layer.
Special charging equipment and lubricant
is required when servicing your NISSAN air
conditioner. Using improper refrigerants or
lubricants will cause severe damage to
your air conditioner system. For additional
information, see “Air conditioner system
refrigerant and oil recommendations”
(P. 10-8).
It is recommended that you visit a NISSAN
dealer to service your “environmentally
friendly” air conditioner system.
WARNING
The air conditioner system contains re-
frigerant under high pressure. To avoid
personal injury, any air conditioner ser-
vice should be done only by an experi-
enced technician with proper equipment.
LHA5046
SERVICING AIR CONDITIONER
4-32Monitor, climate, audio, phone and voice recognition systems
Page 256 of 518
(Af ter step 3 is performed, when the ig-
nition switch is pushed without de-
pressing the brake pedal, the ignition
switch position will change to ON.)
4. Push the ignition switch while depress- ing the brake pedal within 10 seconds
af ter the chime sounds. The engine will
start.
NOTE:
• When the ignition switch is pushed tothe ON position or the engine is started
by the above procedure, the Intelligent
Key battery discharge indicator ap-
pears in the vehicle information dis-
play even when the Intelligent Key is
inside the vehicle. This is not a mal-
function. To turn off the Intelligent Key
battery discharge indicator, touch the
ignition switch with the Intelligent Key
again.
• If the Intelligent Key battery discharge indicator appears, replace the battery
as soon as possible. For additional in-
formation, see “Battery replacement”
(P. 8-23).
NISSAN VEHICLE IMMOBILIZER
SYSTEM
The NISSAN Vehicle Immobilizer System
will not allow the engine to start without
the use of the registered key.
If the engine fails to start using a registered
key (for example, when interference is
caused by another registered key, an auto-
mated toll road device or automatic pay-
ment device on the key ring), restart the
engine using the following procedure:
1. Leave the ignition switch in the ON posi- tion for approximately 5 seconds.
2. Place the ignition switch in the OFF or LOCK position, and wait approximately
10 seconds.
3. Repeat steps 1 and 2.
4. Restart the engine while holding the de- vice (which may have caused the inter-
ference) separate from the registered
key.
If the no start condition re-occurs, NISSAN
recommends placing the registered key on
a separate key ring to avoid interference
from other devices. • Make sure the area around the vehicle is
clear.
• Check fluid levels such as engine oil, cool- ant, brake fluid, and windshield-washer
fluid as frequently as possible, or at least
whenever you refuel.
• Check that all windows and lights are clean.
• Visually inspect tires for their appearance and condition. Also check tires for proper
inflation.
• Check that all doors are closed.
• Position seat and adjust head restraints/ headrests.
• Adjust inside and outside mirrors.
• Fasten seat belts and ask all passengers to do likewise.
• Check the operation of warning lights when the ignition switch is placed in the
ON position. For additional information,
see “Warning lights, indicator lights and
audible reminders” (P. 2-9).
BEFORE STARTING THE ENGINE
5-16Starting and driving
Page 397 of 518
8 Do-it-yourself
Maintenance precautions.......................8-2
Engine compartment check locations ...........8-3
Engine cooling system ..........................8-4
Checking engine coolant level ................8-5
Changing engine coolant ....................8-5
Engine oil .......................................8-6
Checking engine oil level .....................8-6
Changing engine oil and oil filter ..............8-6
Continuously Variable Transmission (CVT)
fluid ............................................ 8-10
Power Steering Fluid (PSF) .......................8-11
Brake fluid ....................................... 8-11
Windshield-washer fluid ........................8-12
Windshield-washer fluid reservoir ...........8-12
Battery......................................... 8-14
Jump starting ............................... 8-15
Drive belt ....................................... 8-16
Spark plugs .................................... 8-16
Replacing spark plugs .......................8-16
Air cleaner ..................................... 8-17In-cabin microfilter
.......................... 8-18
Windshield wiper blades ........................8-18
Cleaning .................................... 8-18
Replacing ................................... 8-18
Brakes ......................................... 8-20
Fuses .......................................... 8-20
Engine compartment ....................... 8-21
Passenger compartment ...................8-22
Battery replacement ........................... 8-23
NISSAN Intelligent Key® ......................8-24
Lights .......................................... 8-25
Headlights .................................. 8-25
Fog lights (if so equipped) ...................8-25
Exterior and interior lights ...................8-26
Wheels and tires ............................... 8-28
Tire pressure ................................ 8-28
Tire labeling ................................. 8-32
Types of tires ................................
8-35
Tir
e chains .................................. 8-36
Changing wheels and tires ..................8-37
Page 398 of 518
When performing any inspection or main-
tenance work on your vehicle, always take
care to prevent serious accidental injury
to yourself or damage to the vehicle. The
following are general precautions which
should be closely observed.
WARNING
• Park the vehicle on a level surface,
apply the parking brake securely and
block the wheels to prevent the
vehicle from moving. Move the shif t
lever to P (Park).
• Be sure the ignition switch is in the
OFF or LOCK position when perform-
ing any parts replacement or repairs.
• If you must work with the engine run-
ning, keep your hands, clothing, hair
and tools away from moving fans,
belts and any other moving parts.
• It is advisable to secure or remove
any loose clothing and remove any
jewelry, such as rings, watches, etc.
before working on your vehicle.
• Always wear eye protection when-
ever you work on your vehicle.
•
Your vehicle is equipped with an auto-
matic engine cooling fan. It may come
on at any time without warning, even if the ignition switch is in the OFF posi-
tion and the engine is not running. To
avoid injury, always disconnect the
negative battery cable before working
near the fan.
•
If you must run the engine in an en-
closed space such as a garage, be
sure there is proper ventilation for
exhaust gases to escape.
• Never get under the vehicle while it is
supported only by a jack. If it is nec-
essary to work under the vehicle,
support it with safety stands.
• Keep smoking materials, flame and
sparks away from the fuel tank and
battery.
• Because the fuel lines on gasoline
engine models are under high pres-
sure even when the engine is off, it
is recommended that you visit a
NISSAN dealer for service of the fuel
filter or fuel lines.
CAUTION
• Do not work under the hood while
the engine is hot. Turn the engine off
and wait until it cools down. •
Avoid contact with used engine oil
and coolant. Improperly disposed
engine oil, engine coolant and/or
other vehicle fluids can damage the
environment. Always conform to lo-
cal regulations for disposal of vehicle
fluid.
• Never leave the engine or Continu-
ously Variable Transmission (CVT) re-
lated component harnesses discon-
nected while the ignition switch is in
the ON position.
• Never connect or disconnect the bat-
tery or any transistorized compo-
nent while the ignition switch is in
the ON position.
This “Do-it-yourself ” section gives instruc-
tions regarding only those items which are
relatively easy for an owner to perform.
A Genuine NISSAN service manual is also
available. For additional information, see
“Owner's Manual/Service Manual order in-
formation” (P. 10-33).
You should be aware that incomplete or
improper servicing may result in operating
difficulties or excessive emissions, and
could affect warranty coverage. If in doubt
about any servicing, it is recommended
that you have it done by a NISSAN dealer.
MAINTENANCE PRECAUTIONS
8-2Do-it-yourself
Page 402 of 518
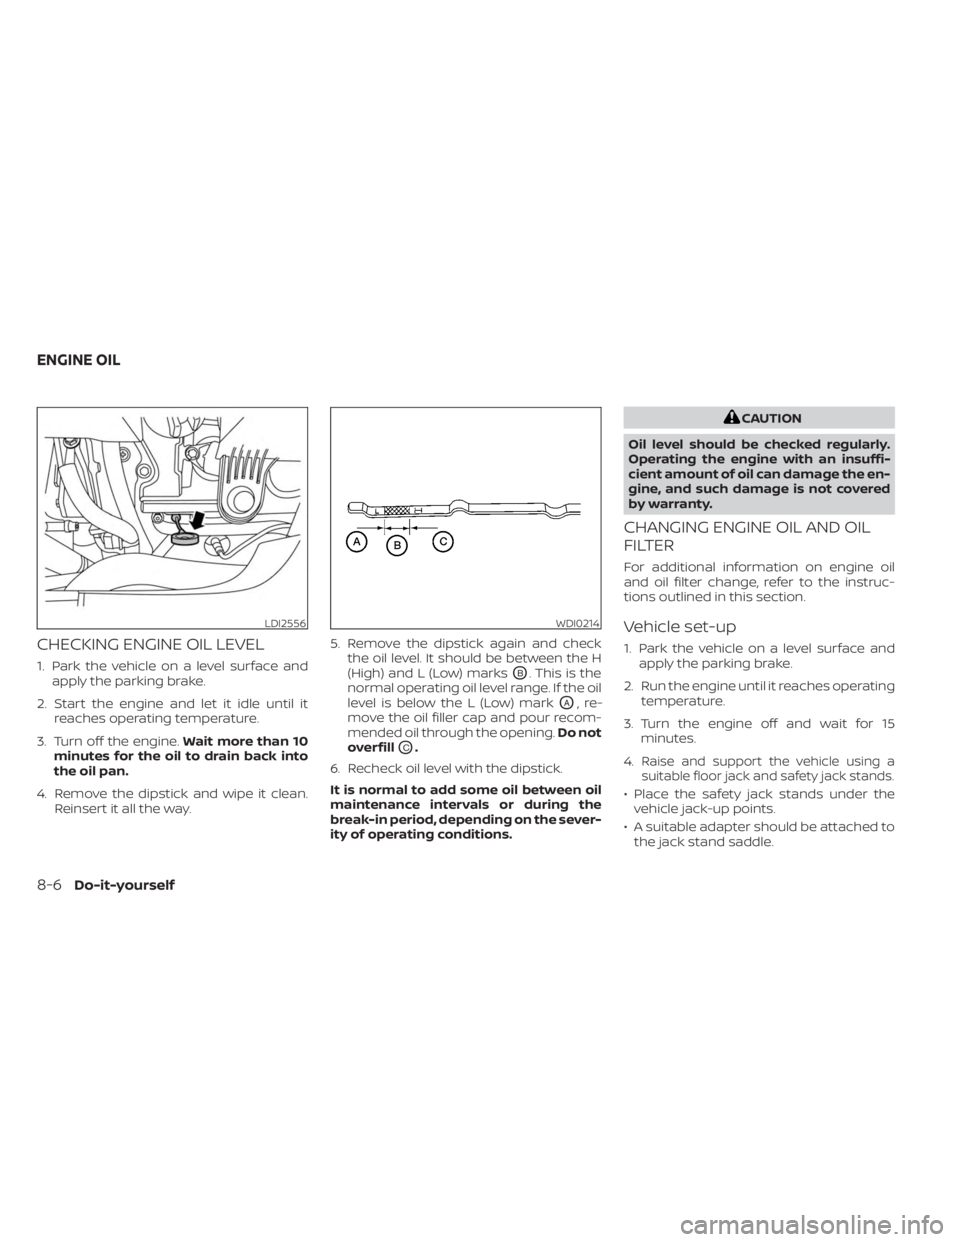
CHECKING ENGINE OIL LEVEL
1. Park the vehicle on a level surface andapply the parking brake.
2. Start the engine and let it idle until it reaches operating temperature.
3. Turn off the engine. Wait more than 10
minutes for the oil to drain back into
the oil pan.
4. Remove the dipstick and wipe it clean. Reinsert it all the way. 5. Remove the dipstick again and check
the oil level. It should be between the H
(High) and L (Low) marksOB. This is the
normal operating oil level range. If the oil
level is below the L (Low) mark
OA,re-
move the oil filler cap and pour recom-
mended oil through the opening. Do not
overfill
OC.
6. Recheck oil level with the dipstick.
It is normal to add some oil between oil
maintenance intervals or during the
break-in period, depending on the sever-
ity of operating conditions.
CAUTION
Oil level should be checked regularly.
Operating the engine with an insuffi-
cient amount of oil can damage the en-
gine, and such damage is not covered
by warranty.
CHANGING ENGINE OIL AND OIL
FILTER
For additional information on engine oil
and oil filter change, refer to the instruc-
tions outlined in this section.
Vehicle set-up
1. Park the vehicle on a level surface and apply the parking brake.
2. Run the engine until it reaches operating temperature.
3. Turn the engine off and wait for 15 minutes.
4.
Raise and support the vehicle using a
suitable floor jack and safety jack stands.
• Place the safety jack stands under the vehicle jack-up points.
• A suitable adapter should be attached to the jack stand saddle.
LDI2556WDI0214
ENGINE OIL
8-6Do-it-yourself
Page 406 of 518
•The dipstick must be inserted in
place to prevent oil spillage from the
dipstick hole when filling the engine
with oil.
6. Coat the gasket on the new filter with clean engine oil.
7. Screw in the oil filter clockwise until a slight resistance is felt, then tighten addi-
tionally more than 2/3 turn.
Oil filter tightening torque: 11 to 15 f t-lb (14.7 to 20.6 N·m)
8. Clean and re-install the drain plug with a new washer. Securely tighten the drain
plug with a wrench. Do not use exces-
sive force.
Drain plug tightening torque: 22 to 29 f t-lb (29.4 to 39.2 N·m)
9. Refill the engine with the recommended oil through the oil filler opening, and in-
stall the oil filler cap securely. For additional information about drain and
refill capacity, see “Recommended fluids/
lubricants and capacities” (P. 10-2). The
drain and refill capacity depends on the oil
temperature and drain time. Use these
specifications for reference only. Always
use the dipstick to determine the proper
amount of oil in the engine.
10. Start the engine and check for leakage
around the drain plug and the oil filter.
Correct as required. Turn the engine off
and wait more than 15 minutes. Check
the oil level with the dipstick. Add en-
gine oil if necessary.
Af ter the operation
1. Reinstall engine protectors in reverse or-der of removal.
2. Lower the vehicle carefully to the ground.
3. Reset oil and oil filter maintenance re- minder. For additional information, see
“Vehicle information display” (P. 2-18).
• Dispose of waste oil and filter properly.
• Check your local regulations.
CAUTION
• NISSAN recommends using Genuine
NISSAN CVT Fluid NS-3 (or equiva-
lent) ONLY in NISSAN CVTs. Do not mix
with other fluids.
• Do not use Automatic Transmission
Fluid (ATF) or manual transmission
fluid in a NISSAN CVT, as it may dam-
age the CVT. Damage caused by the
use of fluids other than as recom-
mended is not covered under
NISSAN's New Vehicle Limited War-
ranty outlined in your Warranty Infor-
mation Booklet.
• Using fluids that are not equivalent
to Genuine NISSAN CVT Fluid NS-3
may also damage the CVT. Damage
caused by the use of fluids other than
as recommended is not covered un-
der NISSAN's New Vehicle Limited
Warranty outlined in your Warranty
Information Booklet.
When checking or replacement of CVT fluid
is required, we recommend a NISSAN
dealer for servicing.
CONTINUOUSLY VARIABLE
TRANSMISSION (CVT) FLUID
8-10Do-it-yourself
Page 440 of 518
Continuously Variable Transmission
(CVT) P (Park) position mechanism:On a
fairly steep hill check that the vehicle is held
securely with the shif t lever in the P (Park)
position without applying any brakes.
Parking brake: Check the parking brake
operation regularly. The vehicle should be
securely held on a fairly steep hill with only
the parking brake applied. If the parking
brake needs adjustment, it is recom-
mended that you visit a NISSAN dealer for
this service.
Seats: Check seat position controls such
as seat adjusters, seatback recliner, etc., to
ensure they operate smoothly and all
latches lock securely in every position.
Check that the head restraints/headrests
move up and down smoothly and the locks
(if so equipped) hold securely in all latched
positions.
Seat belts: Check that all parts of the seat
belt system (for example, buckles, anchors,
adjusters and retractors) operate properly
and smoothly, and are installed securely.
Check the belt webbing for cuts, fraying,
wear or damage.
Steering wheel: Check for changes in the
steering system, such as excessive free
play, hard steering or strange noises. Warning lights and chimes:
Make sure all
warning lights and chimes are operating
properly.
Windshield defroster: Check that the air
comes out of the defroster outlets properly
and in sufficient quantity when operating
the heater or air conditioner.
Windshield wiper and washer*: Check
that the wipers and washer operate prop-
erly and that the wipers do not streak.
Under the hood and vehicle
The maintenance items listed here should
be checked periodically (for example, each
time you check the engine oil or refuel).
Battery* (for maintenance free batter-
ies): This vehicle is equipped with a sealed
maintenance free battery. It is recom-
mended that you visit a NISSAN dealer for
service.
NOTE:
Care should be taken to avoid situations
that can lead to potential battery dis-
charge and potential no-start conditions
such as:
1. Installation or extended use of elec- tronic accessories that consume bat-
tery power when the engine is not
running (Phone chargers, GPS, DVD
players, etc.).
2. Vehicle is not driven regularly and/or only driven short distances.
In these cases, the battery may need to
be charged to maintain battery health.
Brake fluid level*: Make sure that the brake
fluid level is between the MAX and MIN lines
on the reservoir.
Engine coolant level*: Check the coolant
level when the engine is cold.
Engine drive belt*: Make sure the drive
belts are not frayed, worn, cracked or oily.
Engine oil level*: Check the level af ter
parking the vehicle on a level spot and
turning off the engine. Wait more than 15
minutes for the oil to drain back into the oil
pan.
9-4Maintenance and schedules
Page 441 of 518
Engine valve clearance*:Inspect if valve
noise increases.
Exhaust system: Make sure there are no
loose supports, cracks or holes. If the
sound of the exhaust seems unusual or
there is a smell of exhaust fumes, immedi-
ately have the exhaust system inspected. It
is recommended that you visit a NISSAN
dealer for this service. For additional infor-
mation, see “Exhaust gas (carbon monox-
ide)” (P. 5-4).
Fluid leaks: Check under the vehicle for
fuel, oil, water or other fluid leaks af ter the
vehicle has been parked for a while. Water
dripping from the air conditioner af ter use
is normal. If you should notice any leaks or if
fuel fumes are evident, check for the cause
and have it corrected immediately.
Power steering fluid level* and lines:
Check the level when the fluid is cold, with
the engine off. Check the lines for proper
attachment, leaks, cracks, etc.
Radiator and hoses: Check the front of the
radiator and clean off any dirt, insects,
leaves, etc., that may have accumulated.
Make sure the hoses have no cracks, defor-
mation, rot or loose connections. Underbody:
The underbody is frequently
exposed to corrosive substances such as
those used on icy roads or to control dust. It
is very important to remove these sub-
stances, otherwise rust may form on the
floor pan, frame, fuel lines and around the
exhaust system. At the end of winter, the
underbody should be thoroughly flushed
with plain water, being careful to clean
those areas where mud and dirt may accu-
mulate. For additional information, see
“Cleaning exterior” (P. 7-2).
Windshield-washer fluid*: Check that
there is adequate fluid in the reservoir. The following descriptions are provided to
give you a better understanding of the
scheduled maintenance items that should
be regularly checked or replaced. The
maintenance schedule indicates at which
mileage/time intervals each item requires
service.
In addition to scheduled maintenance,
your vehicle requires that some items be
checked during normal day-to-day opera-
tion. For additional information, see “Gen-
eral maintenance” (P. 9-2).
Items marked with
“*”are recommended
by NISSAN for reliable vehicle operation.
You are not required to perform mainte-
nance on these items in order to maintain
the warranties which come with your
NISSAN. Other maintenance items and in-
tervals are required.
When applicable, additional information
can be found in the “Do-it-yourself ” section
of this manual.
EXPLANATION OF SCHEDULED
MAINTENANCE ITEMS
Maintenance and schedules9-5
Page 496 of 518
• Have your vehicle serviced more of tenthan at intervals specified in the recom-
mended Maintenance Schedule in the
“Maintenance and schedules” section of
this manual.
• When making a turn, your trailer wheels will be closer to the inside of the turn than
your vehicle wheels. To compensate for
this, make a larger than normal turning
radius during the turn.
• Crosswinds and rough roads will ad- versely affect vehicle/trailer handling,
possibly causing vehicle sway. When be-
ing passed by larger vehicles, be pre-
pared for possible changes in crosswinds
that could affect vehicle handling.
Do the following if the trailer begins to
sway:
1. Take your foot off the accelerator pedal to allow the vehicle to coast and steer as
straight ahead as the road conditions
allow. This combination will help stabilize
the vehicle
– Do not correct trailer sway by steering or applying the brakes.
2. When the trailer sway stops, gently apply the brakes and pull to the side of the
road in a safe area. 3. Try to rearrange the trailer load so it is
balanced as described in this section.
• Be careful when passing other vehicles. Passing while towing a trailer requires
considerably more distance than normal
passing. Remember, the length of the
trailer must also pass the other vehicle
before you can safely change lanes.
• Downshif t the transmission to a lower gear for engine braking when driving
down steep or long hills. This will help
slow the vehicle without applying the
brakes.
• Avoid holding the brake pedal down too long or too frequently. This could cause
the brakes to overheat, resulting in re-
duced braking efficiency.
• Increase your following distance to allow for greater stopping distances while tow-
ing a trailer. Anticipate stops and brake
gradually.
• NISSAN recommends that the cruise control not be used while towing a trailer.
• Some states or provinces have specific regulations and speed limits for vehicles
that are towing trailers. Obey the local
speed limits. • Check your hitch, trailer wiring harness
connections, and trailer wheel lug nuts
af ter 50 miles (80 km) of travel and at
every break.
• When launching a boat, don't allow the water level to go over the exhaust tail
pipe or rear bumper.
• Make sure you disconnect the trailer lights before backing the trailer into the
water or the trailer lights may burn out.
When towing a trailer, final drive gear oil
should be replaced and transmission oil/
fluid should be changed more fre-
quently. For additional information, see
“Do-it-yourself ” (P. 8-2).
FLAT TOWING FOR ALL–WHEEL
DRIVE VEHICLE (if so equipped)
Towing your vehicle with all four wheels on
the ground is sometimes called flat towing.
This method is sometimes used when
towing a vehicle behind a recreational ve-
hicle, such as a motor home.
10-28Technical and consumer information