child seat NISSAN NOTE 2006 User Guide
[x] Cancel search | Manufacturer: NISSAN, Model Year: 2006, Model line: NOTE, Model: NISSAN NOTE 2006Pages: 235, PDF Size: 2.29 MB
Page 35 of 235
propriate child restraint should be chosen and
purchased according to the child and the ve-
hicle as it may not be possible to properly
install some types of child restraints in your
vehicle.
•Improper use of a child restraint can increase
injuries for both the infant or child and other
occupants in the vehicle.
•When your child restraint is not in use, keep it
secured with a seat belt to prevent it from
being thrown forward in case of a sudden stop
or accident.
•Remember that a child restraint left in a closed
vehicle can become very hot. Check the seat-
ing surface and buckles before placing your
child in the child restraint.
•After attaching a child restraint, test the seat
before you place the child in it. Tilt it from side
to side. Try to tug it forward and check
whether the belt holds it in place. If the re-
straint is not secure, tighten the belt as nec-
essary, or put the restraint in another seat
and test it again.
•If the child restraint is not anchored properly,
the risk of a child being injured in a collision
or a sudden stop greatly increases.
•The front passenger seat and adjustable rear
bench seat should be positioned to fit the
child seat appropriately. See “Installation of a
child restraint system on the front passengerseat” later in this section and “Installation of a
child restraint system on rear seats” later in
this section.
•For a front facing child restraint, installed on a
three-point type lap/shoulder belt, make sure
the shoulder belt does not go in front of the
child’s face or neck. If it does, put the shoul-
der belt behind the child restraint.
•If the child restraint is equipped with a locking
clip, ensure that the clip is securely fastened
to the vehicle seat belt. If the locking clip is
not used, injuries could result from the child
restraint tipping over during normal vehicle
braking or cornering.
Safety — seats, seat belts and supplemental restraint system1-17
Page 36 of 235
Approved child restraint positions List of approved ISOFIX and specific
Universal child restraints
Age group Seating position
Rear outer pas-
sengerRear centre pas-
senger
Group0(<10
kg - 0 to 9
months)Fair G0/1 (1) (2) Romer Baby
Safe (1) (3)
Group 0+ (< 13
kg - 0 to 24
months)Fair G0/1 (1) (2) Romer Baby
Safe (1) (3)
Group1(9to18
kg - 9 to 48
months)Fair G0/1 (2) Romer Lord (3)
Romer Duo-Plus
(3)
Group 2 and 3
(15to36kg–4
to 12 years)Romer Kid (3) Romer Kid (3)
(1) Rearward facing only
(2) The child restraint requires an additional ISOFIX plat-
form to be fitted to your vehicle. Refer to a NISSAN
dealer or qualified workshop for proper platform refer-
ences.
(3) Universal mode ONLY
WARNING
•Since your vehicle is equipped with a front
passenger air bag system, do not fit a rear
facing child restraint on the front passenger
seat without first deactivating the front pas-
senger air bag as such a restraint system used
Age groupSeating position
Front passenger (with
deactivatedfront pas-
senger air bag ONLY)Rear outer passengerRear centre pas-
senger
Group 0 (< 10 kg - 0 to 9 months) U (1) U or I (1) L (1)
Group 0+ (< 13 kg - 0 to 24 months) U (1) U or I (1) L (1)
Group 1 (9 to 18 kg - 9 to 48 months) U U or I L
Group2and3(15to36kg–4to12years) U U L
U: Suitable for “Universal” category -forward and rearward facing child restraints- approved in this age group.
I: Suitable for “ISOFIX (with Top Tether)” category.
L: Suitable for particular child restraints given in the following table. These restraints may be of the specific vehicle,
restricted, “semi-Universal” or “Universal” categories.
X: Seat position not suitable for restraints in this age group.
(1) Rearward facing only.
NOTE
•For the forward facing child restraint position on the rear seat, slide the front passenger seat as
far forwards as possible and the rear bench seat to its rearmost position.
•For the rearward facing child restraint position on the rear seat, slide the front passenger seat
as far backwards as possible and slide the rear bench seat forwards until the edge of the child
restraint touches the front seat.
•For the rearward facing child restraint on the front passenger seat, slide the front passenger
seat forward so that the child restraint touches the vehicle dashboard.
1-18Safety — seats, seat belts and supplemental restraint system
Page 37 of 235
in this position could cause serious injury to
the infant in case of air bag deployment dur-
ing a collision.
•In vehicles equipped with a side air bag sys-
tem, do not let any infants or small children sit
in the front passenger’s seat as the air bag
may cause serious injury in case of deploy-
ment during a collision.
NOTE
Universal child restraints approved to ECE Regu-
lation No. 44.03 are clearly marked “Universal”.
INSTALLATION OF A CHILD
RESTRAINT SYSTEM ON THE FRONT
PASSENGER SEAT
WARNING
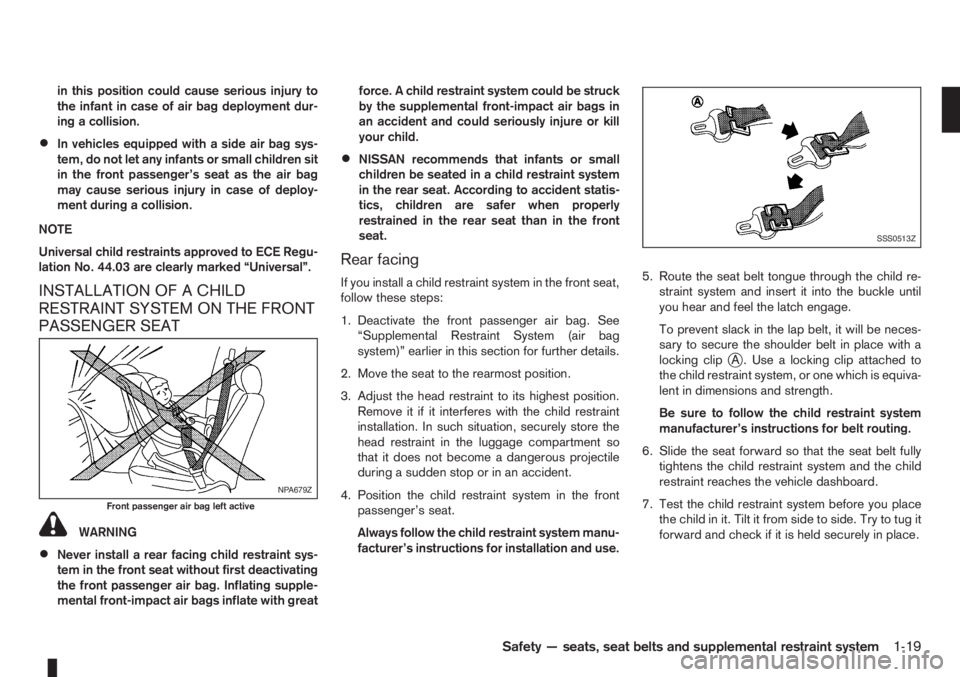
•Never install a rear facing child restraint sys-
tem in the front seat without first deactivating
the front passenger air bag. Inflating supple-
mental front-impact air bags inflate with greatforce. A child restraint system could be struck
by the supplemental front-impact air bags in
an accident and could seriously injure or kill
your child.
•NISSAN recommends that infants or small
children be seated in a child restraint system
in the rear seat. According to accident statis-
tics, children are safer when properly
restrained in the rear seat than in the front
seat.
Rear facing
If you install a child restraint system in the front seat,
follow these steps:
1. Deactivate the front passenger air bag. See
“Supplemental Restraint System (air bag
system)” earlier in this section for further details.
2. Move the seat to the rearmost position.
3. Adjust the head restraint to its highest position.
Remove it if it interferes with the child restraint
installation. In such situation, securely store the
head restraint in the luggage compartment so
that it does not become a dangerous projectile
during a sudden stop or in an accident.
4. Position the child restraint system in the front
passenger’s seat.
Always follow the child restraint system manu-
facturer’s instructions for installation and use.5. Route the seat belt tongue through the child re-
straint system and insert it into the buckle until
you hear and feel the latch engage.
To prevent slack in the lap belt, it will be neces-
sary to secure the shoulder belt in place with a
locking clip
jA . Use a locking clip attached to
the child restraint system, or one which is equiva-
lent in dimensions and strength.
Be sure to follow the child restraint system
manufacturer’s instructions for belt routing.
6. Slide the seat forward so that the seat belt fully
tightens the child restraint system and the child
restraint reaches the vehicle dashboard.
7. Test the child restraint system before you place
the child in it. Tilt it from side to side. Try to tug it
forward and check if it is held securely in place.
NPA679Z
Front passenger air bag left active
SSS0513Z
Safety — seats, seat belts and supplemental restraint system1-19
Page 38 of 235
INSTALLATION OF A CHILD
RESTRAINT SYSTEM ON REAR
SEATS
WARNING
•NISSAN recommends that infants or small
children be seated in a child restraint system.
According to accident statistics, children are
safer when properly restrained in the rear seat
than in the front seat.
•The direction of the child restraint system de-
pends on the type of the child restraint sys-
tem and the size of the child.
Front-facing
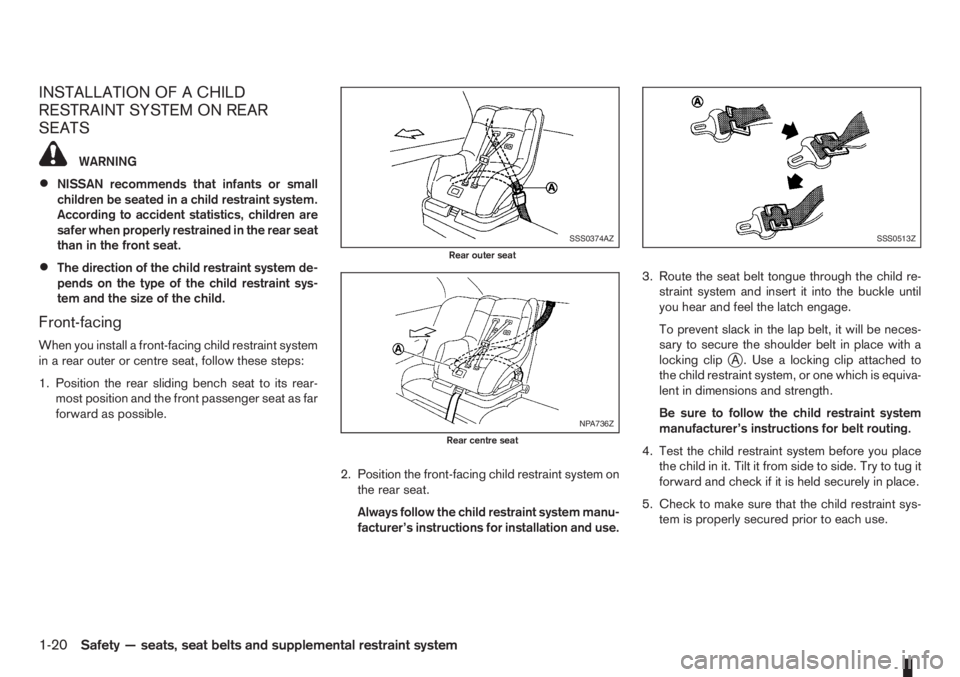
When you install a front-facing child restraint system
in a rear outer or centre seat, follow these steps:
1. Position the rear sliding bench seat to its rear-
most position and the front passenger seat as far
forward as possible.
2. Position the front-facing child restraint system on
the rear seat.
Always follow the child restraint system manu-
facturer’s instructions for installation and use.3. Route the seat belt tongue through the child re-
straint system and insert it into the buckle until
you hear and feel the latch engage.
To prevent slack in the lap belt, it will be neces-
sary to secure the shoulder belt in place with a
locking clipjA . Use a locking clip attached to
the child restraint system, or one which is equiva-
lent in dimensions and strength.
Be sure to follow the child restraint system
manufacturer’s instructions for belt routing.
4. Test the child restraint system before you place
the child in it. Tilt it from side to side. Try to tug it
forward and check if it is held securely in place.
5. Check to make sure that the child restraint sys-
tem is properly secured prior to each use.
SSS0374AZ
Rear outer seat
NPA736Z
Rear centre seat
SSS0513Z
1-20Safety — seats, seat belts and supplemental restraint system
Page 39 of 235
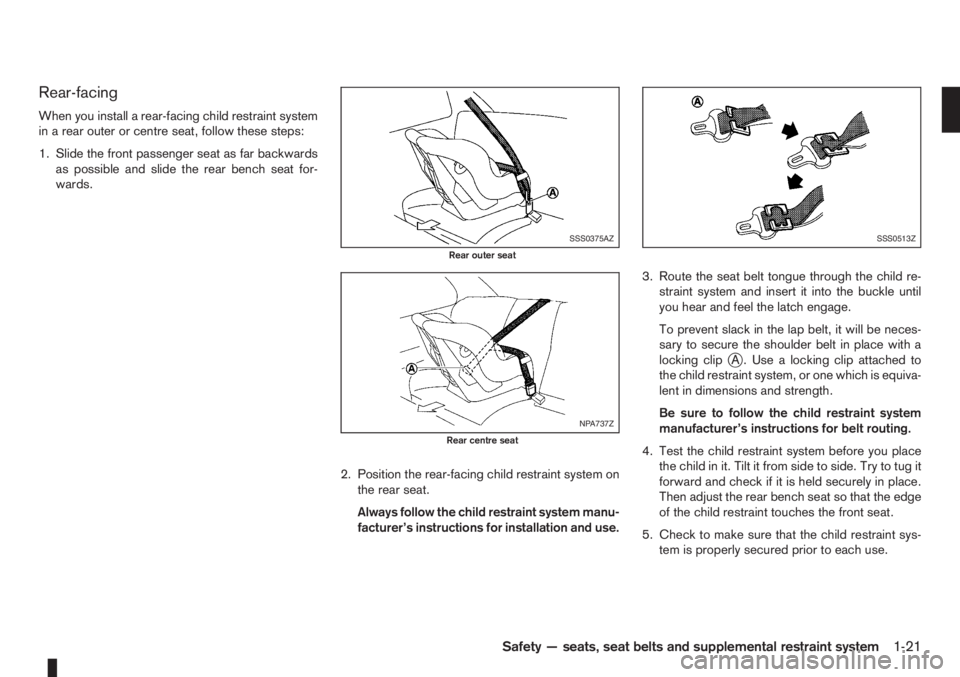
Rear-facing
When you install a rear-facing child restraint system
in a rear outer or centre seat, follow these steps:
1. Slide the front passenger seat as far backwards
as possible and slide the rear bench seat for-
wards.
2. Position the rear-facing child restraint system on
the rear seat.
Always follow the child restraint system manu-
facturer’s instructions for installation and use.3. Route the seat belt tongue through the child re-
straint system and insert it into the buckle until
you hear and feel the latch engage.
To prevent slack in the lap belt, it will be neces-
sary to secure the shoulder belt in place with a
locking clip
jA . Use a locking clip attached to
the child restraint system, or one which is equiva-
lent in dimensions and strength.
Be sure to follow the child restraint system
manufacturer’s instructions for belt routing.
4. Test the child restraint system before you place
the child in it. Tilt it from side to side. Try to tug it
forward and check if it is held securely in place.
Then adjust the rear bench seat so that the edge
of the child restraint touches the front seat.
5. Check to make sure that the child restraint sys-
tem is properly secured prior to each use.
SSS0375AZ
Rear outer seat
NPA737Z
Rear centre seat
SSS0513Z
Safety — seats, seat belts and supplemental restraint system1-21
Page 40 of 235
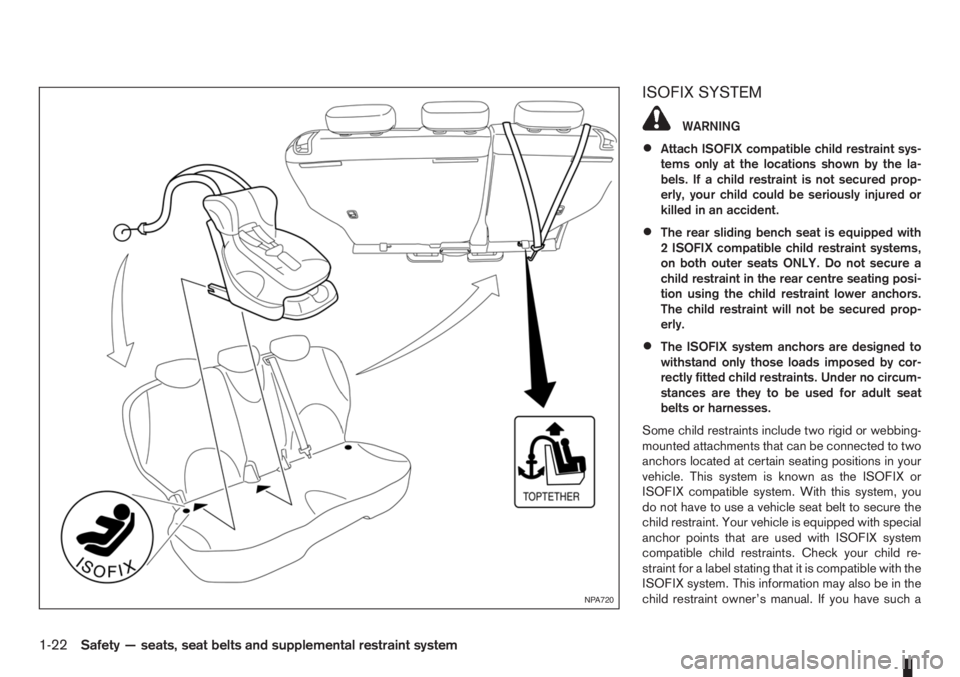
ISOFIX SYSTEM
WARNING
•Attach ISOFIX compatible child restraint sys-
tems only at the locations shown by the la-
bels. If a child restraint is not secured prop-
erly, your child could be seriously injured or
killed in an accident.
•The rear sliding bench seat is equipped with
2 ISOFIX compatible child restraint systems,
on both outer seats ONLY. Do not secure a
child restraint in the rear centre seating posi-
tion using the child restraint lower anchors.
The child restraint will not be secured prop-
erly.
•The ISOFIX system anchors are designed to
withstand only those loads imposed by cor-
rectly fitted child restraints. Under no circum-
stances are they to be used for adult seat
belts or harnesses.
Some child restraints include two rigid or webbing-
mounted attachments that can be connected to two
anchors located at certain seating positions in your
vehicle. This system is known as the ISOFIX or
ISOFIX compatible system. With this system, you
do not have to use a vehicle seat belt to secure the
child restraint. Your vehicle is equipped with special
anchor points that are used with ISOFIX system
compatible child restraints. Check your child re-
straint for a label stating that it is compatible with the
ISOFIX system. This information may also be in the
child restraint owner’s manual. If you have such a
NPA720
1-22Safety — seats, seat belts and supplemental restraint system
Page 41 of 235
child restraint, refer to the illustration for the rear
seating positions equipped with ISOFIX system an-
chors which can be used to secure the child re-
straint.
The ISOFIX system anchors are located at the rear
of the seat cushion near the seatback (as illustrated).
Labels are attached to the seat cushion to help you
locate the ISOFIX system anchors.
CAUTION
•The child restraint may also require the use of
a top tether strap. See “Top tether strap for
child restraint” later in this section for instal-
lation instructions. Alternatively, the child re-
straint may require an anti-rotation device
such as support leg. Refer to the child re-
straint system manufacturer’s instructions.
•When installing a child restraint, carefully read
and follow the instructions in this manual and
those supplied with the child restraint.
When you install an ISOFIX system compatible child
restraint to the lower anchor attachments in the rear
seat, follow these steps.
Inspect the lower anchors by inserting your fingers
into the lower anchor area and feeling to make sure
there are no obstructions over the ISOFIX system
anchors, such as seat belt webbing or seat cushion
material. The child restraint will not be secured prop-
erly if the ISOFIX system anchors are obstructed.
1. To install the ISOFIX system compatible child
restraint, insert the child restraint ISOFIX systemanchor attachments into the anchor points on the
rear seat. See “Top tether strap for child
restraint” later in this section for top tether strap
installation instructions.
2. Fit the ISOFIX funnel guides (supplied with the
ISOFIX child seat – where fitted) to the vehicle
ISOFIX brackets located at the base of the rear
outer seat cushions (refer to the ISOFIX label for
appropriate locations).
3. After attaching the child restraint and before plac-
ing the child in it, use force to tilt the child re-
straint from side to side and tug it forward to
make sure that the child restraint is securely held
in place. Make sure that both ISOFIX anchor-
ages have latched correctly.
4. Check to make sure that the child restraint is
properly secured prior to each use.
NOTE
•For forward facing ISOFIX child restraint
on the rear seat, set the rear sliding bench
seat to its rearmost position and the front
passenger seat as far forward as possible.
•For rearward facing ISOFIX child restraint
on the rear seat, slide the front passenger
seat as far backwards as possible and slide
the rear bench seat forwards until the edge
of the child restraint touches the front seat.
TOP TETHER STRAP FOR CHILD
RESTRAINT
The top tether strap of the child restraint must be
secured to the provided anchor point of your ve-
hicle.Follow the child restraint manufacturer
owner’s manual for installation instructions.
Secure the top tether strap to the anchor bracket as
illustrated.
WARNING
•The child restraint anchor points are designed
to withstand only those loads imposed by cor-
rectly fitted child restraints. Under no circum-
stances are they to be used for adult seat
belts or harnesses.
•The child restraint top tether strap may be
damaged by contact with the rear parcel shelf
or items in the luggage compartment area.
Remove the rear parcel shelf from the vehicle
or secure it in the luggage compartment area.
Also, secure any lose items in the luggage
compartment. Your child could be seriously
injured or killed in a collision if the top tether
strap is damaged.
Safety — seats, seat belts and supplemental restraint system1-23
Page 42 of 235
Anchor point locations
Anchor points are located at the base of the rear
back seat (luggage compartment side).
WARNING
•Refer to the child restraint manufacturer own-
er’s manual for proper installation of the child
restraint’s top tether on the rear bench seat.
If in doubt, consult a NISSAN dealer or quali-
fied workshop.
•Only two anchor points identified by the top
tether labels can be used for top tether strap
anchorage. Under no circumstances should
the luggage hooks be used for top tether strap
anchorage.
CAUTION
If you have any questions when installing a top
tether strap child restraint on the rear seat, con-
sult a NISSAN dealer or qualified workshop for
details.
1-24Safety — seats, seat belts and supplemental restraint system
Page 67 of 235
WARNING
Always secure cargo with ropes or straps to help
prevent it from sliding or shifting. Do not place
cargo higher than the seatbacks. In a sudden
stop or collision, unsecured cargo could cause
personal injury.
UTILITY HOOKS (where fitted)
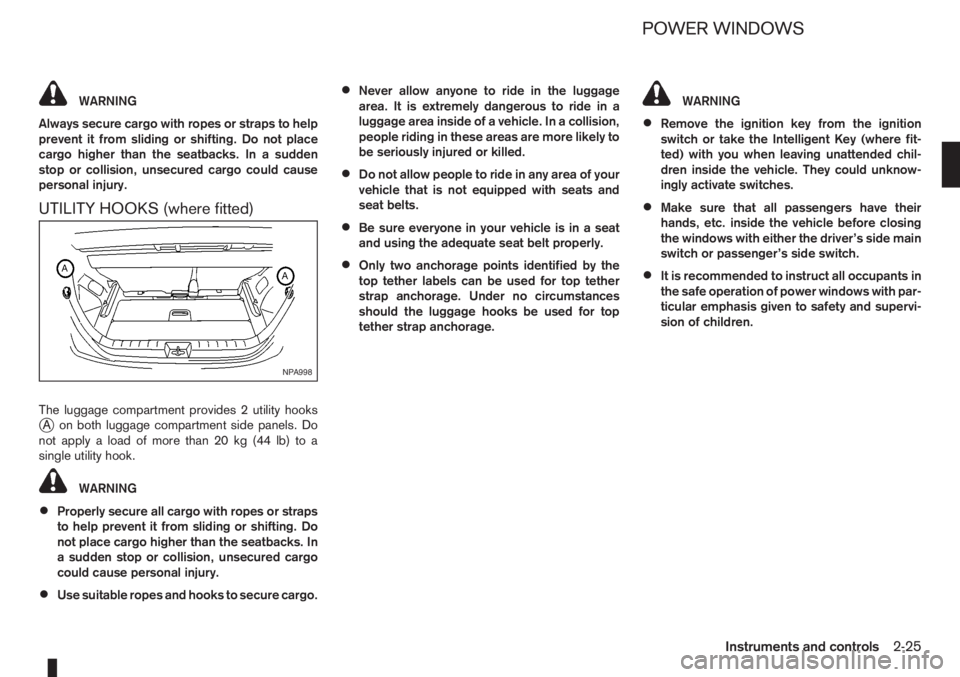
The luggage compartment provides 2 utility hooksjA on both luggage compartment side panels. Do
notapplyaloadofmorethan20kg(44lb)toa
single utility hook.
WARNING
•Properly secure all cargo with ropes or straps
to help prevent it from sliding or shifting. Do
not place cargo higher than the seatbacks. In
a sudden stop or collision, unsecured cargo
could cause personal injury.
•Use suitable ropes and hooks to secure cargo.
•Never allow anyone to ride in the luggage
area. It is extremely dangerous to ride in a
luggage area inside of a vehicle. In a collision,
people riding in these areas are more likely to
be seriously injured or killed.
•Do not allow people to ride in any area of your
vehicle that is not equipped with seats and
seat belts.
•Be sure everyone in your vehicle is in a seat
and using the adequate seat belt properly.
•Only two anchorage points identified by the
top tether labels can be used for top tether
strap anchorage. Under no circumstances
should the luggage hooks be used for top
tether strap anchorage.
WARNING
•Remove the ignition key from the ignition
switch or take the Intelligent Key (where fit-
ted) with you when leaving unattended chil-
dren inside the vehicle. They could unknow-
ingly activate switches.
•Make sure that all passengers have their
hands, etc. inside the vehicle before closing
the windows with either the driver’s side main
switch or passenger’s side switch.
•It is recommended to instruct all occupants in
the safe operation of power windows with par-
ticular emphasis given to safety and supervi-
sion of children.
NPA998
POWER WINDOWS
Instruments and controls2-25
Page 127 of 235
WARNING
•Do not leave children or adults who would
normally require the support of others alone
in your vehicle. Pets should also not be left
alone. They could accidentally injure them-
selves or others through inadvertent opera-
tion of the vehicle. Also, on hot, sunny days,
temperatures in a closed vehicle could quickly
become high enough to cause severe or pos-
sibly fatal injuries to people or animals.
•To prevent luggage or packages from sliding
forward during braking, do not stack anything
in the cargo area higher than the seatbacks.
•Secure all cargo with ropes or straps to pre-
vent it from sliding or shifting.
•Failure to follow proper seating instructions
see “Seats” in the “1. Safety — seats, seat
belts and supplemental restraint system” sec-
tion, could result in serious personal injury in
an accident or sudden stop.
EXHAUST GAS (Carbon Monoxide)
WARNING
•Do not breathe exhaust gases; they contain
colourless and odourless carbon monoxide.
Carbon monoxide is a dangerous gas and can
cause unconsciousness or death.
•If you suspect that exhaust fumes are enter-
ing the vehicle, drive with all windows fully
open and have the vehicle inspected immedi-
ately.
•Do not run the engine in closed spaces, such
as a garage, for any longer than is absolutely
necessary.
•Do not park the vehicle with the engine run-
ning for any extended length of time.
•Keep the back door closed while driving, oth-
erwise exhaust gases could be drawn into the
passenger compartment. If you must drive in
this way for some reason, take the following
steps:
1) Open all the windows.
2) Manual air conditioner equipped models:
Move the air intake lever to the
posi-
tion.
Automatic air conditioner equipped mod-
els: Switch on the outside air mode.
3) Set the fan speed control to the maximum
position to circulate the air.
•If electrical wiring or other cable connections
must pass to a trailer through the seal of the
body, follow the manufacturer’s recommen-
dations to prevent carbon monoxide entry into
the vehicle.
•When a vehicle has been stopped in an open
area with its engine running for any significant
length of time, turn the fan on to force outside
air into the vehicle.
•The exhaust system and body should be in-
spected by a NISSAN dealer or qualified work-
shop whenever:
– the vehicle is raised for service.
– you suspect that exhaust fumes are enter-
ing into the passenger compartment.
– you notice a change in the sound of the
exhaust system.
– you have had an accident involving dam-
age to the exhaust system, underbody, or
rear of the vehicle.
PRECAUTIONS WHEN STARTING
AND DRIVING
Starting and driving5-3