ECU NISSAN NOTE 2012 Owner's Manual
[x] Cancel search | Manufacturer: NISSAN, Model Year: 2012, Model line: NOTE, Model: NISSAN NOTE 2012Pages: 235, PDF Size: 2.29 MB
Page 80 of 235
there is a 10 second time slot to start the engine
after the ignition is turned off. See your NISSAN
dealer for NATS service as soon as possible.
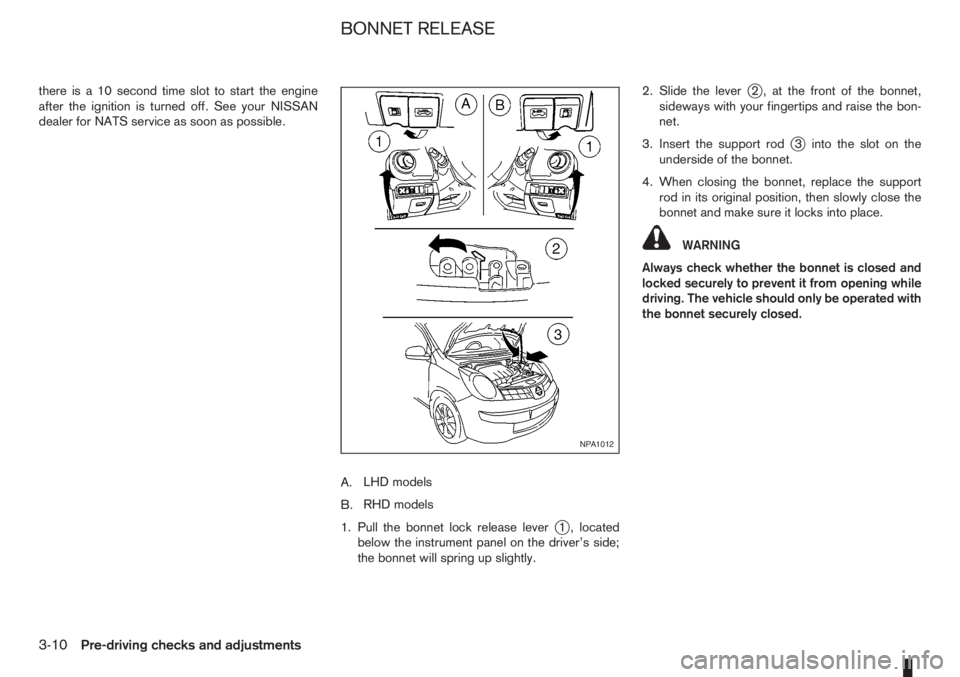
A.LHD models
B.RHD models
1. Pull the bonnet lock release lever
j1 , located
below the instrument panel on the driver’s side;
the bonnet will spring up slightly.2. Slide the lever
j2 , at the front of the bonnet,
sideways with your fingertips and raise the bon-
net.
3. Insert the support rod
j3 into the slot on the
underside of the bonnet.
4. When closing the bonnet, replace the support
rod in its original position, then slowly close the
bonnet and make sure it locks into place.
WARNING
Always check whether the bonnet is closed and
locked securely to prevent it from opening while
driving. The vehicle should only be operated with
the bonnet securely closed.
NPA1012
BONNET RELEASE
3-10Pre-driving checks and adjustments
Page 81 of 235
FUEL FILLER LID OPENER LEVER
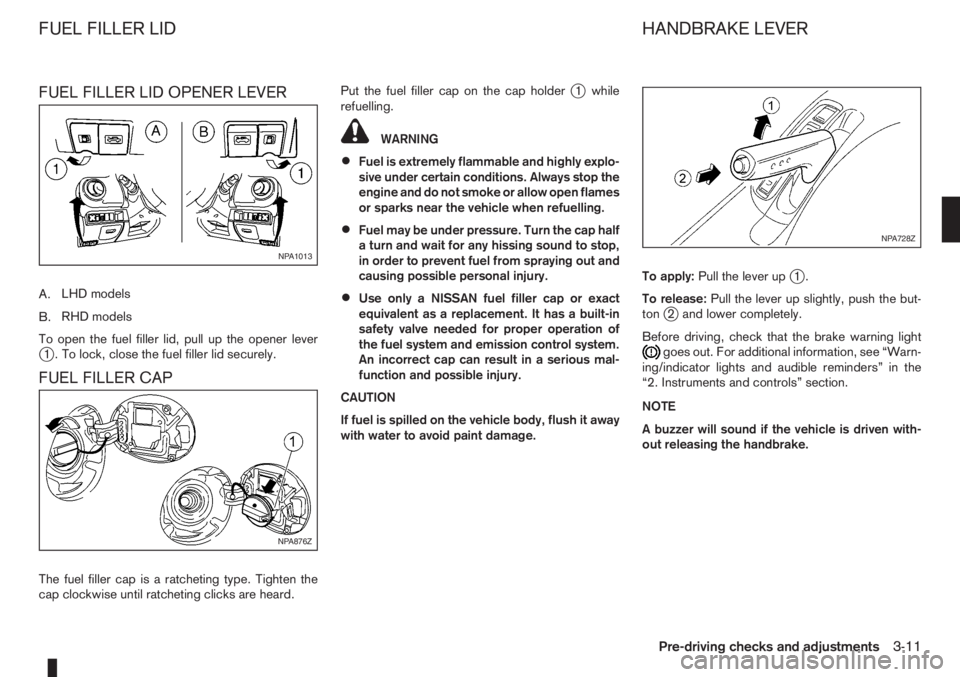
A.LHD models
B.RHD models
To open the fuel filler lid, pull up the opener lever
j1 . To lock, close the fuel filler lid securely.
FUEL FILLER CAP
The fuel filler cap is a ratcheting type. Tighten the
cap clockwise until ratcheting clicks are heard.Put the fuel filler cap on the cap holder
j1 while
refuelling.
WARNING
•Fuel is extremely flammable and highly explo-
sive under certain conditions. Always stop the
engine and do not smoke or allow open flames
or sparks near the vehicle when refuelling.
•Fuel may be under pressure. Turn the cap half
a turn and wait for any hissing sound to stop,
in order to prevent fuel from spraying out and
causing possible personal injury.
•Use only a NISSAN fuel filler cap or exact
equivalent as a replacement. It has a built-in
safety valve needed for proper operation of
the fuel system and emission control system.
An incorrect cap can result in a serious mal-
function and possible injury.
CAUTION
If fuel is spilled on the vehicle body, flush it away
with water to avoid paint damage.To apply:Pull the lever up
j1.
To release:Pull the lever up slightly, push the but-
ton
j2 and lower completely.
Before driving, check that the brake warning light
goes out. For additional information, see “Warn-
ing/indicator lights and audible reminders” in the
“2. Instruments and controls” section.
NOTE
A buzzer will sound if the vehicle is driven with-
out releasing the handbrake.
NPA1013
NPA876Z
NPA728Z
FUEL FILLER LID HANDBRAKE LEVER
Pre-driving checks and adjustments3-11
Page 101 of 235
The only way to unlock the audio unit is by entering
the radio code number. This code number is shown
on an identification card.
NOTE
•The 4 digit radio code is listed on a card that
you received with your vehicle documenta-
tion.
•Record the radio code shown on the card on
the “Security information” page at the end of
this manual and keep the radio code informa-
tion in a safe, not in the vehicle.
•Contact a NISSAN dealer if you lose the fixed
number card of your audio unit.
Unlocking the unit
If the battery supply to the vehicle is interrupted, the
unit will lock.
When the power is restored and the unit switched
on, the display will show CODE for 3 seconds then
afterwards
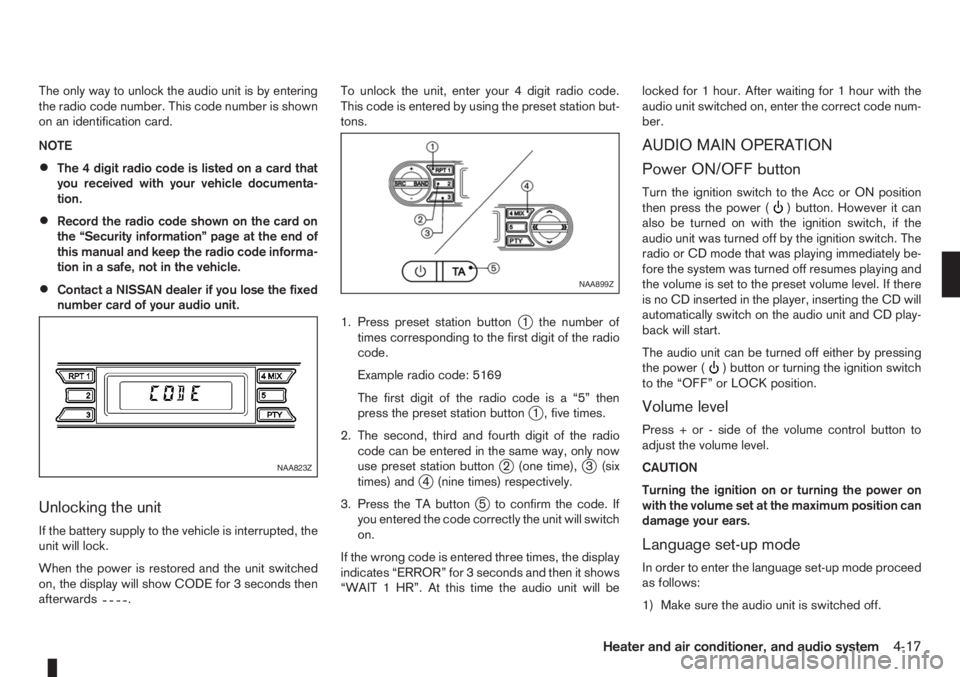
.To unlock the unit, enter your 4 digit radio code.
This code is entered by using the preset station but-
tons.
1. Press preset station button
j1 the number of
times corresponding to the first digit of the radio
code.
Example radio code: 5169
The first digit of the radio code is a “5” then
press the preset station button
j1 , five times.
2. The second, third and fourth digit of the radio
code can be entered in the same way, only now
use preset station button
j2 (one time),j3 (six
times) andj4 (nine times) respectively.
3. Press the TA button
j5 to confirm the code. If
you entered the code correctly the unit will switch
on.
If the wrong code is entered three times, the display
indicates “ERROR” for 3 seconds and then it shows
“WAIT 1 HR”. At this time the audio unit will belocked for 1 hour. After waiting for 1 hour with the
audio unit switched on, enter the correct code num-
ber.
AUDIO MAIN OPERATION
Power ON/OFF button
Turn the ignition switch to the Acc or ON position
then press the power () button. However it can
also be turned on with the ignition switch, if the
audio unit was turned off by the ignition switch. The
radio or CD mode that was playing immediately be-
fore the system was turned off resumes playing and
the volume is set to the preset volume level. If there
is no CD inserted in the player, inserting the CD will
automatically switch on the audio unit and CD play-
back will start.
The audio unit can be turned off either by pressing
the power (
) button or turning the ignition switch
to the “OFF” or LOCK position.
Volume level
Press + or - side of the volume control button to
adjust the volume level.
CAUTION
Turning the ignition on or turning the power on
with the volume set at the maximum position can
damage your ears.
Language set-up mode
In order to enter the language set-up mode proceed
as follows:
1) Make sure the audio unit is switched off.
NAA823Z
NAA899Z
Heater and air conditioner, and audio system4-17
Page 107 of 235
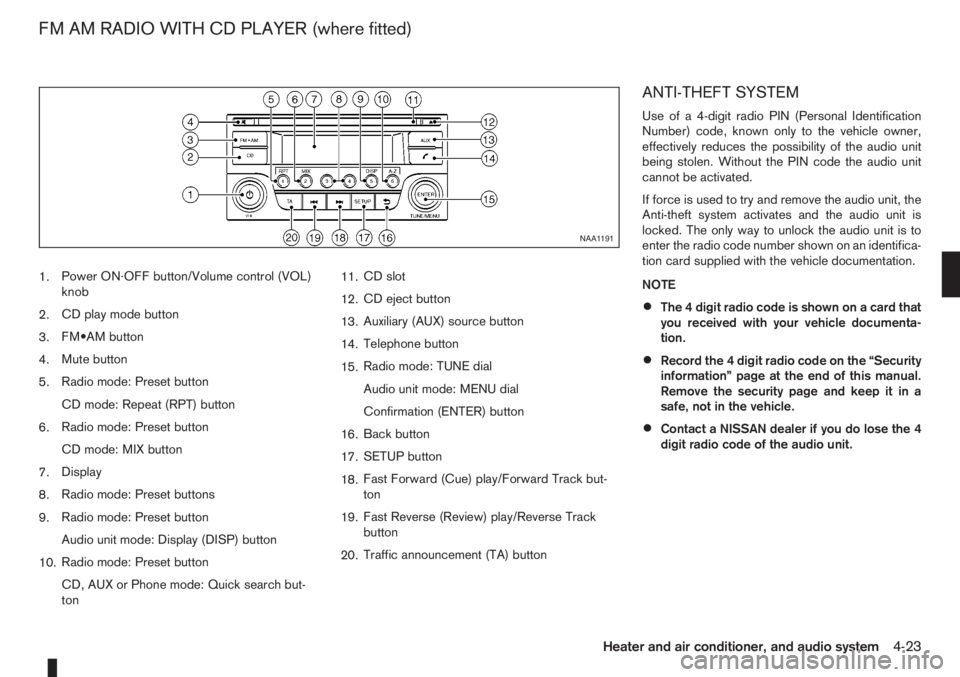
1.Power ON·OFF button/Volume control (VOL)
knob
2.CD play mode button
3.FM•AM button
4.Mute button
5.Radio mode: Preset button
CD mode: Repeat (RPT) button
6.Radio mode: Preset button
CD mode: MIX button
7.Display
8.Radio mode: Preset buttons
9.Radio mode: Preset button
Audio unit mode: Display (DISP) button
10.Radio mode: Preset button
CD, AUX or Phone mode: Quick search but-
ton11.CD slot
12.CD eject button
13.Auxiliary (AUX) source button
14.Telephone button
15.Radio mode: TUNE dial
Audio unit mode: MENU dial
Confirmation (ENTER) button
16.Back button
17.SETUP button
18.Fast Forward (Cue) play/Forward Track but-
ton
19.Fast Reverse (Review) play/Reverse Track
button
20.Traffic announcement (TA) button
ANTI-THEFT SYSTEM
Use of a 4-digit radio PIN (Personal Identification
Number) code, known only to the vehicle owner,
effectively reduces the possibility of the audio unit
being stolen. Without the PIN code the audio unit
cannot be activated.
If force is used to try and remove the audio unit, the
Anti-theft system activates and the audio unit is
locked. The only way to unlock the audio unit is to
enter the radio code number shown on an identifica-
tion card supplied with the vehicle documentation.
NOTE
•The 4 digit radio code is shown on a card that
you received with your vehicle documenta-
tion.
•Record the 4 digit radio code on the “Security
information” page at the end of this manual.
Remove the security page and keep it in a
safe, not in the vehicle.
•Contact a NISSAN dealer if you do lose the 4
digit radio code of the audio unit.
NAA1191
FM AM RADIO WITH CD PLAYER (where fitted)
Heater and air conditioner, and audio system4-23
Page 125 of 235
5Starting and drivingStarting and driving
Running-in schedule ................................................ 5-2
Before starting the engine ........................................ 5-2
Precautions when starting and driving ...................... 5-3
Exhaust gas (Carbon Monoxide) ......................... 5-3
Three-way catalyst (Petrol engine models)................ 5-4
To help prevent damage ..................................... 5-4
Turbocharger system (Diesel engine models) ........... 5-4
Diesel particulate filter (where fitted) ........................ 5-5
Care when driving ................................................... 5-5
Engine cold start period ...................................... 5-5
Loading luggage ................................................. 5-5
Driving on wet roads ........................................... 5-5
Driving under winter conditions ........................... 5-5
Ignition switch.......................................................... 5-6
Manual transmission ........................................... 5-6
Automatic transmission ....................................... 5-6
Steering lock ...................................................... 5-7
Key positions ...................................................... 5-7
NISSAN Anti-Theft System (NATS)..................... 5-7
Ignition knob (where fitted)....................................... 5-7
Manual transmission ........................................... 5-8
Automatic transmission ....................................... 5-8
Steering lock ...................................................... 5-8
Ignition knob position .......................................... 5-8
Emergency key – Intelligent Key dead battery
situation .............................................................. 5-9
NISSAN Anti-Theft System (NATS)..................... 5-9
Starting the engine................................................... 5-10
Driving ..................................................................... 5-11
Driving with manual transmission......................... 5-11Driving with automatic transmission..................... 5-12
Speed limiter ........................................................... 5-15
Speed limiter operations ..................................... 5-16
Cruise control system .............................................. 5-18
Precautions on cruise control system .................. 5-19
Cruise control system operations ........................ 5-19
Ultrasonic Parking Sensor (where fitted) .................. 5-22
Parking .................................................................... 5-22
Trailer towing ........................................................... 5-24
Operating precautions ........................................ 5-24
Tyre pressure ..................................................... 5-25
Safety chains ...................................................... 5-25
Trailer brakes...................................................... 5-25
Trailer detection (where fitted) ............................ 5-25
Installation of coupling device ............................. 5-25
Vehicle security........................................................ 5-26
Power steering system............................................. 5-27
Brake system ........................................................... 5-27
Brake precautions .............................................. 5-27
Anti-lock Braking System (ABS).......................... 5-28
Electronic Stability Programme (ESP) system
(where fitted) ........................................................... 5-29
Electronic Stability Programme (ESP) OFF
switch................................................................. 5-30
Cold weather driving................................................ 5-31
Battery ............................................................... 5-31
Engine coolant .................................................... 5-31
Tyre equipment ................................................... 5-31
Special winter equipment.................................... 5-32
Corrosion protection ........................................... 5-32
Page 127 of 235
WARNING
•Do not leave children or adults who would
normally require the support of others alone
in your vehicle. Pets should also not be left
alone. They could accidentally injure them-
selves or others through inadvertent opera-
tion of the vehicle. Also, on hot, sunny days,
temperatures in a closed vehicle could quickly
become high enough to cause severe or pos-
sibly fatal injuries to people or animals.
•To prevent luggage or packages from sliding
forward during braking, do not stack anything
in the cargo area higher than the seatbacks.
•Secure all cargo with ropes or straps to pre-
vent it from sliding or shifting.
•Failure to follow proper seating instructions
see “Seats” in the “1. Safety — seats, seat
belts and supplemental restraint system” sec-
tion, could result in serious personal injury in
an accident or sudden stop.
EXHAUST GAS (Carbon Monoxide)
WARNING
•Do not breathe exhaust gases; they contain
colourless and odourless carbon monoxide.
Carbon monoxide is a dangerous gas and can
cause unconsciousness or death.
•If you suspect that exhaust fumes are enter-
ing the vehicle, drive with all windows fully
open and have the vehicle inspected immedi-
ately.
•Do not run the engine in closed spaces, such
as a garage, for any longer than is absolutely
necessary.
•Do not park the vehicle with the engine run-
ning for any extended length of time.
•Keep the back door closed while driving, oth-
erwise exhaust gases could be drawn into the
passenger compartment. If you must drive in
this way for some reason, take the following
steps:
1) Open all the windows.
2) Manual air conditioner equipped models:
Move the air intake lever to the
posi-
tion.
Automatic air conditioner equipped mod-
els: Switch on the outside air mode.
3) Set the fan speed control to the maximum
position to circulate the air.
•If electrical wiring or other cable connections
must pass to a trailer through the seal of the
body, follow the manufacturer’s recommen-
dations to prevent carbon monoxide entry into
the vehicle.
•When a vehicle has been stopped in an open
area with its engine running for any significant
length of time, turn the fan on to force outside
air into the vehicle.
•The exhaust system and body should be in-
spected by a NISSAN dealer or qualified work-
shop whenever:
– the vehicle is raised for service.
– you suspect that exhaust fumes are enter-
ing into the passenger compartment.
– you notice a change in the sound of the
exhaust system.
– you have had an accident involving dam-
age to the exhaust system, underbody, or
rear of the vehicle.
PRECAUTIONS WHEN STARTING
AND DRIVING
Starting and driving5-3
Page 131 of 235
2. Turn the key slightly in the ON direction.
3. Turn the key towards the LOCK position.
4. Remove the key.
STEERING LOCK
To lock the steering wheel
1. Turn the key to the LOCK position.
2. Remove the key from the ignition switch.
3. Turn the steering wheel 1/6 of a turn clockwise
from the straight up position.
To unlock the steering wheel
1. Insert the key into the ignition switch.
2. Gently turn the key while rotating the steering
wheel slightly right and left.
KEY POSITIONS
LOCK (Normal parking position) (0)
The ignition key can only be removed when in this
position.
The steering lock can only be locked in this position.
“OFF” (1)
The engine is turned off without locking the steering
wheel.
Acc (Accessories) (2)
This position activates electrical accessories, such
as the radio, when the engine is not running.
ON (Normal operating position) (3)
This position turns on the ignition system and elec-
trical accessories.
START (4)
The engine starter activates and the engine will start.
As soon as the engine has started, release the key
immediately. It will return to the ON position.
NISSAN ANTI-THEFT SYSTEM (NATS)
The NISSAN Anti Theft System (NATS)* will stop
the engine if someone tries to start the engine with-
out using the registered NATS key.
* Immobilizer
If you failed to start the engine using the NATS Key,
turn the ignition knob to the LOCK position, wait for
5 seconds and turn the key to the START position
again to start the engine.
For additional information, see “Security system” in
the “3. Pre-driving checks and adjustments” sec-
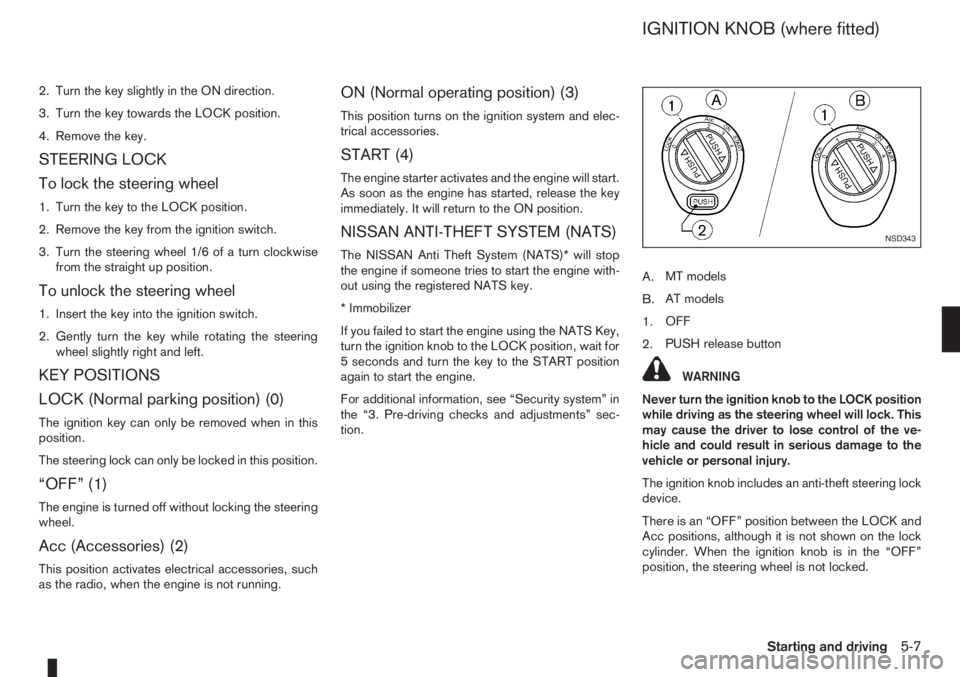
tion.A.MT models
B.AT models
1.OFF
2.PUSH release button
WARNING
Never turn the ignition knob to the LOCK position
while driving as the steering wheel will lock. This
may cause the driver to lose control of the ve-
hicle and could result in serious damage to the
vehicle or personal injury.
The ignition knob includes an anti-theft steering lock
device.
There is an “OFF” position between the LOCK and
Acc positions, although it is not shown on the lock
cylinder. When the ignition knob is in the “OFF”
position, the steering wheel is not locked.
NSD343
IGNITION KNOB (where fitted)
Starting and driving5-7
Page 134 of 235
ligent Key, turn the ignition knob to the LOCK posi-
tion, wait for 5 seconds and turn the knob to the
START position again to start the engine.
For additional information, see “Security system” in
the “3. Pre-driving checks and adjustments” sec-
tion.1. Apply the handbrake.
2.Manual transmission models:
Move the gear lever to N (Neutral) position, and
depress the clutch pedal to the floor while start-
ing the engine.
Automatic transmission models:
Depress the brake pedal and move the selector
lever to the P (Park) or N (Neutral) position. (P
position is preferred).
NOTE
The starter is designed not to operate if the
selector lever is out of the P (Park) or N (Neu-
tral) position.
3. Models without Intelligent Key:
Rotate the steering wheel left to right to release
the ignition lock whilst turning the ignition switch
to the ON position.
Models with Intelligent key:
•MT models – keep the clutch pedal
depressed and/or depress the brake pedal
then:
•AT – depress the brake pedal then:
1) Push the ignition knob.
2) Rotate the steering wheel left to right to
release the ignition lock whilst turning the
ignition knob to the ON position.CAUTION
•Make sure you carry the Intelligent Key with
you when operating the vehicle.
•If the Intelligent Key is too far away from
the driver, the vehicle may not start.
4. For diesel engine models: Wait until the glow
indicator light
goes out.
5. Start the engine with your foot on the brake pedal,
not on the accelerator pedal, by turning the
ignition switch to START.
6. Release the ignition switch when the engine
starts. If the engine starts, but fails to run, repeat
the above procedure.
For petrol engine models:
•If the engine is very hard to start for example
in extremely cold or hot weather, or when
restarting, Proceed as follows:
a. Depress the accelerator pedal a little (ap-
proximately 1/3 to the floor) and hold it
and then start the engine.
b. Release the ignition switch and the accel-
erator pedal when the engine starts.
•If the engine is very hard to start because it is
flooded. Proceed as follows:
a. Depress the accelerator pedal all the way
to the floor and hold it.
b. Start the engine for 5-6 seconds and stop.
After starting the engine, release the ac-
celerator pedal.
STARTING THE ENGINE
5-10Starting and driving
Page 139 of 235
workshop check the transmission and have the
transmission repaired by a NISSAN dealer or
qualified workshop, if necessary.The speed limiter allows you to set the desired ve-
hicle speed limit. While the speed limiter is acti-
vated, you can perform normal braking and accel-
eration, but the vehicle will not exceed the set speed.
When the vehicle reaches the set speed limit or if
the set speed limit is lower than the actual vehicle
speed, the accelerator pedal will not work until the
vehicle speed drops below the set speed limit.
WARNING
•The speed limiter will not automatically brake
the vehicle to the set speed limit.
•Always observe posted speed limits. Do not
set the speed above them.
•Always confirm the setting status of the speed
limiter in the combination meter display.
•When the speed limiter is set, avoid hard ac-
celeration to reach the set limit to ensure that
the system can limit the speed of the vehicle
correctly.
•When additional floor mats are used, be sure
that they are correctly secured and that they
cannot interfere with the accelerator pedal.
Mats not adapted to the vehicle may prevent
proper operation of the speed limiter.
When the speed limiter is on the cruise control sys-
tem cannot be operated.The speed limiter operation switches are located on
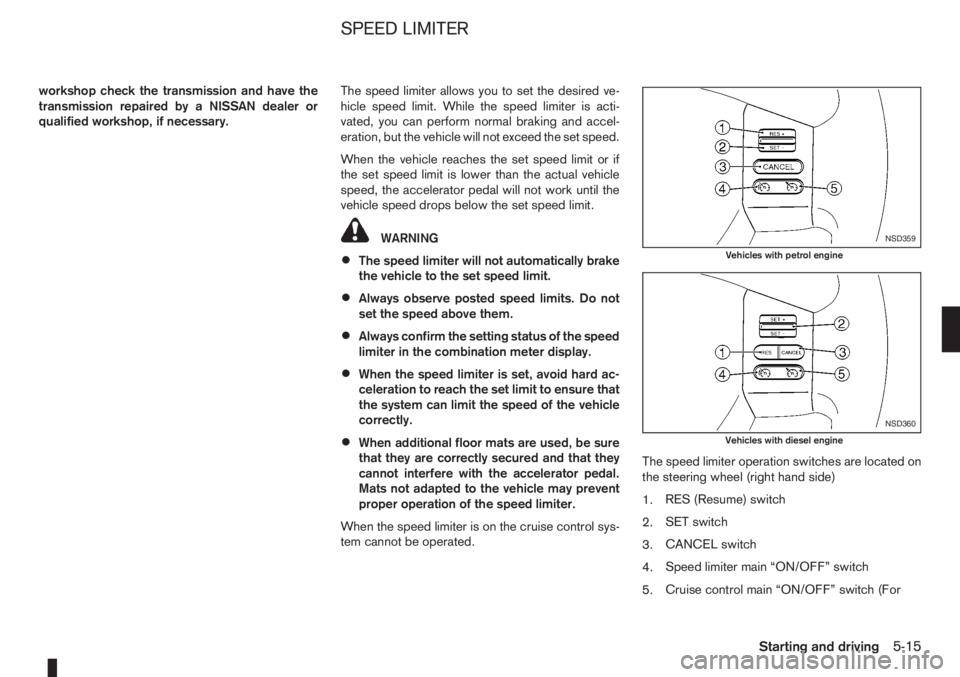
the steering wheel (right hand side)
1.RES (Resume) switch
2.SET switch
3.CANCEL switch
4.Speed limiter main “ON/OFF” switch
5.Cruise control main “ON/OFF” switch (For
NSD359
Vehicles with petrol engine
NSD360
Vehicles with diesel engine
SPEED LIMITER
Starting and driving5-15
Page 140 of 235
details, see “Cruise control system” later in
this section)
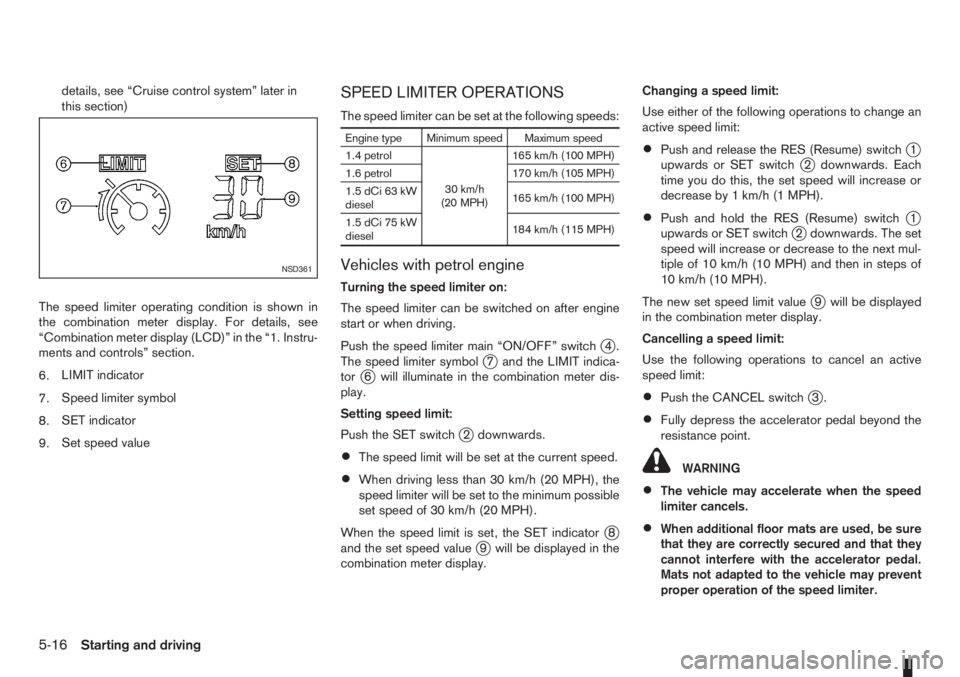
The speed limiter operating condition is shown in
the combination meter display. For details, see
“Combination meter display (LCD)” in the “1. Instru-
ments and controls” section.
6.LIMIT indicator
7.Speed limiter symbol
8.SET indicator
9.Set speed valueSPEED LIMITER OPERATIONS
The speed limiter can be set at the following speeds:
Engine type Minimum speed Maximum speed
1.4 petrol
30 km/h
(20 MPH)165 km/h (100 MPH)
1.6 petrol 170 km/h (105 MPH)
1.5 dCi 63 kW
diesel165 km/h (100 MPH)
1.5 dCi 75 kW
diesel184 km/h (115 MPH)
Vehicles with petrol engine
Turning the speed limiter on:
The speed limiter can be switched on after engine
start or when driving.
Push the speed limiter main “ON/OFF” switch
j4.
The speed limiter symbolj7 and the LIMIT indica-
torj6 will illuminate in the combination meter dis-
play.
Setting speed limit:
Push the SET switch
j2 downwards.
•The speed limit will be set at the current speed.
•When driving less than 30 km/h (20 MPH), the
speed limiter will be set to the minimum possible
set speed of 30 km/h (20 MPH).
When the speed limit is set, the SET indicator
j8
and the set speed valuej9 will be displayed in the
combination meter display.Changing a speed limit:
Use either of the following operations to change an
active speed limit:
•Push and release the RES (Resume) switchj1
upwards or SET switchj2 downwards. Each
time you do this, the set speed will increase or
decrease by 1 km/h (1 MPH).
•Push and hold the RES (Resume) switchj1
upwards or SET switchj2 downwards. The set
speed will increase or decrease to the next mul-
tiple of 10 km/h (10 MPH) and then in steps of
10 km/h (10 MPH).
The new set speed limit value
j9 will be displayed
in the combination meter display.
Cancelling a speed limit:
Use the following operations to cancel an active
speed limit:
•Push the CANCEL switchj3.
•Fully depress the accelerator pedal beyond the
resistance point.
WARNING
•The vehicle may accelerate when the speed
limiter cancels.
•When additional floor mats are used, be sure
that they are correctly secured and that they
cannot interfere with the accelerator pedal.
Mats not adapted to the vehicle may prevent
proper operation of the speed limiter.
NSD361
5-16Starting and driving