brake fluid NISSAN NV PASSENGER VAN 2016 Owners Manual
[x] Cancel search | Manufacturer: NISSAN, Model Year: 2016, Model line: NV PASSENGER VAN, Model: NISSAN NV PASSENGER VAN 2016Pages: 380, PDF Size: 4.05 MB
Page 17 of 380

VQ40DE engine
1. Fuse/Fusible link box (P. 8-24)
2. Engine oil filler cap (P. 8-11)
3. Engine oil dipstick (P. 8-11)
4. Brake fluid reservoir (P. 8-16)
5. Air cleaner (P. 8-21)
6. Windshield-washer fluid reservoir(P. 8-16)
7. Engine coolant reservoir (P. 8-9)
8. Drive belt location (P. 8-19)
9. Power steering fluid reservoir (P. 8-15)
10. Radiator cap (P. 8-9)
11. Battery (P. 8-17)
Refer to the page number indicated in pa-
rentheses for operating details.
LDI2615
ENGINE COMPARTMENT CHECK
LOCATIONS
0-8Illustrated table of contents
Page 18 of 380

VK56DE engine
1. Fuse/Fusible link box (P. 8-24)
2. Power steering fluid reservoir (P. 8-15)
3. Engine coolant reservoir (P. 8-9)
4. Brake fluid reservoir (P. 8-16)
5. Air cleaner (P. 8-21)
6. Windshield-washer fluid reservoir(P. 8-16)
7. Drive belt location (P. 8-19)
8. Engine oil filler cap (P. 8-11)
9. Engine oil dipstick (P. 8-11)
10. Radiator cap (P. 8-9)
11. Battery (P. 8-17)
NOTE:
Engine cover removed for clarity.
Refer to the page number indicated in pa-
rentheses for operating details.
LDI2655
Illustrated table of contents0-9
Page 19 of 380
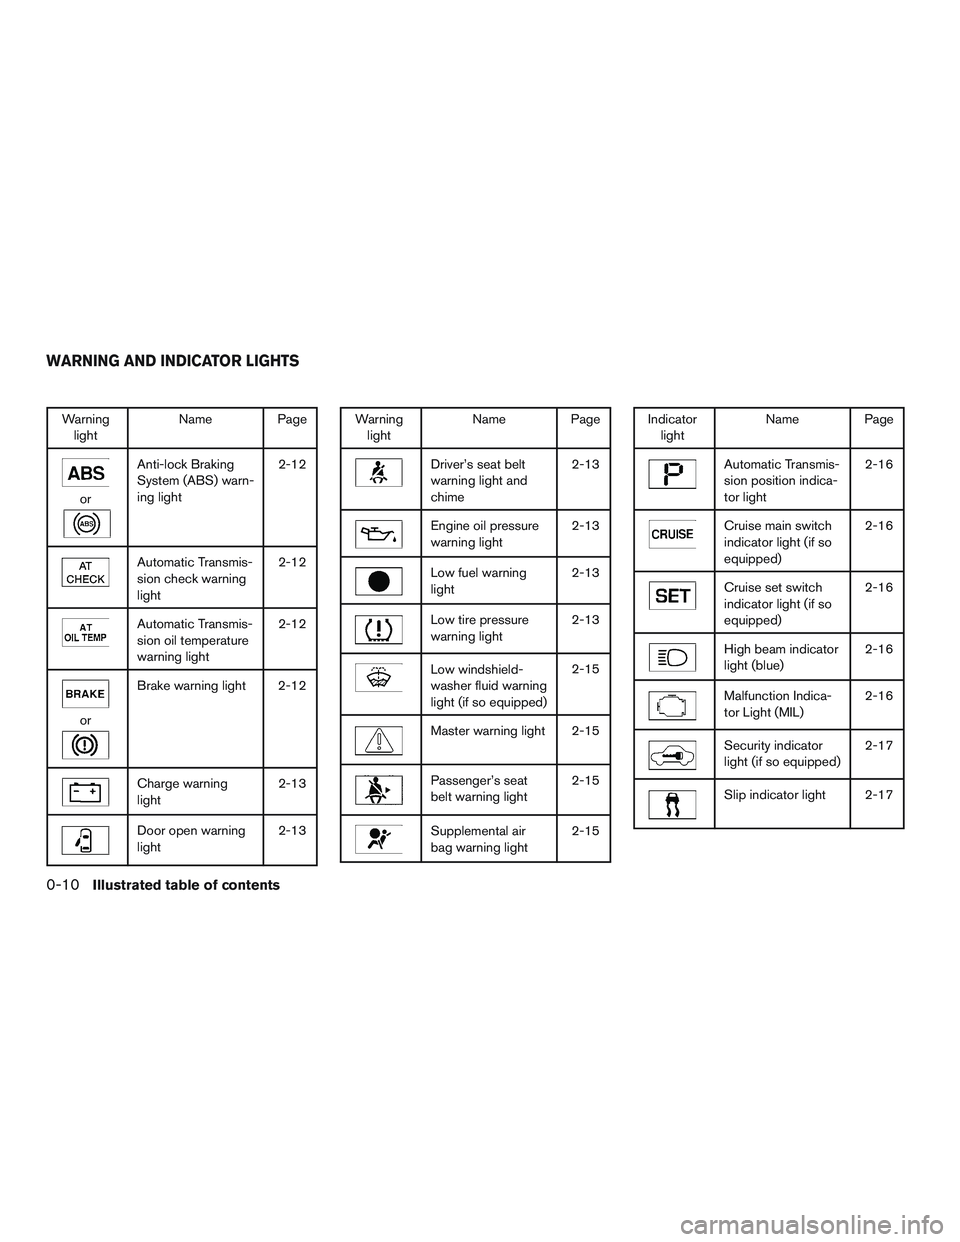
Warninglight Name Page
or
Anti-lock Braking
System (ABS) warn-
ing light 2-12
Automatic Transmis-
sion check warning
light2-12
Automatic Transmis-
sion oil temperature
warning light2-12
or
Brake warning light 2-12
Charge warning
light
2-13
Door open warning
light2-13
Warning
light Name Page
Driver’s seat belt
warning light and
chime 2-13
Engine oil pressure
warning light
2-13
Low fuel warning
light2-13
Low tire pressure
warning light2-13
Low windshield-
washer fluid warning
light (if so equipped)2-15
Master warning light 2-15
Passenger’s seat
belt warning light
2-15
Supplemental air
bag warning light2-15
Indicator
light Name Page
Automatic Transmis-
sion position indica-
tor light 2-16
Cruise main switch
indicator light (if so
equipped)2-16
Cruise set switch
indicator light (if so
equipped)2-16
High beam indicator
light (blue)
2-16
Malfunction Indica-
tor Light (MIL)2-16
Security indicator
light (if so equipped)2-17
Slip indicator light 2-17
WARNING AND INDICATOR LIGHTS
0-10Illustrated table of contents
Page 96 of 380
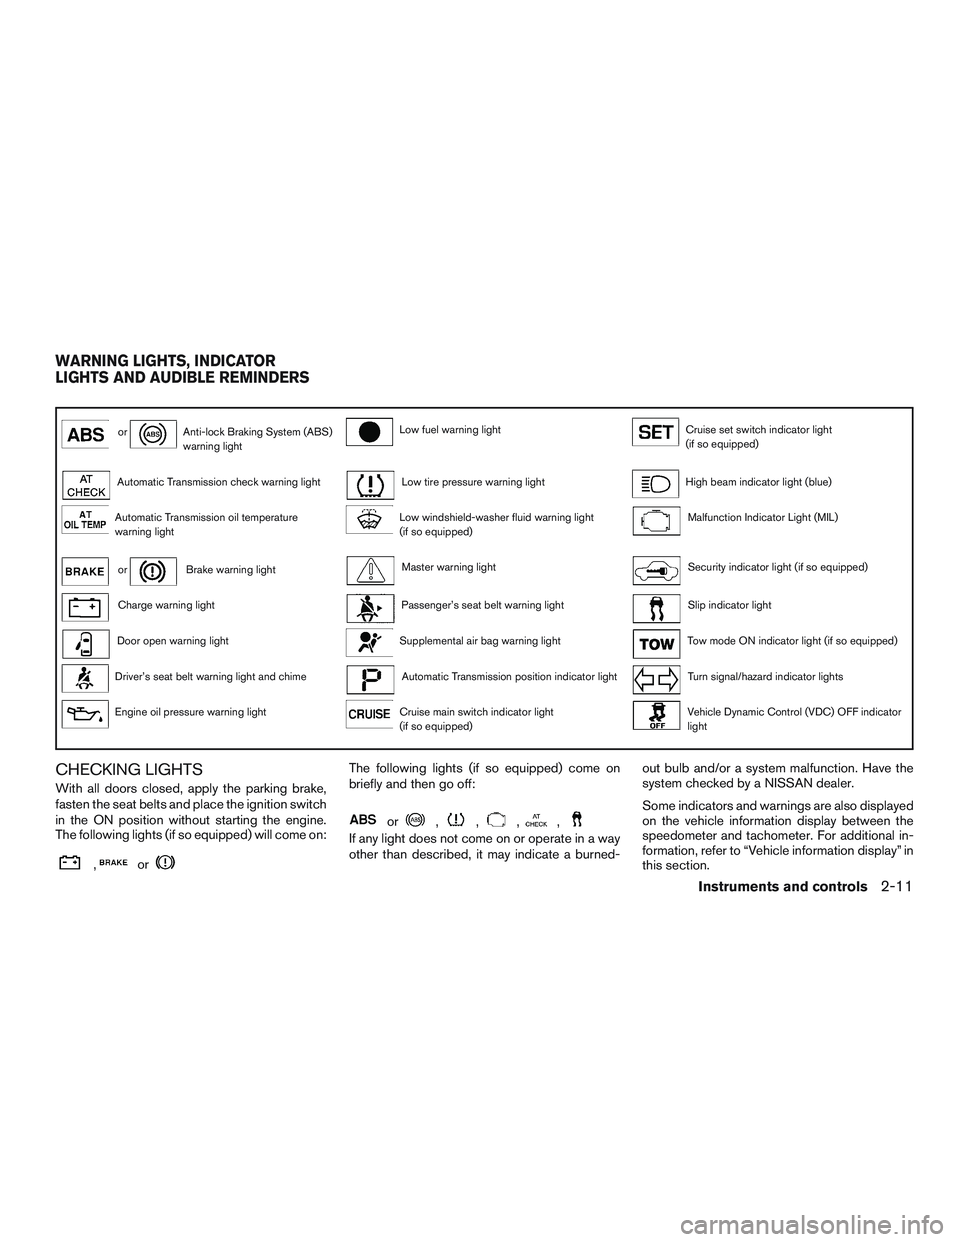
orAnti-lock Braking System (ABS)
warning lightLow fuel warning lightCruise set switch indicator light
(if so equipped)
Automatic Transmission check warning lightLow tire pressure warning lightHigh beam indicator light (blue)
Automatic Transmission oil temperature
warning lightLow windshield-washer fluid warning light
(if so equipped)Malfunction Indicator Light (MIL)
orBrake warning lightMaster warning lightSecurity indicator light (if so equipped)
Charge warning lightPassenger’s seat belt warning lightSlip indicator light
Door open warning lightSupplemental air bag warning lightTow mode ON indicator light (if so equipped)
Driver’s seat belt warning light and chimeAutomatic Transmission position indicator lightTurn signal/hazard indicator lights
Engine oil pressure warning lightCruise main switch indicator light
(if so equipped)Vehicle Dynamic Control (VDC) OFF indicator
light
CHECKING LIGHTS
With all doors closed, apply the parking brake,
fasten the seat belts and place the ignition switch
in the ON position without starting the engine.
The following lights (if so equipped) will come on:
,or
The following lights (if so equipped) come on
briefly and then go off:
or,,,,
If any light does not come on or operate in a way
other than described, it may indicate a burned-out bulb and/or a system malfunction. Have the
system checked by a NISSAN dealer.
Some indicators and warnings are also displayed
on the vehicle information display between the
speedometer and tachometer. For additional in-
formation, refer to “Vehicle information display” in
this section.
WARNING LIGHTS, INDICATOR
LIGHTS AND AUDIBLE REMINDERS
Instruments and controls2-11
Page 97 of 380
WARNING LIGHTS
For additional information, refer to “Vehicle infor-
mation display” in this section.
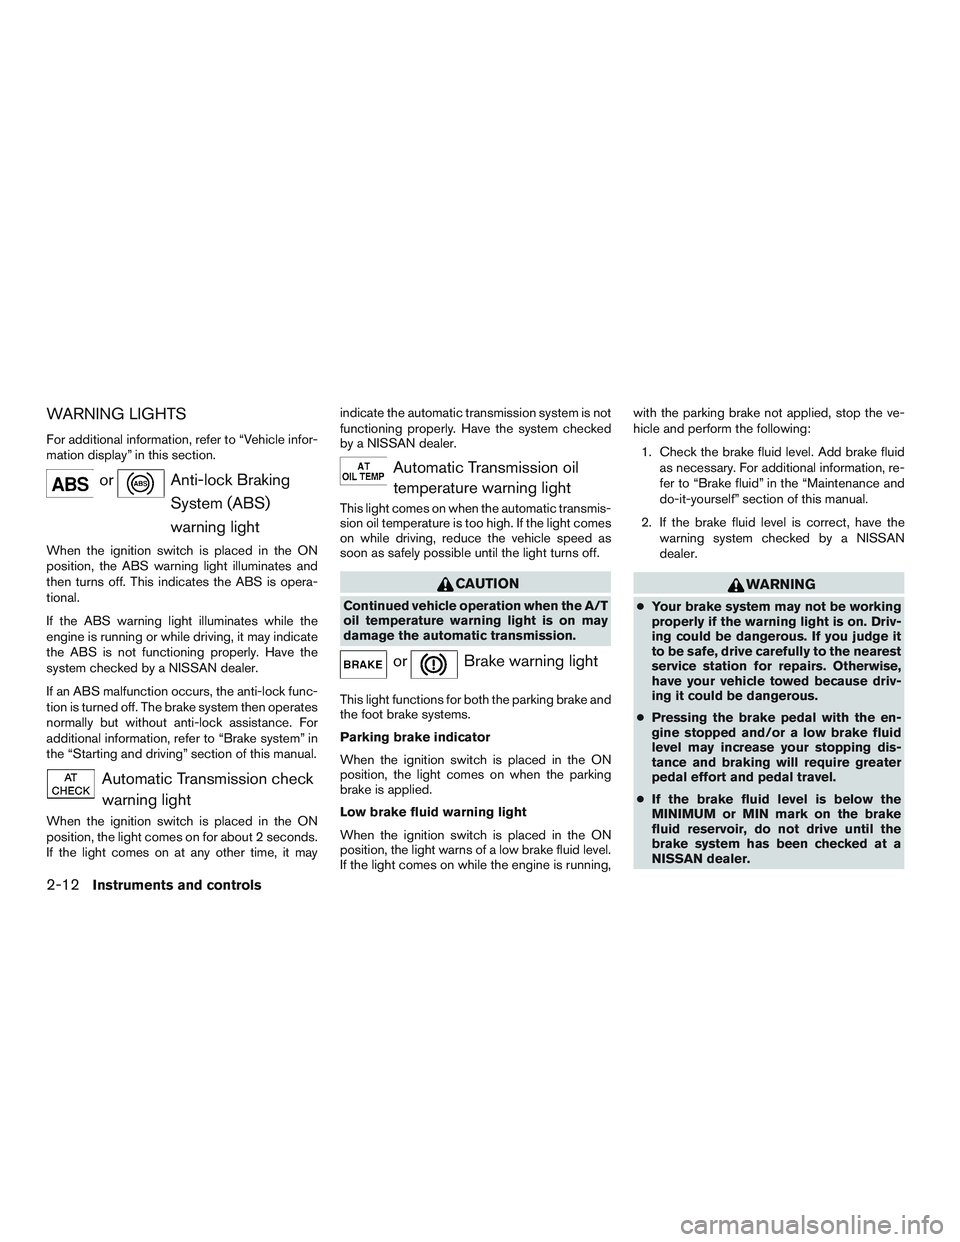
orAnti-lock BrakingSystem (ABS)
warning light
When the ignition switch is placed in the ON
position, the ABS warning light illuminates and
then turns off. This indicates the ABS is opera-
tional.
If the ABS warning light illuminates while the
engine is running or while driving, it may indicate
the ABS is not functioning properly. Have the
system checked by a NISSAN dealer.
If an ABS malfunction occurs, the anti-lock func-
tion is turned off. The brake system then operates
normally but without anti-lock assistance. For
additional information, refer to “Brake system” in
the “Starting and driving” section of this manual.
Automatic Transmission checkwarning light
When the ignition switch is placed in the ON
position, the light comes on for about 2 seconds.
If the light comes on at any other time, it may indicate the automatic transmission system is not
functioning properly. Have the system checked
by a NISSAN dealer.
Automatic Transmission oil
temperature warning light
This light comes on when the automatic transmis-
sion oil temperature is too high. If the light comes
on while driving, reduce the vehicle speed as
soon as safely possible until the light turns off.
CAUTION
Continued vehicle operation when the A/T
oil temperature warning light is on may
damage the automatic transmission.
orBrake warning light
This light functions for both the parking brake and
the foot brake systems.
Parking brake indicator
When the ignition switch is placed in the ON
position, the light comes on when the parking
brake is applied.
Low brake fluid warning light
When the ignition switch is placed in the ON
position, the light warns of a low brake fluid level.
If the light comes on while the engine is running, with the parking brake not applied, stop the ve-
hicle and perform the following:
1. Check the brake fluid level. Add brake fluid as necessary. For additional information, re-
fer to “Brake fluid” in the “Maintenance and
do-it-yourself” section of this manual.
2. If the brake fluid level is correct, have the warning system checked by a NISSAN
dealer.
WARNING
●Your brake system may not be working
properly if the warning light is on. Driv-
ing could be dangerous. If you judge it
to be safe, drive carefully to the nearest
service station for repairs. Otherwise,
have your vehicle towed because driv-
ing it could be dangerous.
● Pressing the brake pedal with the en-
gine stopped and/or a low brake fluid
level may increase your stopping dis-
tance and braking will require greater
pedal effort and pedal travel.
● If the brake fluid level is below the
MINIMUM or MIN mark on the brake
fluid reservoir, do not drive until the
brake system has been checked at a
NISSAN dealer.
2-12Instruments and controls
Page 100 of 380
CAUTION
●The TPMS is not a substitute for the
regular tire pressure check. Be sure to
check the tire pressure regularly.
● If the vehicle is being driven at speeds
of less than 16 mph (25 km/h), the
TPMS may not operate correctly.
● Be sure to install the specified size of
tires to the four wheels correctly.
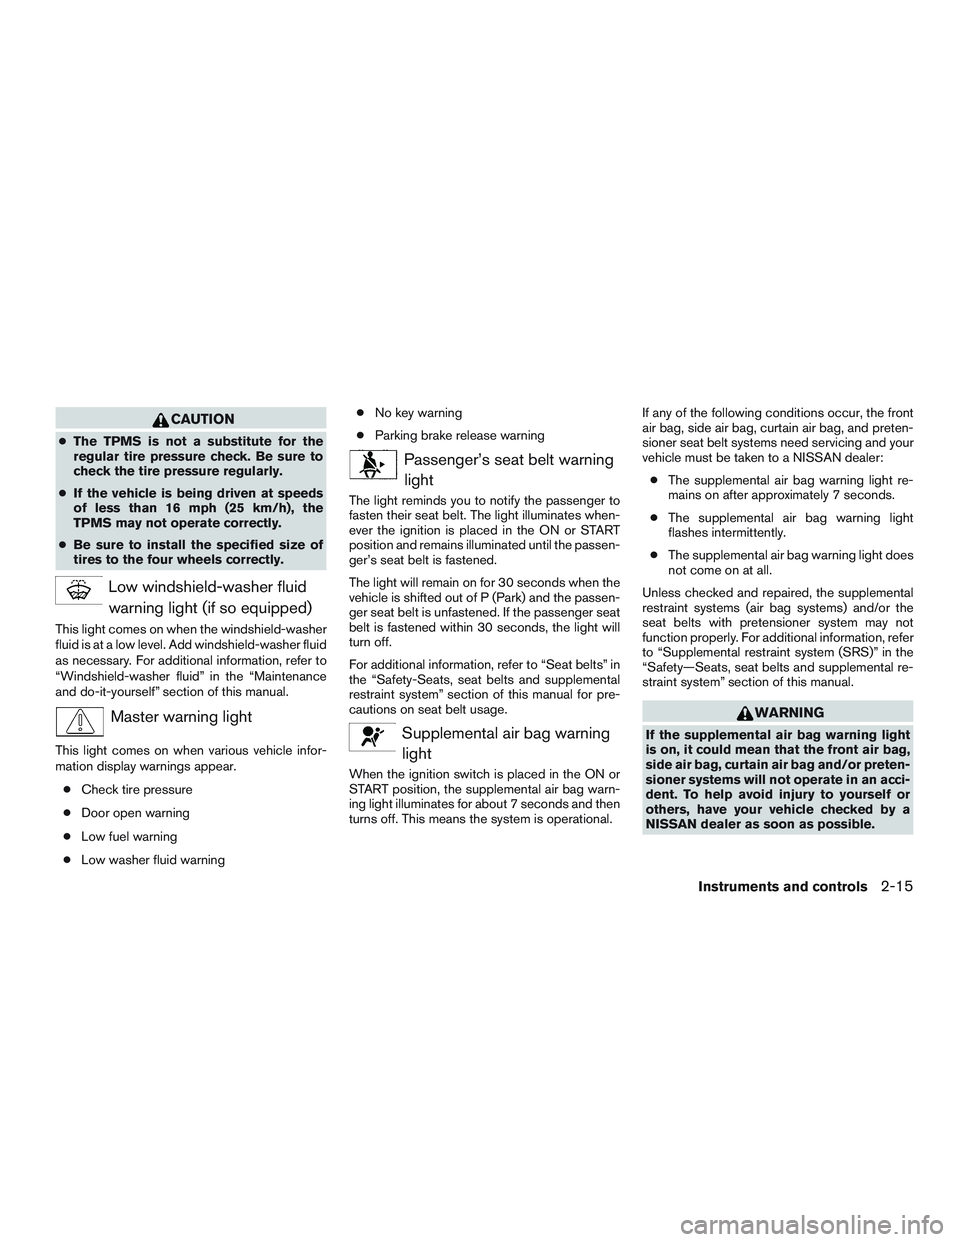
Low windshield-washer fluid
warning light (if so equipped)
This light comes on when the windshield-washer
fluid is at a low level. Add windshield-washer fluid
as necessary. For additional information, refer to
“Windshield-washer fluid” in the “Maintenance
and do-it-yourself” section of this manual.
Master warning light
This light comes on when various vehicle infor-
mation display warnings appear.
● Check tire pressure
● Door open warning
● Low fuel warning
● Low washer fluid warning ●
No key warning
● Parking brake release warning
Passenger’s seat belt warning
light
The light reminds you to notify the passenger to
fasten their seat belt. The light illuminates when-
ever the ignition is placed in the ON or START
position and remains illuminated until the passen-
ger’s seat belt is fastened.
The light will remain on for 30 seconds when the
vehicle is shifted out of P (Park) and the passen-
ger seat belt is unfastened. If the passenger seat
belt is fastened within 30 seconds, the light will
turn off.
For additional information, refer to “Seat belts” in
the “Safety-Seats, seat belts and supplemental
restraint system” section of this manual for pre-
cautions on seat belt usage.
Supplemental air bag warninglight
When the ignition switch is placed in the ON or
START position, the supplemental air bag warn-
ing light illuminates for about 7 seconds and then
turns off. This means the system is operational. If any of the following conditions occur, the front
air bag, side air bag, curtain air bag, and preten-
sioner seat belt systems need servicing and your
vehicle must be taken to a NISSAN dealer:
● The supplemental air bag warning light re-
mains on after approximately 7 seconds.
● The supplemental air bag warning light
flashes intermittently.
● The supplemental air bag warning light does
not come on at all.
Unless checked and repaired, the supplemental
restraint systems (air bag systems) and/or the
seat belts with pretensioner system may not
function properly. For additional information, refer
to “Supplemental restraint system (SRS)” in the
“Safety—Seats, seat belts and supplemental re-
straint system” section of this manual.
WARNING
If the supplemental air bag warning light
is on, it could mean that the front air bag,
side air bag, curtain air bag and/or preten-
sioner systems will not operate in an acci-
dent. To help avoid injury to yourself or
others, have your vehicle checked by a
NISSAN dealer as soon as possible.
Instruments and controls2-15
Page 106 of 380

Indicators for maintenance
1. Engine oil replacement indicatorThis indicator and REMINDER appears
when the customer set distance comes for
changing the engine oil. You can set or reset
the distance for changing the engine oil. For
additional information, refer to “Setting
mode” in this section.
2. Oil filter replacement indicator This indicator and REMINDER appears
when the customer set distance comes for
replacing the oil filter. You can set or reset
the distance for replacing the oil filter. For
additional information, refer to “Setting
mode” in this section.
3. Tire rotation indicator This indicator and REMINDER appears
when the customer set distance comes for
rotating the tires. For additional information,
refer to “Setting mode” in this section.
WARNING
The tire rotation indicator is not a substi-
tute for regular tire checks, including tire
pressure checks. For additional informa-
tion, refer to “Changing wheels and tires”
in the “Maintenance & do-it-yourself” sec-
tion of this manual. Many factors includ-
ing tire inflation, alignment, driving habits
and road conditions affect tire wear and
when tires should be replaced. Setting the
tire replacement indicator for a certain
driving distance does not mean your tires
will last that long. Use the tire replace-
ment indicator as a guide only and always
perform regular tire checks. Failure to per-
form regular tire checks, including tire
pressure checks could result in tire failure.
Serious vehicle damage could occur and
may lead to a collision, which could result
in serious personal injury or death.
4. Other indicator This indicator and REMINDER message ap-
pears when the customer’s set distance is
achieved. This reminder can be used for
other maintenance items such as air filter,
brakes, or washer fluid. You can set or reset
the distance for this reminder. For additional
information, refer to “Setting mode” in this
section. For scheduled maintenance items
LIC2132
Instruments and controls2-21
Page 253 of 380

3. Repeat steps 1 and 2.
4. Restart the engine while holding the device(which may have caused the interference)
separate from the registered key.
If the no start condition re-occurs, NISSAN rec-
ommends placing the registered key on a sepa-
rate key ring to avoid interference from other
devices. ●
Make sure the area around the vehicle is
clear.
● Check fluid levels such as engine oil, cool-
ant, brake fluid, and windshield-washer fluid
as frequently as possible, or at least when-
ever you refuel.
● Check that all windows and lights are clean.
● Visually inspect tires for their appearance
and condition. Also check tires for proper
inflation.
● Check that all doors are closed.
● Position seat and adjust head
restraints/headrests.
● Adjust inside and outside mirrors.
● Fasten seat belts and ask all passengers to
do likewise.
● Check the operation of warning lights when
the ignition switch is placed in the ON posi-
tion. For additional information, refer to
“Warning lights, indicator lights and audible
reminders” in the “Instruments and controls”
section of this manual. 1. Apply the parking brake.
2. Move the shift lever to P (Park) or N (Neu-
tral) . P (Park) is recommended.
The shift lever cannot be moved out of
P (Park) and into any of the other gear
positions if the ignition switch is
turned to the OFF position or if the key
is removed from the ignition switch.
The starter is designed not to operate if
the shift lever is in any of the driving
positions.
3. Crank the engine with your foot off the
accelerator pedal by placing the ignition
switch in the START position. Release the
key when the engine starts. If the engine
starts, but fails to run, repeat the above
procedure.
● If the engine is very hard to start in ex-
tremely cold weather or when restarting,
depress the accelerator pedal a little (ap-
proximately 1/3 to the floor) and hold it
and then crank the engine. Release the
key and the accelerator pedal when the
engine starts.
● If the engine is very hard to start because
it is flooded, depress the accelerator
pedal all the way to the floor and hold it.
Crank the engine for 5–6 seconds. After
BEFORE STARTING THE ENGINE STARTING THE ENGINE
5-10Starting and driving
Page 266 of 380

Wet brakes
When the vehicle is washed or driven through
water, the brakes may get wet. As a result, your
braking distance will be longer and the vehicle
may pull to one side during braking.
To dry the brakes, drive the vehicle at a safe
speed while lightly pressing the brake pedal to
heat up the brakes. Do this until the brakes return
to normal. Avoid driving the vehicle at high
speeds until the brakes function correctly.
Parking brake break-in
Break-in the parking brake shoes whenever the
effect of the parking brake is weakened or when-
ever the parking brake shoes and/or drum/rotors
are replaced, in order to assure the best braking
performance.
This procedure is described in the vehicle service
manual and can be performed by a NISSAN
dealer.
ANTI-LOCK BRAKING SYSTEM
(ABS)
WARNING
●The Anti-lock Braking System (ABS) is a
sophisticated device, but it cannot pre-
vent accidents resulting from careless
or dangerous driving techniques. It can
help maintain vehicle control during
braking on slippery surfaces. Remem-
ber that stopping distances on slippery
surfaces will be longer than on normal
surfaces even with ABS. Stopping dis-
tances may also be longer on rough,
gravel or snow covered roads, or if you
are using tire chains. Always maintain a
safe distance from the vehicle in front of
you. Ultimately, the driver is respon-
sible for safety.
● Tire type and condition may also affect
braking effectiveness.
– When replacing tires, install the specified size of tires on all four
wheels. – When installing a spare tire, make
sure that it is the proper size and type
as specified on the Tire and Loading
Information label. For additional in-
formation, refer to “Tire and loading
information label” in the “Technical
and consumer information” section
of this manual.
– For additional information, refer to “Wheels and tires” in the “Mainte-
nance and do-it-yourself” section of
this manual.
The ABS controls the brakes so the wheels do
not lock during hard braking or when braking on
slippery surfaces. The system detects the rota-
tion speed at each wheel and varies the brake
fluid pressure to prevent each wheel from locking
and sliding. By preventing each wheel from lock-
ing, the system helps the driver maintain steering
control and helps to minimize swerving and spin-
ning on slippery surfaces.
Using the system
Depress the brake pedal and hold it down. De-
press the brake pedal with firm steady pressure,
but do not pump the brakes. The ABS will oper-
ate to prevent the wheels from locking up. Steer
the vehicle to avoid obstacles.
Starting and driving5-23
Page 274 of 380

3. Tire chains may be used. For additional in-formation, refer to “Tire chains” in the “Main-
tenance and do-it-yourself” section of this
manual.
SPECIAL WINTER EQUIPMENT
It is recommended that the following items be
carried in the vehicle during winter:
● A scraper and stiff-bristled brush to remove
ice and snow from the windows and wiper
blades.
● A sturdy, flat board to be placed under the
jack to give it firm support.
● A shovel to dig the vehicle out of snowdrifts.
● Extra washer fluid to refill the windshield-
washer fluid reservoir.
DRIVING ON SNOW OR ICE
WARNING
● Wet ice (32°F, 0°C and freezing rain) ,
very cold snow or ice can be slick and
very hard to drive on. The vehicle will
have much less traction or “grip” under
these conditions. Try to avoid driving on
wet ice until the road is salted or
sanded. ●
Whatever the condition, drive with cau-
tion. Accelerate and slow down with
care. If accelerating or downshifting too
fast, the drive wheels will lose even
more traction.
● Allow more stopping distance under
these conditions. Braking should be
started sooner than on dry pavement.
● Allow greater following distances on
slippery roads.
● Watch for slippery spots (glare ice) .
These may appear on an otherwise
clear road in shaded areas. If a patch of
ice is seen ahead, brake before reach-
ing it. Try not to brake while on the ice,
and avoid any sudden steering
maneuvers.
● Do not use the cruise control on slip-
pery roads.
● Snow can trap dangerous exhaust
gases under your vehicle. Keep snow
clear of the exhaust pipe and from
around your vehicle.
ENGINE BLOCK HEATER (if so
equipped)
Engine block heaters are used to assist with cold
temperature starting.
The engine block heater should be used when
the outside temperature is 20°F (-7°C) or lower.
WARNING
● Do not use your engine block heater
with an ungrounded electrical system or
a 2-pronged adapter. You can be seri-
ously injured by an electrical shock if
you use an ungrounded connection.
● Disconnect and properly store the en-
gine block heater cord before starting
the engine. Damage to the cord could
result in an electrical shock and can
cause serious injury.
● Use a heavy-duty 3-wire, 3-pronged ex-
tension cord rated for at least 10 A. Plug
the extension cord into a Ground Fault
Interrupt (GFI) protected, grounded
110-VAC outlet. Failure to use the
proper extension cord or a grounded
outlet can result in a fire or electrical
shock and cause serious personal
injury.
Starting and driving5-31