radio antenna NISSAN NV PASSENGER VAN 2018 Owners Manual
[x] Cancel search | Manufacturer: NISSAN, Model Year: 2018, Model line: NV PASSENGER VAN, Model: NISSAN NV PASSENGER VAN 2018Pages: 426, PDF Size: 4.52 MB
Page 165 of 426
FM/AM/SAT radio with compact disc
(CD) player (Type A) (if so equipped)..........4-47
FM/AM/SAT radio with compact disc
(CD) player (Type B) (if so equipped) ..........4-53
USB (Universal Serial Bus) Connection
Port (models without Navigation
System) (if so equipped) .....................4-60
USB (Universal Serial Bus) Connection
Port (models with Navigation System)
(if so equipped) .............................. 4-62
iPod®* player operation without
Navigation System (if so equipped) ..........4-64
iPod®* player operation with Navigation
System (if so equipped) ......................4-66
Bluetooth® streaming audio without
Navigation System (if so equipped) ..........4-69
Bluetooth® streaming audio with
Navigation System (if so equipped) ..........4-70
CD care and cleaning ........................ 4-72
Steering wheel switch for audio control
(if so equipped) .............................. 4-72
Antenna ..................................... 4-73
NissanConnect® Mobile Apps (if so equipped). . . 4-74
Car phone or CB radio ..........................4-74 Bluetooth® Hands-Free Phone System
without Navigation System (if so equipped)
.....4-75
Regulatory information ......................4-77
Using the system ............................ 4-77
Control buttons ............................. 4-79
Connecting procedure ......................4-79
Voice commands ........................... 4-80
Making a call ................................ 4-81
Receiving a call .............................. 4-82
During a call ................................. 4-82
Ending a call ................................. 4-83
Text messaging (if so equipped) .............4-83
Bluetooth® settings ......................... 4-85
Manual control .............................. 4-86
Bluetooth® Hands-Free Phone System with
Navigation System (if so equipped) .............4-86
Regulatory information ......................4-88
Voice commands ........................... 4-89
Connecting procedure ......................4-89
Vehicle phonebook .......................... 4-89
Making a call ................................ 4-90
R
eceiving a call .............................. 4-90
During a call ................................. 4-90
Ending a call ................................. 4-90
Page 196 of 426
Reception conditions will constantly
change because of vehicle movement.
Buildings, terrain, signal distance and inter-
ference from other vehicles can work
against ideal reception. Described below
are some of the factors that can affect your
radio reception.
Some cellular phones or other devices may
cause interference or a buzzing noise to
come from the audio system speakers.
Storing the device in a different location
may reduce or eliminate the noise.
FM RADIO RECEPTION
Range: FM range is normally limited to 25 –
30 mi (40 – 48 km), with monaural (single
channel) FM having slightly more range
than stereo FM. External influences may
sometimes interfere with FM station re-
ception even if the FM station is within 25
mi (40 km). The strength of the FM signal is
directly related to the distance between
the transmitter and receiver. FM signals fol-
low a line-of-sight path, exhibiting many of
the same characteristics as light. For ex-
ample, they will reflect off objects.
Fade and drif t: As your vehicle moves away
from a station transmitter, the signals will
tend to fade and/or drif t.Static and flutter: During signal interfer-
ence from buildings, large hills or due to
antenna position (usually in conjunction
with increased distance from the station
transmitter), static or flutter can be heard.
This can be reduced by adjusting the treble
control to reduce treble response.
Multipath reception: Because of the reflec-
tive characteristics of FM signals, direct and
reflected signals reach the receiver at the
same time. The signals may cancel each
other, resulting in momentary flutter or loss
of sound.AM RADIO RECEPTION
AM signals, because of their low frequency,
can bend around objects and skip along
the ground. In addition, the signals can be
bounced off the ionosphere and bent back
to earth. Because of these characteristics,
AM signals are also subject to interference
as they travel from transmitter to receiver.
Fading: Occurs while the vehicle is passing
through freeway underpasses or in areas
with many tall buildings. It can also occur
for several seconds during ionospheric tur-
bulence even in areas where no obstacles
exist.
Static: Caused by thunderstorms, electrical
power lines, electric signs and even traffic
lights.
SATELLITE RADIO RECEPTION
(if so equipped)
When the satellite radio is used for the first
time or the battery has been replaced, the
satellite radio may not work properly. This
is not a malfunction. Wait more than
10 minutes with satellite radio ON and the
vehicle outside of any metal or large build-
ing for satellite radio to receive all of the
necessary data.
No satellite radio reception is available un-
less there is an active SiriusXM® Satellite
Radio service subscription. Satellite radio is
not available in Alaska, Hawaii and Guam. If
satellite radio is not operational then
pressing the RADIO button will switch be-
tween FM and AM bands.
Satellite radio performance may be af-
fected if cargo carried on the roof blocks
the satellite radio signal.
If possible, do not put cargo over the satel-
lite antenna.
Monitor, climate, audio, phone and voice recognition systems4-33
Page 210 of 426
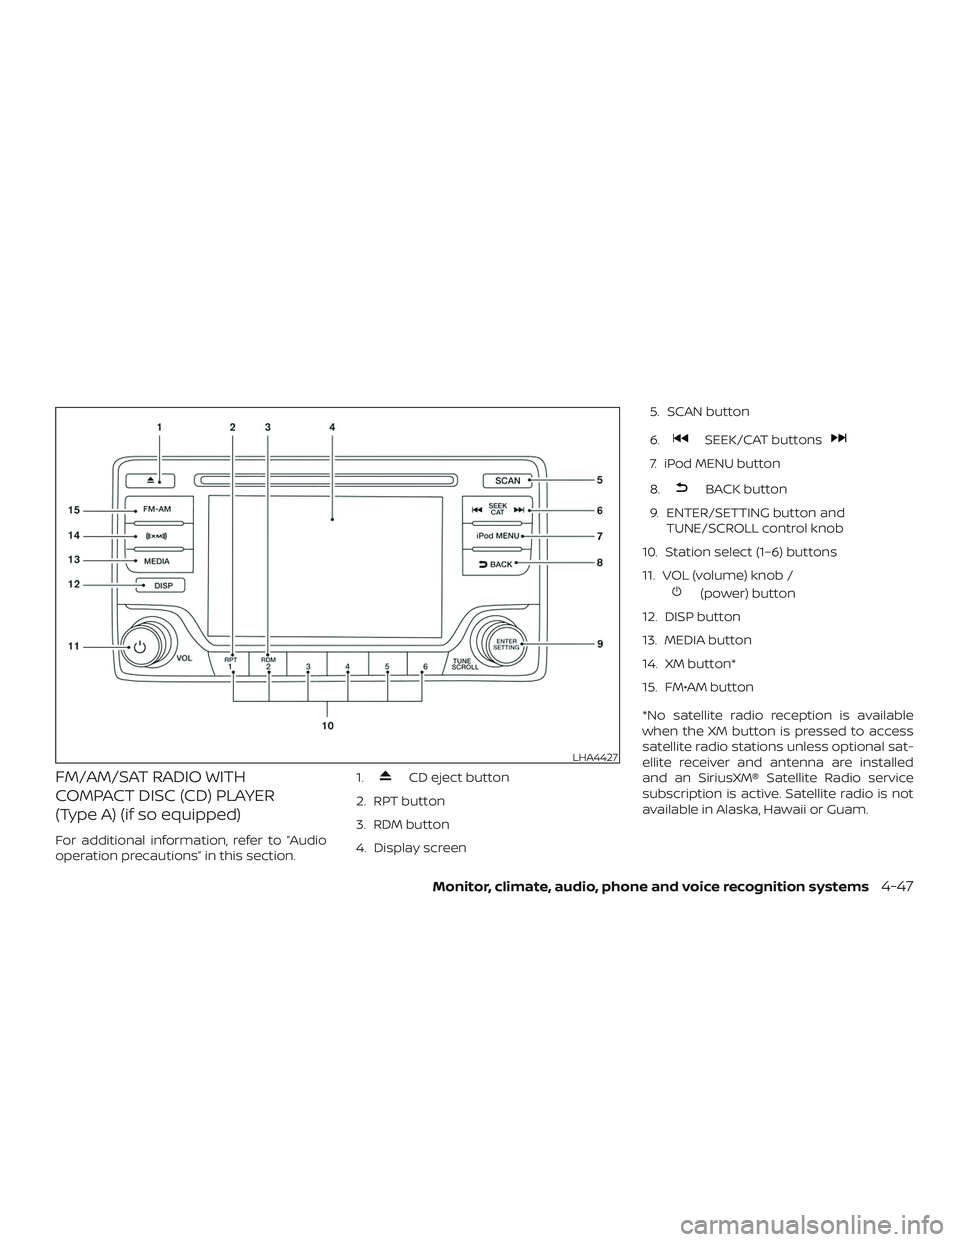
FM/AM/SAT RADIO WITH
COMPACT DISC (CD) PLAYER
(Type A) (if so equipped)
For additional information, refer to “Audio
operation precautions” in this section.1.
CD eject button
2. RPT button
3. RDM button
4. Display screen 5. SCAN button
6.
SEEK/CAT buttons
7. iPod MENU button
8.
BACK button
9. ENTER/SETTING button and TUNE/SCROLL control knob
10. Station select (1–6) buttons
11. VOL (volume) knob /
(power) button
12. DISP button
13. MEDIA button
14. XM button*
15. FM•AM button
*No satellite radio reception is available
when the XM button is pressed to access
satellite radio stations unless optional sat-
ellite receiver and antenna are installed
and an SiriusXM® Satellite Radio service
subscription is active. Satellite radio is not
available in Alaska, Hawaii or Guam.
LHA4427
Monitor, climate, audio, phone and voice recognition systems4-47
Page 216 of 426
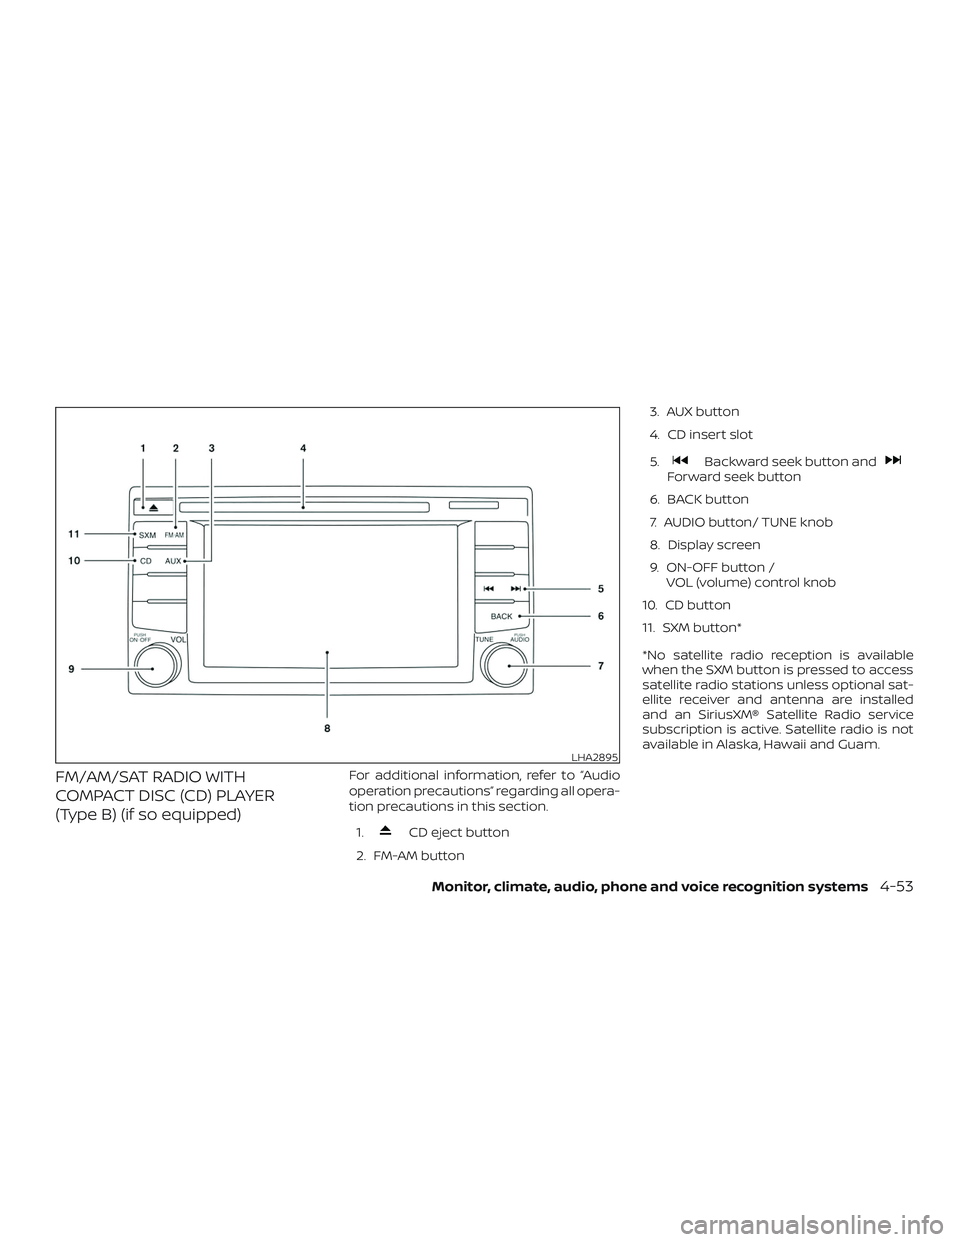
FM/AM/SAT RADIO WITH
COMPACT DISC (CD) PLAYER
(Type B) (if so equipped)For additional information, refer to “Audio
operation precautions” regarding all opera-
tion precautions in this section.1.
CD eject button
2. FM-AM button 3. AUX button
4. CD insert slot
5.
Backward seek button andForward seek button
6. BACK button
7. AUDIO button/ TUNE knob
8. Display screen
9. ON-OFF button / VOL (volume) control knob
10. CD button
11. SXM button*
*No satellite radio reception is available
when the SXM button is pressed to access
satellite radio stations unless optional sat-
ellite receiver and antenna are installed
and an SiriusXM® Satellite Radio service
subscription is active. Satellite radio is not
available in Alaska, Hawaii and Guam.
LHA2895
Monitor, climate, audio, phone and voice recognition systems4-53
Page 218 of 426
![NISSAN NV PASSENGER VAN 2018 Owners Manual SXM settings
To view the SXM settings:1. Press the [
] button.
2. Touch the “Settings” key.
3. Touch the “SXM” key.
The signal strength, activation status and
other information are displayed o NISSAN NV PASSENGER VAN 2018 Owners Manual SXM settings
To view the SXM settings:1. Press the [
] button.
2. Touch the “Settings” key.
3. Touch the “SXM” key.
The signal strength, activation status and
other information are displayed o](/img/5/58178/w960_58178-217.png)
SXM settings
To view the SXM settings:1. Press the [
] button.
2. Touch the “Settings” key.
3. Touch the “SXM” key.
The signal strength, activation status and
other information are displayed on the
screen.
AUX button
The AUX IN audio input jack accepts any
standard analog audio input such as from
a portable cassette tape/CD player, MP3
player or a laptop computer. Press the AUX
button to play a compatible device
plugged into the AUX IN jack.
FM/AM/SAT radio operation
FM·AM button
Press the FM·AM button to change the
band as follows:
AM →FM1 →FM2 →AM
If another audio source is playing when the
FM·AM button is pressed, the audio source
playing will automatically be turned off and
the last radio station played will begin playing.
The FM stereo indicator (ST) is shown on
the screen during FM stereo reception.
When the stereo broadcast signal is weak,
the radio automatically changes from ste-
reo to monaural reception.
SXM band select
Pressing the SXM button will change the
band as follows:
SXM1* →SXM2* →SXM3* →SXM1* (satellite,
if so equipped)
When the SXM button is pressed while the
ignition switch is in the ACC or ON position,
the radio will come on at the last station
played.
The last station played will also come on
when the ON-OFF button is pressed to turn
the radio on.
*When the SXM button is pressed, the sat-
ellite radio mode will be skipped unless an
optional satellite receiver and antenna are
installed and a SiriusXM® Satellite Radio
service subscription is active. Satellite radio
is not available in Alaska, Hawaii and Guam.
If a compact disc is playing when the SXM
button is pressed, the compact disc will
automatically be turned off and the last
radio station played will come on. While the radio is in SXM mode, the opera-
tion can be controlled through the touch-
screen. Touch the “Categories” key to dis-
play a list of categories. Touch a category
displayed on the list to display options
within that category.
Tuning with the touch-screen
When in AM or FM mode, the radio can be
tuned using the touch-screen. To bring up
the visual tuner, touch the “Tune” key on the
lower right corner of the screen. A screen
appears with a bar running from low fre-
quencies on the lef t to high frequencies on
the right. Touch the screen at the location
of the frequency you wish to tune and the
station will change to that frequency. To
return to the regular radio display screen,
touch the “OK” key.
Tuning with the TUNE knob
The radio can also be manually tuned us-
ing the TUNE knob. When in FM or AM mode,
turn the TUNE knob to the lef t for lower
frequencies or to the right for higher fre-
quencies. When in SXM mode, turn the
TUNE knob to change the channel.
Monitor, climate, audio, phone and voice recognition systems4-55
Page 236 of 426
SOURCE switch
Press the SOURCE switch to change the
mode in the following sequence:
AM→FM1 →FM2 →(XM1 →XM2 →XM3
(satellite radio, if so
equipped))→(SXM1→SXM2→SXM3 (satellite,
if so equipped))→ CD*→USB/iPod®* →
Bluetooth® Audio* (if so equipped) →AUX*
→ AM.
* These modes are only available when
compatible media storage is inserted into
the device or connected to the system.
Volume control switch
Push the + or – volume control switch to
increase or decrease the volume.
Tuning switch
While the display is showing a map or audio
screen, tilt the Tuning switch upward or
downward to select a station, track, CD or
folder. For most audio sources, tilting the
switch up/down for more than 1.5 seconds
provides a different function than a tilting
up/down for less than 1.5 seconds. AM and FM
∙ Tilt up/down for less than 1.5 seconds to increase or decrease the preset station.
∙ Tilt up/down for more than 1.5 seconds to seek up or down to the next station.
XM/SXM (if so equipped) ∙ Tilt up/down for less than 1.5 seconds to increase or decrease the preset station.
∙ Tilt up/down for more than 1.5 seconds to go to the next or previous category.
iPod® ∙ Tilt up/down for less than 1.5 seconds to increase or decrease the track number.
CD ∙ Tilt up/down for less than 1.5 seconds to increase or decrease the track number.
∙ Tilt up/down for more than 1.5 seconds to increase or decrease the folder num-
ber (if playing compressed audio files)
or to fast forward or rewind the current
track. USB
∙ Tilt up/down for less than 1.5 seconds to increase or decrease the track number.
Bluetooth® Audio ∙ Tilt up/down for less than 1.5 seconds to skip ahead or back to the next song.
ANTENNA
The antenna cannot be shortened, but can
be removed. When you need to remove the
antenna, turn the antenna rod counter-
clockwise.
To install the antenna rod, turn the antenna
clockwise. Tighten the antenna rod to
specification using a suitable tool such as
an open-end wrench. The antenna rod
tightening specification is 3.4 – 3.6 N·m (30 –
32 in-lb). Do not use pliers to tighten the
antenna as they can leave marks on the
antenna surface. The antenna rod cannot
be hand tightened to the proper specification.
CAUTION
Always properly tighten the antenna
rod during installation or the antenna
rod may break during vehicle operation.
Monitor, climate, audio, phone and voice recognition systems4-73
Page 237 of 426
This vehicle is equipped with Smartphone
Integration technology. This allows many
compatible Smartphone applications to
be displayed and easily controlled through
the vehicle’s touch-screen. This feature is
an option on navigation system equipped
vehicles. For additional information, refer to
the separate NissanConnect® Owner’s
Manual.When installing a CB, ham radio or car
phone in your vehicle, be sure to observe
the following precautions; otherwise, the
new equipment may adversely affect the
engine control system and other electronic
parts.
WARNING
∙ A cellular phone should not be used
for any purpose while driving so full
attention may be given to vehicle op-
eration. Some jurisdictions prohibit
the use of cellular phones while
driving.
∙ If you must make a call while your ve- hicle is in motion, the hands free cellu-
lar phone operational mode (if so
equipped) is highly recommended.
Exercise extreme caution at all times
so full attention may be given to ve-
hicle operation.
∙ If you are unable to devote full atten- tion to vehicle operation while talking
on the phone, pull off the road to a
safe location and stop your vehicle.
CAUTION
∙ Keep the antenna as far away as pos-sible from the electronic control
modules.
∙ Keep the antenna wire more than 8 in (20 cm) away from the electronic con-
trol system harnesses. Do not route
the antenna wire next to any harness.
∙ Adjust the antenna standing-wave ratio as recommended by the
manufacturer.
∙ Connect the ground wire from the CB radio chassis to the body.
∙ For additional information, it is rec- ommended that you visit a NISSAN
dealer for this service.
NISSANCONNECT® MOBILE APPS
(if so equipped) CAR PHONE OR CB RADIO
4-74Monitor, climate, audio, phone and voice recognition systems
Page 239 of 426
with the in-vehicle phone module when
the ignition switch is placed in the ON po-
sition with the previously connected cellu-
lar phone turned on and carried in the ve-
hicle.
NOTE:
Some devices require the user to accept
connections to other Bluetooth® de-
vices. If your phone does not connect au-
tomatic ally to the system, consult the
phone’s Owner’s Manual for details on
device operation.
You can connect up to five different
Bluetooth® cellular phones to the in-
vehicle phone module. However, you can
talk on only one cellular phone at a time.
Before using the Bluetooth® Hands-Free
Phone System, refer to the following notes.∙ Set up the wireless connection be- tween a compatible cellular phone and
the in-vehicle phone module before us-
ing the hands-free phone system. ∙ Some Bluetooth® enabled cellular
phones may not be recognized or work
properly. Please visit
www.nissanusa.com/bluetooth or
www.nissan.ca/bluetooth for a recom-
mended phone list and connecting in-
structions.
∙ You will not be able to use a hands-free phone under the following conditions:
– Your vehicle is outside of the cellular service area.
– Your vehicle is in an area where it is difficult to receive a cellular signal;
such as in a tunnel, in an under-
ground parking garage, near a tall
building or in a mountainous area.
– Your cellular phone is locked to pre- vent it from being dialed.
∙ When the radio wave condition is not ideal or ambient sound is too loud, it
may be difficult to hear the other per-
son’s voice during a call.
∙ Do not place the cellular phone in an area surrounded by metal or far away
from the in-vehicle phone module to
prevent tone quality degradation and
wireless connection disruption. ∙ While a cellular phone is connected
through the Bluetooth® wireless con-
nection, the battery power of the cellu-
lar phone may discharge quicker than
usual. The Bluetooth® Hands-Free
Phone System cannot charge cellular
phones.
∙ For additional information, you can visit www.nissanusa.com/bluetooth or
www.nissan.ca/bluetooth for trouble-
shooting help.
∙ Some cellular phones or other devices may cause interference or a buzzing
noise to come from the audio system
speakers. Storing the device in a differ-
ent location may reduce or eliminate
the noise.
∙ For additional information, refer to the cellular phone Owner’s Manual regard-
ing the telephone charges, cellular
phone antenna and body, etc.
4-76Monitor, climate, audio, phone and voice recognition systems
Page 251 of 426
∙ You will not be able to use a hands-freephone under the following conditions:
– Your vehicle is outside of the cellular service area.
– Your vehicle is in an area where it is difficult to receive cellular signal;
such as in a tunnel, in an under-
ground parking garage, near a tall
building or in a mountainous area.
– Your cellular phone is locked to pre- vent it from being dialed.
∙ When the radio wave condition is not ideal or ambient sound is too loud, it
may be difficult to hear the other per-
son’s voice during a call.
∙ Immediately af ter the ignition switch is placed in the ON position, it may be im-
possible to receive a call for a short pe-
riod of time.
∙ Do not place the cellular phone in an area surrounded by metal or far away
from the in-vehicle phone module to
prevent tone quality degradation and
wireless connection disruption. ∙ While a cellular phone is connected
through the Bluetooth® wireless con-
nection, the battery power of the cellu-
lar phone may discharge quicker than
usual. The Bluetooth® Hands-Free
Phone System cannot charge cellular
phones.
∙ For additional information, refer to “Troubleshooting guide” in this section if
the hands-free phone system seems to
be malfunctioning.
∙ Some cellular phones or other devices may cause interference or a buzzing
noise to come from the audio system
speakers. Storing the device in a differ-
ent location may reduce or eliminate
the noise.
∙ For additional information, refer to the cellular phone owner’s manual regard-
ing the telephone charges, cellular
phone antenna and body, etc.
∙ The signal strength display on the monitor will not coincide with the signal
strength display of some cellular
phones.REGULATORY INFORMATION
FCC Regulatory information
– CAUTION: To maintain compliance with FCC’s RF exposure guidelines, use only
the supplied antenna. Unauthorized an-
tenna, modification, or attachments
could damage the transmitter and may
violate FCC regulations.
– Operation is subject to the following two conditions:
1. This device may not cause interference and
2. this device must accept any interfer- ence, including interference that may
cause undesired operation of the de-
vice.
IC Regulatory information
– Operation is subject to the following two conditions: (1) this device may not cause
interference, and (2) this device must ac-
cept any interference, including interfer-
ence that may cause undesired opera-
tion of the device.
4-88Monitor, climate, audio, phone and voice recognition systems
Page 268 of 426
∙ The TIRE PRES warning does not appearif the low tire pressure warning light illu-
minates to indicate a TPMS malfunc-
tion. Instead, TPMS ERROR will appear in
the trip computer.
∙ Tire pressure rises and falls depending on the heat caused by the vehicle’s op-
eration and the outside temperature.
Do not reduce the tire pressure af ter
driving because the tire pressure rises
af ter driving. Low outside temperature
can lower the temperature of the air
inside the tire which can cause a lower
tire inflation pressure. This may cause
the low tire pressure warning light to
illuminate. If the warning light illumi-
nates, check the tire pressure for all four
tires.
∙ The Tire and Loading Information label is located in the driver’s door opening.
For additional information, refer to “Low tire
pressure warning light” in the “Instruments
and controls” section and “Tire Pressure
Monitoring System (TPMS)” in the “In case of
emergency” section of this manual.WARNING
∙ Radio waves could adversely affect electric medical equipment. Those
who use a pacemaker should contact
the electric medical equipment
manufacturer for the possible influ-
ences before use.
∙ If the low tire pressure warning light illuminates while driving, avoid sud-
den steering maneuvers or abrupt
braking, reduce vehicle speed, pull off
the road to a safe location and stop
the vehicle as soon as possible. Driv-
ing with under-inflated tires may per-
manently damage the tires and in-
crease the likelihood of tire failure.
Serious vehicle damage could occur
and may lead to an accident and could
result in serious personal injury.
Check the tire pressure for all four
tires. Adjust the tire pressure to the
recommended COLD tire pressure
shown on the Tire and Loading Infor-
mation label to turn the low tire pres-
sure warning light off. If you have a flat
tire, replace it with a spare tire as soon
as possible. (For additional informa-
tion, refer to “Flat tire” in the “In case of
emergency ” section of this manual.) ∙ When replacing a wheel without the
TPMS such as the spare tire, when a
spare tire is mounted or a wheel is
replaced, tire pressure will not be indi-
cated, the TPMS will not function and
the low tire pressure warning light will
flash for approximately 1 minute. The
light will remain on af ter 1 minute.
Have your tires replaced and/or TPMS
system reset as soon as possible. It is
recommended that you visit a NISSAN
dealer for this service.
∙ Replacing tires with those not origi- nally specified by NISSAN could affect
the proper operation of the TPMS.
∙ Do not inject any tire liquid or aerosol tire sealant into the tires, as this may
cause a malfunction of the tire pres-
sure sensors.
CAUTION
Do not place metalized film or any
metal parts (antenna, etc.) on the win-
dows. This may cause poor reception of
the signals from the tire pressure sen-
sors, and the TPMS will not function
properly.
Starting and driving5-5