cooling NISSAN NV200 2021 Owners Manual
[x] Cancel search | Manufacturer: NISSAN, Model Year: 2021, Model line: NV200, Model: NISSAN NV200 2021Pages: 300, PDF Size: 1.9 MB
Page 133 of 300
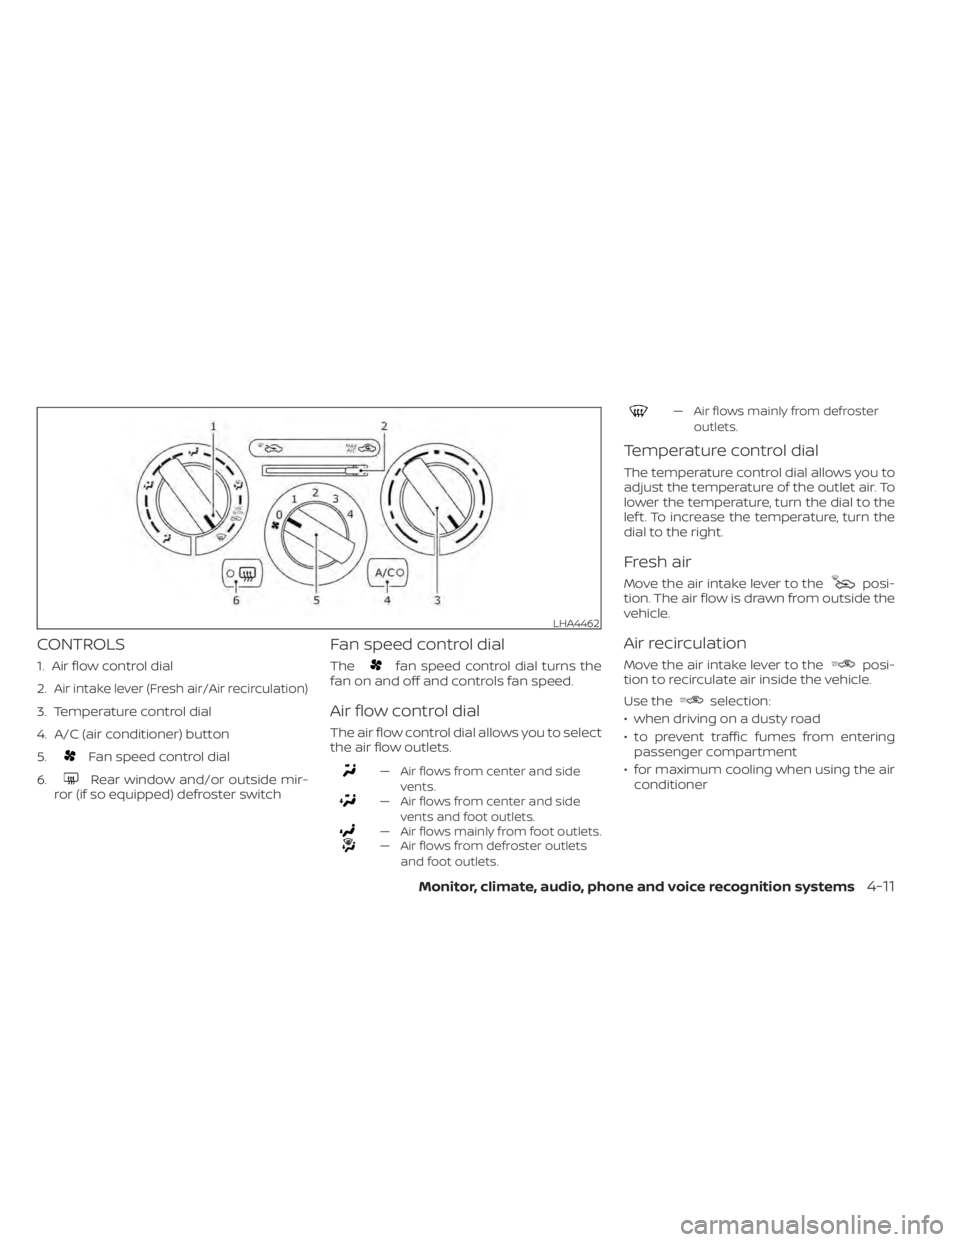
Fan speed control dial
6.
Rear window and/or outside mir-
ror (if so equipped) defroster switch
Fan speed control dial
Thefan speed control dial turns the
fan on and off and controls fan speed.
Air flow control dial
The air flow control dial allows you to select
the air flow outlets.
„ Air flows from center and side
vents.
„ Air flows from center and sidevents and foot outlets.
„ Air flows mainly from foot outlets.„ Air flows from defroster outletsand foot outlets.
„ Air flows mainly from defrosteroutlets.
Temperature control dial
The temperature control dial allows you to
adjust the temperature of the outlet air. To
lower the temperature, turn the dial to the
lef t. To increase the temperature, turn the
dial to the right.
Fresh air
Move the air intake lever to theposi-
tion. The air flow is drawn from outside the
vehicle.
Air recirculation
Move the air intake lever to theposi-
tion to recirculate air inside the vehicle.
Use the
selection:
€ when driving on a dusty road
€ to prevent traffic fumes from entering passenger compartment
€ for maximum cooling when using the air conditioner
LHA4462
Page 134 of 300
fan speed
control dial to the desired position and
press the
button to turn on the air
conditioner. To turn off the air conditioner,
press the
button again.
The air conditioner cooling function op-
erates only when the engine is running.
Rear window and/or outside
mirror defroster switch (if so
equipped)
For additional information, see “Rear win-
dow and/or outside mirror defroster
switch (if so equipped)” (P. 2-21).
HEATER OPERATION
Heating
This mode is used to direct heated air to
the foot outlets. Some air also flows from
the defrost outlets.
1. Move the air intake lever to the
position for normal heating.
2. Turn the air flow control dial to the
position. 3. Turn the
fan speed control dial to
the desired position.
4. Turn the temperature control dial to the desired position between the middle
and the hot position.
Ventilation
This mode directs outside air to the side
and center vents.
1. Move the air intake lever to the
position.
2. Turn the air flow control dial to the
position.
3. Turn the
fan speed control dial to
the desired position.
4. Turn the temperature control dial to the desired position.
Defrosting or defogging
This mode directs the air to the defrost
outlets to defrost/defog the windows.
1. Move the air intake lever to the
position.
2. Turn the air flow control dial to the
position. 3. Turn the
fan speed control dial to
the desired position.
4. Turn the temperature control dial to the desired position between the middle
and the hot position.
• To quickly remove ice or fog from the win- dows, turn the
fan speed control dial
to the maximum position and the tem-
perature control dial to the full hot
position.
When the
orposition is se-
lected, the air conditioner automatically
turns on (however, the indicator light will
not illuminate). In this position, the air con-
ditioner cannot be turned off. When the air
flow control is turned to any position other
than
or(the air conditioner will
continue operating). and can be turned off
using the air conditioner button. This dehu-
midifies the air, which helps defog the
windshield.
Bi-level heating
This mode directs cooler air from the side
and center vents and warmer air from the
floor outlets. When the temperature con-
trol dial is moved to the full hot or full cool
position, the air between the vents and the
floor outlets is the same temperature.
4-12Monitor, climate, audio, phone and voice recognition systems
Page 135 of 300
position.
2. Turn the air flow control dial to the
position.
3. Turn the
fan speed control dial to
the desired position.
4. Turn the temperature control dial to the desired position.
Heating and defogging
This mode heats the interior and defogs
the windshield.
1. Move the air intake lever to the
position.
2. Turn the air flow control dial to the
position.
3. Turn the
fan speed control dial to
the desired position.
4. Turn the temperature control dial to the desired position between the middle
and the hot position.
When the
orposition is se-
lected, the air conditioner automatically
turns on (however, the indicator light will
not illuminate). In this position, the air con-
ditioner cannot be turned off. When the air
flow control is turned to any position other than
or(the air conditioner will
continue operating) and can be turned off
using the air conditioner button. This dehu-
midifies the air, which helps defog the
windshield.
Operating tips
Clear snow and ice from the wiper blades
and air inlet in front of the windshield.
This improves heater operation.
AIR CONDITIONER OPERATION
Start the engine, turn thefan speed
control dial to the desired position, and
press the
button to activate the air
conditioner. When the air conditioner is on,
cooling and dehumidif ying functions are
added to the heater operation.
The air conditioner cooling function op-
erates only when the engine is running.
Cooling
This mode is used to cool and dehumidif y
the air.
1. Move the air intake lever to the
position.
2. Turn the air flow control dial to the
position. 3. Turn the
fan speed control dial to
the desired position.
4. Press the
button. The indicator
light comes on.
5. Turn the temperature control dial to the desired position.
• For quick cooling when the outside tem- perature is high, move the air intake lever
to the
position. Be sure to return to
theposition for normal cooling.
Dehumidified heating
This mode is used to heat and dehumidif y
the air.
1. Move the air intake lever to the
position.
2. Turn the air flow control dial to the
position.
3. Turn the
fan speed control dial to
the desired position.
4. Press the
button. The indicator
light comes on.
5. Turn the temperature control dial to the desired position.
Monitor, climate, audio, phone and voice recognition systems4-13
Page 136 of 300
position.
2. Turn the air flow control dial to the
position.
3. Turn the
fan speed control dial to
the desired position. When theorposition is selected, the air condi-
tioner automatically turns on (however,
the indicator light will not illuminate). In
this position, the air conditioner cannot
be turned off. When the air flow control is
turned to any position other than
or(the air conditioner will continue
operating). and can be turned off using
the air conditioner button. This dehu-
midifies the air, which helps defog the
windshield.
4. Turn the temperature control dial to the desired position.
Operating tips
€ Keep the windows closed while the airconditioner is in operation.
€ Af ter parking in the sun, drive for 2 or 3 minutes with the windows open to vent
hot air from the passenger compart-
ment before closing the windows. This
allows the air conditioner to cool the inte-
rior more quickly.
€ The air conditioning system should be
operated for approximately 10 minutes
at least once a month. This helps pre-
vent damage to the system due to lack
of lubrication.
• A visible mist may be seen coming from the ventilators in hot, humid conditions
as the air is cooled rapidly. This does not
indicate a malfunction.
• If the high temperature warning light
illuminates in red indicating en-
gine coolant temperature is over the
normal range, turn the air conditioner
off. For additional information, see “If
your vehicle overheats” (P. 6-12).
AIR FLOW CHARTS
The following charts show the button and
dial positions for MAXIMUM AND QUICK
heating, cooling or defrosting. The air in-
take lever should always be in the
position for heating and defrosting.
4-14Monitor, climate, audio, phone and voice recognition systems
Page 153 of 300
ENGINE PROTECTION MODE
The engine has an engine protection mode
to reduce the chance of damage if the
coolant temperature becomes too high
(for example, when climbing steep grades
in high temperature with heavy loads, such
as when towing a trailer). When the engine
temperature reaches a certain level:
• The high temperature warning light willturn on.
• Engine power may be reduced.
• The air conditioning cooling function may be automatically turned off for a short
time (the blower will continue to operate).
Engine power and, under some conditions,
vehicle speed will decrease. Vehicle speed
can be controlled with the accelerator
pedal, but the vehicle may not accelerate at
the desired speed. The transmission will
downshif t or upshif t as it reaches pre-
scribed shif t points. You can also shif t
manually.
As driving conditions change and engine
coolant temperature is reduced, vehicle
speed can be increased using the accel-
erator pedal, and air conditioning cooling
function will automatically be turned back
on. Move the vehicle off the road in a safe area
and allow the engine to cool if the following
occurs:
1. The engine coolant temperature is not
reduced.
2. The air conditioning cooling function does not turn back on.
3. The engine oil pressure low and high temperature warning light
illumi-
nates. This may indicate a malfunction.
If af ter checking the oil and coolant, the
remains on, do not continue to drive. It
is recommended that you visit a NISSAN
dealer for servicing.
The Malfunction Indicator Light (MIL) may
also come ON. If onlyit remains on, you do
not need to have your vehicle towed, but
have it inspected soon. It is recommended
that you visit a NISSAN dealer for this ser-
vice. For additional information, see “Mal-
function Indicator Light (MIL)” (P. 2-14).
CAUTION
Running the engine with the engine oil
pressure warning light on could cause
serious damage to the engine almost
immediately. Such damage is not cov-
ered by warranty. Turn off the engine as
soon as it is safe to do so.
DRIVING THE VEHICLE
Starting and driving5-11
Page 161 of 300
CAUTION
During the first 1,200 miles (2,000 km),
follow these recommendations to ob-
tain maximum engine performance
and ensure the future reliability and
economy of your new vehicle. Failure to
follow these recommendations may
result in shortened engine life and re-
duced engine performance.
• Avoid driving for long periods at constant speed, either fast or slow, and do not run
the engine over 4,000 rpm.
• Do not accelerate at full throttle in any gear.
• Avoid quick starts.
• Avoid hard braking as much as possible. Follow these easy-to-use Fuel Efficient
Driving Tips to help you achieve the most
fuel economy from your vehicle.
1.
Use Smooth Accelerator and Brake
Pedal Application
• Avoid rapid starts and stops.
• Use smooth, gentle accelerator and brake application whenever possible.
• Maintain constant speed while com- muting and coast whenever possible.
2. Maintain Constant Speed
• Look ahead to try and anticipate and minimize stops.
• Synchronizing your speed with traffic lights allows you to reduce your num-
ber of stops.
• Maintaining a steady speed can mini- mize red light stops and improve fuel
efficiency.
3. Use Air Conditioning (A/C) at Higher
Vehicle Speeds
• Below 40 mph (64 km/h), it is more efficient to open windows to cool the
vehicle due to reduced engine load.
• Above 40 mph (64 km/h), it is more efficient to use A/C to cool the vehicle
due to increased aerodynamic drag. • Recirculating the cool air in the cabin
when the A/C is on reduces cooling
load.
4. Drive at Economical Speeds and
Distances
• Observing the speed limit and not ex- ceeding 60 mph (97 km/h) (where le-
gally allowed) can improve fuel effi-
ciency due to reduced aerodynamic
drag.
• Maintaining a safe following distance behind other vehicles reduces unnec-
essary braking.
• Safely monitoring traffic to anticipate changes in speed permits reduced
braking and smooth acceleration
changes.
• Select a gear range suitable to road conditions.
5. Use Cruise Control
• Using cruise control during highway driving helps maintain a steady speed.
• Cruise control is particularly effective in providing fuel savings when driving
on flat terrains.
6. Plan for the Shortest Route
• Utilize a map or navigation system to determine the best route to save time.
BREAK-IN SCHEDULE FUEL EFFICIENT DRIVING TIPS
Starting and driving5-19
Page 189 of 300
WARNING
Be careful not to allow your hands, hair,
jewelry or clothing to come into con-
tact with, or get caught in, engine belts
or the engine cooling fan. The engine
cooling fan can start at any time.
6. Af ter the engine cools down, check the coolant level in the engine coolant res-
ervoir tank with the engine running. Add
coolant to the engine coolant reservoir
tank if necessary. It is recommended
that you visit a NISSAN dealer for this
service. When towing your vehicle, all jurisdictional
and local regulations for towing must be
followed. Incorrect towing equipment
could damage your vehicle. Towing in-
structions are available from a NISSAN
dealer. Local service operators are gener-
ally familiar with the applicable laws and
procedures for towing. To assure proper
towing and to prevent accidental damage
to your vehicle, NISSAN recommends hav-
ing a service operator tow your vehicle. It is
advisable to have the service operator
carefully read the following precautions:
CAUTION
• When towing, make sure that the
transmission, axles, steering system
and powertrain are in working condi-
tion. If any of these conditions apply,
dollies or a flatbed tow truck must be
used.
• Always attach safety chains before
towing. For additional information about towing
your vehicle behind a Recreational Vehicle
(RV), see “Flat towing” (P. 10-19).
TOWING RECOMMENDED BY
NISSAN
NISSAN recommends towing your vehicle
based upon the type of drivetrain. For addi-
tional information, refer to the diagrams in
this section to ensure that your vehicle is
properly towed.
TOWING YOUR VEHICLE
In case of emergency6-13
Page 205 of 300
The engine cooling system is filled at the
factory with a pre-diluted mixture of 50%
Genuine NISSAN Long Life Antifreeze/
Coolant (blue) and 50% water to provide
year-round antifreeze and coolant protec-
tion. The antifreeze solution contains rust
and corrosion inhibitors. Additional engine
cooling system additives are not
necessary.CAUTION
• Never use any cooling system addi-
tives such as radiator sealer. Addi-
tives may clog the cooling system
and cause damage to the engine,
transmission and/or cooling system.
• When adding or replacing coolant, be
sure to use only Genuine NISSAN
Long Life Antifreeze/Coolant (blue)
or equivalent. Genuine NISSAN Long
Life Antifreeze/Coolant (blue) is pre-
diluted to provide antifreeze protec-
tion to -34° F (-37° C). If additional
freeze protection is needed due to
weather where you operate your ve-
hicle, add Genuine NISSAN Long Life
Antifreeze/Coolant (blue) concen-
trate following the directions on the
container. If an equivalent coolant
other than Genuine NISSAN Long Life
Antifreeze/Coolant (blue) is used, fol-
low the coolant manufacturer’s in-
structions to maintain minimum an-
tifreeze protection to -34° F (-37° C).
The use of other types of coolant so-
lutions other than Genuine NISSAN
Long Life Antifreeze/Coolant (blue)
or equivalent may damage the en-
gine cooling system. •
The life expectancy of the factory-fill
coolant is 105,000 miles (168,000 km)
or 7 years. Mixing any other type of
coolant other than Genuine NISSAN
Long Life Antifreeze/Coolant
(blue)(or equivalent coolant), includ-
ing Genuine NISSAN Long Life
Antifreeze/Coolant (green), or the
use of non-distilled water may re-
duce the life expectancy of the
factory-fill coolant. For additional in-
formation, see the “Maintenance and
schedules” section of this manual.
ENGINE COOLING SYSTEM
Do-it-yourself8-5
Page 206 of 300
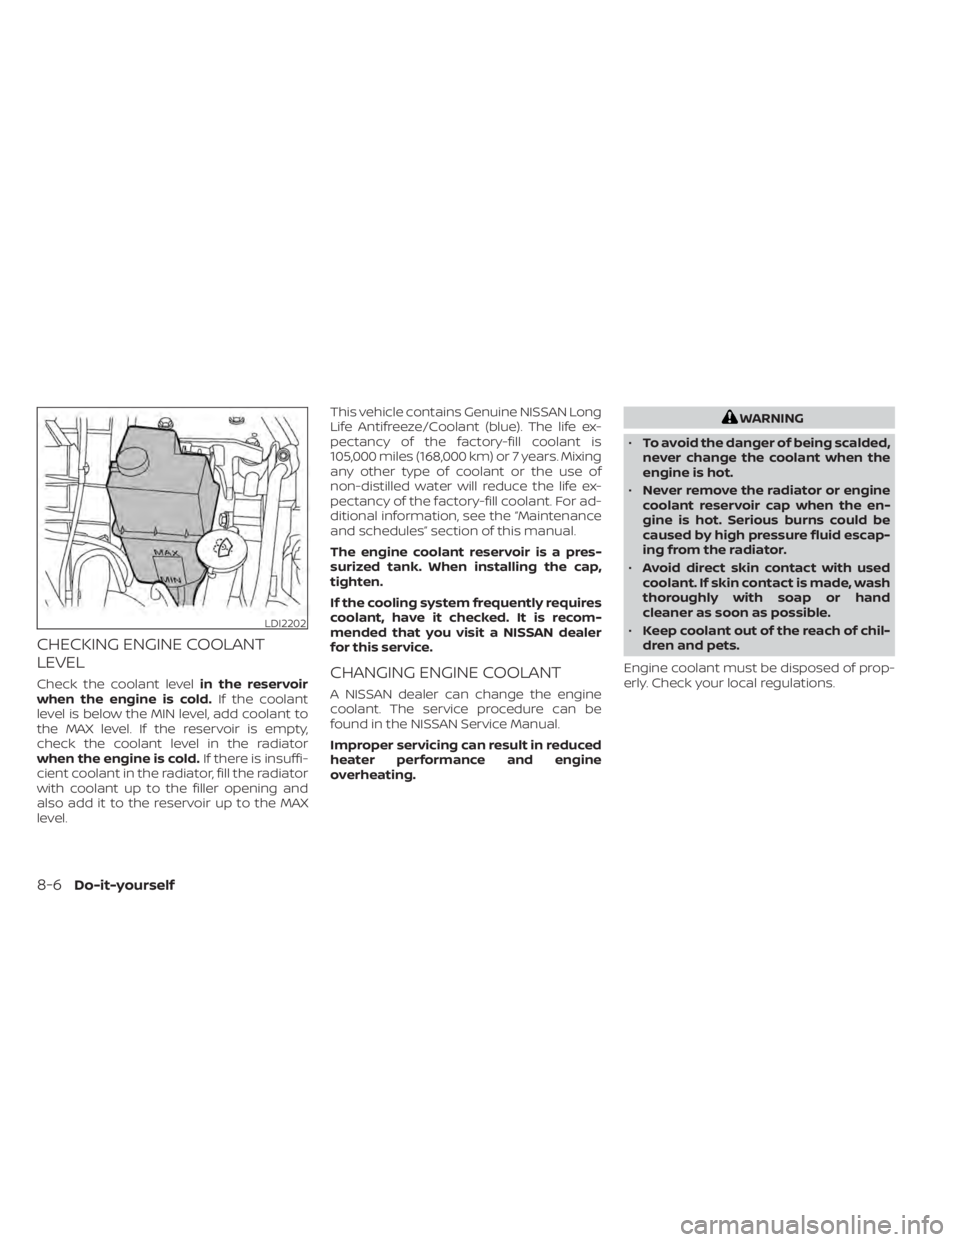
CHECKING ENGINE COOLANT
LEVEL
Check the coolant levelin the reservoir
when the engine is cold. If the coolant
level is below the MIN level, add coolant to
the MAX level. If the reservoir is empty,
check the coolant level in the radiator
when the engine is cold. If there is insuffi-
cient coolant in the radiator, fill the radiator
with coolant up to the filler opening and
also add it to the reservoir up to the MAX
level. This vehicle contains Genuine NISSAN Long
Life Antifreeze/Coolant (blue). The life ex-
pectancy of the factory-fill coolant is
105,000 miles (168,000 km) or 7 years. Mixing
any other type of coolant or the use of
non-distilled water will reduce the life ex-
pectancy of the factory-fill coolant. For ad-
ditional information, see the “Maintenance
and schedules” section of this manual.
The engine coolant reservoir is a pres-
surized tank. When installing the cap,
tighten.
If the cooling system frequently requires
coolant, have it checked. It is recom-
mended that you visit a NISSAN dealer
for this service.CHANGING ENGINE COOLANT
A NISSAN dealer can change the engine
coolant. The service procedure can be
found in the NISSAN Service Manual.
Improper servicing can result in reduced
heater performance and engine
overheating.
WARNING
• To avoid the danger of being scalded,
never change the coolant when the
engine is hot.
• Never remove the radiator or engine
coolant reservoir cap when the en-
gine is hot. Serious burns could be
caused by high pressure fluid escap-
ing from the radiator.
• Avoid direct skin contact with used
coolant. If skin contact is made, wash
thoroughly with soap or hand
cleaner as soon as possible.
• Keep coolant out of the reach of chil-
dren and pets.
Engine coolant must be disposed of prop-
erly. Check your local regulations.
LDI2202
8-6Do-it-yourself
Page 292 of 300
Cruise control..................5-17Cup holders..................2-28
D
D-ring..................2-28,10-17Daytime light system.............2-22Defroster switchRear window and outside mirror defroster
switch
.....................2-21Dimensions and weights..........10-9Dimmer switch for instrument panel. . .2-23Door locks................ .3-3, 3-4Door open warning light...........2-10Drive belt....................8-14Driving
Cold weather driving...........5-32Driving with Continuously Variable
Transmission (CVT)..........5-8, 5-12Precautions when starting and
driving.....................5-2Driving the vehicle...............5-11
E
Economy - fuel................5-20Emission control information label. . . .10-11Emission control system warranty. . . .10-21EngineBefore starting the engine........5-9Capacities and recommended
fuel/lubricants...............10-2Changing engine coolant.........8-6
Changing engine oil.............8-7Changing engine oil filter.........8-7Checking engine coolant level......8-6Checking engine oil level..........8-7Engine cooling system...........8-5Engine oil...................8-7Engine oil and oil filter
recommendation.............10-6Engine oil pressure warning light. . . .2-10Engine oil viscosity.............10-6Engine serial number..........10-10Engine specifications...........10-8Starting the engine............5-10Engine Block Heater.............5-34Event Data recorders............10-23Exhaust gas (Carbon monoxide)......5-2Explanation of maintenance items.....9-2Explanation of scheduled maintenance
items...................... .9-5Extended storage switch..........8-20
F
F.M.V.S.S. certification label.........10-11Flashers (See hazard warning flasher
switch)......................6-2Flat tire...................6-2,6-3Floor mat positioning aid...........7-5Fluid
Brake fluid..................8-10Capacities and recommended
fuel/lubricants...............10-2
Continuously Variable Transmission (CVT)
fluid......................8-10Engine coolant................8-5Engine oil...................8-7Windshield-washer fluid..........8-11Front air bag system (See supplemental
restraint system)...............1-38Front seats....................1-2Front-door pocket...............2-27FuelCapacities and recommended
fuel/lubricants
...............10-2Fuel economy...............5-20Fuel gauge................. .2-6Fuel octane rating.............10-5Fuel recommendation..........10-3Fuel-filler door and cap..........3-14Fuel-filler door lock opener lever. . . .3-14Loose fuel cap warning..........2-5Fuel efficient driving tips...........5-19Fuel gauge................... .2-6Fuel-filler door.................3-14Fuses.......................8-18Fusible links...................8-19
G
Gas cap.....................3-14Gauge
Fuel gauge................. .2-6Speedometer..............2-3, 2-4Tachometer.................2-6Trip computer................2-7
11-2