ECU NISSAN PATHFINDER 1997 R50 / 2.G Owner's Manual
[x] Cancel search | Manufacturer: NISSAN, Model Year: 1997, Model line: PATHFINDER, Model: NISSAN PATHFINDER 1997 R50 / 2.GPages: 233, PDF Size: 1.9 MB
Page 80 of 233

Bolt diameter: 8.0 mm
Bolt length: more than 1.18 in (30 mm)
Thread pitch: 1.25 mm
The top strap should be secured to the attach-
ing bolt which provides the straightest installa-
tion of the top strap.
Child restraint anchor points are de-
signed to withstand only those loads
imposed by correctly fitted child re-
straints. Under no circumstances are
they to be used for adult seat belts or
harnesses.
Anchor point locations
Anchor point attaching bolts are located under
the carpet of the rear luggage area floor.
Your NISSAN dealer can assist you with the
installation of your child restraint.
The anchor bolt should be installed at all
times to prevent the possibility of ex-
haust fumes entering the passenger
compartment through the holes. See
ªExhaust gasº in the ªStarting and driv-ingº section.
SPA0393
2-39
Z01.2.1/R50-DX
Page 81 of 233
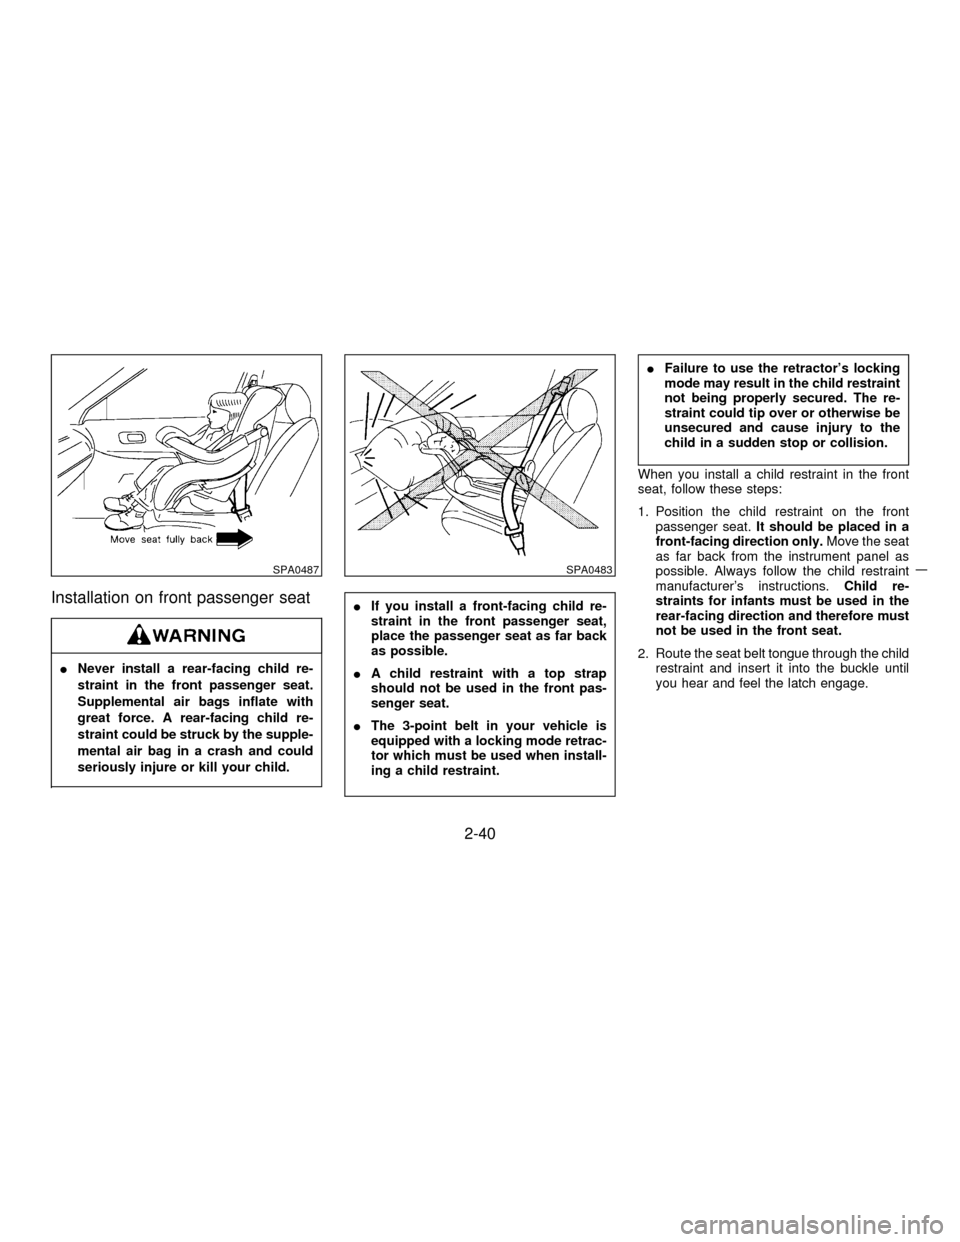
Installation on front passenger seat
INever install a rear-facing child re-
straint in the front passenger seat.
Supplemental air bags inflate with
great force. A rear-facing child re-
straint could be struck by the supple-
mental air bag in a crash and could
seriously injure or kill your child.
IIf you install a front-facing child re-
straint in the front passenger seat,
place the passenger seat as far back
as possible.
IA child restraint with a top strap
should not be used in the front pas-
senger seat.
IThe 3-point belt in your vehicle is
equipped with a locking mode retrac-
tor which must be used when install-
ing a child restraint.
IFailure to use the retractor's locking
mode may result in the child restraint
not being properly secured. The re-
straint could tip over or otherwise be
unsecured and cause injury to the
child in a sudden stop or collision.
When you install a child restraint in the front
seat, follow these steps:
1. Position the child restraint on the front
passenger seat.It should be placed in a
front-facing direction only.Move the seat
as far back from the instrument panel as
possible. Always follow the child restraint
manufacturer's instructions.Child re-
straints for infants must be used in the
rear-facing direction and therefore must
not be used in the front seat.
2. Route the seat belt tongue through the child
restraint and insert it into the buckle until
you hear and feel the latch engage.
SPA0487SPA0483
2-40
Z01.2.1/R50-DX
Page 82 of 233
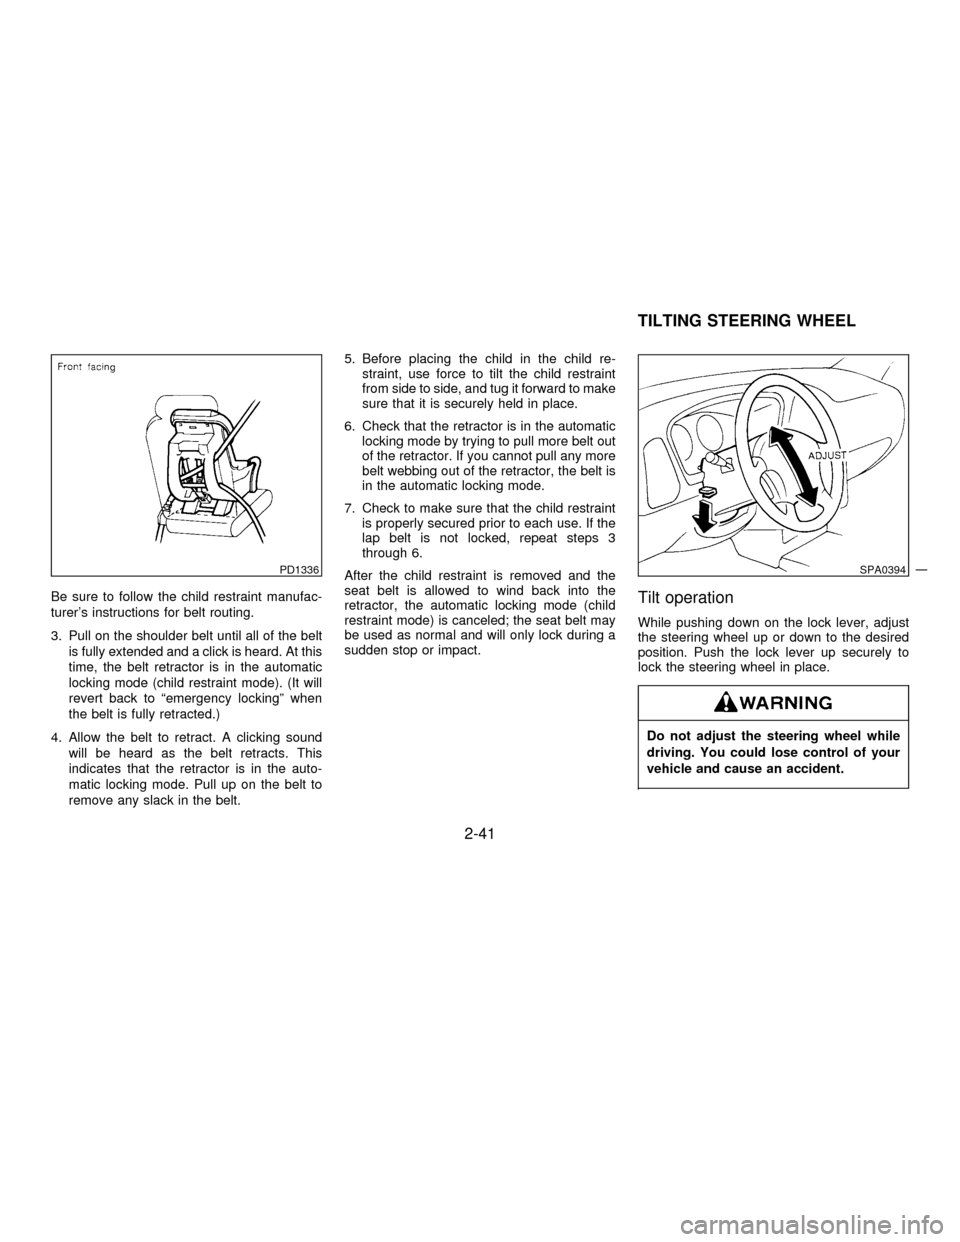
Be sure to follow the child restraint manufac-
turer's instructions for belt routing.
3. Pull on the shoulder belt until all of the belt
is fully extended and a click is heard. At this
time, the belt retractor is in the automatic
locking mode (child restraint mode). (It will
revert back to ªemergency lockingº when
the belt is fully retracted.)
4. Allow the belt to retract. A clicking sound
will be heard as the belt retracts. This
indicates that the retractor is in the auto-
matic locking mode. Pull up on the belt to
remove any slack in the belt.5. Before placing the child in the child re-
straint, use force to tilt the child restraint
from side to side, and tug it forward to make
sure that it is securely held in place.
6. Check that the retractor is in the automatic
locking mode by trying to pull more belt out
of the retractor. If you cannot pull any more
belt webbing out of the retractor, the belt is
in the automatic locking mode.
7. Check to make sure that the child restraint
is properly secured prior to each use. If the
lap belt is not locked, repeat steps 3
through 6.
After the child restraint is removed and the
seat belt is allowed to wind back into the
retractor, the automatic locking mode (child
restraint mode) is canceled; the seat belt may
be used as normal and will only lock during a
sudden stop or impact.Tilt operation
While pushing down on the lock lever, adjust
the steering wheel up or down to the desired
position. Push the lock lever up securely to
lock the steering wheel in place.
Do not adjust the steering wheel while
driving. You could lose control of your
vehicle and cause an accident.
PD1336SPA0394
TILTING STEERING WHEEL
2-41
Z01.2.1/R50-DX
Page 85 of 233
The night position will reduce glare from the
headlights of vehicles behind you at night.
Use the night position only when neces-
sary, because it reduces rear view
clarity.
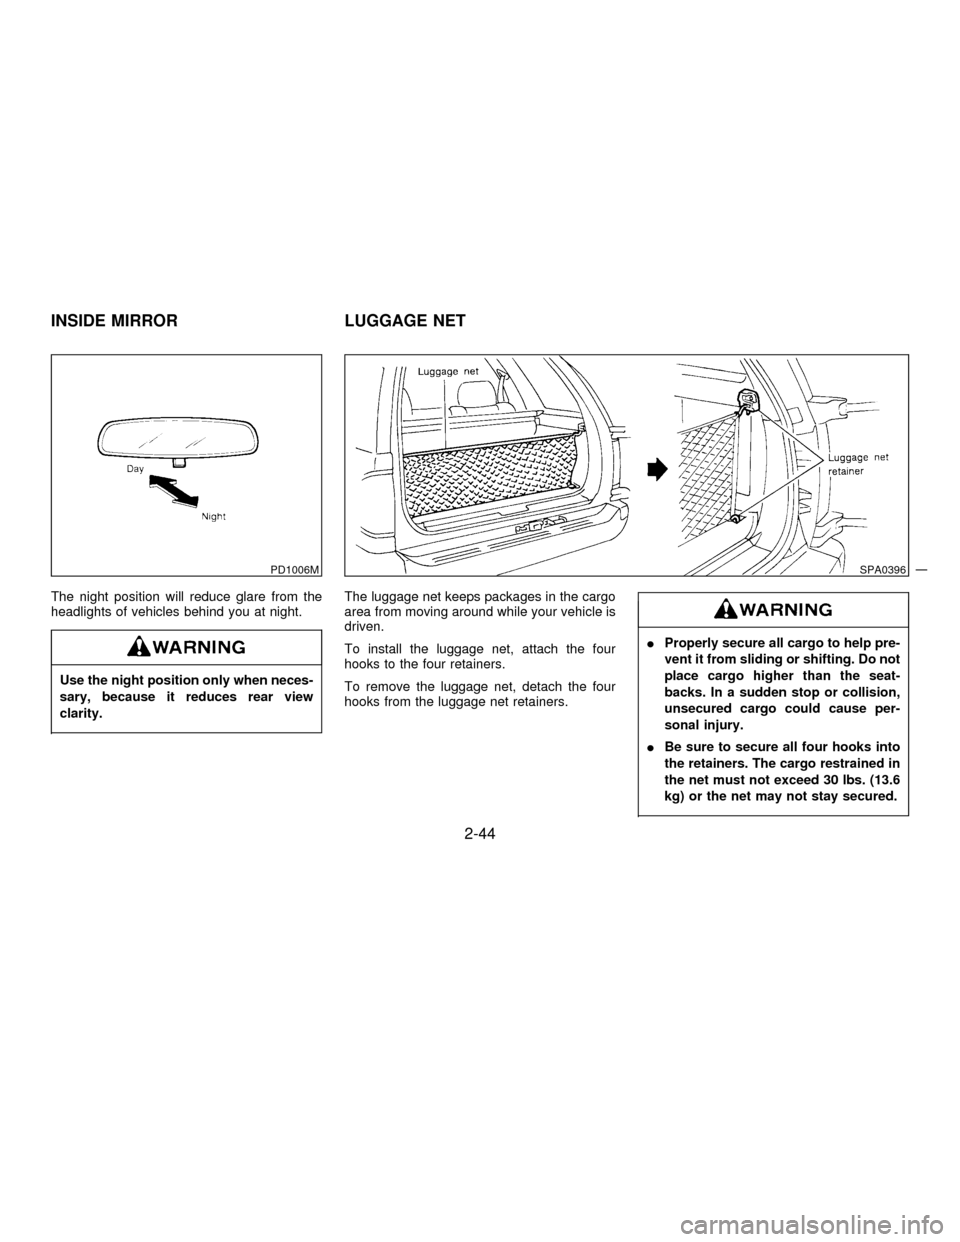
The luggage net keeps packages in the cargo
area from moving around while your vehicle is
driven.
To install the luggage net, attach the four
hooks to the four retainers.
To remove the luggage net, detach the four
hooks from the luggage net retainers.
IProperly secure all cargo to help pre-
vent it from sliding or shifting. Do not
place cargo higher than the seat-
backs. In a sudden stop or collision,
unsecured cargo could cause per-
sonal injury.
IBe sure to secure all four hooks into
the retainers. The cargo restrained in
the net must not exceed 30 lbs. (13.6
kg) or the net may not stay secured.
PD1006MSPA0396
INSIDE MIRROR LUGGAGE NET
2-44
Z01.2.1/R50-DX
Page 86 of 233
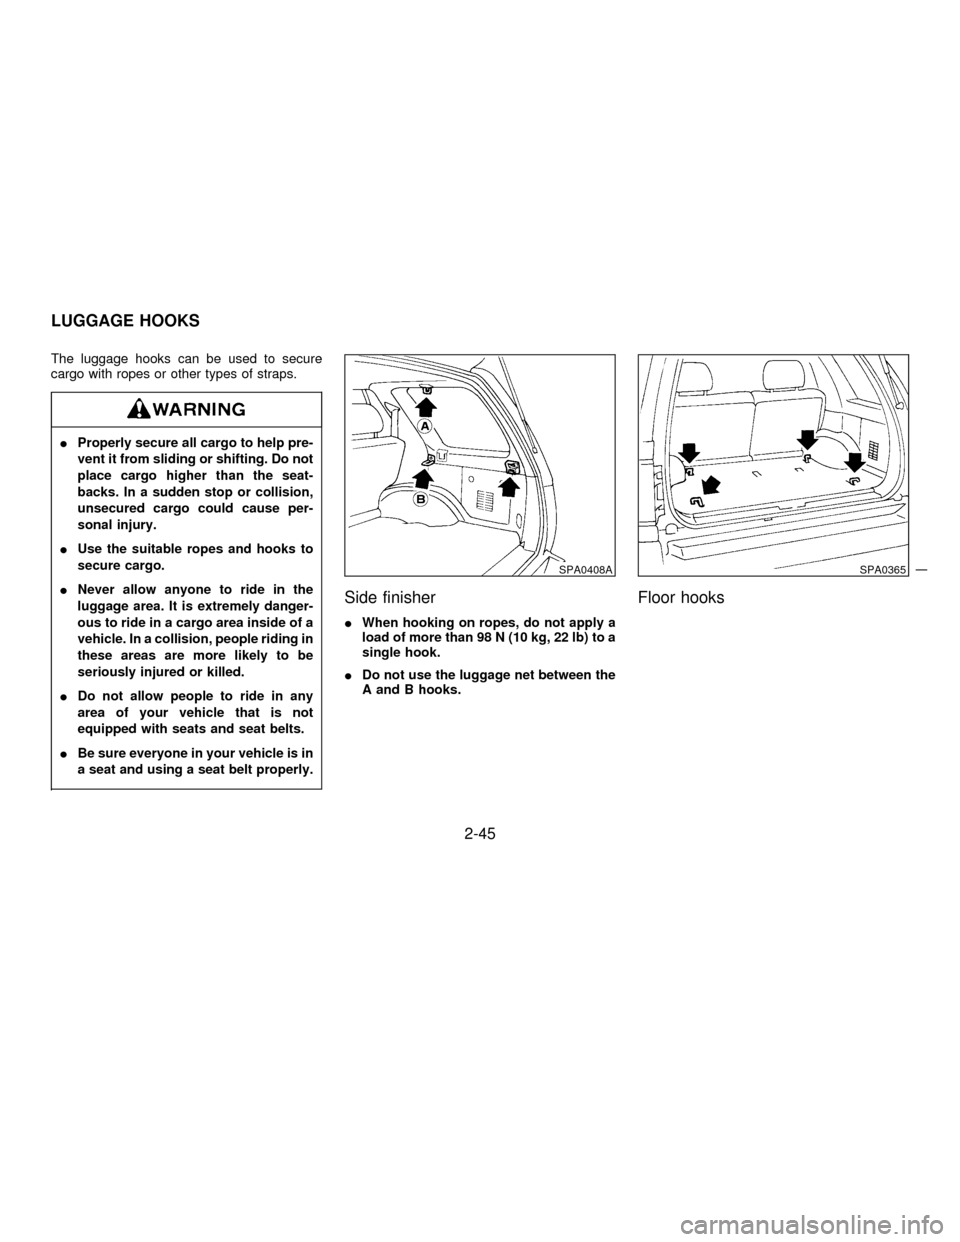
The luggage hooks can be used to secure
cargo with ropes or other types of straps.
IProperly secure all cargo to help pre-
vent it from sliding or shifting. Do not
place cargo higher than the seat-
backs. In a sudden stop or collision,
unsecured cargo could cause per-
sonal injury.
IUse the suitable ropes and hooks to
secure cargo.
INever allow anyone to ride in the
luggage area. It is extremely danger-
ous to ride in a cargo area inside of a
vehicle. In a collision, people riding in
these areas are more likely to be
seriously injured or killed.
IDo not allow people to ride in any
area of your vehicle that is not
equipped with seats and seat belts.
IBe sure everyone in your vehicle is in
a seat and using a seat belt properly.
Side finisher
IWhen hooking on ropes, do not apply a
load of more than 98 N (10 kg, 22 lb) to a
single hook.
IDo not use the luggage net between the
A and B hooks.
Floor hooks
SPA0408ASPA0365
LUGGAGE HOOKS
2-45
Z01.2.1/R50-DX
Page 87 of 233
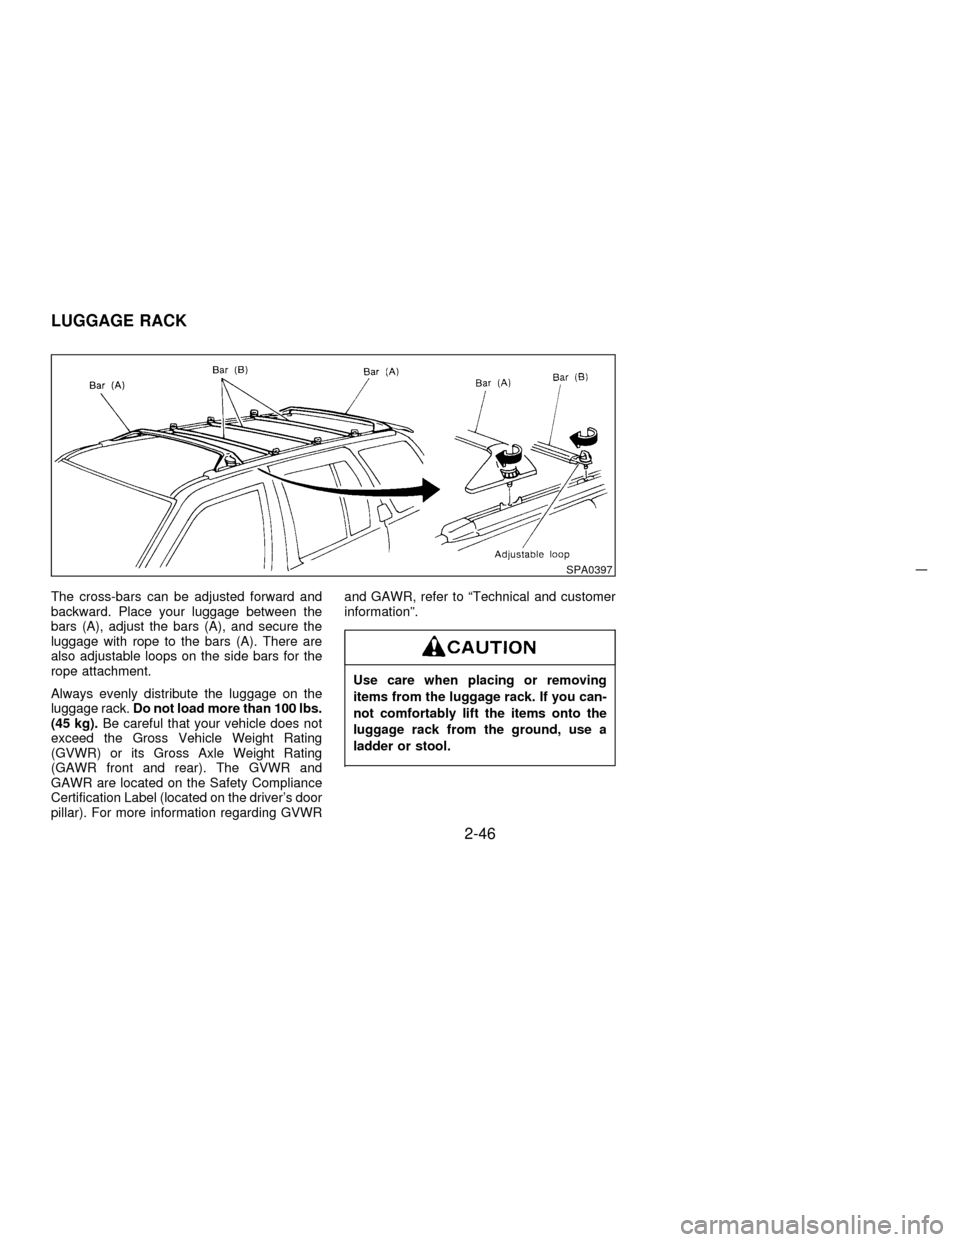
The cross-bars can be adjusted forward and
backward. Place your luggage between the
bars (A), adjust the bars (A), and secure the
luggage with rope to the bars (A). There are
also adjustable loops on the side bars for the
rope attachment.
Always evenly distribute the luggage on the
luggage rack.Do not load more than 100 lbs.
(45 kg).Be careful that your vehicle does not
exceed the Gross Vehicle Weight Rating
(GVWR) or its Gross Axle Weight Rating
(GAWR front and rear). The GVWR and
GAWR are located on the Safety Compliance
Certification Label (located on the driver's door
pillar). For more information regarding GVWRand GAWR, refer to ªTechnical and customer
informationº.
Use care when placing or removing
items from the luggage rack. If you can-
not comfortably lift the items onto the
luggage rack from the ground, use a
ladder or stool.
SPA0397
LUGGAGE RACK
2-46
Z01.2.1/R50-DX
Page 117 of 233

IDo not leave children, unreliable
adults, or pets alone in your vehicle.
They could accidentally injure them-
selves or others through inadvertent
operation of the vehicle. Also, on hot,
sunny days, temperatures in a closed
vehicle could quickly become high
enough to cause severe or possibly
fatal injuries to people or animals.
IProperly secure all cargo to help pre-
vent it from sliding or shifting. Do not
place cargo higher than the seat-
backs. In a sudden stop or collision,
unsecured cargo could cause per-
sonal injury.
EXHAUST GAS (Carbon Monoxide)
Do not breathe exhaust gases; they con-
tain colorless and odorless carbon mon-
oxide. Carbon monoxide is a dangerous
gas, and can cause unconsciousness or
death.
IIf you suspect that exhaust fumes are
entering the vehicle, drive with all
windows fully open, and have the
vehicle inspected immediately.
IDo not run the engine in closed
spaces such as a garage.
IDo not park the vehicle with the en-
gine running for any extended length
of time.
IKeep the back door and rear window
closed while driving, otherwise ex-
haust gases could be drawn into the
passenger compartment. If you must
drive in this manner for some reason,
take the following steps.
1. Open all the windows.2. Set the air recirculate switch
ªOFFº and the fan control at
ªhighº to circulate the air.
IIf electrical wiring or other cable con-
nections must pass to a trailer
through the seal on the back door or
the body, follow the manufacturer's
recommendation to prevent carbon
monoxide entry into the vehicle.
IIf a special body or other equipment
is added for recreational or other us-
age, follow the manufacturer's rec-
ommendation to prevent carbon
monoxide entry into the vehicle.
(Some recreational vehicle appli-
ances such as stoves, refrigerator,
heaters, etc. may also generate car-
bon monoxide.)
IThe exhaust system and body should
be inspected by a qualified mechanic
whenever:
a. The vehicle is raised for service.
b. You suspect that exhaust fumes
are entering into the passenger
compartment.
PRECAUTIONS WHEN STARTING
AND DRIVING
4-2
Z01.2.1/R50-DX
Page 136 of 233
DRIVING SAFETY PRECAUTIONS
Your NISSAN is designed for both normal and
off-road use. However, avoid driving in deep
water or mud as your NISSAN is mainly de-
signed for leisure use, unlike a conventional
off-road vehicle.
Remember that two-wheel drive models are
less capable than four-wheel drive models for
rough road driving and extrication when stuck
in deep snow or mud, or the like.
Please observe the following precautions:
IDrive carefully when off the road and
avoid dangerous areas. Always wear
your seat belts to help keep you and
your passengers in position when
driving over rough terrain.
IDo not drive across steep slopes.
Instead drive either straight up or
straight down the slopes. Off-road
vehicles can tip over sideways much
more easily than they can forward or
backward.
IMany hills are too steep for any ve-
hicle. If you drive up them, you maystall. If you drive down them, you may
not be able to control your speed. If
you drive across them, you may roll
over.
IStay alert when driving to the top of a
hill. At the top there could be a drop-
off or other hazard that could cause
an accident.
IIf your engine stalls or you cannot
make it to the top of a steep hill, never
attempt to turn around. Your vehicle
could tip or roll over. Always back
straight down in reverse gear. Never
back down in neutral (N) or with the
clutch depressed, using only the
brake, as this could cause loss of
control.
IHeavy braking going down a hill
could cause your brakes to overheat
and fade, resulting in loss of control
and an accident. Apply brakes lightly
and use a low gear to control your
speed.
IUnsecured cargo can be thrown
around when driving over rough ter-
rain. Properly secure it so that it willnot be thrown forward and cause in-
jury to you or your passengers.
IAvoid raising the center of gravity by
loading things on the roof or equip-
ping the vehicle with tires larger than
specified in this manual. This could
cause your vehicle to rollover. Put
heavy loads in the cargo area as far
forward and as low as possible.
IDo not grip the inside or spokes of
the steering wheel when driving off-
road. The steering wheel could jerk
and injure your hands. Instead drive
with your fingers and thumbs on the
outside of the rim.
IBefore operating the vehicle, ensure
that the driver and all passengers
have their seat belts fastened.
IAlways drive with the floor mats in
place as the floor may become very
hot. Particular care should be taken if
you are barefoot.
ILower your speed when encounter-
ing strong crosswinds. With its
higher center of gravity, your NISSAN
is more affected by gusty side winds.
4-21
Z01.2.1/R50-DX
Page 142 of 233

Engine Coolantº in the ªDo- it-yourself opera-
tionsº section.
Tire equipment
1. SUMMER tires are of a tread design to
provide superior performance on dry pave-
ment. However, the performance of these
tires will be substantially reduced in snowy
and icy conditions. If you operate your
vehicle on snowy or icy roads, Nissan rec-
ommends the use on all four wheels of
MUD & SNOW or ALL SEASON tires.
Please consult your Nissan dealer for the
tire type, size, speed rating and availability
information.
2. For additional traction on icy roads, studded
tires may be used. However, some Prov-
inces and States prohibit their use, so,
before installing studded tires, check local,
state and provincial laws.
Skid and traction capabilities of studded
snow tires, on wet or dry surfaces, may be
poorer than that of non-studded snow tires.
3. Tire chains may be used if desired. Make
sure they are of proper size for the tires on
your vehicle and are installed according to
the chain manufacturer's suggestions. Use
of tire chains may be prohibited according
to location. Check the local laws beforeinstalling tire chains. When installing tire
chains, make sure they are of proper size
for the tires on your vehicle and are in-
stalled according to the chain manufactur-
er's suggestions.Use only SAE Class ªSº
chains.Other types may damage your
vehicle. Use chain tensioners when recom-
mended by the tire chain manufacturer to
ensure a tight fit. Loose end links of the tire
chain must be secured or removed to pre-
vent the possibility of whipping action dam-
age to the fenders or underbody. If pos-
sible, avoid fully loading your vehicle when
using tire chains. In addition, drive at a
reduced speed. Otherwise, your vehicle
may be damaged and/or vehicle handling
and performance may be adversely af-
fected.
Do not use the chains on dry roads.
Special winter equipment
It is recommended that the following items be
carried in the vehicle during winter:
1. A scraper and stiff-bristled brush to remove
ice and snow from the windows and wiper
blades.
2. A sturdy, flat board to be placed under the
jack to give it firm support.3. A shovel to dig the vehicle out of snow-
drifts.
4. Extra window washer fluid to refill the res-
ervoir tank.
4-27
Z01.2.1/R50-DX
Page 145 of 233

If you have a flat tire, follow the instructions
below.
Stopping the vehicle
1. Safely move the vehicle off the road away
from traffic.
2. Turn on the hazard warning flasher.
3. Park on a level surface and apply the
parking brake. Shift the manual transmis-
sion into reverse (automatic transmission in
ªPº).
The transfer control lever must
be in the ª2Hº, ª4Hº or ª4Lº position.
Never place the transfer control lever in
the ªNº position. Otherwise, the vehicle
could roll unexpectedly even if the
manual transmission is in gear or the
automatic transmission is in the ªPº
position. This could result in serious
personal injury or property damage.
4. Turn off the engine.
5. Raise the hood to warn other traffic and to
signal professional road assistance person-nel that you require assistance.
6. Have all passengers get out of the vehicle
and stand in a safe place away from traffic
and clear of the vehicle.
IMake sure that the parking brake is
securely applied and the manual
transmission is shifted into reverse
(automatic transmission in ªPº).
INever change tires when the vehicle
is on a slope, ice or a slippery area.
This is hazardous.
INever change tires if oncoming traffic
is close to your vehicle. Wait for pro-
fessional road assistance.
Blocking wheels
Place suitable blocks at both the front and
back of the wheel diagonally opposite the flat
tire.
Be sure to block the wheel as the vehicle
may move and could cause personal
injury.
MCE0001
FLAT TIRE
5-2
Z01.2.1/R50-DX