steering wheel NISSAN PATHFINDER 1997 R50 / 2.G Owners Manual
[x] Cancel search | Manufacturer: NISSAN, Model Year: 1997, Model line: PATHFINDER, Model: NISSAN PATHFINDER 1997 R50 / 2.GPages: 233, PDF Size: 1.9 MB
Page 7 of 233
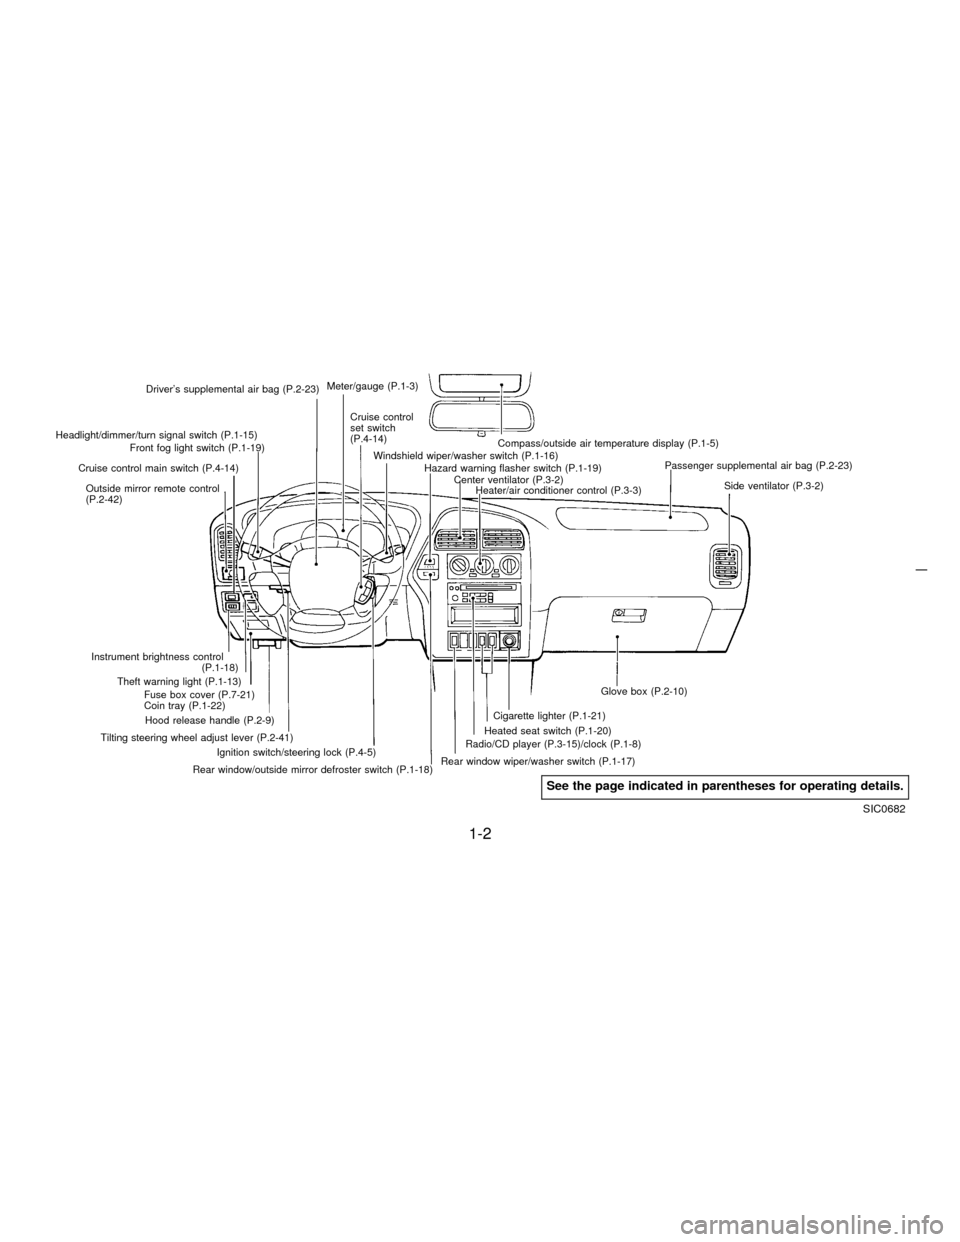
Driver's supplemental air bag (P.2-23)
Cruise control
set switch
(P.4-14)
Outside mirror remote control
(P.2-42) Headlight/dimmer/turn signal switch (P.1-15)
Front fog light switch (P.1-19)Meter/gauge (P.1-3)
Windshield wiper/washer switch (P.1-16)
Hazard warning flasher switch (P.1-19)
Center ventilator (P.3-2)
Heater/air conditioner control (P.3-3)Compass/outside air temperature display (P.1-5)
Passenger supplemental air bag (P.2-23)
Side ventilator (P.3-2)
Glove box (P.2-10)
Cigarette lighter (P.1-21)
Radio/CD player (P.3-15)/clock (P.1-8)
Rear window wiper/washer switch (P.1-17)
Rear window/outside mirror defroster switch (P.1-18)Ignition switch/steering lock (P.4-5)Heated seat switch (P.1-20)
Tilting steering wheel adjust lever (P.2-41)Hood release handle (P.2-9) Fuse box cover (P.7-21)
Coin tray (P.1-22) Theft warning light (P.1-13) Cruise control main switch (P.4-14)
Instrument brightness control
(P.1-18)
SIC0682
See the page indicated in parentheses for operating details.
1-2
Z01.2.1/R50-DX
Page 42 of 233

2 Pre-driving checks and adjustments
Key ......................................................................... 2-2
Door locks .............................................................. 2-2
Multi-remote control system (If so equipped) ......... 2-4
Battery replacement ................................................ 2-6
Spare tire carrier .................................................... 2-7
Back door locks ....................................................... 2-8
Rear window locks .................................................. 2-8
Hood release .......................................................... 2-9
Glove box lock ..................................................... 2-10
Fuel filler lid lock .................................................. 2-10
Fuel filler cap ....................................................... 2-11
Front seats ........................................................... 2-12
Rear seats ............................................................ 2-16
Supplemental restraint system
(Supplemental air bag system) ............................ 2-19Warning labels ...................................................... 2-25
Supplemental air bag warning light ..................... 2-25
Seat belts ............................................................. 2-27
Child restraints for infants and
small children ....................................................... 2-34
Tilting steering wheel ........................................... 2-41
Sunvisors ............................................................... 2-42
Outside mirror control .......................................... 2-42
Outside mirrors .................................................... 2-43
Inside mirror ......................................................... 2-44
Luggage net .......................................................... 2-44
Luggage hooks........................................................ 2-45
Luggage rack ........................................................ 2-46
Z01.2.1/R50-DX
Page 60 of 233

This Supplemental Restraint System section
contains important information concerning the
driver and passenger supplemental air bags.
The Supplemental Restraint System Air Bag
can help reduce impact force to the driver and
to the front passenger in certain frontal colli-
sions. The supplemental air bags are designed
tosupplementthe crash protection provided
by the driver and passenger seat belts and are
not a substitutefor them. The seat belts
should always be correctly worn and the driver
and front passenger seated a suitable distance
away from the steering wheel and instrument
panel. (See ªSeat beltsº for instructions and
precautions on seat belt usage.)
After turning the ignition key to the ªONº
position, the supplemental air bag warning
light illuminates. The supplemental air bag
warning light will turn off after about 7
seconds if the system is operational.
IThe supplemental air bags ordinarily
will not inflate in the event of a side
impact, rear impact, roll over, or
lower severity frontal collision. Al-
ways wear your seat belts to help
reduce the risk or severity of injury in
various kinds of accidents.
IThe seat belts and the supplemental
air bags are most effective when you
are sitting back and upright in the
seat. Supplemental air bags inflate
with great force. If you are unre-
strained, leaning forward, sitting
sideways or out of position in any
way, you are at greater risk of injury
or death in a crash and may also
receive serious or fatal injuries from
the supplemental air bag if you are up
against it when it inflates. Always sit
back against the seatback and as far
away as practical from the steering
SPA0504SPA0505
SUPPLEMENTAL RESTRAINT
SYSTEM (SUPPLEMENTAL AIR
BAG SYSTEM)
2-19
Z01.2.1/R50-DX
Page 61 of 233

wheel or instrument panel. Always
use the seat belts.
IKeep hands on the outside of the
steering wheel. Placing them inside
the steering wheel rim could increase
the risk that they are injured when the
supplemental air bag inflates.
SPA0476SPA0477SPA0478
2-20
Z01.2.1/R50-DX
Page 64 of 233

Supplemental air bag system
The driver supplemental air bag is located in
the center of the steering wheel; the front
passenger supplemental air bag is mounted in
the dashboard above the glove box. The
supplemental air bag system is designed to
inflate in higher severity frontal collisions, al-
though it may inflate if the forces in another
type of collision are similar to those of a higher
severity frontal impact. It may not inflate in
certain frontal collisions. Vehicle damage (or
lack of it) is not always an indication of proper
supplemental air bag operation.
When the supplemental air bag inflates, a fairlyloud noise may be heard, followed by release
of smoke. This smoke is not harmful and does
not indicate a fire, but care should be taken not
to inhale it, as it may cause irritation and
choking. Those with a history of breathing
trouble should get fresh air promptly.
Supplemental air bags, along with the use of
seat belts, help to cushion the impact force on
the face and chest of the occupant. They can
help save lives and reduce serious injuries.
However, an inflating supplemental air bag
may cause facial abrasions or other injuries.
Supplemental air bags do not provide restraint
to the lower body.The seat belts should be correctly worn and
the driver and passenger seated upright as far
as practical away from the steering wheel or
dashboard. Since the supplemental air bag
inflates quickly in order to help protect the
occupant, the force of the supplemental air
bag inflating can increase the risk of injury if
the occupant is too close to or is against the
supplemental air bag module during inflation.
The supplemental air bag will deflate quickly
after a collision.
After turning the ignition key to the ªONº
position, the supplemental air bag warning
light illuminates. The supplemental air bag
warning light will turn off after about 7
seconds if the system is operational.
IDo not attach any objects to the
steering wheel pad and to the instru-
ment panel. Also, do not place any
objects between any occupant and
the steering wheel or instrument
panel. Such objects may become
dangerous projectiles and cause in-
jury if the supplemental air bag in-
flates.
SPA0390B
2-23
Z01.2.1/R50-DX
Page 65 of 233

IRight after inflation, several supple-
mental air bag system components
will be hot. Do not touch them; you
may severely burn yourself.
INo unauthorized changes should be
made to any components or wiring of
the supplemental air bag system.
This is to prevent accidental inflation
of the supplemental air bag or dam-
age to the supplemental air bag sys-
tem.
IDo not make unauthorized changes
to your vehicle's electrical system,
suspension system or front end
structure. This could affect proper
operation of the supplemental air bag
system.
ITampering with the supplemental air
bag system may result in serious
personal injury. Tampering includes
changes to the steering wheel and
the instrument panel assembly by
placing material over the steering
wheel pad and above the dashboard,
or by installing additional trim mate-
rial around the supplemental air bag
system.IWork around and on the supplemen-
tal air bag system should be done by
an authorized NISSAN dealer. Instal-
lation of electrical equipment should
also be done by an authorized
NISSAN dealer. The SRS wiring har-
nesses* should not be modified or
disconnected. Unauthorized electri-
cal test equipment and probing de-
vices should not be used on the
supplemental air bag system.
* SRS wiring harnesses are covered
with yellow insulation either just be-
fore the harness connectors or for
the complete harness, for easy
identifi-
cation.
When selling your vehicle, we request that
you inform the buyer about the supplemen-
tal air bag system and guide the buyer to
the appropriate sections in this Owner's
Manual.
2-24
Z01.2.1/R50-DX
Page 82 of 233
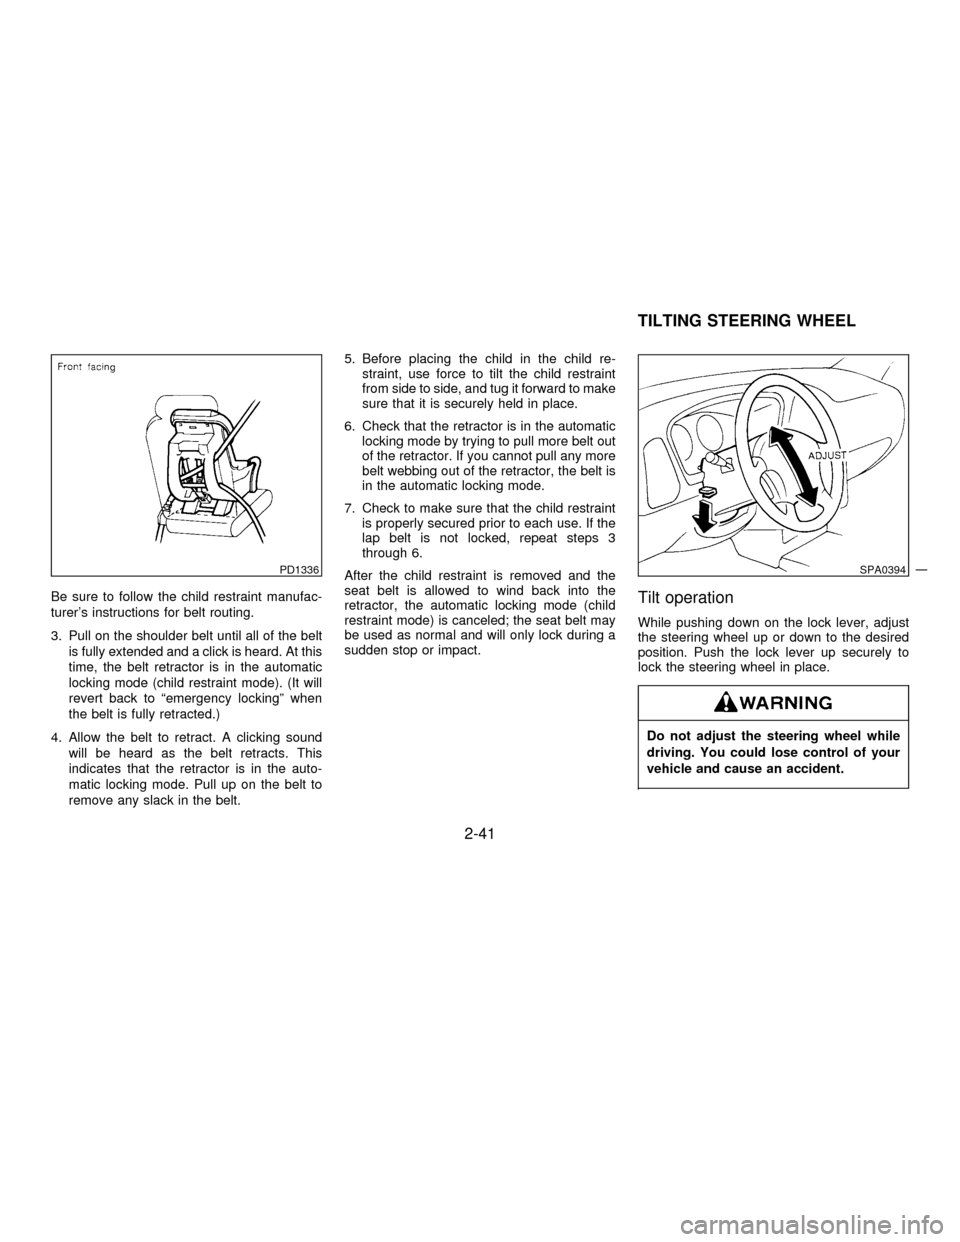
Be sure to follow the child restraint manufac-
turer's instructions for belt routing.
3. Pull on the shoulder belt until all of the belt
is fully extended and a click is heard. At this
time, the belt retractor is in the automatic
locking mode (child restraint mode). (It will
revert back to ªemergency lockingº when
the belt is fully retracted.)
4. Allow the belt to retract. A clicking sound
will be heard as the belt retracts. This
indicates that the retractor is in the auto-
matic locking mode. Pull up on the belt to
remove any slack in the belt.5. Before placing the child in the child re-
straint, use force to tilt the child restraint
from side to side, and tug it forward to make
sure that it is securely held in place.
6. Check that the retractor is in the automatic
locking mode by trying to pull more belt out
of the retractor. If you cannot pull any more
belt webbing out of the retractor, the belt is
in the automatic locking mode.
7. Check to make sure that the child restraint
is properly secured prior to each use. If the
lap belt is not locked, repeat steps 3
through 6.
After the child restraint is removed and the
seat belt is allowed to wind back into the
retractor, the automatic locking mode (child
restraint mode) is canceled; the seat belt may
be used as normal and will only lock during a
sudden stop or impact.Tilt operation
While pushing down on the lock lever, adjust
the steering wheel up or down to the desired
position. Push the lock lever up securely to
lock the steering wheel in place.
Do not adjust the steering wheel while
driving. You could lose control of your
vehicle and cause an accident.
PD1336SPA0394
TILTING STEERING WHEEL
2-41
Z01.2.1/R50-DX
Page 116 of 233

4 Starting and driving
Precautions when starting and driving ................... 4-2
On-pavement and off-road driving precautions ...... 4-4
Avoiding collision and rollover ................................. 4-4
Drinking alcohol/drugs and driving .......................... 4-4
Ignition switch ........................................................ 4-5
Before starting the engine ..................................... 4-7
Driving with automatic transmission ...................... 4-7
Driving with manual transmission ........................ 4-11
Starting the engine ............................................... 4-13
Parking brake ....................................................... 4-13
Cruise control ....................................................... 4-14
Break-in schedule ................................................ 4-16
Economy hints ..................................................... 4-17
Transfer case shifting procedures
for 4-wheel drive vehicles .................................... 4-17
Parking ................................................................. 4-23
Power steering system ........................................ 4-24
Brake system ....................................................... 4-24
Anti-lock brake system .......................................... 4-25
Cold weather driving ............................................ 4-26
Corrosion protection ............................................. 4-28
Z01.2.1/R50-DX
Page 120 of 233

Remember, drinking and driving don't mix!
And that's true for drugs too (over the counter,
prescription, and illegal drugs). Don't drive if
your ability to operate your vehicle is impaired
by alcohol, drugs, or some other physical
condition.
The switch includes an anti-theft steering lock
device.
ªLOCKº Normal parking position (0)
The ignition key can only be removed when
the switch is in this position.
On manual transmission models, to turn the
ignition key to ªLOCKº from ªACCº or ªONº,
first turn the key to ªOFFº and turn the key to
ªLOCKº while pushing the key in.
In order for the steering wheel to be locked, it
must be turned about 1/6 of a turn clockwise
from the straight up position.
To lock the steering wheel, remove the key.To unlock the steering wheel, insert the key
and turn it gently while rotating the steer-
ing wheel slightly right and left.
Never remove the key while driving. If
the key is removed, the steering wheel
will lock. This may cause the driver to
lose control of the vehicle and could
result in serious vehicle damage or per-
sonal injury.
SSD0082
IGNITION SWITCH
4-5
Z01.2.1/R50-DX
Page 121 of 233

On automatic transmission models, the igni-
tion lock is designed so that the key cannot be
turned to ªLOCKº and removed until the selec-
tor lever is moved to the ªPº position.
When removing the key from the ignition,
make sure the selector lever is in the ªPº
position.
If the selector lever is not returned to ªPº
(Park), the key cannot be moved toward
LOCK.
When the key cannot be turned toward the
ªLOCKº position, proceed as follows to remove
the key:1) Move the selector lever into the ªPº posi-
tion.
2) Turn the ignition key slightly in the ªONº
direction.
3) Turn the key toward the ªLOCKº position.
4) Remove the key.
If the key is removed from the ignition switch,
the selector lever cannot be moved from ªPº
(Park).The selector lever can be moved if
the ignition switch is in the ªACCº position.
The selector lever can also be moved if the
ignition switch is in the ªONº position and
the foot brake pedal is depressed.
There is an ªOFFº position in between ªLOCKº
and ªACCº, although it does not show on the
lock cylinder. When the ignition is in ªOFFº the
steering wheel is not locked.
In order for the steering wheel to be locked, it
must be turned about 1/6 of a turn clockwise
from the straight up position.To lock the steering wheel, remove the key.
To unlock the steering wheel, insert the key
and turn it gently while rotating the steer-
ing wheel slightly right and left.
Never remove the key while driving. If
the key is removed, the steering wheel
will lock. This may cause the driver to
lose control of the vehicle and could
result in serious vehicle damage or per-
sonal injury.
SSD0083
4-6
Z01.2.1/R50-DX