light NISSAN PATHFINDER 1998 R50 / 2.G Workshop Manual
[x] Cancel search | Manufacturer: NISSAN, Model Year: 1998, Model line: PATHFINDER, Model: NISSAN PATHFINDER 1998 R50 / 2.GPages: 249, PDF Size: 2.14 MB
Page 145 of 249
ACCEL set switch. Each time you do this,
the set speed will increase by about 1 MPH
(1.6 km/h).
To reset at a slower cruising speed,follow
either of these three methods:
a) Lightly tap the brake pedal. When the ve-
hicle attains the desired speed, push the
COAST/SET switch and release it.
b) Push and hold the COAST/SET switch.
Release the switch when the vehicle slows
down to the desired speed.
c) Push, then quickly release the COAST/
SET switch. Each time you do this, the set
speed will decrease by about 1 MPH (1.6
km/h).
To resume the preset speed,push and re-
lease the resume set switch. The vehicle will
resume the last set cruising speed when the
vehicle speed is over 30 MPH (48 km/h).
PrecautionsIThe cruise indicator may sometimes blink
when the cruise control switch (Main
switch) is turned ON while pushing the
RES/ACCEL switch or COAST/SET switch
or CANCEL switch (located on the steering
wheel). To properly set the cruise control
system perform the steps above in theorder indicated. (This is a fail-safe mode.
Turn the main switch OFF and turn it ON
again without pushing the set switch to
return to normal operation.)
IIf the cruise control system malfunctions, it
will cancel automatically. The cruise indica-
tor in the meter assembly will then blink to
warn the driver.
IWhen the cruise indicator blinks, turn the
cruise control switch (Main switch) OFF and
have the system checked by your NISSAN
dealer.During the first 1,000 miles (1,600 km), follow
these recommendations for the future reliabil-
ity and economy of your new vehicle. Failure to
follow these recommendations may result in
vehicle damage or shortened engine life.
IDo not run the engine over 4,000 rpm.
Do not drive over the following speed limits:
Two wheel drive models:
Four wheel drive models
(2H position):
55 MPH (90 km/h)
Four wheel drive models
(4H position):
50 MPH (80 km/h)
Four wheel drive models
(4L position):
30 MPH (50 km/h)
IDo not accelerate hard in top gear.
IAvoid quick starts and full acceleration.
IAvoid hard stops as much as possible.
I
For the first 300 miles (500 km), it is rec-
ommended that you drive in the two wheel
drive (2H) position.
IDo not tow a trailer for the first 500 miles
(800 km).
BREAK-IN SCHEDULE
5-18
Starting and driving
Z
01.1.31/R50-D
X
Page 147 of 249

2HÐ (2WD, high range) Only the rear wheels
are driven. Use when driving under the same
conditions as standard 2WD vehicle.
4HÐ (4WD, high range) Four wheels are
driven. Use when driving on roads where it is
difficult to drive in the 2H position (i.e., driving
at normal speeds on snow covered, icy, wet,
muddy or sandy roads).
The 4H position provides maximum power
and traction. Avoid excessive speed, as it
will cause loss of traction. Speed over 50
MPH (80 km/h) in 4H is not recommend.
4LÐ (4WD, low range) Four wheels aredriven. Use when climbing or descending
steep hills, or during hard driving in sand, mud
or deep snow. The 4L position provides maxi-
mum power and traction. Avoid raising vehicle
speed excessively, as the maximum speed is
approximately 30 MPH (50 km/h).
NÐ No wheels are driven. Always keep the
transfer lever out of the N position. Shift the
lever quickly and smoothly when moving
across the N position with the vehicle stopped.
IDo not drive on dry hard surface
roads in four wheel drive.
Driving on dry hard surfaces in 4H or
4L may cause unnecessary noise and
tire wear. We recommend driving in
the 2H position under these
conditions.
IWhen parking the vehicle, apply the
parking brake and shift the transfer
control lever in the 2H, 4H or 4L
position.
IDo not leave the transfer control lever
in the N position. Otherwise, the ve-
hicle could roll unexpectedly even if
the manual transmission is in any
gear or the automatic transmission in
the P position. If the ATP light is on,
this indicates that the automatic
transmission P position will not func-
tion and the transfer lever is in neu-
tral.
IFailure to engage the transfer control
lever in 2H, 4H or 4L could result in
the vehicle moving unexpectedly, re-
sulting in serious personal injury or
property damage.
SSD0108
USING FOUR WHEEL DRIVE5-20
Starting and driving
Z
01.1.31/R50-D
X
Page 151 of 249
IHEADED DOWNHILL WITH CURB:
q1
Turn the wheels into the curb and move the
vehicle forward until the curb side wheel
gently touches the curb.
IHEADED UPHILL WITH CURB:
q2
Turn the wheels away from the curb and
move the vehicle back until the curb side
wheel gently touches the curb.
IHEADED UPHILL OR DOWNHILL, NO
CURB:
q3
Turn the wheels toward the side of the road
so the vehicle will move away from the
center of the road if it moves.
4. Turn the ignition key to the LOCK position
and remove the key.INever leave the engine running while
vehicle is unattended.
INever leave children unattended in
the vehicle.
The power assisted steering is designed to
use a hydraulic pump, driven by the engine, to
assist steering.
If the engine stops or drive belt breaks, you will
still have control of the vehicle. However,
much greater steering effort is needed, espe-
cially in sharp turns or at low speeds.If the engine is not running or is turned
off while driving, the power assist for the
steering will not work. Steering will be
much harder to operate.
The brake system has two separate hydraulic
circuits. If one circuit develops a problem, you
will still have braking at two wheels.
Vacuum assisted brake
The brake booster aids braking by using en-
gine vacuum. If the engine stops, you can stop
the vehicle by depressing the brake pedal.
However, greater foot pressure on the brake
pedal will be required to stop the vehicle and
the stopping distance will be longer.
Wet brakes
When the vehicle is washed or driven through
water, the brakes may get wet. As a result,
your braking distance will be longer and the
vehicle may pull to one side during braking.
To dry brakes, drive the vehicle at a safe
speed while lightly pressing the brake pedal to
heat-up the brakes. Do this until the brakes
return to normal. Avoid driving the vehicle at
high speeds until the brakes function correctly.
Using the brakes
Avoid resting your foot on the brake pedal
while driving. This will overheat the brakes,
wear out the brake linings and pads faster and
reduce gas mileage.
To help save the brakes and to prevent the
brakes from overheating, before going down a
POWER STEERING BRAKE SYSTEM
5-24
Starting and driving
Z
01.1.31/R50-D
X
Page 152 of 249
slope or long grade, reduce speed and down-
shift to a lower gear.IWhile driving on a slippery surface,
be careful when braking, accelerating
or downshifting. Abrupt braking or
accelerating could cause the wheels
to skid and result in an accident.
IIf the engine is not running or is
turned off while driving, the power
assist for the brakes will not work.
Braking will be harder.ANTI-LOCK BRAKE SYSTEM (ABS)The anti-lock brake system controls the brakes
at each wheel so the wheels will not lock when
braking abruptly or when braking on slippery
surfaces. The system detects the rotation
speed at each wheel and varies the brake fluid
pressure to prevent each wheel from locking
and sliding. By preventing wheel lockup, the
system helps the driver maintain steering con-
trol and helps to minimize swerving and spin-
ning on slippery surfaces.
Using the systemDepress the brake pedal and hold it down.Do not pump the brake pedal. Doing so
may result in increased stopping
distances.Normal operationThe anti-lock brake system will not operate at
speeds below 3 to 6 MPH (5 to 10 km/h) to
completely stop the vehicle. (The speeds will
vary according to road conditions.) When the
anti-lock system senses that one or more
wheels are close to locking up, the actuator
(under the hood) rapidly applies and releases
hydraulic pressure (like pumping the brakes
very quickly). While the actuator is working,
you may feel a pulsation in the brake pedal
and hear a noise or vibration from the actuator
under the hood. This is normal and indicates
that the anti-lock system is working properly.
However, the pulsation may indicate that road
conditions are hazardous and extra care is
required while driving.
If a tire slips on rough roads for more than
10 seconds, the ABS brake warning lightmay come on. Turn OFF the ignition key,
restart the engine and drive the vehicle at
speeds above 20 MPH (30 km/h). If the
warning light does not go out, have the
vehicle checked at a NISSAN dealer.
Self-test featureThe anti-lock brake system consists of elec-
tronic sensors, electric pumps, and hydraulic
solenoids controlled by a computer. The com-
puter has a built-in diagnostic feature that tests
the system each time you start the engine and
move the vehicle at a low speed in forward or
reverse. When the self-test occurs, you may
hear a clunk noise and/or feel a pulsation in
the brake pedal. This is normal and is not an
indication of any malfunction. If the computer
senses any malfunction, it switches the anti-
lock brake system OFF and turns on the ABS
brake warning light in the dashboard. The
brake system will then behave normally, but
without anti-lock assistance.
If the light comes on during the self check, or
while you are driving, you should take your
vehicle to your NISSAN dealer for repair at
your earliest convenience.
Starting and driving
5-25
Z
01.1.31/R50-D
X
Page 163 of 249
Always follow the instructions below
exactly. Failure to do so could result in
damage to the charging system and
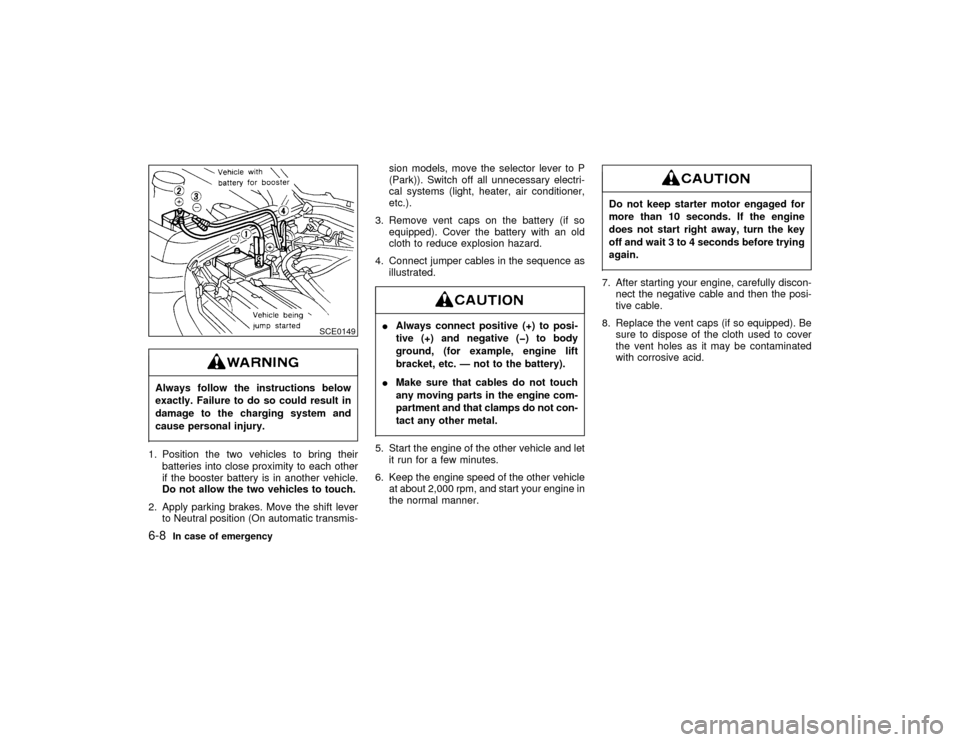
cause personal injury.1. Position the two vehicles to bring their
batteries into close proximity to each other
if the booster battery is in another vehicle.
Do not allow the two vehicles to touch.
2. Apply parking brakes. Move the shift lever
to Neutral position (On automatic transmis-sion models, move the selector lever to P
(Park)). Switch off all unnecessary electri-
cal systems (light, heater, air conditioner,
etc.).
3. Remove vent caps on the battery (if so
equipped). Cover the battery with an old
cloth to reduce explosion hazard.
4. Connect jumper cables in the sequence as
illustrated.
IAlways connect positive (+) to posi-
tive (+) and negative (þ) to body
ground, (for example, engine lift
bracket, etc. Ð not to the battery).
IMake sure that cables do not touch
any moving parts in the engine com-
partment and that clamps do not con-
tact any other metal.5. Start the engine of the other vehicle and let
it run for a few minutes.
6. Keep the engine speed of the other vehicle
at about 2,000 rpm, and start your engine in
the normal manner.
Do not keep starter motor engaged for
more than 10 seconds. If the engine
does not start right away, turn the key
off and wait 3 to 4 seconds before trying
again.7. After starting your engine, carefully discon-
nect the negative cable and then the posi-
tive cable.
8. Replace the vent caps (if so equipped). Be
sure to dispose of the cloth used to cover
the vent holes as it may be contaminated
with corrosive acid.
SCE0149
6-8
In case of emergency
Z
01.1.31/R50-D
X
Page 171 of 249

In order to maintain the appearance of your
vehicle, it is important to take proper care of it.
In the following cases, please wash your ve-
hicle as soon as possible to protect the paint
surface.
IAfter a rainfall to prevent possible damage
from acid rain
IAfter driving on coastal roads
IWhen contaminants such as soot, bird
droppings, tree sap, metal particles or bugs
get on the paint surface
IWhen dust or mud builds up on the surfaceWhenever possible, store or park your vehicle
inside a garage or in a covered area.
When it is necessary to park outside, park in a
shady area or protect the vehicle with a body
cover.
Be careful not to scratch the paint surface
when putting on or removing the body
cover.Wash dirt off with a wet sponge and plenty of
water. Clean the vehicle thoroughly using a
mild soap such as Nissan Car Wash, or a
general purpose dish-washing liquid mixed
with clean, lukewarm (never hot) water.
IDo not use strong household soap,
strong chemical detergents, gasoline
or solvents.
IDo not wash the vehicle in direct
sunlight or while the vehicle body is
hot, as the surface may become
water-spotted.
IAvoid using tight-napped or rough
cloths, such as washing mitts. Care
must be taken when removing
caked-on dirt or other foreign sub-
stance so that the paint surface is not
scratched or damaged.Rinse the vehicle thoroughly with plenty of
clean water.
Inside flanges, seams and folds on the doors,
hatches and hood are particularly endangered
by the effects of road salt. Therefore, these
MAI0001
CLEANING EXTERIOR WASHING7-2
Appearance and care
Z
01.1.31/R50-D
X
Page 176 of 249
8 Do-it-yourselfMaintenance precautions .......................................... 8-2
Engine compartment check locations ....................... 8-3
Engine cooling system .............................................. 8-4
Engine oil .................................................................. 8-7
Automatic transmission fluid ..................................... 8-9
Power steering fluid ................................................ 8-11
Brake and clutch fluid ............................................. 8-11
Window washer fluid ............................................... 8-12
Battery ..................................................................... 8-13
Drive belts ............................................................... 8-14
Spark plugs ............................................................. 8-14
Air cleaner ............................................................... 8-16
Windshield wiper blades ......................................... 8-17
Parking brake and brake pedal ............................... 8-18
Clutch pedal ............................................................ 8-20
Fuses....................................................................... 8-20
Lights ....................................................................... 8-21
Tires and wheels ..................................................... 8-26
Clutch housing drain ................................... 8-30
Z
01.1.31/R50-D
X
Page 184 of 249
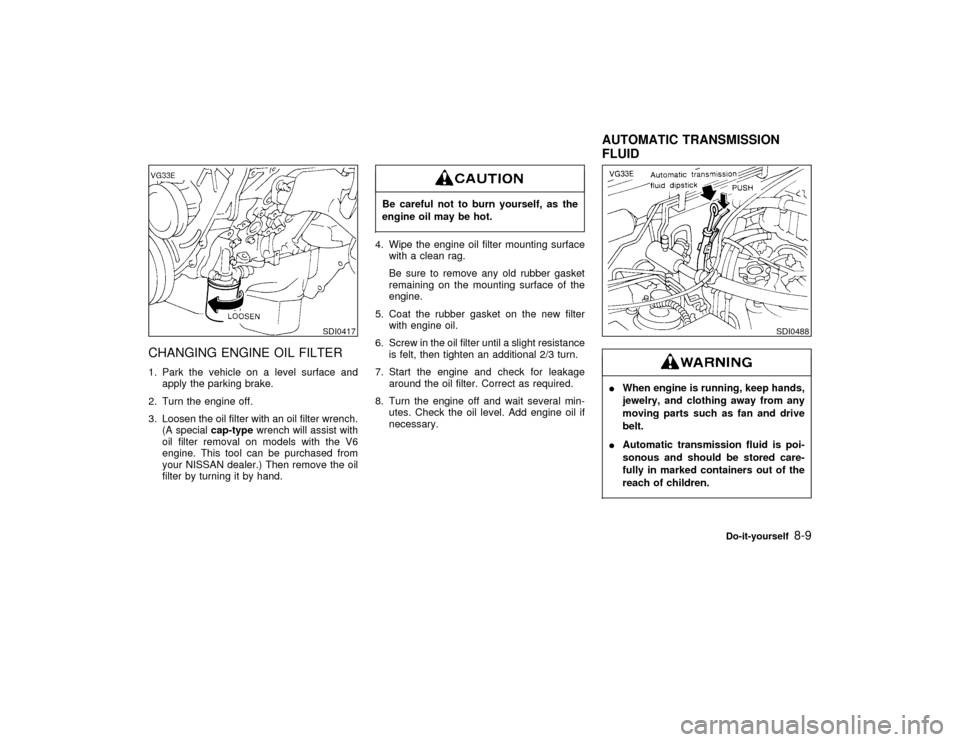
CHANGING ENGINE OIL FILTER1. Park the vehicle on a level surface and
apply the parking brake.
2. Turn the engine off.
3. Loosen the oil filter with an oil filter wrench.
(A specialcap-typewrench will assist with
oil filter removal on models with the V6
engine. This tool can be purchased from
your NISSAN dealer.) Then remove the oil
filter by turning it by hand.
Be careful not to burn yourself, as the
engine oil may be hot.4. Wipe the engine oil filter mounting surface
with a clean rag.
Be sure to remove any old rubber gasket
remaining on the mounting surface of the
engine.
5. Coat the rubber gasket on the new filter
with engine oil.
6. Screw in the oil filter until a slight resistance
is felt, then tighten an additional 2/3 turn.
7. Start the engine and check for leakage
around the oil filter. Correct as required.
8. Turn the engine off and wait several min-
utes. Check the oil level. Add engine oil if
necessary.
IWhen engine is running, keep hands,
jewelry, and clothing away from any
moving parts such as fan and drive
belt.
IAutomatic transmission fluid is poi-
sonous and should be stored care-
fully in marked containers out of the
reach of children.
SDI0417
SDI0488
AUTOMATIC TRANSMISSION
FLUID
Do-it-yourself
8-9
Z
01.1.31/R50-D
X
Page 186 of 249

Check the fluid level.
The fluid level should be checked using the
HOT range on the dipstick at fluid tempera-
tures of 122 to 176ÉF (50 to 80ÉC) or using the
COLD range on the dipstick at fluid tempera-
tures of 32 to 86ÉF (0 to 30ÉC).IDo not overfill.
IUse type DEXRON
TMIII or equivalent.
Check the fluid level in the reservoir. If the fluid
level is below the MIN. line or the brake
warning light comes on, add DOT 3 fluid up to
the MAX. line.
If fluid is added frequently, the system should
be thoroughly checked by your
NISSAN dealer.Use only new fluid. Old, inferior or con-
taminated fluid may damage the brake
and clutch systems. The use of im-
proper fluids can damage the brake sys-tem and affect the vehicle's stopping
ability.
Do not spill the fluid on any painted
surfaces. This will damage the paint. If
fluid is spilled, wash with water.
DI0187M
SDI0722
POWER STEERING FLUID BRAKE AND CLUTCH FLUID
Do-it-yourself
8-11
Z
01.1.31/R50-D
X
Page 187 of 249
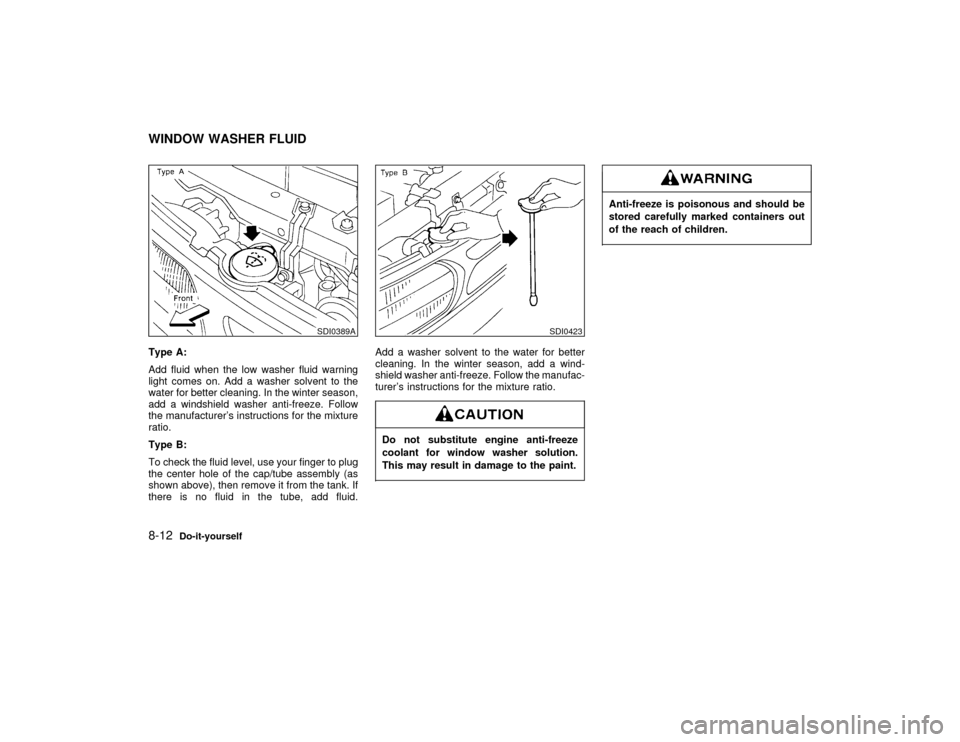
Type A:
Add fluid when the low washer fluid warning
light comes on. Add a washer solvent to the
water for better cleaning. In the winter season,
add a windshield washer anti-freeze. Follow
the manufacturer's instructions for the mixture
ratio.
Type B:
To check the fluid level, use your finger to plug
the center hole of the cap/tube assembly (as
shown above), then remove it from the tank. If
there is no fluid in the tube, add fluid.Add a washer solvent to the water for better
cleaning. In the winter season, add a wind-
shield washer anti-freeze. Follow the manufac-
turer's instructions for the mixture ratio.
Do not substitute engine anti-freeze
coolant for window washer solution.
This may result in damage to the paint.
Anti-freeze is poisonous and should be
stored carefully marked containers out
of the reach of children.
SDI0389A
SDI0423
WINDOW WASHER FLUID8-12
Do-it-yourself
Z
01.1.31/R50-D
X