remove seats NISSAN PATHFINDER 1999 R50 / 2.G Owners Manual
[x] Cancel search | Manufacturer: NISSAN, Model Year: 1999, Model line: PATHFINDER, Model: NISSAN PATHFINDER 1999 R50 / 2.GPages: 274, PDF Size: 2.34 MB
Page 14 of 274
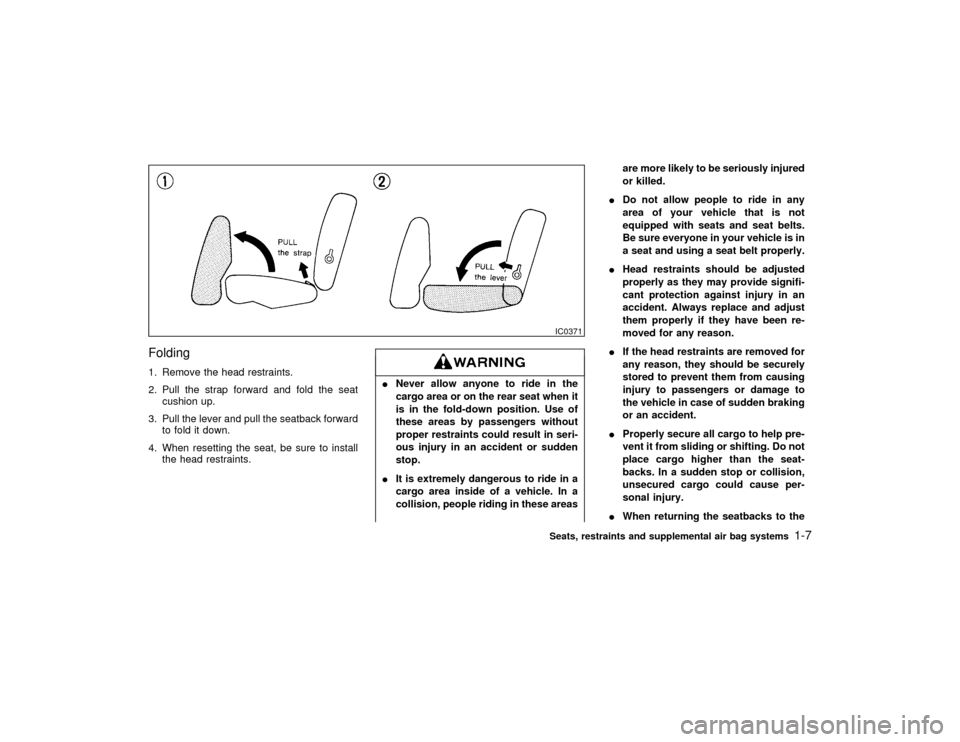
Folding1. Remove the head restraints.
2. Pull the strap forward and fold the seat
cushion up.
3. Pull the lever and pull the seatback forward
to fold it down.
4. When resetting the seat, be sure to install
the head restraints.
INever allow anyone to ride in the
cargo area or on the rear seat when it
is in the fold-down position. Use of
these areas by passengers without
proper restraints could result in seri-
ous injury in an accident or sudden
stop.
IIt is extremely dangerous to ride in a
cargo area inside of a vehicle. In a
collision, people riding in these areasare more likely to be seriously injured
or killed.
IDo not allow people to ride in any
area of your vehicle that is not
equipped with seats and seat belts.
Be sure everyone in your vehicle is in
a seat and using a seat belt properly.
IHead restraints should be adjusted
properly as they may provide signifi-
cant protection against injury in an
accident. Always replace and adjust
them properly if they have been re-
moved for any reason.
IIf the head restraints are removed for
any reason, they should be securely
stored to prevent them from causing
injury to passengers or damage to
the vehicle in case of sudden braking
or an accident.
IProperly secure all cargo to help pre-
vent it from sliding or shifting. Do not
place cargo higher than the seat-
backs. In a sudden stop or collision,
unsecured cargo could cause per-
sonal injury.
IWhen returning the seatbacks to the
IC0371Seats, restraints and supplemental air bag systems
1-7
Z
01.1.22/R50-D/V5
X
Page 16 of 274

HEAD RESTRAINT ADJUSTMENTHead restraints should be adjusted
properly as they may provide significant
protection against injury in an accident.
Do not remove them. Check the adjust-
ment after someone else uses the seat.Adjust the head restraints so the top is level
with the top of your ears.
To raise the head restraint, just pull it up. Tolower, push the lock knob and push the head
restraint down.
ARMRESTPull the armrest forward until it is horizontal.
SSS0125
SPA0351
Seats, restraints and supplemental air bag systems
1-9
Z
01.1.22/R50-D/V5
X
Page 40 of 274
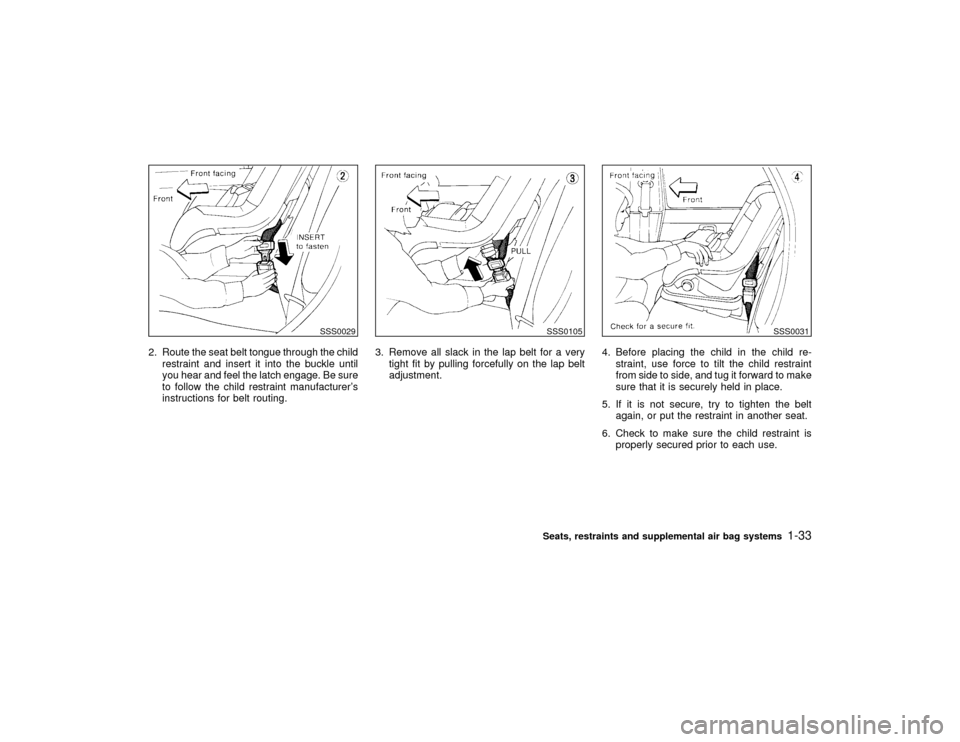
2. Route the seat belt tongue through the child
restraint and insert it into the buckle until
you hear and feel the latch engage. Be sure
to follow the child restraint manufacturer's
instructions for belt routing.3. Remove all slack in the lap belt for a very
tight fit by pulling forcefully on the lap belt
adjustment.4. Before placing the child in the child re-
straint, use force to tilt the child restraint
from side to side, and tug it forward to make
sure that it is securely held in place.
5. If it is not secure, try to tighten the belt
again, or put the restraint in another seat.
6. Check to make sure the child restraint is
properly secured prior to each use.
SSS0029
SSS0105
SSS0031
Seats, restraints and supplemental air bag systems
1-33
Z
01.1.22/R50-D/V5
X
Page 41 of 274
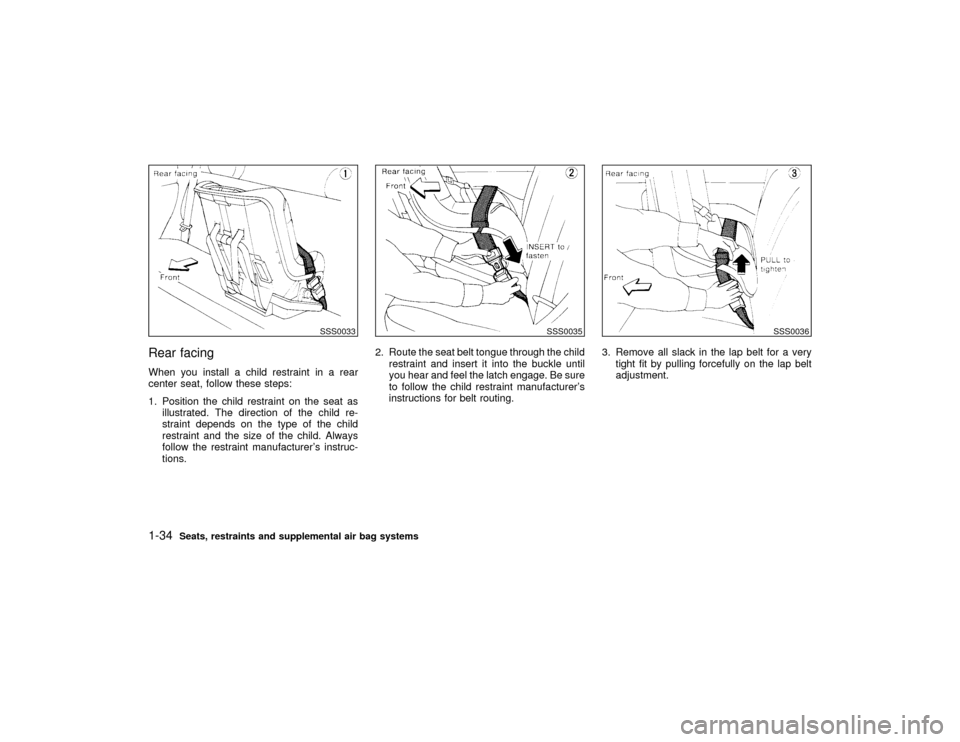
Rear facingWhen you install a child restraint in a rear
center seat, follow these steps:
1. Position the child restraint on the seat as
illustrated. The direction of the child re-
straint depends on the type of the child
restraint and the size of the child. Always
follow the restraint manufacturer's instruc-
tions.2. Route the seat belt tongue through the child
restraint and insert it into the buckle until
you hear and feel the latch engage. Be sure
to follow the child restraint manufacturer's
instructions for belt routing.3. Remove all slack in the lap belt for a very
tight fit by pulling forcefully on the lap belt
adjustment.
SSS0033
SSS0035
SSS0036
1-34
Seats, restraints and supplemental air bag systems
Z
01.1.22/R50-D/V5
X
Page 43 of 274
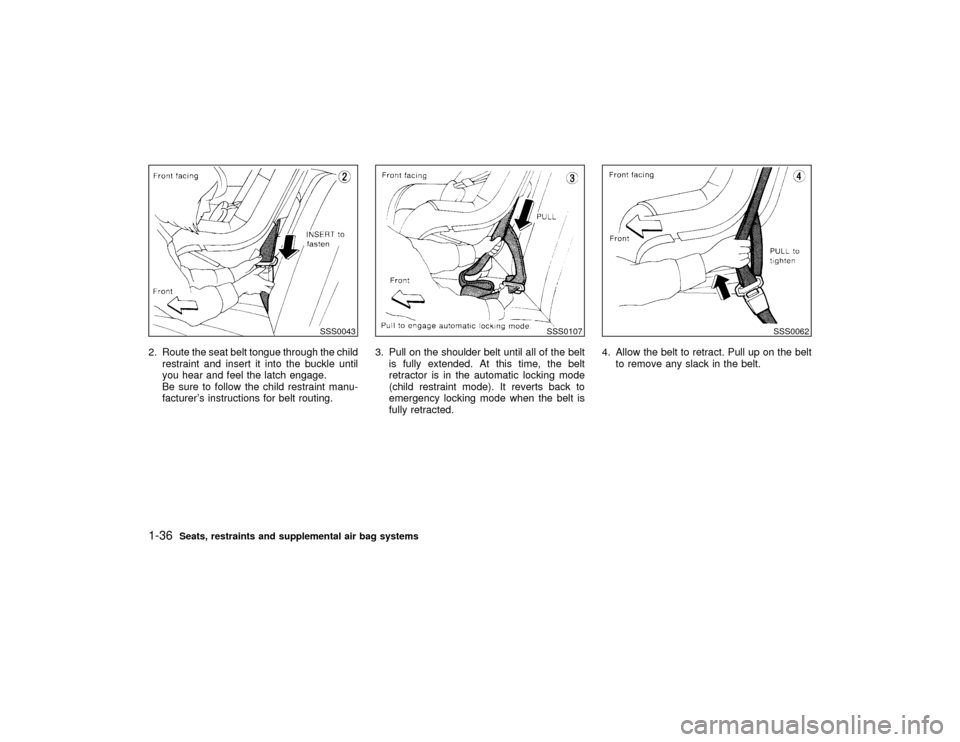
2. Route the seat belt tongue through the child
restraint and insert it into the buckle until
you hear and feel the latch engage.
Be sure to follow the child restraint manu-
facturer's instructions for belt routing.3. Pull on the shoulder belt until all of the belt
is fully extended. At this time, the belt
retractor is in the automatic locking mode
(child restraint mode). It reverts back to
emergency locking mode when the belt is
fully retracted.4. Allow the belt to retract. Pull up on the belt
to remove any slack in the belt.
SSS0043
SSS0107
SSS0062
1-36
Seats, restraints and supplemental air bag systems
Z
01.1.22/R50-D/V5
X
Page 44 of 274

5. Before placing the child in the child re-
straint, use force to tilt the child restraint
from side to side, and tug it forward to make
sure that it is securely held in place.
6. Check that the retractor is in the automatic
locking mode by trying to pull more belt out
of the retractor. If you cannot pull any more
belt webbing out of the retractor, the belt is
in the automatic locking mode.
7. Check to make sure that the child restraint
is properly secured prior to each use. If the
belt is not locked, repeat steps 3 through 6.
After the child restraint is removed and theseat belt is allowed to wind back into the
retractor, the automatic locking mode (child
restraint mode) is canceled; the seat belt only
locks during a sudden stop or impact.
Rear facingIThe three-point belt on your vehicle is
equipped with a locking mode retrac-
tor which must be used when install-
ing a child restraint.
IFailure to do so will result in the child
restraint not being properly secured.
It could tip over or otherwise be un-
secured and cause injury to the child
SSS0108
SSS0044
Seats, restraints and supplemental air bag systems
1-37
Z
01.1.22/R50-D/V5
X
Page 46 of 274
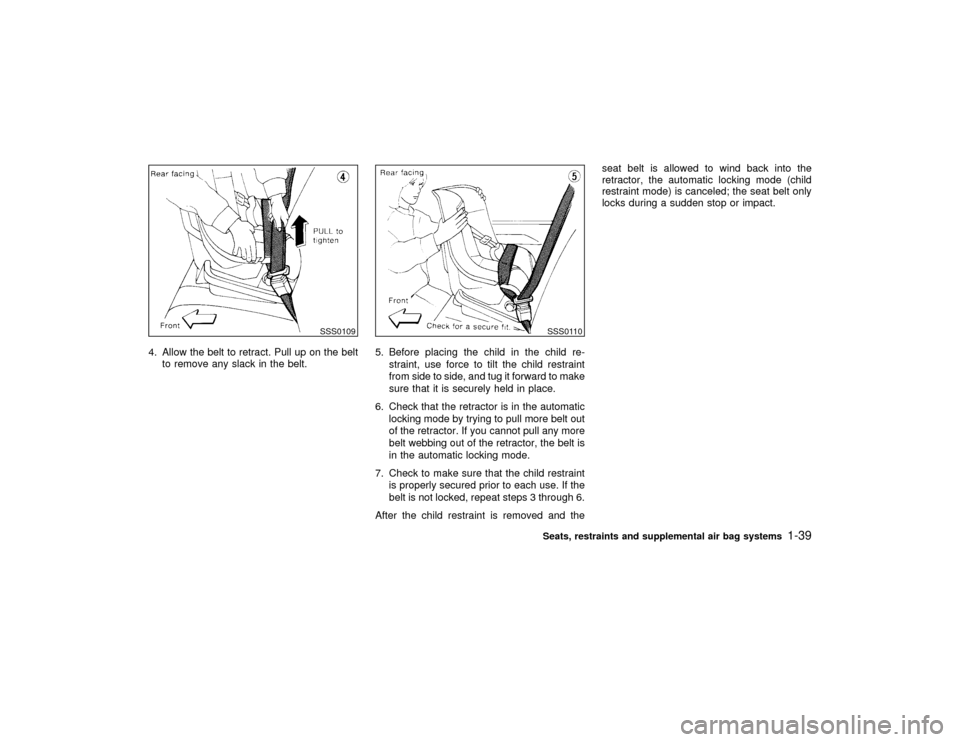
4. Allow the belt to retract. Pull up on the belt
to remove any slack in the belt.5. Before placing the child in the child re-
straint, use force to tilt the child restraint
from side to side, and tug it forward to make
sure that it is securely held in place.
6. Check that the retractor is in the automatic
locking mode by trying to pull more belt out
of the retractor. If you cannot pull any more
belt webbing out of the retractor, the belt is
in the automatic locking mode.
7. Check to make sure that the child restraint
is properly secured prior to each use. If the
belt is not locked, repeat steps 3 through 6.
After the child restraint is removed and theseat belt is allowed to wind back into the
retractor, the automatic locking mode (child
restraint mode) is canceled; the seat belt only
locks during a sudden stop or impact.
SSS0109
SSS0110Seats, restraints and supplemental air bag systems
1-39
Z
01.1.22/R50-D/V5
X
Page 50 of 274
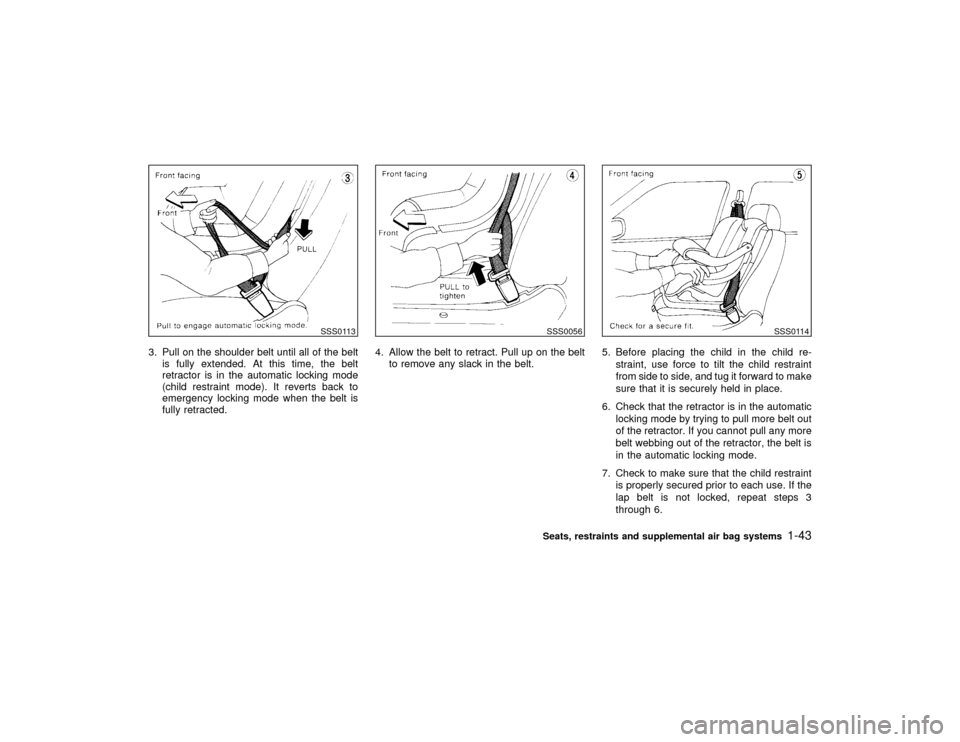
3. Pull on the shoulder belt until all of the belt
is fully extended. At this time, the belt
retractor is in the automatic locking mode
(child restraint mode). It reverts back to
emergency locking mode when the belt is
fully retracted.4. Allow the belt to retract. Pull up on the belt
to remove any slack in the belt.5. Before placing the child in the child re-
straint, use force to tilt the child restraint
from side to side, and tug it forward to make
sure that it is securely held in place.
6. Check that the retractor is in the automatic
locking mode by trying to pull more belt out
of the retractor. If you cannot pull any more
belt webbing out of the retractor, the belt is
in the automatic locking mode.
7. Check to make sure that the child restraint
is properly secured prior to each use. If the
lap belt is not locked, repeat steps 3
through 6.
SSS0113
SSS0056
SSS0114
Seats, restraints and supplemental air bag systems
1-43
Z
01.1.22/R50-D/V5
X
Page 51 of 274

After the child restraint is removed and the
seat belt is allowed to wind back into the
retractor, the automatic locking mode (child
restraint mode) is canceled; the seat belt only
locks during a sudden stop or impact.1-44
Seats, restraints and supplemental air bag systems
Z
01.1.22/R50-D/V5
X
Page 76 of 274
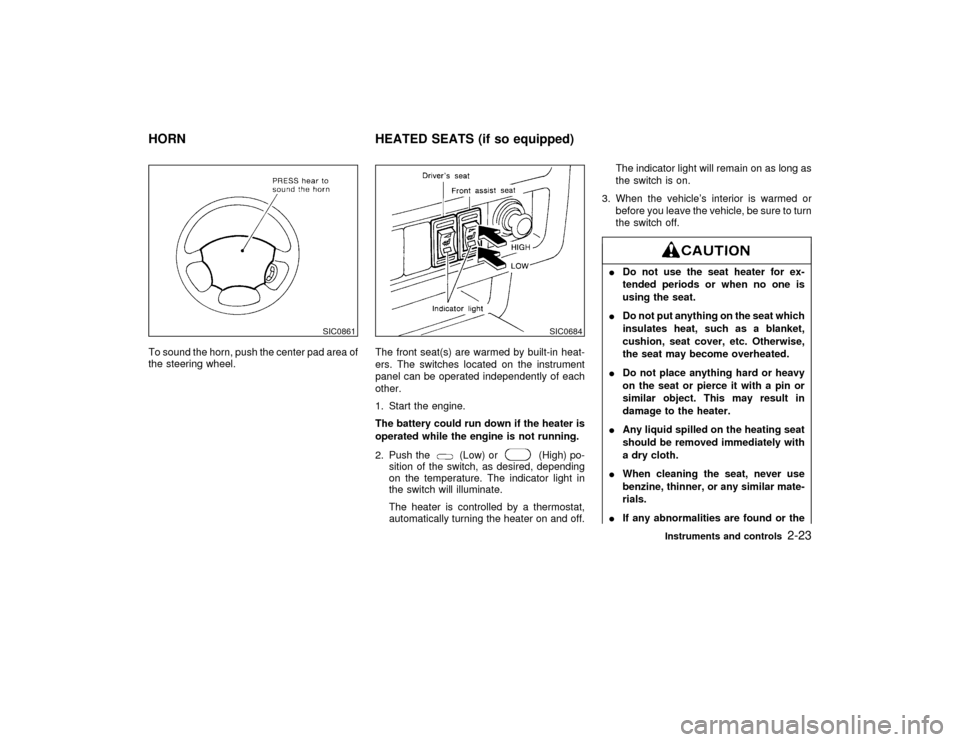
To sound the horn, push the center pad area of
the steering wheel.The front seat(s) are warmed by built-in heat-
ers. The switches located on the instrument
panel can be operated independently of each
other.
1. Start the engine.
The battery could run down if the heater is
operated while the engine is not running.
2. Push the
(Low) or
(High) po-
sition of the switch, as desired, depending
on the temperature. The indicator light in
the switch will illuminate.
The heater is controlled by a thermostat,
automatically turning the heater on and off.The indicator light will remain on as long as
the switch is on.
3. When the vehicle's interior is warmed or
before you leave the vehicle, be sure to turn
the switch off.
IDo not use the seat heater for ex-
tended periods or when no one is
using the seat.
IDo not put anything on the seat which
insulates heat, such as a blanket,
cushion, seat cover, etc. Otherwise,
the seat may become overheated.
IDo not place anything hard or heavy
on the seat or pierce it with a pin or
similar object. This may result in
damage to the heater.
IAny liquid spilled on the heating seat
should be removed immediately with
a dry cloth.
IWhen cleaning the seat, never use
benzine, thinner, or any similar mate-
rials.
IIf any abnormalities are found or the
SIC0861
SIC0684
HORN HEATED SEATS (if so equipped)
Instruments and controls
2-23
Z
01.1.22/R50-D/V5
X